02
User Settings
Configuring Users
Configuring Users
The screens shown in this guide may differ from the actual product.
- On the main screen, select [] > [User]. The user settings screen appears.
![On the main screen, select [{{icon:cog-frame}}] > [User]. The user settings screen appears.](/manual/vurix-admin/images/page38_img1.jpg)
- Select the item you want.
Note
- [User] settings require the [User management] permission.
- On the user settings screen, select a user and select [Permission group] > [Management] > [User management].
User Environment Settings
Configure permission settings and user settings.
Adding a permission group
Adds a group.
- On the main screen, select [] > [Users] > [User Settings].
- Select [User List].
- Right-click to open the context menu.
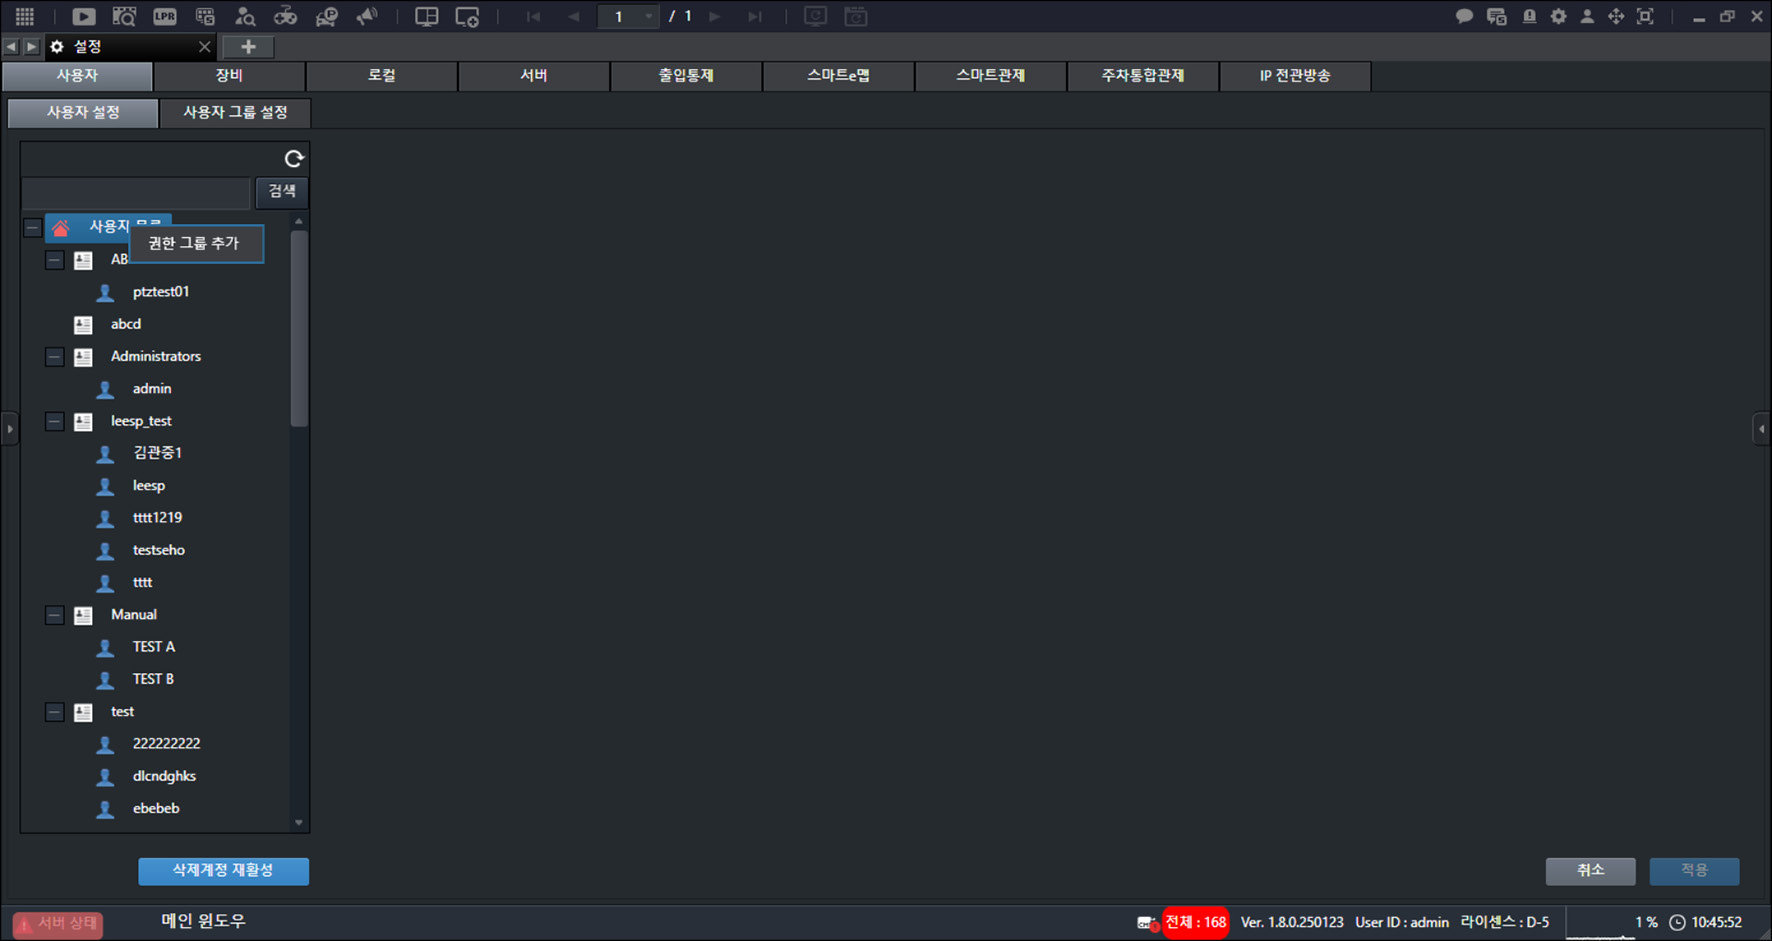
- Click [Add Permission Group].
![Click [Add Permission Group].](/manual/vurix-admin/images/page40_img1.jpg)
- Enter the [Permission Group Name].
- Set [Camera].
- [PTZ Access Level]: Set the PTZ camera control priority among multiple users.
- [PTZ Control]: Set the permission.
- [PTZ Preset Settings]: Set the management permission.
- [Microphone Control]: Set the permission.
- [Speaker Control]: Set the permission.
- Configure [Video].
- [Play Recorded Video]: Set playback permission.
- [AVI Backup]: Set save permission.
- [JPG Backup]: Set save permission.
- [Instant Search]: Set the time limit for instant video search. (1–60 minutes)
- [Save Live Video]: Set save permission.
- [Live Video Allowed Period]: Set the period during which live video is allowed.
- [Live Video Allowed Period] does not apply immediately; it takes effect every hour on the hour.
- [Search Period Limit]: Set the searchable period for recorded video.
- Set [Management].
- [User management]: Set the management permission.
- [Device management]: Set the management permission.
- [Tree management]: Set the management permission.
- [Client management]: Set the management permission.
- [Event management]: Set the management permission.
- [Server management]: Set the management permission.
- [Privacy masking]: Set the management permission.
- [Smart monitoring management]: Set the management permission.
- Configure [Other].
- [PTZ Touring Settings]: Set the permission.
- [System Monitoring]: Set the permission.
- [Recording Server Failover]: Set the permission.
- [Manual VFS Recovery]: Set the permission.
- [Single Connection]: Set concurrent login permission for the user account.
- [View Secondary Storage Restore Status]: Set the permission.
- [User Activity]: Set the permission.
- [Chat]: Set the permission.
- [Device System Info Access]: Disable display of device information menus.
- [Display Info Security]: Disable display of IP information menus.
- [Logout Time When No Events]: Set the automatic logout time.
- Configure [Smart Monitoring].
- [Monitoring]
- [Dragnet monitoring]
- [Event search]
- [Monitoring report search]
- [Other permissions]
- Set [Feature Options].
- [Add-on]
- [External system (Web API) integration]
- Click [Apply].
- Restart the program to finish applying the settings.
Note
- Click [Group Schedule]. Set the group's login schedule.
- When [Group Schedule] is set, the user account login schedule does not apply.
Deleting a permission group
Deletes the group.
- On the main screen, select [] > [Users] > [User Settings].
- Select the item you want.
- Right-click to open the context menu.
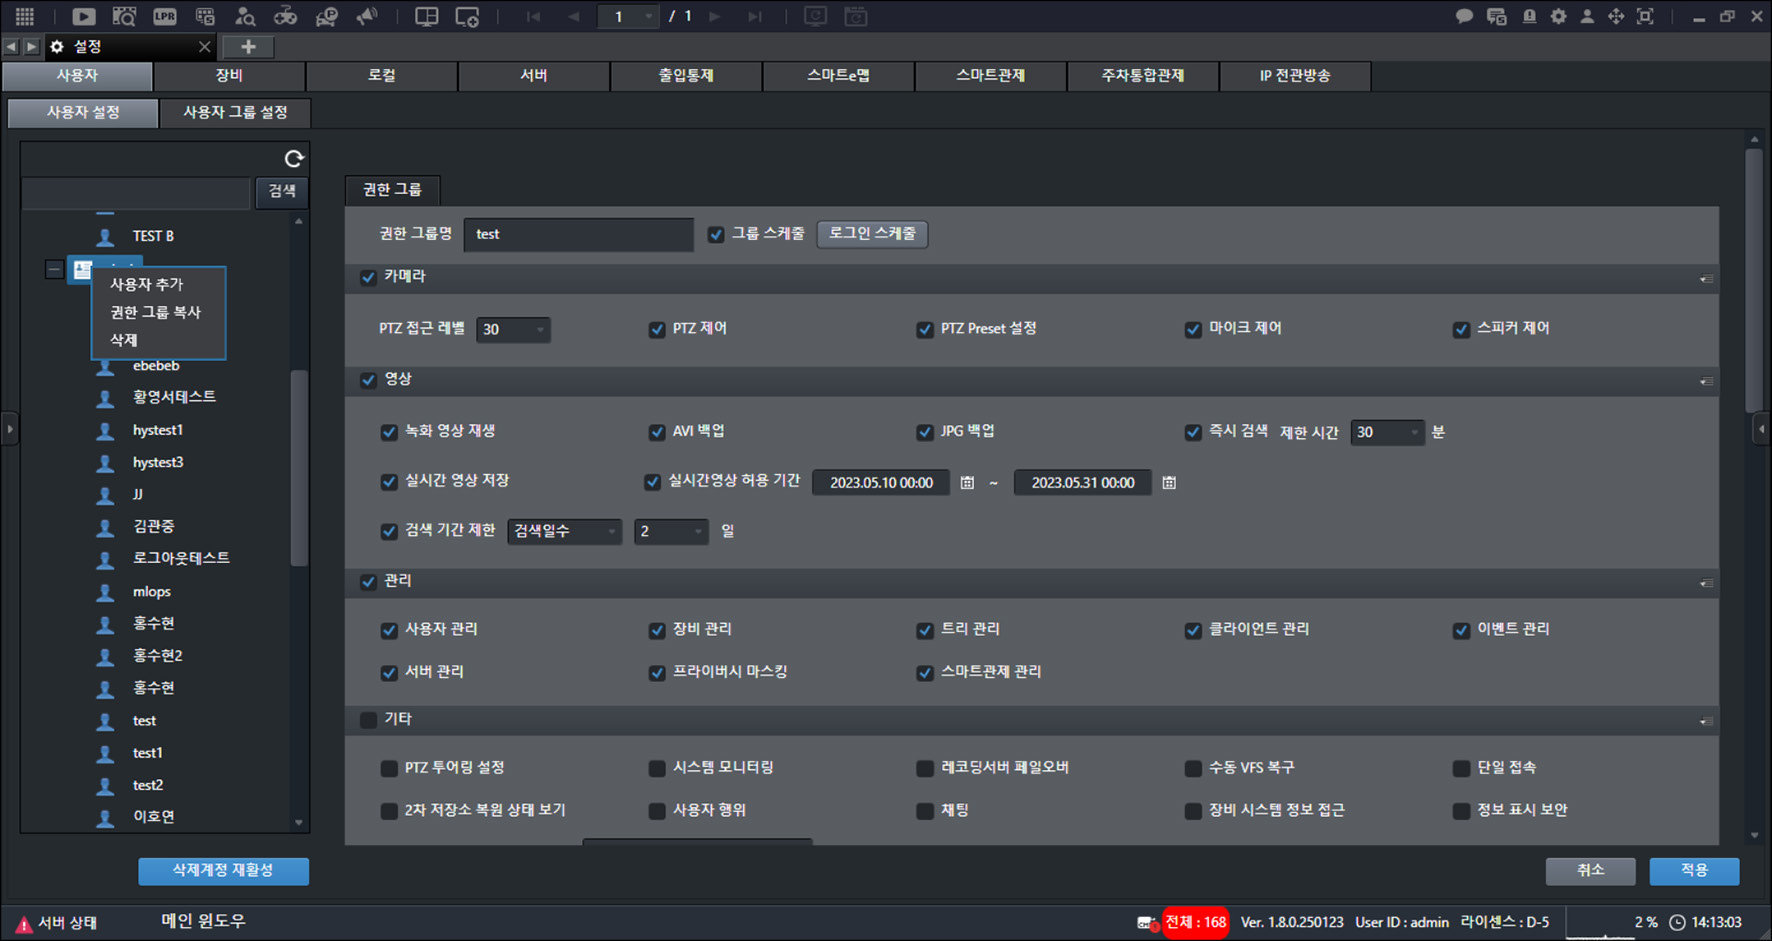
- Click [Delete].
![Click [Delete].](/manual/vurix-admin/images/page44_img2.jpg)
- Click [OK] > [OK] > [Apply].
Note
- Click [Copy Permission Group]. Copies a group with the same permissions.
- Groups with registered users cannot be deleted.
- The [Administrators] and [Uncategorized] groups cannot be deleted or copied.
Add User
Add a user account.
- On the main screen, select [] > [Users] > [User Settings].
- Select the item you want.
- Right-click to open the context menu.
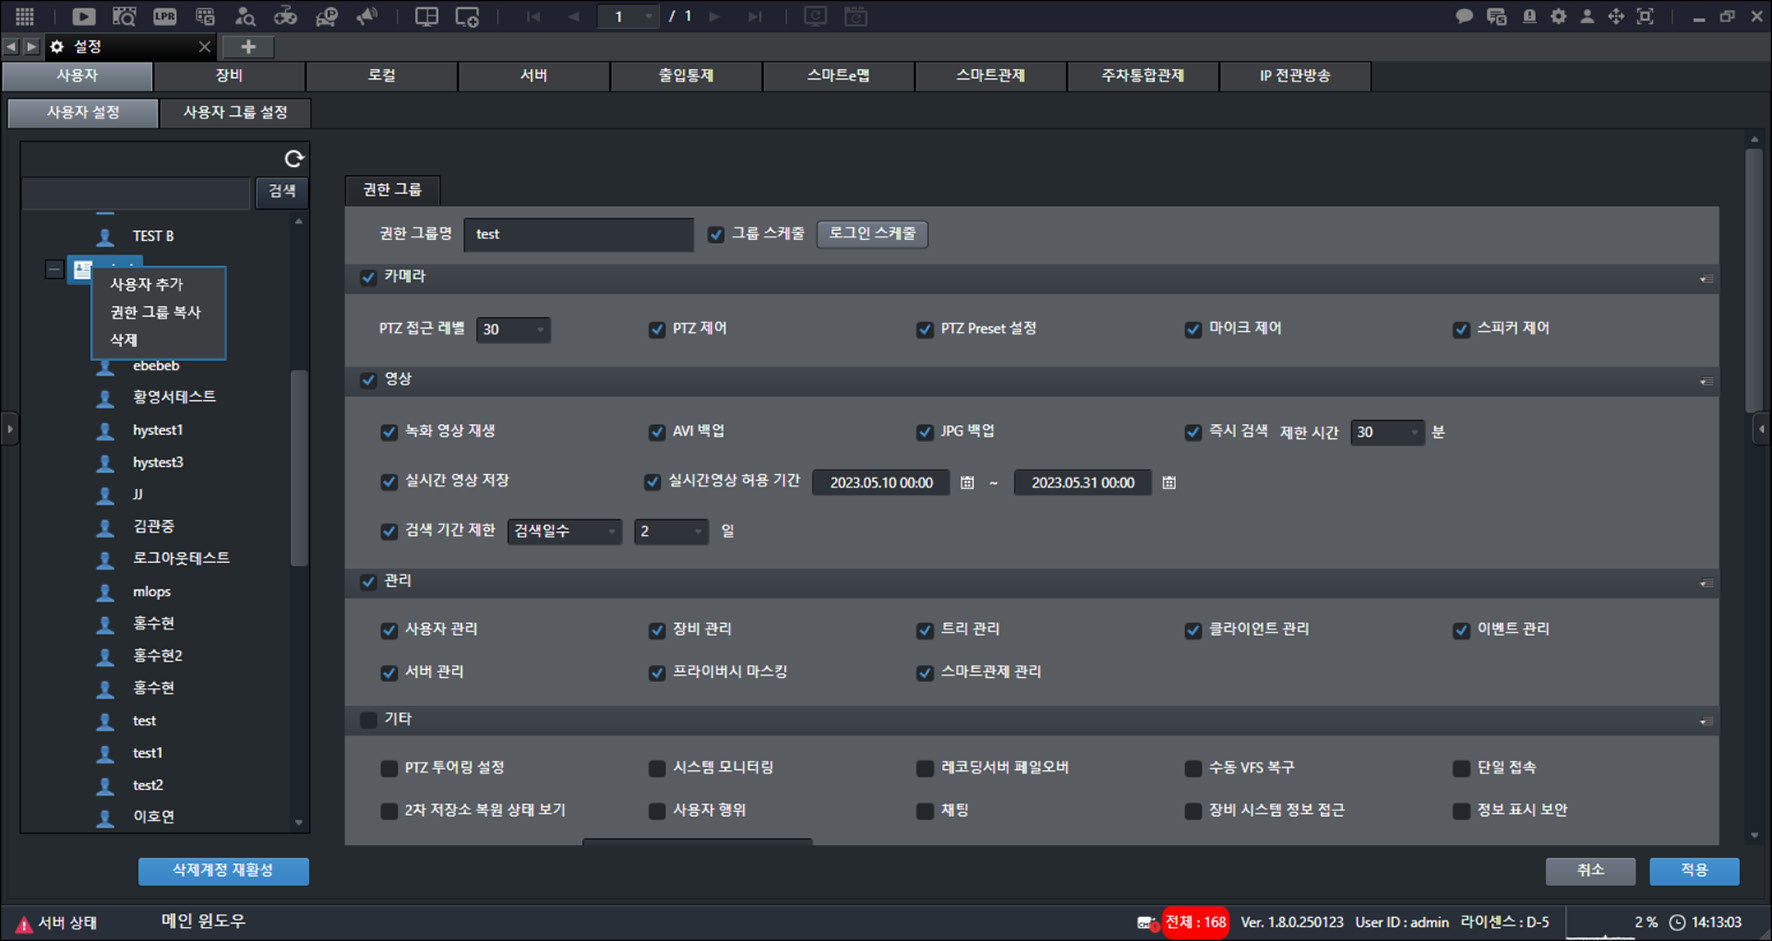
- Click [Add User].
![Click [Add User].](/manual/vurix-admin/images/page46_img2.jpg)
- Enter the information.
- [User ID]: Enter the ID.
- [Password] / [Confirm password]: Enter the password.
- [Organization] / [Department]: Enter the organization and department names.
- [User name]: Enter the name.
- [User type]: Set the user account type.
- [Login schedule]: Set the login schedule for the user account.
- [Authentication question] / [Authentication answer]: Enter the authentication question and answer.
- [Additional login user information]: Set additional information required for login.
- Click [Apply].
Note
- [Password] must include uppercase and lowercase English letters, numbers, and special characters. (9 to 16 characters)
- Click [Allowed IP list] > [Add]. Adds accessible IP addresses to the list.
- Reusing a deleted user account ID is not allowed.
Configure User Environment
Set the environment settings for a user account.
- On the main screen, select [] > [Users] > [User Settings].
- Select a user account.
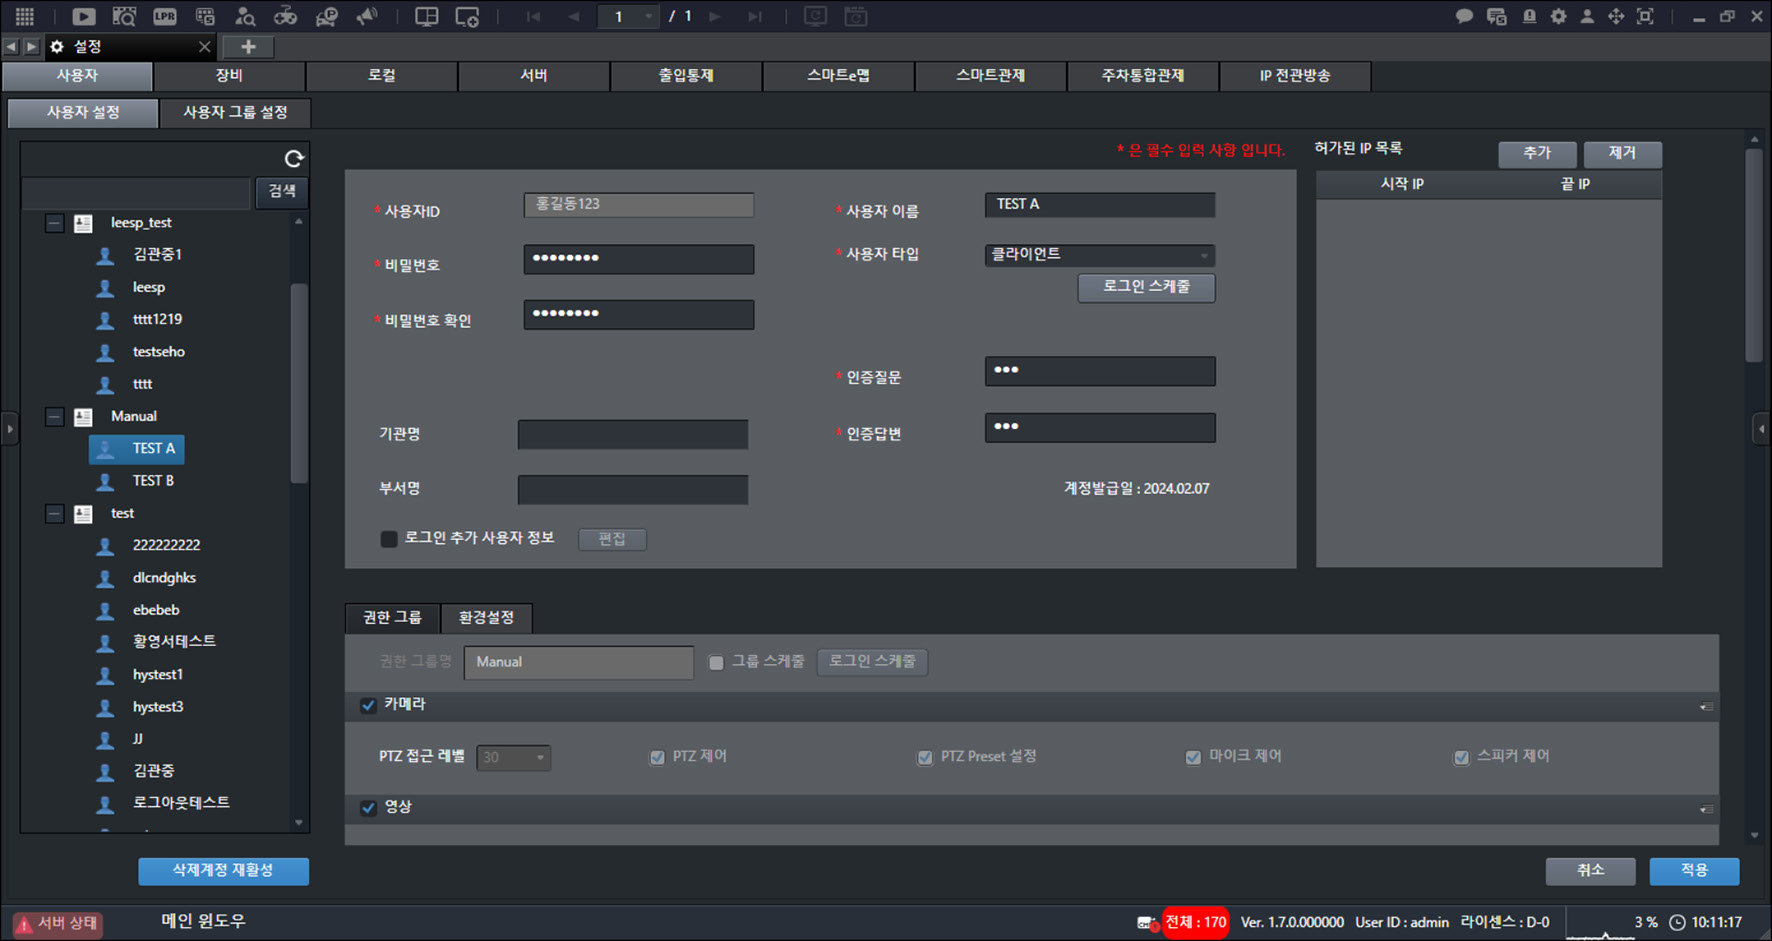
- Click [Preferences].
![Click [Preferences].](/manual/vurix-admin/images/page48_img2.jpg)
- Set [Screen Settings].
- [Tree position]: Set the tree position to the left or right.
- [Settings window start mode]: On the main screen, select [] to open the settings screen in a new window or a new tab.
- Set [Font Settings].
- [Live window font settings]: Set the font color, font, and font size to display on the live video screen.
- [Event pop-up window font settings]: Set the font color, font, and font size to display in the event pop-up window.
- Set [Event].
- [Event window border thickness settings]: Set the line color, line thickness, and more to display the event pop-up window.
- [Event pop-up settings]: Set [Create overlapping by event rule], [Create single per channel], and more.
- Configure [Video].
- [Show video information from the start]: Display video information on the video.
- Set [Tree].
- [Show tree item thumbnails]: Display thumbnails in the tree.
- [Tree hierarchy limit]: Set the tree display depth.
- [Show description in tree]: Display descriptions in the tree.
- [Search type]: In the device tree quick search window, when searching by device name, show only search results or move to the searched device.
- Set [Switch Interval].
- [Auto tab switch time (3–120)]: On the main screen, select [] to set the time for automatically switching live video tabs. (3 to 120 seconds)
- [Auto page switch time (3–120)]: On the main screen, select [] to set the time for automatically switching screen pages. (3 to 120 seconds)
- Configure [PTZ].
- [Enable PTZ Guidelines]: Display PTZ guidelines on the live video screen.
- [Show PTZ Control Panel Initially]: Display the PTZ camera control mini window on the live video screen.
- Configure [Other].
- [Use process check]: Set whether to check key processes when the program starts.
- [Camera device fault notification]: Display camera device fault notifications on the main screen status bar.
- [Shortcut settings]: Set shortcuts.
- Configure [LPR].
- [Show LPR Recognition Failure]: When LPR recognition fails, display it on the LPR video.
- [LPR Additional Info Display Settings]: Set information display items and show them on the LPR video.
- Configure [Smart Monitoring].
- [Alarm sound file]: Set the event alarm sound.
- [Event notification (event notification delay (sec))]: When an event occurs, a green border is displayed on the video.
- [Monitoring status]: Check the list.
- [Quick monitoring status]: Set [Quick monitoring status] items to display on the event video.
- Click [Apply].
- Restart the program to finish applying the settings.
Note
Supported features may vary depending on your license and device specifications.
Setting Info Display Security
Disables display of IP-related menus.
- On the main screen, select [] > [Users] > [User Settings].
- Select a user account.
- Click [Permission Group] > [Other] > [Display Info Security].
![Click [Permission Group] > [Other] > [Display Info Security].](/manual/vurix-admin/images/page51_img1.jpg)
- Click [Apply].
- Restart the program to finish applying the settings.
Note
- When [Information display security] is enabled, IP information is shown as special characters (*) on the login and logout windows.
- When [Information display security] is enabled, [], [], and [IP] are disabled.
Setting shortcuts
Set shortcuts.
- On the main screen, select [] > [Users] > [User Settings].
- Select a user account.
- Click [Preferences].
![Click [Preferences].](/manual/vurix-admin/images/page52_img1.jpg)
- Click [Other] > [Shortcut Settings] > [Settings].
![Click [Other] > [Shortcut Settings] > [Settings].](/manual/vurix-admin/images/page52_img2.jpg)
- Select the item you want.
- Click [Apply].
Note
Click [Reset]. Resets the settings.
Setting quick monitoring status
Set [Quick Monitoring Status] items to display them on the event video.
- On the main screen, select [] > [Users] > [User Settings].
- Select a user account.
- Click [Preferences] > [Smart Monitoring] > [Monitoring Status].
![Click [Preferences] > [Smart Monitoring] > [Monitoring Status].](/manual/vurix-admin/images/page55_img1.jpg)
- Select the item you want.
- Click [Apply].
Note
- Manage [Monitoring Status] items.
- Only administrator accounts can add or delete items.
- For details, see "Adding Monitoring Status Items" on page 158.
Reactivate Deleted Account
Reactivate a deleted account.
[Reactivate Deleted Account] settings are available only to administrator accounts.
- On the main screen, select [] > [Users] > [User Settings].
- Click [Reactivate Deleted Account].
![Click [Reactivate Deleted Account].](/manual/vurix-admin/images/page56_img1.jpg)
- Enter the [Reactivation Reason].
- Click [Reactivate Account] > [OK].
- Click [Apply].
Note
On the main screen, select [] > [User activity]. View the reason for account reactivation.
User Group Settings
Configure user groups.
[User Group Settings] is available only to administrator accounts.
Add User Group
Adds a group.
- On the main screen, select [] > [Users] > [User Group Settings].
- Select the item you want.
- Right-click to open the context menu.
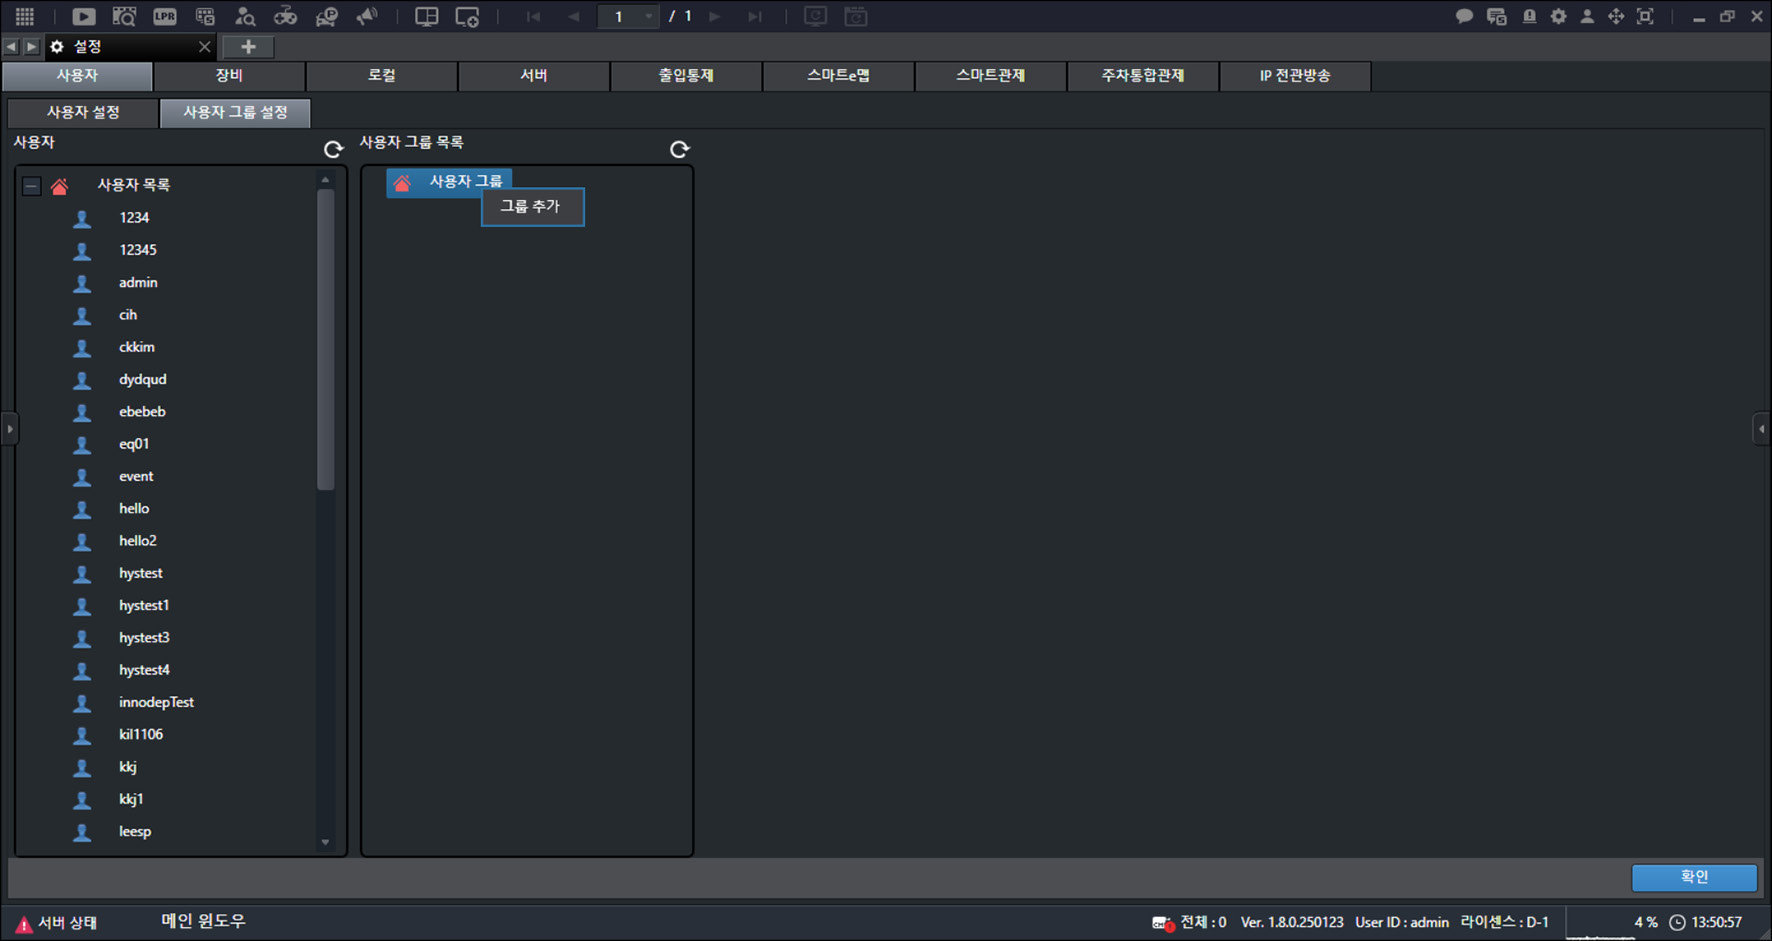
- Click [Add Group].
![Click [Add Group].](/manual/vurix-admin/images/page58_img1.jpg)
- Enter the group name.
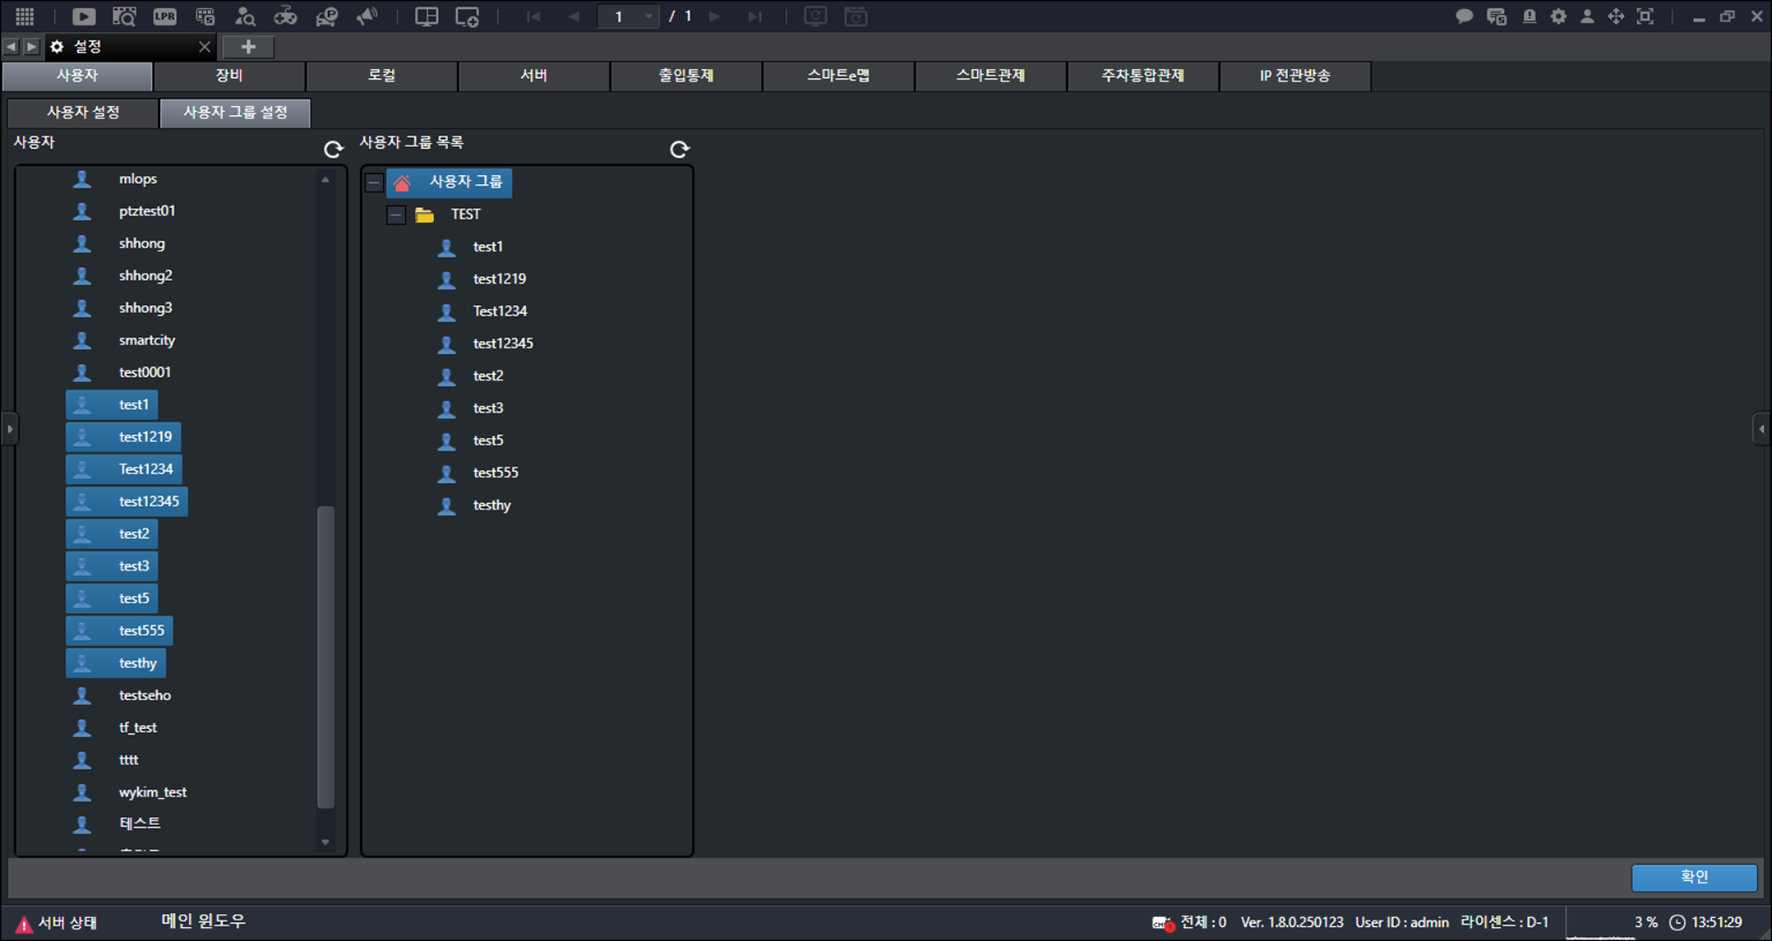
- Drag to the right while holding the mouse button.
- Click [OK].
Delete User Group
Deletes the group.
- On the main screen, select [] > [Users] > [User Group Settings].
- Select the item you want.
- Right-click to open the context menu.
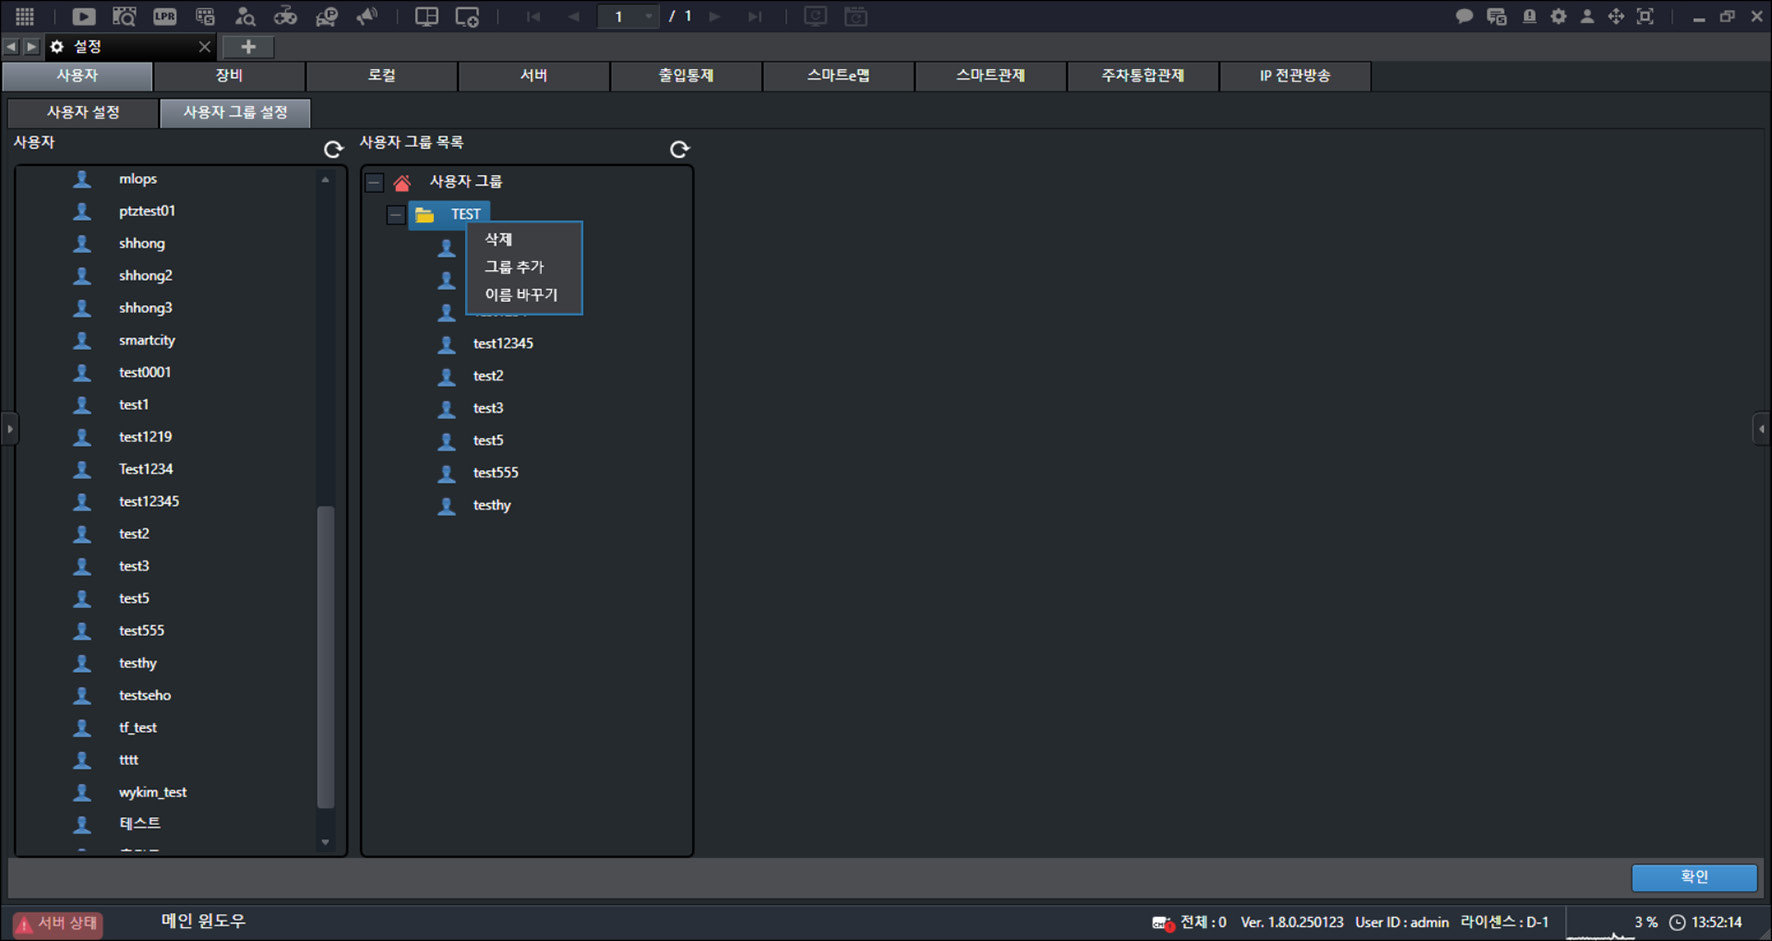
- Click [Delete].
![Click [Delete].](/manual/vurix-admin/images/page59_img2.jpg)
- Click [OK].