VURIX Admin
User Manual
Menu configuration may vary or some features may not be supported depending on the product version.
Table of Contents
Dashboard
Managing the Dashboard
Managing the Dashboard
The screens shown in this guide may differ from the actual product.
- On the main screen, select [] to open the menu.
![On the main screen, select [{{icon:grid-3x3}}] to open the menu.](/manual/vurix-admin/images/page6_img1.jpg)
- Select the item you want.
- [PTZ Touring Settings]: Start or stop touring, or create and delete touring groups.
- [Manual VFS Recovery]: Manually recover VFS data.
- [Manual Failover]: Manually set a storage server as a failover server.
- [System Monitoring]: Check server, camera, and license information.
- [View Secondary Storage Restore Status]: Check the secondary storage restore status.
- [User Activity]: Review all actions performed by users.
- [Maintenance]: Select a recording server and inquiry period to check the storage status of devices with missing recordings.
- [Intelligent Statistics]: View intelligent statistics.
PTZ Touring Settings
Automatically monitors surveillance areas by repeatedly moving through multiple PTZ camera presets in sequence.
Starting PTZ Touring
Set touring start.
- On the main screen, select [] > [PTZ Touring Settings].
- [Start all]: Starts touring for all groups.
- [Stop all]: Stops touring for all groups.
- [Settings]: Set touring.
- [PTZ touring stop list]: Check the list of devices whose touring has stopped.
![On the main screen, select [{{icon:grid-3x3}}] > [PTZ Touring Settings].](/manual/vurix-admin/images/page7_img1.jpg)
- Select a group.
- [Start]: Starts touring for the selected group.
- [Stop]: Stops touring for the selected group.
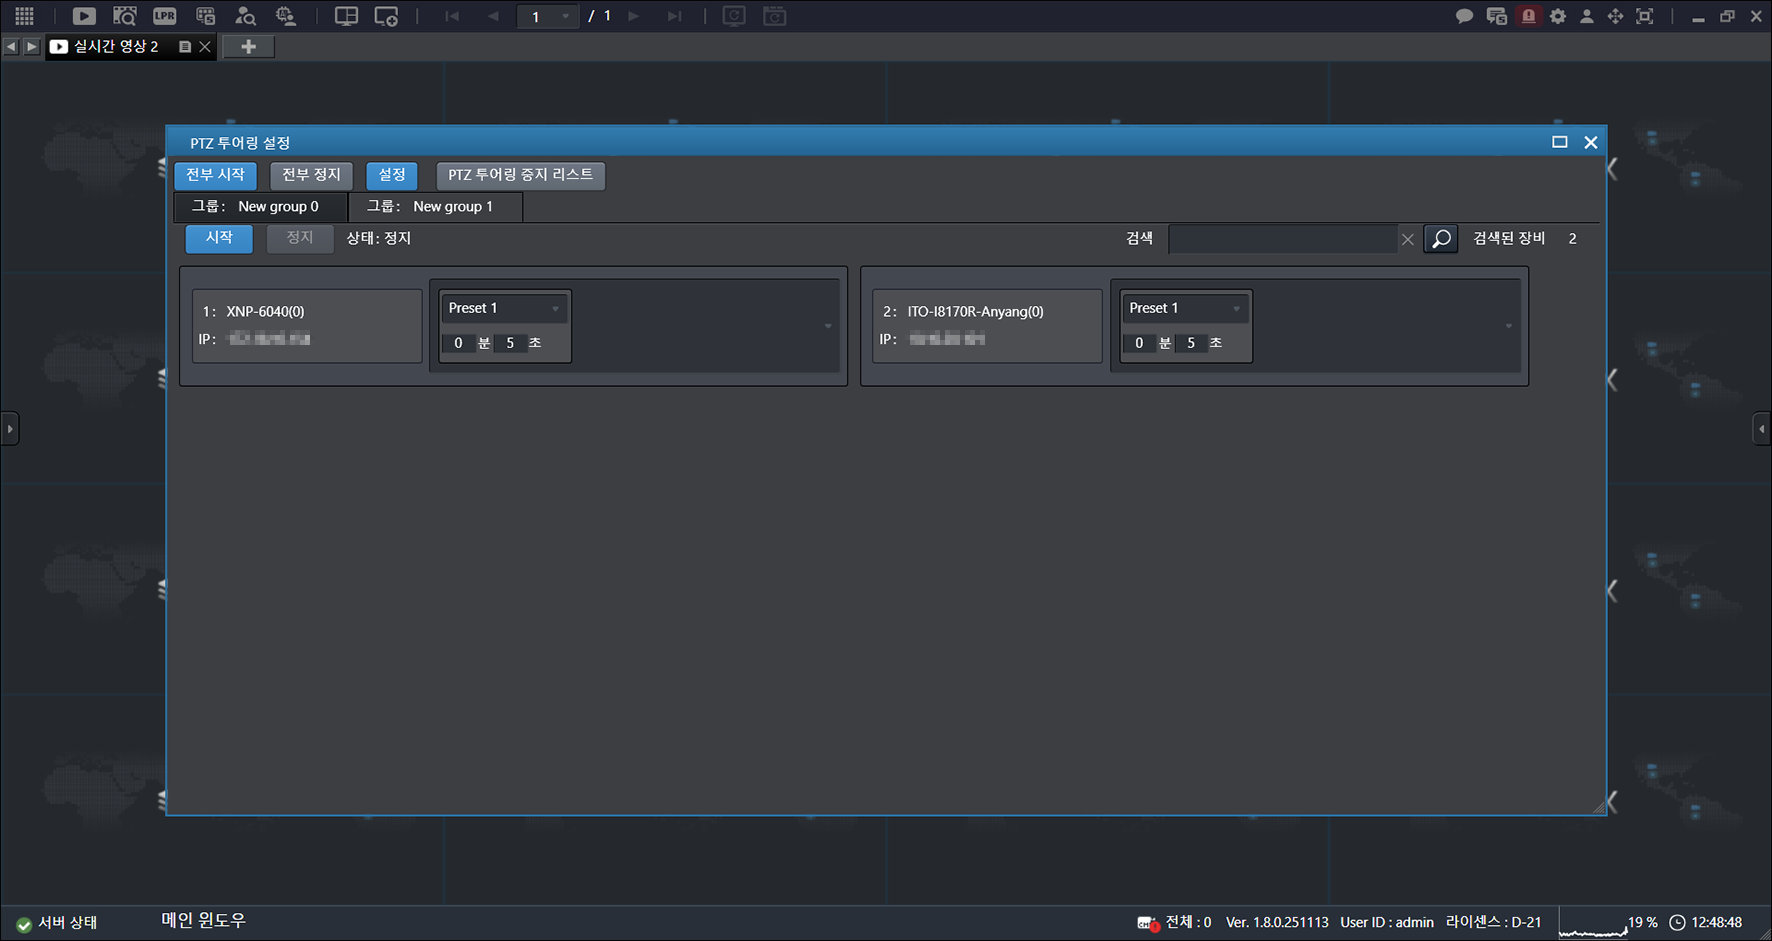
- Select a device.
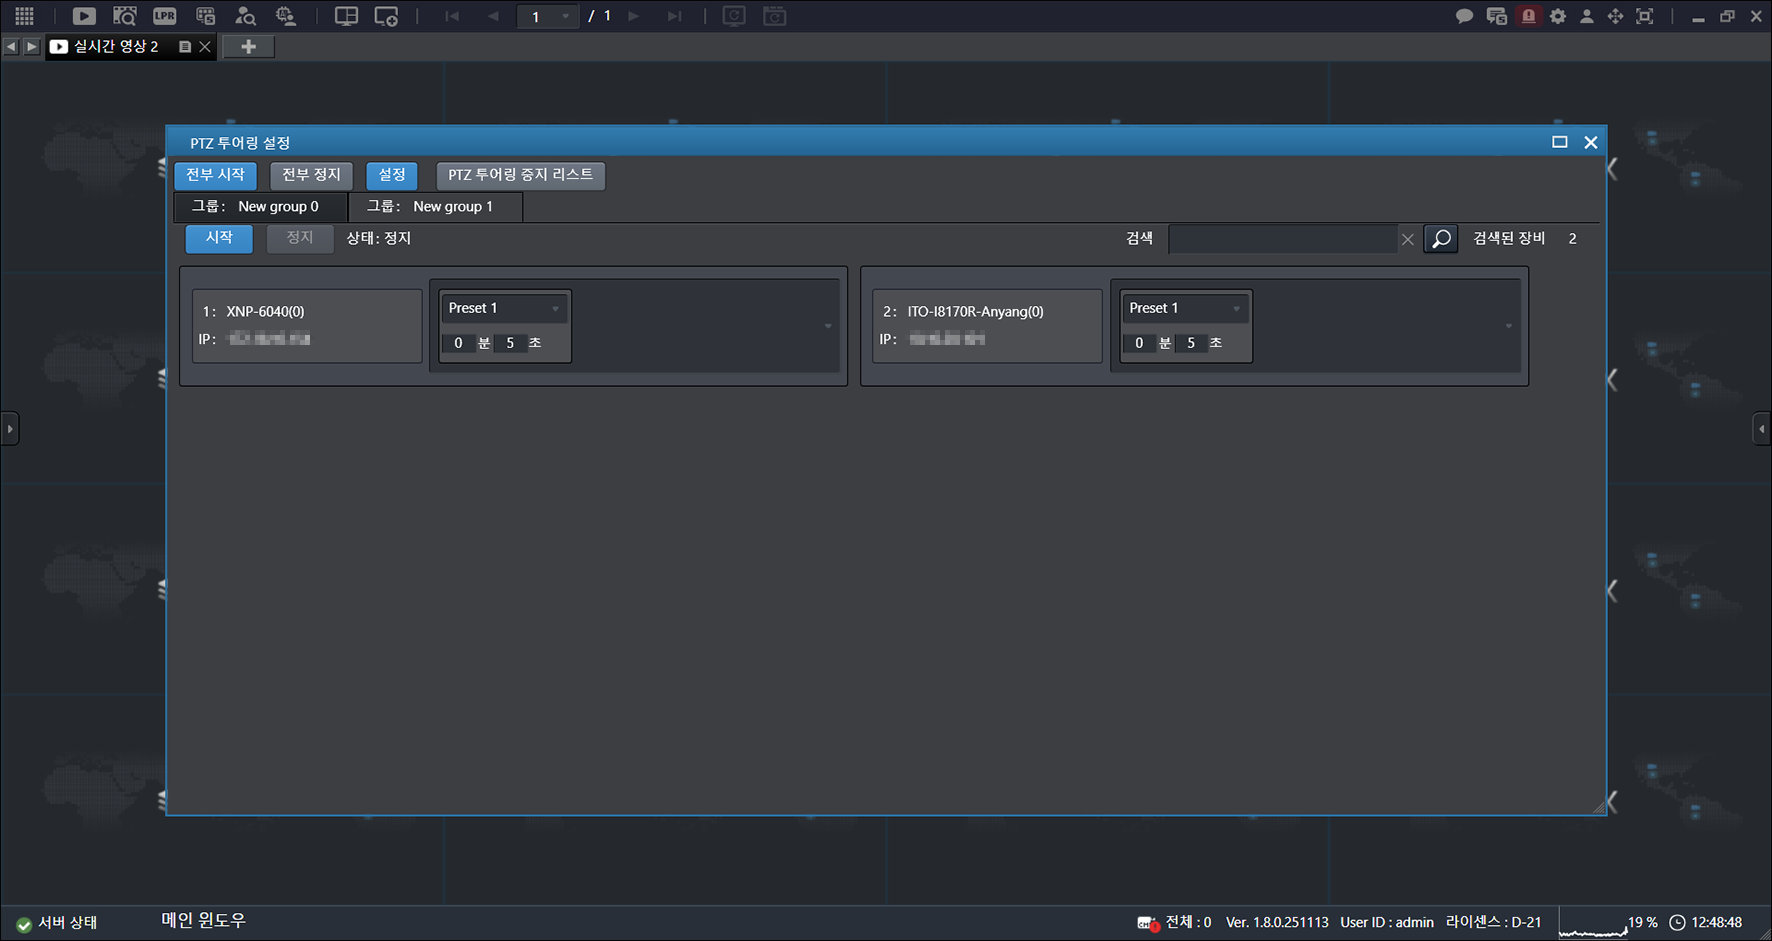
- Check the settings.
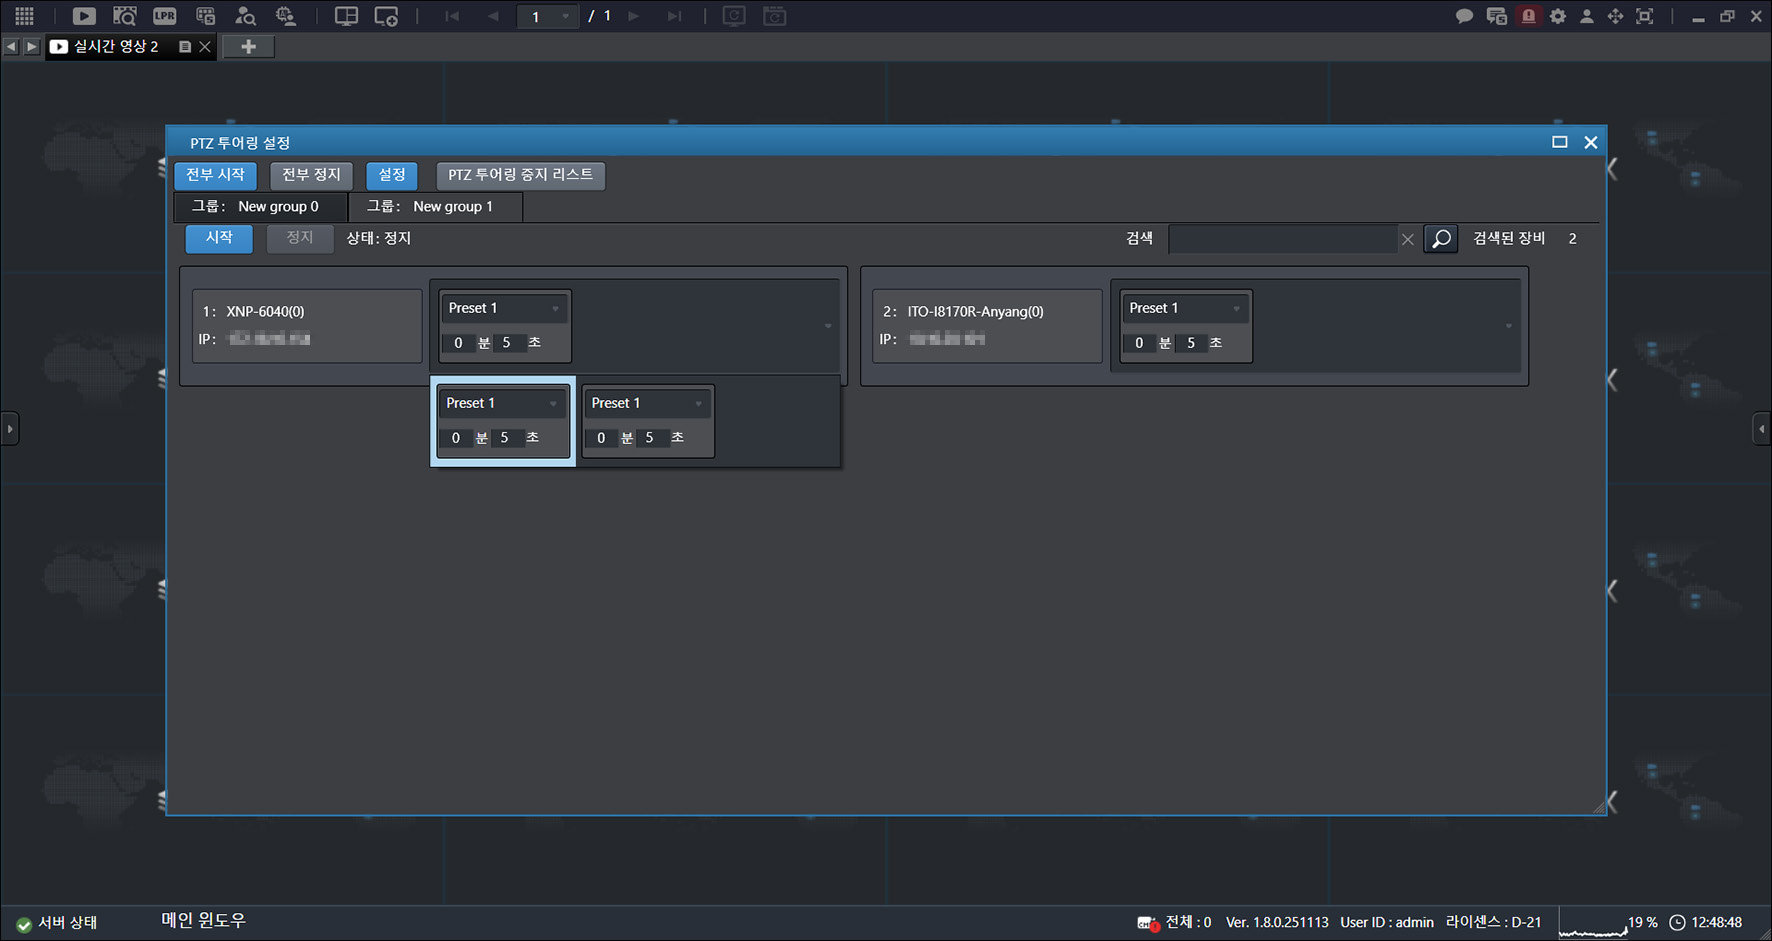
- Click [Start].
Creating Touring Groups
Create a group.
- On the main screen, select [] > [PTZ Touring Settings].
![On the main screen, select [{{icon:grid-3x3}}] > [PTZ Touring Settings].](/manual/vurix-admin/images/page10_img1.jpg)
- Click [Settings].
- [Create Group]: Create a group.
- [Delete Group]: Delete a group.
- [Update All Groups]: Update all groups.
![Click [Settings].](/manual/vurix-admin/images/page10_img2.jpg)
- Click [Create Group].
![Click [Create Group].](/manual/vurix-admin/images/page11_img1.jpg)
- In [PTZ Device List] > [Assigned], select a device marked with [X].
- Drag to the right while holding the mouse button.
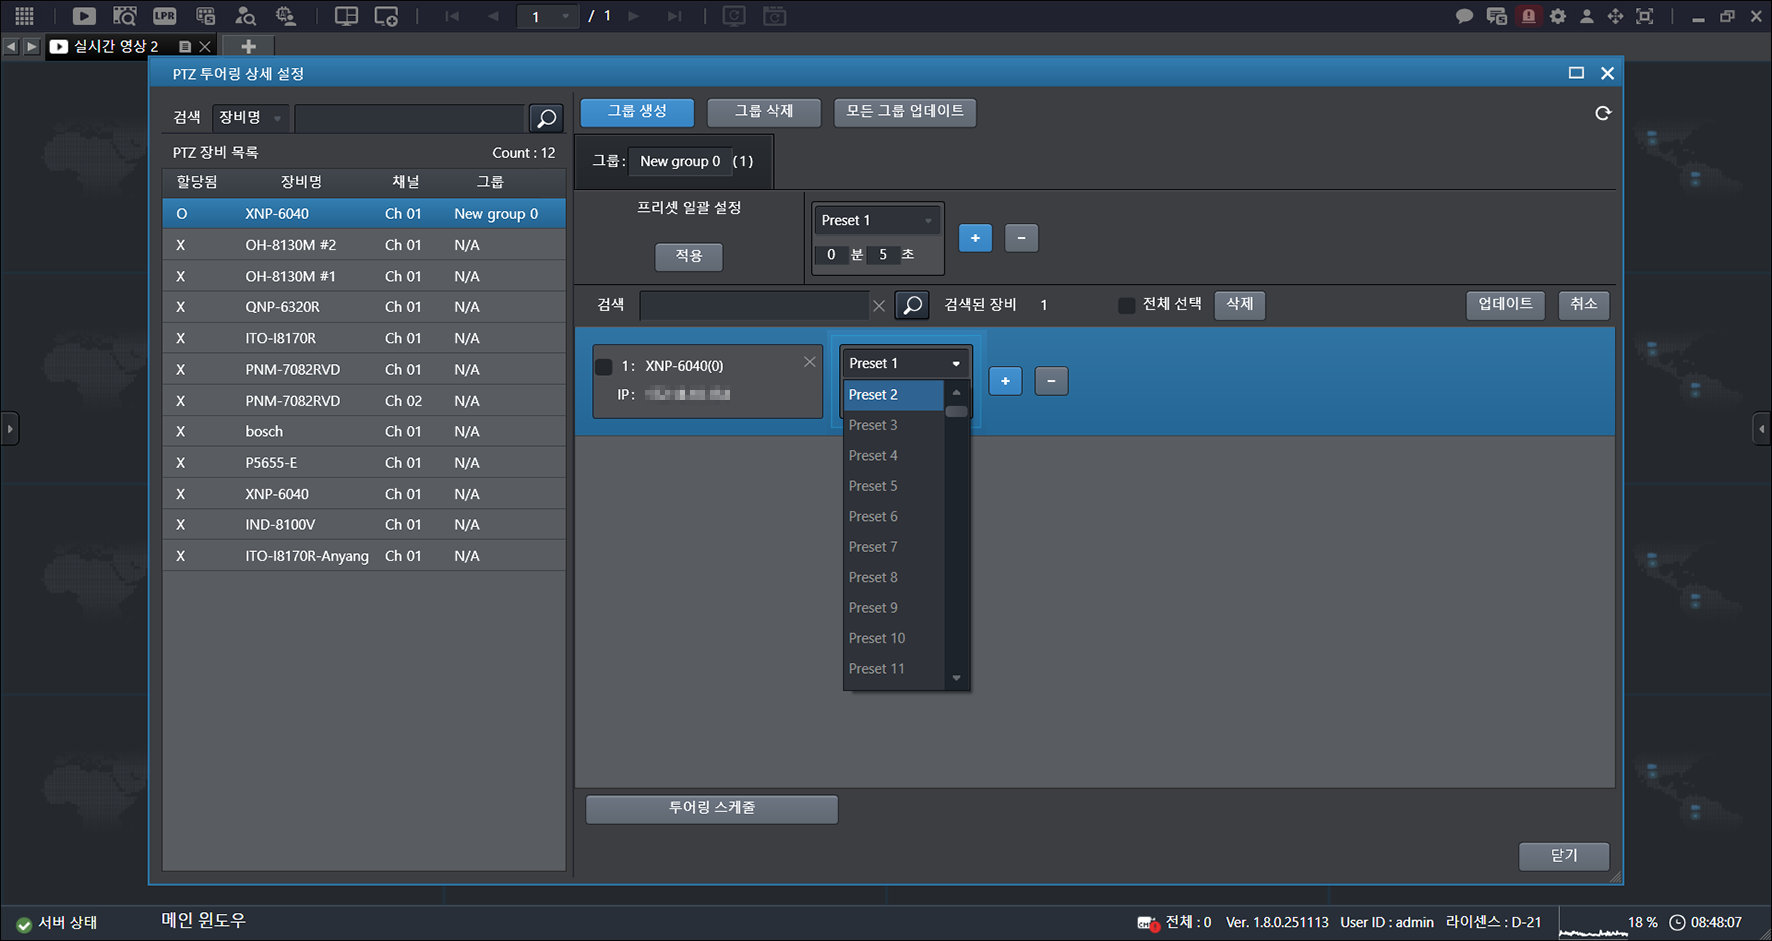
- Click the area marked with a dotted line.
- Click [+].
![Click [+].](/manual/vurix-admin/images/page12_img1.jpg)
- Click [Update].
![Click [Update].](/manual/vurix-admin/images/page12_img2.jpg)
- Click [OK] > [Close].
![Click [OK] > [Close].](/manual/vurix-admin/images/page13_img1.jpg)
- Only devices marked with [X] can be assigned to a touring group.
- In [PTZ Device List] > [Assigned], devices marked with [O] are already assigned to a touring group.
Applying Touring Presets in Bulk
Apply the same preset settings to all devices in the group.
- On the main screen, select [] > [PTZ Touring Settings] > [Settings].
- Select a group.
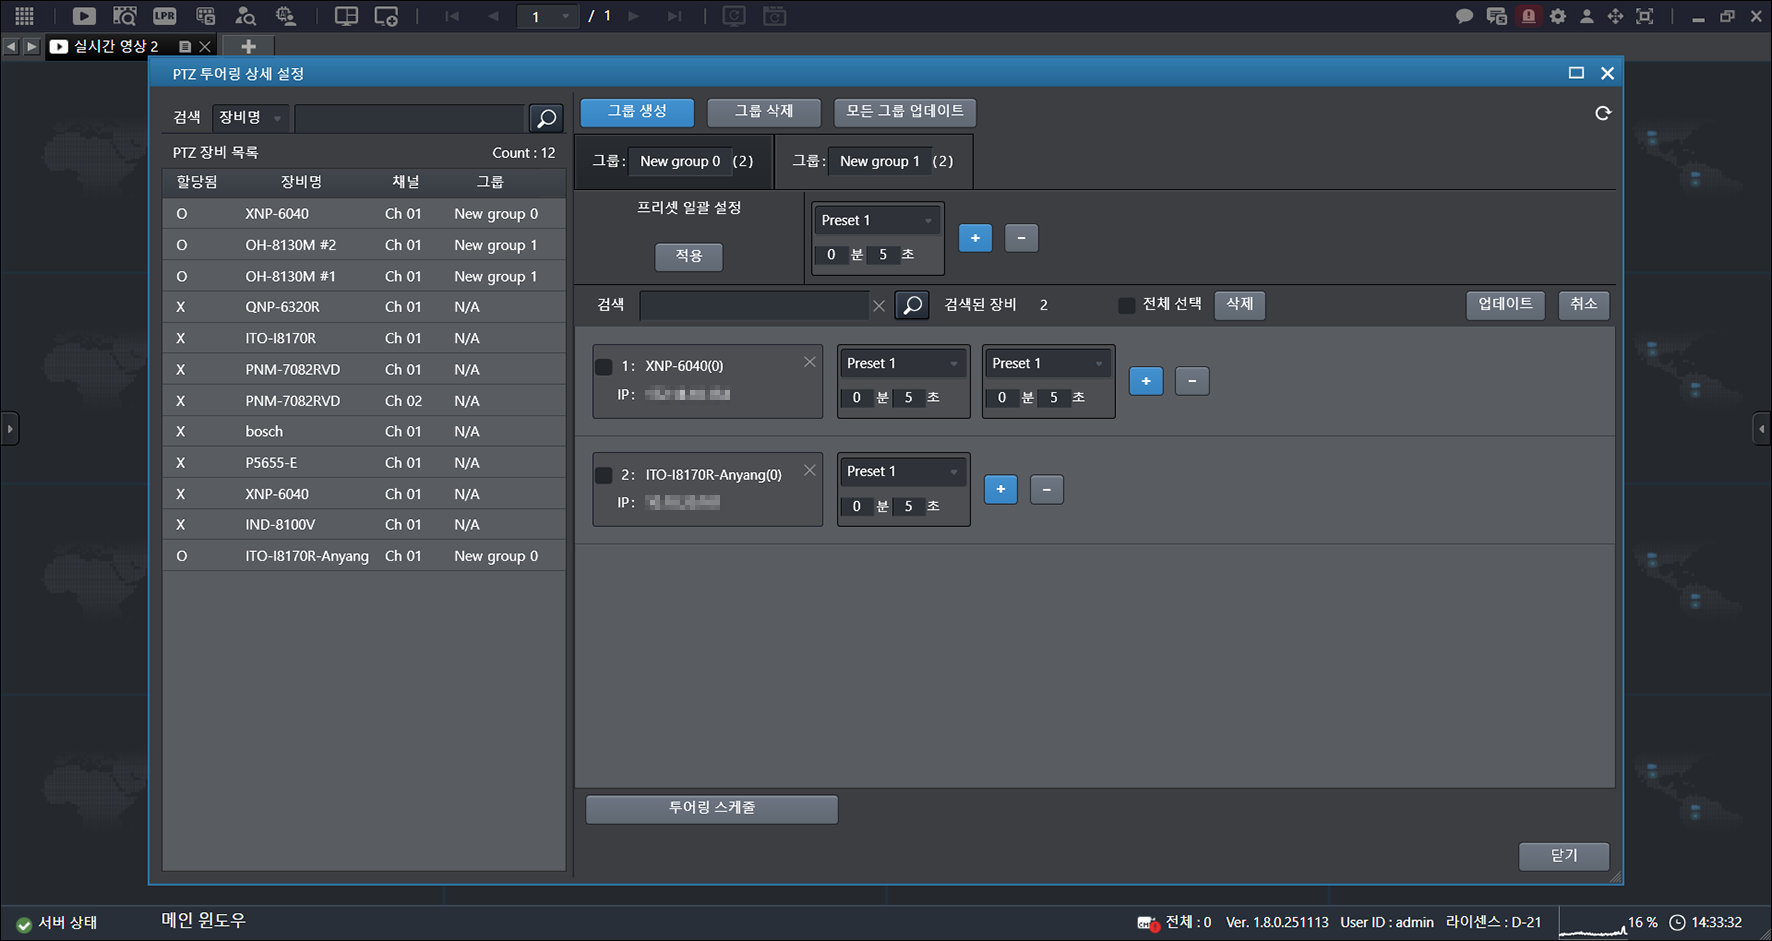
- Set [Apply Presets in Batch].
![Set [Apply Presets in Batch].](/manual/vurix-admin/images/page14_img2.jpg)
- Click [Apply].
![Click [Apply].](/manual/vurix-admin/images/page15_img1.jpg)
- Click [Update] > [OK] > [Close].
Setting Touring Schedule
Set the touring operating time.
- On the main screen, select [] > [PTZ Touring Settings] > [Settings].
- Select a group.
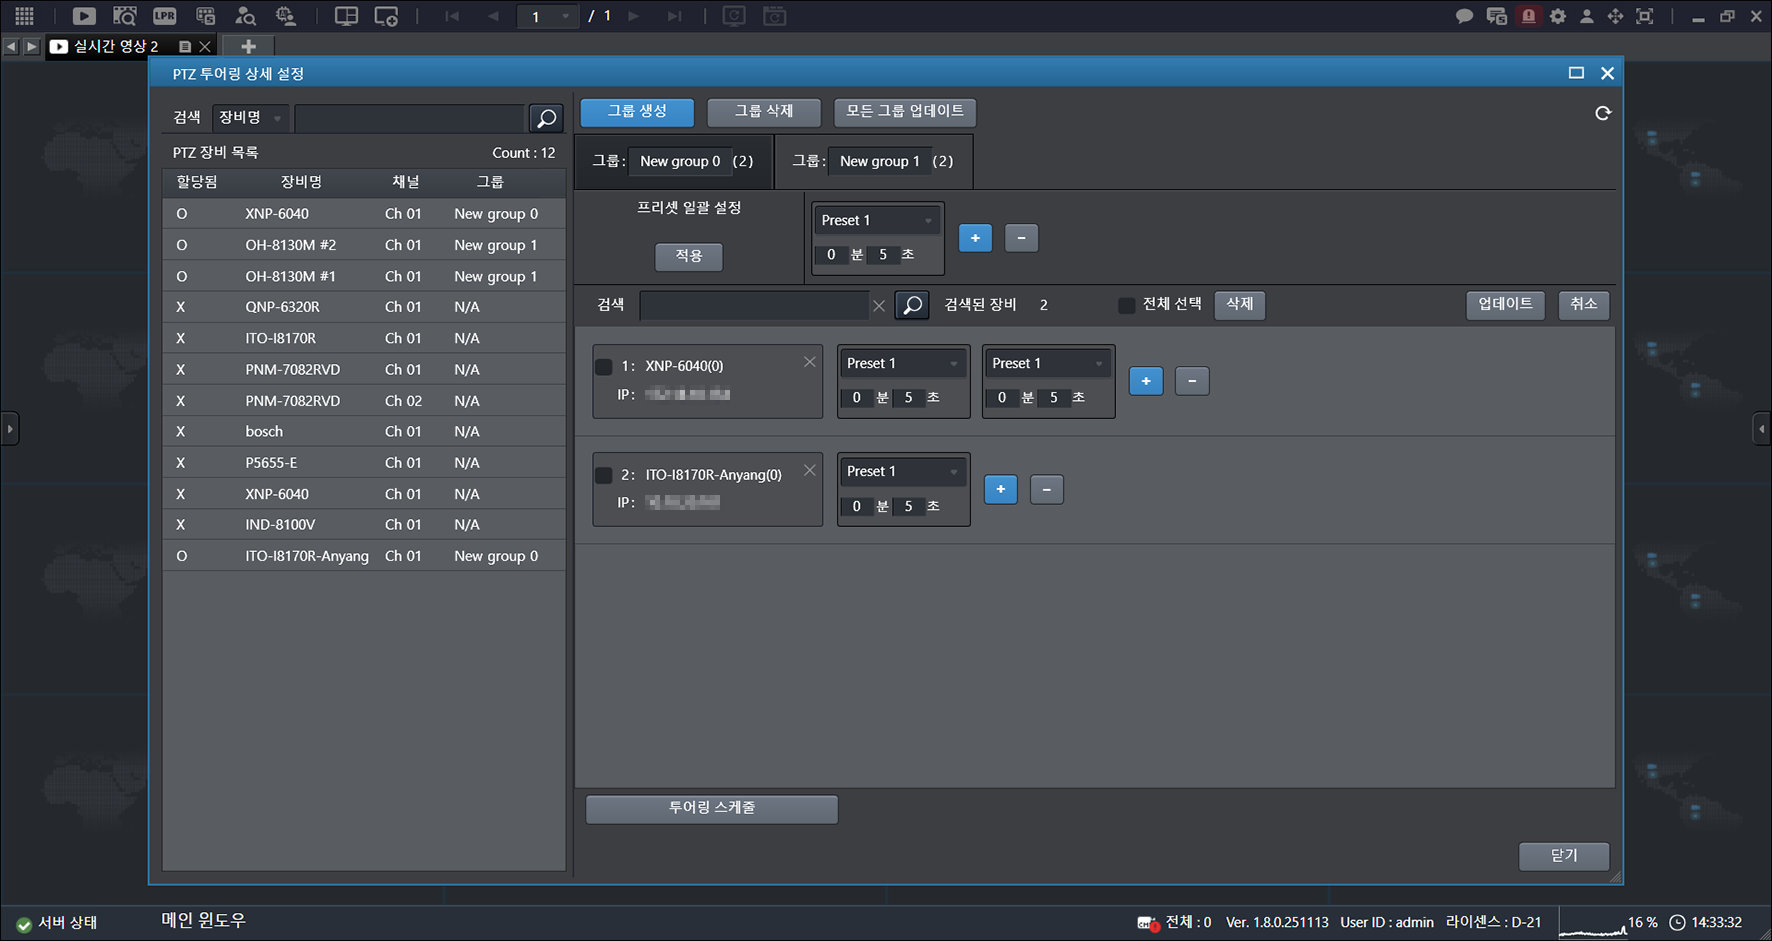
- Click [Touring Schedule].
![Click [Touring Schedule].](/manual/vurix-admin/images/page16_img2.jpg)
- Click [Disable].
- Hold down the mouse button and move in the direction you want.
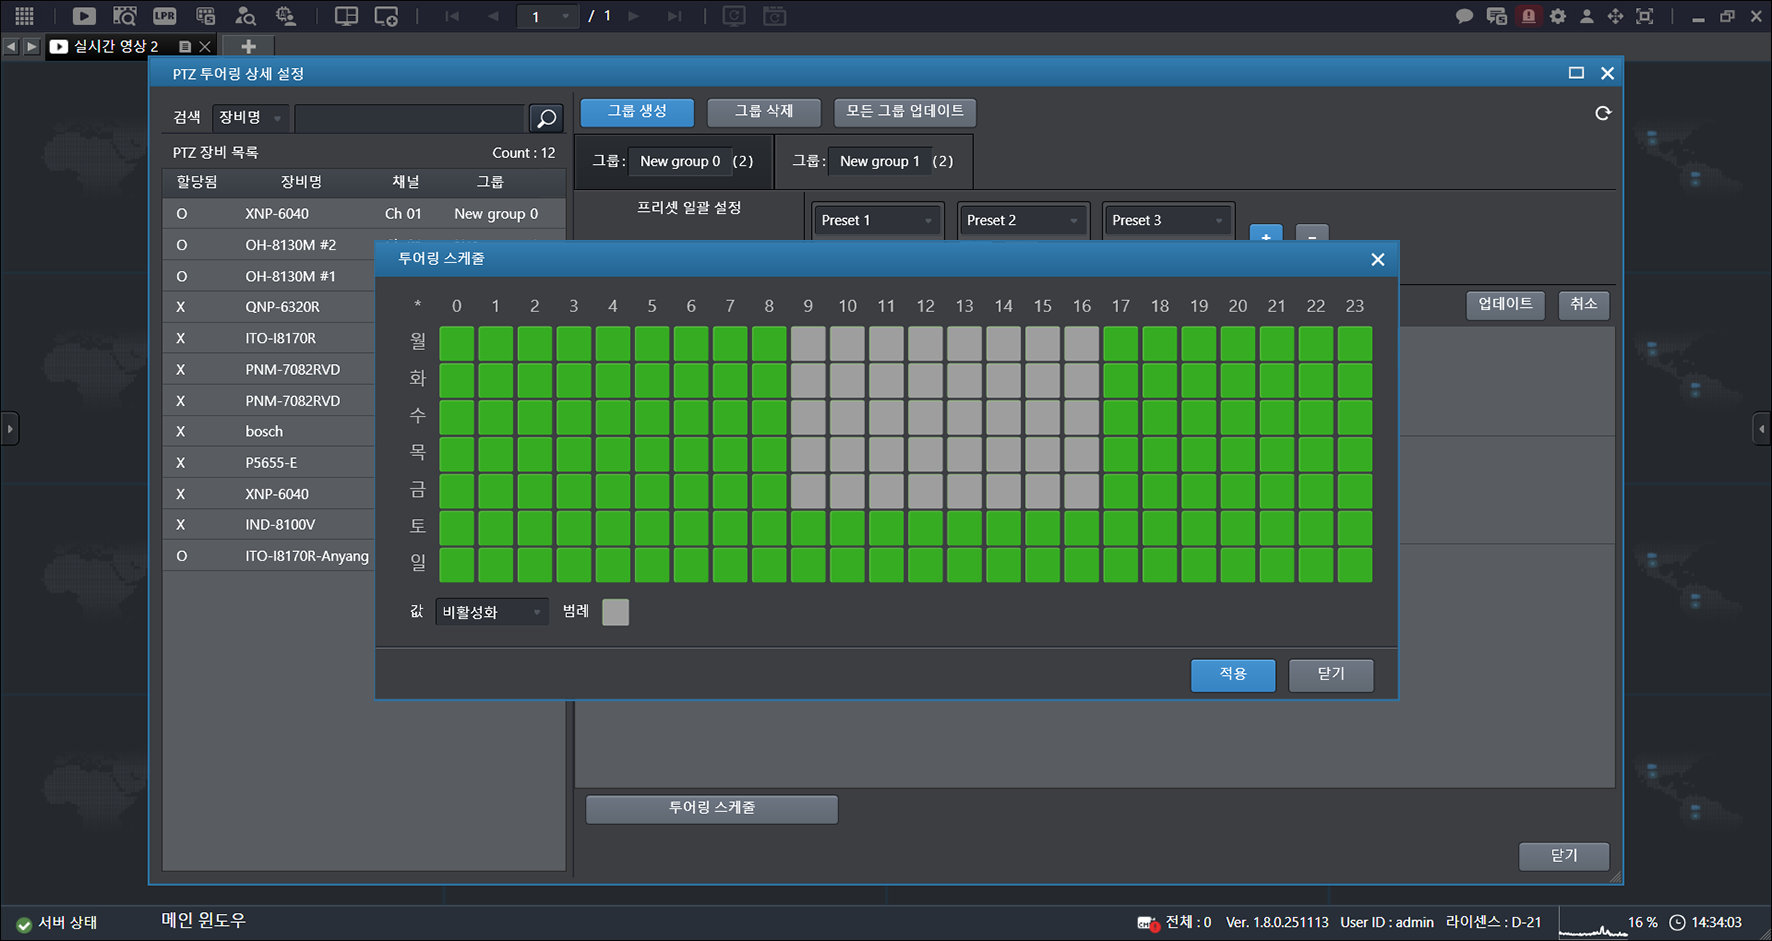
- Click [Apply].
- Click [Update] > [OK] > [Close].
Deleting Touring Groups
Deletes the group.
- On the main screen, select [] > [PTZ Touring Settings] > [Settings].
- Select a group.
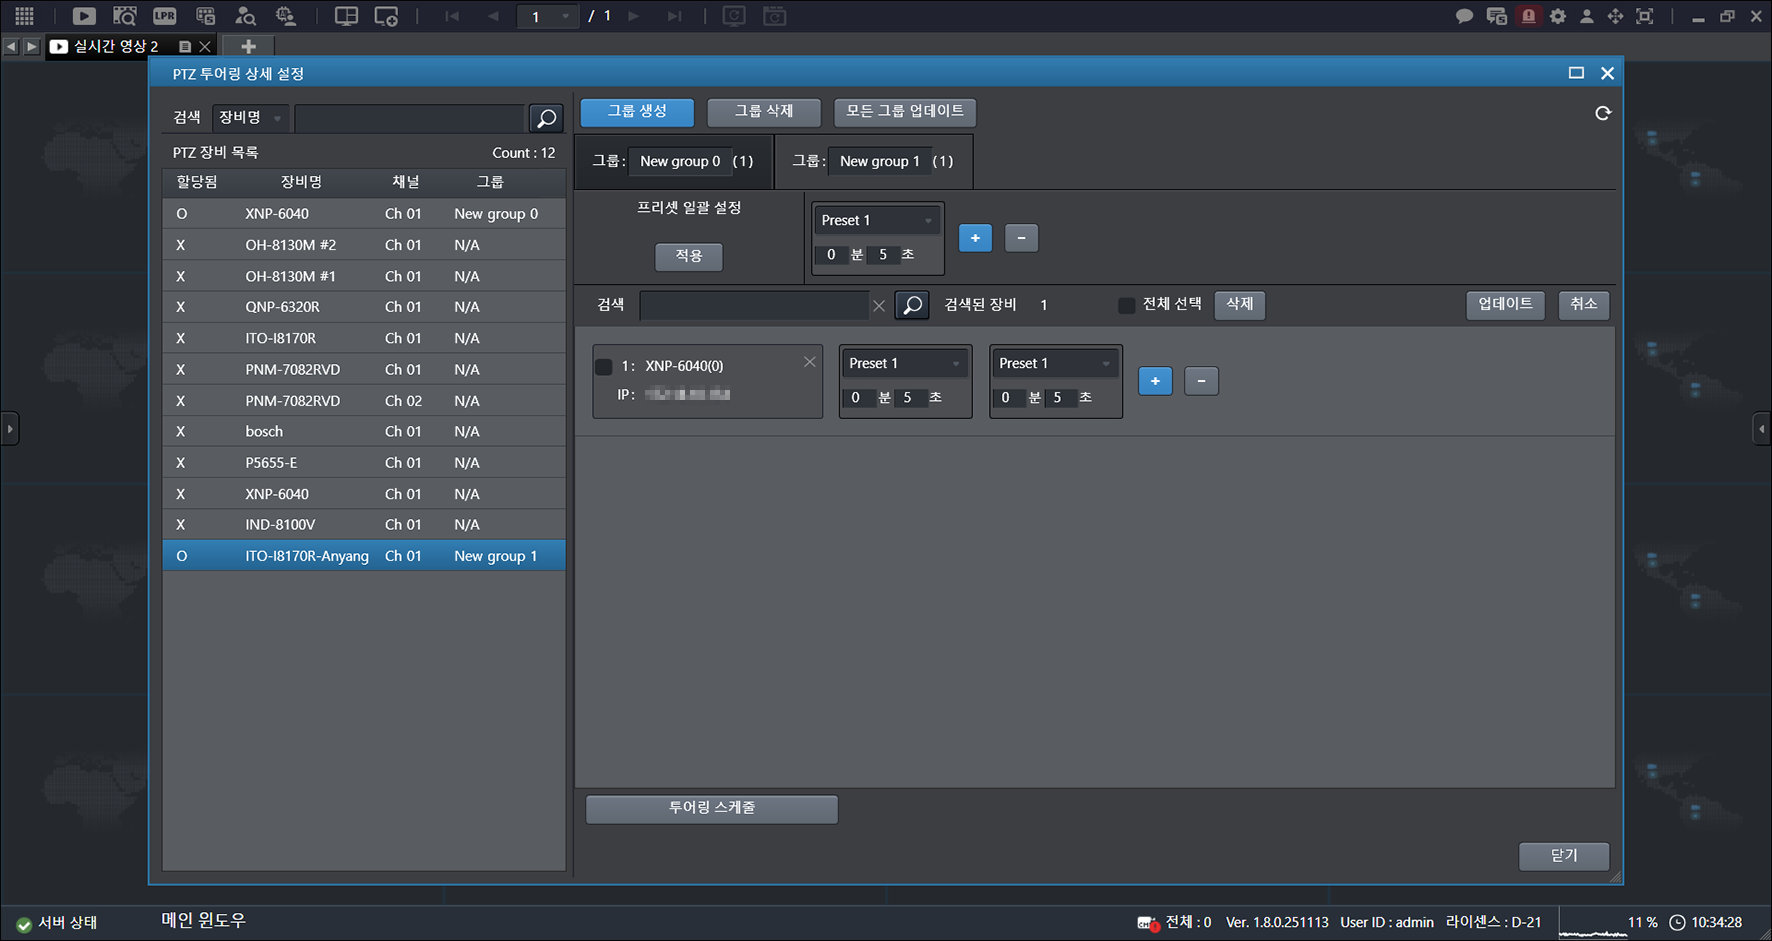
- Click [Delete Group].
![Click [Delete Group].](/manual/vurix-admin/images/page18_img2.jpg)
- Click [OK].
- Click [Update] > [OK] > [Close].
Manual VFS Recovery
VFS (Video File System) data lets you check index information for video
stored through the master server database.
Recover VFS Manually
Manually recover VFS data.
- On the main screen, select [] > [Manual VFS Recovery].
![On the main screen, select [{{icon:grid-3x3}}] > [Manual VFS Recovery].](/manual/vurix-admin/images/page19_img1.jpg)
- Select [Recovery Period].
- [Specify Period]: Select the period to recover.
- [Entire Period]: Select the entire period as the recovery period.
- Select [Recovery Mode].
- [Normal recovery mode]: Opens VFS data files one by one and recovers based on the data in the file header.
- [Fast recovery mode]: Performs full index recovery unconditionally based on the VFS data file names.
- Click [Next].
- Drag to the right while holding the mouse button.
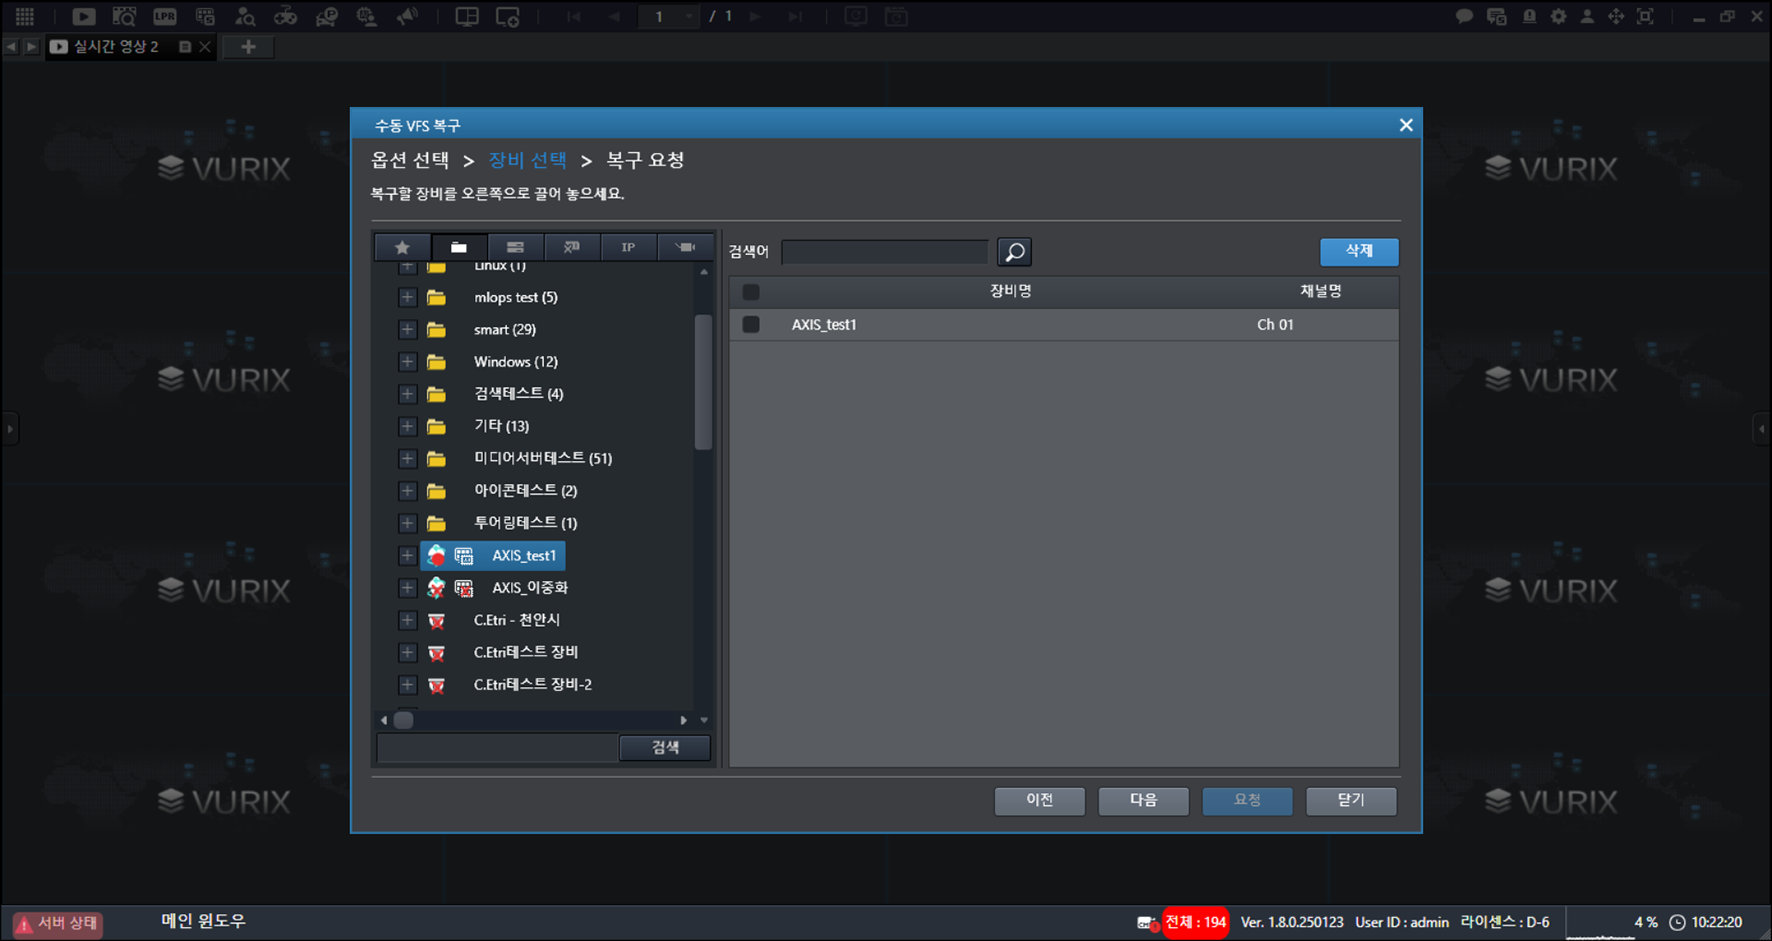
- Click [Next].
![Click [Next].](/manual/vurix-admin/images/page20_img2.jpg)
- Click [Request] > [OK].
Manual Failover
[Manual Failover] settings require a failover storage server to be assigned.
Configure Manual Failover
Manually set the storage server as the failover server.
- On the main screen, select [] > [Manual Failover].
![On the main screen, select [{{icon:grid-3x3}}] > [Manual Failover].](/manual/vurix-admin/images/page21_img1.jpg)
- Select [Recording Server] and [Failover Server].
- Enter the [Description].
- Click [Manual Failover].
- Select the item you want.
- [Current failover]: Check the current failover server information.
- [Failover history]: Check the failover history.
- [Failback]: Revert a manual failover operation.
- Click [Refresh]. Refreshes the screen.
- On the server settings screen, select [Failover server]. Sets use of the failover server.
System Monitoring
View server, camera, and license information.
View Server Information
Check server information such as the master server, recording server, and server history.
- On the main screen, select [] > [System Monitoring] > [Server Information].
- Click [Master Server].
![Click [Master Server].](/manual/vurix-admin/images/page22_img1.jpg)
- Click [Recording Server].
![Click [Recording Server].](/manual/vurix-admin/images/page22_img2.jpg)
- Click [History Management].
![Click [History Management].](/manual/vurix-admin/images/page23_img1.jpg)
- Check the information.
- Click [Master server] > [Connected users list] > [Disconnect]. Disconnects the user session.
- Click [Export to Excel]. Saves the results as an Excel file.
Checking Camera Information
Check the registered camera information.
- On the main screen, select [] > [System Monitoring] > [Camera Information].
- Set the conditions, then click [Search].
![Set the conditions, then click [Search].](/manual/vurix-admin/images/page24_img1.jpg)
- Check the results.
- Click []. Refreshes the screen.
- Click [Export to Excel]. Saves the results as an Excel file.
Checking license information
License items may differ depending on sales policy and version.
View license information such as the number of licenses issued and usage status.
- On the main screen, select [] > [System Monitoring] > [License Information].
![On the main screen, select [{{icon:grid-3x3}}] > [System Monitoring] > [License Information].](/manual/vurix-admin/images/page25_img1.jpg)
- Check the information.
View Secondary Storage Restore Status
To use secondary storage, you must set the secondary storage path.
Checking Secondary Storage Restore Status
Checks the secondary storage restore status.
- On the main screen, select [] > [View Secondary Storage Restore Status].
![On the main screen, select [{{icon:grid-3x3}}] > [View Secondary Storage Restore Status].](/manual/vurix-admin/images/page26_img1.jpg)
- Click [Register Restore Job].
![Click [Register Restore Job].](/manual/vurix-admin/images/page26_img2.jpg)
- Enter the [Restore Job Name] and [Restore Request Reason].
![Enter the [Restore Job Name] and [Restore Request Reason].](/manual/vurix-admin/images/page27_img1.jpg)
- Drag to the right while holding the mouse button.
- Click [Add].
![Click [Add].](/manual/vurix-admin/images/page27_img2.jpg)
- Click [Restore].
- Devices with a restore capacity of 0 Byte have no stored video.
- Devices with a restore capacity of 0 Byte have no data to restore from secondary storage.
User Activity
View all actions performed by the user on the client.
View User Activity
View user activity.
- On the main screen, select [] > [User Activity].
![On the main screen, select [{{icon:grid-3x3}}] > [User Activity].](/manual/vurix-admin/images/page28_img1.jpg)
- Set the conditions, then click [Search].
![Set the conditions, then click [Search].](/manual/vurix-admin/images/page28_img2.jpg)
- Check the results.
- Click [Reset]. Resets the settings.
- Click [Export to Excel]. Saves the results as an Excel file.
Maintenance
Check the storage status of devices with missing recordings.
Check Maintenance
Check maintenance.
- On the main screen, select [] > [Maintenance].
![On the main screen, select [{{icon:grid-3x3}}] > [Maintenance].](/manual/vurix-admin/images/page30_img1.jpg)
- Set the conditions, then click [Search].
![Set the conditions, then click [Search].](/manual/vurix-admin/images/page30_img2.jpg)
- Check the results.
Intelligent Statistics
Check object and event statistics for dashboard regions based on intelligent equipment.
Viewing the Intelligent Statistics Dashboard
Check the dashboard in Intelligent Statistics.
- On the main screen, select [] > [Intelligent Statistics] > [Statistics Dashboard].
![On the main screen, select [{{icon:grid-3x3}}] > [Intelligent Statistics] > [Statistics Dashboard].](/manual/vurix-admin/images/page31_img1.jpg)
- Select the item you want.
- Intelligent statistics require the IDM server (Back) and Web_Stats (Front).
- Select the regions to display on the intelligent statistics dashboard.
- For details, see "Setting intelligent statistics" on page 154.
Searching Intelligent Statistics Objects
Check object search in Intelligent Statistics.
- On the main screen, select [] > [Intelligent Statistics] > [Object Search].
![On the main screen, select [{{icon:grid-3x3}}] > [Intelligent Statistics] > [Object Search].](/manual/vurix-admin/images/page32_img1.jpg)
- Set the conditions, then click [Search].
![Set the conditions, then click [Search].](/manual/vurix-admin/images/page32_img2.jpg)
- Point to the item you want with the mouse.
- Check the information.
- Click [Download PNG]. Saves the results as an image file.
- Click [Download Excel]. Saves the results as an Excel file.
Searching Intelligent Statistics Events
Check event search in Intelligent Statistics.
- On the main screen, select [] > [Intelligent Statistics] > [Event Search].
![On the main screen, select [{{icon:grid-3x3}}] > [Intelligent Statistics] > [Event Search].](/manual/vurix-admin/images/page34_img1.jpg)
- Set the conditions, then click [Search].
![Set the conditions, then click [Search].](/manual/vurix-admin/images/page34_img2.jpg)
- Point to the item you want with the mouse.
- Check the information.
- Click [Download PNG]. Saves the results as an image file.
- Click [Download Excel]. Saves the results as an Excel file.
Checking Intelligent Statistics Status
Check the Intelligent Statistics status.
- On the main screen, select [] > [Intelligent Statistics] > [Statistics Status].
![On the main screen, select [{{icon:grid-3x3}}] > [Intelligent Statistics] > [Statistics Status].](/manual/vurix-admin/images/page36_img1.jpg)
- Set the conditions, then click [Search].
![Set the conditions, then click [Search].](/manual/vurix-admin/images/page36_img2.jpg)
- Point to the item you want with the mouse.
- Check the information.
User Settings
Configuring Users
Configuring Users
The screens shown in this guide may differ from the actual product.
- On the main screen, select [] > [User]. The user settings screen appears.
![On the main screen, select [{{icon:cog-frame}}] > [User]. The user settings screen appears.](/manual/vurix-admin/images/page38_img1.jpg)
- Select the item you want.
- [User] settings require the [User management] permission.
- On the user settings screen, select a user and select [Permission group] > [Management] > [User management].
User Environment Settings
Configure permission settings and user settings.
Adding a permission group
Adds a group.
- On the main screen, select [] > [Users] > [User Settings].
- Select [User List].
- Right-click to open the context menu.
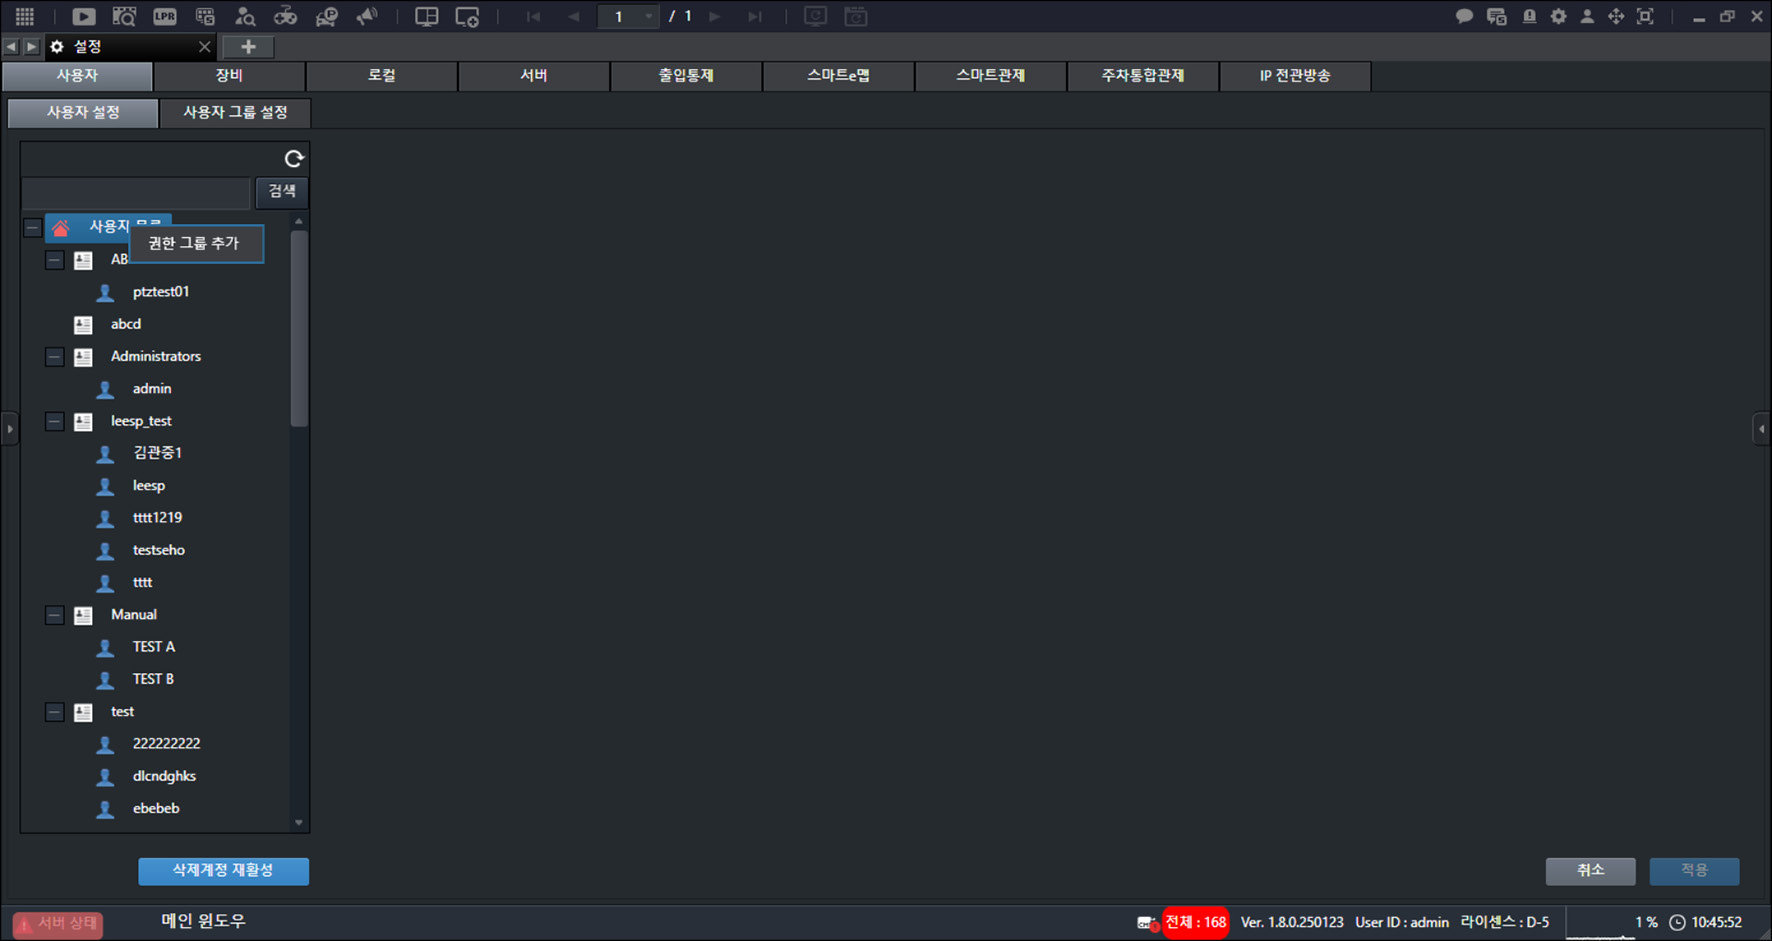
- Click [Add Permission Group].
![Click [Add Permission Group].](/manual/vurix-admin/images/page40_img1.jpg)
- Enter the [Permission Group Name].
- Set [Camera].
- [PTZ Access Level]: Set the PTZ camera control priority among multiple users.
- [PTZ Control]: Set the permission.
- [PTZ Preset Settings]: Set the management permission.
- [Microphone Control]: Set the permission.
- [Speaker Control]: Set the permission.
- Configure [Video].
- [Play Recorded Video]: Set playback permission.
- [AVI Backup]: Set save permission.
- [JPG Backup]: Set save permission.
- [Instant Search]: Set the time limit for instant video search. (1–60 minutes)
- [Save Live Video]: Set save permission.
- [Live Video Allowed Period]: Set the period during which live video is allowed.
- [Live Video Allowed Period] does not apply immediately; it takes effect every hour on the hour.
- [Search Period Limit]: Set the searchable period for recorded video.
- Set [Management].
- [User management]: Set the management permission.
- [Device management]: Set the management permission.
- [Tree management]: Set the management permission.
- [Client management]: Set the management permission.
- [Event management]: Set the management permission.
- [Server management]: Set the management permission.
- [Privacy masking]: Set the management permission.
- [Smart monitoring management]: Set the management permission.
- Configure [Other].
- [PTZ Touring Settings]: Set the permission.
- [System Monitoring]: Set the permission.
- [Recording Server Failover]: Set the permission.
- [Manual VFS Recovery]: Set the permission.
- [Single Connection]: Set concurrent login permission for the user account.
- [View Secondary Storage Restore Status]: Set the permission.
- [User Activity]: Set the permission.
- [Chat]: Set the permission.
- [Device System Info Access]: Disable display of device information menus.
- [Display Info Security]: Disable display of IP information menus.
- [Logout Time When No Events]: Set the automatic logout time.
- Configure [Smart Monitoring].
- [Monitoring]
- [Dragnet monitoring]
- [Event search]
- [Monitoring report search]
- [Other permissions]
- Set [Feature Options].
- [Add-on]
- [External system (Web API) integration]
- Click [Apply].
- Restart the program to finish applying the settings.
- Click [Group Schedule]. Set the group's login schedule.
- When [Group Schedule] is set, the user account login schedule does not apply.
Deleting a permission group
Deletes the group.
- On the main screen, select [] > [Users] > [User Settings].
- Select the item you want.
- Right-click to open the context menu.
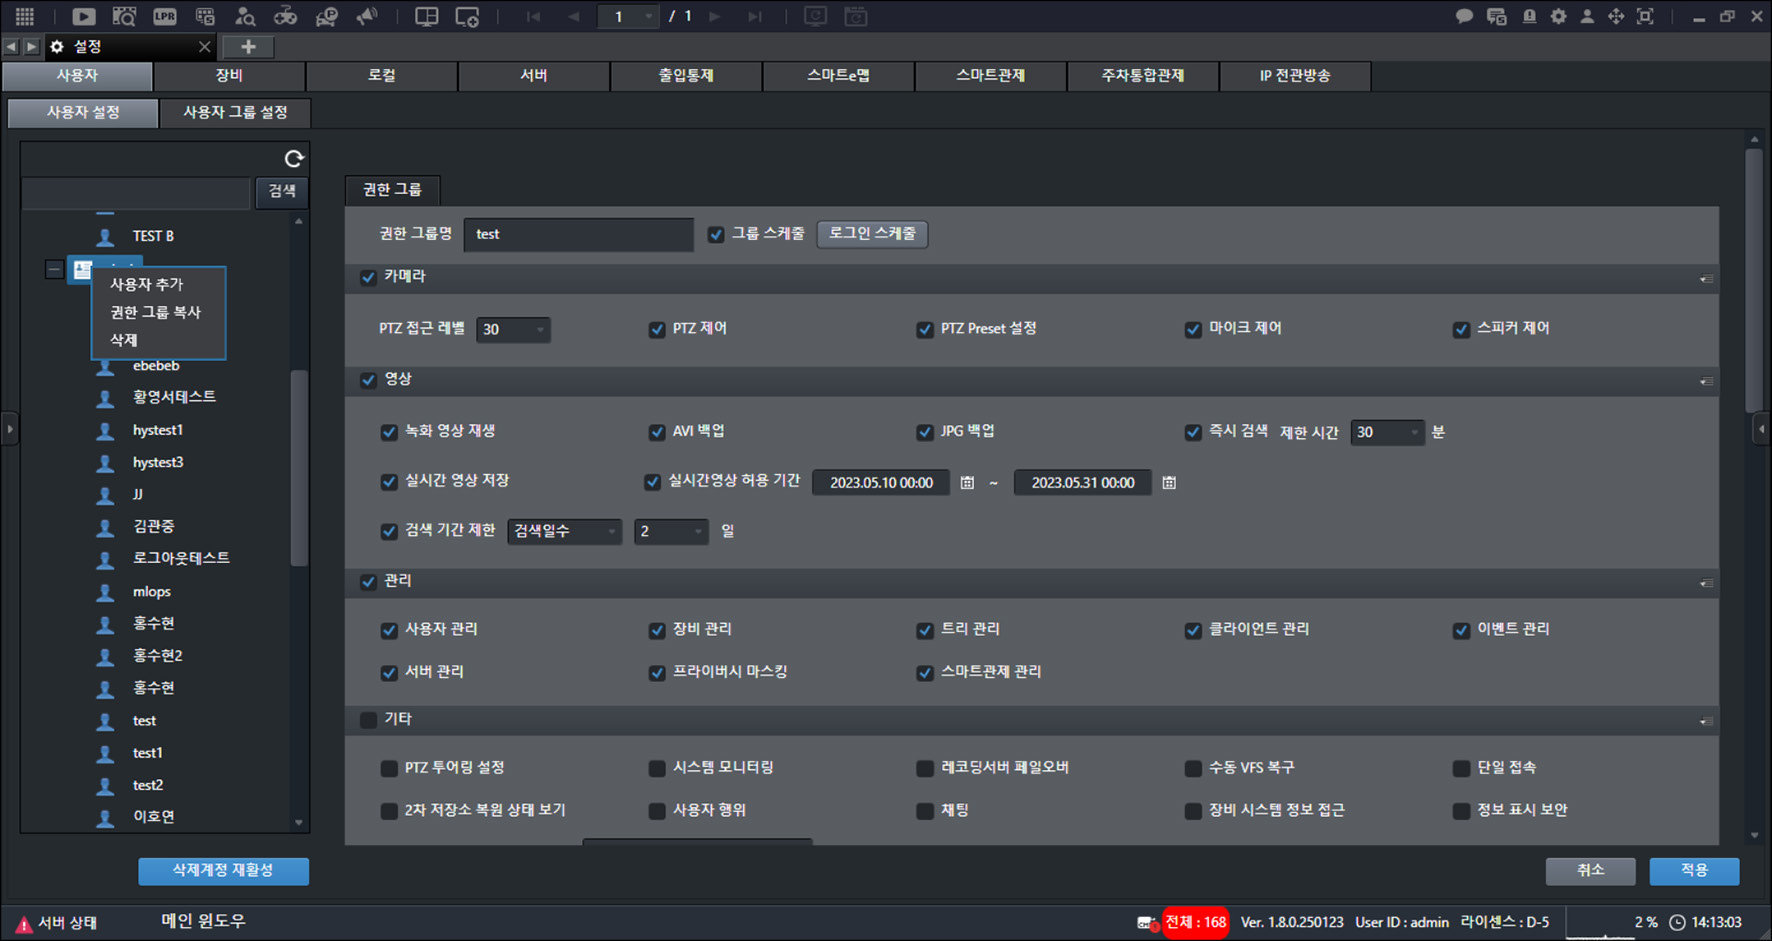
- Click [Delete].
![Click [Delete].](/manual/vurix-admin/images/page44_img2.jpg)
- Click [OK] > [OK] > [Apply].
- Click [Copy Permission Group]. Copies a group with the same permissions.
- Groups with registered users cannot be deleted.
- The [Administrators] and [Uncategorized] groups cannot be deleted or copied.
Add User
Add a user account.
- On the main screen, select [] > [Users] > [User Settings].
- Select the item you want.
- Right-click to open the context menu.
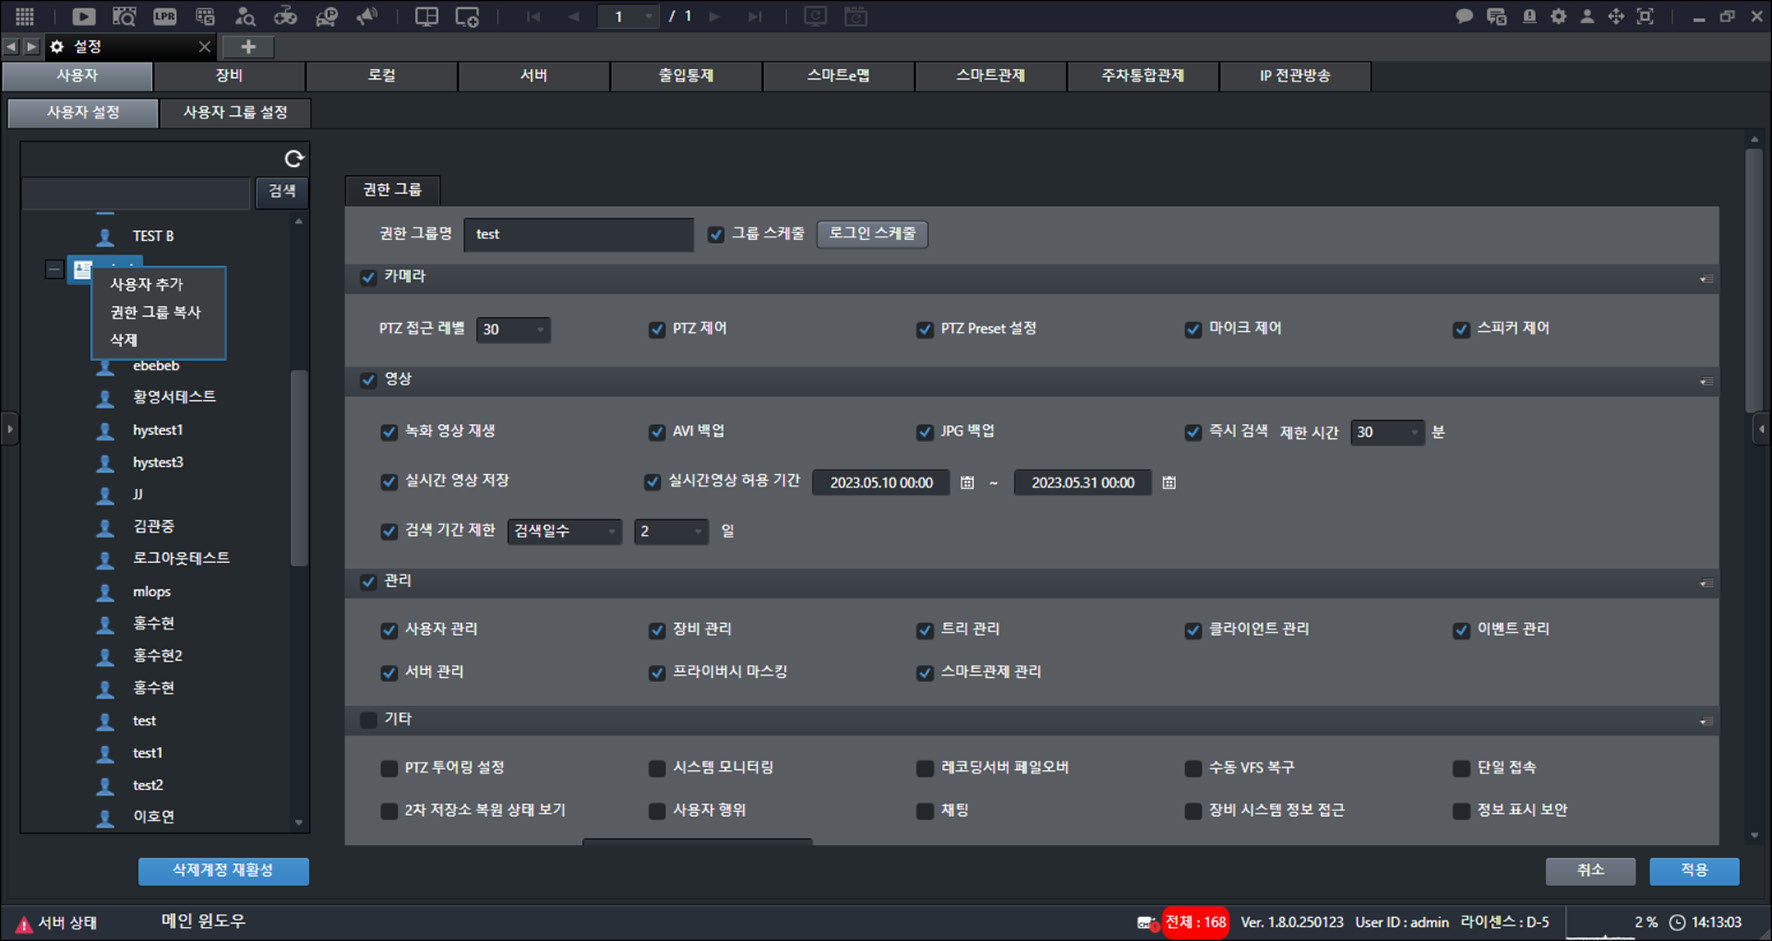
- Click [Add User].
![Click [Add User].](/manual/vurix-admin/images/page46_img2.jpg)
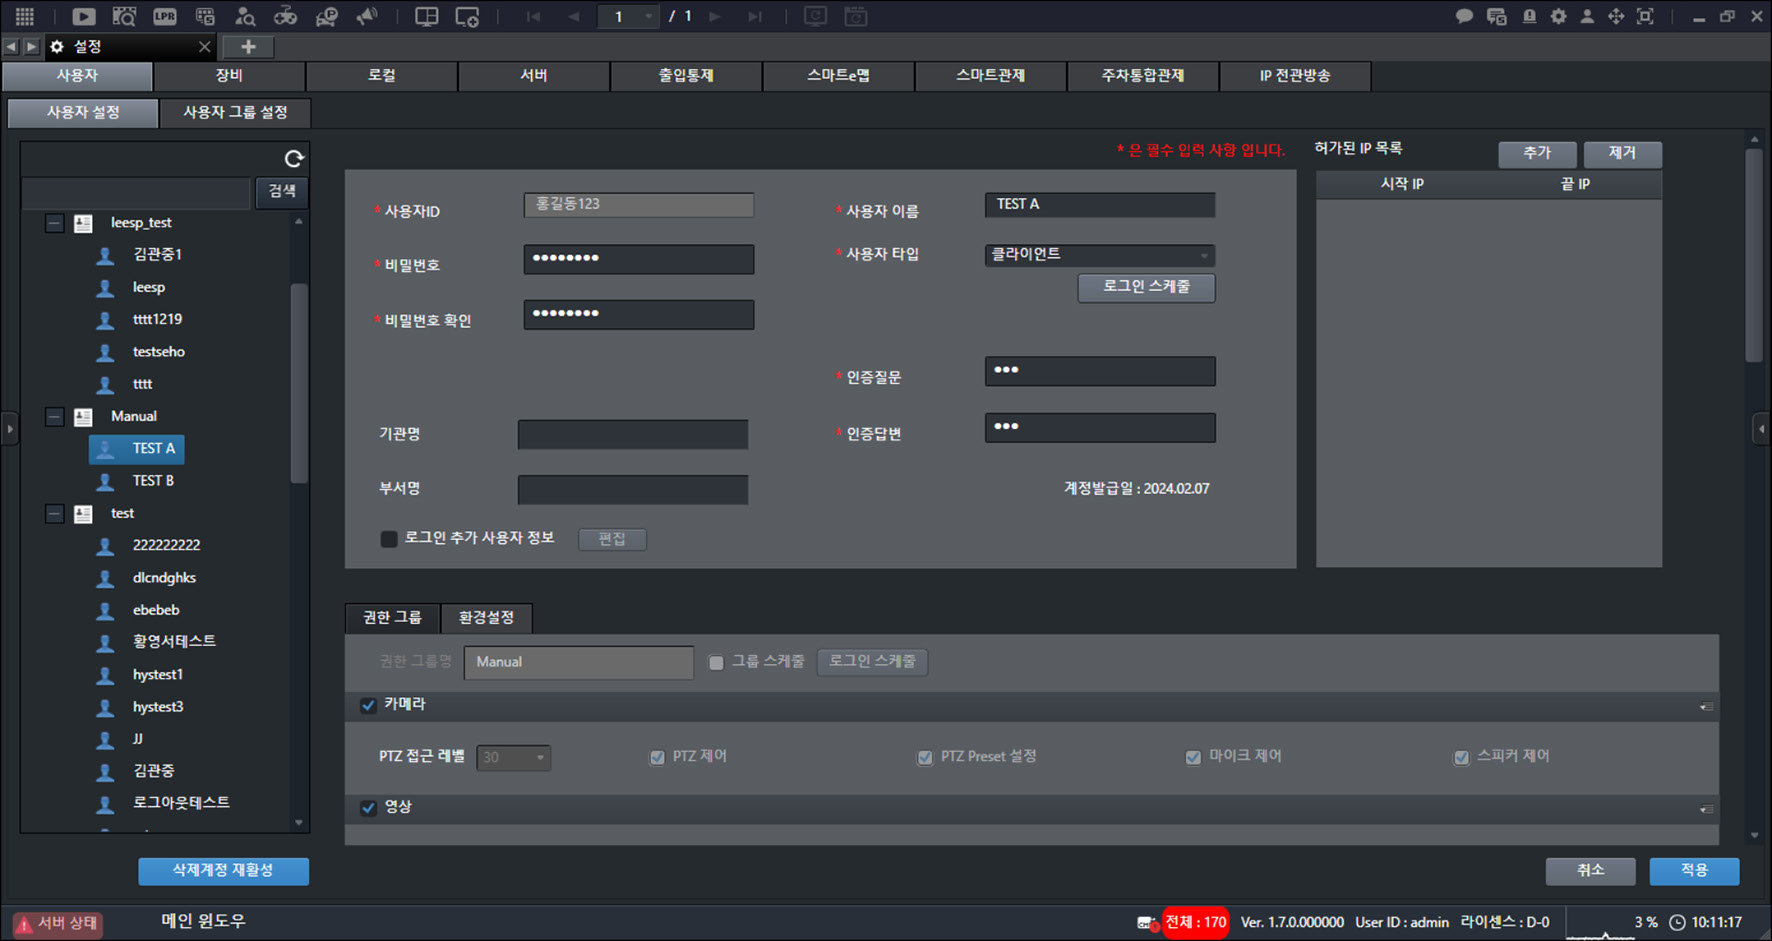
- Enter the information.
- [User ID]: Enter the ID.
- [Password] / [Confirm password]: Enter the password.
- [Organization] / [Department]: Enter the organization and department names.
- [User name]: Enter the name.
- [User type]: Set the user account type.
- [Login schedule]: Set the login schedule for the user account.
- [Authentication question] / [Authentication answer]: Enter the authentication question and answer.
- [Additional login user information]: Set additional information required for login.
- Click [Apply].
- [Password] must include uppercase and lowercase English letters, numbers, and special characters. (9 to 16 characters)
- Click [Allowed IP list] > [Add]. Adds accessible IP addresses to the list.
- Reusing a deleted user account ID is not allowed.
Configure User Environment
Set the environment settings for a user account.
- On the main screen, select [] > [Users] > [User Settings].
- Select a user account.
- Click [Preferences].
![Click [Preferences].](/manual/vurix-admin/images/page48_img2.jpg)
- Set [Screen Settings].
- [Tree position]: Set the tree position to the left or right.
- [Settings window start mode]: On the main screen, select [] to open the settings screen in a new window or a new tab.
- Set [Font Settings].
- [Live window font settings]: Set the font color, font, and font size to display on the live video screen.
- [Event pop-up window font settings]: Set the font color, font, and font size to display in the event pop-up window.
- Set [Event].
- [Event window border thickness settings]: Set the line color, line thickness, and more to display the event pop-up window.
- [Event pop-up settings]: Set [Create overlapping by event rule], [Create single per channel], and more.
- Configure [Video].
- [Show video information from the start]: Display video information on the video.
- Set [Tree].
- [Show tree item thumbnails]: Display thumbnails in the tree.
- [Tree hierarchy limit]: Set the tree display depth.
- [Show description in tree]: Display descriptions in the tree.
- [Search type]: In the device tree quick search window, when searching by device name, show only search results or move to the searched device.
- Set [Switch Interval].
- [Auto tab switch time (3–120)]: On the main screen, select [] to set the time for automatically switching live video tabs. (3 to 120 seconds)
- [Auto page switch time (3–120)]: On the main screen, select [] to set the time for automatically switching screen pages. (3 to 120 seconds)
- Configure [PTZ].
- [Enable PTZ Guidelines]: Display PTZ guidelines on the live video screen.
- [Show PTZ Control Panel Initially]: Display the PTZ camera control mini window on the live video screen.
- Configure [Other].
- [Use process check]: Set whether to check key processes when the program starts.
- [Camera device fault notification]: Display camera device fault notifications on the main screen status bar.
- [Shortcut settings]: Set shortcuts.
- Configure [LPR].
- [Show LPR Recognition Failure]: When LPR recognition fails, display it on the LPR video.
- [LPR Additional Info Display Settings]: Set information display items and show them on the LPR video.
- Configure [Smart Monitoring].
- [Alarm sound file]: Set the event alarm sound.
- [Event notification (event notification delay (sec))]: When an event occurs, a green border is displayed on the video.
- [Monitoring status]: Check the list.
- [Quick monitoring status]: Set [Quick monitoring status] items to display on the event video.
- Click [Apply].
- Restart the program to finish applying the settings.
Setting Info Display Security
Disables display of IP-related menus.
- On the main screen, select [] > [Users] > [User Settings].
- Select a user account.
- Click [Permission Group] > [Other] > [Display Info Security].
![Click [Permission Group] > [Other] > [Display Info Security].](/manual/vurix-admin/images/page51_img1.jpg)
- Click [Apply].
- Restart the program to finish applying the settings.
- When [Information display security] is enabled, IP information is shown as special characters (*) on the login and logout windows.
- When [Information display security] is enabled, [], [], and [IP] are disabled.
Setting shortcuts
Set shortcuts.
- On the main screen, select [] > [Users] > [User Settings].
- Select a user account.
- Click [Preferences].
![Click [Preferences].](/manual/vurix-admin/images/page52_img1.jpg)
- Click [Other] > [Shortcut Settings] > [Settings].
![Click [Other] > [Shortcut Settings] > [Settings].](/manual/vurix-admin/images/page52_img2.jpg)
- Select the item you want.
- Click [Apply].
Setting quick monitoring status
Set [Quick Monitoring Status] items to display them on the event video.
- On the main screen, select [] > [Users] > [User Settings].
- Select a user account.
- Click [Preferences] > [Smart Monitoring] > [Monitoring Status].
![Click [Preferences] > [Smart Monitoring] > [Monitoring Status].](/manual/vurix-admin/images/page55_img1.jpg)
- Select the item you want.
- Click [Apply].
- Manage [Monitoring Status] items.
- Only administrator accounts can add or delete items.
- For details, see "Adding Monitoring Status Items" on page 158.
Reactivate Deleted Account
Reactivate a deleted account.
[Reactivate Deleted Account] settings are available only to administrator accounts.
- On the main screen, select [] > [Users] > [User Settings].
- Click [Reactivate Deleted Account].
![Click [Reactivate Deleted Account].](/manual/vurix-admin/images/page56_img1.jpg)
- Enter the [Reactivation Reason].
- Click [Reactivate Account] > [OK].
- Click [Apply].
User Group Settings
Configure user groups.
[User Group Settings] is available only to administrator accounts.
Add User Group
Adds a group.
- On the main screen, select [] > [Users] > [User Group Settings].
- Select the item you want.
- Right-click to open the context menu.
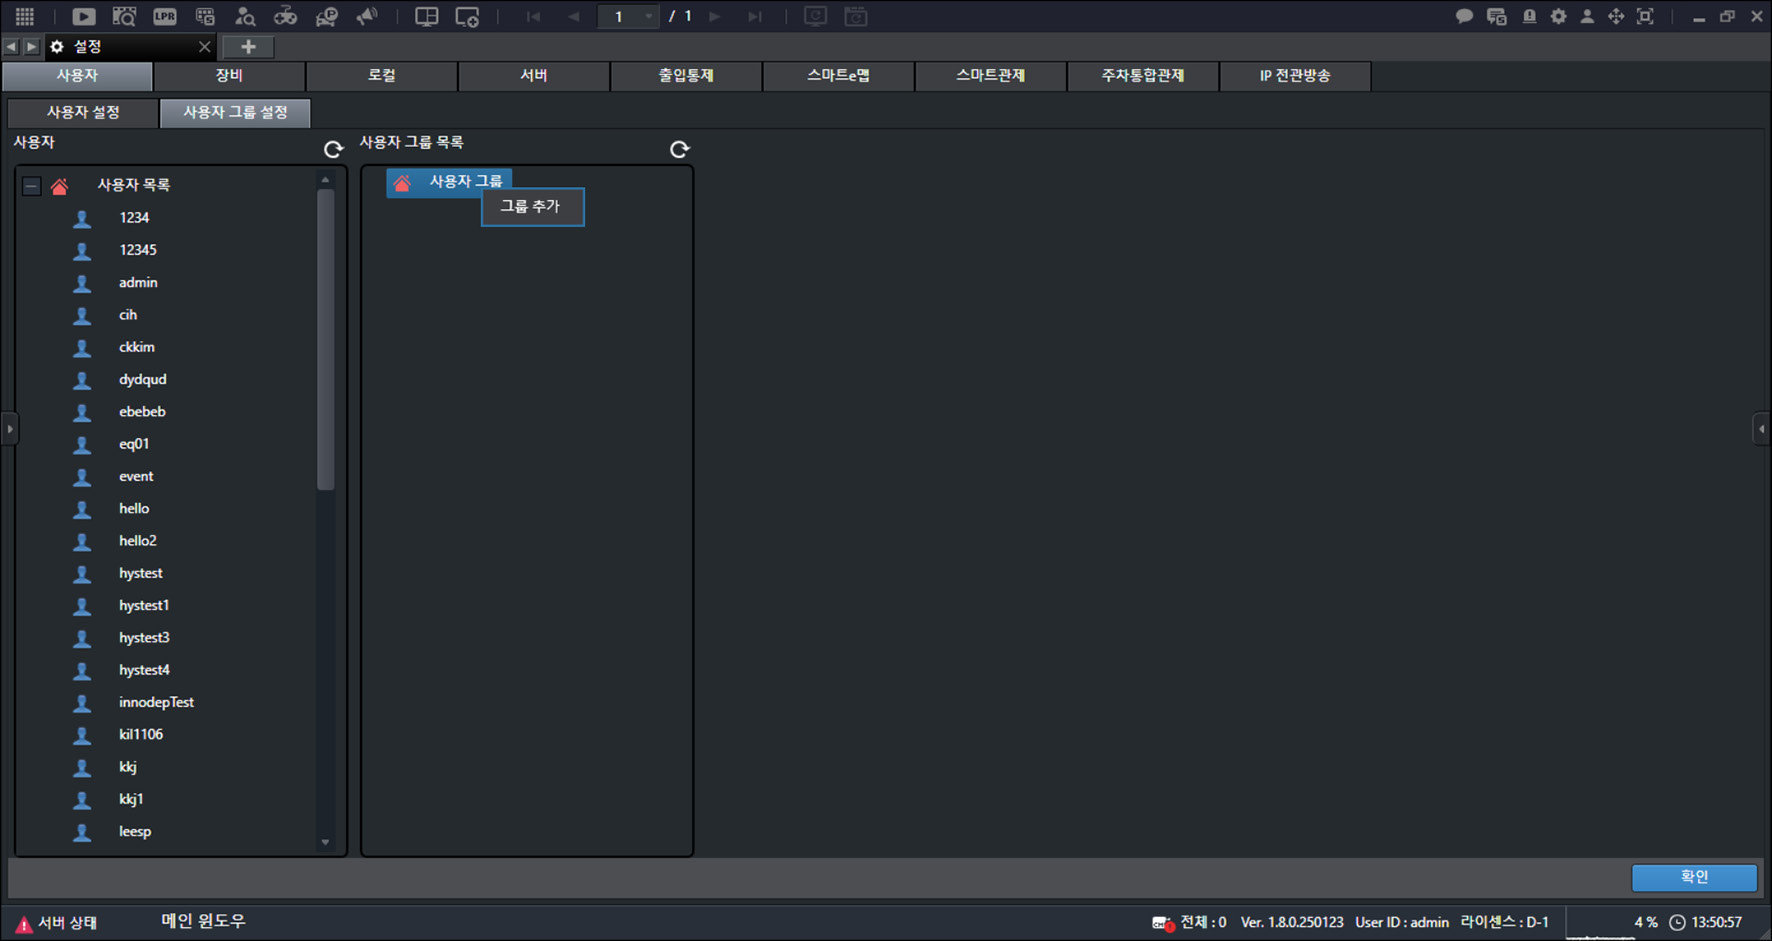
- Click [Add Group].
![Click [Add Group].](/manual/vurix-admin/images/page58_img1.jpg)
- Enter the group name.
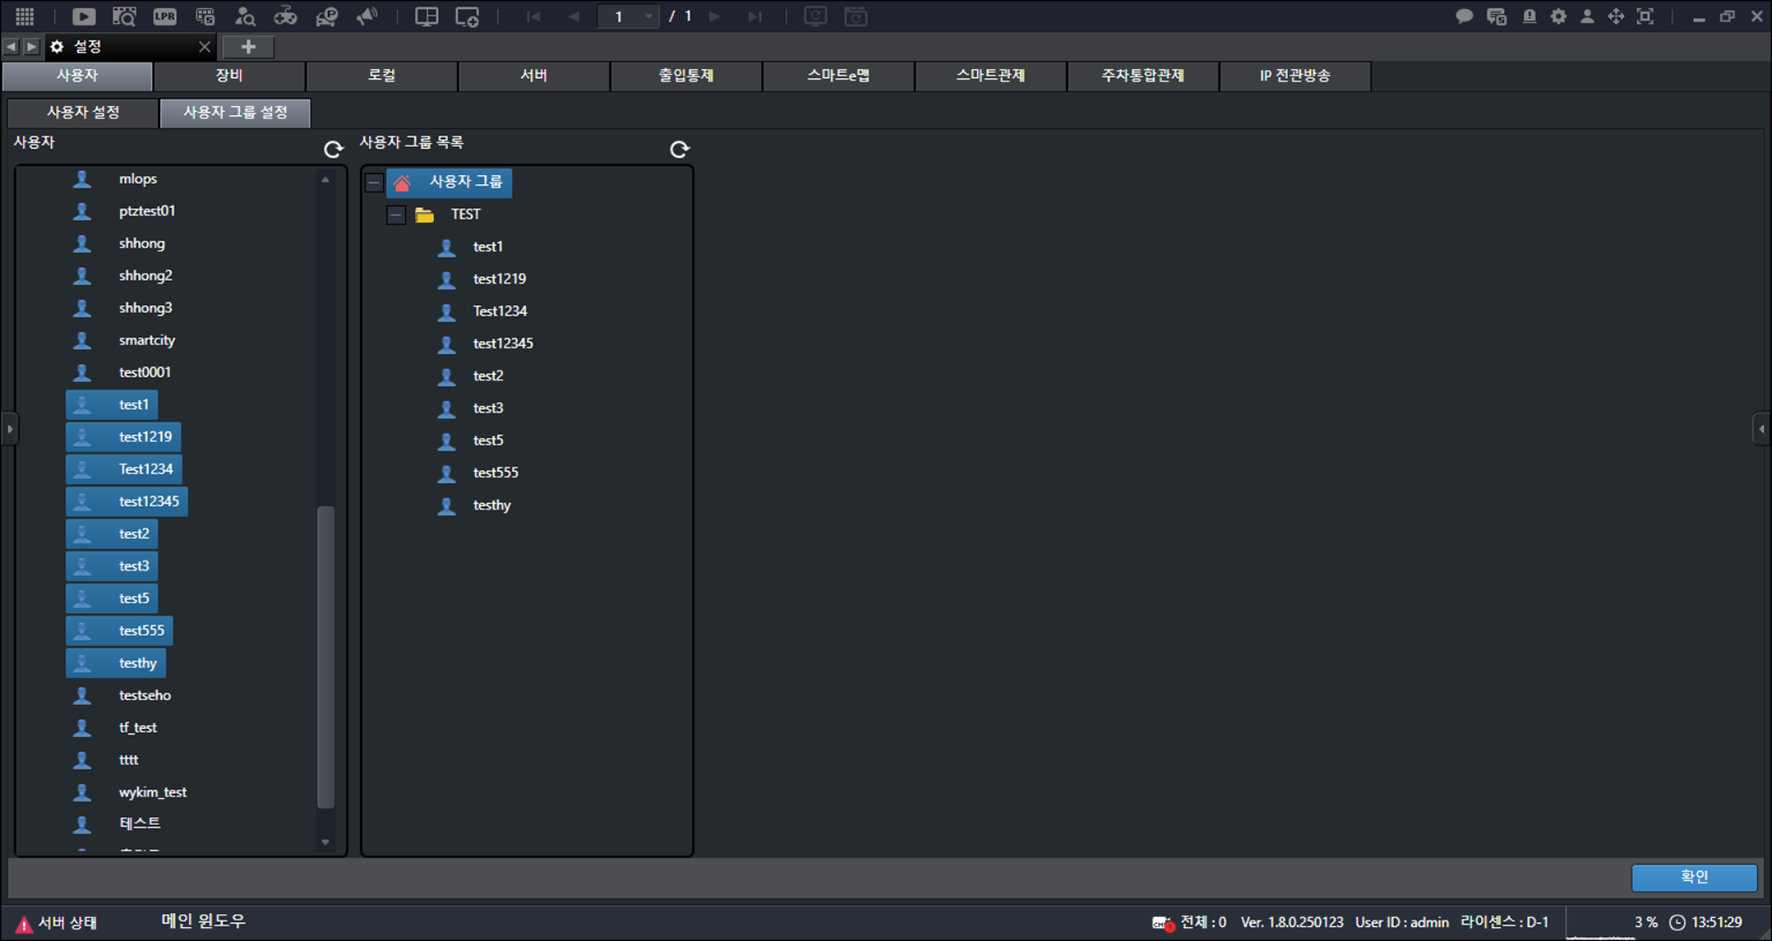
- Drag to the right while holding the mouse button.
- Click [OK].
Delete User Group
Deletes the group.
- On the main screen, select [] > [Users] > [User Group Settings].
- Select the item you want.
- Right-click to open the context menu.
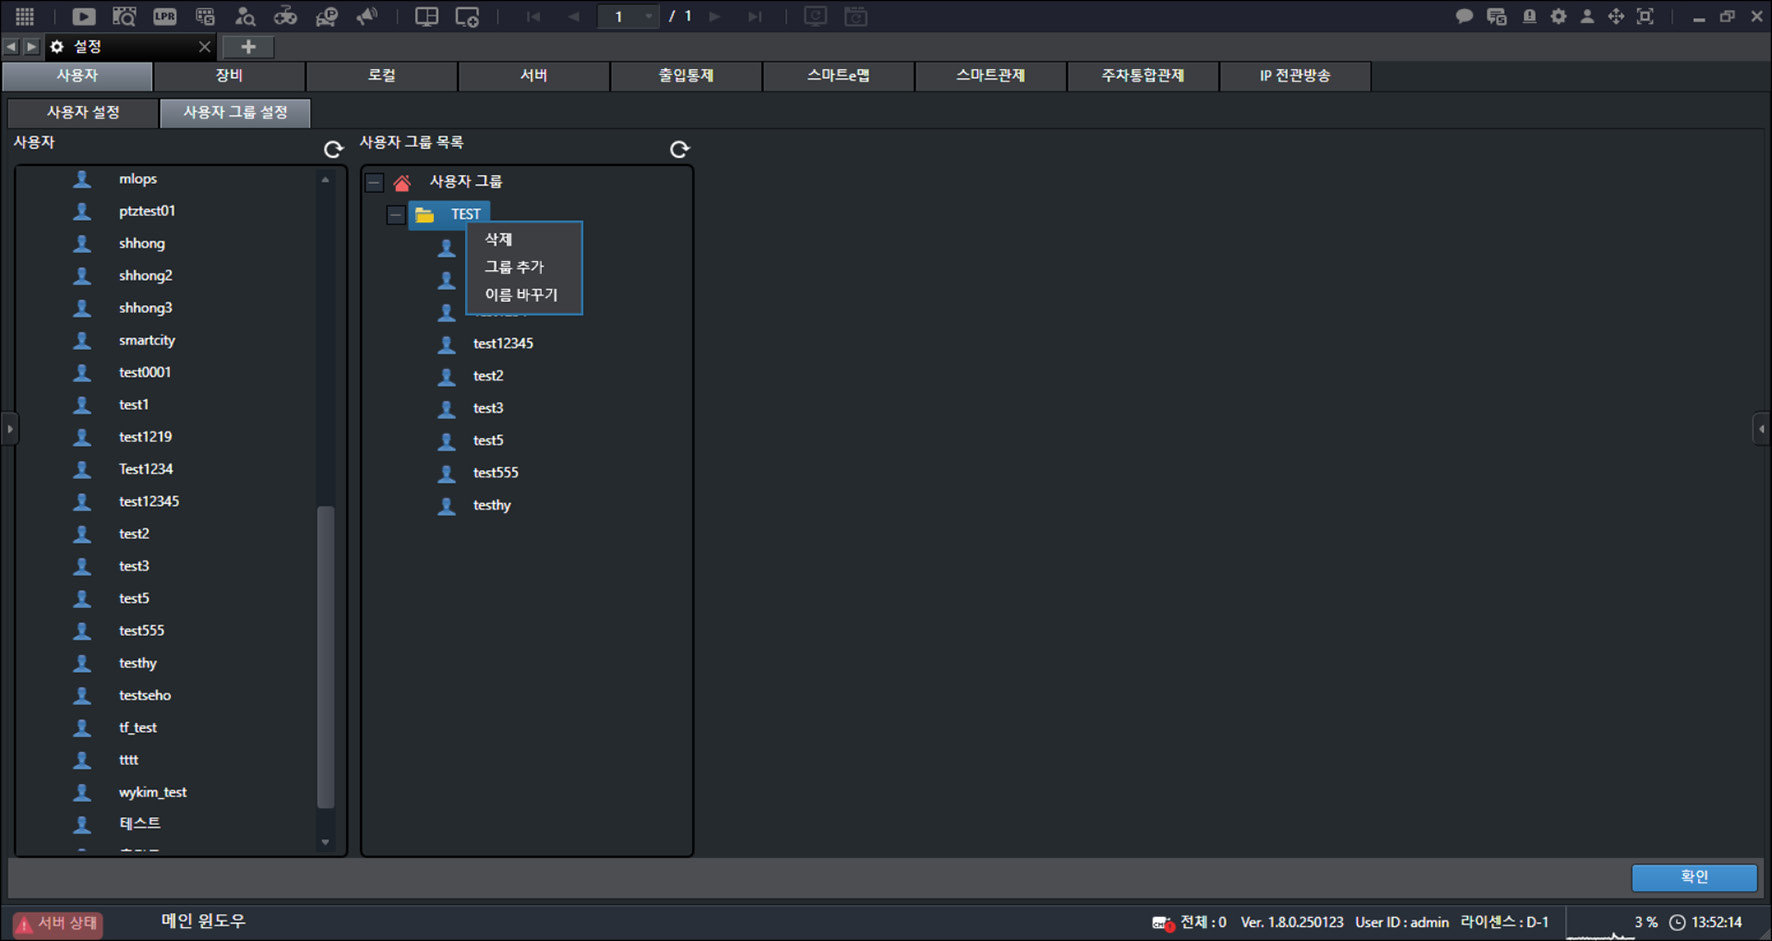
- Click [Delete].
![Click [Delete].](/manual/vurix-admin/images/page59_img2.jpg)
- Click [OK].
Device Settings
Configuring Devices
Configuring Devices
The screens shown in this guide may differ from the actual product.
- On the main screen, select [] > [Device]. The device settings screen appears.
![On the main screen, select [{{icon:cog-frame}}] > [Device]. The device settings screen appears.](/manual/vurix-admin/images/page61_img1.jpg)
- Select the item you want.
- [Device] settings require the [Device management] permission.
- On the user settings screen, select a user and select [Permission group] > [Management] > [Device management].
Device Management
Manage devices, including adding, deleting, and copying devices.
Add Device
Adds a device.
- On the main screen, select [] > [Devices] > [Device Management].
![On the main screen, select [{{icon:cog-frame}}] > [Devices] > [Device Management].](/manual/vurix-admin/images/page62_img1.jpg)
- Click [Add Device].
- Set the conditions, then click [Search].
![Set the conditions, then click [Search].](/manual/vurix-admin/images/page62_img2.jpg)
- Select the item you want.
- Click [OK].
- [Recording media]: Set the recording media.
- [Add media]: Add media.
- [Recording schedule]: Set the recording schedule.
- [PTZ control schedule]: Set the PTZ control schedule.
- [Fisheye lens settings]: Set the fisheye lens.
- [Linked devices]: Set linked devices.
![Click [OK].](/manual/vurix-admin/images/page63_img1.jpg)
- Click [OK].
- After entering the [IP], verify the [ID] and [Password].
- Selected values in [Fisheye Lens Settings] such as [Change X-Axis Radius], [Change Y-Axis Radius], and [Show Rotation Control]
Delete Device
Deletes the device.
- On the main screen, select [] > [Devices] > [Device Management].
- Select a device.
- Click [Delete].
![Click [Delete].](/manual/vurix-admin/images/page64_img1.jpg)
- Click [Yes] > [OK].
Copy Device
Copy a device.
- On the main screen, select [] > [Devices] > [Device Management].
- Select a device.
- Click [Copy Device].
![Click [Copy Device].](/manual/vurix-admin/images/page65_img1.jpg)
- Click [OK].
Add Devices Automatically
Add devices automatically.
Click [Auto Add Device] to add ONVIF devices.
- On the main screen, select [] > [Devices] > [Device Management].
- Click [Auto Add Device].
![Click [Auto Add Device].](/manual/vurix-admin/images/page66_img1.jpg)
- Select a server.
- Click [Next].
![Click [Next].](/manual/vurix-admin/images/page66_img2.jpg)
- Enter the [ID] and [Password].
- Click [Next].
- Select the item you want.
- Click [Next] > [OK].
- On the local settings screen, select [ONVIF search type] > [Wizard UI].
- On the device settings screen, change the UI button name from [ONVIF] to [Auto add device].
Configure Remote Control Process and Devices
Register a process that manages and controls digital input and digital output.
After registering the process, remotely control the devices.
- On the main screen, select [] > [Devices] > [Device Management].
- Click [Add Device].
![Click [Add Device].](/manual/vurix-admin/images/page68_img1.jpg)
- Click [OK].
![Click [OK].](/manual/vurix-admin/images/page68_img2.jpg)
- Set [Other Channels].
- Select a device.
- Click [Linked Device].
![Click [Linked Device].](/manual/vurix-admin/images/page69_img1.jpg)
- Click [OK].
![Click [OK].](/manual/vurix-admin/images/page69_img2.jpg)
- Configure [Other channel] remote control items for your site.
- Set remote control for power control devices.
- Set remote control for the barrier gate.
- On the main screen, select []. Check devices linked with the remote control process.
Configure Event Devices
Configure devices to receive events correctly.
- On the main screen, select [] > [Devices] > [Device Management].
- Select a device.
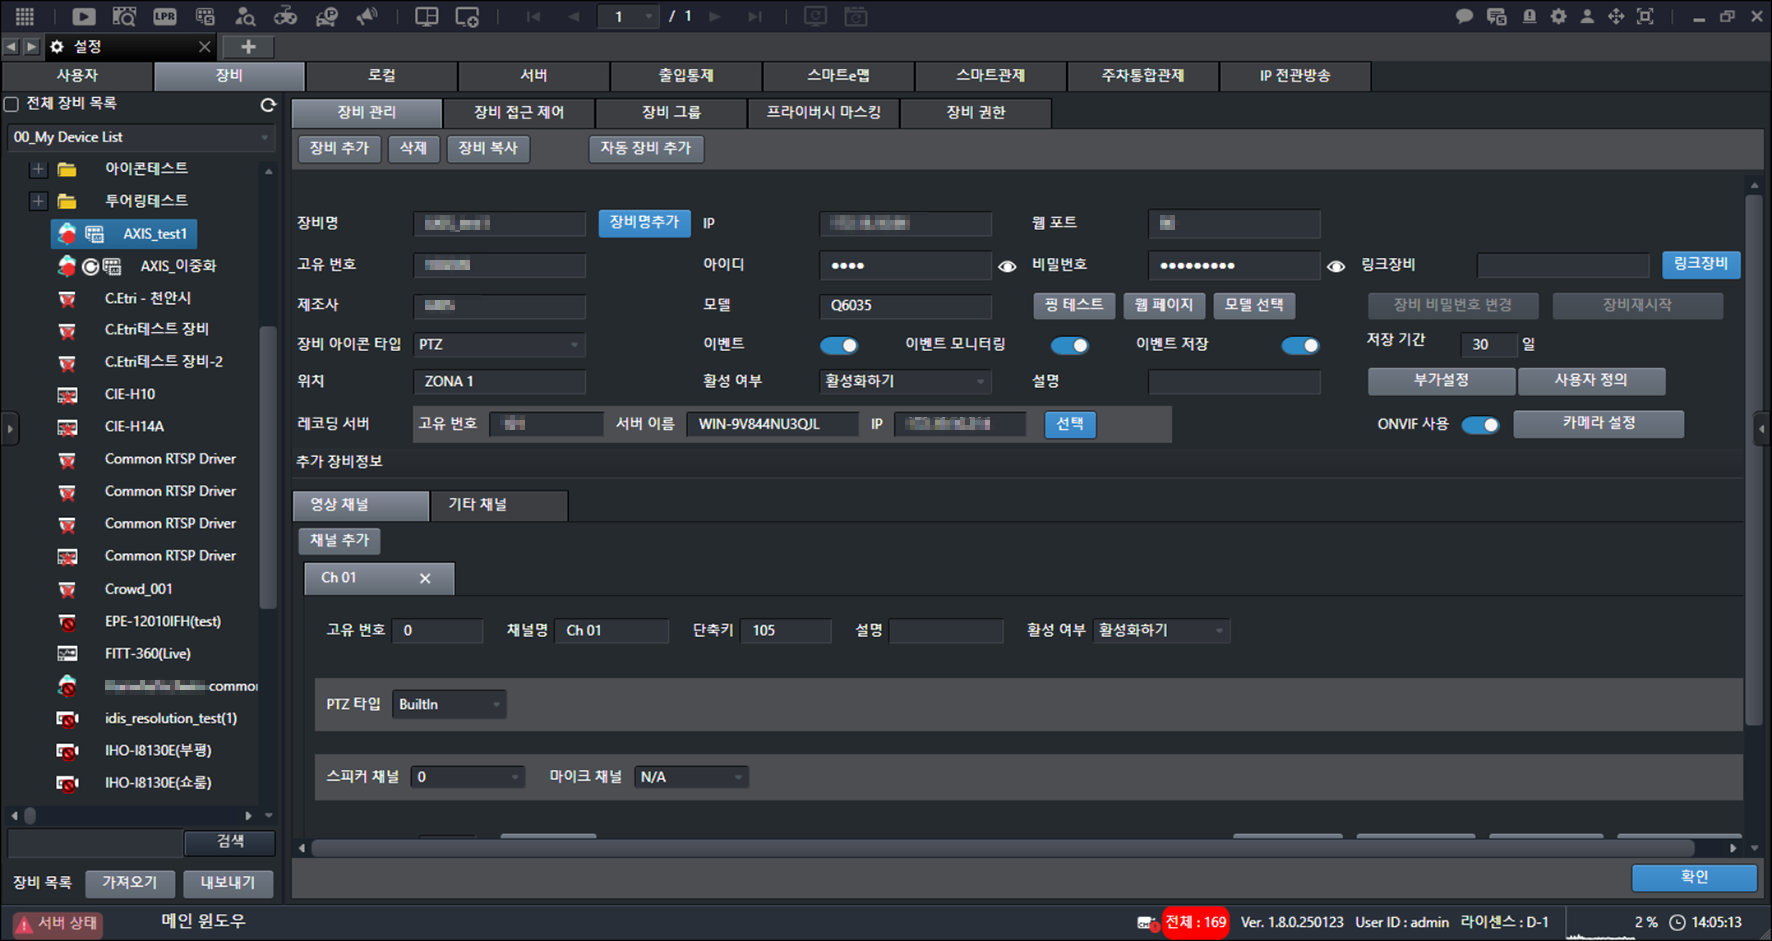
- Select the item you want.
- [Event]: Set whether to use events.
- [Event monitoring]: When event and metadata are received, display the metadata on the screen.
- [Event save]: Set whether to save events.
- [Retention period]: Set the event retention period.
- [Use ONVIF]: Set whether to use ONVIF.
- Click [OK].
Device Access Control
Assign devices to a user account or remove them.
Assign Devices to a User Account
Assigns a device.
- On the main screen, select [] > [Devices] > [Device Access Control].
![On the main screen, select [{{icon:cog-frame}}] > [Devices] > [Device Access Control].](/manual/vurix-admin/images/page72_img1.jpg)
- Select a user account.
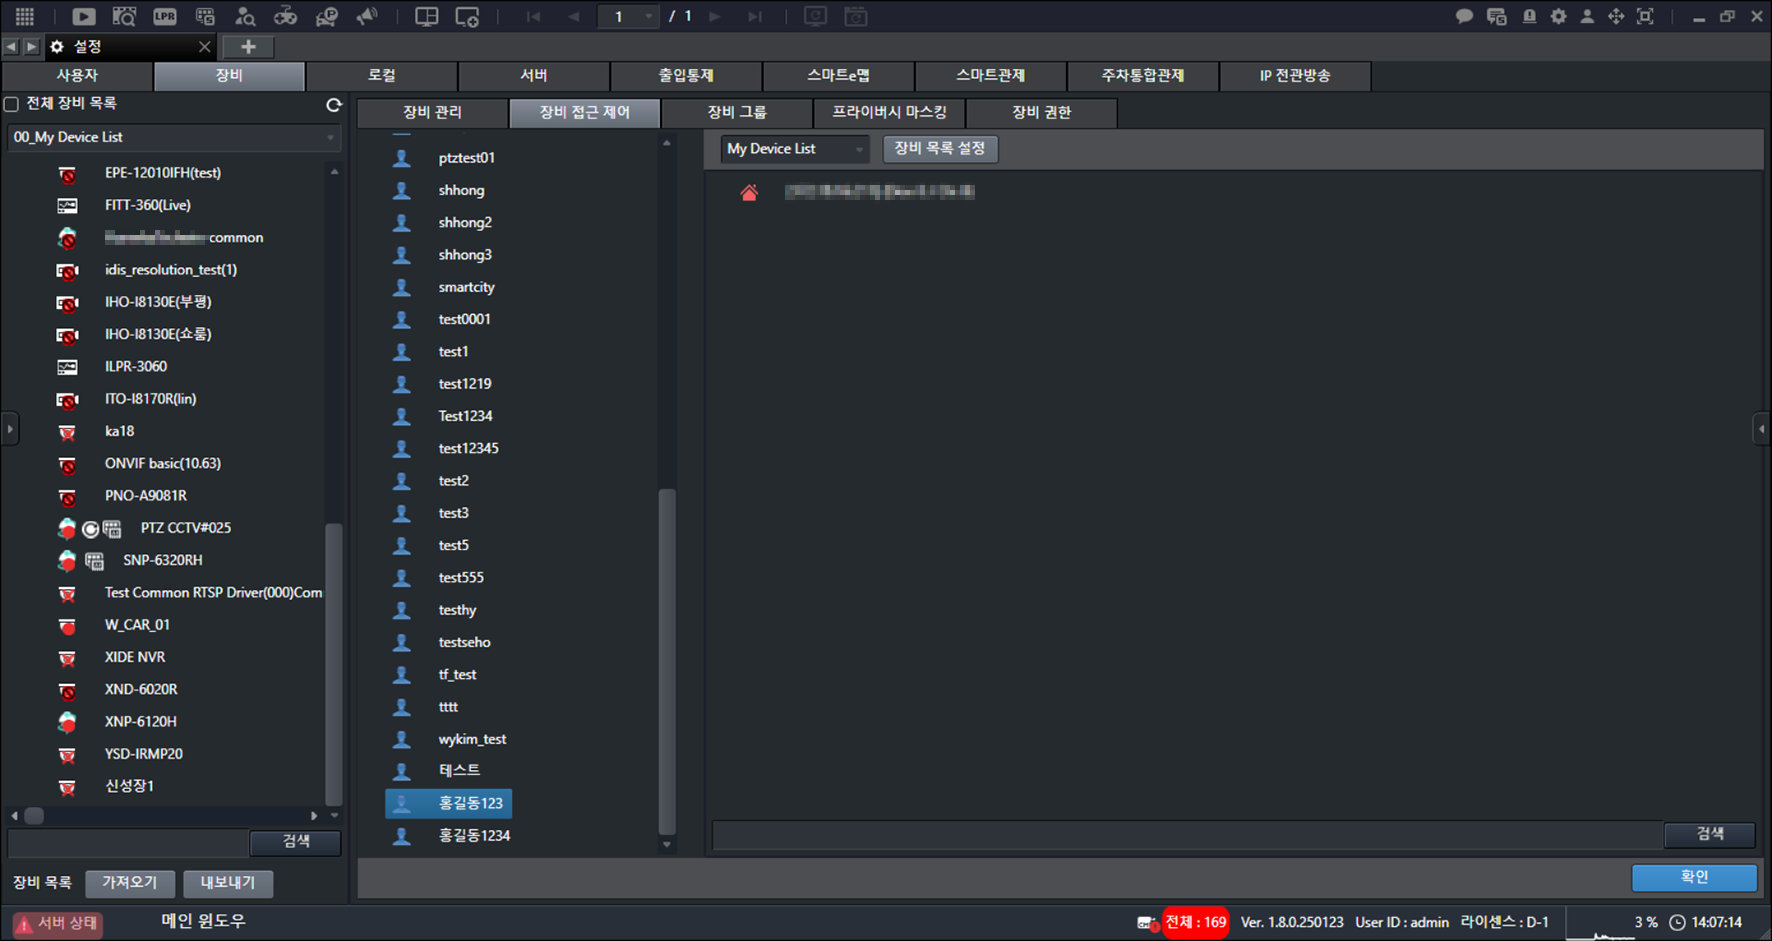
- Drag to the right while holding the mouse button.
- Click [OK].
Remove Devices from a User Account
Deletes the device.
- On the main screen, select [] > [Devices] > [Device Access Control].
- Select a user account.
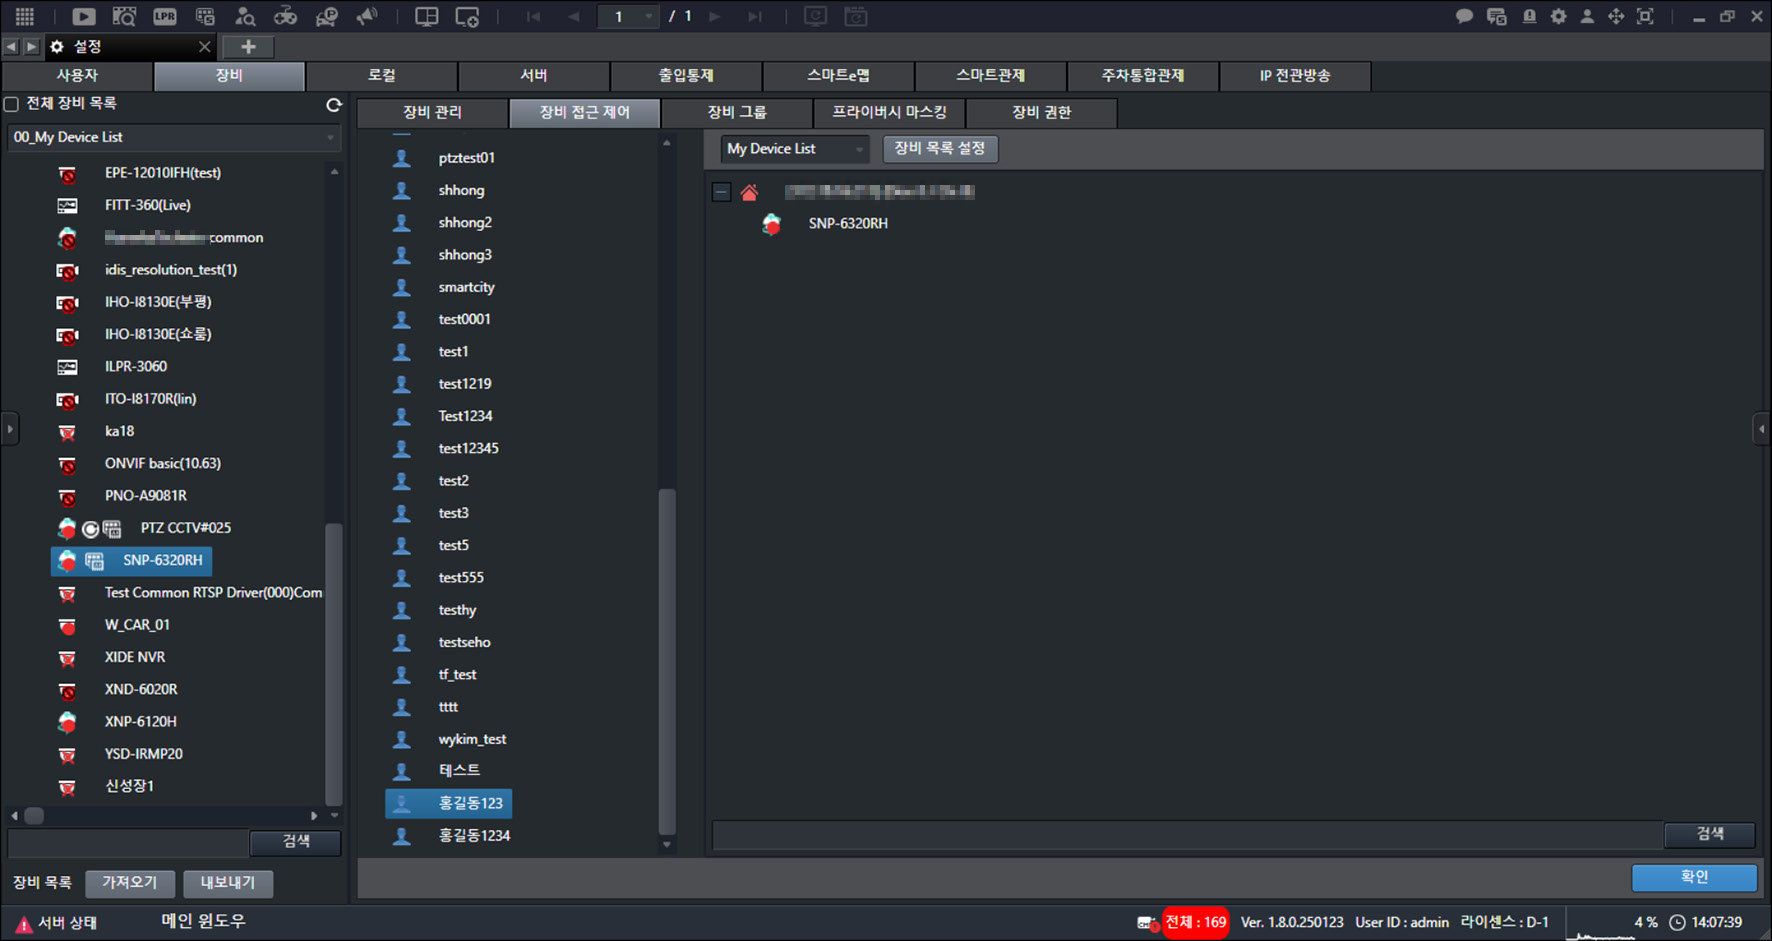
- Select a device.
- Right-click to open the context menu.
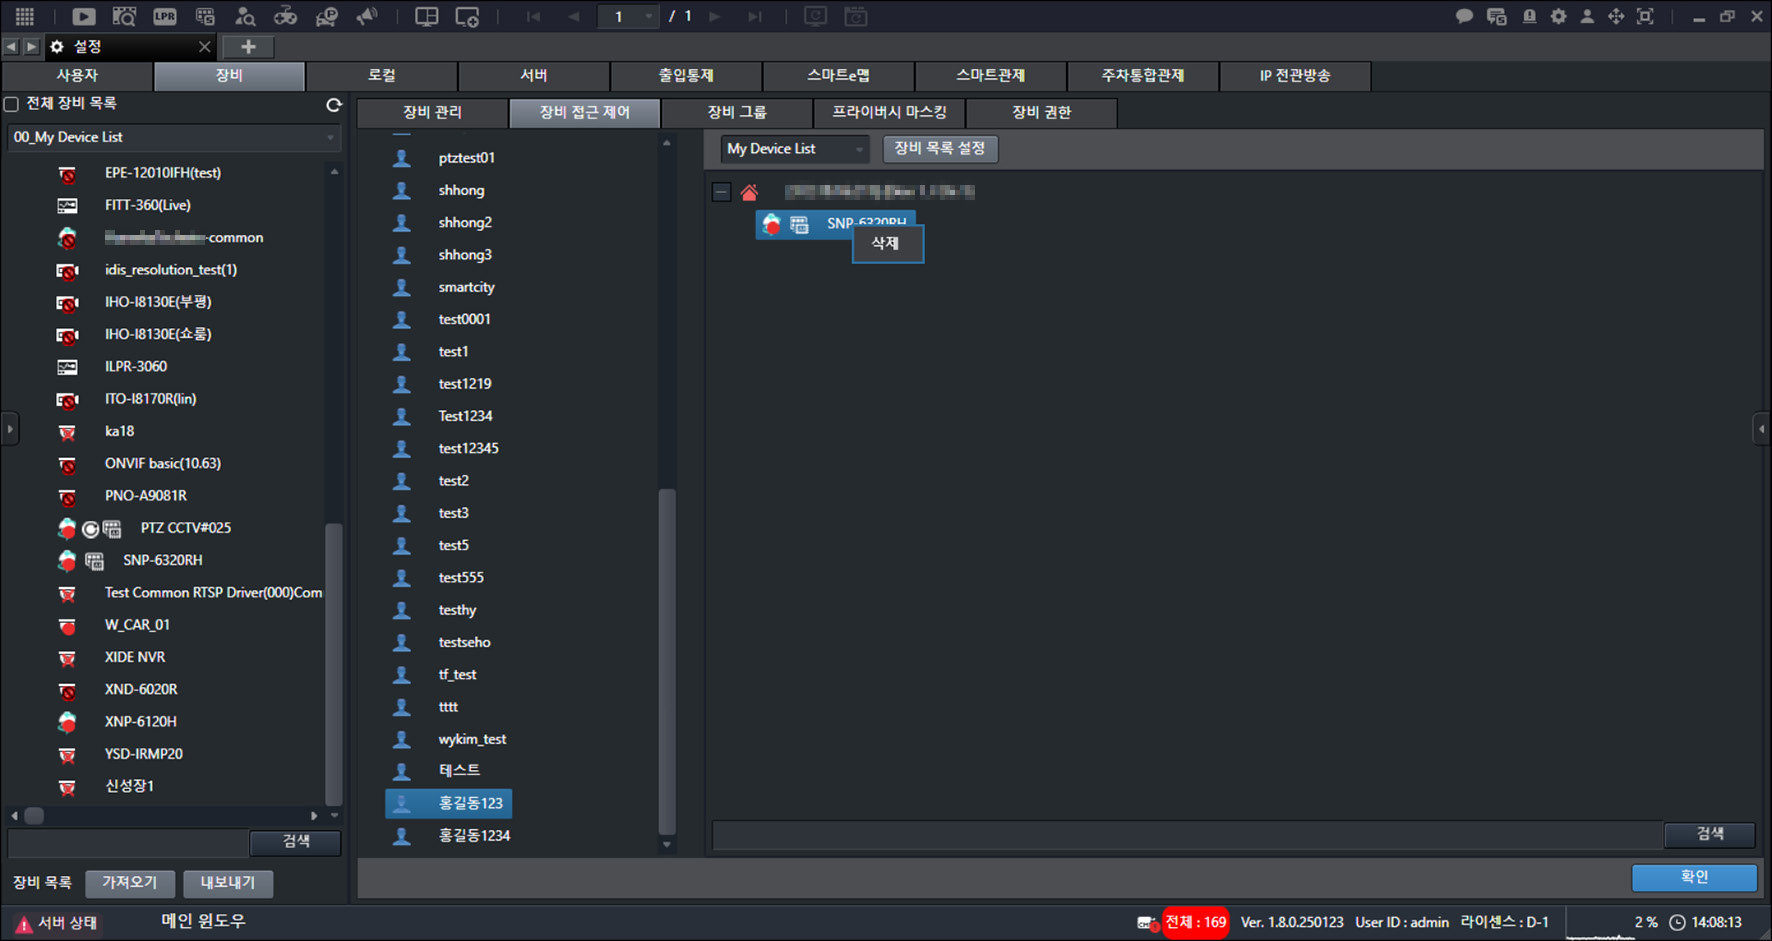
- Click [Delete].
![Click [Delete].](/manual/vurix-admin/images/page74_img1.jpg)
- Click [Yes].
![Click [Yes].](/manual/vurix-admin/images/page74_img2.jpg)
- Click [Yes] > [OK].
Assigning devices to multiple user accounts
Assigns a device.
- On the main screen, select [] > [Devices] > [Device Access Control].
![On the main screen, select [{{icon:cog-frame}}] > [Devices] > [Device Access Control].](/manual/vurix-admin/images/page75_img1.jpg)
- Select a user account.
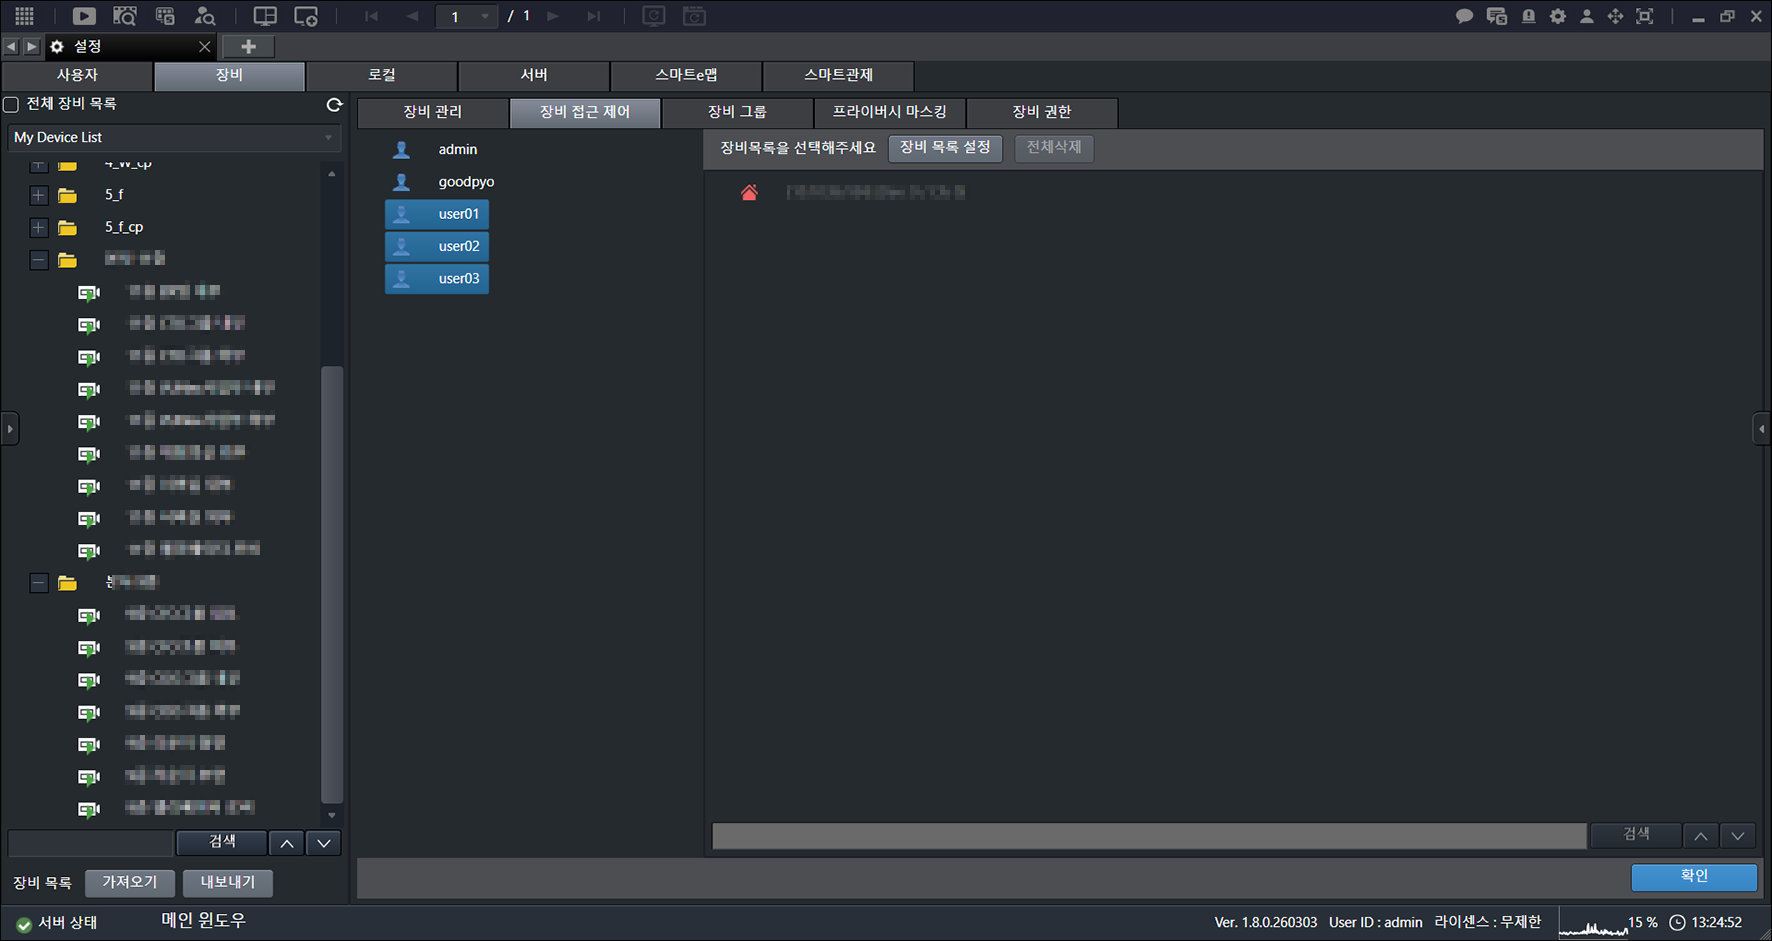
- Click [Device List Settings].
![Click [Device List Settings].](/manual/vurix-admin/images/page76_img1.jpg)
- Click [OK].
- Select a device.
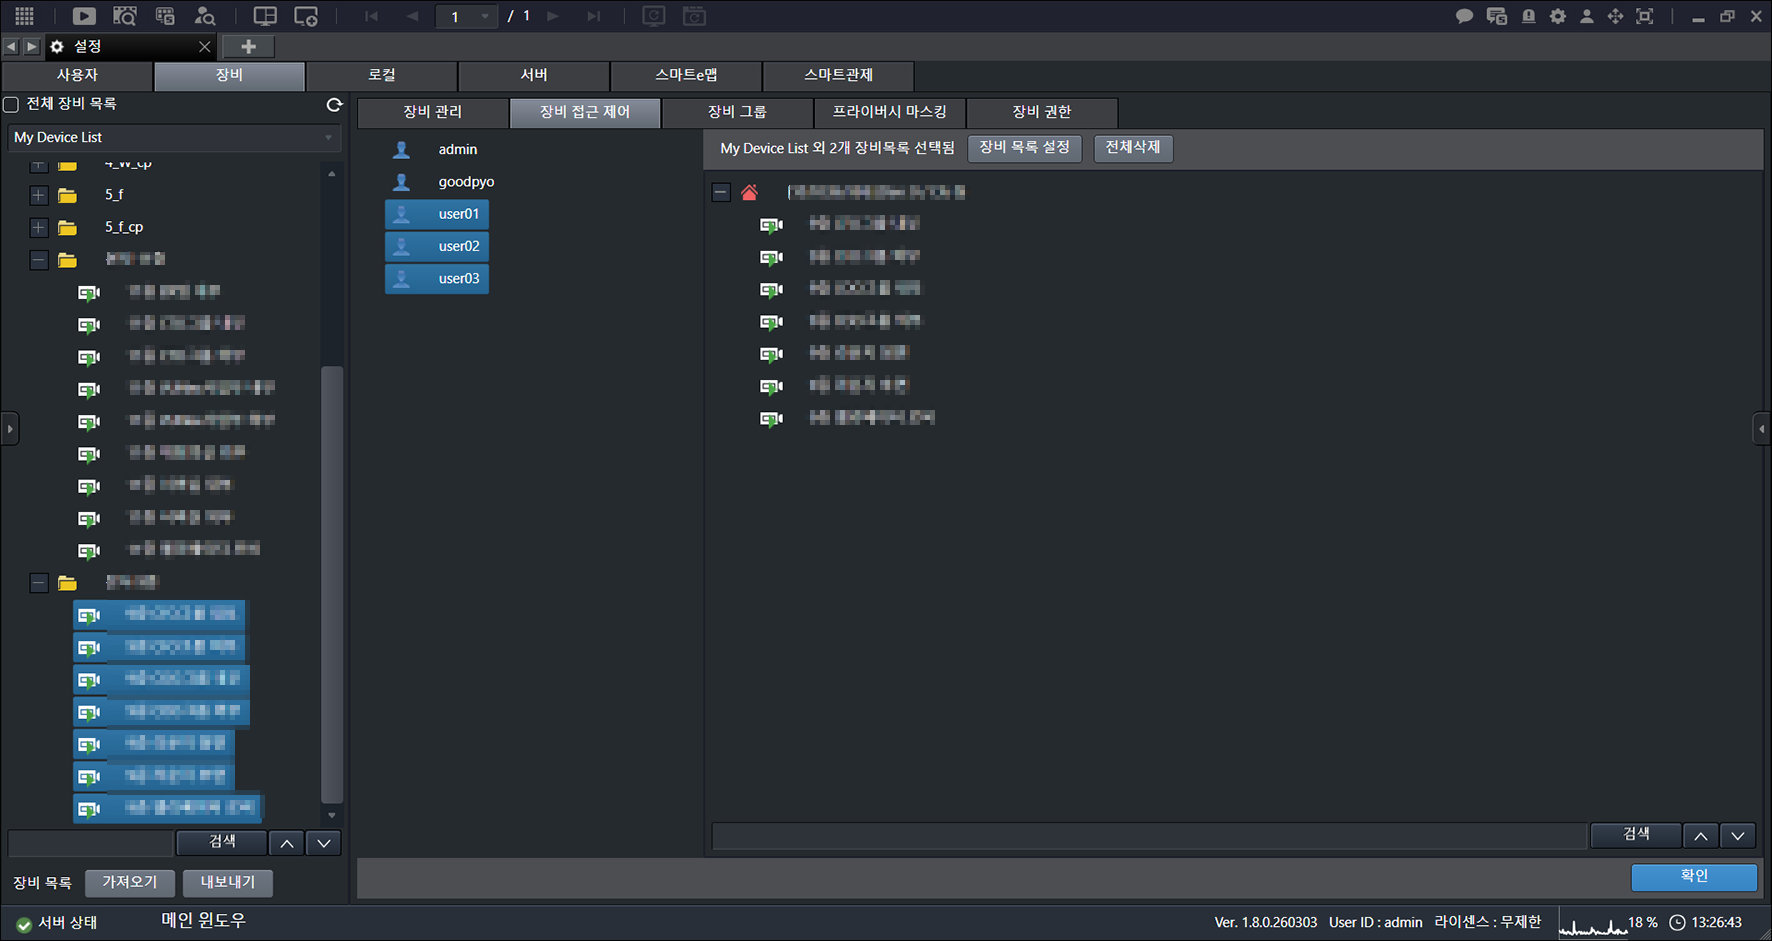
- Drag to the right while holding the mouse button.
- Click [OK].
![Click [OK].](/manual/vurix-admin/images/page77_img1.jpg)
- Click [OK].
![Click [OK].](/manual/vurix-admin/images/page77_img2.jpg)
Deleting all devices from multiple user accounts
Deletes the device.
- On the main screen, select [] > [Devices] > [Device Access Control].
- Select a user account.
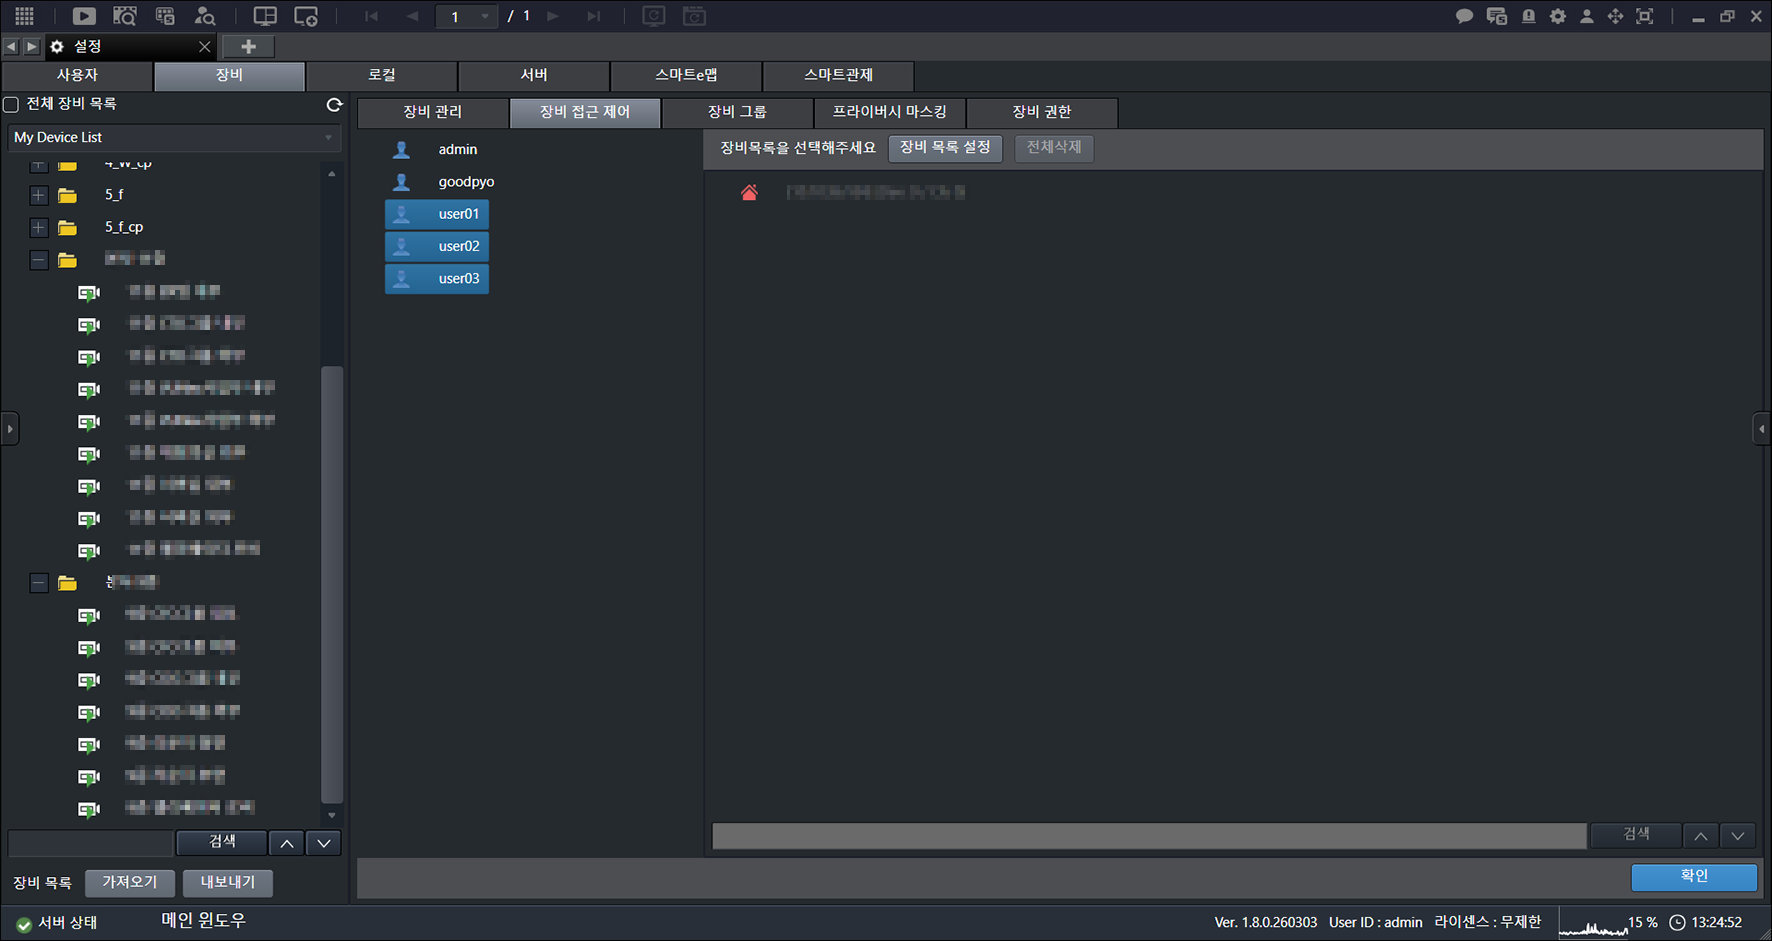
- Click [Device List Settings].
![Click [Device List Settings].](/manual/vurix-admin/images/page78_img2.jpg)
- Click [OK].
![Click [OK].](/manual/vurix-admin/images/page79_img1.jpg)
- Click [Delete All].
![Click [Delete All].](/manual/vurix-admin/images/page79_img2.jpg)
- Click [OK].
Device Group
Only administrator accounts can set [Device Groups].
Add Device Group
Adds a group.
- On the main screen, select [] > [Devices] > [Device Groups].
![On the main screen, select [{{icon:cog-frame}}] > [Devices] > [Device Groups].](/manual/vurix-admin/images/page80_img1.jpg)
- Click [Add].
![Click [Add].](/manual/vurix-admin/images/page80_img2.jpg)
- Enter a name.
- Click [OK].
- Select a group.
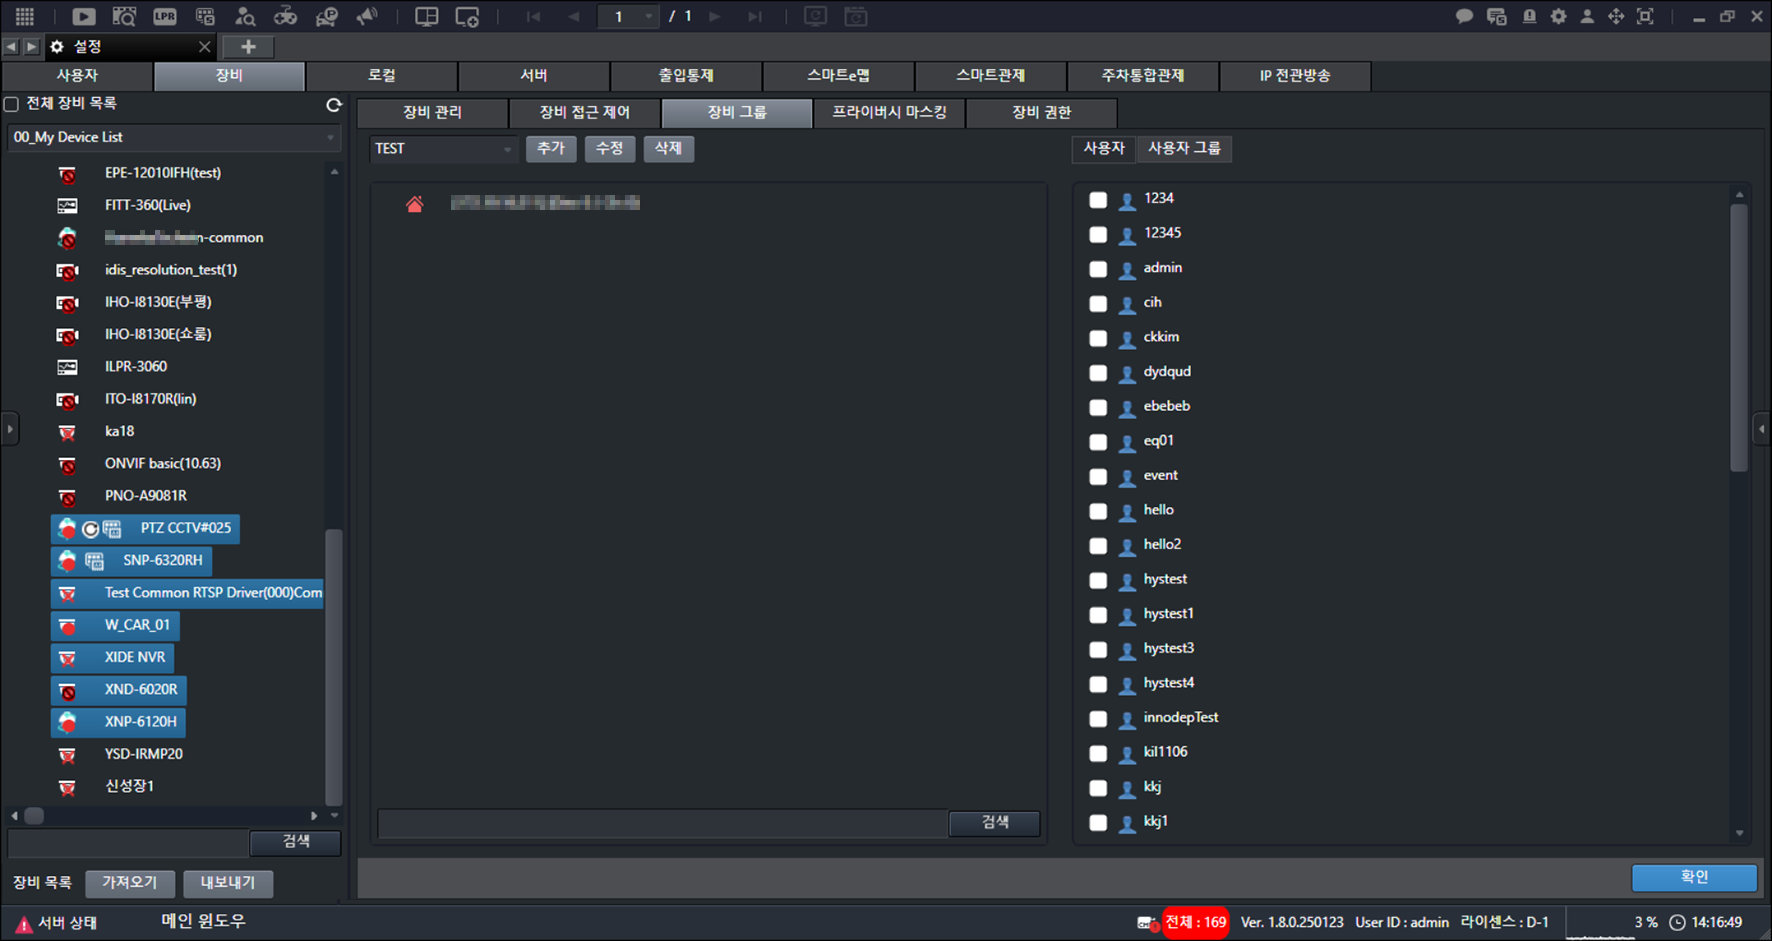
- Drag to the right while holding the mouse button.
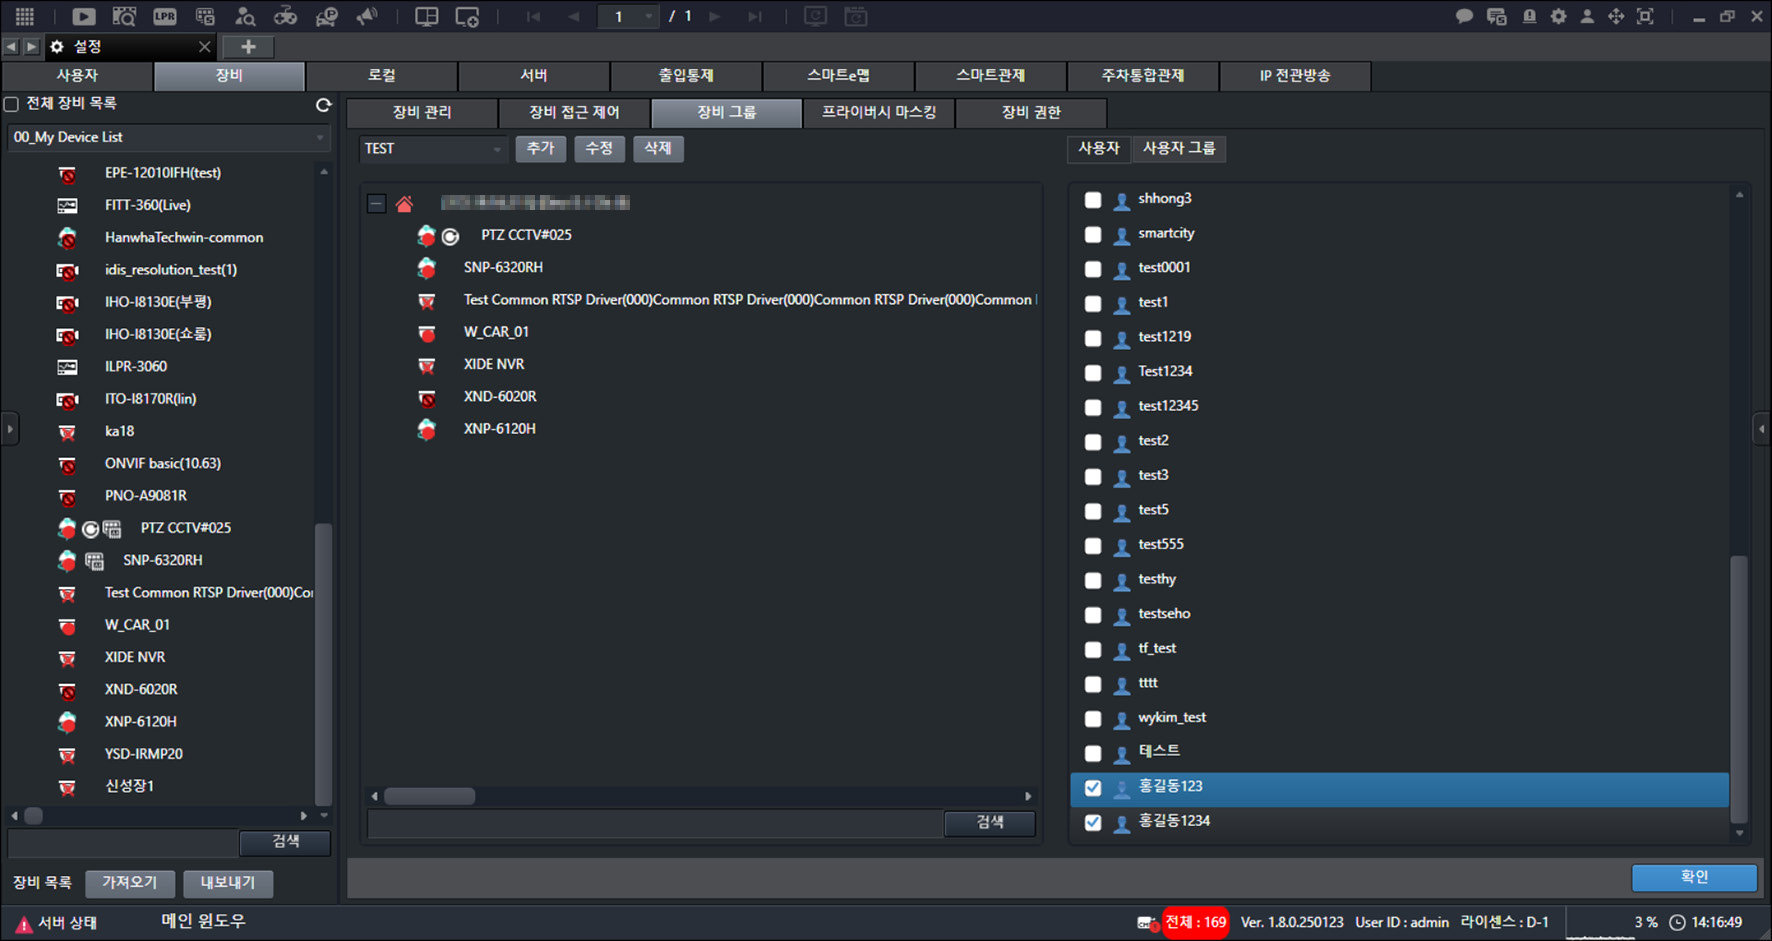
- Select a user account.
- Click [OK].
Delete Device Group
Deletes the group.
- On the main screen, select [] > [Devices] > [Device Groups].
- Select a group.
- Click [Delete].
![Click [Delete].](/manual/vurix-admin/images/page82_img1.jpg)
- Click [Yes] > [OK].
Privacy Masking
Set privacy masking areas depending on the device.
- On the main screen, select [] > [Device] > [Privacy masking].
- Select a device.
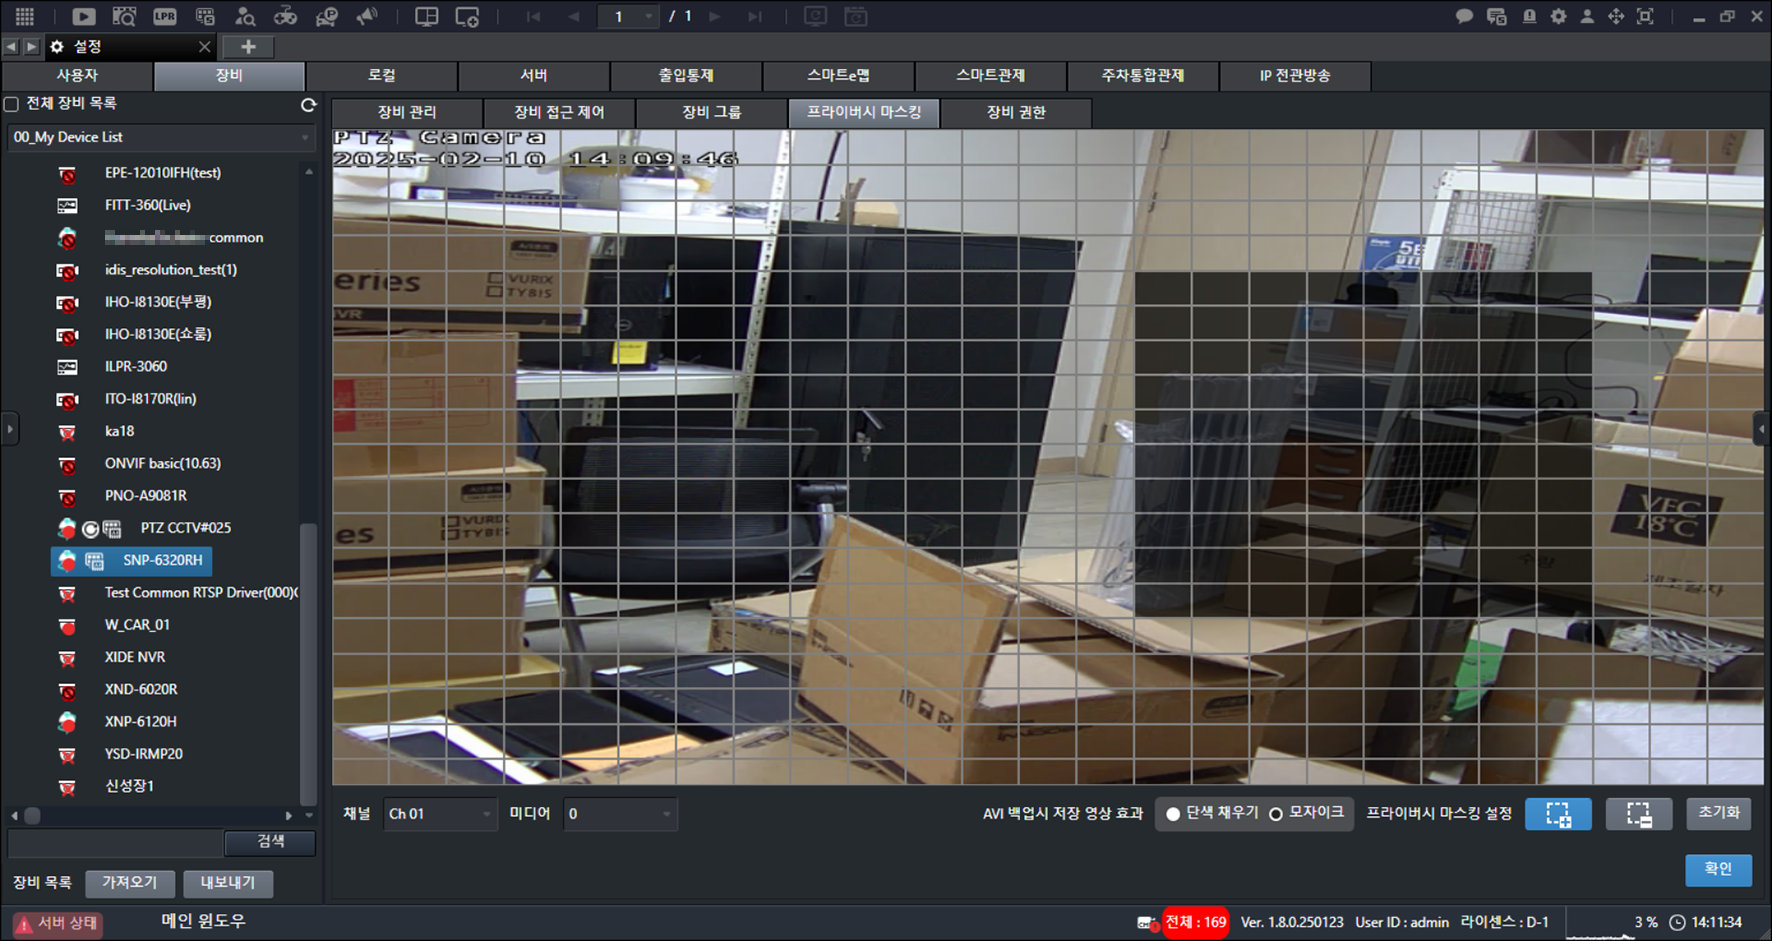
- Hold down the mouse button and move in the direction you want.
- Select the item you want.
- [Saved Video Effect for AVI Backup]: Set options such as [Solid Fill] and [Mosaic].
- [Privacy Masking Settings]: Set the privacy masking area.
- [Reset]: Reset the settings.
- Click [OK].
![Click [OK].](/manual/vurix-admin/images/page84_img1.jpg)
Device Permissions
Only administrator accounts can set [Device Permissions].
Setting PTZ Device Control Permissions
Set device permissions.
- On the main screen, select [] > [Device] > [Device permissions].
- Select a user account.
- Click [Use Per-Device Permissions].
- Select a device.
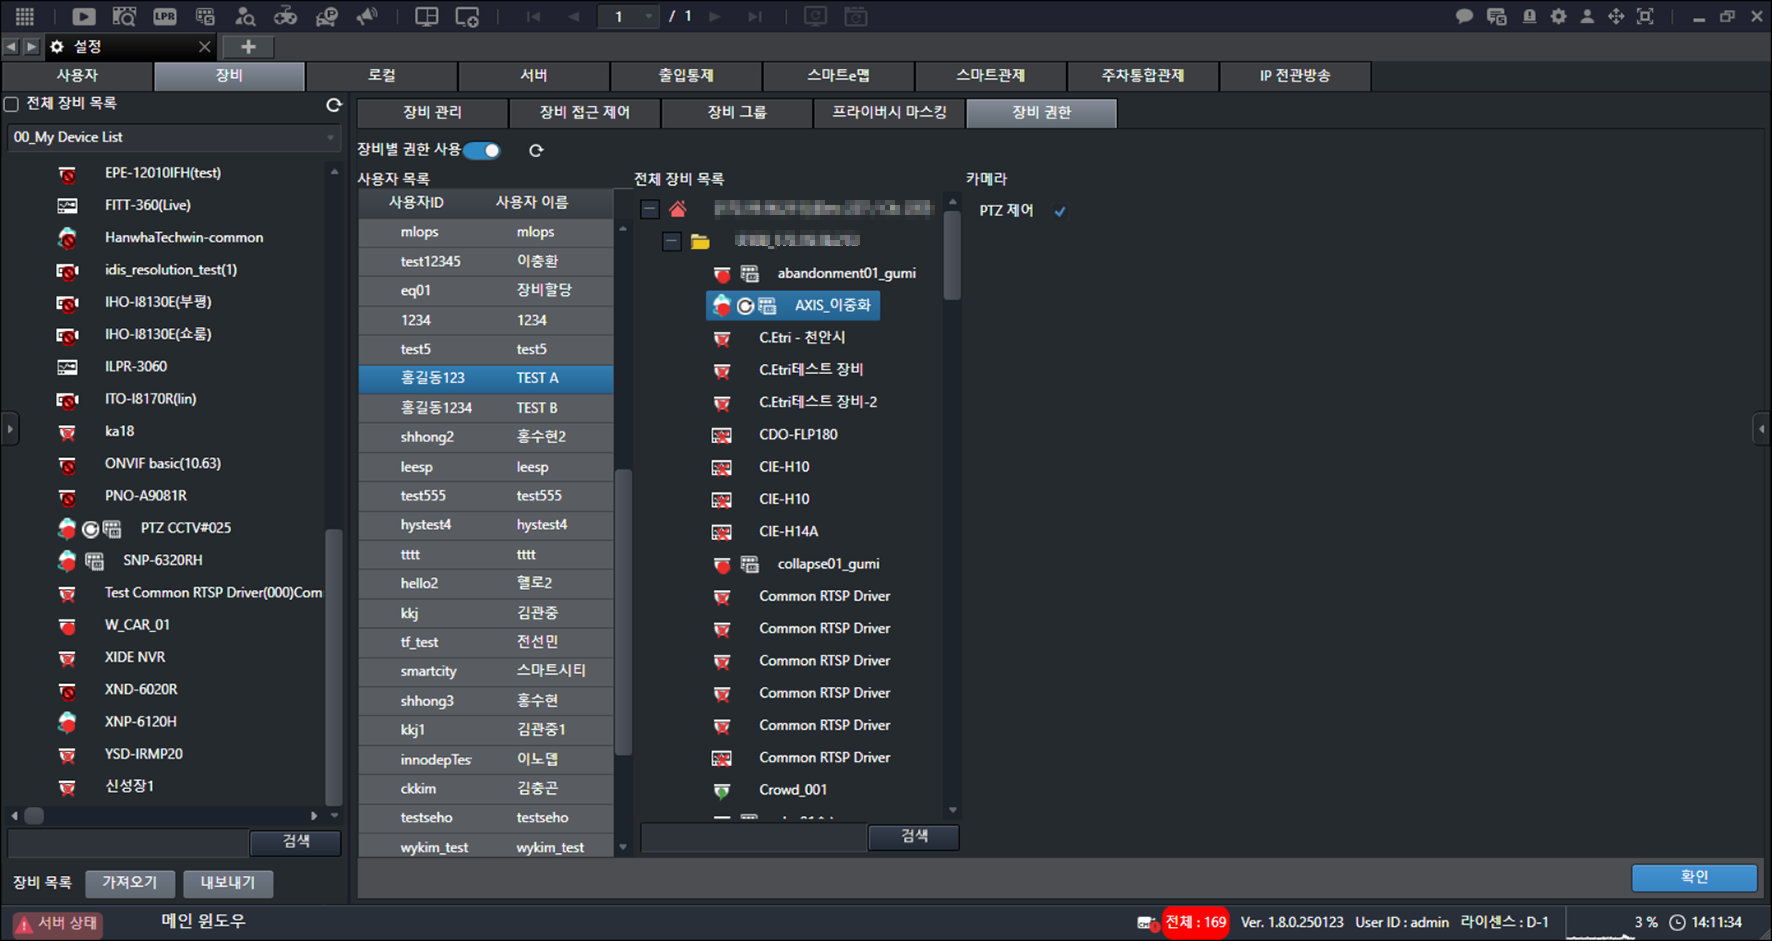
- Click [Camera] > [PTZ Control].
- Click [OK].
- Restart the program to finish applying the settings.
Export or Import Devices
Export the equipment list saved in the program, or import it into the program.
- On the main screen, select [] > [Devices] > [Device Management].
- Click [Export].
- Click [Device Tree Page] > [].
![Click [Device Tree Page] > [{{icon:cog-frame}}].](/manual/vurix-admin/images/page86_img1.jpg)
- Select the item you want.
- Click [Load].
![Click [Load].](/manual/vurix-admin/images/page86_img2.jpg)
- Click [Export] > [OK].
Local settings
Configuring Local Settings
Configuring Local Settings
The screens shown in this guide may differ from the actual product.
- On the main screen, select [] > [Local]. The local settings screen appears.
![On the main screen, select [{{icon:cog-frame}}] > [Local]. The local settings screen appears.](/manual/vurix-admin/images/page88_img1.jpg)
- Select the item you want.
- [Local] settings require the [Client management] permission.
- On the user settings screen, select a user and select [Permission group] > [Management] > [Client management].
Local environment settings
Set the client environment, including language, background image, and hardware codec.
- On the main screen, select [] > [Local].
![On the main screen, select [{{icon:cog-frame}}] > [Local].](/manual/vurix-admin/images/page89_img1.jpg)
- Select the item you want.
- [Language]: Set the language.
- [Search screen version]: Set the recorded video search mode.
- [Default background image] / [Connection attempt image] / [Disconnected image] / [Inactive image]: Set the background screen images.
- [File save path]: Set the file save path.
- [Log level]: Set the log level.
- [Use hardware codec]: Set whether to use the hardware codec.
- [Use expansion animation]: Set whether to use expansion animation.
- [Save login information]: Set whether to save login information.
- [Use login information security]: Set whether to use login information security.
- [Joystick settings]: Set the joystick.
- [FTP settings]: Set the FTP server information.
- [UCP settings]: Set UCP by integrating with the unified platform.
- [Fault history registration settings]: Set the server information for registering fault history.
- [Watermark settings]: Set watermark display on saved images.
- [AVI file maximum size]: Set the maximum size of saved AVI files.
- [Live video playback control]: Set whether to use live video playback control.
- [Font settings when saving images]: Set the typeface and attributes displayed on saved images.
- [Event pop-up bottom display]: Set the information to display at the bottom of the event pop-up.
- [Video quality selection]: Set the video quality.
- [Event thumbnail log]: Set whether to use the event thumbnail log.
- [Live cell top/bottom menu display method]: Set how menus are displayed at the top and bottom of the live video screen.
- [Beacon light settings]: Set whether to use the beacon light.
- [Live video tab maximum cell count]: Set the number of devices that can be displayed on the live video tab.
- [Fault status pop-up settings]: When a server fault occurs, set the fault notification window and alarm sound.
- [Dual stream settings]: Set [Auto quality conversion], [Split screen count], [Fixed high quality], and more.
- [ONVIF search type]: Set the Open Network Video Interface (ONVIF) search type.
- [Use NVR maximum connection option]: Set whether to use the NVR maximum connection option.
- Click [OK].
- Restart the program to finish applying the settings.
- When setting UCP by integrating with the unified platform, enter the URL provided by the unified platform.
- Enable the [UCP] button on the video screen.
Set Language
Set the language.
- On the main screen, select [] > [Local].
- Select [Language].
![Select [Language].](/manual/vurix-admin/images/page92_img1.jpg)
- Click [OK].
- Restart the program to finish applying the settings.
Changing the recorded video search mode
Set the recorded video search mode.
- On the main screen, select [] > [Local].
![On the main screen, select [{{icon:cog-frame}}] > [Local].](/manual/vurix-admin/images/page93_img1.jpg)
- Select [Search Screen Version].
- [Basic]: Set to basic mode.
- [Advanced]: Set to advanced mode.
- Click [OK].
- Restart the program to finish applying the settings.
- Supported features may vary depending on your license and device specifications.
- [Advanced] does not work on recording servers earlier than version 1.7.4.
- Recording servers earlier than version 1.7.4 can use [Advanced] after reinstallation.
- [Advanced] does not support port forwarding.
- [Advanced] requires port 7005 for communication between the recording server and the client.
- [Advanced] requires at least 6 GB of memory.
Setting Hardware Codec Usage
Set hardware codec usage.
A hardware codec is dedicated hardware acceleration
equipment that encodes (compresses) and decodes (decompresses) video and audio data.
- On the main screen, select [] > [Local].
![On the main screen, select [{{icon:cog-frame}}] > [Local].](/manual/vurix-admin/images/page94_img1.jpg)
- Select [Use Hardware Codec].
- [Software]: Use a CPU-based decoder.
- [QSV]: Use QSV.
- [NVDEC]: Use NVDEC.
- Select [Scaler Version].
![Select [Scaler Version].](/manual/vurix-admin/images/page94_img2.jpg)
- Click [OK].
- Restart the program to finish applying the settings.
- Supported features may vary depending on your license and device specifications.
- When [Use hardware codec] is set, [Allocation settings] is enabled.
- Select the allocation count, or set it automatically according to the PC specifications.
- When [Use hardware codec] is set, [QSV] or [NVDEC] is shown in the video information.
- [Scaler ver.1] and [Scaler ver.2] use different libraries.
- [Scaler ver.3] uses the FFmpeg scaler.
Server Settings
Configuring the Server
Configuring the Server
The screens shown in this guide may differ from the actual product.
- On the main screen, select [] > [Server]. The server settings screen appears.
![On the main screen, select [{{icon:cog-frame}}] > [Server]. The server settings screen appears.](/manual/vurix-admin/images/page97_img1.jpg)
- Select the item you want.
- [Server] settings require the [Server management] permission.
- On the user settings screen, select [User settings] > [Permission group] > [Management] > [Server management].
Server Environment Settings
Set the server environment, including server settings, redundancy, failover settings, and database settings.
Configure Server Environment
Configures the server.
- On the main screen, select [] > [Server].
![On the main screen, select [{{icon:cog-frame}}] > [Server].](/manual/vurix-admin/images/page98_img1.jpg)
- Select [Recording Server List].
- Set [Storage Path].
- Select the item you want.
- [Use engine]: Set whether to use the recording server DB engine.
- [Limit options]: Set the limit options.
- [Port]: Set the ports.
- [Other options]: Set other options.
- [Run mode]: Set the run mode.
- [LPR image save path]: Set the LPR image save path.
- [Image save path]: Set the image save path.
- [Secondary storage]: Set whether to use secondary storage.
- Click [Apply].
- Restart the program to finish applying the settings.
- When operating 5 recording servers, assign 1 storage failover server (5:1 ratio).
- We recommend operating a storage failover server for contingency.
Running the recording service
Set recording service execution.
- On the main screen, select [] > [Server].
![On the main screen, select [{{icon:cog-frame}}] > [Server].](/manual/vurix-admin/images/page100_img1.jpg)
- Select the item you want.
- Right-click to open the context menu.
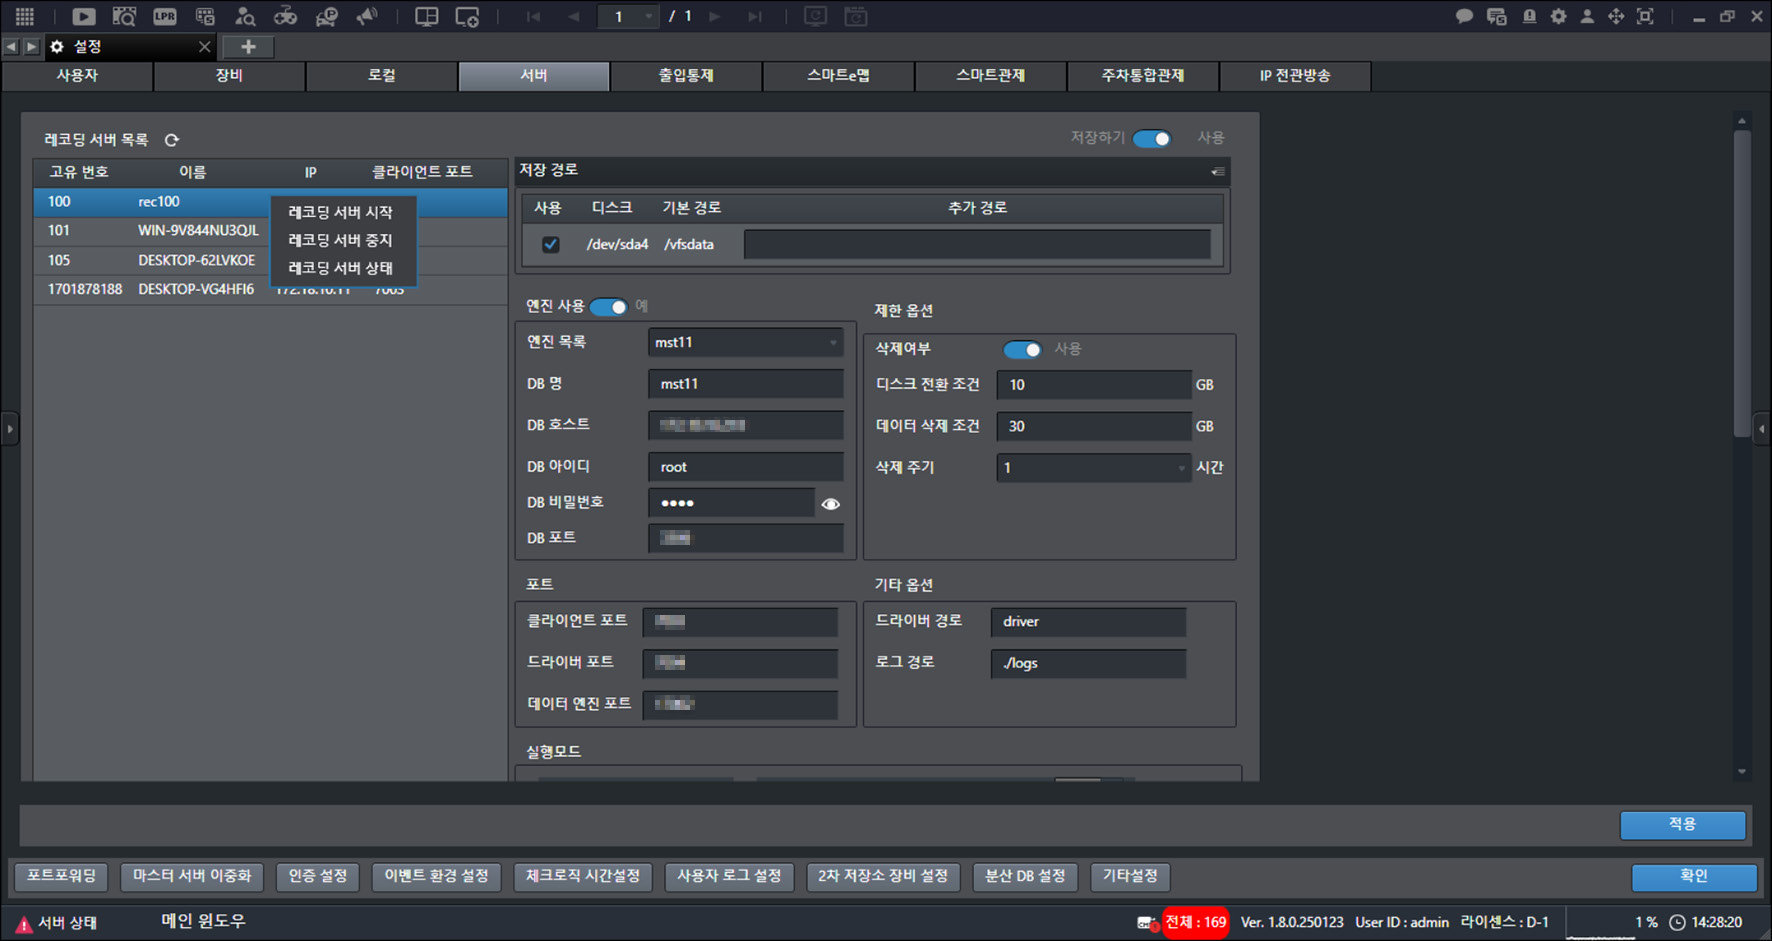
- Click [Start Recording Server].
- Click [Stop recording server]. Stops the running recording service.
- Click [Recording server status]. Check the information.
Port Forwarding Settings
When connecting from outside, configure port forwarding.
Only an administrator account can configure [Port Forwarding].
Setting master server port forwarding
Set master server port forwarding.
- On the main screen, select [] > [Server] > [Port Forwarding].
![On the main screen, select [{{icon:cog-frame}}] > [Server] > [Port Forwarding].](/manual/vurix-admin/images/page102_img1.jpg)
- Click [Add Group] > [Edit].
![Click [Add Group] > [Edit].](/manual/vurix-admin/images/page102_img2.jpg)
- Select a server.
- Click [OK].
![Click [OK].](/manual/vurix-admin/images/page103_img1.jpg)
- Enter the [Group Description].
- Click [Add].
![Click [Add].](/manual/vurix-admin/images/page103_img2.jpg)
- Click [Apply] > [OK] > [Apply].
- Restart the program to finish applying the settings.
- Click [Update]. Updates the information.
- Click [Delete]. Deletes the information.
Setting recording server port forwarding
Set recording server port forwarding.
- On the main screen, select [] > [Server] > [Port Forwarding].
![On the main screen, select [{{icon:cog-frame}}] > [Server] > [Port Forwarding].](/manual/vurix-admin/images/page104_img1.jpg)
- Click [Add Rule] > [Group].
![Click [Add Rule] > [Group].](/manual/vurix-admin/images/page104_img2.jpg)
- Select a group.
- Click [Edit].
![Click [Edit].](/manual/vurix-admin/images/page105_img1.jpg)
- Select a server.
- Click [OK].
- Enter the [Rule Description].
- Click [Add].
![Click [Add].](/manual/vurix-admin/images/page105_img2.jpg)
- Click [Apply] > [OK] > [Apply].
- Restart the program to finish applying the settings.
- Click [Update]. Updates the information.
- Click [Delete]. Deletes the information.
Master server redundancy settings
Set up master server redundancy for uninterrupted service.
[Master Server Redundancy] settings are available for admin accounts only.
- On the main screen, select [] > [Server] > [Master server redundancy].
![On the main screen, select [{{icon:cog-frame}}] > [Server] > [Master server redundancy].](/manual/vurix-admin/images/page107_img1.jpg)
- Enter the [IP] and [Port].
- Click [Apply] > [OK] > [Apply].
- Restart the program to finish applying the settings.
Login authentication settings
Strengthen or relax authentication settings for security.
[Authentication Settings] is available only to administrator accounts.
- On the main screen, select [] > [Server] > [Authentication settings].
![On the main screen, select [{{icon:cog-frame}}] > [Server] > [Authentication settings].](/manual/vurix-admin/images/page108_img1.jpg)
- Select the item you want.
- [Reset mode]: Set to [ON] or [OFF].
- [Wait time on failure]: Set the wait time when the login failure limit is exceeded.
- [Password reset interval]: Set the password reset interval.
- [Login failure limit]: Set the login failure limit count.
- [IP filtering settings]: Set IP filtering.
- [IP list]: Add or remove IP addresses from the [Whitelist] or [Blacklist].
- Click [Apply] > [OK] > [Apply].
- Restart the program to finish applying the settings.
Event Preferences
Only administrator accounts can use [Event Preferences].
- On the main screen, select [] > [Server] > [Event environment settings].
![On the main screen, select [{{icon:cog-frame}}] > [Server] > [Event environment settings].](/manual/vurix-admin/images/page110_img1.jpg)
- Select the item you want.
- [Duplicate RAW Event Storage]: Enable duplicate storage of LPR events in the 'raw_lpr_event' and 'raw_event'
- [RAW Event Retention Days]: Set the duplicate storage period for all LPR event-related tables.
- [User Event Retention Days]: Set the retention period for user events.
- Click [Apply] > [OK] > [Apply].
- Restart the program to finish applying the settings.
Check Logic Time Settings
The driver reconnection check logic verifies at the specified interval that cameras are properly connected to the driver.
It instructs reconnection for disconnected cameras.
Only administrator accounts can set [Check logic time settings].
- On the main screen, select [] > [Server] > [Check logic time settings].
![On the main screen, select [{{icon:cog-frame}}] > [Server] > [Check logic time settings].](/manual/vurix-admin/images/page111_img1.jpg)
- Select a server.
- Set [Time Settings].
- Click [OK] > [Apply].
- Restart the program to finish applying the settings.
User Log Storage Settings
Configure saving of activity logs for user accounts.
[User Log Settings] is available only to administrator accounts.
- On the main screen, select [] > [Server] > [User log settings].
![On the main screen, select [{{icon:cog-frame}}] > [Server] > [User log settings].](/manual/vurix-admin/images/page112_img1.jpg)
- Select [Log Retention Period].
- Configure [DB Capacity Exceeded Notification Settings].
- Click [Apply] > [OK] > [Apply].
- Restart the program to finish applying the settings.
Secondary Storage Device Settings
Secondary storage is a separate repository connected outside the system.
Configure secondary storage devices.
Only administrator accounts can use [Secondary Storage Device Settings].
- On the main screen, select [] > [Server] > [Secondary storage device settings].
![On the main screen, select [{{icon:cog-frame}}] > [Server] > [Secondary storage device settings].](/manual/vurix-admin/images/page113_img1.jpg)
- Select the item you want.
- [Device]: Select the device for secondary storage.
- [Job status]: Set the job status.
- [Secondary storage type]: Select the secondary storage type.
- [Path]: Set the path.
- [Retention period (days)]: Set the retention period.
- [Keep period (days)]: Set the keep period.
- [Timeout (minutes)]: Set the timeout.
- [Host]: Enter the host.
- [Port]: Enter the port.
- [User]: Enter the ID.
- [Password]: Enter the password.
- Click [Apply] > [OK] > [Apply].
- Restart the program to finish applying the settings.
Distributed DB Settings
Configure multiple DB servers to distribute database load.
With [Distributed DB Settings], VFS and EVT DB data for the recording server are stored across distributed servers.
Only administrator accounts can use [Distributed DB Settings].
Add Distributed DB
Set the distributed DB.
- On the main screen, select [] > [Server].
![On the main screen, select [{{icon:cog-frame}}] > [Server].](/manual/vurix-admin/images/page115_img1.jpg)
- Select the item you want.
- [DB Engine List]: Displays the engine list.
- [Target Server]: Select a server.
- [Engine Name] / [Engine Type] / [Engine DB] / [Engine IP] / [Engine Port] / [Engine User (ID)] / [Engine
- Click [Add] > [OK] > [OK] > [Apply].
- Restart the program to finish applying the settings.
- Click [Refresh]. Refreshes the screen.
- Click [Edit] or [Delete]. Edits or deletes the server.
Other Server Settings
Only administrator accounts can use [Other Settings].
- On the main screen, select [] > [Server] > [Other settings].
![On the main screen, select [{{icon:cog-frame}}] > [Server] > [Other settings].](/manual/vurix-admin/images/page116_img1.jpg)
- Select the item you want.
- [FTP Server Settings]: Enable FTP.
- [PTZ Settings]: Set PTZ-related features.
- [Remote Management Service Settings]: Enable remote access.
- [Agent Server Settings]: Enable the Agent server.
- [Audio Save Settings]: Also save audio when saving video.
- [Administrator Access Management]: Manage administrator access.
- [Photo Transfer Settings]: Enable photo transfer.
- [Contact Settings]: Save contact information.
- [Backup Dual Security]: Require a password when saving AVI files.
- [Device Global Settings]: Set items used for detailed device search.
- [Reply Timeout]: Set the reply timeout.
- [WASS Settings]: Enable WASS.
- [System Time Settings]: Enable system time.
- [Additional Device Info Settings]: Set additional device information.
- Click [Apply] > [OK] > [Apply].
- Restart the program to finish applying the settings.
Access Control Settings
Configuring Access Control
Configuring Access Control
The screens shown in this guide may differ from the actual product.
- On the main screen, select [] > [Access control]. The access control settings screen appears.
![On the main screen, select [{{icon:cog-frame}}] > [Access control]. The access control settings screen appears.](/manual/vurix-admin/images/page119_img1.jpg)
- Select the item you want.
Access user
Manage access users, such as searching or adding access users.
Searching Access Users
Search access users.
- On the main screen, select [] > [Access Control] > [Access Users].
- Set the conditions, then click [Search].
![Set the conditions, then click [Search].](/manual/vurix-admin/images/page120_img1.jpg)
- Check the results.
- Click [Import]. Imports the item.
- Click []. Refreshes the screen.
- Click [Delete]. Deletes the item.
Adding Access Users
Add an access user.
- On the main screen, select [] > [Access Control] > [Access Users].
- Click [Add].
![Click [Add].](/manual/vurix-admin/images/page121_img1.jpg)
- Enter the information.
- Set [Status].
- [Blacklist]: Set the blacklist.
- [Expiration period]: Set the expiration period.
- Set [Credential].
- [Verification Level]: Set the verification level.
- [Credential]: Add authentication information.
- Click [OK].
- Restart the program to finish applying the settings.
Access door
Manage access doors, such as searching and adding access doors.
Searching Access Doors
Search access doors.
- On the main screen, select [] > [Access Control] > [Access Doors].
- Set the conditions, then click [Search].
![Set the conditions, then click [Search].](/manual/vurix-admin/images/page122_img1.jpg)
- Check the results.
- Click [Sync]. Synchronizes with the server.
- Click []. Refreshes the screen.
- Click [Delete]. Deletes the item.
Adding Access Doors
Add an access door.
- On the main screen, select [] > [Access Control] > [Access Doors].
- Click [Add].
![Click [Add].](/manual/vurix-admin/images/page123_img1.jpg)
- Enter the information.
- Select [Group].
- Select [Server].
![Select [Server].](/manual/vurix-admin/images/page123_img2.jpg)
- Click [Add Camera].
- Select a device.
- Click [OK].
- Restart the program to finish applying the settings.
Elevator
Manage elevators, including searching for and adding elevators.
Search Elevators
Search for elevators.
- On the main screen, select [] > [Access Control] > [Elevator].
- Set the conditions, then click [Search].
![Set the conditions, then click [Search].](/manual/vurix-admin/images/page125_img1.jpg)
- Check the results.
- Click [Sync]. Synchronizes with the server.
- Click []. Refreshes the screen.
- Click [Delete]. Deletes the item.
Add Elevator
Add an elevator.
- On the main screen, select [] > [Access Control] > [Elevator].
- Click [Add].
![Click [Add].](/manual/vurix-admin/images/page126_img1.jpg)
- Enter the information.
- Select [Group].
- Select [Server].
![Select [Server].](/manual/vurix-admin/images/page126_img2.jpg)
- Set [Total Floors].
- Click [Apply].
- Click [Add Camera].
- Select a device.
- Click [OK].
- Restart the program to finish applying the settings.
Access Control Schedule
Manage access control schedules.
Searching Access Control Schedules
Search schedules.
- On the main screen, select [] > [Access Control] > [Schedules].
- Set the conditions, then click [Search].
![Set the conditions, then click [Search].](/manual/vurix-admin/images/page128_img1.jpg)
- Check the results.
- Click [Sync]. Synchronizes with the server.
- Click []. Refreshes the screen.
- Click [Delete]. Deletes the item.
Adding an Access Control Schedule
Adds a schedule.
- On the main screen, select [] > [Access Control] > [Schedules].
- Click [Add].
![Click [Add].](/manual/vurix-admin/images/page129_img1.jpg)
- Enter the information.
- Select [Enable] or [Disable].
![Select [Enable] or [Disable].](/manual/vurix-admin/images/page129_img2.jpg)
- Set the time and day of the week.
- Click [OK].
- Restart the program to finish applying the settings.
- Displays the schedule in a grid. (1 cell = 30 minutes)
- For [Holiday], select the dates you want as holidays on the calendar.
Access Rule
Manage access rules, such as searching and adding access rules.
Set access rules applied to access doors and elevators to control access.
Searching Access Rules
Search access rules.
- On the main screen, select [] > [Access Control] > [Access Rules].
- Set the conditions, then click [Search].
![Set the conditions, then click [Search].](/manual/vurix-admin/images/page131_img1.jpg)
- Check the results.
- Click [Sync]. Synchronizes with the server.
- Click []. Refreshes the screen.
- Click [Delete]. Deletes the item.
Adding Access Rules
Add access rules.
- On the main screen, select [] > [Access Control] > [Access Rules].
- Click [Add].
![Click [Add].](/manual/vurix-admin/images/page132_img1.jpg)
- Enter the information.
- [Name] / [Description]: Enter information about the rule and level.
- [Access user]: Select the access user.
- [Access level]: Select the access level.
- [Floor level]: Select the floor level.
- Click [OK].
- Click [Access Level] > [Add].
![Click [Access Level] > [Add].](/manual/vurix-admin/images/page133_img1.jpg)
- Enter the information.
- [Name] / [Description]: Enter information about the rule and level.
- [Server]: Select the server.
- [Access door]: Select the access door.
- [Schedule]: Select the schedule.
- Click [OK].
- Click [Floor Level] > [Add].
![Click [Floor Level] > [Add].](/manual/vurix-admin/images/page134_img1.jpg)
- Enter the information.
- [Name] / [Description]: Enter information about the rule and level.
- [Server]: Select the server.
- [Schedule]: Select the schedule.
- [Elevator]: Select the elevator.
- [Floor]: Select the floor.
- Click [OK].
- Restart the program to finish applying the settings.
Access Control Zone
Manage access control zones, such as searching and adding access control zones.
Searching Access Control Zones
Search access control zones.
- On the main screen, select [] > [Access Control] > [Zones].
- Set the conditions, then click [Search].
![Set the conditions, then click [Search].](/manual/vurix-admin/images/page135_img1.jpg)
- Check the results.
- Click [Sync]. Synchronizes with the server.
- Click []. Refreshes the screen.
- Click [Delete]. Deletes the item.
Adding Access Control Zones
Add an access control zone.
- On the main screen, select [] > [Access Control] > [Zones].
- Click [Add].
![Click [Add].](/manual/vurix-admin/images/page136_img1.jpg)
- Enter the information.
- Select [Server].
![Select [Server].](/manual/vurix-admin/images/page136_img2.jpg)
- Set the items you want.
- Click [OK].
- Restart the program to finish applying the settings.
Access Control Equipment
Manage access control equipment.
Registering an Access Control Server
Access control settings are available after registering the access control server.
- On the main screen, select [] > [Access Control] > [Devices].
- Select [].
- Right-click to open the context menu.
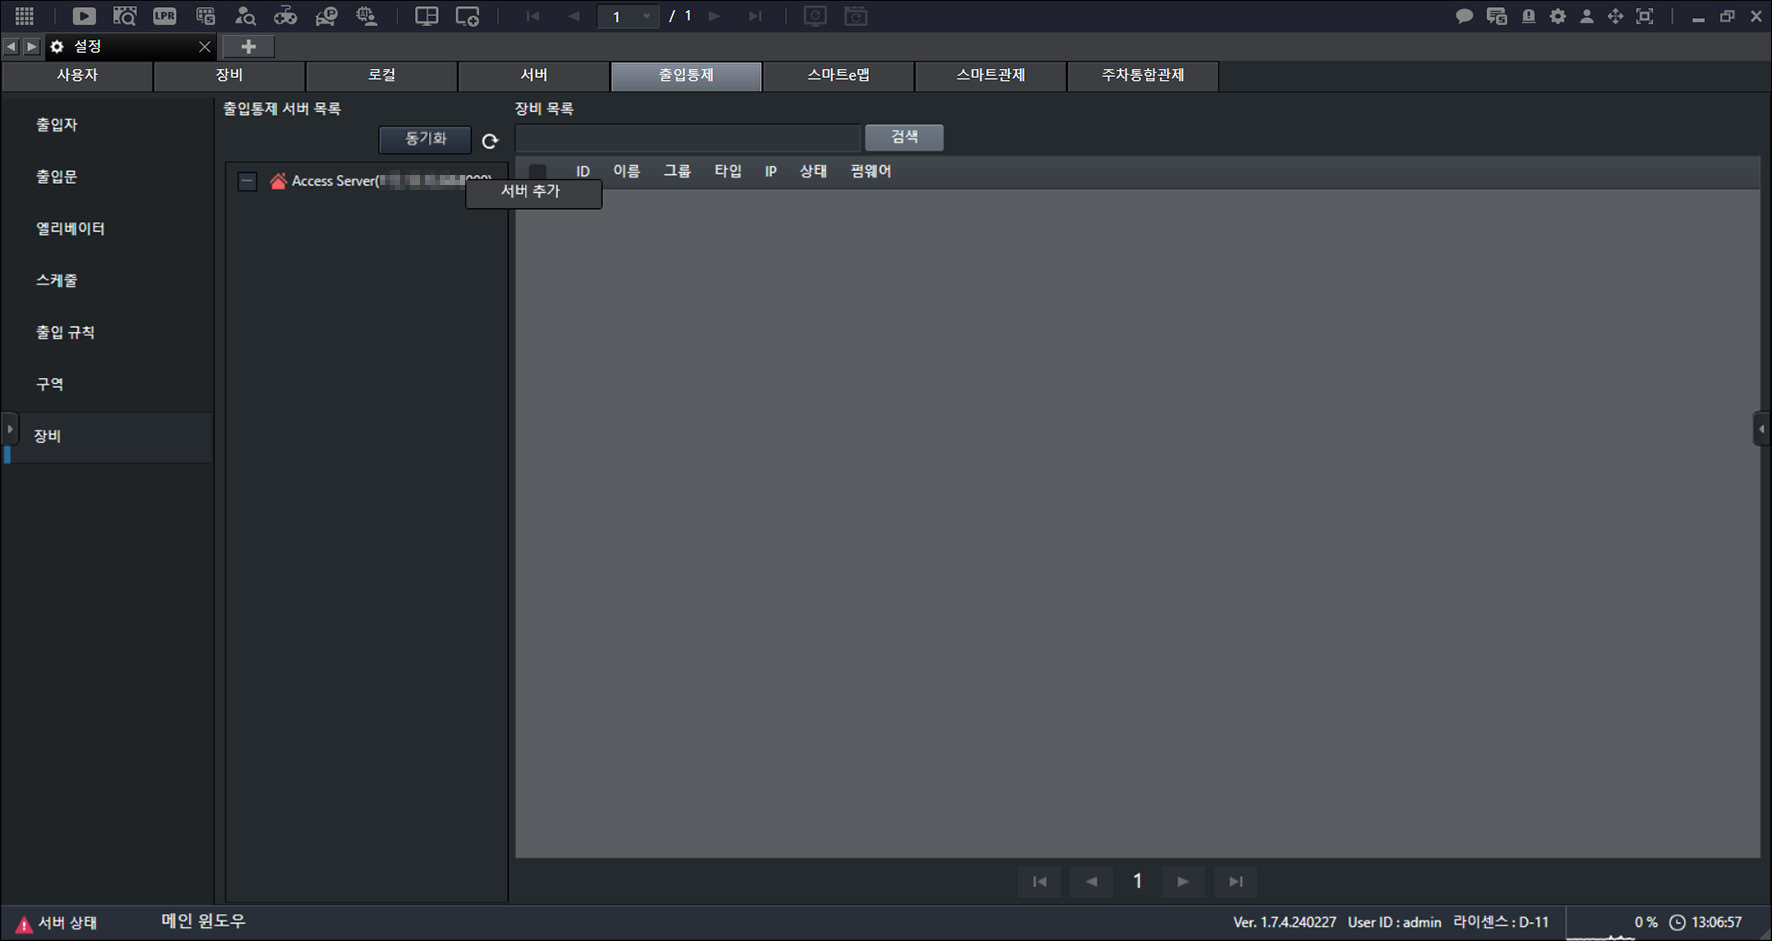
- Click [Add Server].
![Click [Add Server].](/manual/vurix-admin/images/page137_img2.jpg)
- Enter the information.
- [Name]: Enter the name.
- [Manufacturer]: Select the manufacturer.
- [Server IP]: Enter the IP.
- [Port]: Enter the port.
- [ID]: Enter the ID.
- [Password]: Enter the password.
- [Connection method]: Select the server connection method.
- Click [Apply].
- Restart the program to finish applying the settings.
- If you set [ID] to a general user account, access control may not work.
- If [Connection method] differs from the access control server, the server cannot connect.
Searching Access Control Equipment
Search for devices.
- On the main screen, select [] > [Access Control] > [Devices].
- Set the conditions, then click [Search].
![Set the conditions, then click [Search].](/manual/vurix-admin/images/page139_img1.jpg)
- Check the results.
- Click [Sync]. Synchronizes with the server.
- Click []. Refreshes the screen.
- Click [Delete]. Deletes the item.
Adding Access Control Equipment
Adds a device.
- On the main screen, select [] > [Access Control] > [Devices].
![On the main screen, select [{{icon:cog-frame}}] > [Access Control] > [Devices].](/manual/vurix-admin/images/page140_img1.jpg)
- Select a device.
- Right-click to open the context menu.
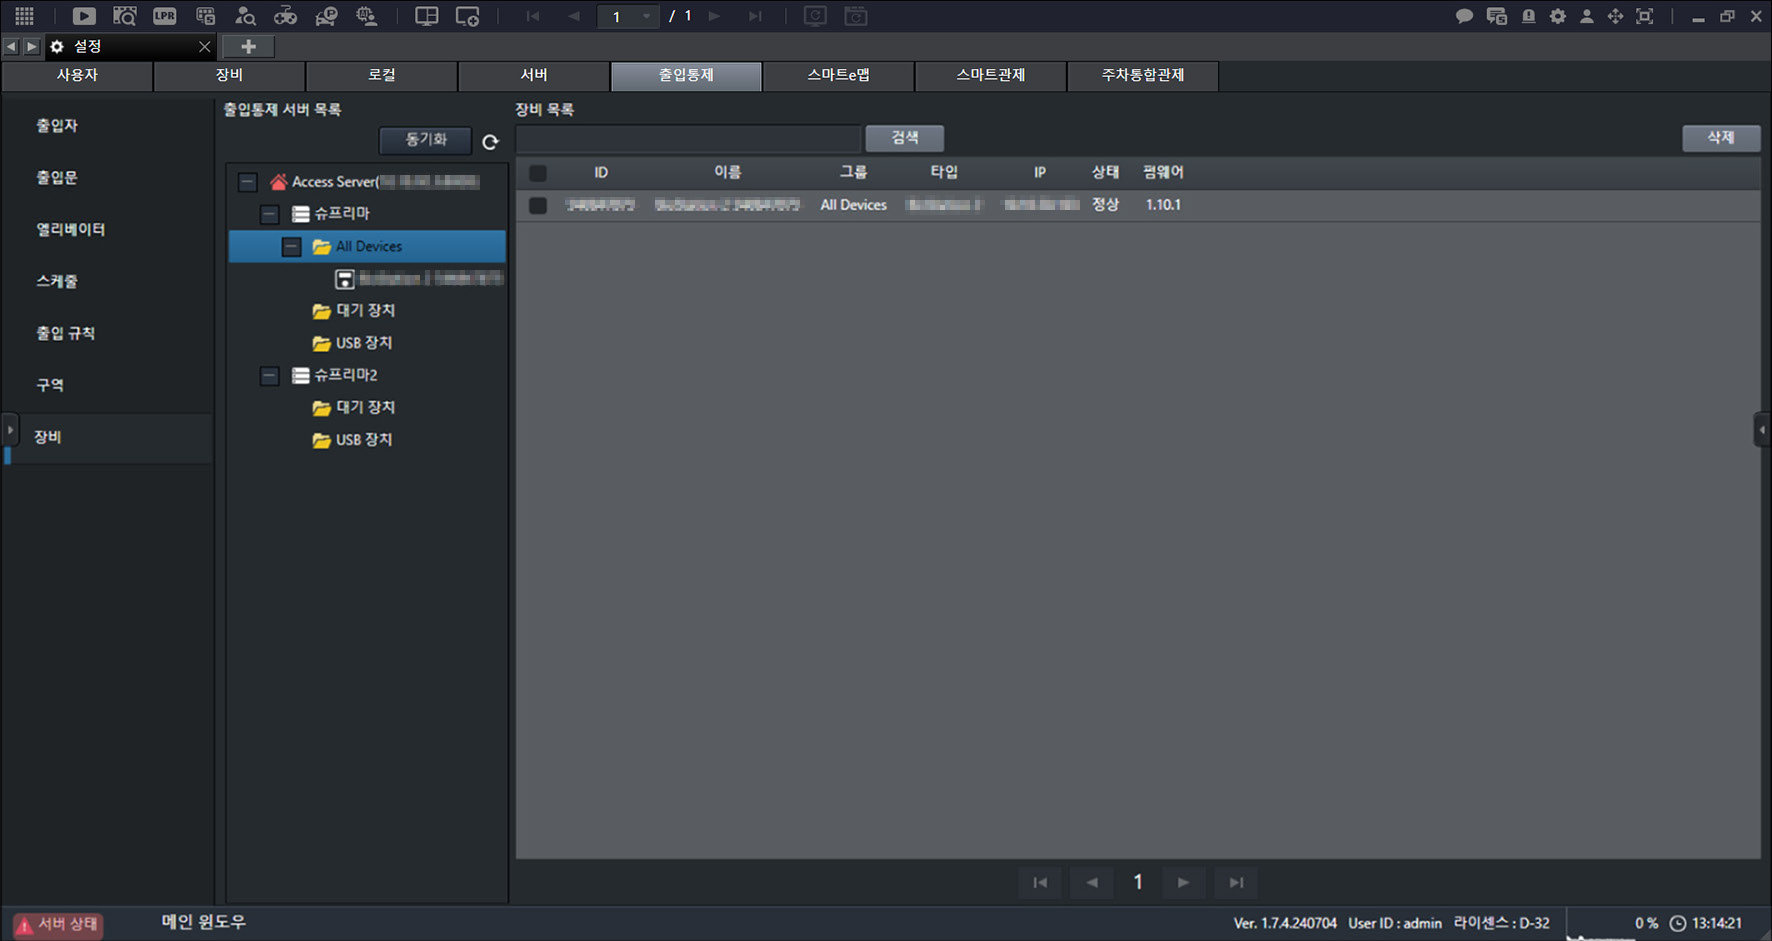
- Click [Add Pending Device].
Smart eMap Settings
Configuring Smart eMap
Configuring Smart eMap
The screens shown in this guide may differ from the actual product.
- On the main screen, select [] > [Smart eMap]. The smart eMap settings screen appears.
![On the main screen, select [{{icon:cog-frame}}] > [Smart eMap]. The smart eMap settings screen appears.](/manual/vurix-admin/images/page143_img1.jpg)
- Select the item you want.
- [Smart eMap] settings require the [E-Map] permission.
- On the user settings screen, select a user and select [Permission group] > [Feature options] > [E-Map].
Smart eMap Preferences
Set the Smart eMap environment, including server connection and proxy settings.
Configure Smart eMap Server
Configures the server.
- On the main screen, select [] > [Smart eMap] > [Basic Settings].
![On the main screen, select [{{icon:cog-frame}}] > [Smart eMap] > [Basic Settings].](/manual/vurix-admin/images/page144_img1.jpg)
- Select the item you want.
- [E-Map]: Set the server.
- [Proxy]: Set the server. Provides indirect access via another network.
- [Offline]: Set offline mode. Uses saved images.
- [Map API Key]: Set the map API key.
- Click [OK].
- Restart the program to finish applying the settings.
Configure Smart eMap Event Monitoring
Configure focused event monitoring.
- On the main screen, select [] > [Smart eMap] > [Basic Settings].
- Click [Focused Event Monitoring].
![Click [Focused Event Monitoring].](/manual/vurix-admin/images/page145_img1.jpg)
- Select the item you want.
- [Move directly to event location]: Moves to the device location where the event occurred on the map.
- [Video pop-up window position]: Set the pop-up window position.
- [Video pop-up window size]: Set the pop-up window size.
- [Video pop-up close condition]: Set the pop-up close condition.
- [Video pop-up playback mode]: Set the pop-up playback mode.
- Click [OK].
- Restart the program to finish applying the settings.
Smart eMap Management
Manage the Smart eMap, such as adding, modifying, or deleting maps.
Search Smart eMap
Search maps.
- On the main screen, select [] > [Smart eMap] > [eMap Management].
- Set the conditions, then click [Search].
![Set the conditions, then click [Search].](/manual/vurix-admin/images/page146_img1.jpg)
- Check the results.
- Click []. Refreshes the screen.
- Click []. Edits the item.
- Click []. Adds an item.
- Click []. Deletes the item.
Add Smart eMap
Add a map.
- On the main screen, select [] > [Smart eMap] > [eMap Management].
- Click [+ New Map].
![Click [+ New Map].](/manual/vurix-admin/images/page147_img1.jpg)
- Enter the information.
- Select [Background].
- [Image]: Select an image.
- [Geographic]: Select a map.
- Click [OK].
Edit Smart eMap
Edit the map.
- On the main screen, select [] > [Smart eMap] > [eMap Management].
![On the main screen, select [{{icon:cog-frame}}] > [Smart eMap] > [eMap Management].](/manual/vurix-admin/images/page148_img1.jpg)
- Click the map.
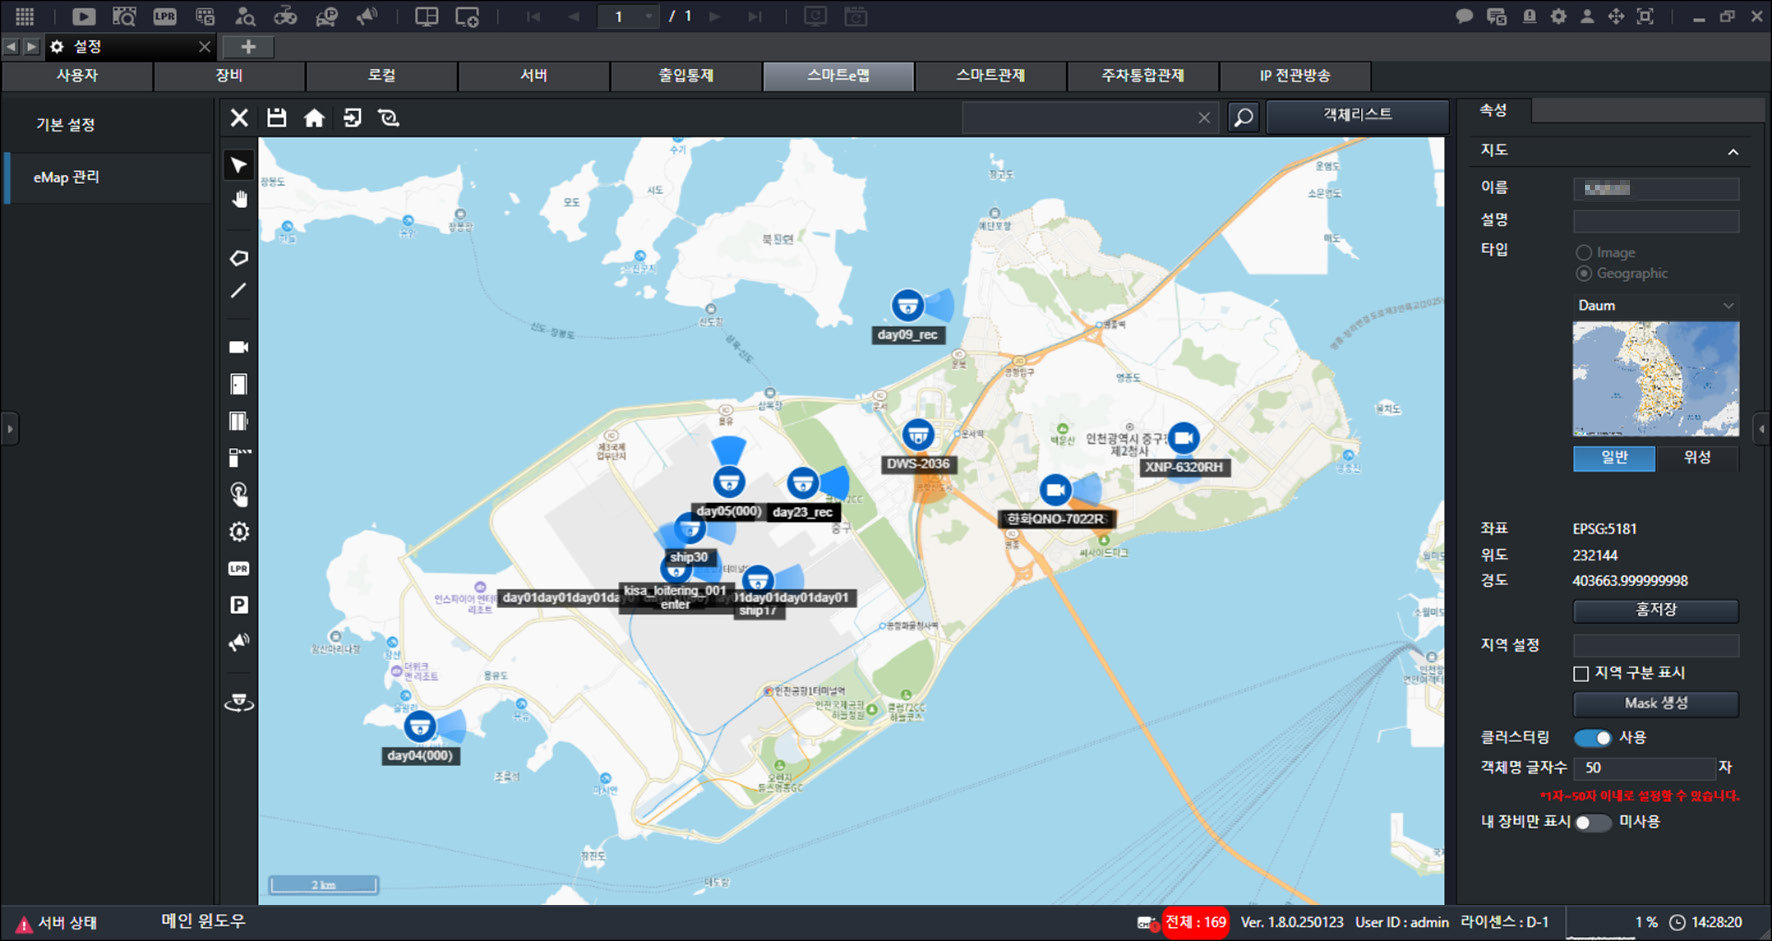
- Select the item you want.
- []: Close the map.
- []: Save the settings.
- []: Move to the home location on the map.
- []: Import devices.
- []: Update device location information.
- []: Search for an address.
- [Object List]: Display the list of devices registered on the map.
- Edit the map.
- []: Select an item.
- []: Move the map.
- []: Draw a polygon
- []: Draw a line.
- []: Add a camera.
- []: Add an access door.
- []: Add an elevator.
- []: Add a barrier.
- []: Add an emergency bell.
- []: Add another object.
- [LPR]: Add LPR.
- [P]: Add a parking lot.
- []: Add a speaker.
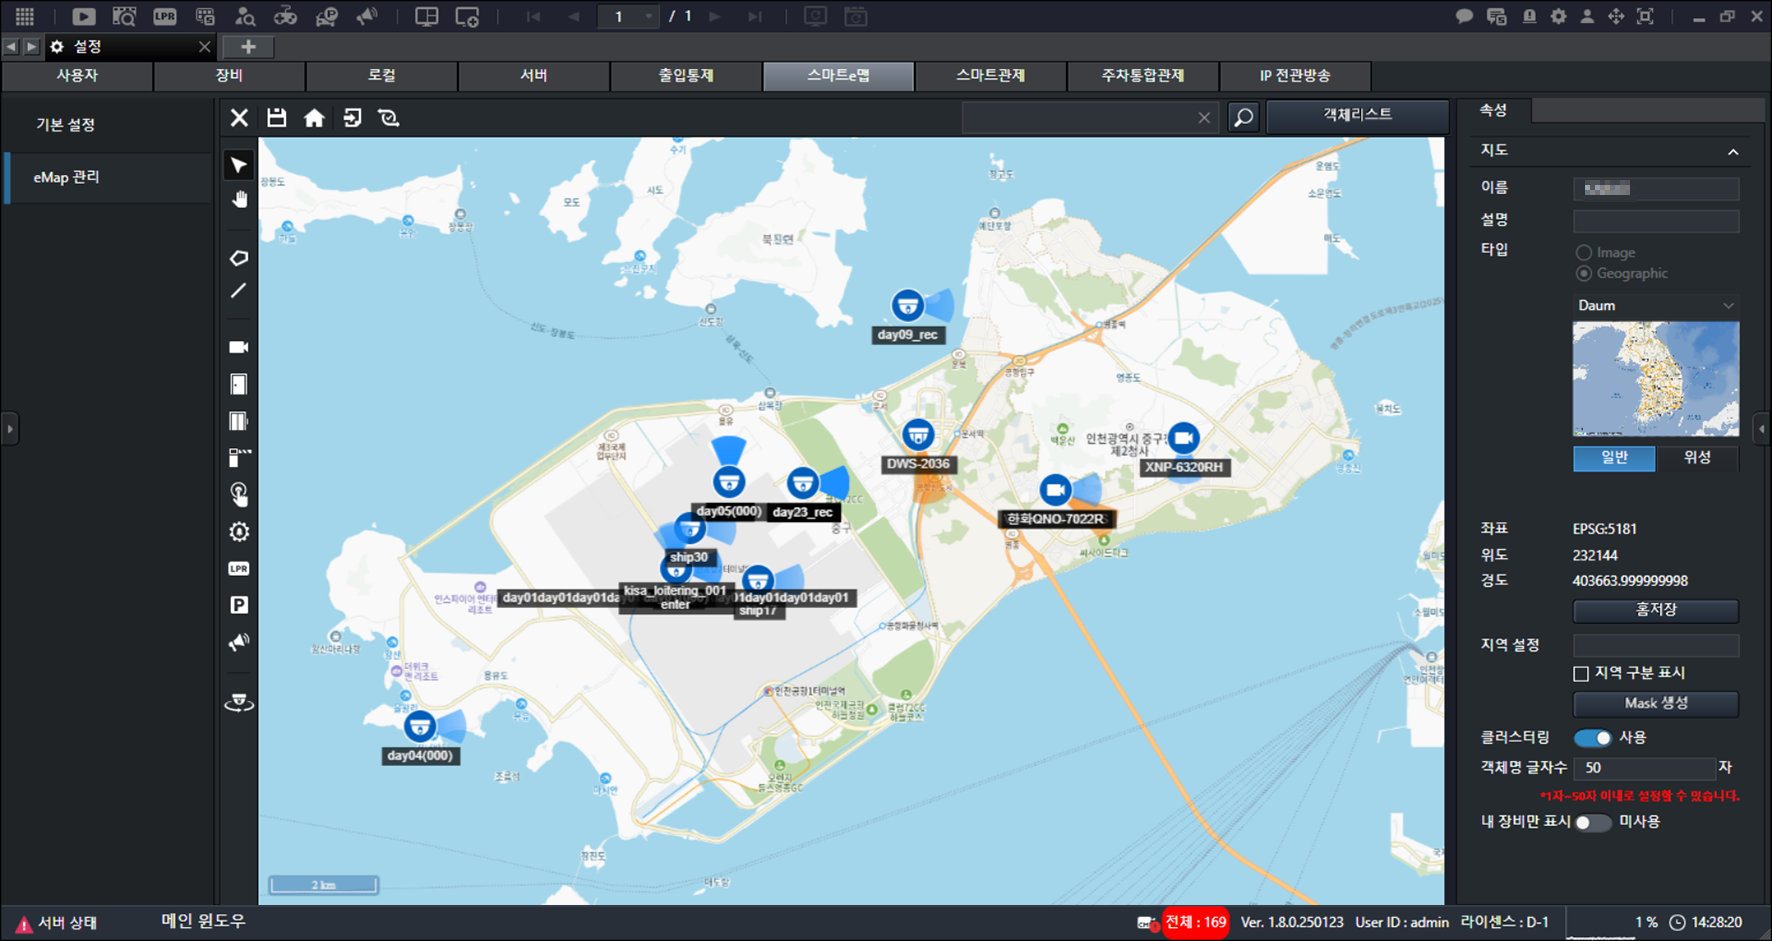
- Set [Properties].
- [Name]: Enter the name.
- [Description]: Enter the description.
- [Type]: Select the map type.
- [Coordinates] / [Latitude] / [Longitude]: Display the home coordinates, latitude, and longitude.
- [Region settings]: Select the region.
- [Clustering]: Set whether to use clustering.
- [Object name character count]: Set the character count. (1 to 50 characters)
- [Show my devices only]: Set to display only your devices.
- Click [].
Smart Monitoring Settings
Configuring Smart Monitoring
Configuring Smart Monitoring
The screens shown in this guide may differ from the actual product.
- On the main screen, select [] > [Smart monitoring]. The smart monitoring settings screen appears.
![On the main screen, select [{{icon:cog-frame}}] > [Smart monitoring]. The smart monitoring settings screen appears.](/manual/vurix-admin/images/page152_img1.jpg)
- Select the item you want.
- [Smart monitoring] settings require the [Smart monitoring management] permission.
- On the user settings screen, select a user and select [Permission group] > [Management] > [Smart monitoring management].
Smart Monitoring Preferences
Set the Smart Monitoring environment, including MAM connection and Smart Monitoring options.
Connecting to MAM
Connects to MAM.
- On the main screen, select [] > [Smart Monitoring] > [Basic Settings].
![On the main screen, select [{{icon:cog-frame}}] > [Smart Monitoring] > [Basic Settings].](/manual/vurix-admin/images/page153_img1.jpg)
- Enter the [MAM Information].
- [MAM Host]: Enter the host. (MAM web page address)
- [MAM Port]: Enter the port. (Fixed value: 3001)
- [MAM ID]: Enter the ID. (MAM web page ID)
- [MAM Password]: Enter the password. (MAM web page password)
- [Request Wait Time]: Set the wait time for intelligent search requests.
- Click [Connect to MAM].
Setting Intelligent Statistics
Set Intelligent Statistics.
- On the main screen, select [] > [Smart Monitoring] > [Basic Settings].
![On the main screen, select [{{icon:cog-frame}}] > [Smart Monitoring] > [Basic Settings].](/manual/vurix-admin/images/page154_img1.jpg)
- Set [Statistics Settings].
- [VURIX Information]: View information.
- [Select Dashboard Region]: Select the region to display on the intelligent statistics dashboard.
- Click [OK].
Save Smart Monitoring Metadata
Configure metadata.
Save object boxes together with recorded video.
- On the main screen, select [] > [Smart Monitoring] > [Basic Settings].
![On the main screen, select [{{icon:cog-frame}}] > [Smart Monitoring] > [Basic Settings].](/manual/vurix-admin/images/page155_img1.jpg)
- Click [Server] > [Save Metadata].
- Click [OK].
- When [Save metadata] is enabled, the recording storage capacity of smart monitoring devices may increase rapidly.
- Use with caution.
Configure Event Monitoring Options
Configure monitoring options.
- On the main screen, select [] > [Smart Monitoring] > [Basic Settings].
![On the main screen, select [{{icon:cog-frame}}] > [Smart Monitoring] > [Basic Settings].](/manual/vurix-admin/images/page156_img1.jpg)
- Set [Monitoring].
- [Action After Monitoring Report]: Close or pin the video after reporting.
- [Quick Monitoring Report Size] / [Show Quick Monitoring Report]: Set the size or visibility.
- [Show ROI Area]: Display the ROI area on the event video.
- [Show Channel Icon]: Display the channel icon on the event video.
- [Show Event Time]: Display the event occurrence time on the event video.
- Click [OK].
Set Event Priority
Set event priority.
If priority is not set, videos are displayed in the order events occur.
- On the main screen, select [] > [Smart Monitoring] > [Basic Settings].
![On the main screen, select [{{icon:cog-frame}}] > [Smart Monitoring] > [Basic Settings].](/manual/vurix-admin/images/page157_img1.jpg)
- Set [Event Priority].
- Click [OK].
- Set the weight value from 0 to 5.
- The higher the weight value, the higher the priority.
Adding a monitoring status item
Manage [Monitoring Status] items.
Only administrator accounts can add or delete items.
- On the main screen, select [] > [Smart Monitoring] > [Basic Settings].
![On the main screen, select [{{icon:cog-frame}}] > [Smart Monitoring] > [Basic Settings].](/manual/vurix-admin/images/page158_img1.jpg)
- Set [Monitoring Status].
- [Add]: Add an item.
- [Delete]: Delete an item.
- Click [OK].
Setting object box options
Set object box display options.
- On the main screen, select [] > [Smart Monitoring] > [Basic Settings].
![On the main screen, select [{{icon:cog-frame}}] > [Smart Monitoring] > [Basic Settings].](/manual/vurix-admin/images/page159_img1.jpg)
- Set [Object Box].
- [Object Box Display Monitor]: Display object boxes on the video.
- [Show Event Objects Only]: Display analysis information from smart monitoring devices on the live video.
- [Additional Object Box Display]: Set additional items to display on object boxes.
- [Show Object Box Label]: Display object box labels.
- [Object Box Style]: Set object box color, line thickness, and more.
- Click [OK].
Setting ROI Event Colors
Depending on the event that occurred, the detection area (ROI, Region of Interest) appears in the configured event color.
- On the main screen, select [] > [Smart Monitoring] > [Basic Settings].
![On the main screen, select [{{icon:cog-frame}}] > [Smart Monitoring] > [Basic Settings].](/manual/vurix-admin/images/page160_img1.jpg)
- Configure [ROI Event Color Settings].
- [Use cell border line]: Display the border.
- [Display cell event text]: Display the text.
- Select the item you want.
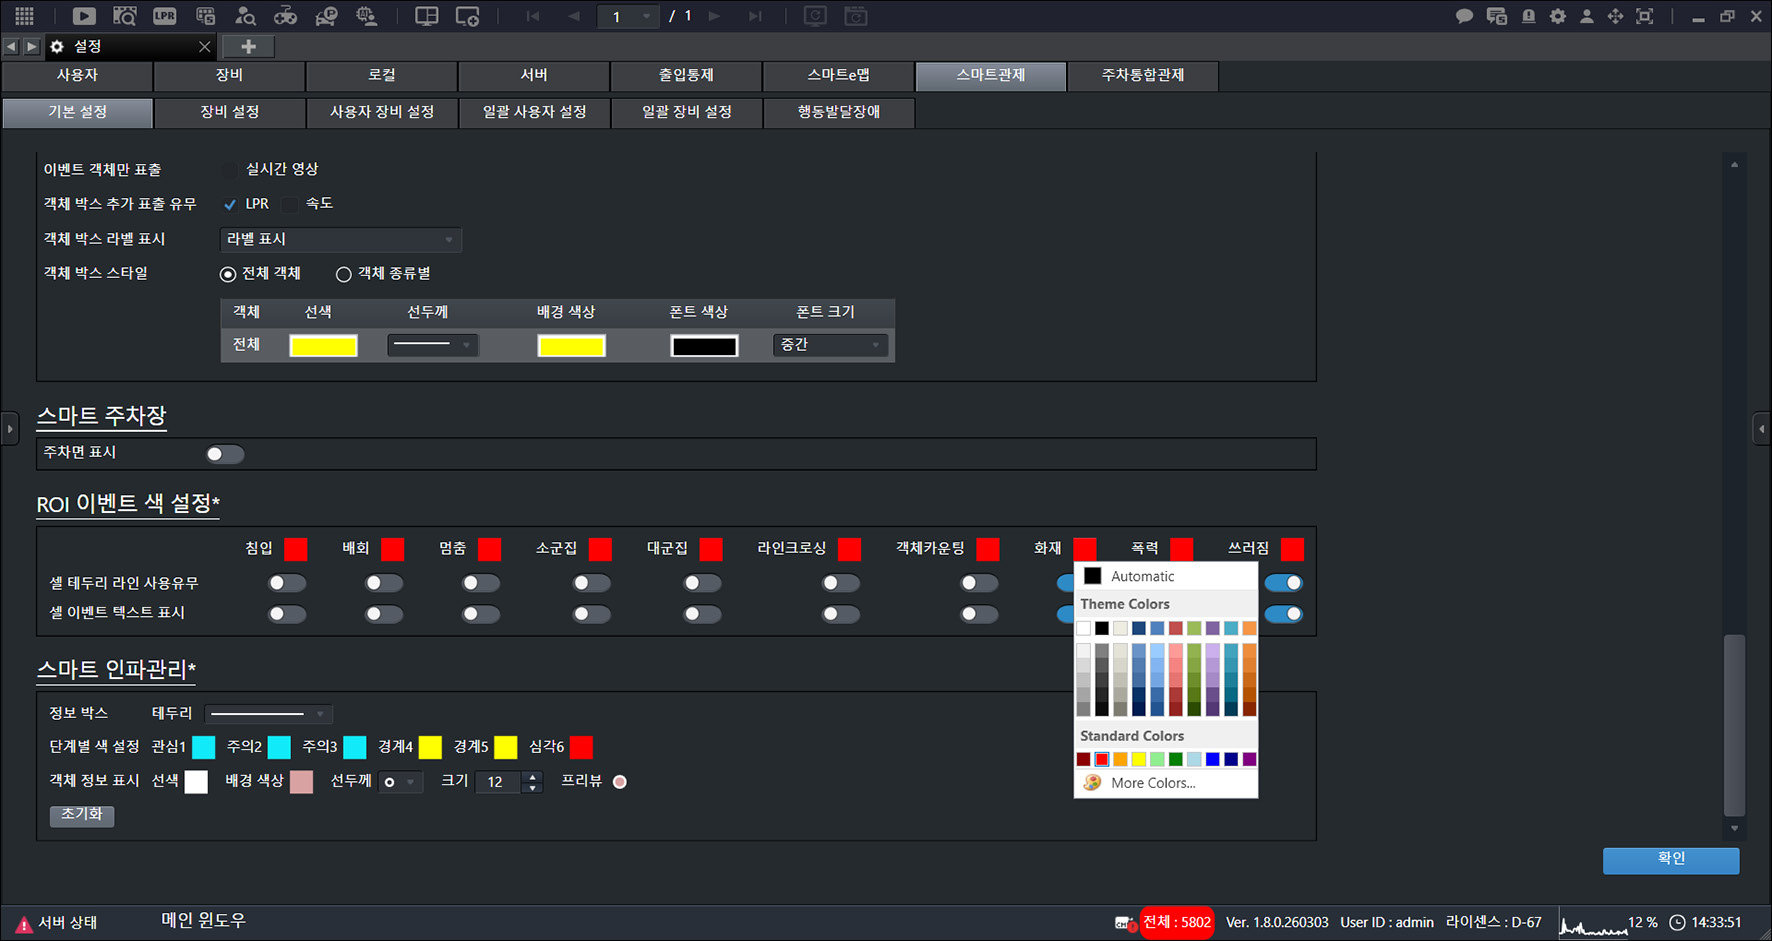
- Click [OK].
Set Crowd Management Event Colors
Set crowd management event colors.
- On the main screen, select [] > [Smart Monitoring] > [Basic Settings].
![On the main screen, select [{{icon:cog-frame}}] > [Smart Monitoring] > [Basic Settings].](/manual/vurix-admin/images/page161_img1.jpg)
- Set [Smart Crowd Management].
- [Info box]: Set the background color of the event information box.
- [Color by level]: Set the color for each event level.
- [Object information display]: Set the color for object information display.
- Click [OK].
Smart Monitoring Device Settings
Configure Smart Monitoring devices.
Register Smart Monitoring Devices
Register devices to use in Smart Monitoring.
When registering Smart Monitoring devices, the configured objects are monitored.
- On the main screen, select [] > [Smart Monitoring] > [Device Settings].
- Select a device.
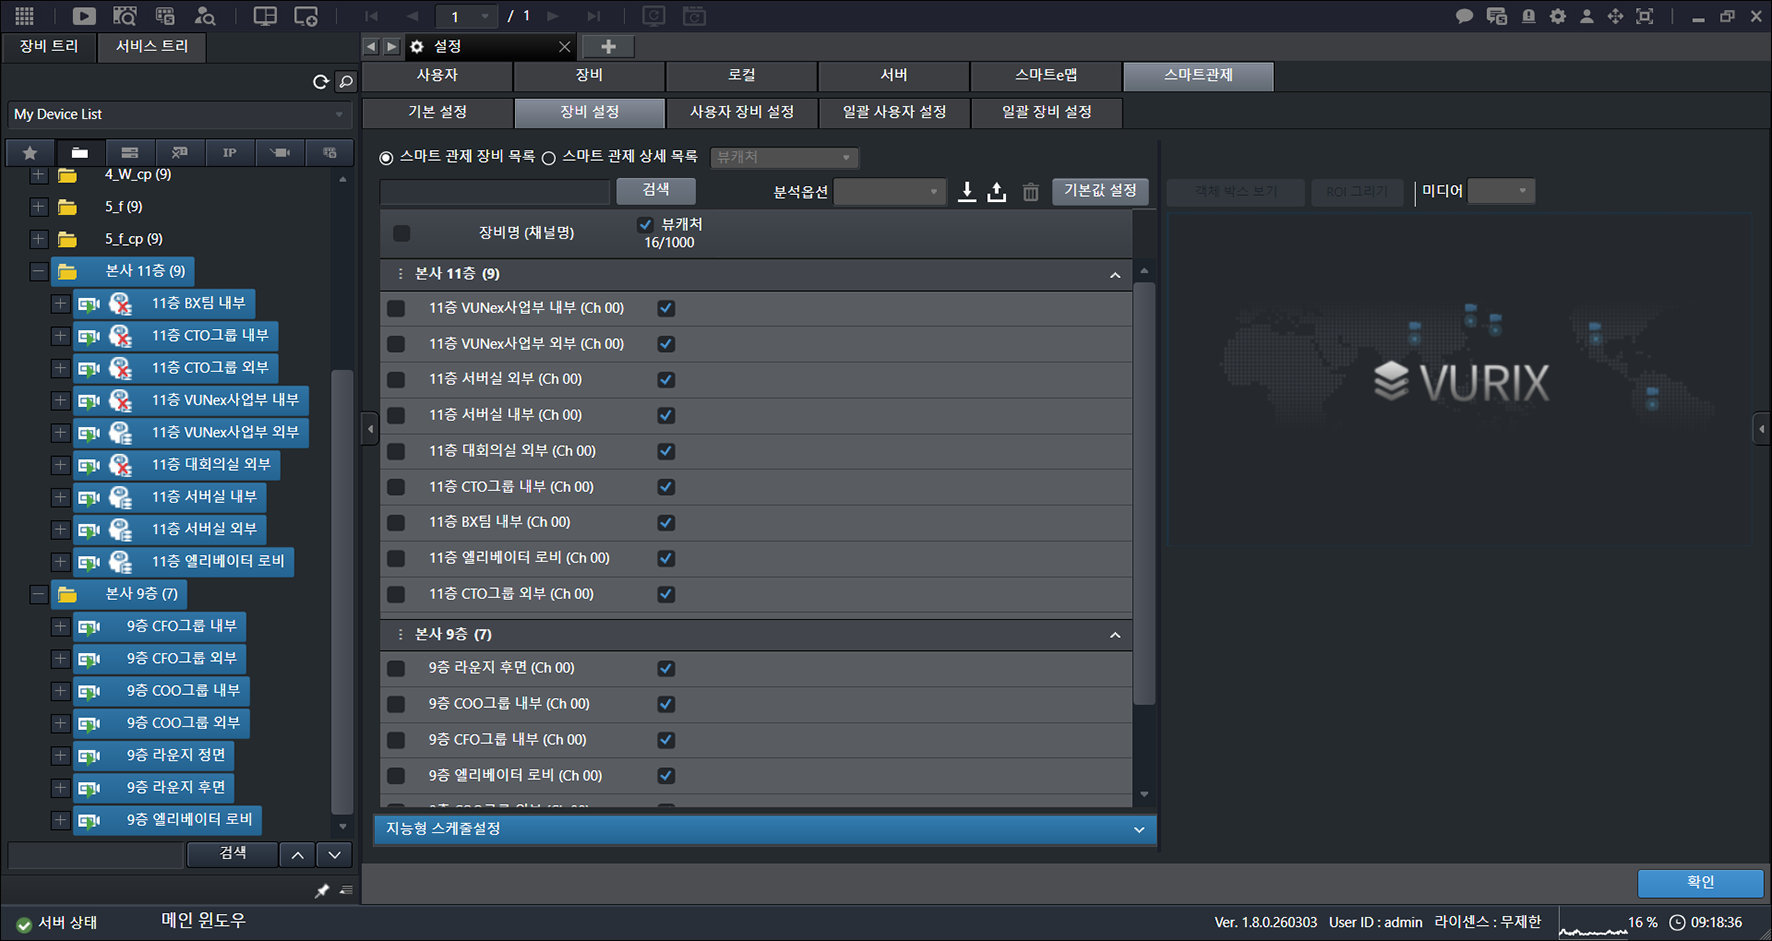
- Drag to the right while holding the mouse button.
- Click [OK].
View Smart Monitoring Device List
Check detection area information, event information, analysis areas, and other details configured on Smart Monitoring devices.
- On the main screen, select [] > [Smart Monitoring] > [Device Settings].
![On the main screen, select [{{icon:cog-frame}}] > [Smart Monitoring] > [Device Settings].](/manual/vurix-admin/images/page163_img1.jpg)
- Click [Smart Monitoring Detail List].
![Click [Smart Monitoring Detail List].](/manual/vurix-admin/images/page163_img2.jpg)
- Select the item you want.
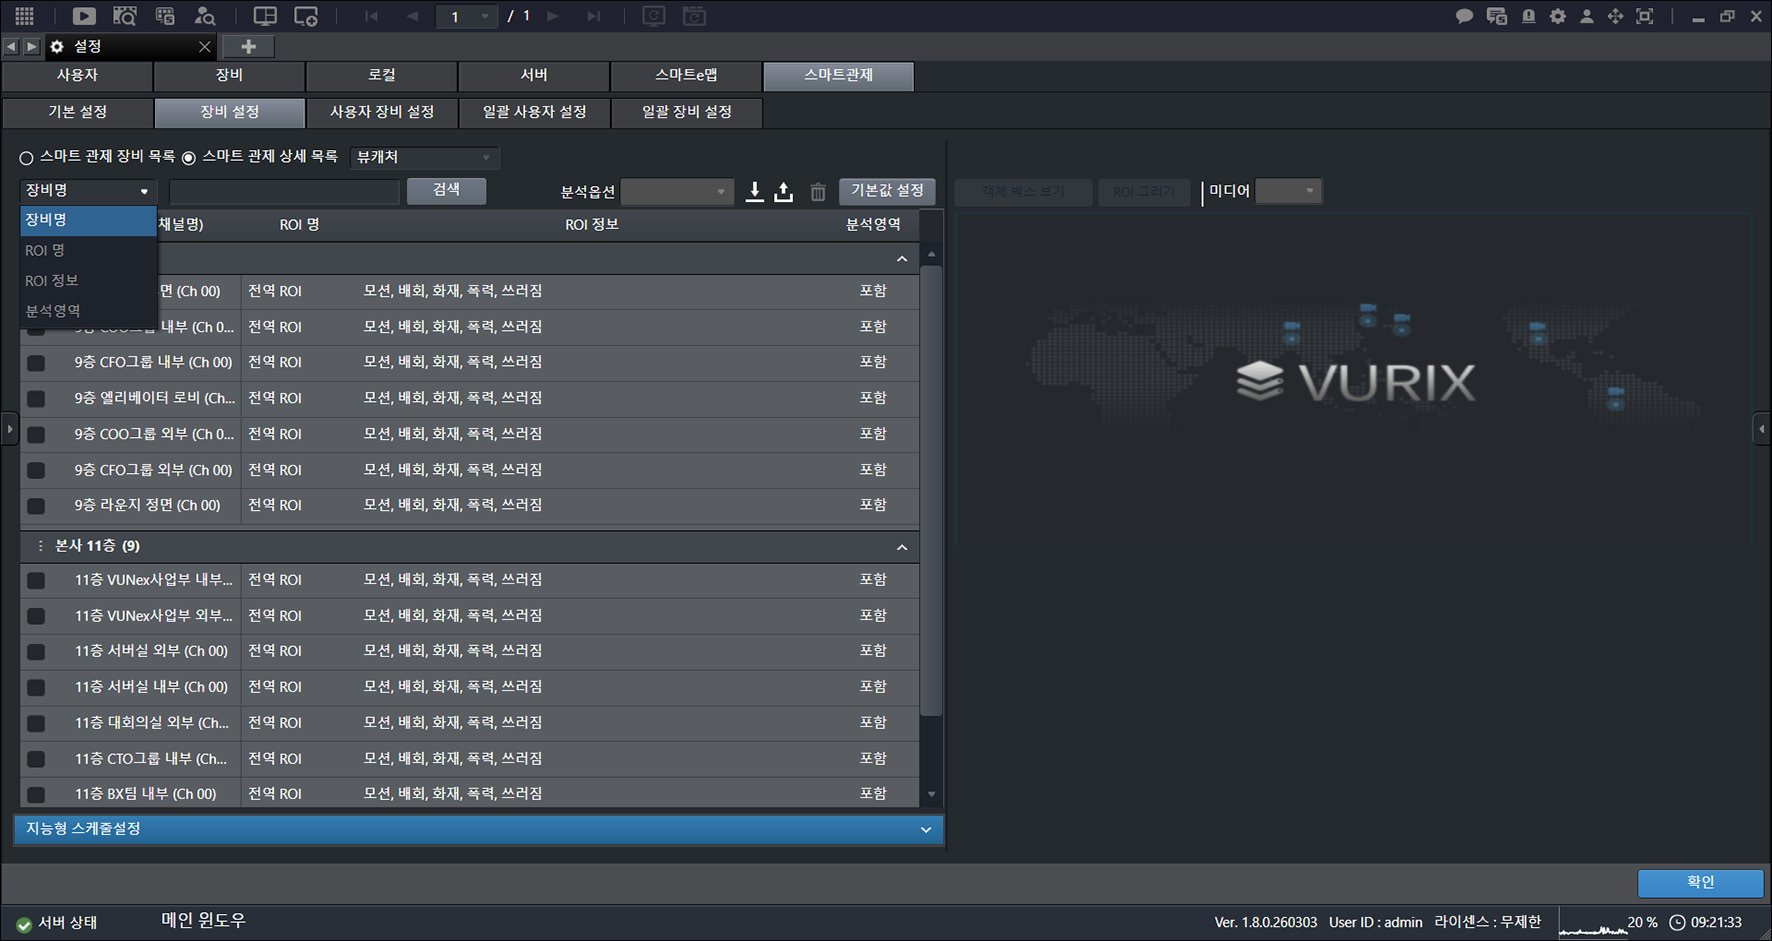
- Set the conditions, then click [Search].
- [Analysis options]: Set the analysis options.
- [] / []: Export the device list saved in the program, or import it into the program.
- []: Delete the item.
- [Set defaults]: Set the default values for video analysis.
![Set the conditions, then click [Search].](/manual/vurix-admin/images/page164_img2.jpg)
- Check the results.
Smart Monitoring ROI Settings
Select a device to check detection area information and edit detection areas.
Creating a detection area (ROI)
Create detection areas for each device.
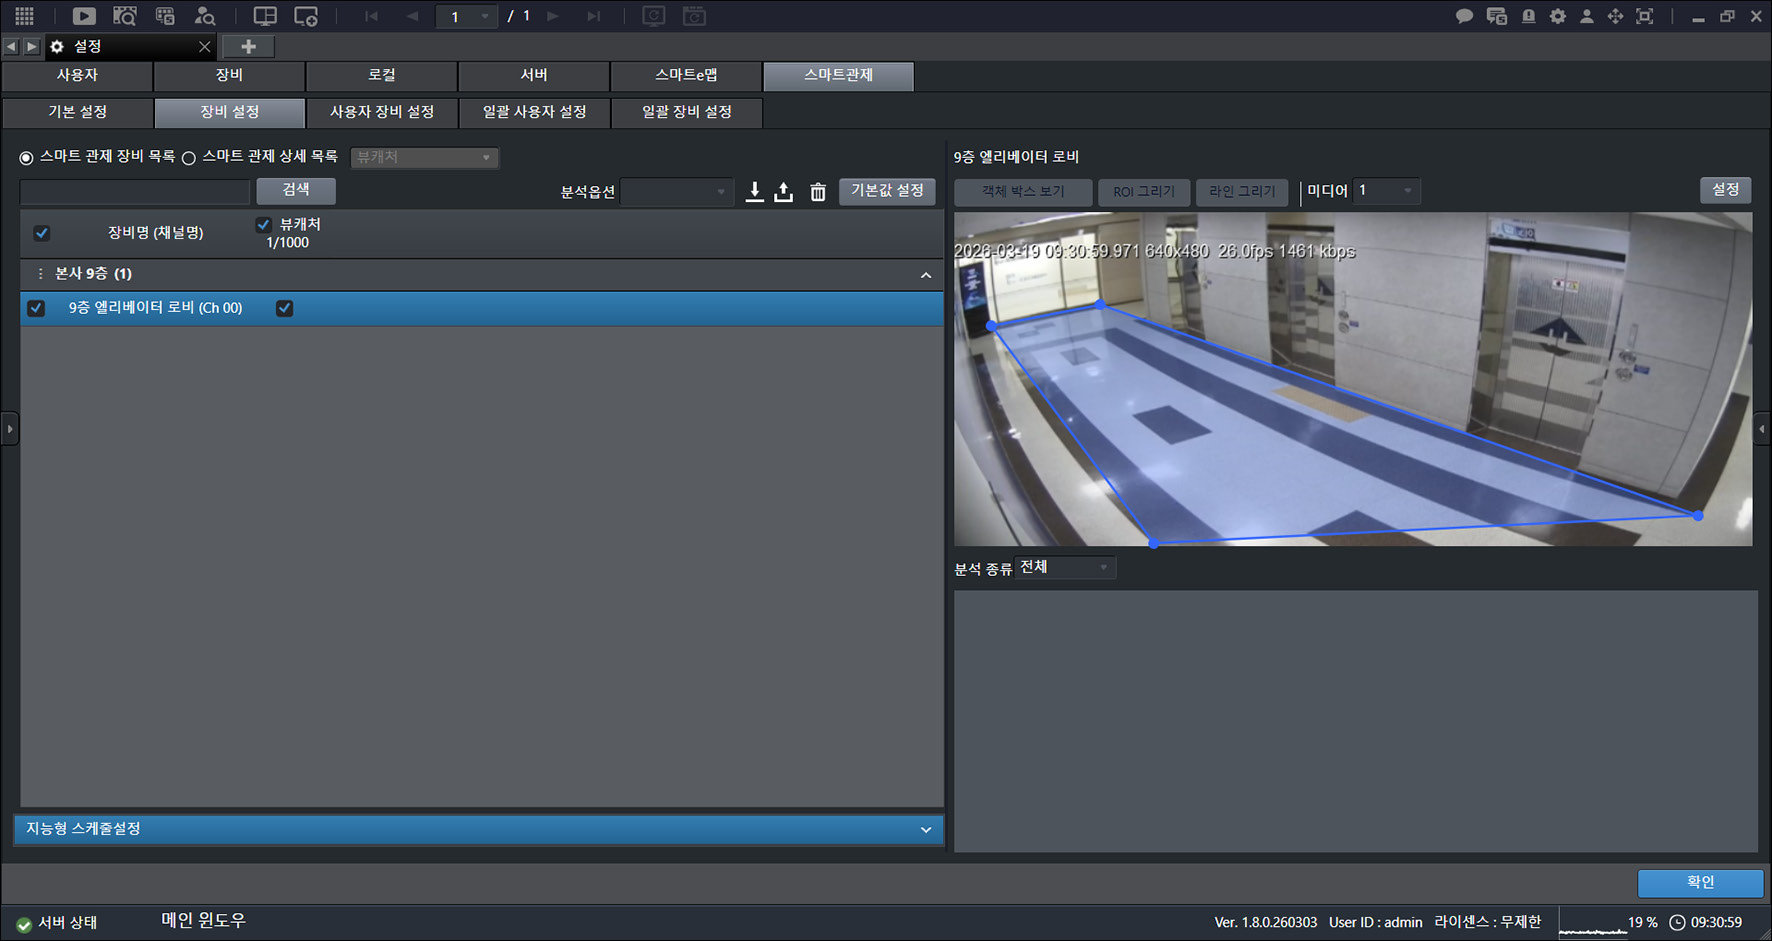
- On the main screen, select [] > [Smart Monitoring] > [Device Settings].
- Select a device.
- [View Object Box]: Display object boxes on the video.
- [Draw ROI] / [Draw Line]: Draw a shape or line to create a detection area.
- [Media]: Select media.
- [Settings]: Set the smart crosswalk.
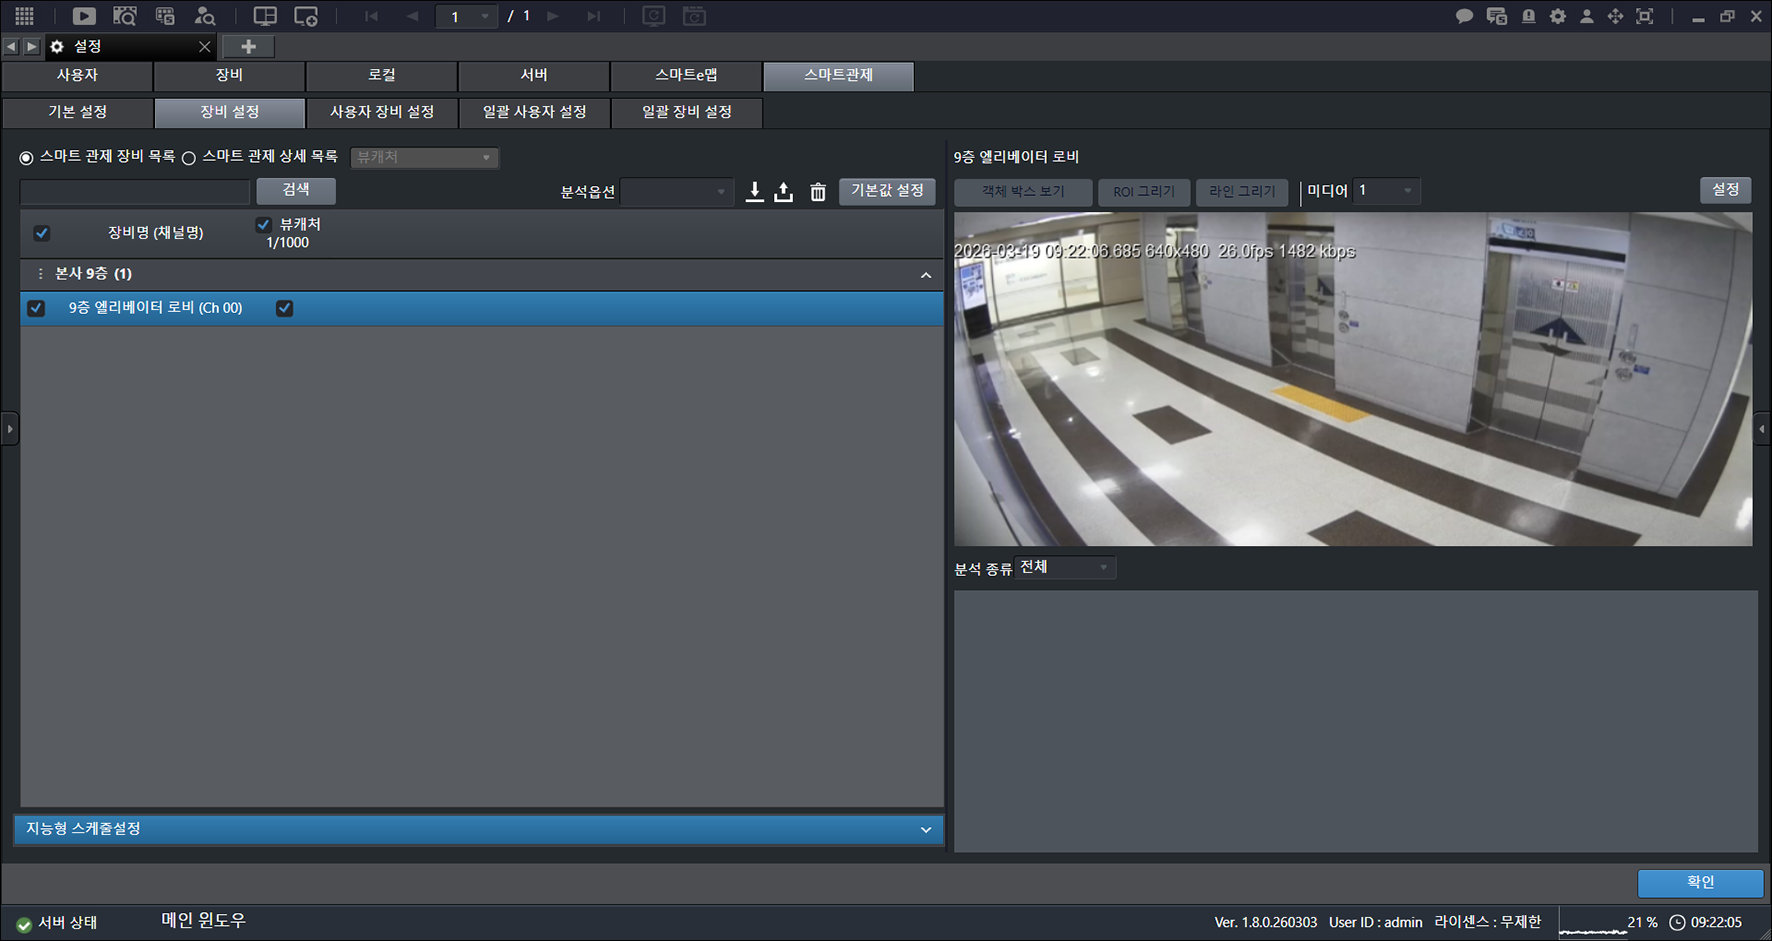
- Click [Draw ROI].
![Click [Draw ROI].](/manual/vurix-admin/images/page166_img1.jpg)
- Select the item you want.
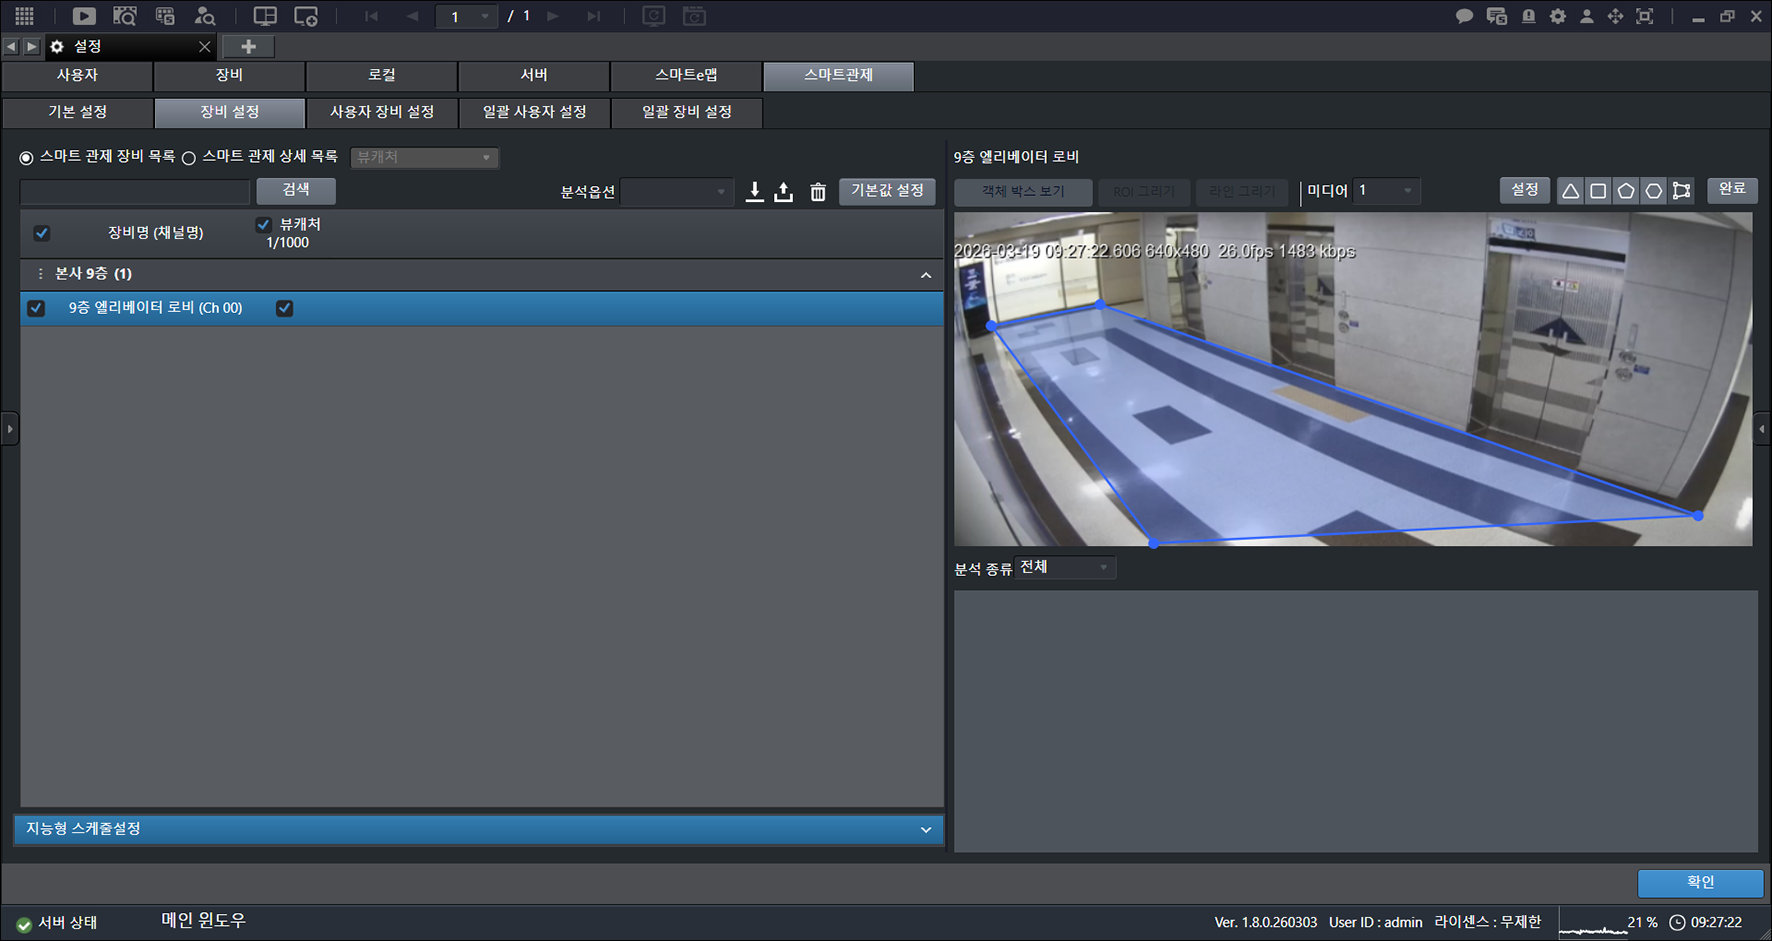
- Click the point you want with the mouse.
- Create an area.
- Click [Complete] > [OK].
Setting detection area (ROI) analysis conditions
Set analysis conditions for the detection area.
- On the main screen, select [] > [Smart Monitoring] > [Device Settings].
- Select a device.
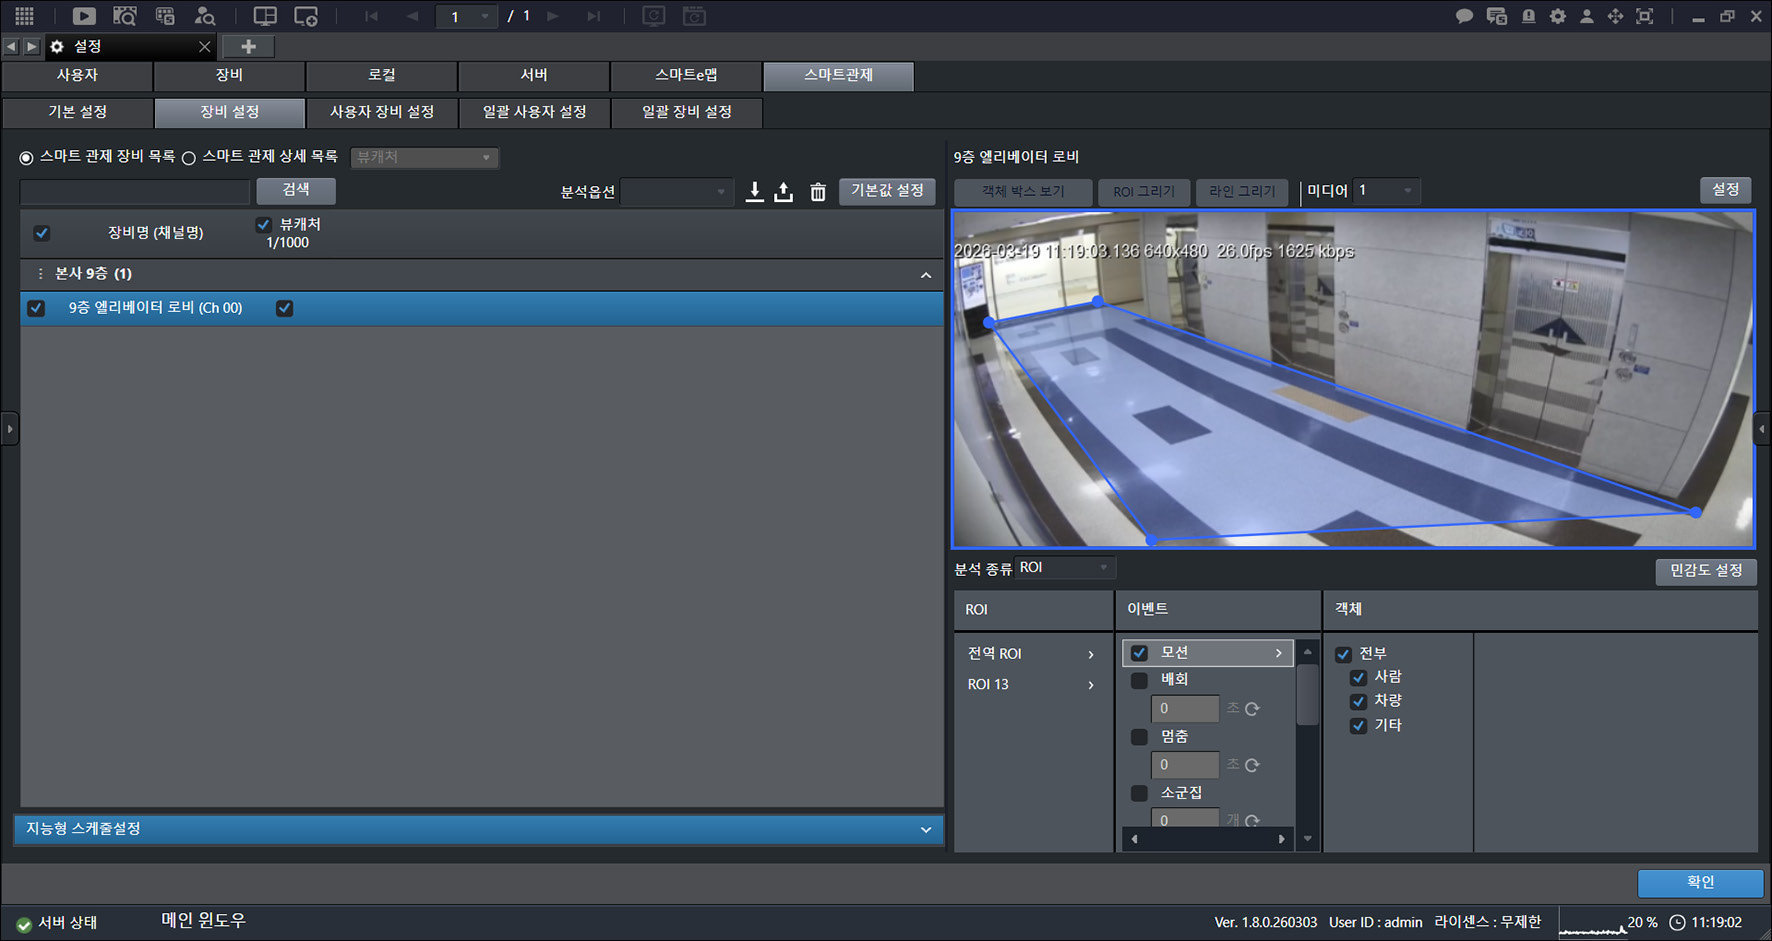
- Click [Analysis Type] > [ROI].
- [ROI Name]: Enter a name.
- [Analysis Area]: Include or exclude the analysis area.
- [Sensitivity Settings]: Set the sensitivity for the detection area.
![Click [Analysis Type] > [ROI].](/manual/vurix-admin/images/page167_img2.jpg)
- Select [ROI].
![Select [ROI].](/manual/vurix-admin/images/page168_img1.jpg)
- Select [Event].
![Select [Event].](/manual/vurix-admin/images/page168_img2.jpg)
- Select [Object].
![Select [Object].](/manual/vurix-admin/images/page169_img1.jpg)
- Click [OK].
Setting detection area (ROI) sensitivity
Set sensitivity for the detection area.
Depending on the event, you can also set event sensitivity and object sensitivity separately. (Example: violence, fall, and more)
- On the main screen, select [] > [Smart Monitoring] > [Device Settings].
- Select a device.
- Select the item you want.
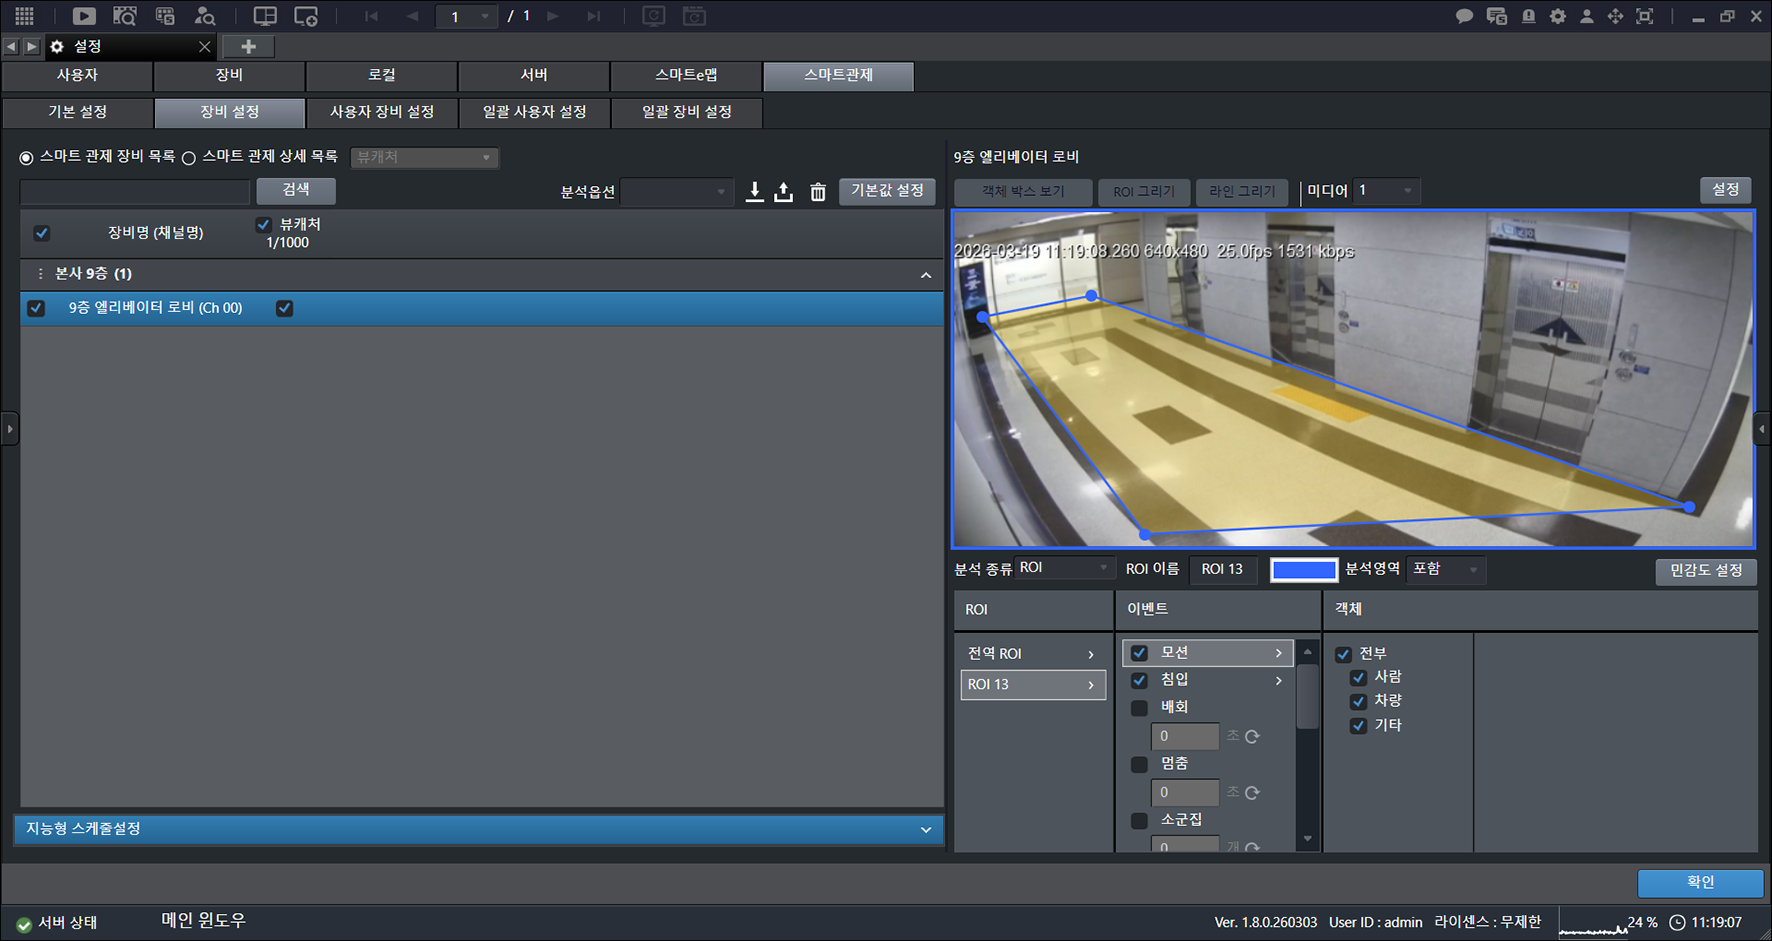
- Click [Sensitivity Settings].
- Set the items you want.
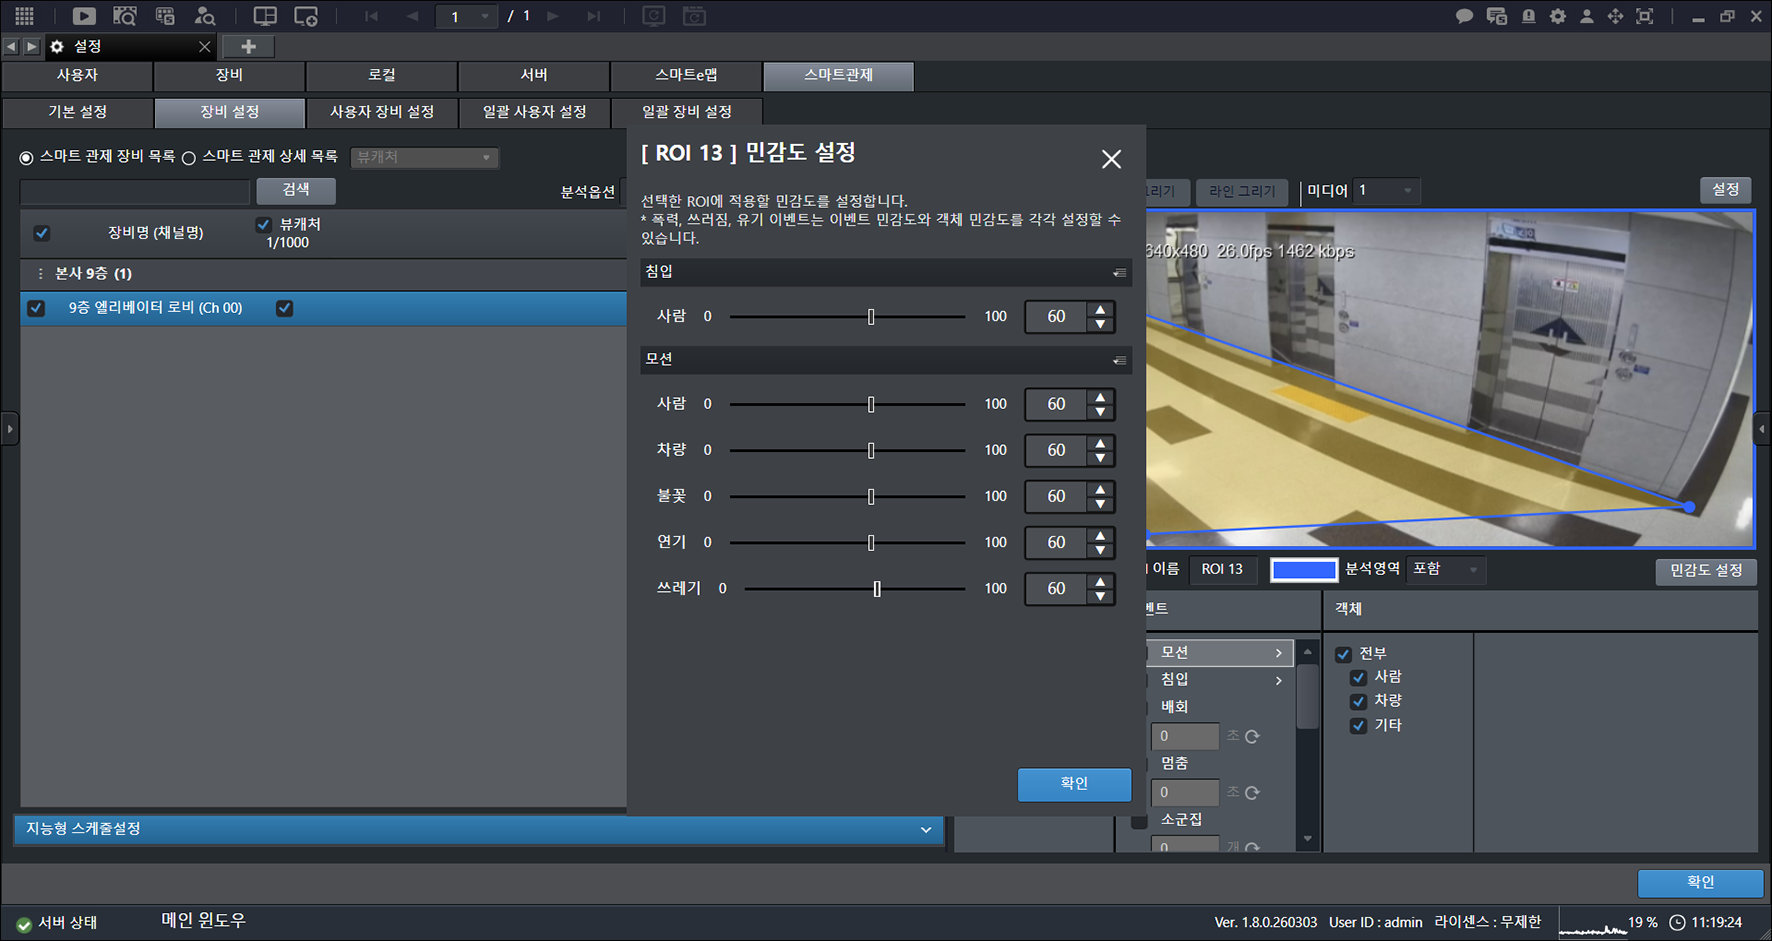
- Hold down the mouse button and move in the direction you want.
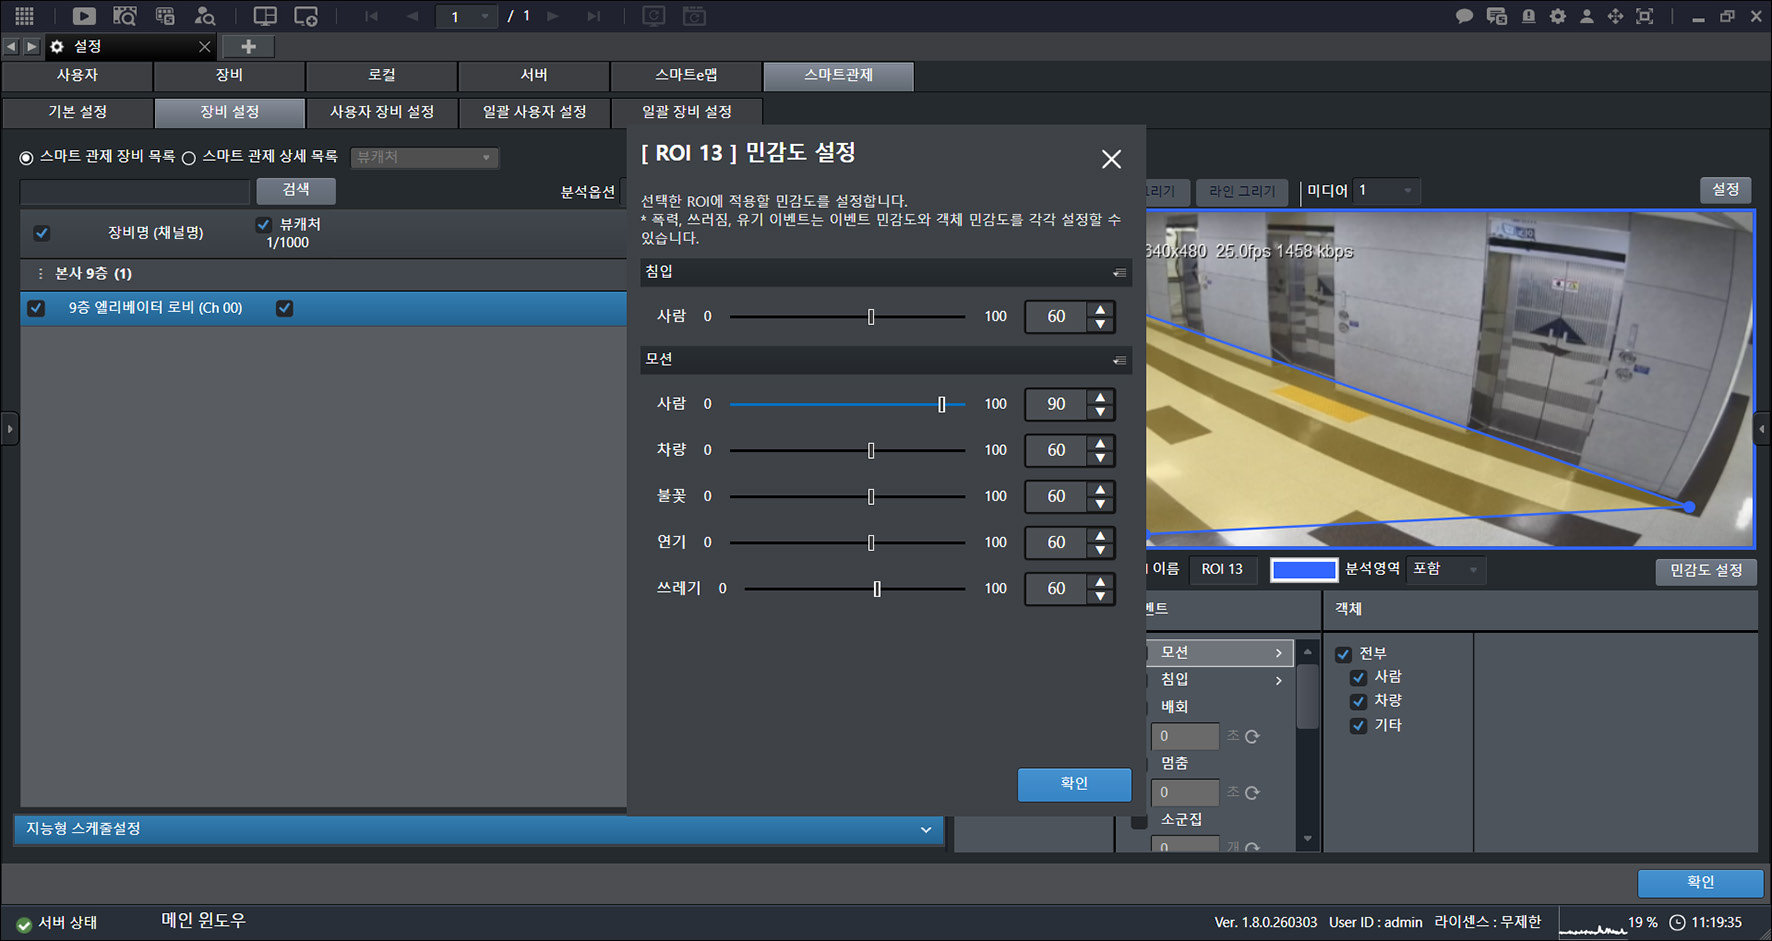
- Click [OK] > [OK].
- Depending on the event, you can also set event sensitivity and object sensitivity separately. (Example: violence, fall, and more)
- See the table below for sensitivity classification by event.
Deleting a detection area (ROI)
Delete the detection area.
- On the main screen, select [] > [Smart Monitoring] > [Device Settings].
- Select a device.
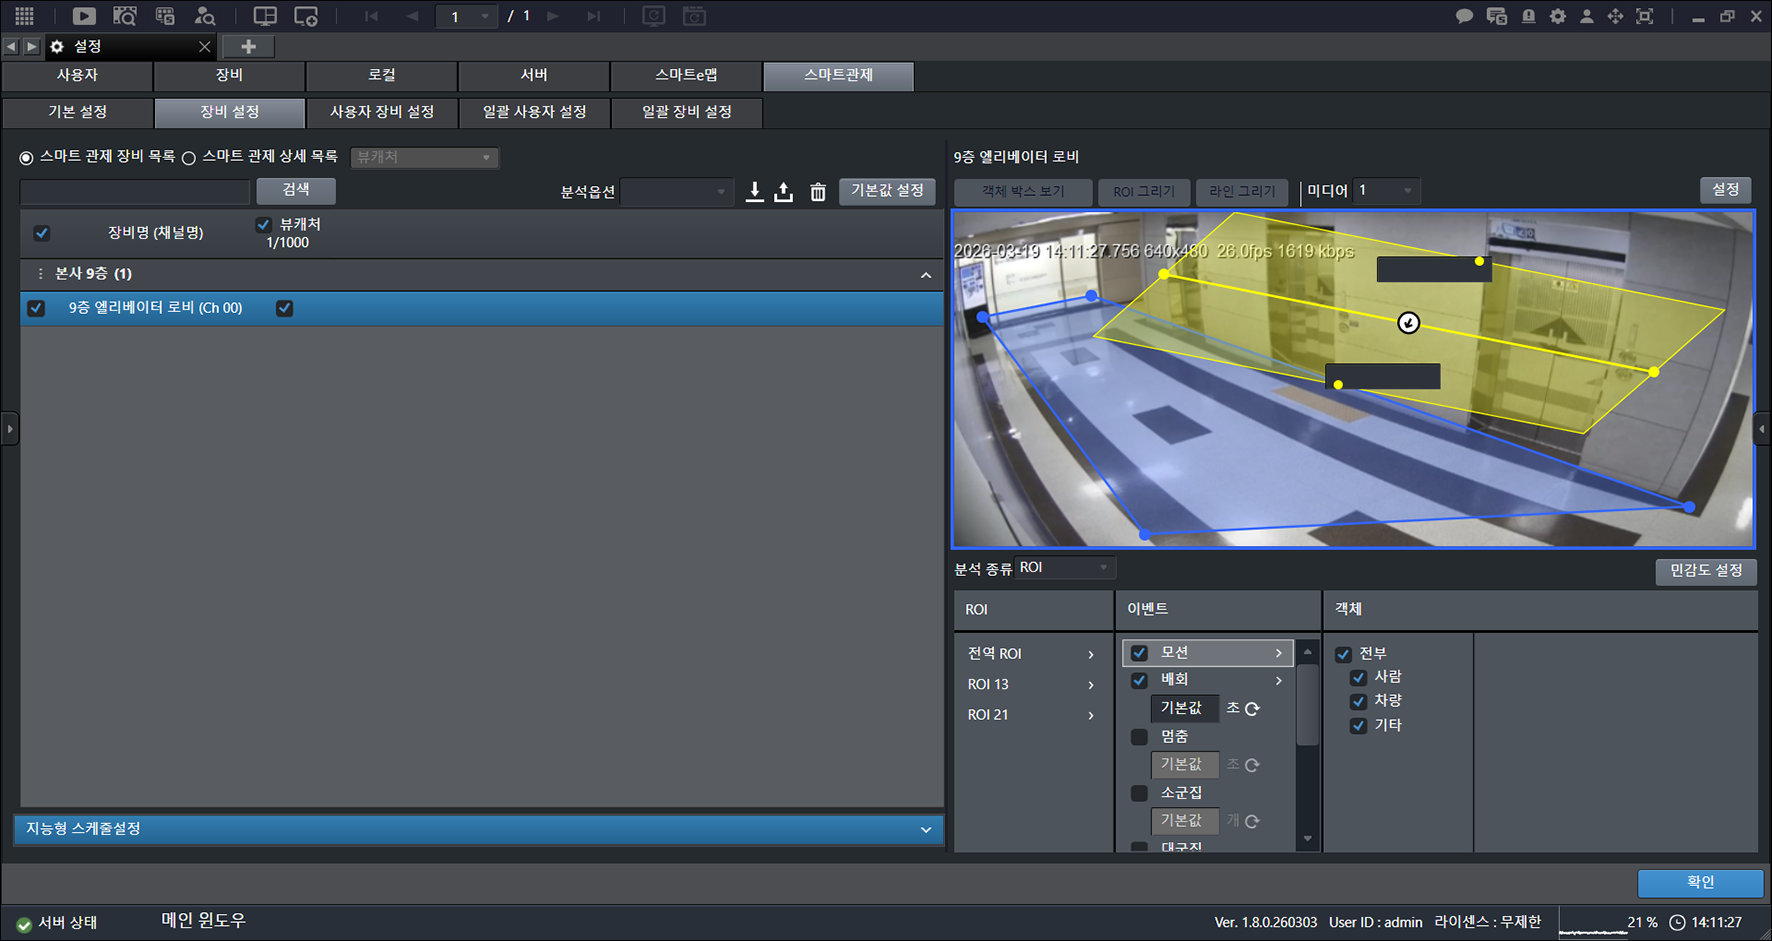
- Select the item you want.
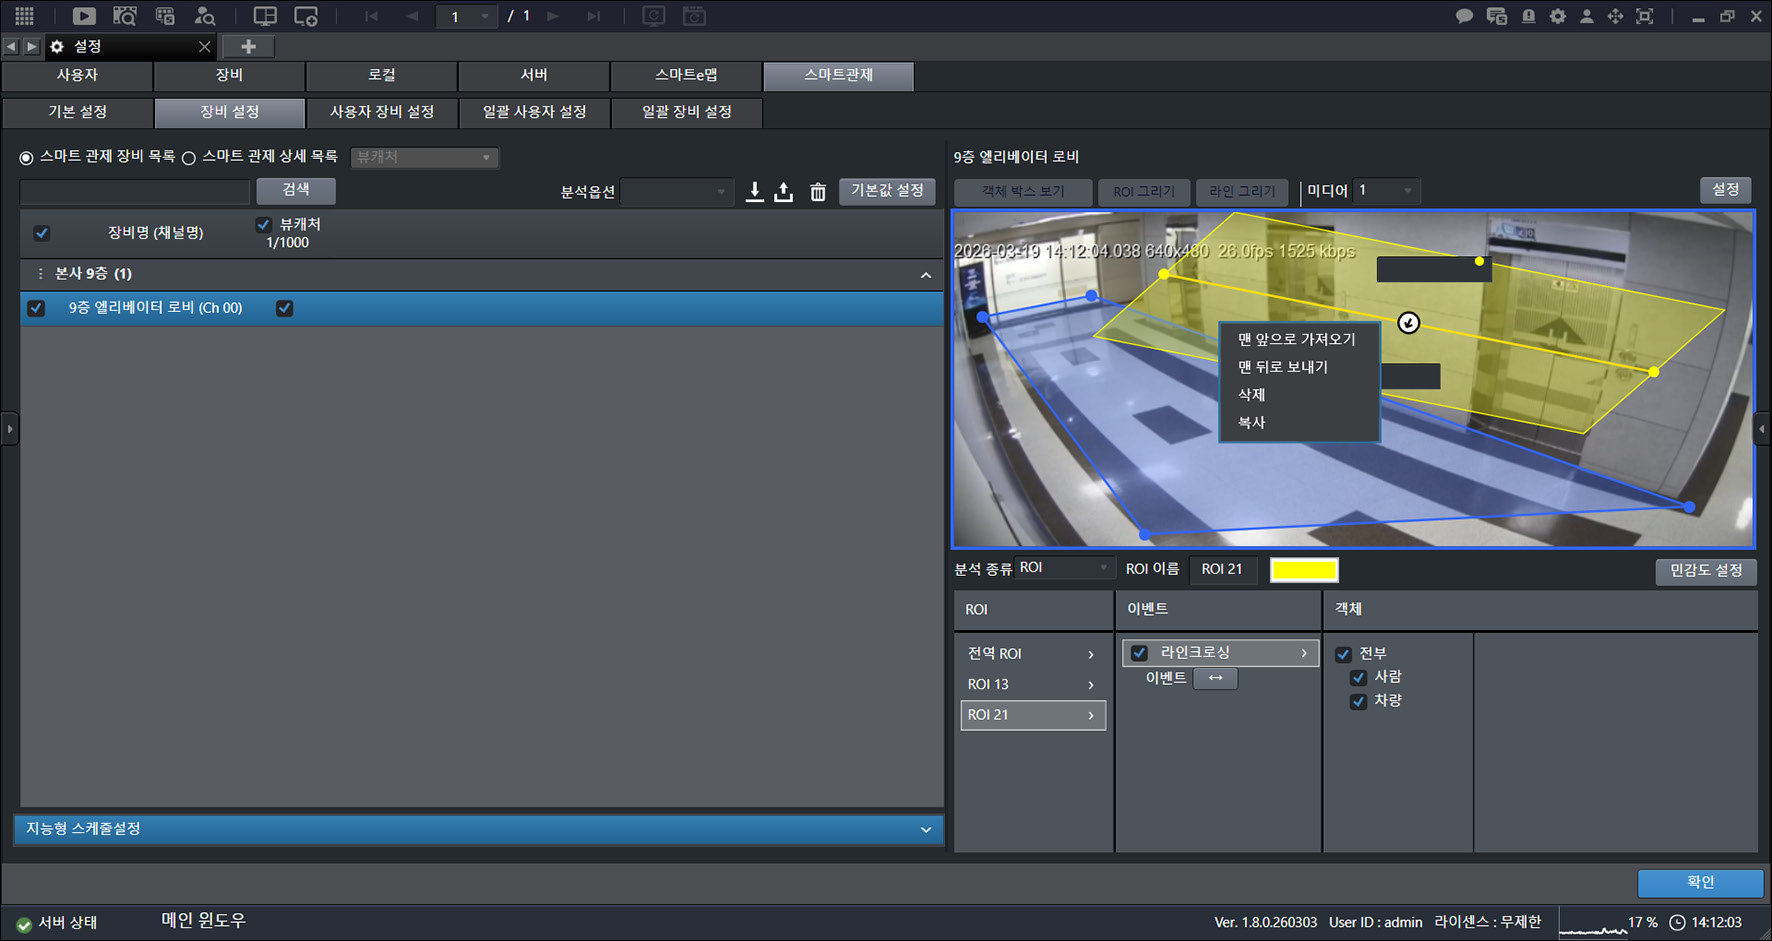
- Right-click to open the context menu.
- [Bring to front]: Brings the item to the front.
- [Send to back]: Sends the item to the back.
- [Delete]: Deletes the item.
- [Copy]: Copies the item.
- Click [Delete] > [OK].
Changing the detection area (ROI) shape
Change the detection area shape, such as by adding or deleting points.
- On the main screen, select [] > [Smart Monitoring] > [Device Settings].
- Select a device.
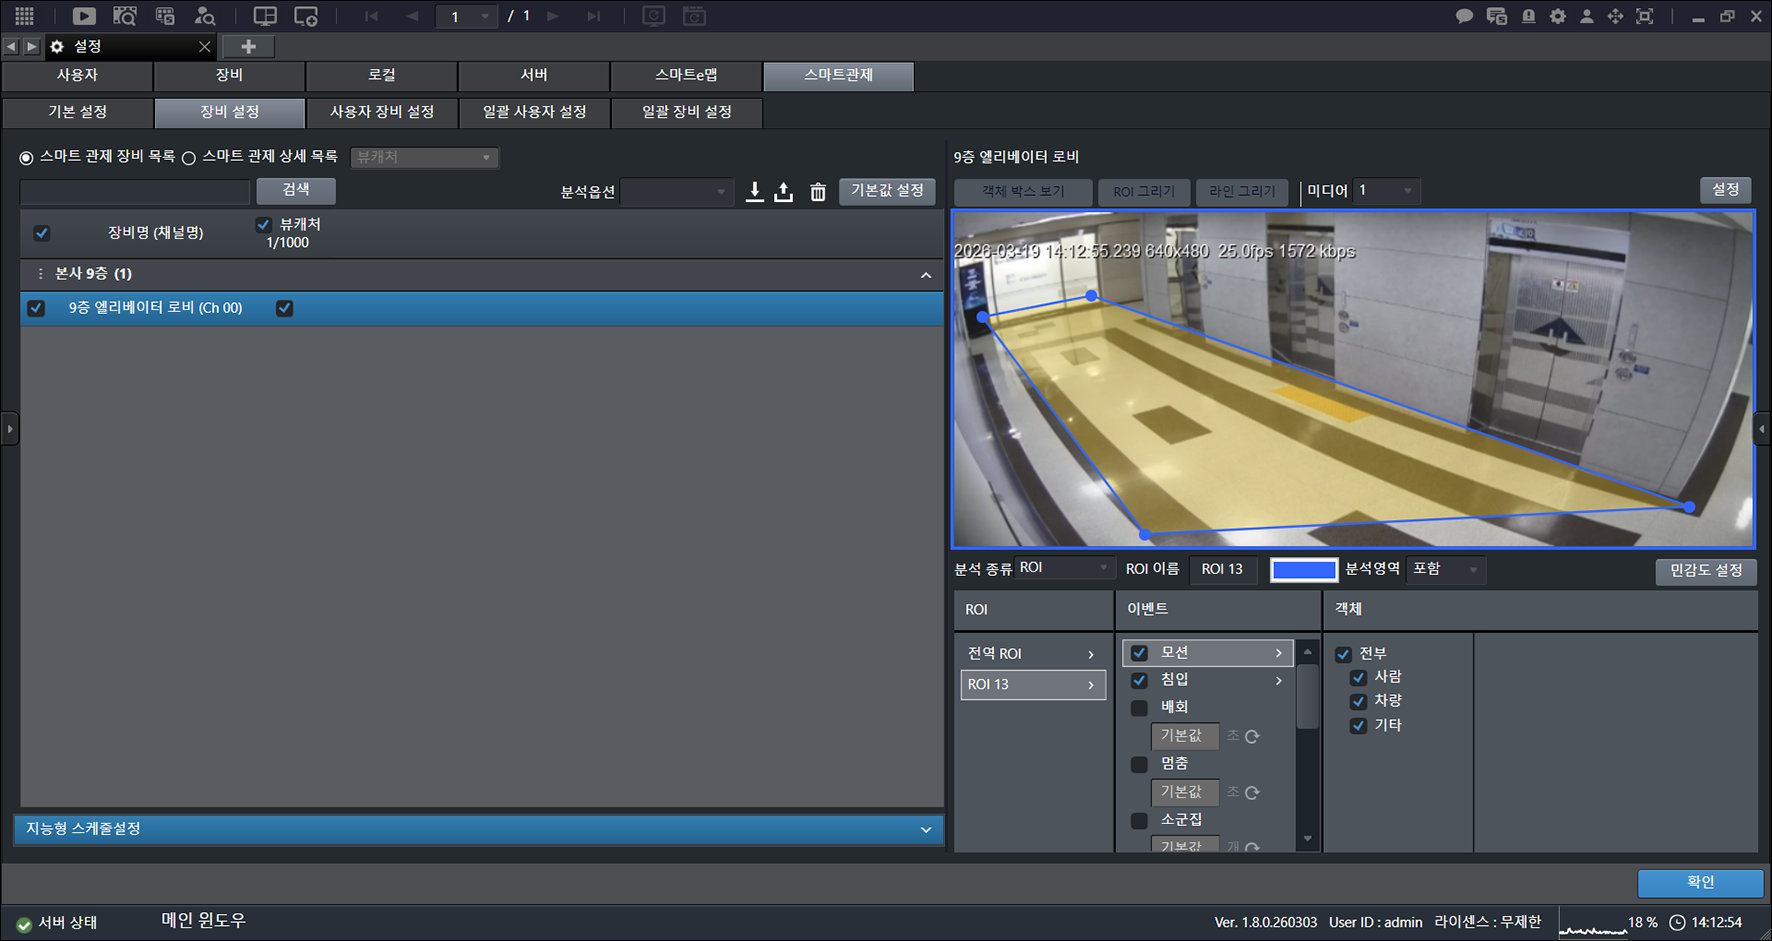
- Select the item you want.
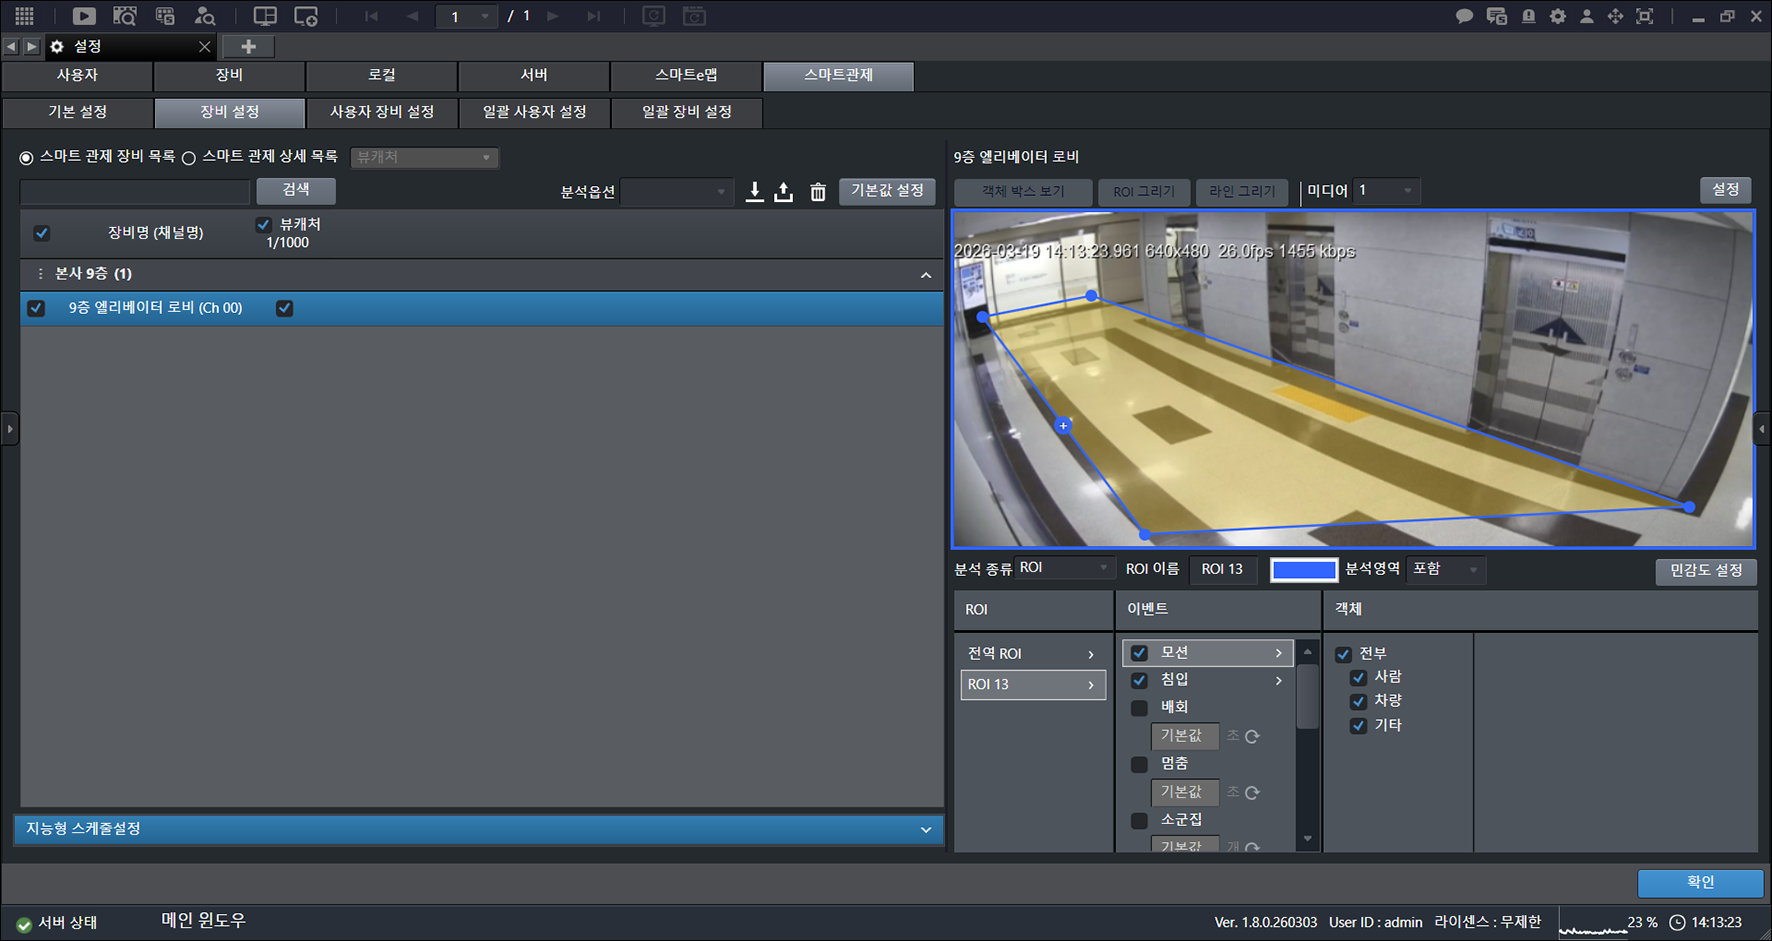
- Click the point you want with the mouse.
- Add a point.
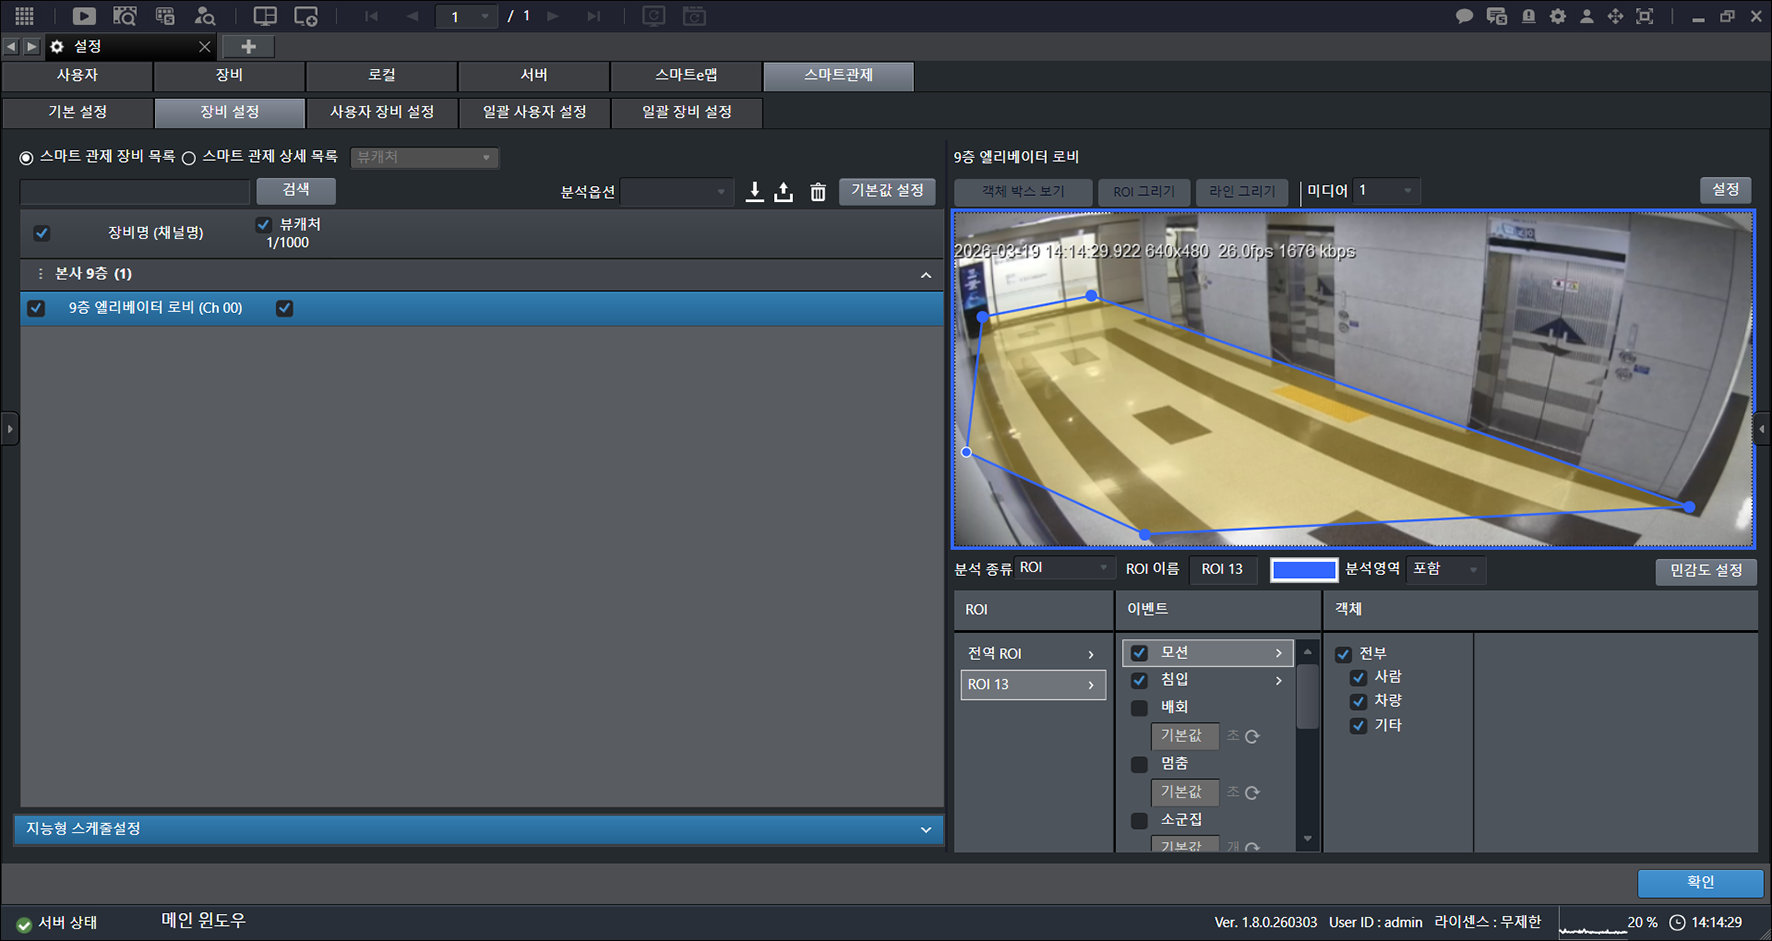
- Hold down the mouse button and move in the direction you want.
- Change the area shape.
- Click [OK].
Setting the detection area (ROI) color
Set the detection area color.
- On the main screen, select [] > [Smart Monitoring] > [Device Settings].
- Select a device.
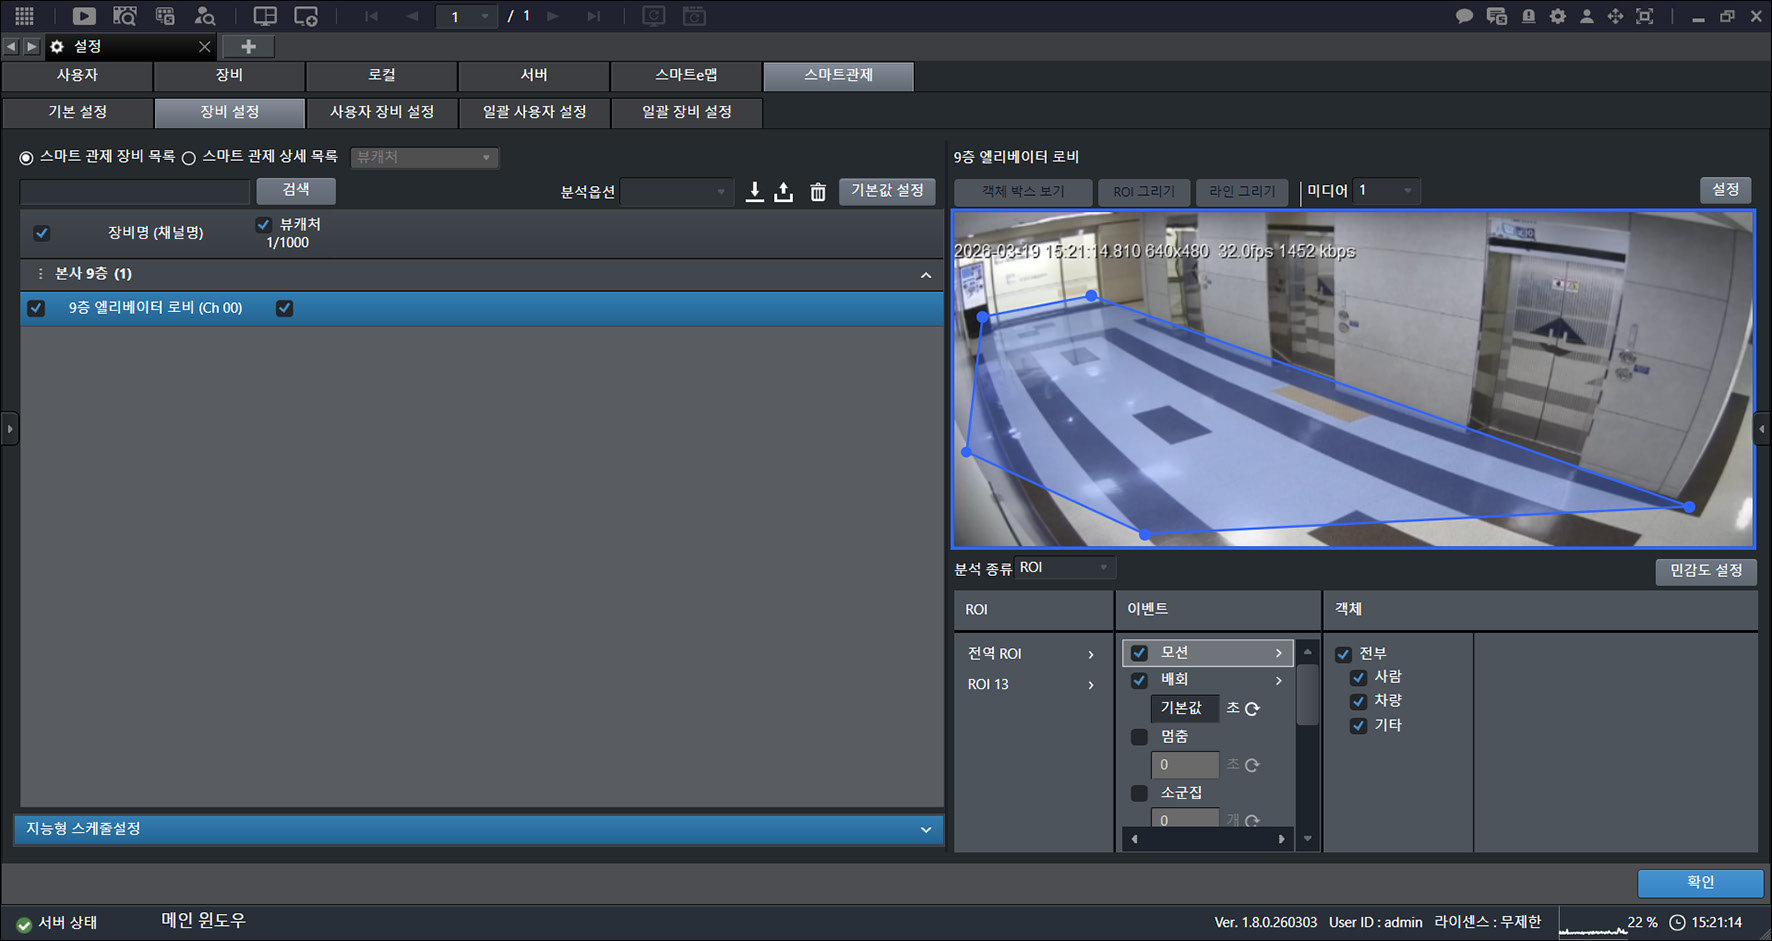
- Select the item you want.
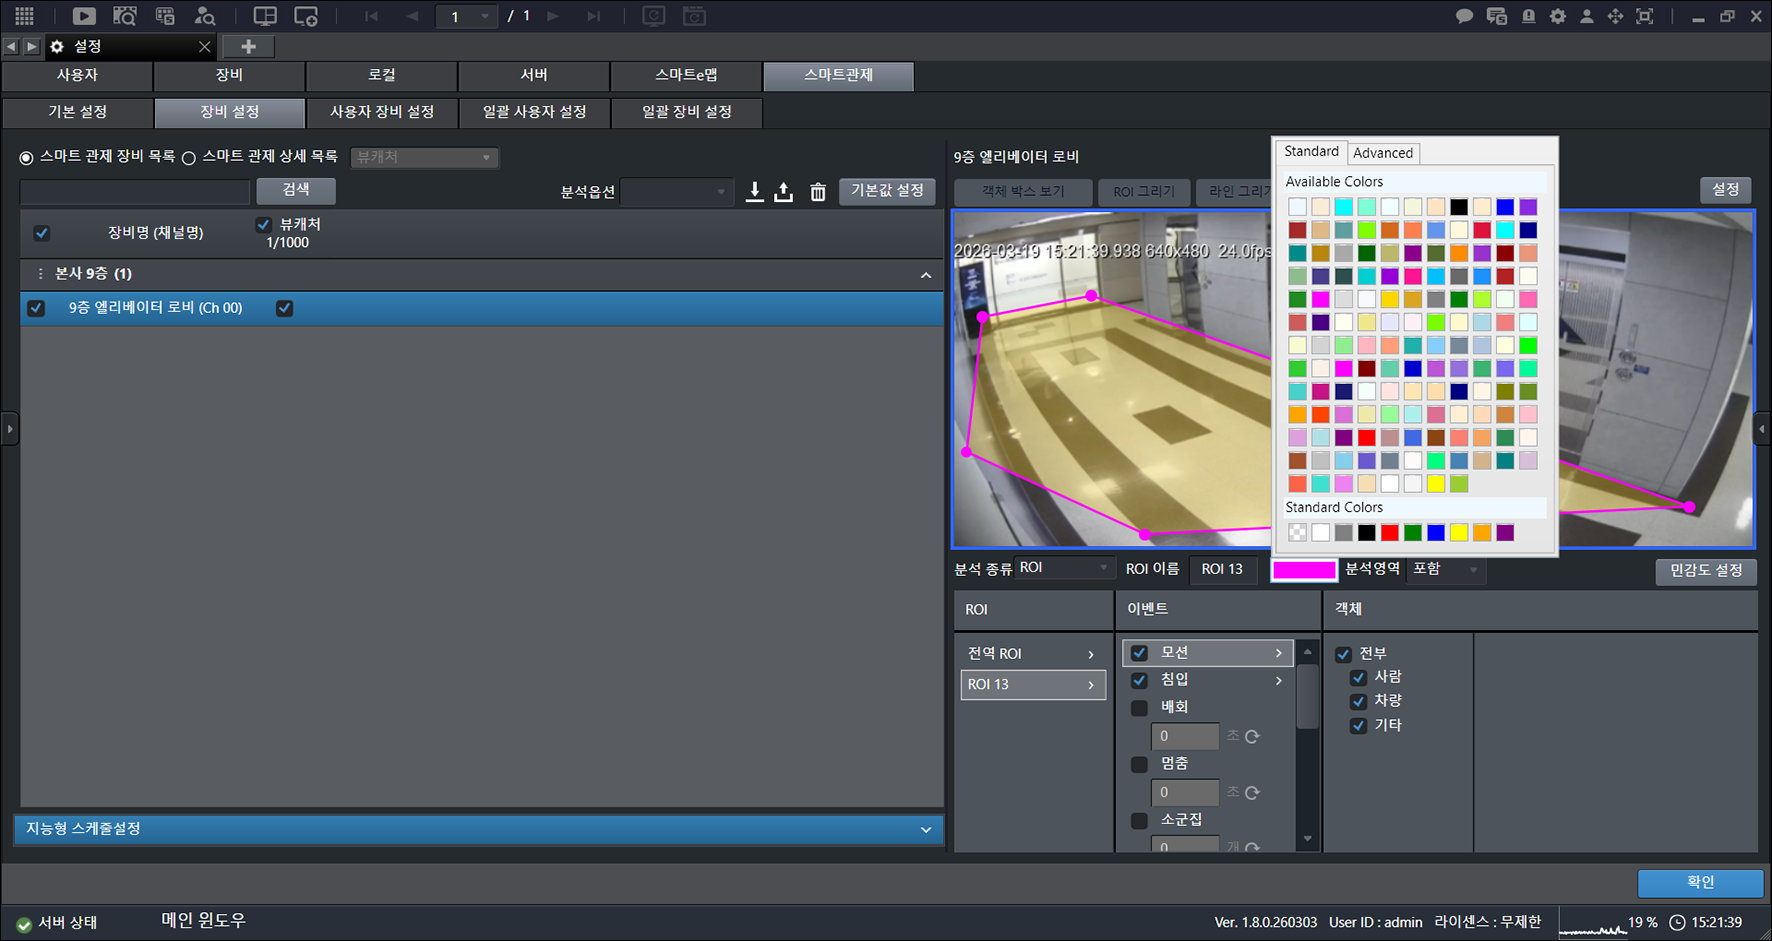
- Click the area marked with a dotted line.
- Select the item you want.
- Click [OK].
![Click [OK].](/manual/vurix-admin/images/page178_img1.jpg)
Configure Smart Crosswalk
The smart crosswalk uses video analytics and a voice guidance system to intelligently recognize pedestrians and vehicles, and warns of hazardous
situations in advance.
- On the main screen, select [] > [Smart Monitoring] > [Device Settings].
- Select a device.
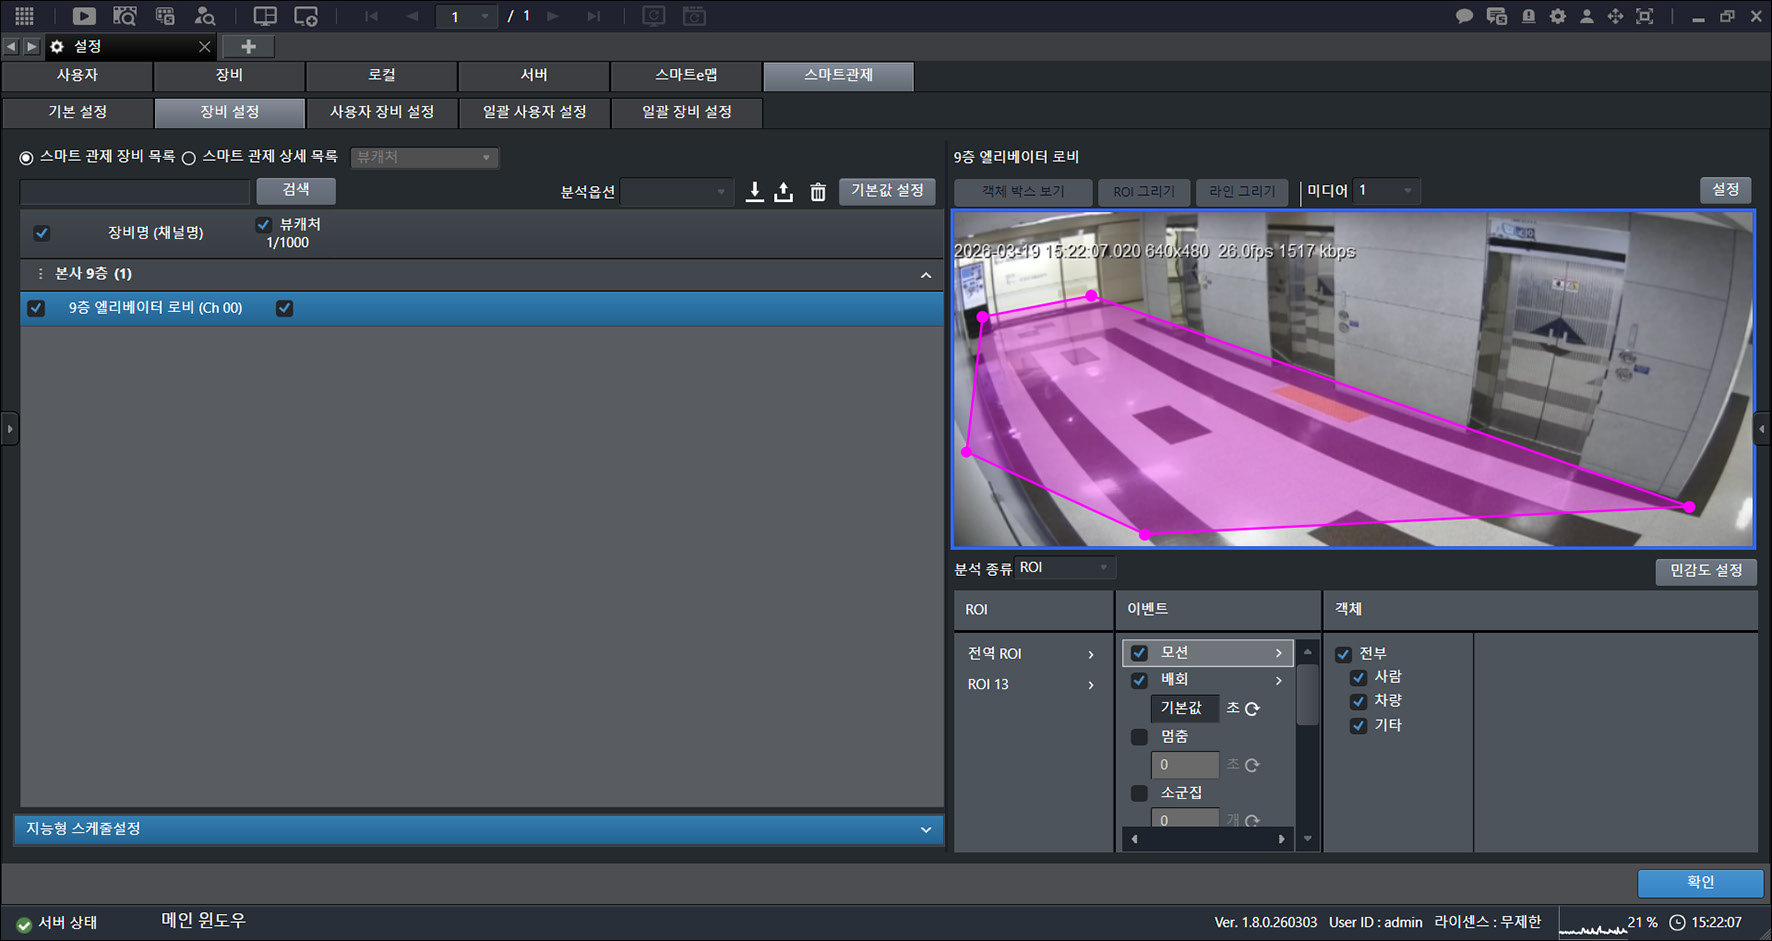
- Click [Settings] > [Smart Crosswalk].
![Click [Settings] > [Smart Crosswalk].](/manual/vurix-admin/images/page179_img2.jpg)
- Select the item you want.
- Click [OK].
Smart Monitoring User Device Settings
To use [User Device Settings], a smart monitoring device must already be assigned to the user account.
Configure Smart Monitoring Devices for a User Account
Assigns a device.
- On the main screen, select [] > [Smart Monitoring] > [User Device Settings].
- Select a user account.
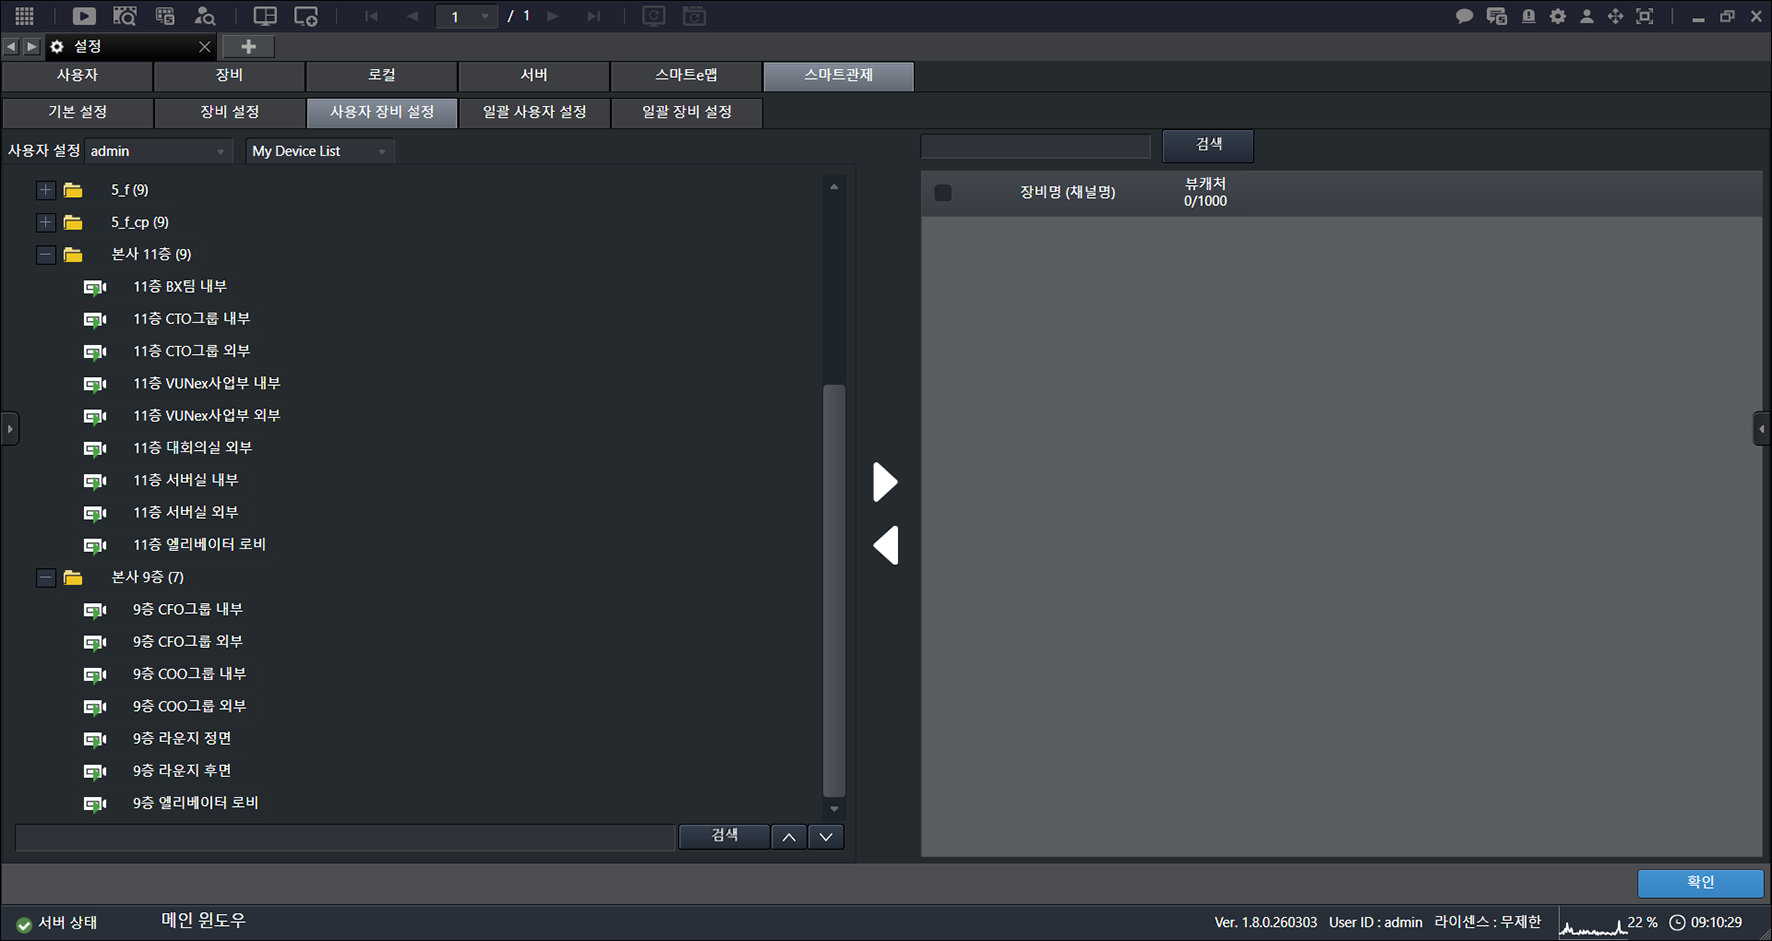
- Select a device.
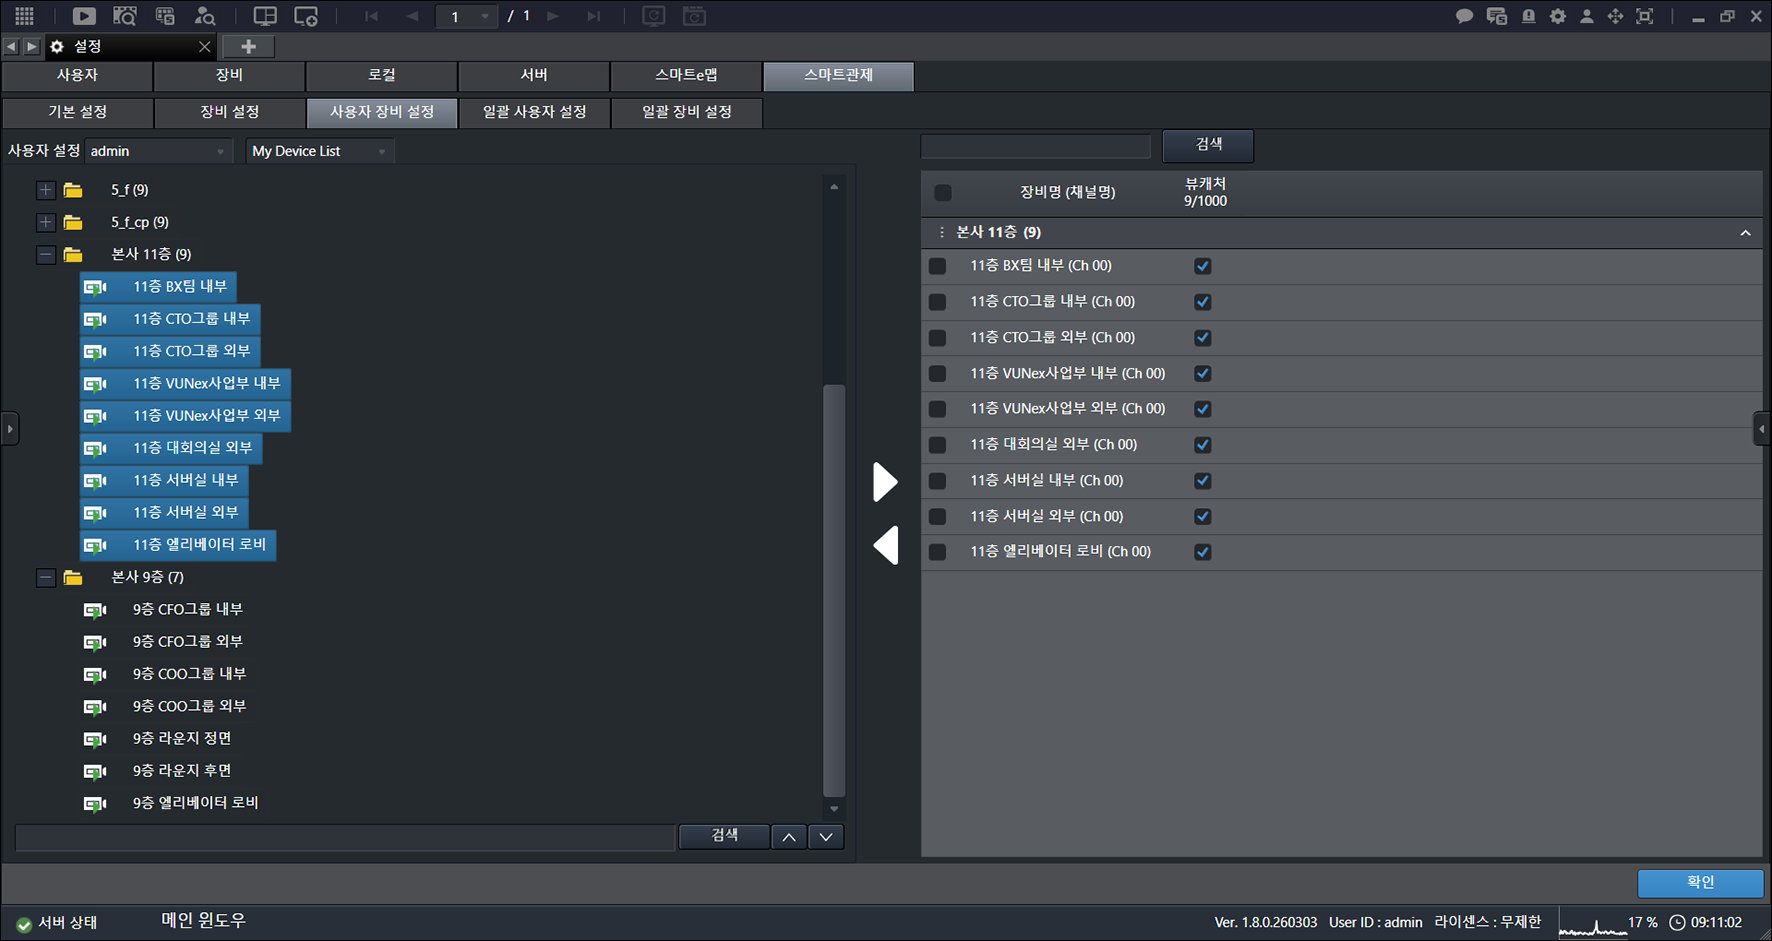
- Click [] > [OK].
Search Smart Monitoring Devices for a User Account
Search assigned equipment.
- On the main screen, select [] > [Smart Monitoring] > [User Device Settings].
- Select a user account.
- Enter a search term in the search box.
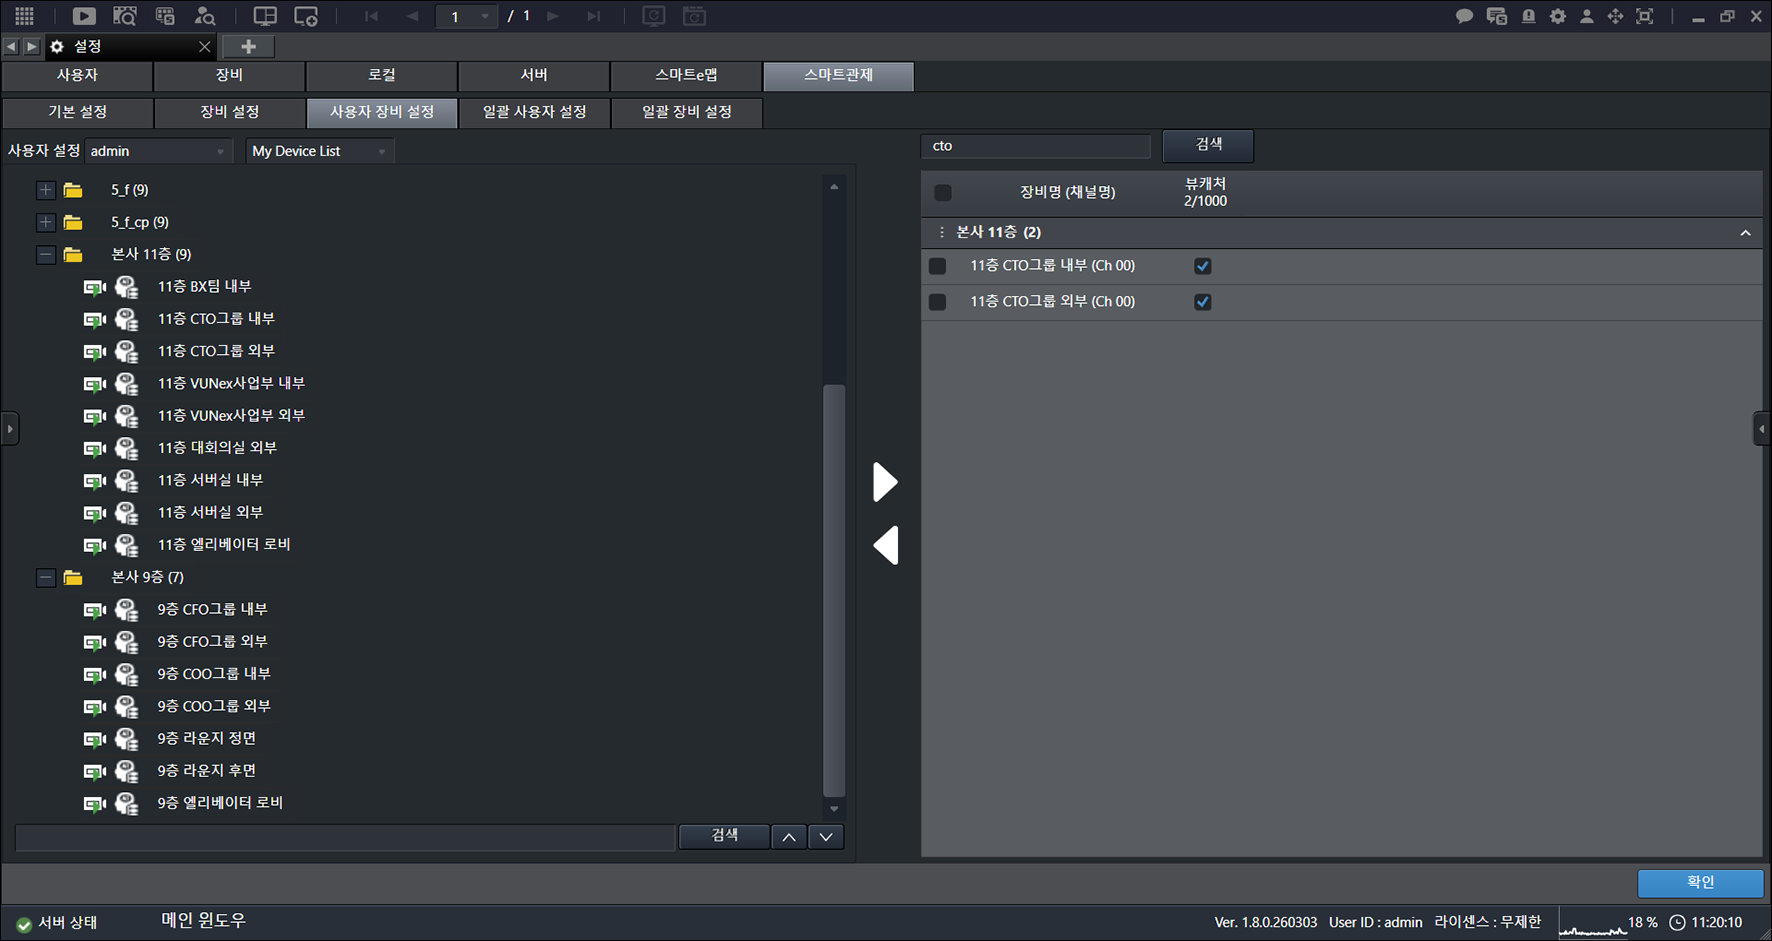
- Check the results.
Smart Monitoring User Batch Settings
Apply device assignment to multiple user accounts in batch.
- On the main screen, select [] > [Smart monitoring] > [Batch user settings].
![On the main screen, select [{{icon:cog-frame}}] > [Smart monitoring] > [Batch user settings].](/manual/vurix-admin/images/page182_img1.jpg)
- Select [Add Mode] or [Delete Mode].
![Select [Add Mode] or [Delete Mode].](/manual/vurix-admin/images/page182_img2.jpg)
- Select a user account.
- Select a device.
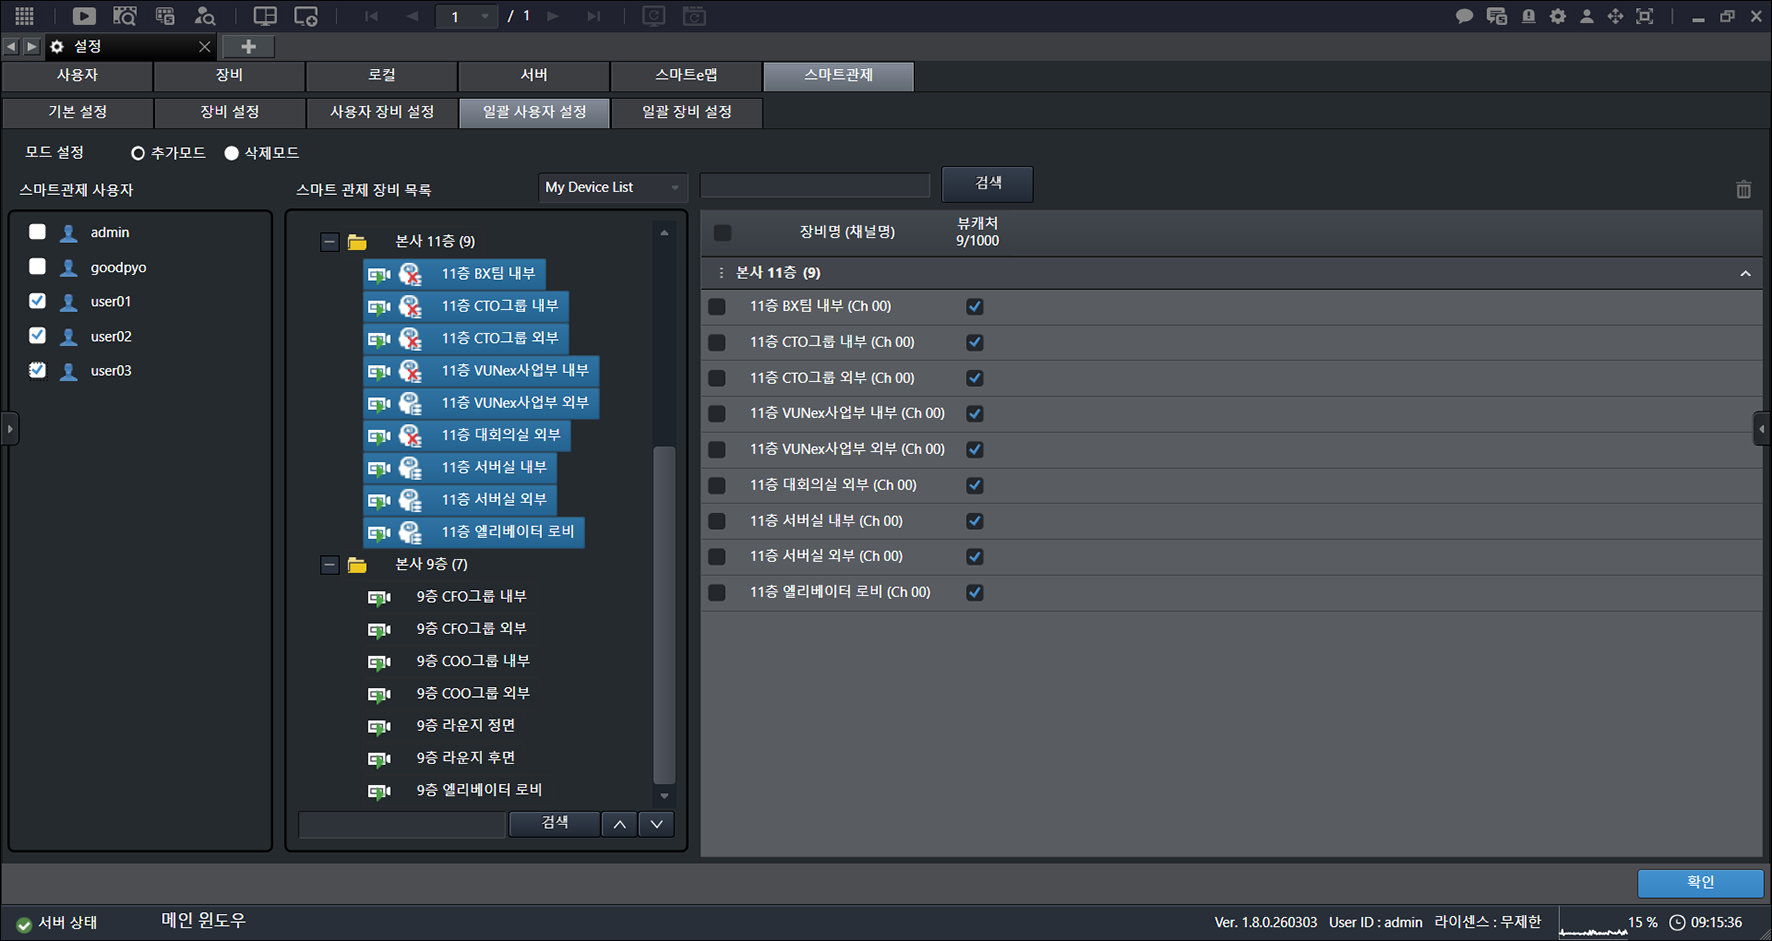
- Drag to the right while holding the mouse button.
- Click [OK].
Smart Monitoring Device Batch Settings
Apply detailed settings such as schedule and event settings to devices in batch.
- On the main screen, select [] > [Smart monitoring] > [Batch device settings].
- Select the item you want.
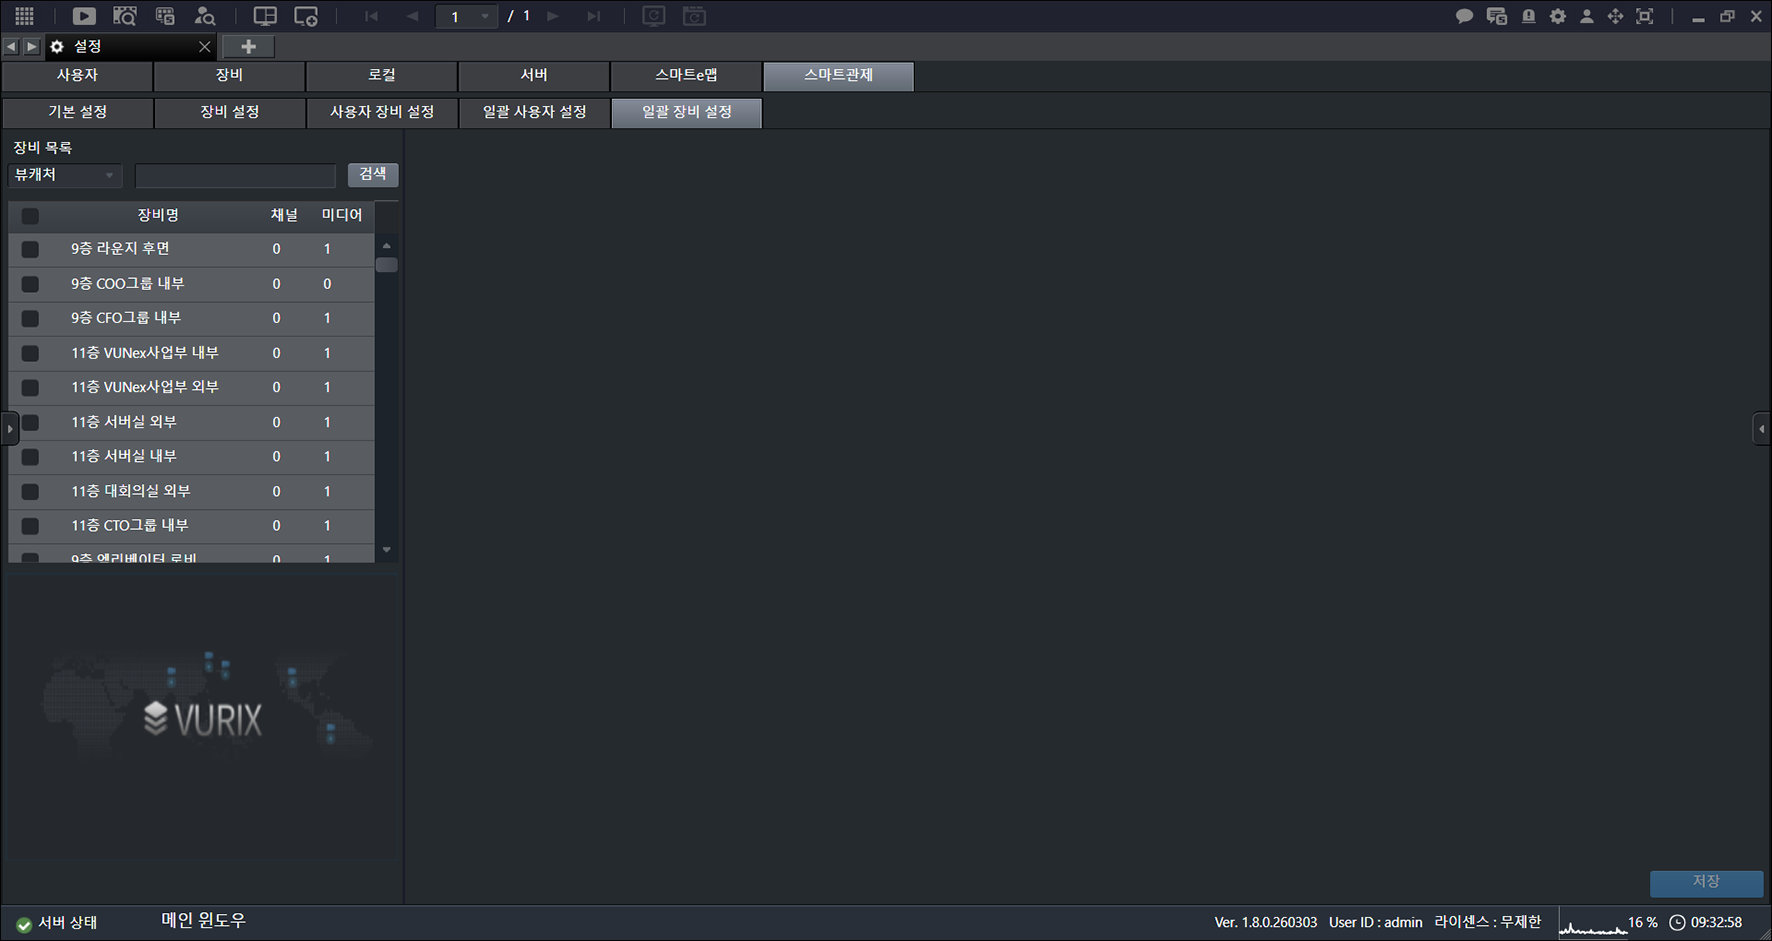
- Select a device.
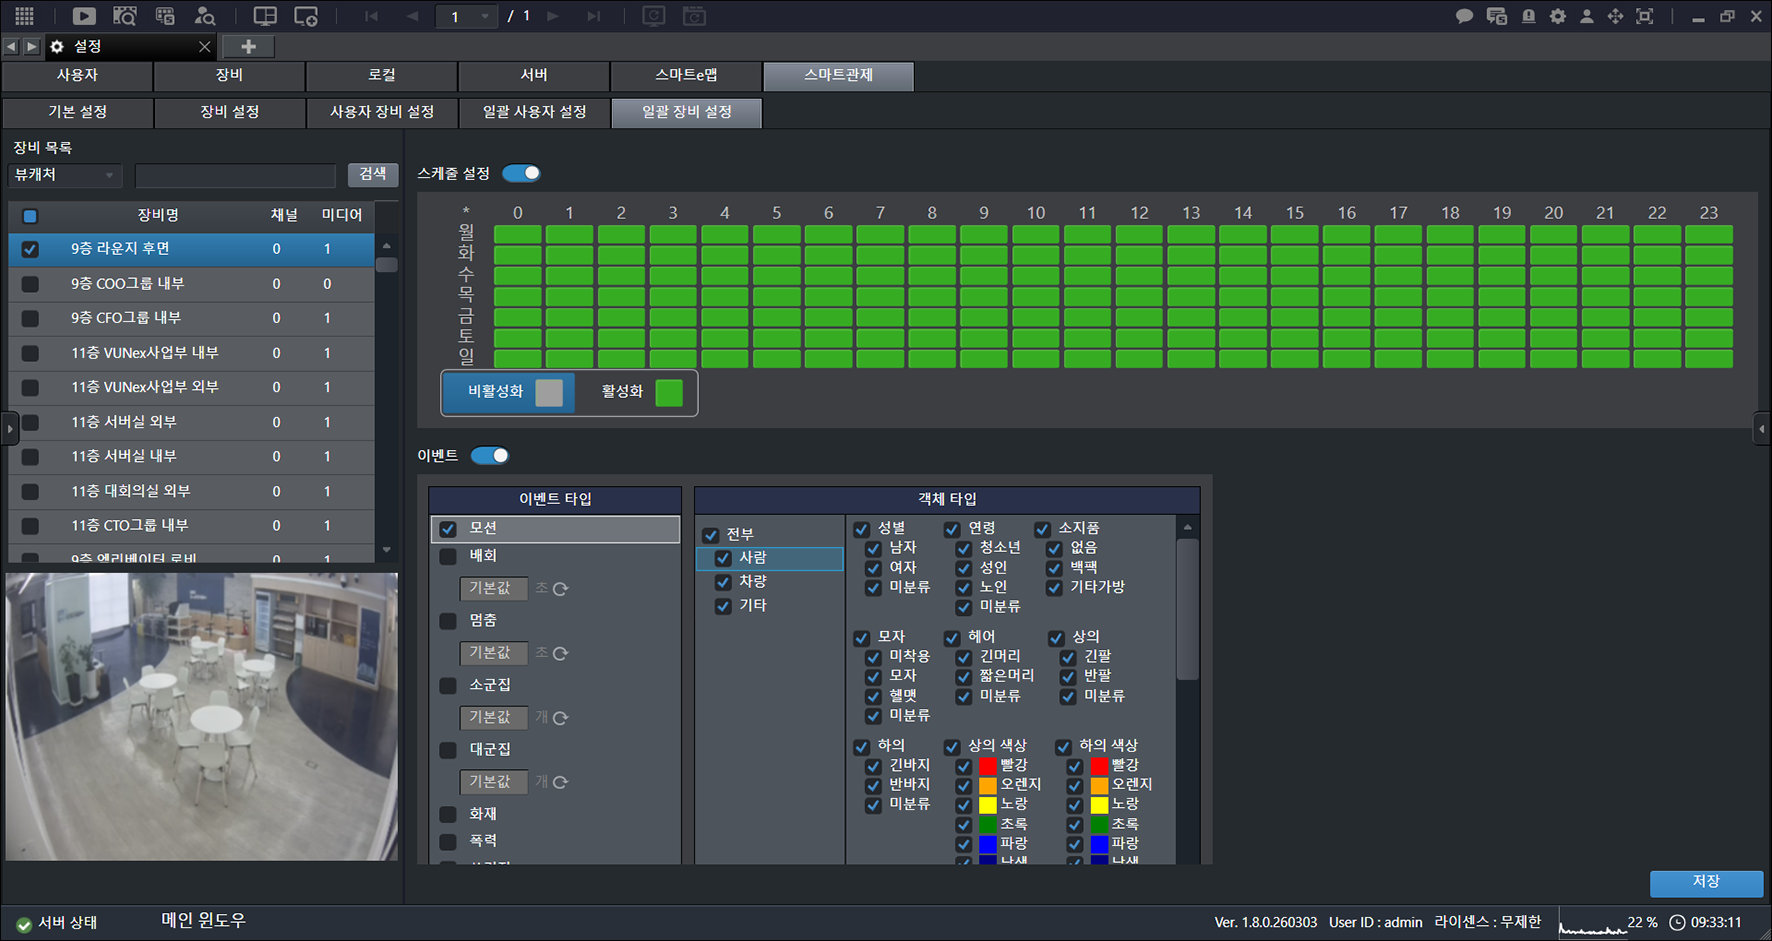
- Set the items you want.
- Click [Save].
IP PA Settings
Configuring IP PA
Configuring IP PA
The screens shown in this guide may differ from the actual product.
- On the main screen, select [] > [IP public address system]. The IP public address system settings screen appears.
![On the main screen, select [{{icon:cog-frame}}] > [IP public address system]. The IP public address system settings screen appears.](/manual/vurix-admin/images/page186_img1.jpg)
- Select the item you want.
IP PA Device Management
Manage devices such as speakers and microphones.
Adding an IP PA Device
Adds a device.
- On the main screen, select [] > [IP PA] > [Device Management].
![On the main screen, select [{{icon:cog-frame}}] > [IP PA] > [Device Management].](/manual/vurix-admin/images/page187_img1.jpg)
- Select [Speaker] or [Microphone].
![Select [Speaker] or [Microphone].](/manual/vurix-admin/images/page187_img2.jpg)
- Click [+].
- Enter the information.
- [Device name]: Enter the device name.
- [IP]: Enter the IP.
- [Web port]: Enter the port.
- [ID]: Enter the ID.
- [Password]: Enter the password.
- [Speaker type]: Select the speaker type.
- [Camera link]: Select the camera.
- [Model]: Select the model.
- [Manufacturer]: Select the manufacturer.
- [Latitude] / [Longitude]: Enter the latitude and longitude.
- Click [Add].
Synchronizing IP PA Devices
Synchronize audio sources with devices.
- On the main screen, select [] > [IP PA] > [Device Management].
![On the main screen, select [{{icon:cog-frame}}] > [IP PA] > [Device Management].](/manual/vurix-admin/images/page189_img1.jpg)
- Select the item you want.
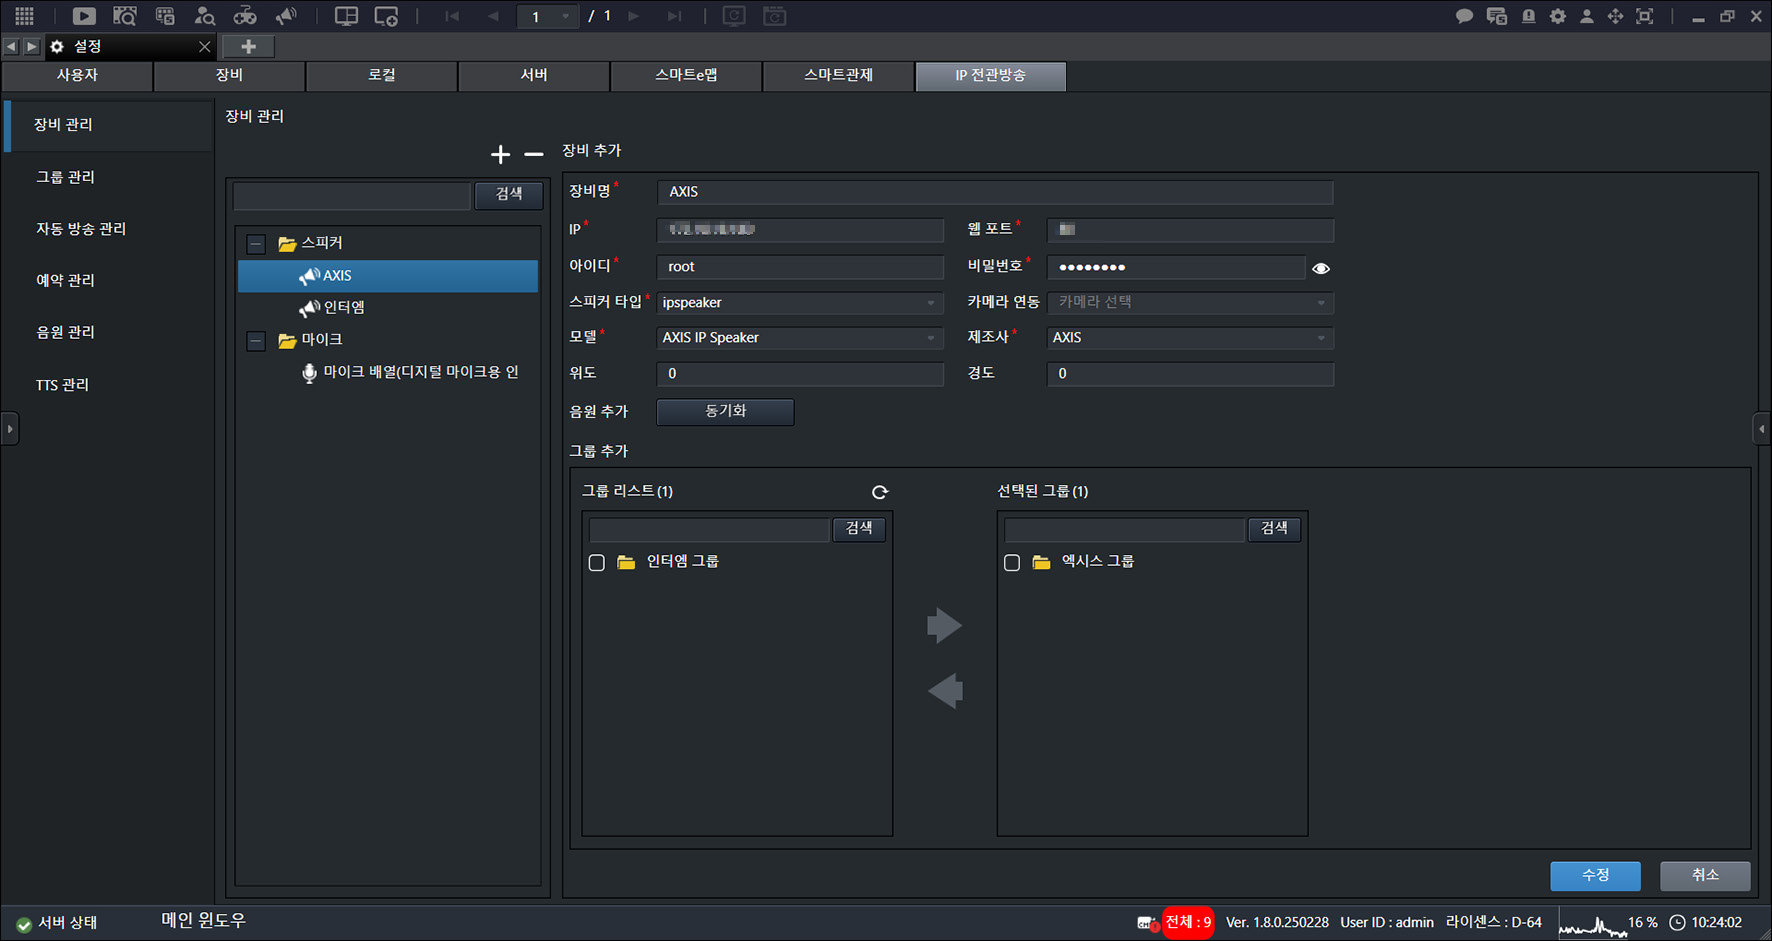
- Click [Sync].
- When adding another AXIS device while an AXIS device is already added, audio registered on the existing AXIS device can be synchronized.
- Inter-M devices do not support [Sync].
- If only Inter-M devices are registered, or if no AXIS device is connected, [Preview] is not supported.
- TTS audio supports [Preview] regardless of the device.
Deleting an IP PA Device
Deletes the device.
- On the main screen, select [] > [IP PA] > [Device Management].
![On the main screen, select [{{icon:cog-frame}}] > [IP PA] > [Device Management].](/manual/vurix-admin/images/page191_img1.jpg)
- Select the item you want.
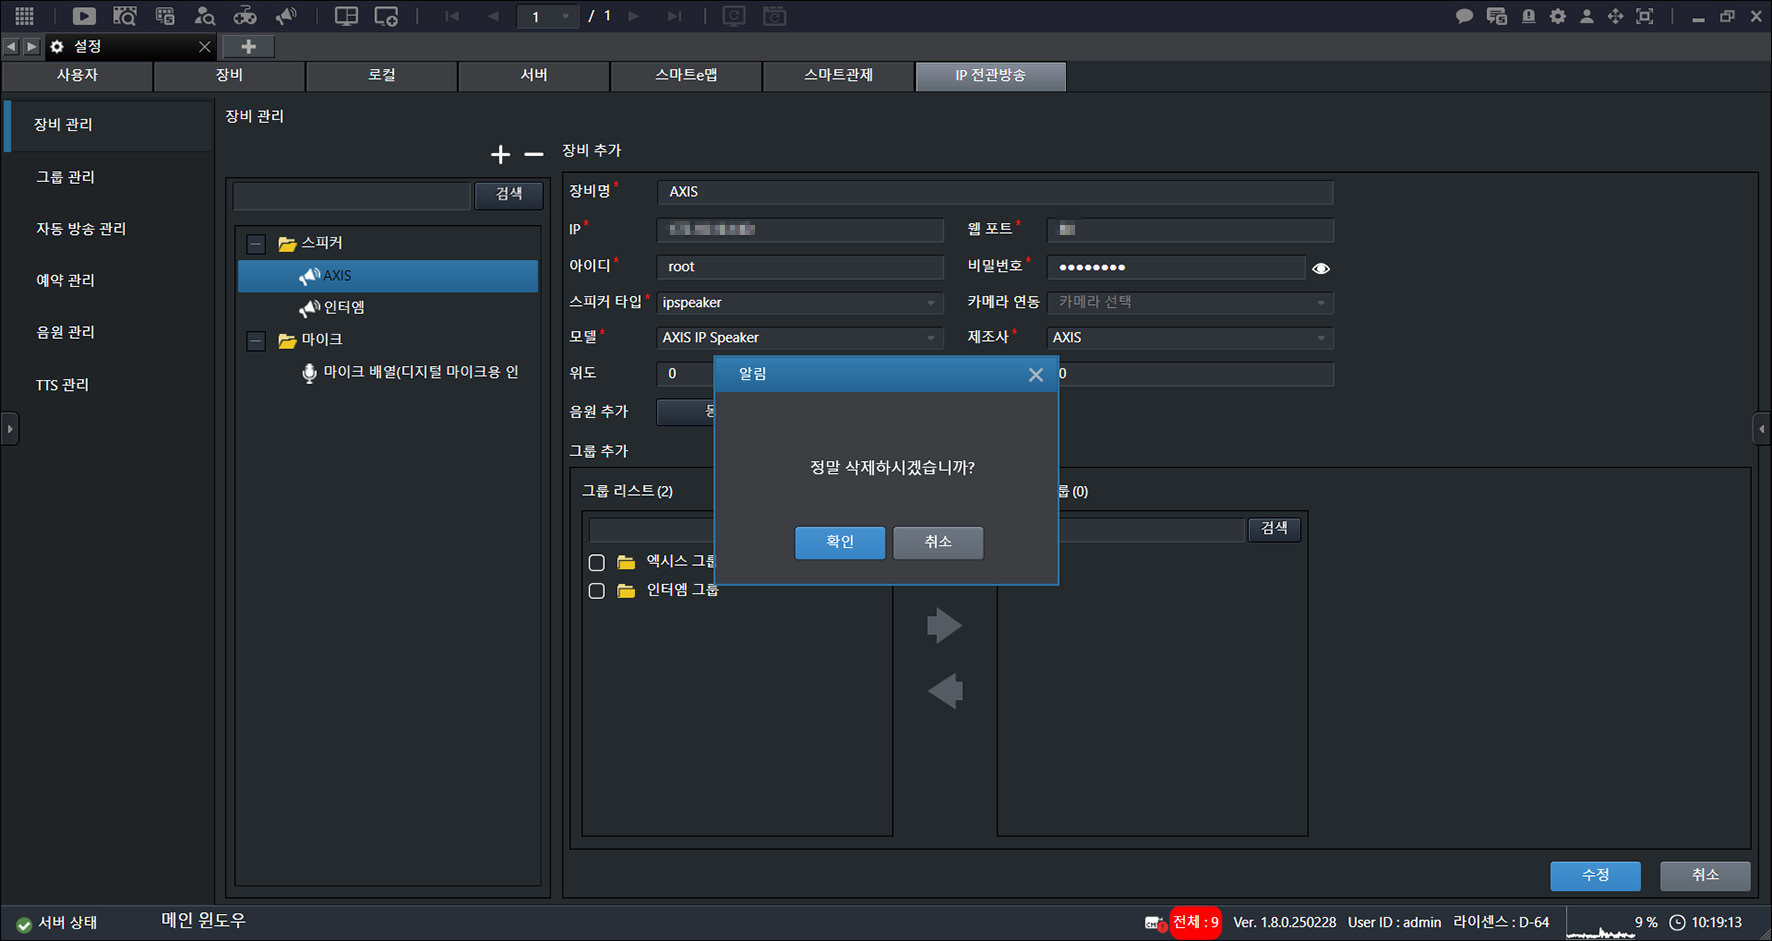
- Click [-] > [OK].
IP PA Group Management
Manage IP PA groups.
Adding an IP PA Group
Adds a group.
- On the main screen, select [] > [IP PA] > [Group Management].
![On the main screen, select [{{icon:cog-frame}}] > [IP PA] > [Group Management].](/manual/vurix-admin/images/page192_img1.jpg)
- Click [+].
![Click [+].](/manual/vurix-admin/images/page192_img2.jpg)
- Enter the [Group Name].
- Click [Add].
Deleting an IP PA Group
Deletes the group.
- On the main screen, select [] > [IP PA] > [Group Management].
![On the main screen, select [{{icon:cog-frame}}] > [IP PA] > [Group Management].](/manual/vurix-admin/images/page193_img1.jpg)
- Select the item you want.
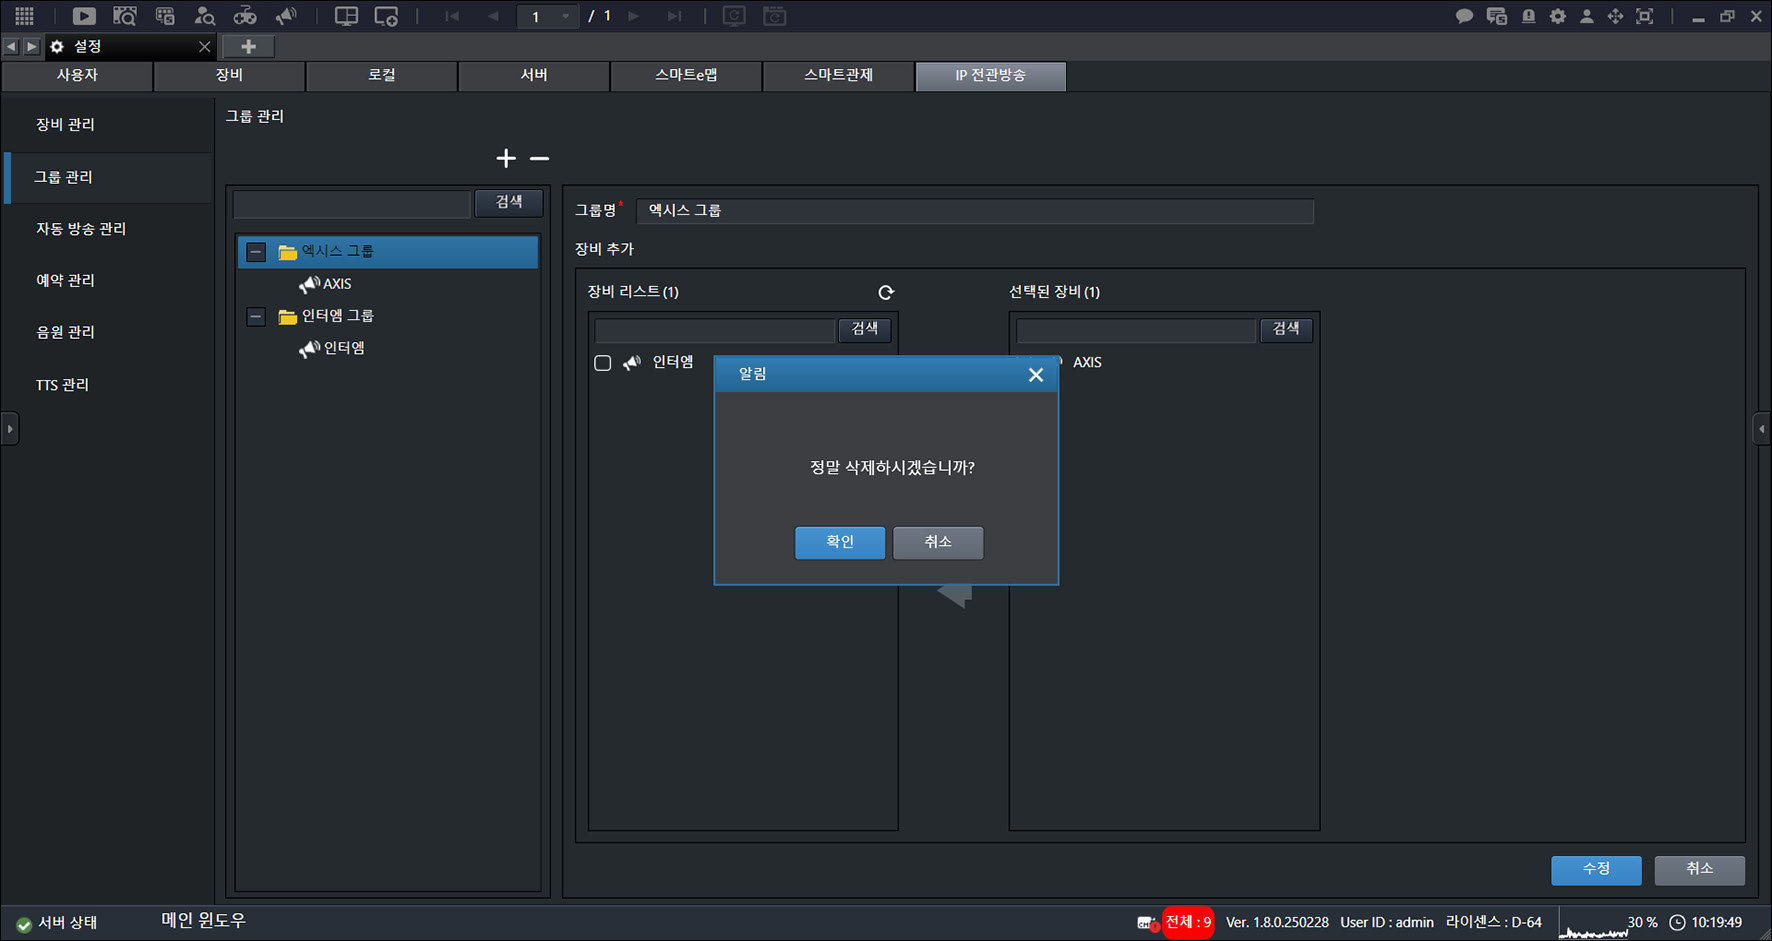
- Click [-] > [OK].
Auto Broadcast Management
Manage auto broadcasts.
Add Auto Broadcast
Add an auto broadcast.
- On the main screen, select [] > [IP PA] > [Auto Broadcast Management].
![On the main screen, select [{{icon:cog-frame}}] > [IP PA] > [Auto Broadcast Management].](/manual/vurix-admin/images/page194_img1.jpg)
- Select the item you want.
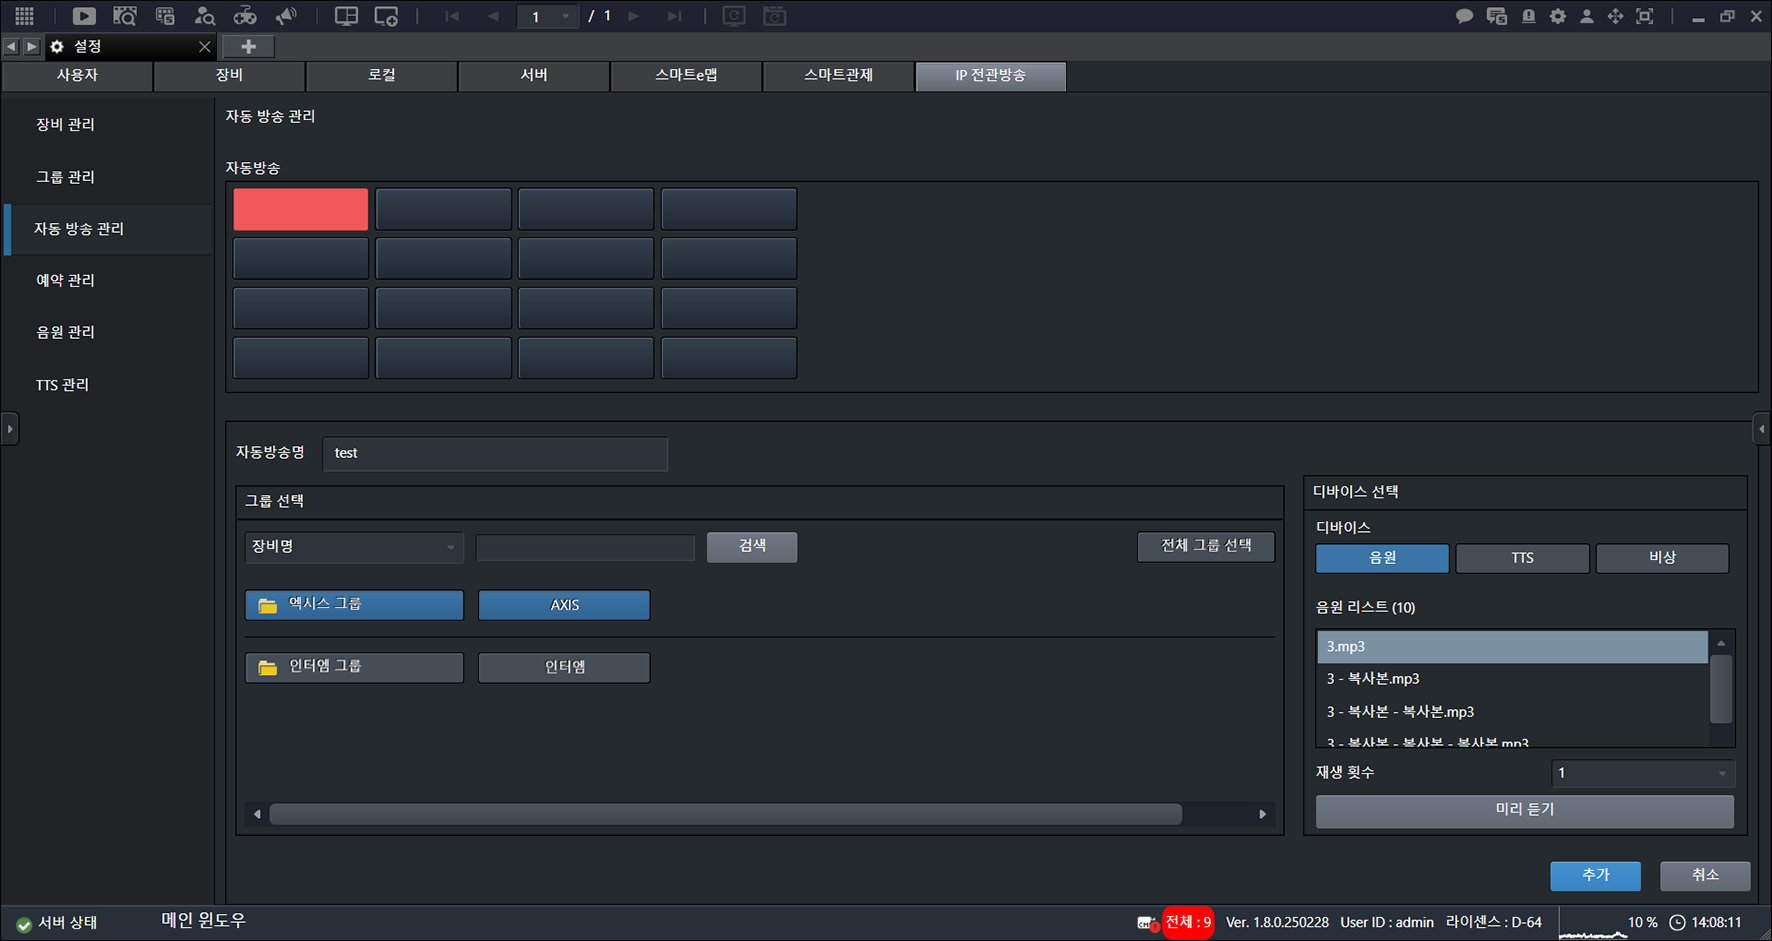
- Enter the [Auto Broadcast Name].
- Click [Add].
Delete Auto Broadcast
Delete an auto broadcast.
- On the main screen, select [] > [IP PA] > [Auto Broadcast Management].
![On the main screen, select [{{icon:cog-frame}}] > [IP PA] > [Auto Broadcast Management].](/manual/vurix-admin/images/page195_img1.jpg)
- Select the item you want.
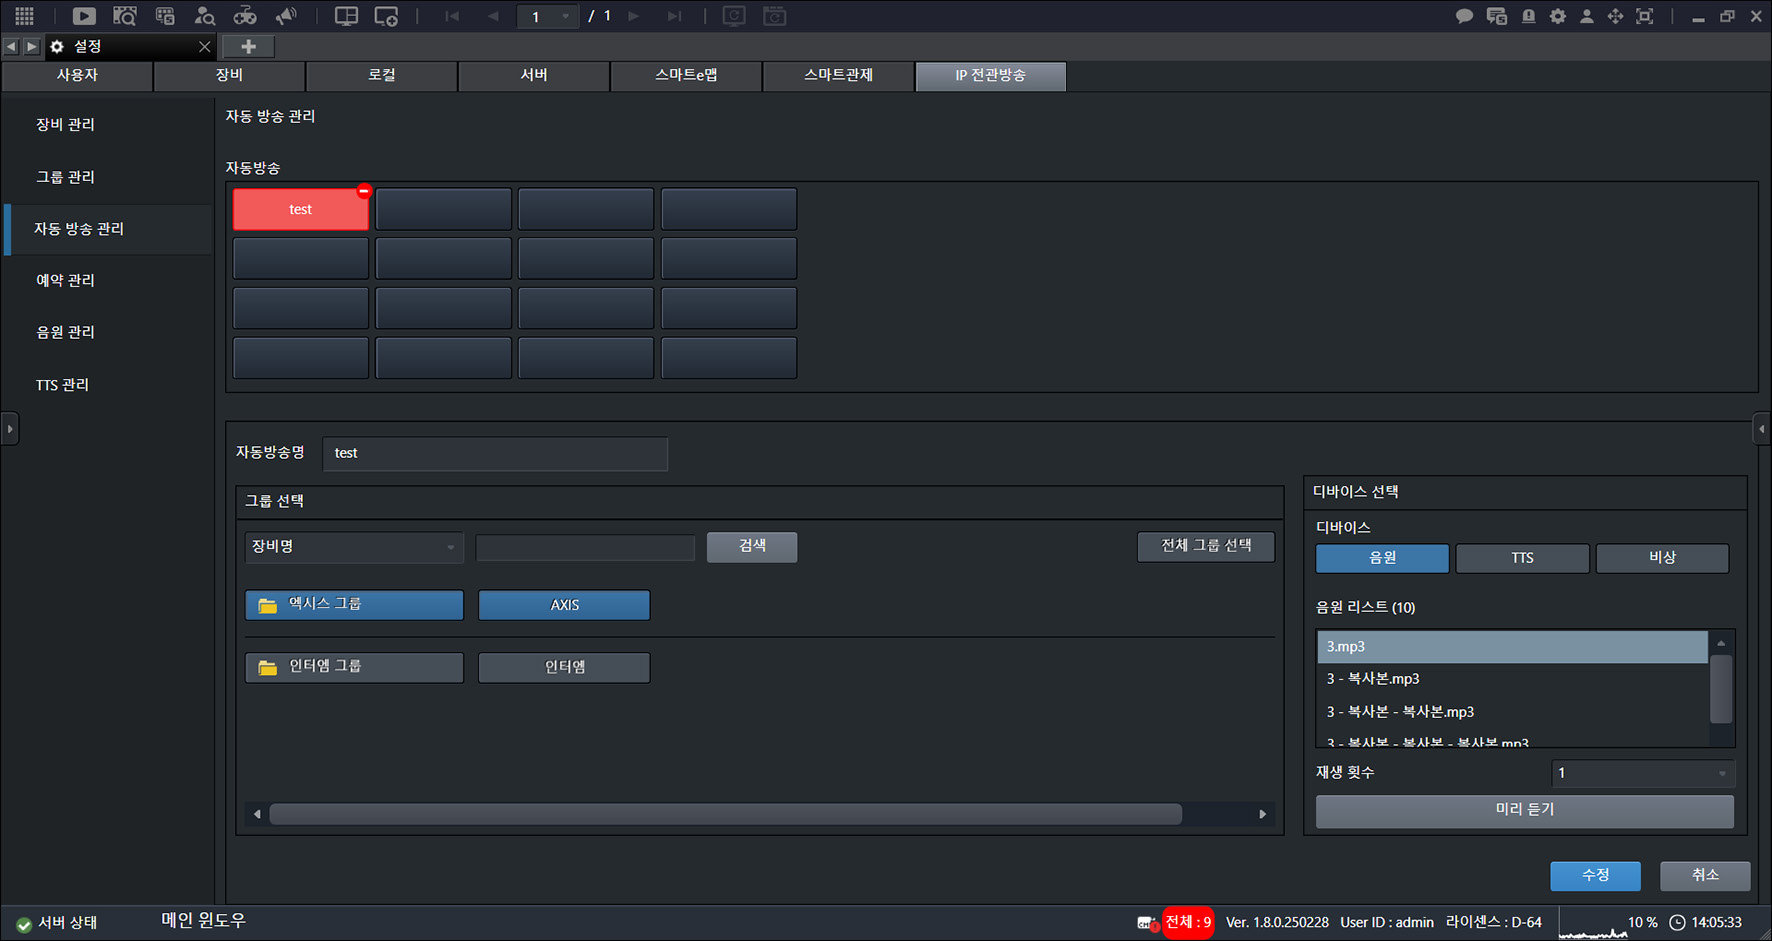
- Click [-].
IP PA Schedule Management
Manage IP PA schedules.
Adding an IP PA Schedule
Adds a schedule.
- On the main screen, select [] > [IP PA] > [Schedule Management].
![On the main screen, select [{{icon:cog-frame}}] > [IP PA] > [Schedule Management].](/manual/vurix-admin/images/page196_img1.jpg)
- Click [Add].
![Click [Add].](/manual/vurix-admin/images/page196_img2.jpg)
- Set the [Scheduled Start Time] and [Scheduled Date].
- Click [Add].
Editing an IP PA Schedule
Edit a schedule.
- On the main screen, select [] > [IP PA] > [Schedule Management].
![On the main screen, select [{{icon:cog-frame}}] > [IP PA] > [Schedule Management].](/manual/vurix-admin/images/page197_img1.jpg)
- Select the item you want.
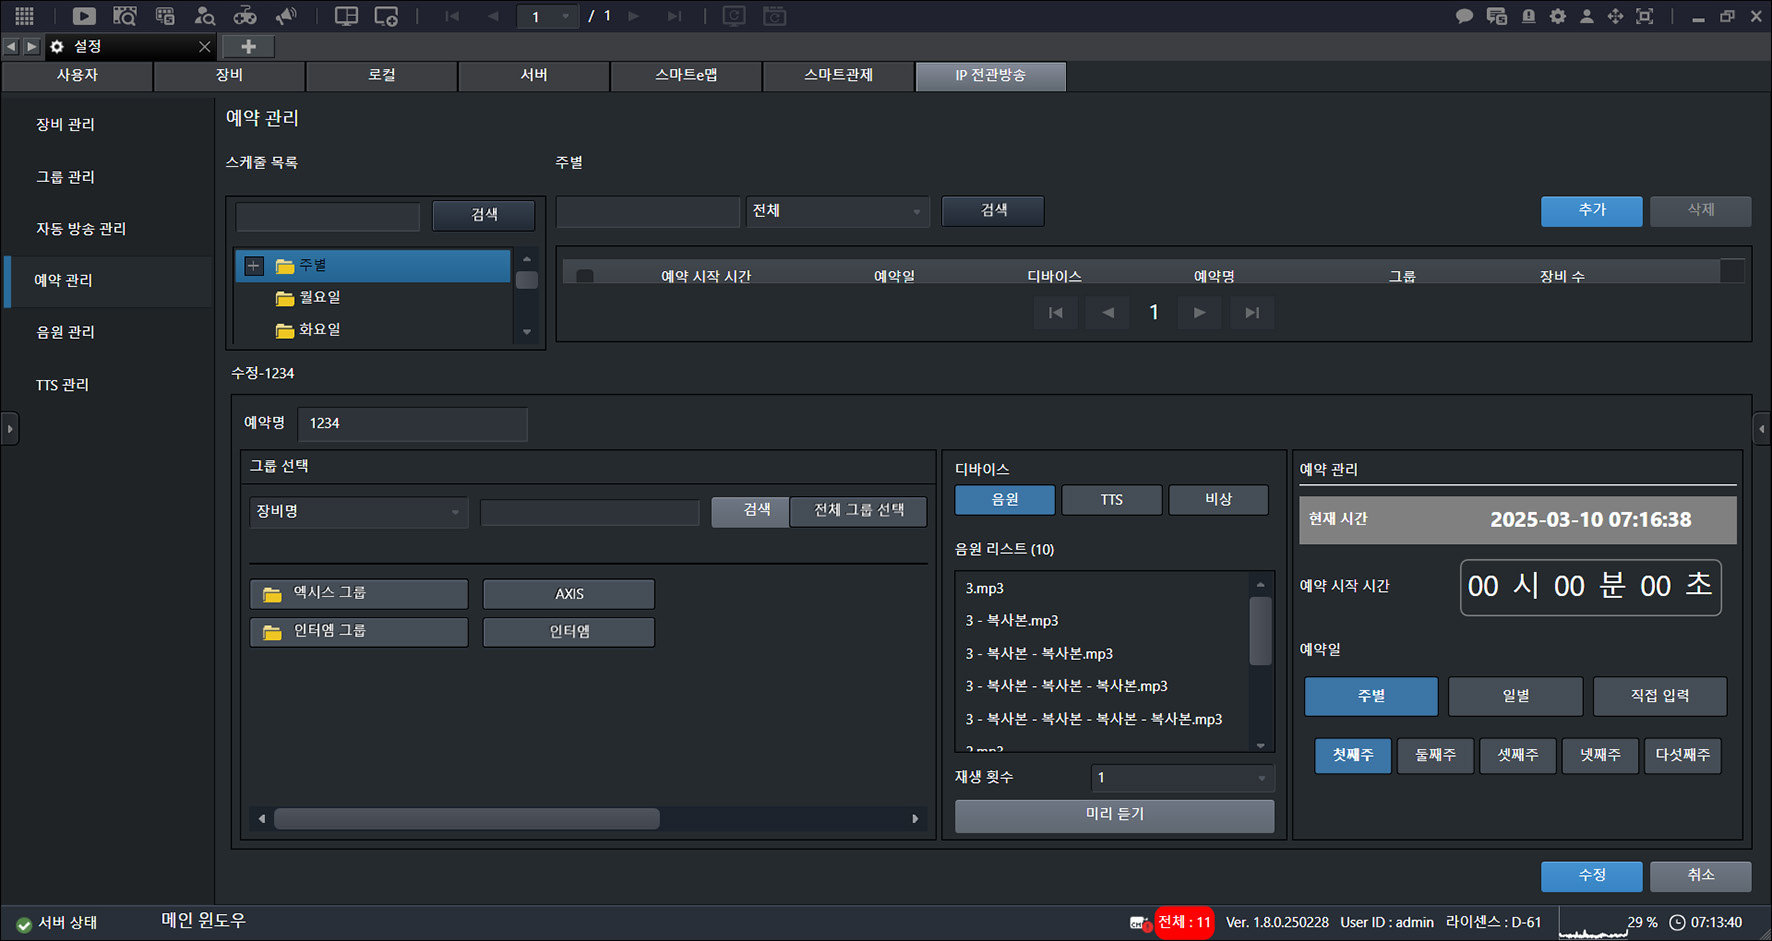
- Click [Edit].
Deleting an IP PA Schedule
Delete a schedule.
- On the main screen, select [] > [IP PA] > [Schedule Management].
![On the main screen, select [{{icon:cog-frame}}] > [IP PA] > [Schedule Management].](/manual/vurix-admin/images/page198_img1.jpg)
- Select the item you want.
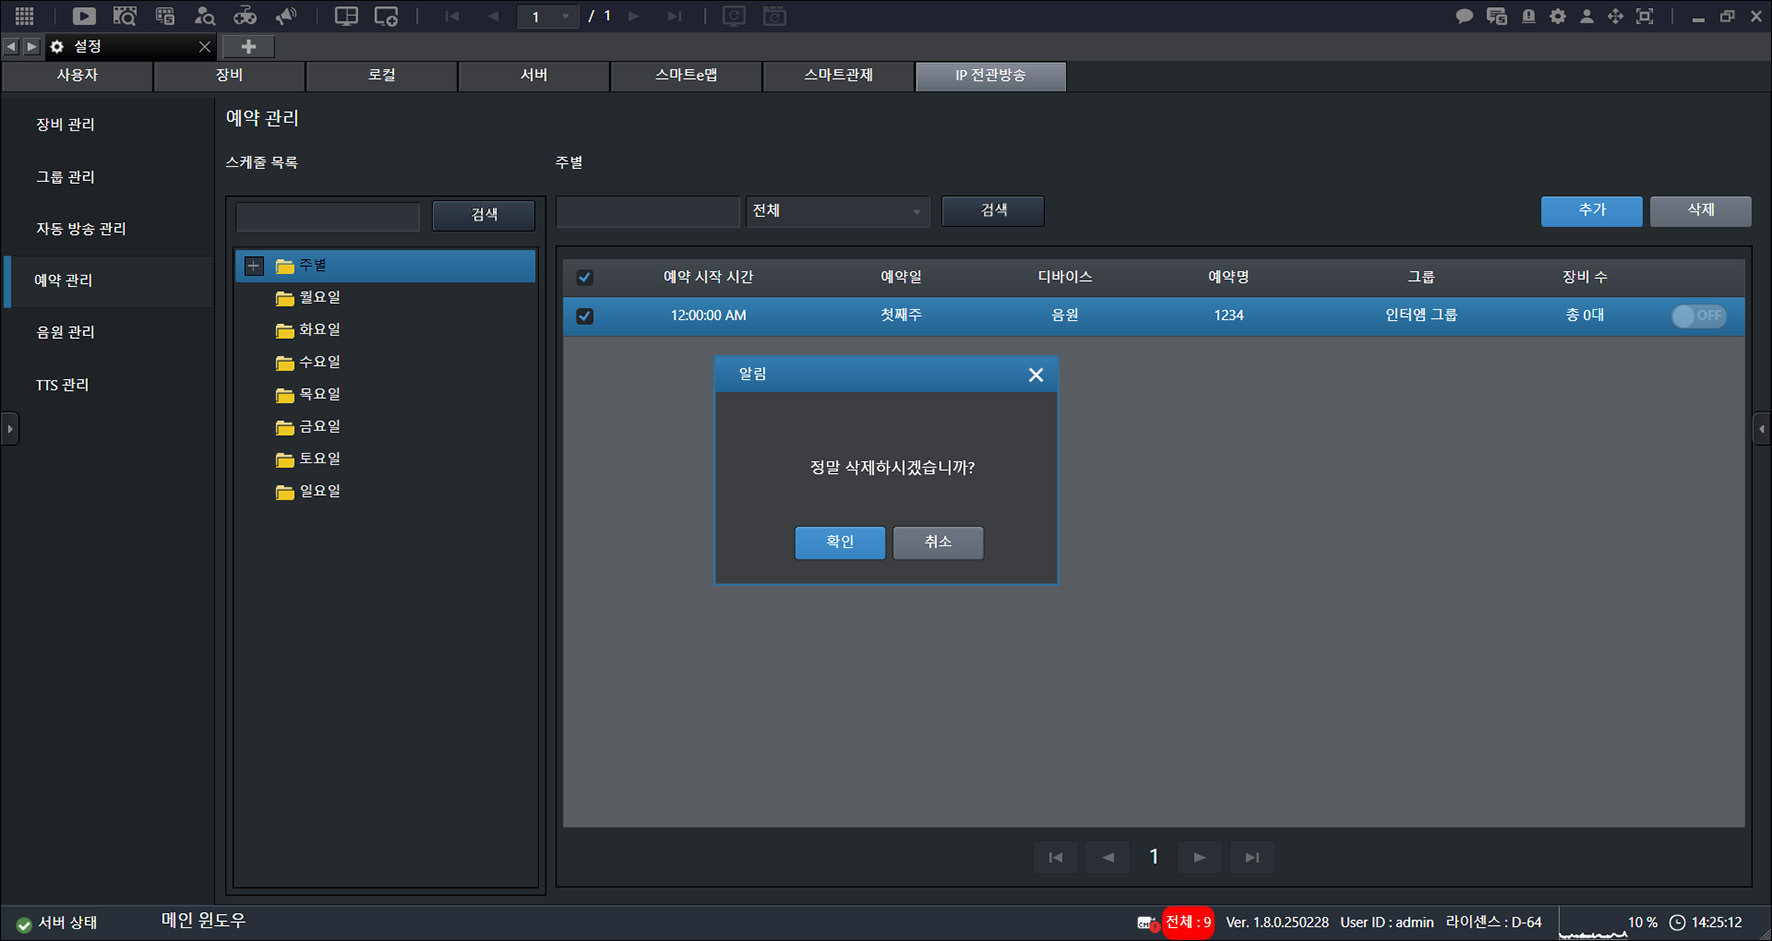
- Click [Delete] > [OK].
IP PA Audio File Management
Manage IP PA audio files.
Adding an IP PA Audio File
Add an audio source.
- On the main screen, select [] > [IP PA] > [Audio File Management].
![On the main screen, select [{{icon:cog-frame}}] > [IP PA] > [Audio File Management].](/manual/vurix-admin/images/page199_img1.jpg)
- Click [Add].
![Click [Add].](/manual/vurix-admin/images/page199_img2.jpg)
- Click [Select File].
![Click [Select File].](/manual/vurix-admin/images/page200_img1.jpg)
- Click [Add].
Editing an IP PA Audio File
Edit an audio source.
- On the main screen, select [] > [IP PA] > [Audio File Management].
![On the main screen, select [{{icon:cog-frame}}] > [IP PA] > [Audio File Management].](/manual/vurix-admin/images/page201_img1.jpg)
- Select the item you want.
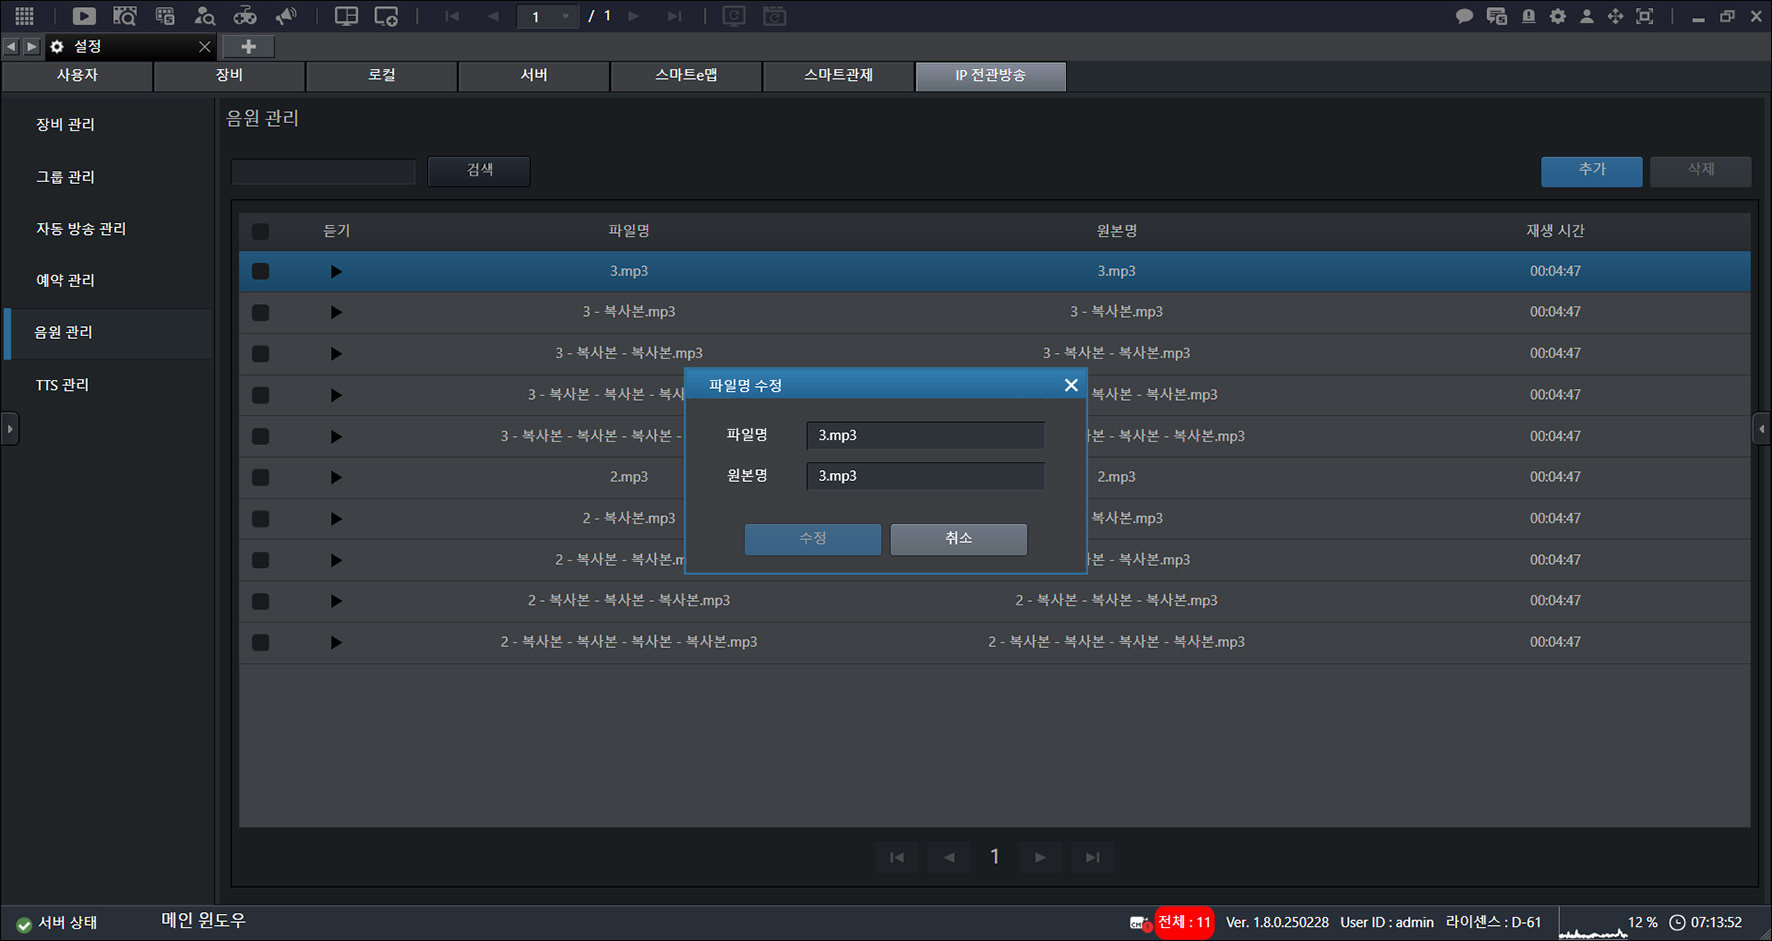
- Click [Edit].
Deleting an IP PA Audio File
Delete an audio source.
- On the main screen, select [] > [IP PA] > [Audio File Management].
![On the main screen, select [{{icon:cog-frame}}] > [IP PA] > [Audio File Management].](/manual/vurix-admin/images/page202_img1.jpg)
- Select the item you want.
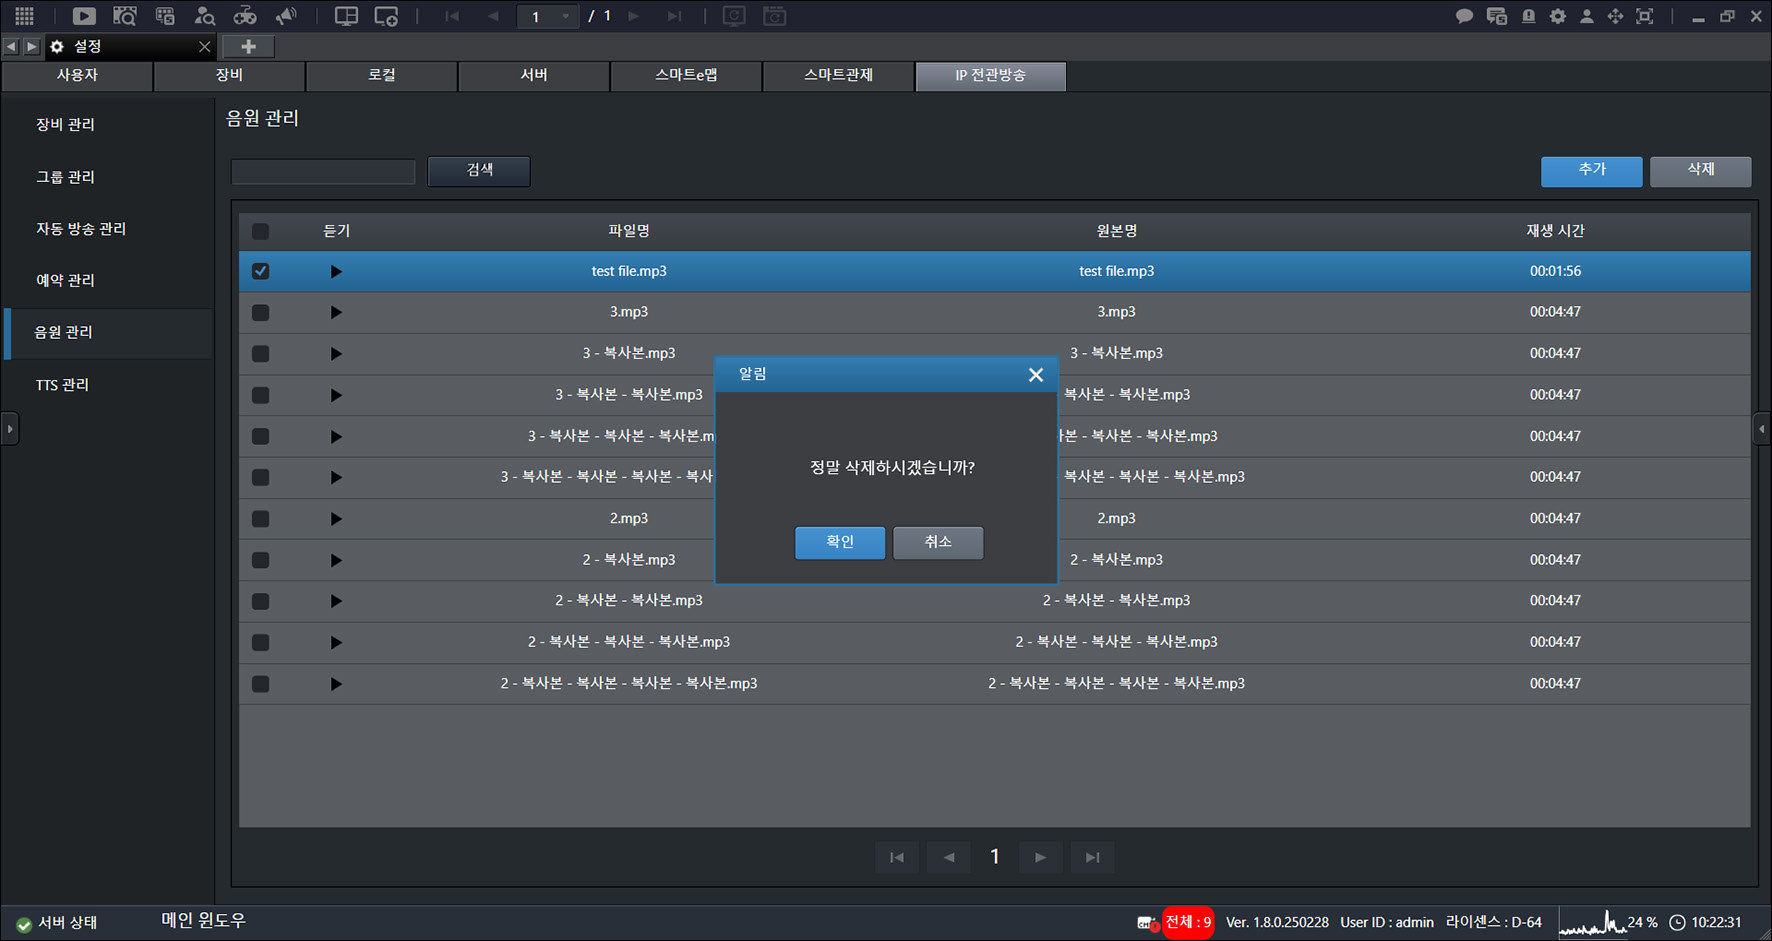
- Click [Delete] > [OK].
IP PA TTS Management
Manage IP PA TTS (Text to Speech).
Adding an IP PA TTS
Adds a TTS.
- On the main screen, select [] > [IP PA] > [TTS Management].
![On the main screen, select [{{icon:cog-frame}}] > [IP PA] > [TTS Management].](/manual/vurix-admin/images/page203_img1.jpg)
- Click [Add].
![Click [Add].](/manual/vurix-admin/images/page203_img2.jpg)
- Enter the title and content.
- Click [Add].
Editing an IP PA TTS
Edits the TTS.
- On the main screen, select [] > [IP PA] > [TTS Management].
![On the main screen, select [{{icon:cog-frame}}] > [IP PA] > [TTS Management].](/manual/vurix-admin/images/page204_img1.jpg)
- Select the item you want.
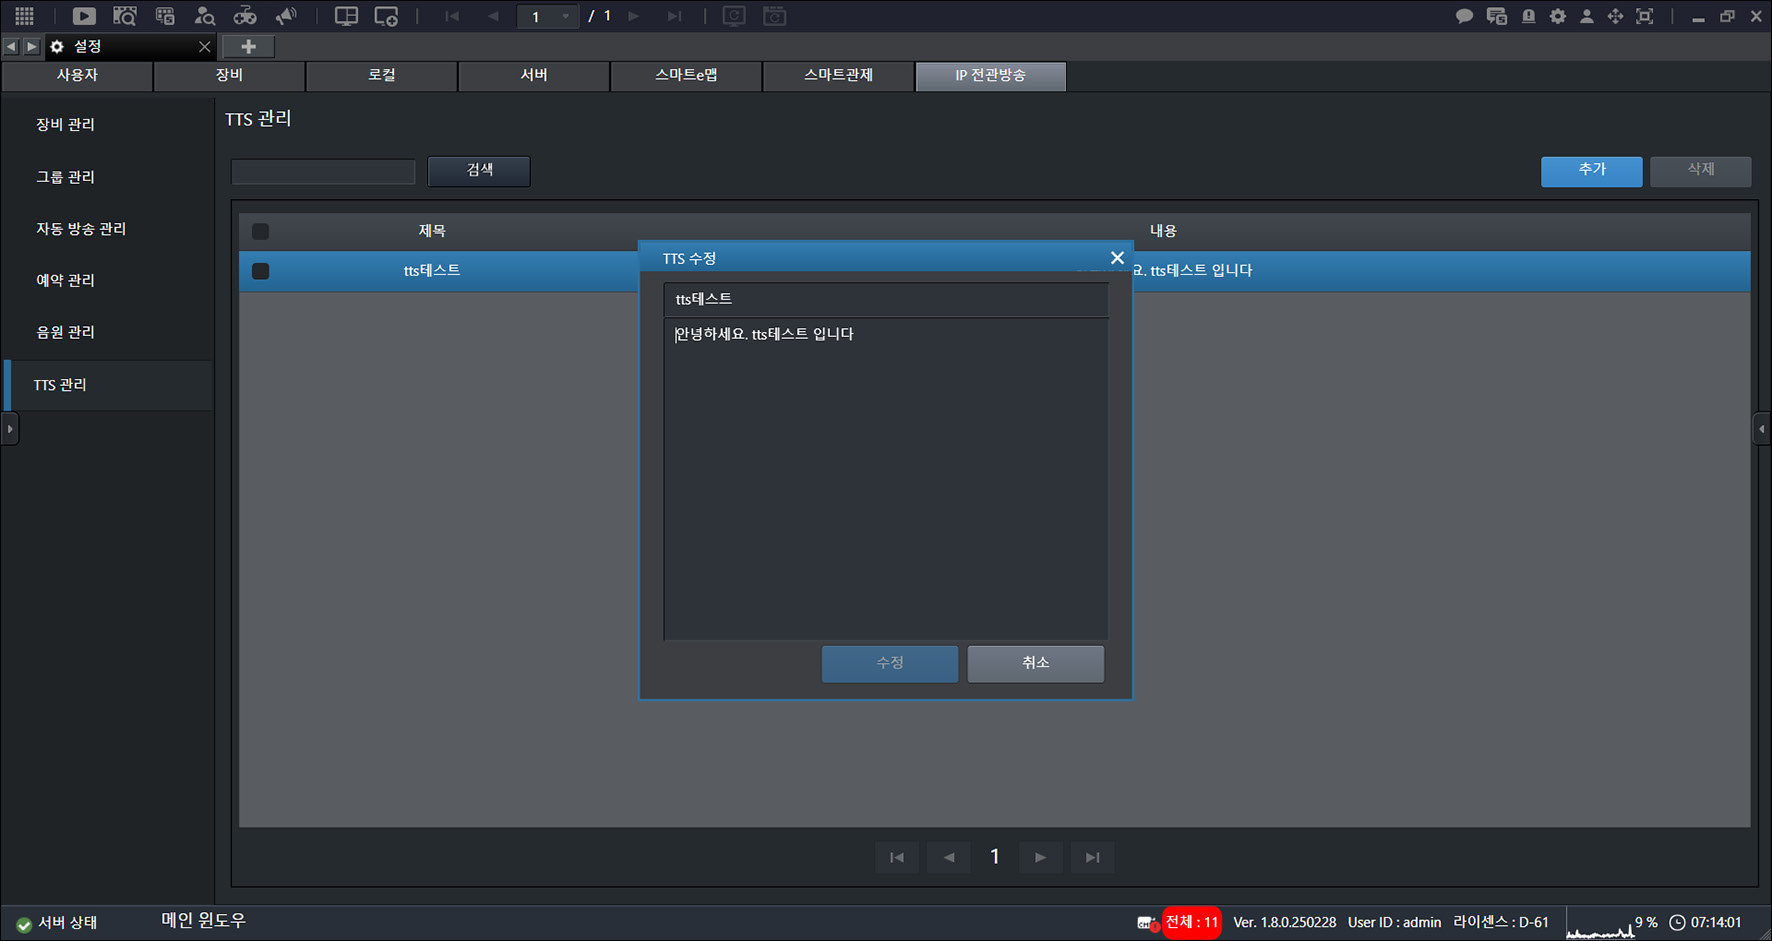
- Click [Edit].
Deleting an IP PA TTS
Deletes the TTS.
- On the main screen, select [] > [IP PA] > [TTS Management].
![On the main screen, select [{{icon:cog-frame}}] > [IP PA] > [TTS Management].](/manual/vurix-admin/images/page205_img1.jpg)
- Select the item you want.
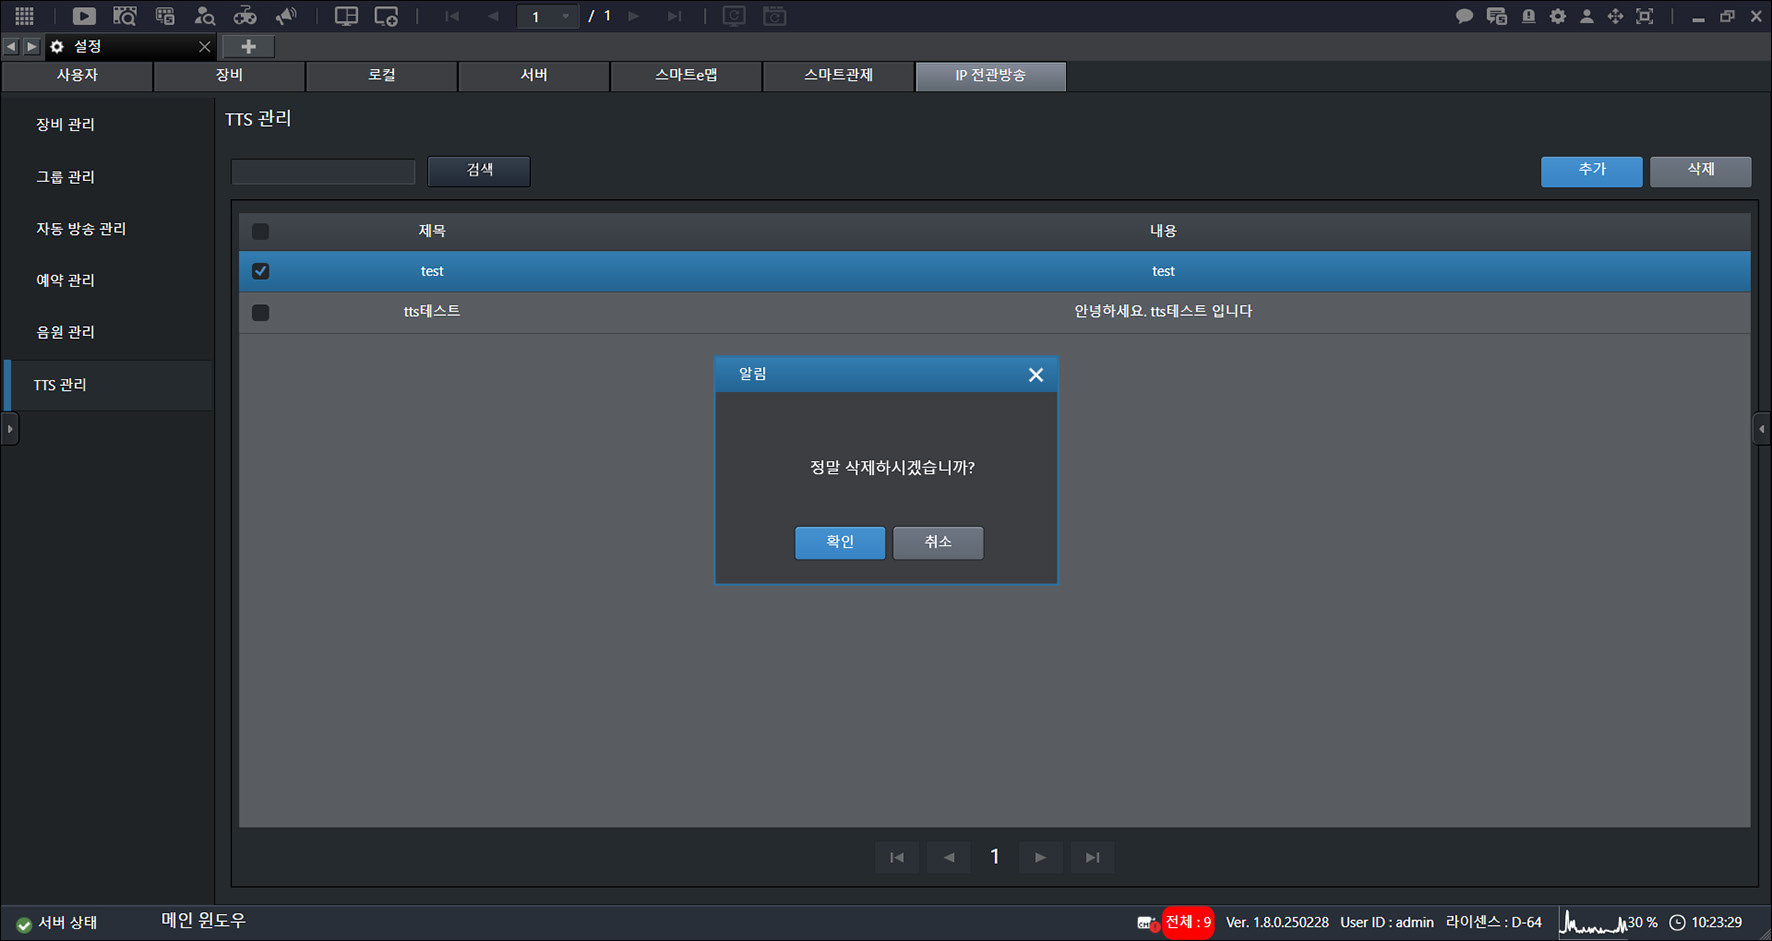
- Click [Delete] > [OK].
Parking Integrated Monitoring Settings
Configuring Parking Integrated Monitoring
Configuring Parking Integrated Monitoring
The screens shown in this guide may differ from the actual product.
- On the main screen, select [] > [Integrated parking monitoring]. The integrated parking monitoring settings screen appears.
![On the main screen, select [{{icon:cog-frame}}] > [Integrated parking monitoring]. The integrated parking monitoring settings screen appears.](/manual/vurix-admin/images/page207_img1.jpg)
- Select the item you want.
Parking Integrated Monitoring Settings
Set integrated parking control.
Set Storage Period
Set the database retention period.
- On the main screen, select [] > [Integrated parking monitoring].
![On the main screen, select [{{icon:cog-frame}}] > [Integrated parking monitoring].](/manual/vurix-admin/images/page208_img1.jpg)
- Click [Do Not Use Retention Period (Unlimited Storage)].
- Click [OK].
Note
About This Manual
About This Manual
• Be sure to read this manual before using the product, and use it correctly.
• This manual explains how to use the product based on the basic screens.
• This manual contains critically important safety information. Be sure to understand it.
• Supported features may vary depending on your license and device specifications.
• Depending on the firmware version, configuration file, or device type used, the actual product may differ in part from this manual.
Symbols Used in This Manual
Symbol meanings
WarningViolating a warning may result in serious injury or an accident.
CautionViolating a caution may result in minor injury or product damage.
NoteProvides detailed information for correct feature use and understanding of operation.
Legal Notice
This document and the products described in this document are provided by Innodep Inc. and are subject to the following conditions:
Copyright
• This document is protected by copyright law. © Innodep Inc.
• No part of this document may be used in any form, including unauthorized copying, transmission, distribution, reproduction, or modification, without the prior written consent of Innodep Inc.
Disclaimer
• The information in this document is based on the product status at the time of writing and may differ from the current product status.
• Innodep Inc. assumes no legal liability under any circumstances for direct, indirect, incidental, or consequential damages arising from the information in this document or from product use.
• Although every effort has been made to ensure the accuracy of the information in this document, Innodep Inc. makes no express or implied warranty regarding its completeness, accuracy, or reliability, and assumes no responsibility for errors or omissions.
• This document is provided "as is," and Innodep Inc. provides no warranty of any kind, including implied warranties of merchantability, fitness for a particular purpose, or non-infringement.
• Innodep Inc. reserves the right to modify, improve, or change product specifications and the contents of this document at any time without prior notice.
• This disclaimer applies to the maximum extent permitted by applicable law.
Registered trademarks
• This product is a registered trademark of Innodep Inc.
• Other trademarks mentioned in this document are the property of their respective manufacturers or suppliers.
Safety Precautions
To prevent hazards and property damage, use the product correctly according to the safety warnings and precautions.
Installation Precautions
- Do not install the product in an unsafe location or position. There is a risk of product damage and failure.
- Do not disassemble, repair, or modify the product yourself. There is a risk of product damage and failure.
- Do not install the product too close to a wall. There is a risk of product damage, fire, and electric shock.
- Do not install the product in places that are too hot or too cold, or that are humid. There is a risk of fire and electric shock.
- Do not install the product in places with high humidity, dust, or soot. There is a risk of fire and electric shock.
- Do not install the product near high-heat devices such as heaters or amplifiers. There is a risk of fire and electric shock.
- Be sure to cut off the power before installing the product or performing additional work. There is a risk of fire and electric shock.
Usage Precautions
- Keep water or foreign matter from entering the product. There is a risk of product damage, fire, and electric shock.
- Do not expose the product to the sun or strong light. There is a risk of product damage and failure.
- Protect the product from vibration or strong impact. There is a risk of product damage and failure.
- Use only the specified power supply. There is a risk of product damage and failure.
- Do not plug multiple power plugs into the same outlet at the same time. There is a risk of fire and electric shock.
- Do not bend the power cable excessively or place heavy objects on it so that it is not damaged. There is a risk of fire and electric shock.
- Do not pull the power cable to unplug it, and do not touch the power plug with wet hands. There is a risk of fire and electric shock.
- If the product makes an unusual sound or smell, immediately cut off the power. There is a risk of fire and electric shock.
- Do not touch the unit with bare hands immediately after power is supplied or cut off. There is a risk of burns.
- Do not place heavy objects on the product. There is a risk of product failure.
- Do not move the product while it is operating. There is a risk of product failure.
- Check the operating status of the product regularly. If there is any abnormality, contact the customer center immediately.
Storage Precautions
- When cleaning the product, be sure to wipe it with a dry cloth. There is a risk of product damage, fire, and electric shock.
- Do not use water, thinner, or organic solvents. There is a risk of product damage, fire, and electric shock.
- Do not place containers of liquid such as water, coffee, or beverages on the product. There is a risk of product damage, fire, and electric shock.
- Do not store the product for a long period with the power off. There is a risk of product damage and failure.
- Keep the installation location clean and free of dust at all times.
Other information
- The power connector is damaged
- Liquid has entered the product
- Foreign matter has entered the product
- There is a problem with product performance
- The product is damaged by natural disasters such as lightning
- The product is damaged due to careless installation
Fault diagnosis
Check these items before reporting a fault.
Possible causes and solutions are provided for commonly occurring problems.
Symptom - A device cannot be accessed from a specific client.
• Check the proxy settings in the web browser.
• Check all cables and connectors.
Symptom - The device works well locally but does not work on another network.
• Check the firewall and router settings.
Symptom - The network connection is unstable or disconnected.
• Check the network connection type.
Symptom - The device cannot be accessed by host name.
• Check that the host name and DNS server settings match.
Symptom - Login fails.
• Use the correct protocol (HTTP or HTTPS).
System Configuration
Main Modules
Master server
• The core server that manages the database and all storage servers, devices, and users.
• The master server is the core module of the VMS.
• On the master server, all VMS items are configured, stored, and managed through the database.
• Configure user authentication, user permissions, event settings, camera registration, camera management, system management, and more.
• Users receive access permission to the master server through the client and request video from a specific camera on the desired storage server.
Master server redundancy
• Run a redundant server in preparation for master server shutdown.
• Master server redundancy prepares for problems on the master server.
• Install the master server on a separate server and enter the redundancy-related IP information on the first master server to run it.
Database server
• A server that stores information on all devices and video, users, events, and more.
• The database server is installed together with the master server.
• Choose MariaDB or MS SQL.
• For sites with 5,000 or more channels, install it on a separate server to improve master server and database server performance.
Database server failover
• When a problem occurs, the failover server maintains database services.
• Database server failover is installed in Active Standby mode.
• On Linux OS, failover is maintained using DRBD.
• On Windows OS, failover is maintained using Windows Cluster.
Recording server
• A server that connects directly to each IP camera to store and transmit its video.
• As the number of cameras increases, more storage servers are required.
• The recording server actually connects to all IP cameras and stores and transmits their video.
• Search stored video through the recording server history.
• Recording server software includes all device drivers. (ONVIF device drivers, manufacturer-specific drivers, and more.)
• The number of video streams varies depending on each storage server's hardware performance and the resolution and size of connected video.
• From version 1.7.4, recording server software includes a Playback server.
• The Playback server plays stored video in real time.
• When Advanced mode is used on the client, stored video is transmitted through the Playback server.
Recording server failover
• A standby server used when a problem occurs on a recording server.
• Recording server failover operates in Cold Standby mode.
• Example: When operating 10 recording servers, operate 1–2 storage failover servers in anticipation of problems. If a specific recording server operates abnormally, the master server determines that the recording server cannot operate and switches all camera video connected to that recording server to the storage failover server.
• When failover is enabled in server settings, that server operates as a storage failover server.
Client
• Primarily monitors and searches video.
• Includes administrator tools that appear only when logged in with an administrator account.
• Available as a standard PC-installed client and a mobile client.
• The standard PC-installed client provides administrator features. (Example: server settings, user settings, and more.)
• The standard PC-installed client provides general users with monitoring or search features according to their permissions.
• The number of channels that can be monitored on the standard PC-installed client varies depending on the hardware performance.
Web API
• An API server for third-party integration.
• An API server provided to third parties for VURIX integration.
• It replaces the existing Windows SDK and provides the same functionality.
Access Control Server
• A server provided for access control system integration.
• Integrates with third-party access control systems for unified management.
• Support for third-party access control system integration varies by vendor.
IP PA Server
• This server is provided for IP speaker system integration.
• It integrates with third-party IP speaker systems for unified management.
• Third-party IP speaker system support varies by vendor.
IDM Server
• The IDM server (Innodep Data Mapping Server) is required to use smart eMap.
Customer support
Customer support
Contact partner companies or Customer Service for product-related inquiries.
Customer Service1661 - 6806
Business Hours24 hours a day, 365 days a year
Emailsales@innodep.com
Websiteinnodep.co.kr
Headquarters9F, Hansin IT Tower 2, 47, Digital-ro 9-gil (Gasan-dong), Geumcheon-gu, Seoul, Korea
Anyang Center62 Simin-daero 109beon-gil, Dongan-gu, Anyang-si, Gyeonggi-do
Technical support
Technical support through Customer Service is available depending on the product version.
Technical support requires purchase information, such as the purchasing agent and sales representative, as well as product version information.
Check the purchase information and product version.
- A D M 1 0 4 2 *