Dashboard
Managing the Dashboard
Managing the Dashboard
The screens shown in this guide may differ from the actual product.
- On the main screen, select [] to open the menu.
![On the main screen, select [{{icon:grid-3x3}}] to open the menu.](/manual/vurix-admin/images/page6_img1.jpg)
- Select the item you want.
- [PTZ Touring Settings]: Start or stop touring, or create and delete touring groups.
- [Manual VFS Recovery]: Manually recover VFS data.
- [Manual Failover]: Manually set a storage server as a failover server.
- [System Monitoring]: Check server, camera, and license information.
- [View Secondary Storage Restore Status]: Check the secondary storage restore status.
- [User Activity]: Review all actions performed by users.
- [Maintenance]: Select a recording server and inquiry period to check the storage status of devices with missing recordings.
- [Intelligent Statistics]: View intelligent statistics.
PTZ Touring Settings
Automatically monitors surveillance areas by repeatedly moving through multiple PTZ camera presets in sequence.
Starting PTZ Touring
Set touring start.
- On the main screen, select [] > [PTZ Touring Settings].
- [Start all]: Starts touring for all groups.
- [Stop all]: Stops touring for all groups.
- [Settings]: Set touring.
- [PTZ touring stop list]: Check the list of devices whose touring has stopped.
![On the main screen, select [{{icon:grid-3x3}}] > [PTZ Touring Settings].](/manual/vurix-admin/images/page7_img1.jpg)
- Select a group.
- [Start]: Starts touring for the selected group.
- [Stop]: Stops touring for the selected group.
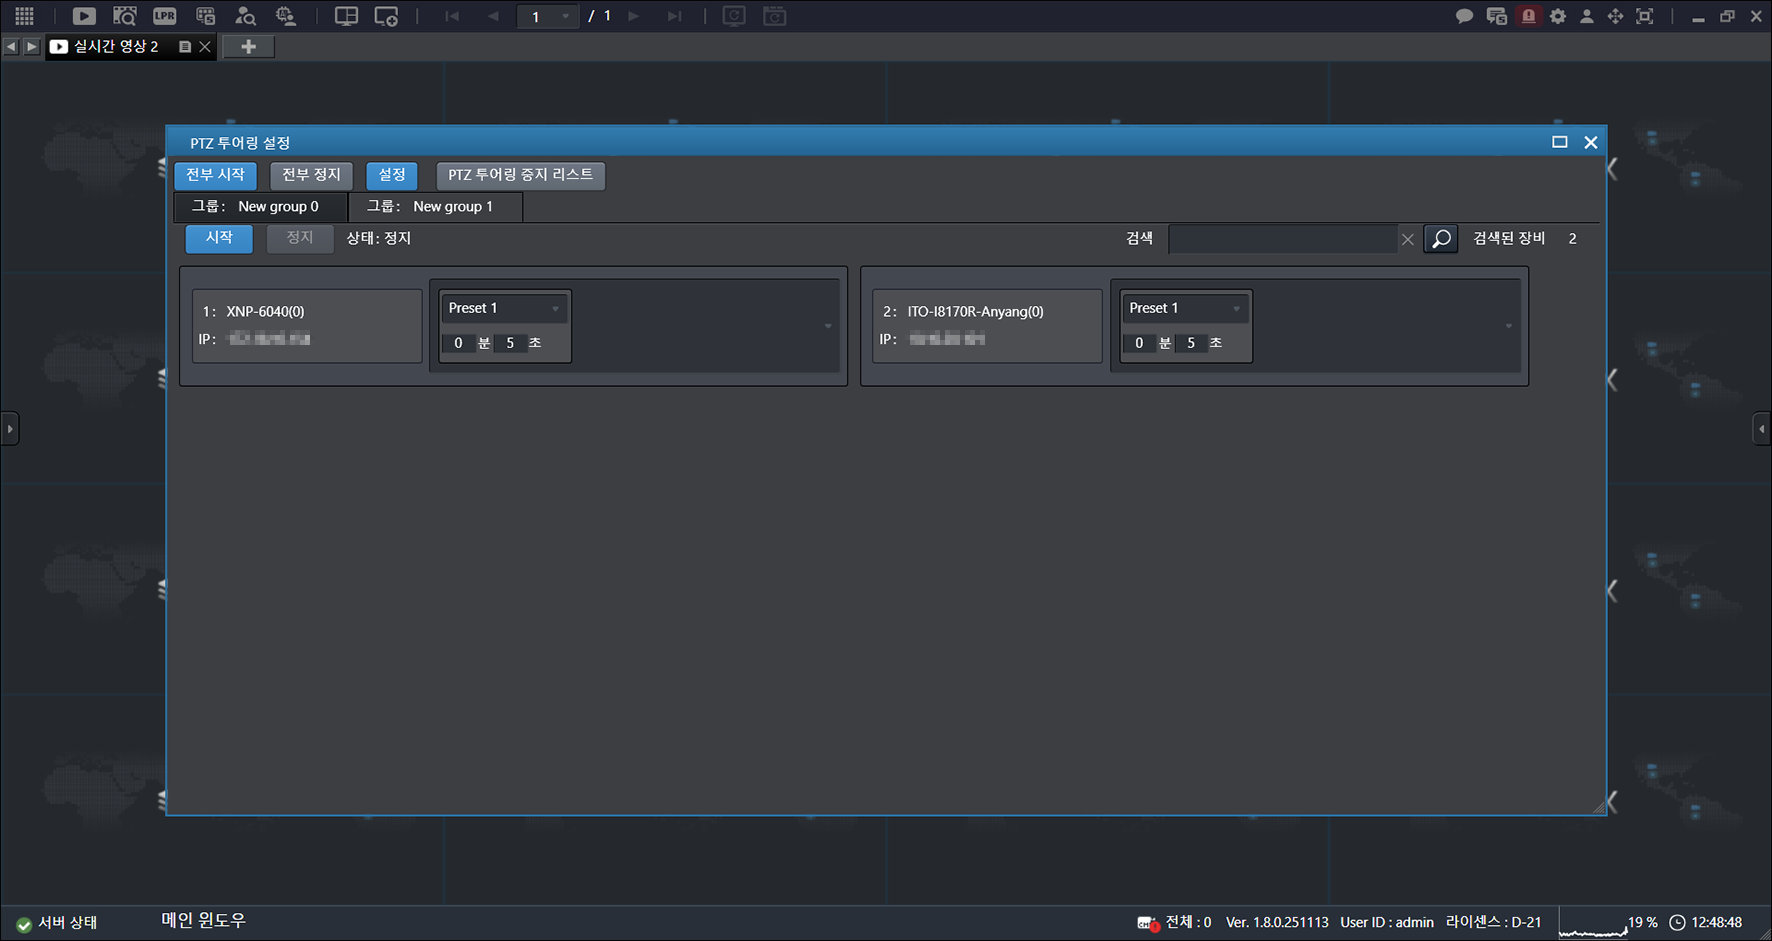
- Select a device.
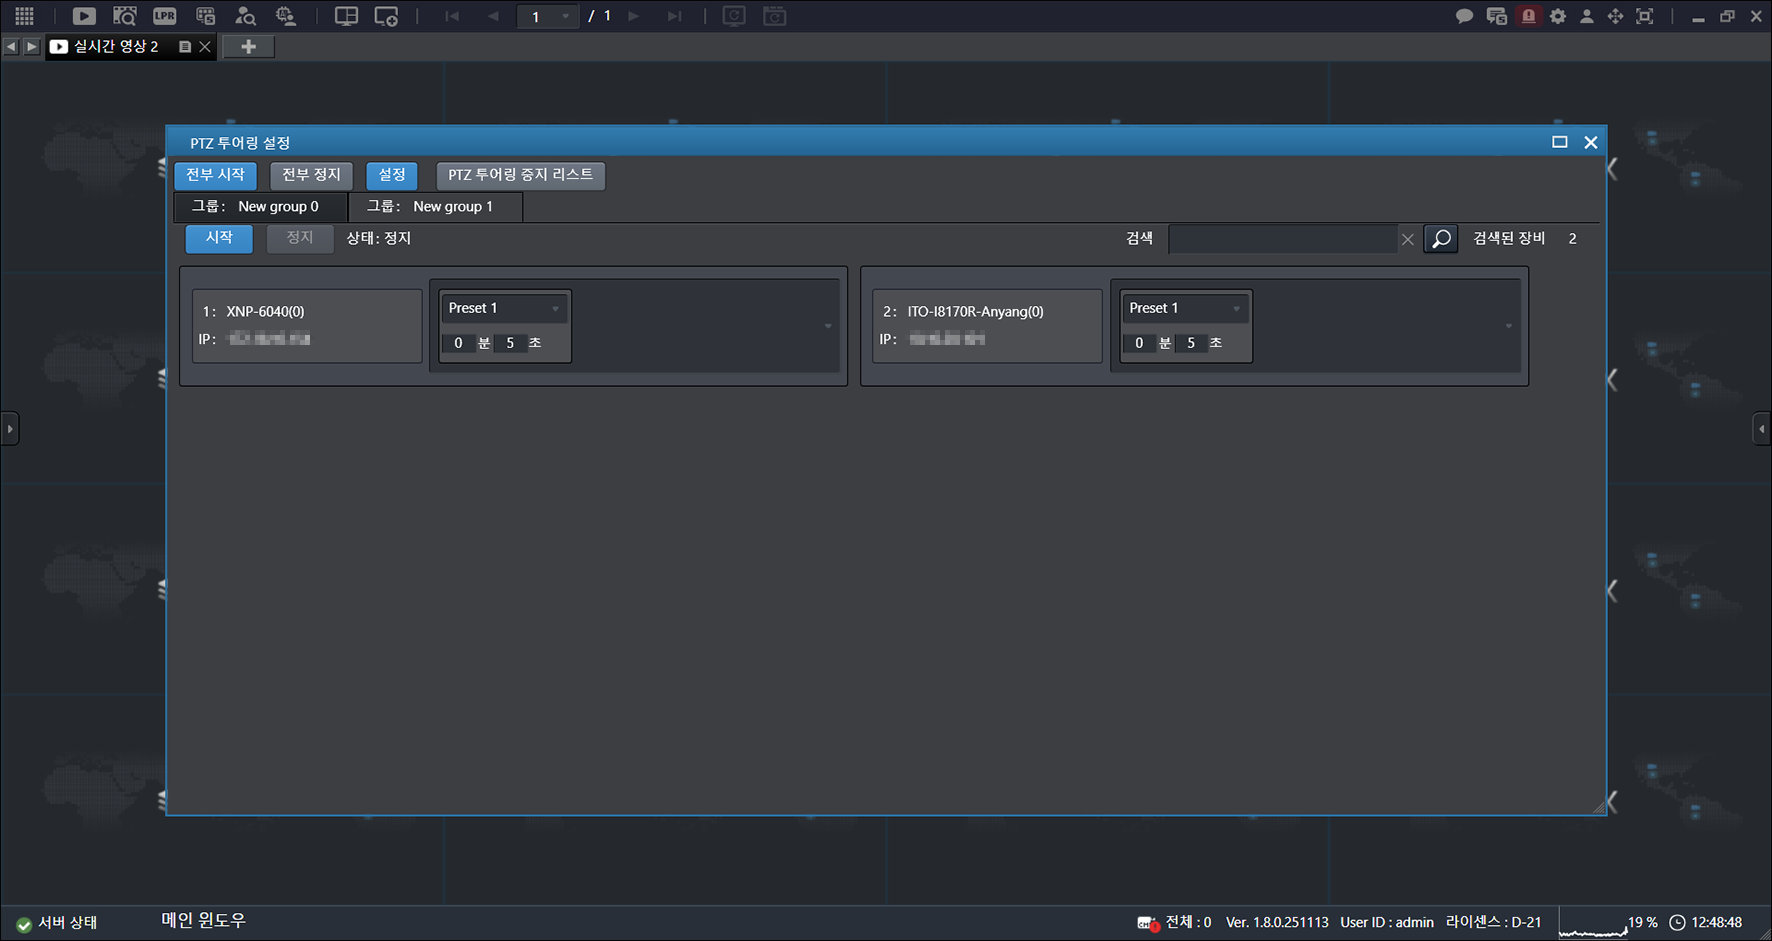
- Check the settings.
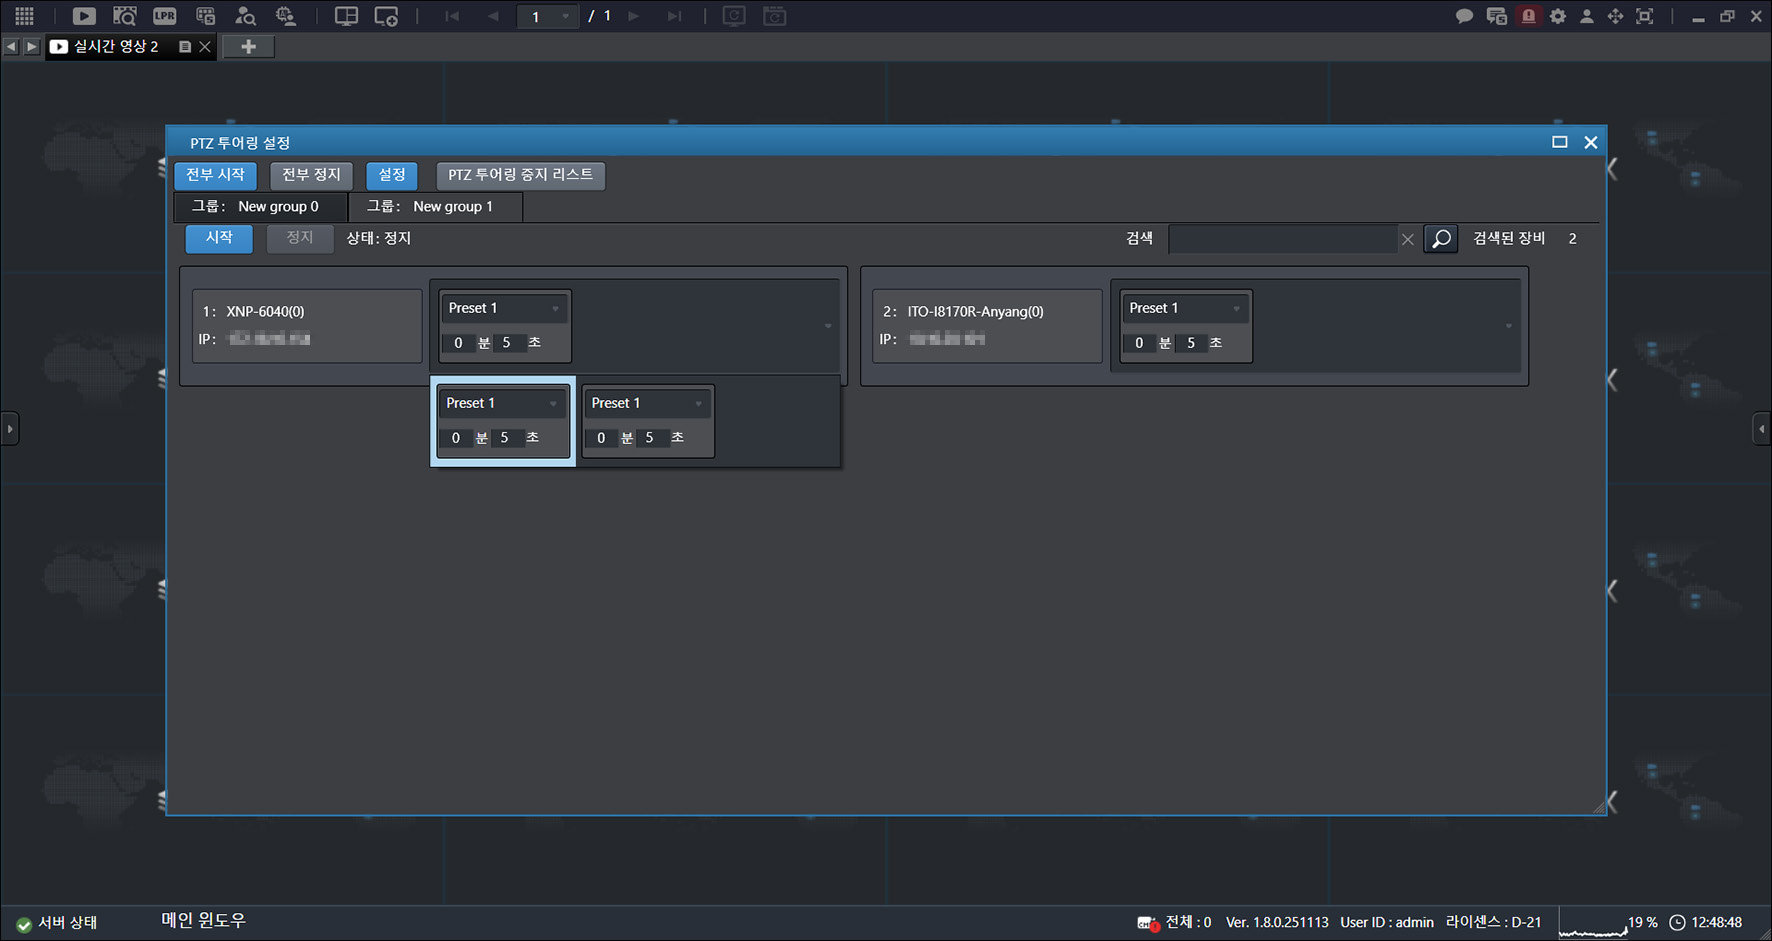
- Click [Start].
Creating Touring Groups
Create a group.
- On the main screen, select [] > [PTZ Touring Settings].
![On the main screen, select [{{icon:grid-3x3}}] > [PTZ Touring Settings].](/manual/vurix-admin/images/page10_img1.jpg)
- Click [Settings].
- [Create Group]: Create a group.
- [Delete Group]: Delete a group.
- [Update All Groups]: Update all groups.
![Click [Settings].](/manual/vurix-admin/images/page10_img2.jpg)
- Click [Create Group].
![Click [Create Group].](/manual/vurix-admin/images/page11_img1.jpg)
- In [PTZ Device List] > [Assigned], select a device marked with [X].
- Drag to the right while holding the mouse button.
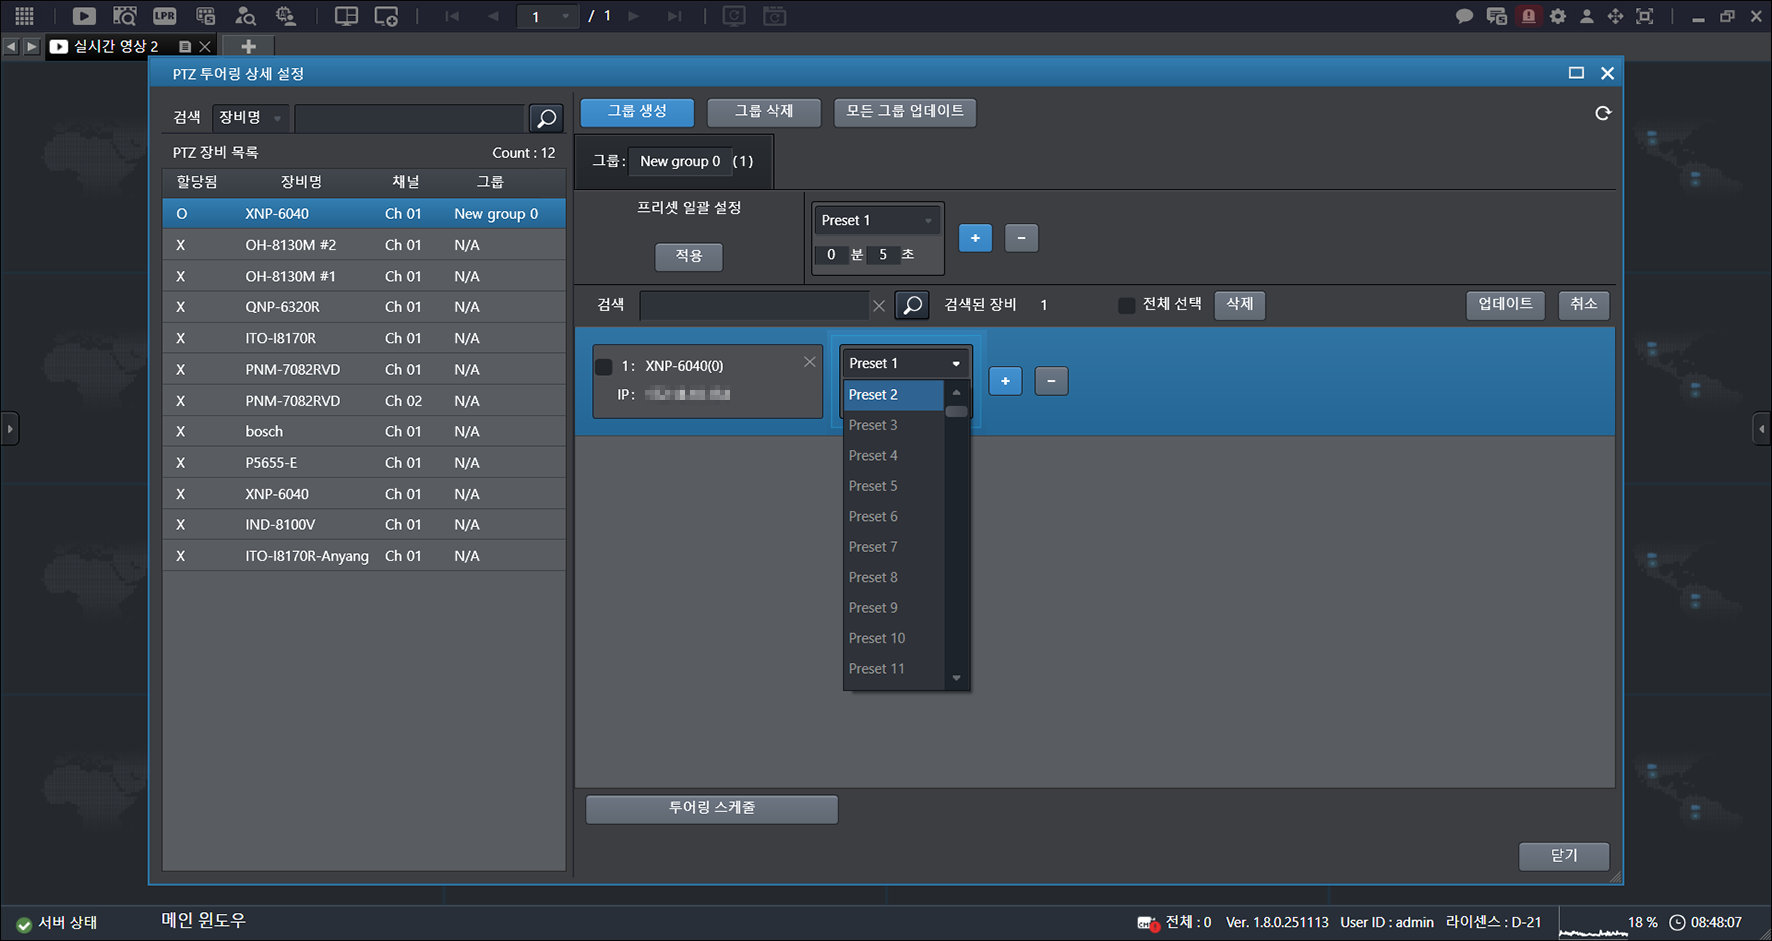
- Click the area marked with a dotted line.
- Click [+].
![Click [+].](/manual/vurix-admin/images/page12_img1.jpg)
- Click [Update].
![Click [Update].](/manual/vurix-admin/images/page12_img2.jpg)
- Click [OK] > [Close].
![Click [OK] > [Close].](/manual/vurix-admin/images/page13_img1.jpg)
- Only devices marked with [X] can be assigned to a touring group.
- In [PTZ Device List] > [Assigned], devices marked with [O] are already assigned to a touring group.
Applying Touring Presets in Bulk
Apply the same preset settings to all devices in the group.
- On the main screen, select [] > [PTZ Touring Settings] > [Settings].
- Select a group.
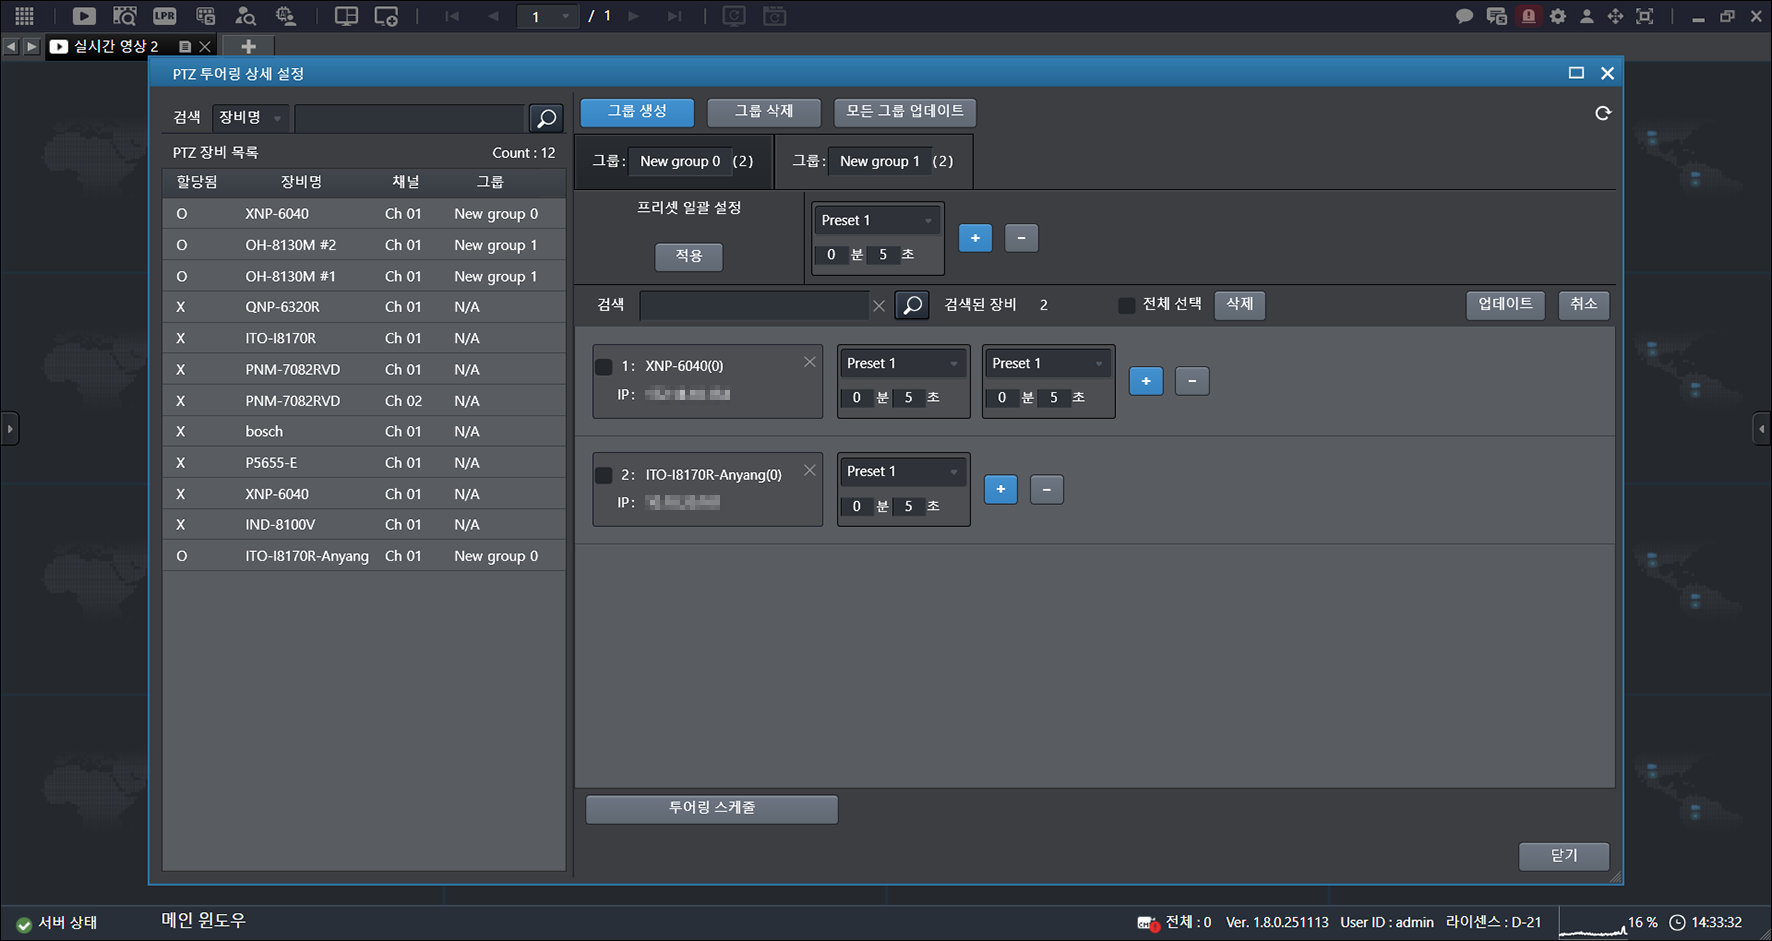
- Set [Apply Presets in Batch].
![Set [Apply Presets in Batch].](/manual/vurix-admin/images/page14_img2.jpg)
- Click [Apply].
![Click [Apply].](/manual/vurix-admin/images/page15_img1.jpg)
- Click [Update] > [OK] > [Close].
Setting Touring Schedule
Set the touring operating time.
- On the main screen, select [] > [PTZ Touring Settings] > [Settings].
- Select a group.
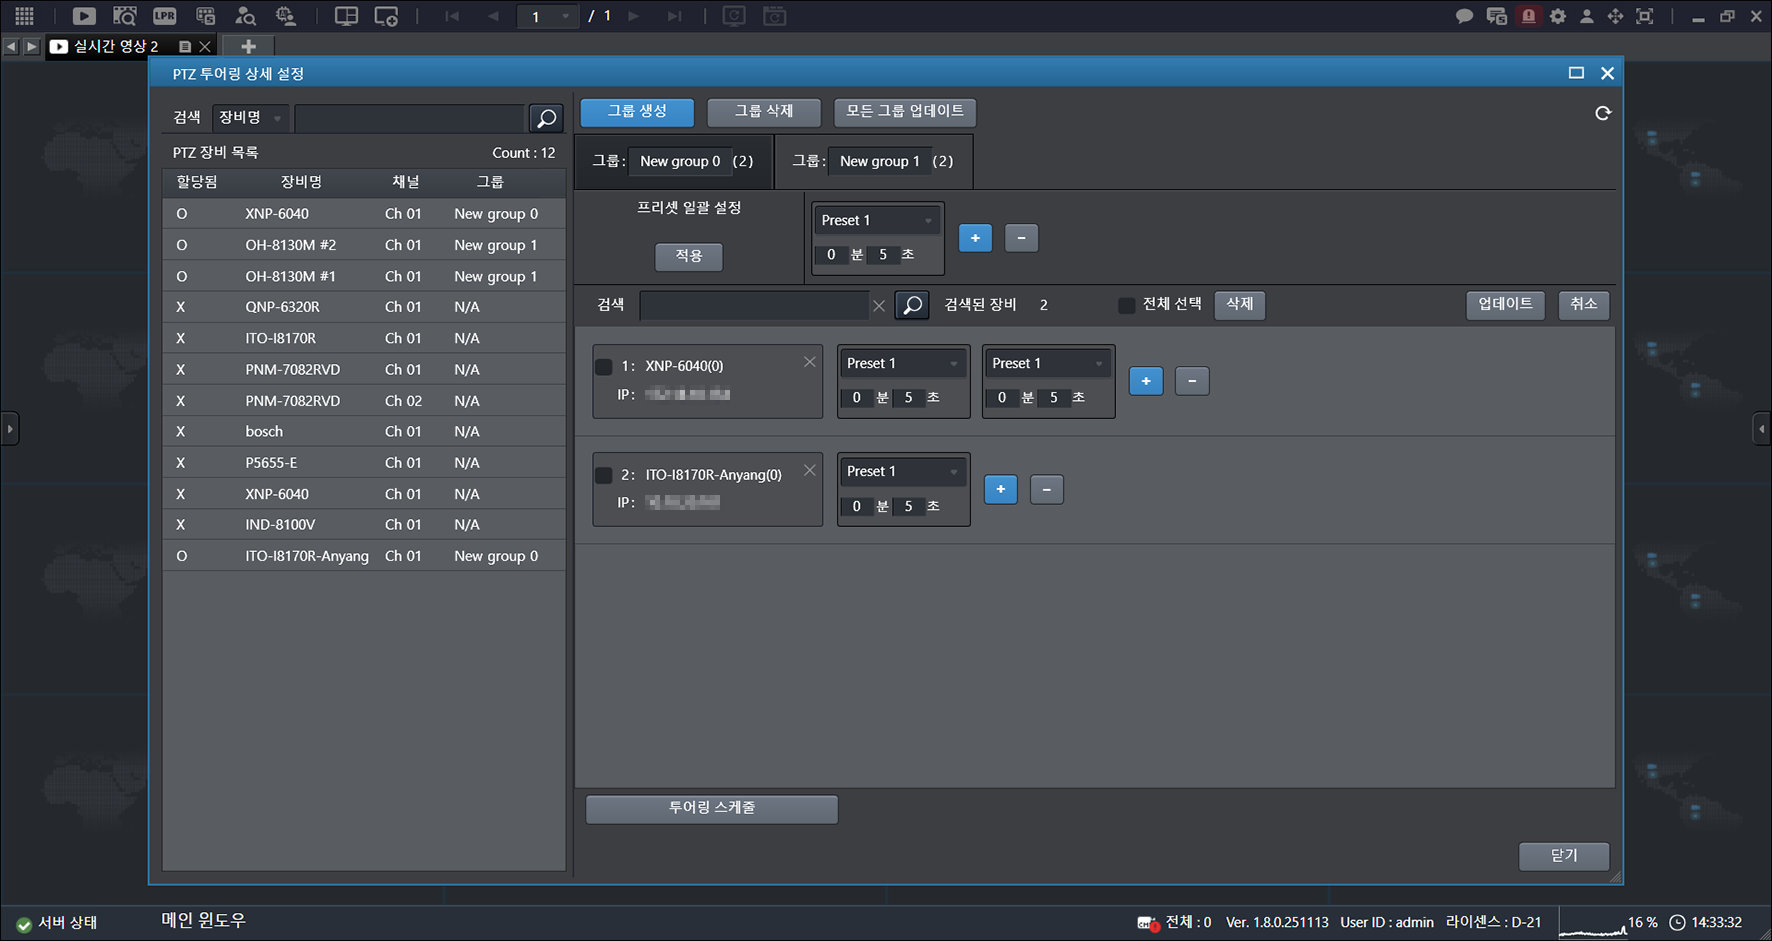
- Click [Touring Schedule].
![Click [Touring Schedule].](/manual/vurix-admin/images/page16_img2.jpg)
- Click [Disable].
- Hold down the mouse button and move in the direction you want.
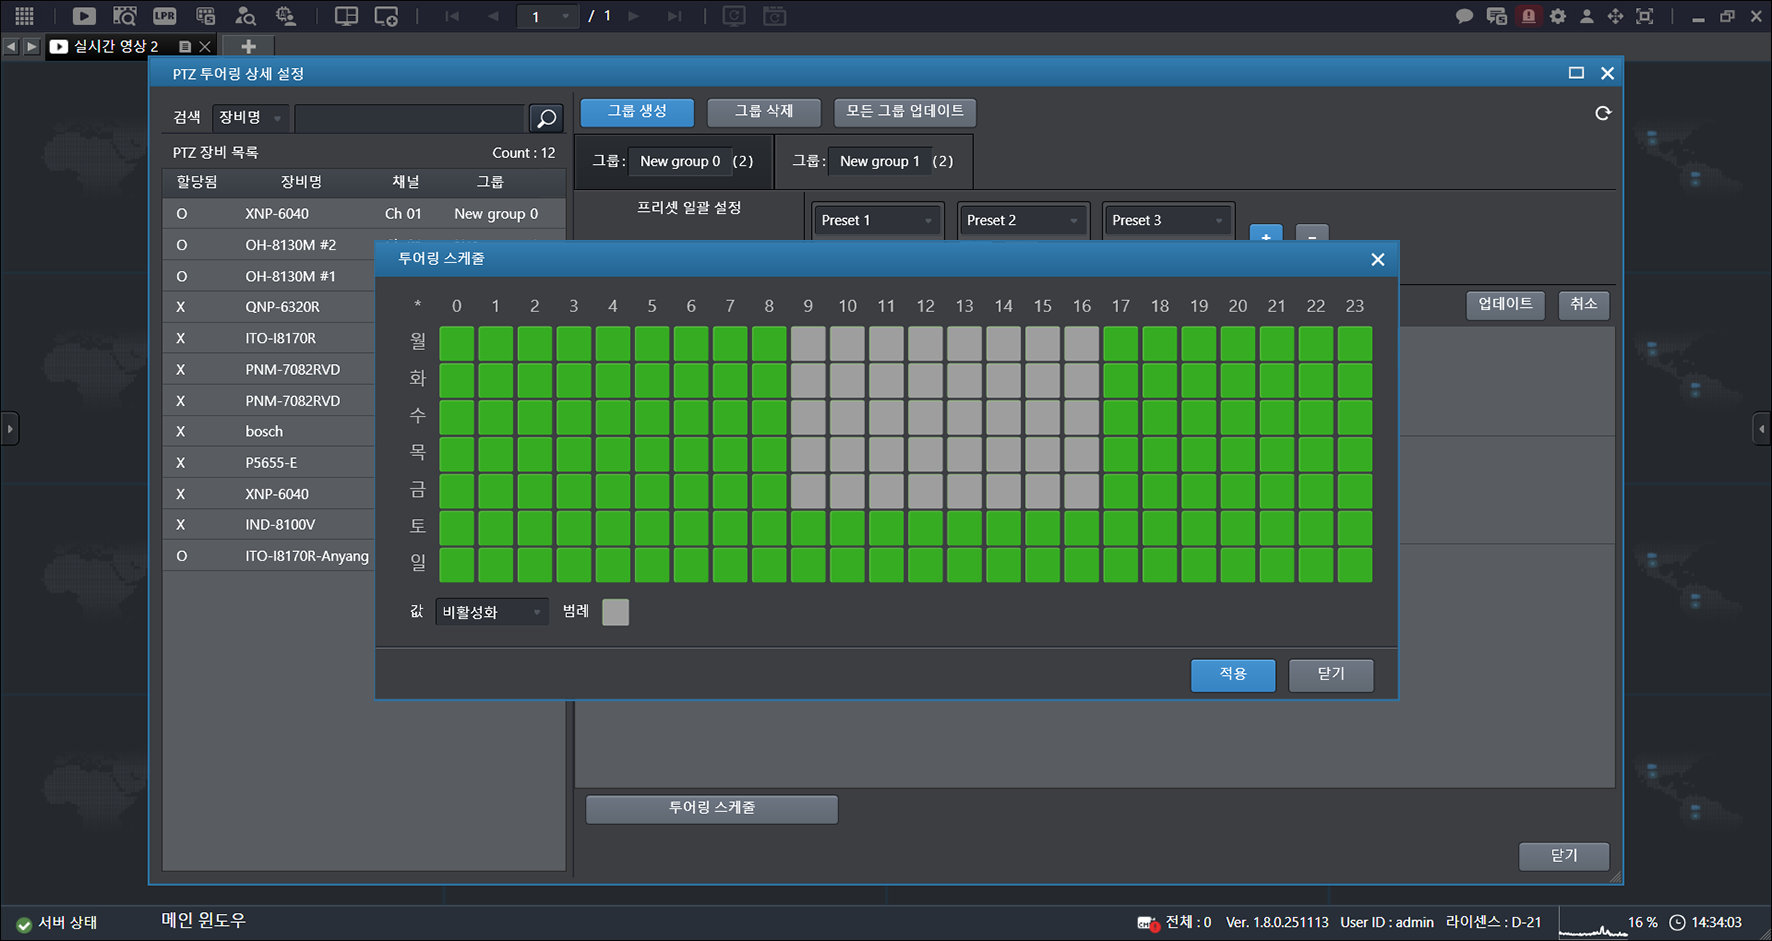
- Click [Apply].
- Click [Update] > [OK] > [Close].
Deleting Touring Groups
Deletes the group.
- On the main screen, select [] > [PTZ Touring Settings] > [Settings].
- Select a group.
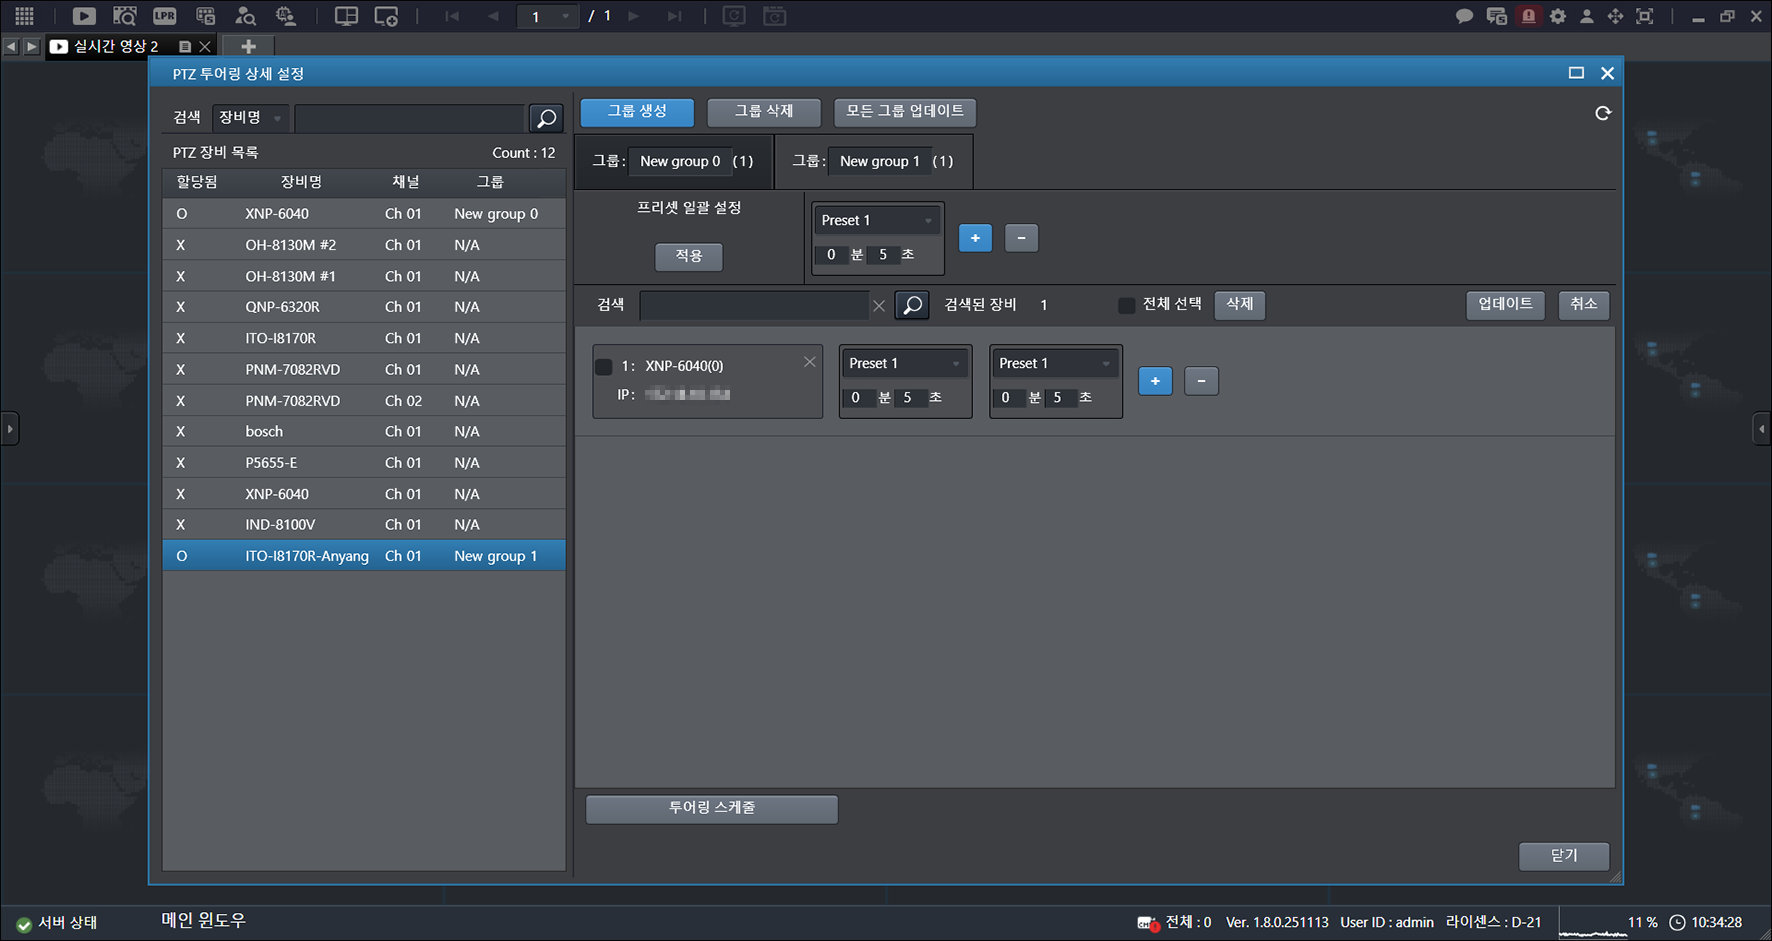
- Click [Delete Group].
![Click [Delete Group].](/manual/vurix-admin/images/page18_img2.jpg)
- Click [OK].
- Click [Update] > [OK] > [Close].
Manual VFS Recovery
VFS (Video File System) data lets you check index information for video
stored through the master server database.
Recover VFS Manually
Manually recover VFS data.
- On the main screen, select [] > [Manual VFS Recovery].
![On the main screen, select [{{icon:grid-3x3}}] > [Manual VFS Recovery].](/manual/vurix-admin/images/page19_img1.jpg)
- Select [Recovery Period].
- [Specify Period]: Select the period to recover.
- [Entire Period]: Select the entire period as the recovery period.
- Select [Recovery Mode].
- [Normal recovery mode]: Opens VFS data files one by one and recovers based on the data in the file header.
- [Fast recovery mode]: Performs full index recovery unconditionally based on the VFS data file names.
- Click [Next].
- Drag to the right while holding the mouse button.
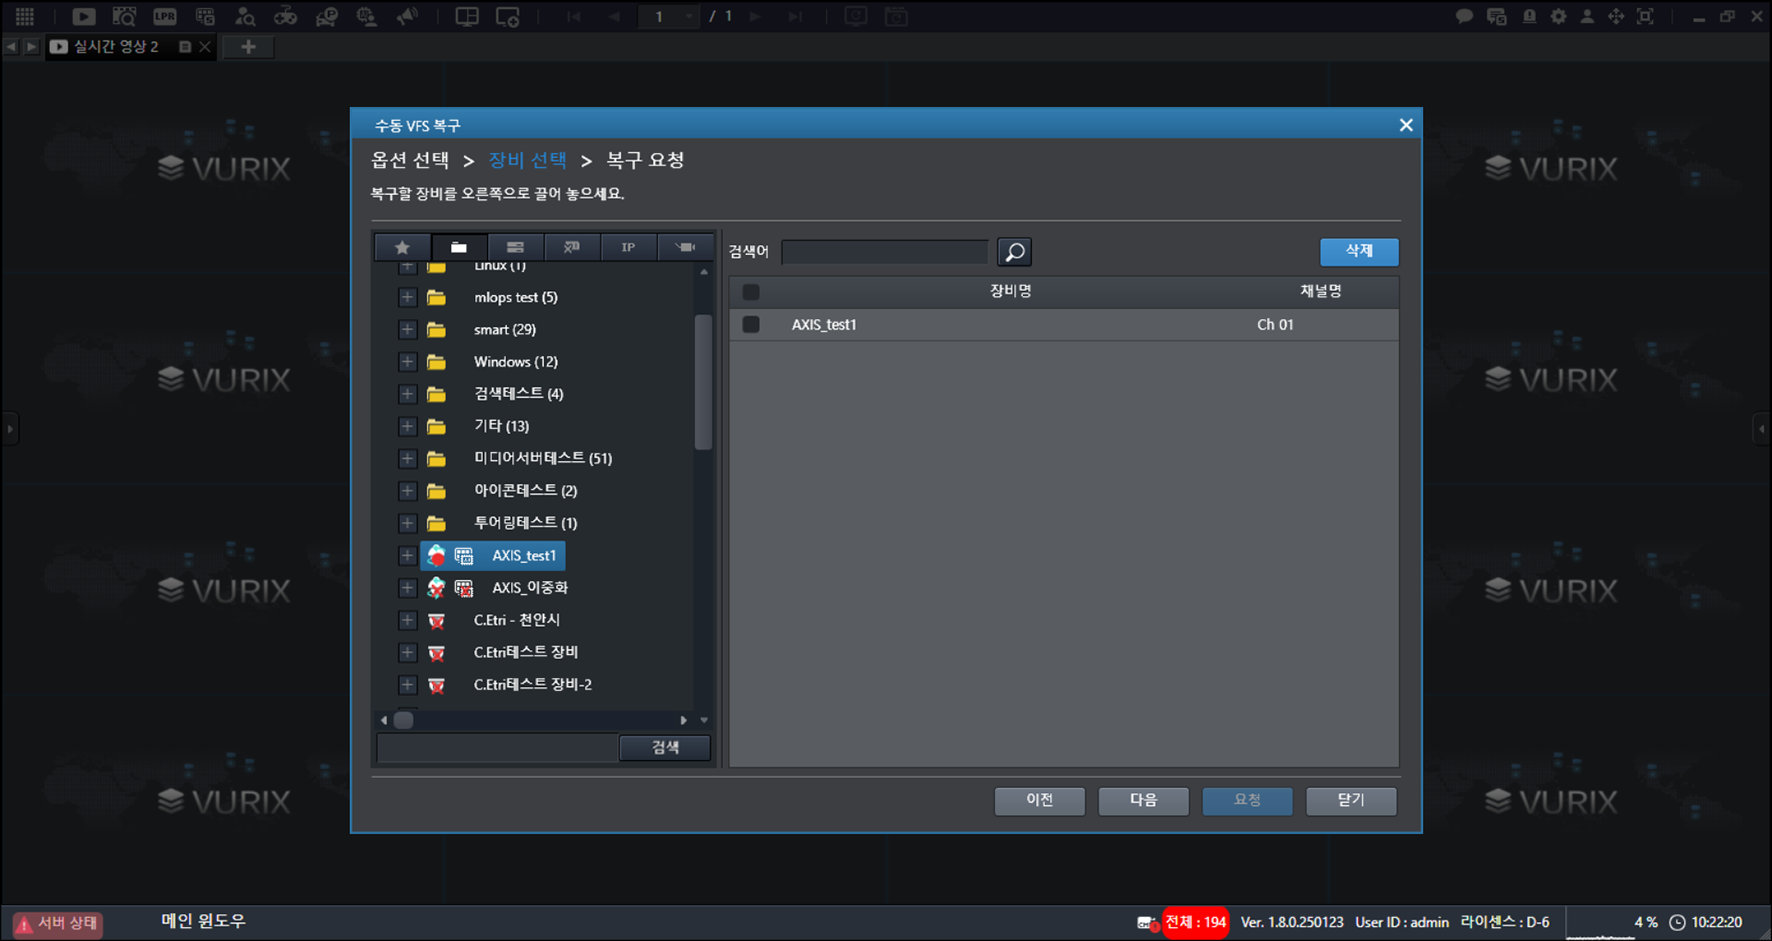
- Click [Next].
![Click [Next].](/manual/vurix-admin/images/page20_img2.jpg)
- Click [Request] > [OK].
Manual Failover
[Manual Failover] settings require a failover storage server to be assigned.
Configure Manual Failover
Manually set the storage server as the failover server.
- On the main screen, select [] > [Manual Failover].
![On the main screen, select [{{icon:grid-3x3}}] > [Manual Failover].](/manual/vurix-admin/images/page21_img1.jpg)
- Select [Recording Server] and [Failover Server].
- Enter the [Description].
- Click [Manual Failover].
- Select the item you want.
- [Current failover]: Check the current failover server information.
- [Failover history]: Check the failover history.
- [Failback]: Revert a manual failover operation.
- Click [Refresh]. Refreshes the screen.
- On the server settings screen, select [Failover server]. Sets use of the failover server.
System Monitoring
View server, camera, and license information.
View Server Information
Check server information such as the master server, recording server, and server history.
- On the main screen, select [] > [System Monitoring] > [Server Information].
- Click [Master Server].
![Click [Master Server].](/manual/vurix-admin/images/page22_img1.jpg)
- Click [Recording Server].
![Click [Recording Server].](/manual/vurix-admin/images/page22_img2.jpg)
- Click [History Management].
![Click [History Management].](/manual/vurix-admin/images/page23_img1.jpg)
- Check the information.
- Click [Master server] > [Connected users list] > [Disconnect]. Disconnects the user session.
- Click [Export to Excel]. Saves the results as an Excel file.
Checking Camera Information
Check the registered camera information.
- On the main screen, select [] > [System Monitoring] > [Camera Information].
- Set the conditions, then click [Search].
![Set the conditions, then click [Search].](/manual/vurix-admin/images/page24_img1.jpg)
- Check the results.
- Click []. Refreshes the screen.
- Click [Export to Excel]. Saves the results as an Excel file.
Checking license information
License items may differ depending on sales policy and version.
View license information such as the number of licenses issued and usage status.
- On the main screen, select [] > [System Monitoring] > [License Information].
![On the main screen, select [{{icon:grid-3x3}}] > [System Monitoring] > [License Information].](/manual/vurix-admin/images/page25_img1.jpg)
- Check the information.
View Secondary Storage Restore Status
To use secondary storage, you must set the secondary storage path.
Checking Secondary Storage Restore Status
Checks the secondary storage restore status.
- On the main screen, select [] > [View Secondary Storage Restore Status].
![On the main screen, select [{{icon:grid-3x3}}] > [View Secondary Storage Restore Status].](/manual/vurix-admin/images/page26_img1.jpg)
- Click [Register Restore Job].
![Click [Register Restore Job].](/manual/vurix-admin/images/page26_img2.jpg)
- Enter the [Restore Job Name] and [Restore Request Reason].
![Enter the [Restore Job Name] and [Restore Request Reason].](/manual/vurix-admin/images/page27_img1.jpg)
- Drag to the right while holding the mouse button.
- Click [Add].
![Click [Add].](/manual/vurix-admin/images/page27_img2.jpg)
- Click [Restore].
- Devices with a restore capacity of 0 Byte have no stored video.
- Devices with a restore capacity of 0 Byte have no data to restore from secondary storage.
User Activity
View all actions performed by the user on the client.
View User Activity
View user activity.
- On the main screen, select [] > [User Activity].
![On the main screen, select [{{icon:grid-3x3}}] > [User Activity].](/manual/vurix-admin/images/page28_img1.jpg)
- Set the conditions, then click [Search].
![Set the conditions, then click [Search].](/manual/vurix-admin/images/page28_img2.jpg)
- Check the results.
- Click [Reset]. Resets the settings.
- Click [Export to Excel]. Saves the results as an Excel file.
Maintenance
Check the storage status of devices with missing recordings.
Check Maintenance
Check maintenance.
- On the main screen, select [] > [Maintenance].
![On the main screen, select [{{icon:grid-3x3}}] > [Maintenance].](/manual/vurix-admin/images/page30_img1.jpg)
- Set the conditions, then click [Search].
![Set the conditions, then click [Search].](/manual/vurix-admin/images/page30_img2.jpg)
- Check the results.
Intelligent Statistics
Check object and event statistics for dashboard regions based on intelligent equipment.
Viewing the Intelligent Statistics Dashboard
Check the dashboard in Intelligent Statistics.
- On the main screen, select [] > [Intelligent Statistics] > [Statistics Dashboard].
![On the main screen, select [{{icon:grid-3x3}}] > [Intelligent Statistics] > [Statistics Dashboard].](/manual/vurix-admin/images/page31_img1.jpg)
- Select the item you want.
- Intelligent statistics require the IDM server (Back) and Web_Stats (Front).
- Select the regions to display on the intelligent statistics dashboard.
- For details, see "Setting intelligent statistics" on page 154.
Searching Intelligent Statistics Objects
Check object search in Intelligent Statistics.
- On the main screen, select [] > [Intelligent Statistics] > [Object Search].
![On the main screen, select [{{icon:grid-3x3}}] > [Intelligent Statistics] > [Object Search].](/manual/vurix-admin/images/page32_img1.jpg)
- Set the conditions, then click [Search].
![Set the conditions, then click [Search].](/manual/vurix-admin/images/page32_img2.jpg)
- Point to the item you want with the mouse.
- Check the information.
- Click [Download PNG]. Saves the results as an image file.
- Click [Download Excel]. Saves the results as an Excel file.
Searching Intelligent Statistics Events
Check event search in Intelligent Statistics.
- On the main screen, select [] > [Intelligent Statistics] > [Event Search].
![On the main screen, select [{{icon:grid-3x3}}] > [Intelligent Statistics] > [Event Search].](/manual/vurix-admin/images/page34_img1.jpg)
- Set the conditions, then click [Search].
![Set the conditions, then click [Search].](/manual/vurix-admin/images/page34_img2.jpg)
- Point to the item you want with the mouse.
- Check the information.
- Click [Download PNG]. Saves the results as an image file.
- Click [Download Excel]. Saves the results as an Excel file.
Checking Intelligent Statistics Status
Check the Intelligent Statistics status.
- On the main screen, select [] > [Intelligent Statistics] > [Statistics Status].
![On the main screen, select [{{icon:grid-3x3}}] > [Intelligent Statistics] > [Statistics Status].](/manual/vurix-admin/images/page36_img1.jpg)
- Set the conditions, then click [Search].
![Set the conditions, then click [Search].](/manual/vurix-admin/images/page36_img2.jpg)
- Point to the item you want with the mouse.
- Check the information.