Server Settings
Configuring the Server
Configuring the Server
The screens shown in this guide may differ from the actual product.
- On the main screen, select [] > [Server]. The server settings screen appears.
![On the main screen, select [{{icon:cog-frame}}] > [Server]. The server settings screen appears.](/manual/vurix-admin/images/page97_img1.jpg)
- Select the item you want.
- [Server] settings require the [Server management] permission.
- On the user settings screen, select [User settings] > [Permission group] > [Management] > [Server management].
Server Environment Settings
Set the server environment, including server settings, redundancy, failover settings, and database settings.
Configure Server Environment
Configures the server.
- On the main screen, select [] > [Server].
![On the main screen, select [{{icon:cog-frame}}] > [Server].](/manual/vurix-admin/images/page98_img1.jpg)
- Select [Recording Server List].
- Set [Storage Path].
- Select the item you want.
- [Use engine]: Set whether to use the recording server DB engine.
- [Limit options]: Set the limit options.
- [Port]: Set the ports.
- [Other options]: Set other options.
- [Run mode]: Set the run mode.
- [LPR image save path]: Set the LPR image save path.
- [Image save path]: Set the image save path.
- [Secondary storage]: Set whether to use secondary storage.
- Click [Apply].
- Restart the program to finish applying the settings.
- When operating 5 recording servers, assign 1 storage failover server (5:1 ratio).
- We recommend operating a storage failover server for contingency.
Running the recording service
Set recording service execution.
- On the main screen, select [] > [Server].
![On the main screen, select [{{icon:cog-frame}}] > [Server].](/manual/vurix-admin/images/page100_img1.jpg)
- Select the item you want.
- Right-click to open the context menu.
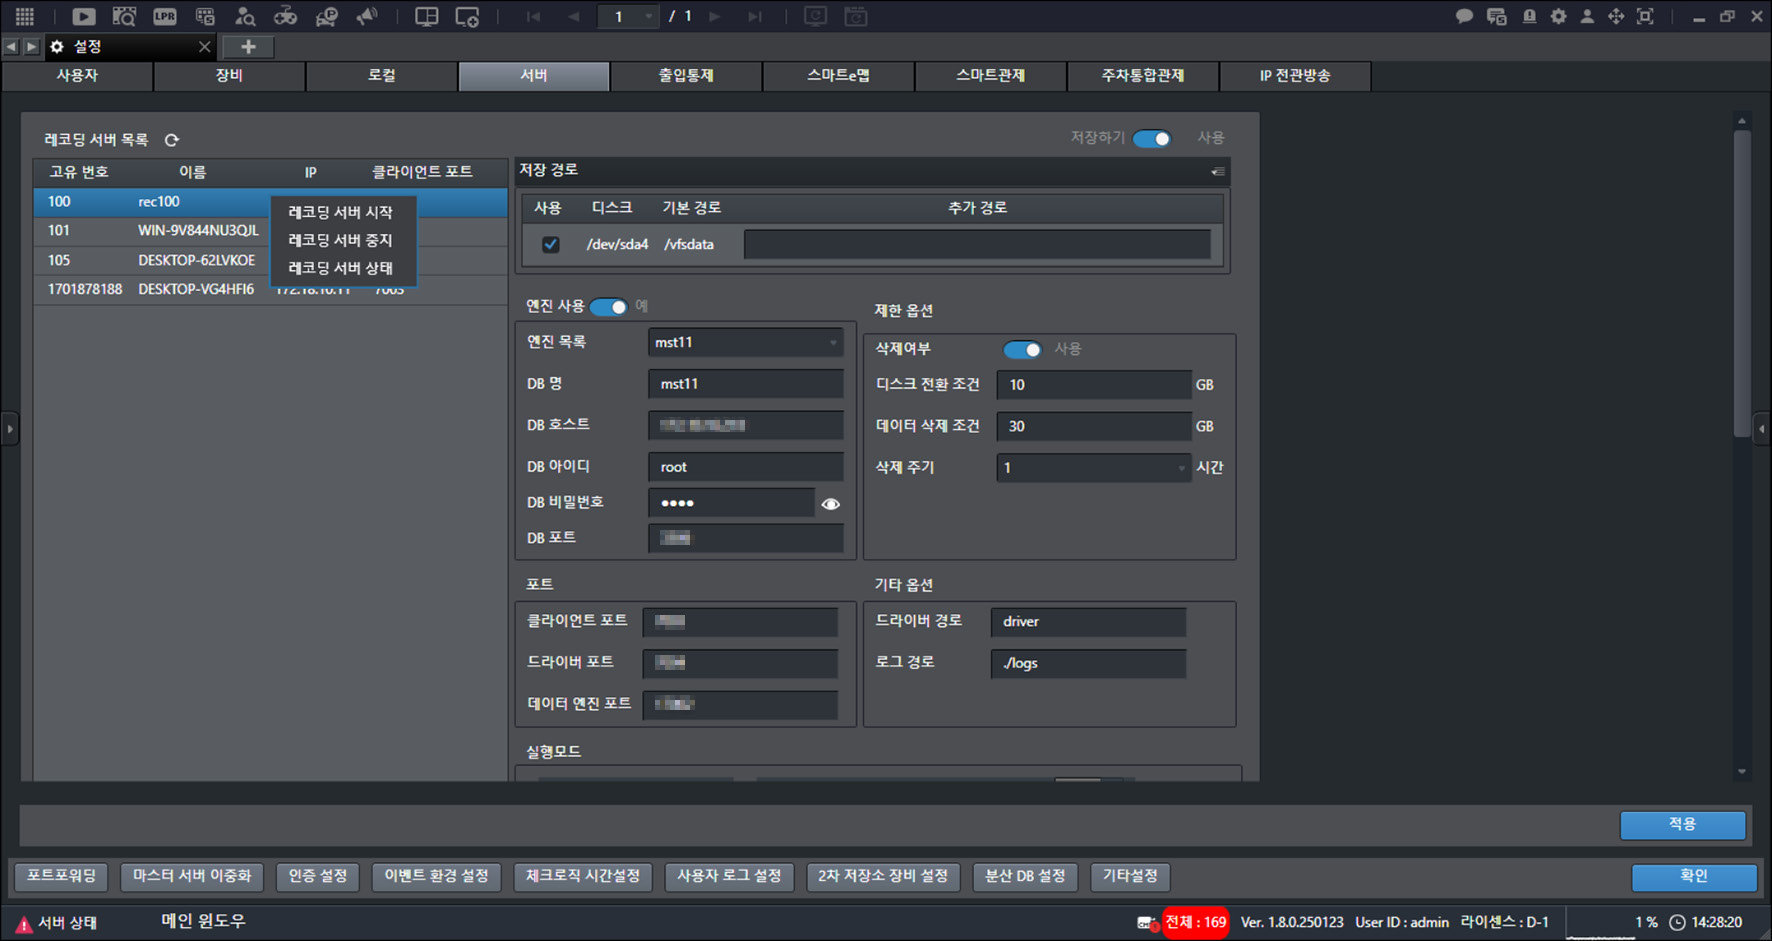
- Click [Start Recording Server].
- Click [Stop recording server]. Stops the running recording service.
- Click [Recording server status]. Check the information.
Port Forwarding Settings
When connecting from outside, configure port forwarding.
Only an administrator account can configure [Port Forwarding].
Setting master server port forwarding
Set master server port forwarding.
- On the main screen, select [] > [Server] > [Port Forwarding].
![On the main screen, select [{{icon:cog-frame}}] > [Server] > [Port Forwarding].](/manual/vurix-admin/images/page102_img1.jpg)
- Click [Add Group] > [Edit].
![Click [Add Group] > [Edit].](/manual/vurix-admin/images/page102_img2.jpg)
- Select a server.
- Click [OK].
![Click [OK].](/manual/vurix-admin/images/page103_img1.jpg)
- Enter the [Group Description].
- Click [Add].
![Click [Add].](/manual/vurix-admin/images/page103_img2.jpg)
- Click [Apply] > [OK] > [Apply].
- Restart the program to finish applying the settings.
- Click [Update]. Updates the information.
- Click [Delete]. Deletes the information.
Setting recording server port forwarding
Set recording server port forwarding.
- On the main screen, select [] > [Server] > [Port Forwarding].
![On the main screen, select [{{icon:cog-frame}}] > [Server] > [Port Forwarding].](/manual/vurix-admin/images/page104_img1.jpg)
- Click [Add Rule] > [Group].
![Click [Add Rule] > [Group].](/manual/vurix-admin/images/page104_img2.jpg)
- Select a group.
- Click [Edit].
![Click [Edit].](/manual/vurix-admin/images/page105_img1.jpg)
- Select a server.
- Click [OK].
- Enter the [Rule Description].
- Click [Add].
![Click [Add].](/manual/vurix-admin/images/page105_img2.jpg)
- Click [Apply] > [OK] > [Apply].
- Restart the program to finish applying the settings.
- Click [Update]. Updates the information.
- Click [Delete]. Deletes the information.
Master server redundancy settings
Set up master server redundancy for uninterrupted service.
[Master Server Redundancy] settings are available for admin accounts only.
- On the main screen, select [] > [Server] > [Master server redundancy].
![On the main screen, select [{{icon:cog-frame}}] > [Server] > [Master server redundancy].](/manual/vurix-admin/images/page107_img1.jpg)
- Enter the [IP] and [Port].
- Click [Apply] > [OK] > [Apply].
- Restart the program to finish applying the settings.
Login authentication settings
Strengthen or relax authentication settings for security.
[Authentication Settings] is available only to administrator accounts.
- On the main screen, select [] > [Server] > [Authentication settings].
![On the main screen, select [{{icon:cog-frame}}] > [Server] > [Authentication settings].](/manual/vurix-admin/images/page108_img1.jpg)
- Select the item you want.
- [Reset mode]: Set to [ON] or [OFF].
- [Wait time on failure]: Set the wait time when the login failure limit is exceeded.
- [Password reset interval]: Set the password reset interval.
- [Login failure limit]: Set the login failure limit count.
- [IP filtering settings]: Set IP filtering.
- [IP list]: Add or remove IP addresses from the [Whitelist] or [Blacklist].
- Click [Apply] > [OK] > [Apply].
- Restart the program to finish applying the settings.
Event Preferences
Only administrator accounts can use [Event Preferences].
- On the main screen, select [] > [Server] > [Event environment settings].
![On the main screen, select [{{icon:cog-frame}}] > [Server] > [Event environment settings].](/manual/vurix-admin/images/page110_img1.jpg)
- Select the item you want.
- [Duplicate RAW Event Storage]: Enable duplicate storage of LPR events in the 'raw_lpr_event' and 'raw_event'
- [RAW Event Retention Days]: Set the duplicate storage period for all LPR event-related tables.
- [User Event Retention Days]: Set the retention period for user events.
- Click [Apply] > [OK] > [Apply].
- Restart the program to finish applying the settings.
Check Logic Time Settings
The driver reconnection check logic verifies at the specified interval that cameras are properly connected to the driver.
It instructs reconnection for disconnected cameras.
Only administrator accounts can set [Check logic time settings].
- On the main screen, select [] > [Server] > [Check logic time settings].
![On the main screen, select [{{icon:cog-frame}}] > [Server] > [Check logic time settings].](/manual/vurix-admin/images/page111_img1.jpg)
- Select a server.
- Set [Time Settings].
- Click [OK] > [Apply].
- Restart the program to finish applying the settings.
User Log Storage Settings
Configure saving of activity logs for user accounts.
[User Log Settings] is available only to administrator accounts.
- On the main screen, select [] > [Server] > [User log settings].
![On the main screen, select [{{icon:cog-frame}}] > [Server] > [User log settings].](/manual/vurix-admin/images/page112_img1.jpg)
- Select [Log Retention Period].
- Configure [DB Capacity Exceeded Notification Settings].
- Click [Apply] > [OK] > [Apply].
- Restart the program to finish applying the settings.
Secondary Storage Device Settings
Secondary storage is a separate repository connected outside the system.
Configure secondary storage devices.
Only administrator accounts can use [Secondary Storage Device Settings].
- On the main screen, select [] > [Server] > [Secondary storage device settings].
![On the main screen, select [{{icon:cog-frame}}] > [Server] > [Secondary storage device settings].](/manual/vurix-admin/images/page113_img1.jpg)
- Select the item you want.
- [Device]: Select the device for secondary storage.
- [Job status]: Set the job status.
- [Secondary storage type]: Select the secondary storage type.
- [Path]: Set the path.
- [Retention period (days)]: Set the retention period.
- [Keep period (days)]: Set the keep period.
- [Timeout (minutes)]: Set the timeout.
- [Host]: Enter the host.
- [Port]: Enter the port.
- [User]: Enter the ID.
- [Password]: Enter the password.
- Click [Apply] > [OK] > [Apply].
- Restart the program to finish applying the settings.
Distributed DB Settings
Configure multiple DB servers to distribute database load.
With [Distributed DB Settings], VFS and EVT DB data for the recording server are stored across distributed servers.
Only administrator accounts can use [Distributed DB Settings].
Add Distributed DB
Set the distributed DB.
- On the main screen, select [] > [Server].
![On the main screen, select [{{icon:cog-frame}}] > [Server].](/manual/vurix-admin/images/page115_img1.jpg)
- Select the item you want.
- [DB Engine List]: Displays the engine list.
- [Target Server]: Select a server.
- [Engine Name] / [Engine Type] / [Engine DB] / [Engine IP] / [Engine Port] / [Engine User (ID)] / [Engine
- Click [Add] > [OK] > [OK] > [Apply].
- Restart the program to finish applying the settings.
- Click [Refresh]. Refreshes the screen.
- Click [Edit] or [Delete]. Edits or deletes the server.
Other Server Settings
Only administrator accounts can use [Other Settings].
- On the main screen, select [] > [Server] > [Other settings].
![On the main screen, select [{{icon:cog-frame}}] > [Server] > [Other settings].](/manual/vurix-admin/images/page116_img1.jpg)
- Select the item you want.
- [FTP Server Settings]: Enable FTP.
- [PTZ Settings]: Set PTZ-related features.
- [Remote Management Service Settings]: Enable remote access.
- [Agent Server Settings]: Enable the Agent server.
- [Audio Save Settings]: Also save audio when saving video.
- [Administrator Access Management]: Manage administrator access.
- [Photo Transfer Settings]: Enable photo transfer.
- [Contact Settings]: Save contact information.
- [Backup Dual Security]: Require a password when saving AVI files.
- [Device Global Settings]: Set items used for detailed device search.
- [Reply Timeout]: Set the reply timeout.
- [WASS Settings]: Enable WASS.
- [System Time Settings]: Enable system time.
- [Additional Device Info Settings]: Set additional device information.
- Click [Apply] > [OK] > [Apply].
- Restart the program to finish applying the settings.