Access Control Settings
Configuring Access Control
Configuring Access Control
The screens shown in this guide may differ from the actual product.
- On the main screen, select [] > [Access control]. The access control settings screen appears.
![On the main screen, select [{{icon:cog-frame}}] > [Access control]. The access control settings screen appears.](/manual/vurix-admin/images/page119_img1.jpg)
- Select the item you want.
Access user
Manage access users, such as searching or adding access users.
Searching Access Users
Search access users.
- On the main screen, select [] > [Access Control] > [Access Users].
- Set the conditions, then click [Search].
![Set the conditions, then click [Search].](/manual/vurix-admin/images/page120_img1.jpg)
- Check the results.
- Click [Import]. Imports the item.
- Click []. Refreshes the screen.
- Click [Delete]. Deletes the item.
Adding Access Users
Add an access user.
- On the main screen, select [] > [Access Control] > [Access Users].
- Click [Add].
![Click [Add].](/manual/vurix-admin/images/page121_img1.jpg)
- Enter the information.
- Set [Status].
- [Blacklist]: Set the blacklist.
- [Expiration period]: Set the expiration period.
- Set [Credential].
- [Verification Level]: Set the verification level.
- [Credential]: Add authentication information.
- Click [OK].
- Restart the program to finish applying the settings.
Access door
Manage access doors, such as searching and adding access doors.
Searching Access Doors
Search access doors.
- On the main screen, select [] > [Access Control] > [Access Doors].
- Set the conditions, then click [Search].
![Set the conditions, then click [Search].](/manual/vurix-admin/images/page122_img1.jpg)
- Check the results.
- Click [Sync]. Synchronizes with the server.
- Click []. Refreshes the screen.
- Click [Delete]. Deletes the item.
Adding Access Doors
Add an access door.
- On the main screen, select [] > [Access Control] > [Access Doors].
- Click [Add].
![Click [Add].](/manual/vurix-admin/images/page123_img1.jpg)
- Enter the information.
- Select [Group].
- Select [Server].
![Select [Server].](/manual/vurix-admin/images/page123_img2.jpg)
- Click [Add Camera].
- Select a device.
- Click [OK].
- Restart the program to finish applying the settings.
Elevator
Manage elevators, including searching for and adding elevators.
Search Elevators
Search for elevators.
- On the main screen, select [] > [Access Control] > [Elevator].
- Set the conditions, then click [Search].
![Set the conditions, then click [Search].](/manual/vurix-admin/images/page125_img1.jpg)
- Check the results.
- Click [Sync]. Synchronizes with the server.
- Click []. Refreshes the screen.
- Click [Delete]. Deletes the item.
Add Elevator
Add an elevator.
- On the main screen, select [] > [Access Control] > [Elevator].
- Click [Add].
![Click [Add].](/manual/vurix-admin/images/page126_img1.jpg)
- Enter the information.
- Select [Group].
- Select [Server].
![Select [Server].](/manual/vurix-admin/images/page126_img2.jpg)
- Set [Total Floors].
- Click [Apply].
- Click [Add Camera].
- Select a device.
- Click [OK].
- Restart the program to finish applying the settings.
Access Control Schedule
Manage access control schedules.
Searching Access Control Schedules
Search schedules.
- On the main screen, select [] > [Access Control] > [Schedules].
- Set the conditions, then click [Search].
![Set the conditions, then click [Search].](/manual/vurix-admin/images/page128_img1.jpg)
- Check the results.
- Click [Sync]. Synchronizes with the server.
- Click []. Refreshes the screen.
- Click [Delete]. Deletes the item.
Adding an Access Control Schedule
Adds a schedule.
- On the main screen, select [] > [Access Control] > [Schedules].
- Click [Add].
![Click [Add].](/manual/vurix-admin/images/page129_img1.jpg)
- Enter the information.
- Select [Enable] or [Disable].
![Select [Enable] or [Disable].](/manual/vurix-admin/images/page129_img2.jpg)
- Set the time and day of the week.
- Click [OK].
- Restart the program to finish applying the settings.
- Displays the schedule in a grid. (1 cell = 30 minutes)
- For [Holiday], select the dates you want as holidays on the calendar.
Access Rule
Manage access rules, such as searching and adding access rules.
Set access rules applied to access doors and elevators to control access.
Searching Access Rules
Search access rules.
- On the main screen, select [] > [Access Control] > [Access Rules].
- Set the conditions, then click [Search].
![Set the conditions, then click [Search].](/manual/vurix-admin/images/page131_img1.jpg)
- Check the results.
- Click [Sync]. Synchronizes with the server.
- Click []. Refreshes the screen.
- Click [Delete]. Deletes the item.
Adding Access Rules
Add access rules.
- On the main screen, select [] > [Access Control] > [Access Rules].
- Click [Add].
![Click [Add].](/manual/vurix-admin/images/page132_img1.jpg)
- Enter the information.
- [Name] / [Description]: Enter information about the rule and level.
- [Access user]: Select the access user.
- [Access level]: Select the access level.
- [Floor level]: Select the floor level.
- Click [OK].
- Click [Access Level] > [Add].
![Click [Access Level] > [Add].](/manual/vurix-admin/images/page133_img1.jpg)
- Enter the information.
- [Name] / [Description]: Enter information about the rule and level.
- [Server]: Select the server.
- [Access door]: Select the access door.
- [Schedule]: Select the schedule.
- Click [OK].
- Click [Floor Level] > [Add].
![Click [Floor Level] > [Add].](/manual/vurix-admin/images/page134_img1.jpg)
- Enter the information.
- [Name] / [Description]: Enter information about the rule and level.
- [Server]: Select the server.
- [Schedule]: Select the schedule.
- [Elevator]: Select the elevator.
- [Floor]: Select the floor.
- Click [OK].
- Restart the program to finish applying the settings.
Access Control Zone
Manage access control zones, such as searching and adding access control zones.
Searching Access Control Zones
Search access control zones.
- On the main screen, select [] > [Access Control] > [Zones].
- Set the conditions, then click [Search].
![Set the conditions, then click [Search].](/manual/vurix-admin/images/page135_img1.jpg)
- Check the results.
- Click [Sync]. Synchronizes with the server.
- Click []. Refreshes the screen.
- Click [Delete]. Deletes the item.
Adding Access Control Zones
Add an access control zone.
- On the main screen, select [] > [Access Control] > [Zones].
- Click [Add].
![Click [Add].](/manual/vurix-admin/images/page136_img1.jpg)
- Enter the information.
- Select [Server].
![Select [Server].](/manual/vurix-admin/images/page136_img2.jpg)
- Set the items you want.
- Click [OK].
- Restart the program to finish applying the settings.
Access Control Equipment
Manage access control equipment.
Registering an Access Control Server
Access control settings are available after registering the access control server.
- On the main screen, select [] > [Access Control] > [Devices].
- Select [].
- Right-click to open the context menu.
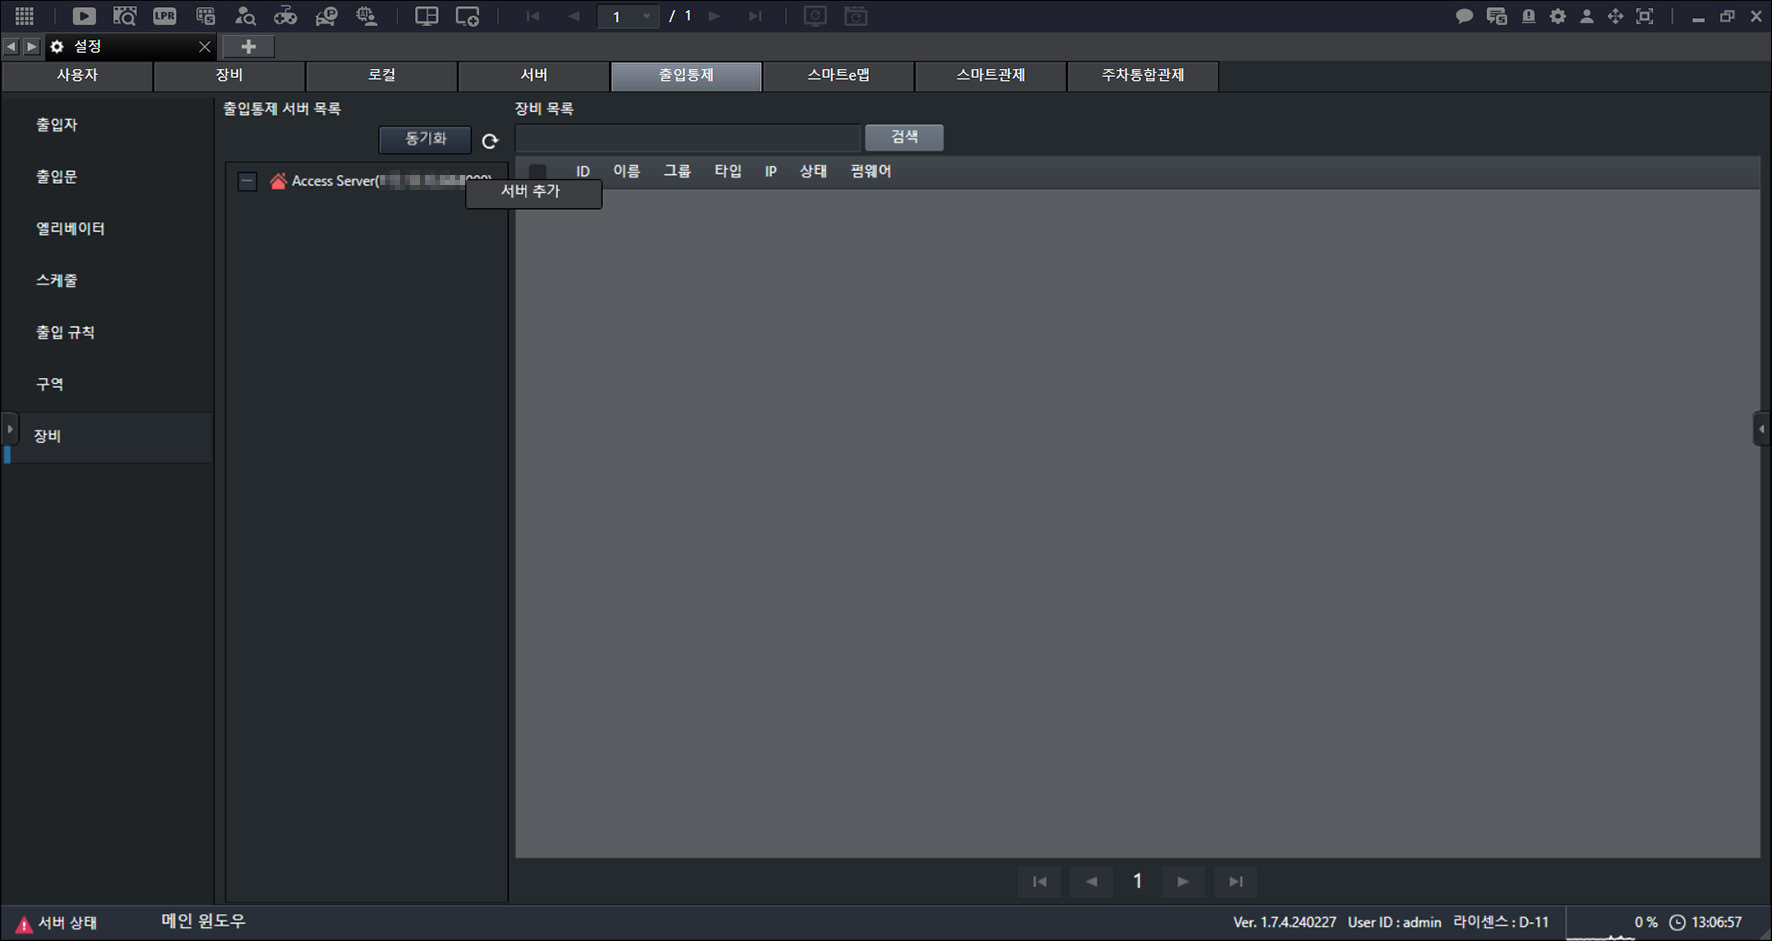
- Click [Add Server].
![Click [Add Server].](/manual/vurix-admin/images/page137_img2.jpg)
- Enter the information.
- [Name]: Enter the name.
- [Manufacturer]: Select the manufacturer.
- [Server IP]: Enter the IP.
- [Port]: Enter the port.
- [ID]: Enter the ID.
- [Password]: Enter the password.
- [Connection method]: Select the server connection method.
- Click [Apply].
- Restart the program to finish applying the settings.
- If you set [ID] to a general user account, access control may not work.
- If [Connection method] differs from the access control server, the server cannot connect.
Searching Access Control Equipment
Search for devices.
- On the main screen, select [] > [Access Control] > [Devices].
- Set the conditions, then click [Search].
![Set the conditions, then click [Search].](/manual/vurix-admin/images/page139_img1.jpg)
- Check the results.
- Click [Sync]. Synchronizes with the server.
- Click []. Refreshes the screen.
- Click [Delete]. Deletes the item.
Adding Access Control Equipment
Adds a device.
- On the main screen, select [] > [Access Control] > [Devices].
![On the main screen, select [{{icon:cog-frame}}] > [Access Control] > [Devices].](/manual/vurix-admin/images/page140_img1.jpg)
- Select a device.
- Right-click to open the context menu.
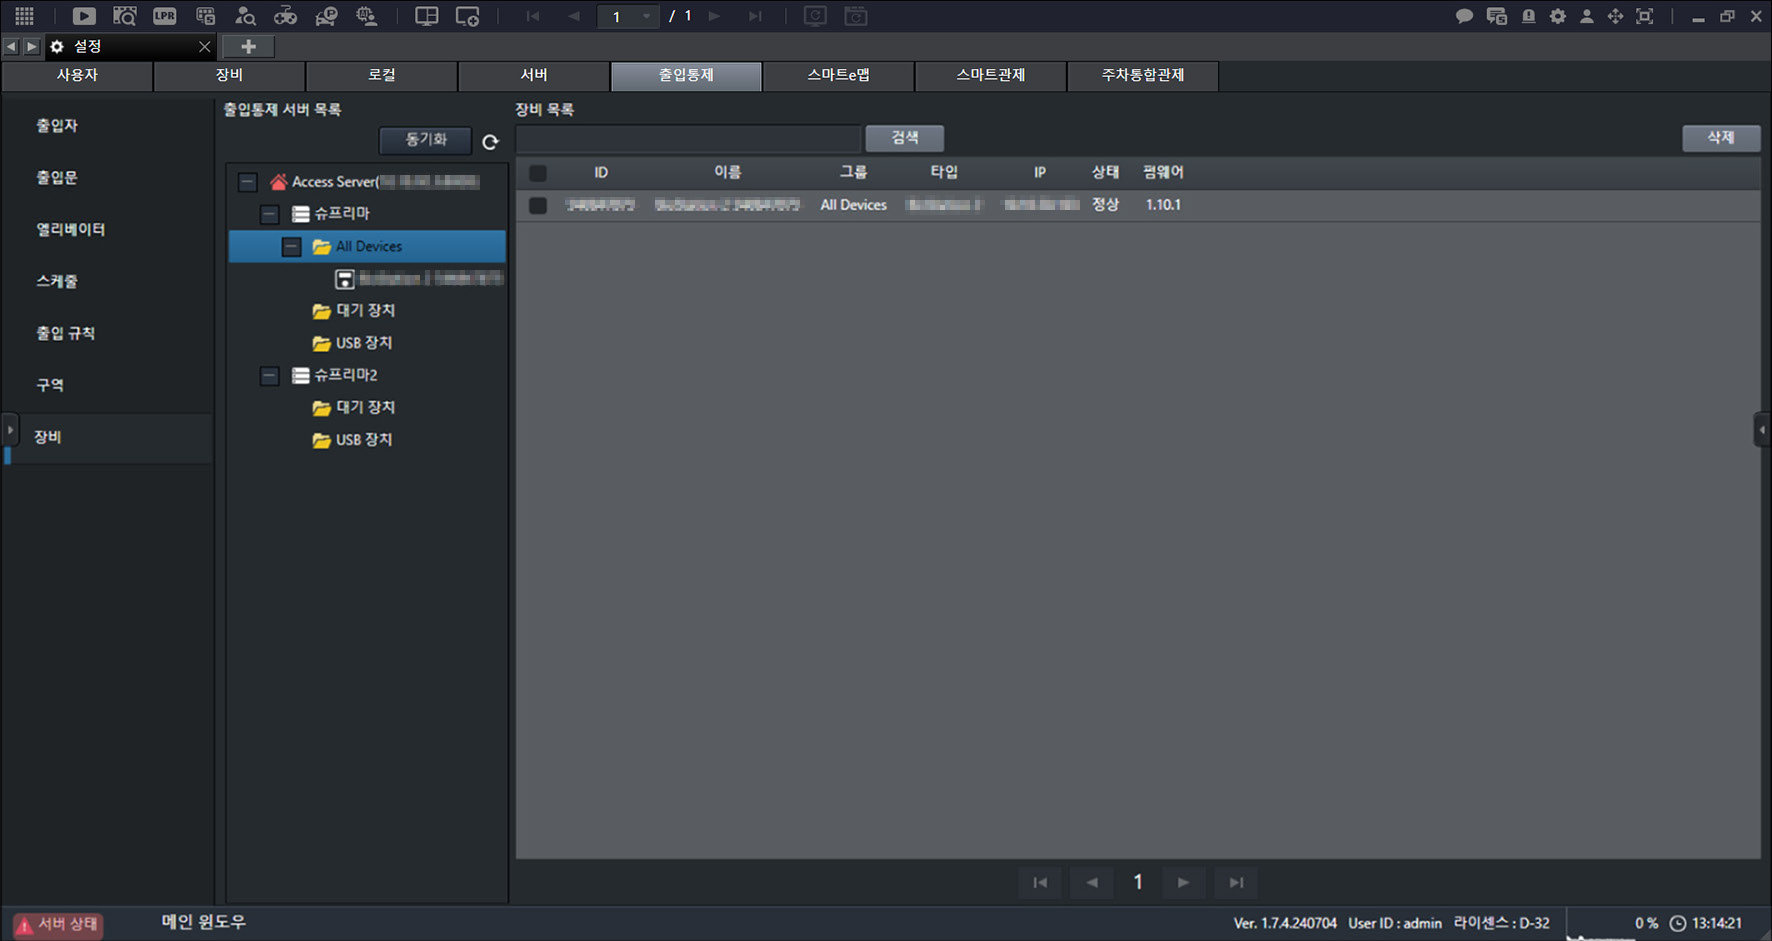
- Click [Add Pending Device].