Smart Monitoring Settings
Configuring Smart Monitoring
Configuring Smart Monitoring
The screens shown in this guide may differ from the actual product.
- On the main screen, select [] > [Smart monitoring]. The smart monitoring settings screen appears.
![On the main screen, select [{{icon:cog-frame}}] > [Smart monitoring]. The smart monitoring settings screen appears.](/manual/vurix-admin/images/page152_img1.jpg)
- Select the item you want.
- [Smart monitoring] settings require the [Smart monitoring management] permission.
- On the user settings screen, select a user and select [Permission group] > [Management] > [Smart monitoring management].
Smart Monitoring Preferences
Set the Smart Monitoring environment, including MAM connection and Smart Monitoring options.
Connecting to MAM
Connects to MAM.
- On the main screen, select [] > [Smart Monitoring] > [Basic Settings].
![On the main screen, select [{{icon:cog-frame}}] > [Smart Monitoring] > [Basic Settings].](/manual/vurix-admin/images/page153_img1.jpg)
- Enter the [MAM Information].
- [MAM Host]: Enter the host. (MAM web page address)
- [MAM Port]: Enter the port. (Fixed value: 3001)
- [MAM ID]: Enter the ID. (MAM web page ID)
- [MAM Password]: Enter the password. (MAM web page password)
- [Request Wait Time]: Set the wait time for intelligent search requests.
- Click [Connect to MAM].
Setting Intelligent Statistics
Set Intelligent Statistics.
- On the main screen, select [] > [Smart Monitoring] > [Basic Settings].
![On the main screen, select [{{icon:cog-frame}}] > [Smart Monitoring] > [Basic Settings].](/manual/vurix-admin/images/page154_img1.jpg)
- Set [Statistics Settings].
- [VURIX Information]: View information.
- [Select Dashboard Region]: Select the region to display on the intelligent statistics dashboard.
- Click [OK].
Save Smart Monitoring Metadata
Configure metadata.
Save object boxes together with recorded video.
- On the main screen, select [] > [Smart Monitoring] > [Basic Settings].
![On the main screen, select [{{icon:cog-frame}}] > [Smart Monitoring] > [Basic Settings].](/manual/vurix-admin/images/page155_img1.jpg)
- Click [Server] > [Save Metadata].
- Click [OK].
- When [Save metadata] is enabled, the recording storage capacity of smart monitoring devices may increase rapidly.
- Use with caution.
Configure Event Monitoring Options
Configure monitoring options.
- On the main screen, select [] > [Smart Monitoring] > [Basic Settings].
![On the main screen, select [{{icon:cog-frame}}] > [Smart Monitoring] > [Basic Settings].](/manual/vurix-admin/images/page156_img1.jpg)
- Set [Monitoring].
- [Action After Monitoring Report]: Close or pin the video after reporting.
- [Quick Monitoring Report Size] / [Show Quick Monitoring Report]: Set the size or visibility.
- [Show ROI Area]: Display the ROI area on the event video.
- [Show Channel Icon]: Display the channel icon on the event video.
- [Show Event Time]: Display the event occurrence time on the event video.
- Click [OK].
Set Event Priority
Set event priority.
If priority is not set, videos are displayed in the order events occur.
- On the main screen, select [] > [Smart Monitoring] > [Basic Settings].
![On the main screen, select [{{icon:cog-frame}}] > [Smart Monitoring] > [Basic Settings].](/manual/vurix-admin/images/page157_img1.jpg)
- Set [Event Priority].
- Click [OK].
- Set the weight value from 0 to 5.
- The higher the weight value, the higher the priority.
Adding a monitoring status item
Manage [Monitoring Status] items.
Only administrator accounts can add or delete items.
- On the main screen, select [] > [Smart Monitoring] > [Basic Settings].
![On the main screen, select [{{icon:cog-frame}}] > [Smart Monitoring] > [Basic Settings].](/manual/vurix-admin/images/page158_img1.jpg)
- Set [Monitoring Status].
- [Add]: Add an item.
- [Delete]: Delete an item.
- Click [OK].
Setting object box options
Set object box display options.
- On the main screen, select [] > [Smart Monitoring] > [Basic Settings].
![On the main screen, select [{{icon:cog-frame}}] > [Smart Monitoring] > [Basic Settings].](/manual/vurix-admin/images/page159_img1.jpg)
- Set [Object Box].
- [Object Box Display Monitor]: Display object boxes on the video.
- [Show Event Objects Only]: Display analysis information from smart monitoring devices on the live video.
- [Additional Object Box Display]: Set additional items to display on object boxes.
- [Show Object Box Label]: Display object box labels.
- [Object Box Style]: Set object box color, line thickness, and more.
- Click [OK].
Setting ROI Event Colors
Depending on the event that occurred, the detection area (ROI, Region of Interest) appears in the configured event color.
- On the main screen, select [] > [Smart Monitoring] > [Basic Settings].
![On the main screen, select [{{icon:cog-frame}}] > [Smart Monitoring] > [Basic Settings].](/manual/vurix-admin/images/page160_img1.jpg)
- Configure [ROI Event Color Settings].
- [Use cell border line]: Display the border.
- [Display cell event text]: Display the text.
- Select the item you want.
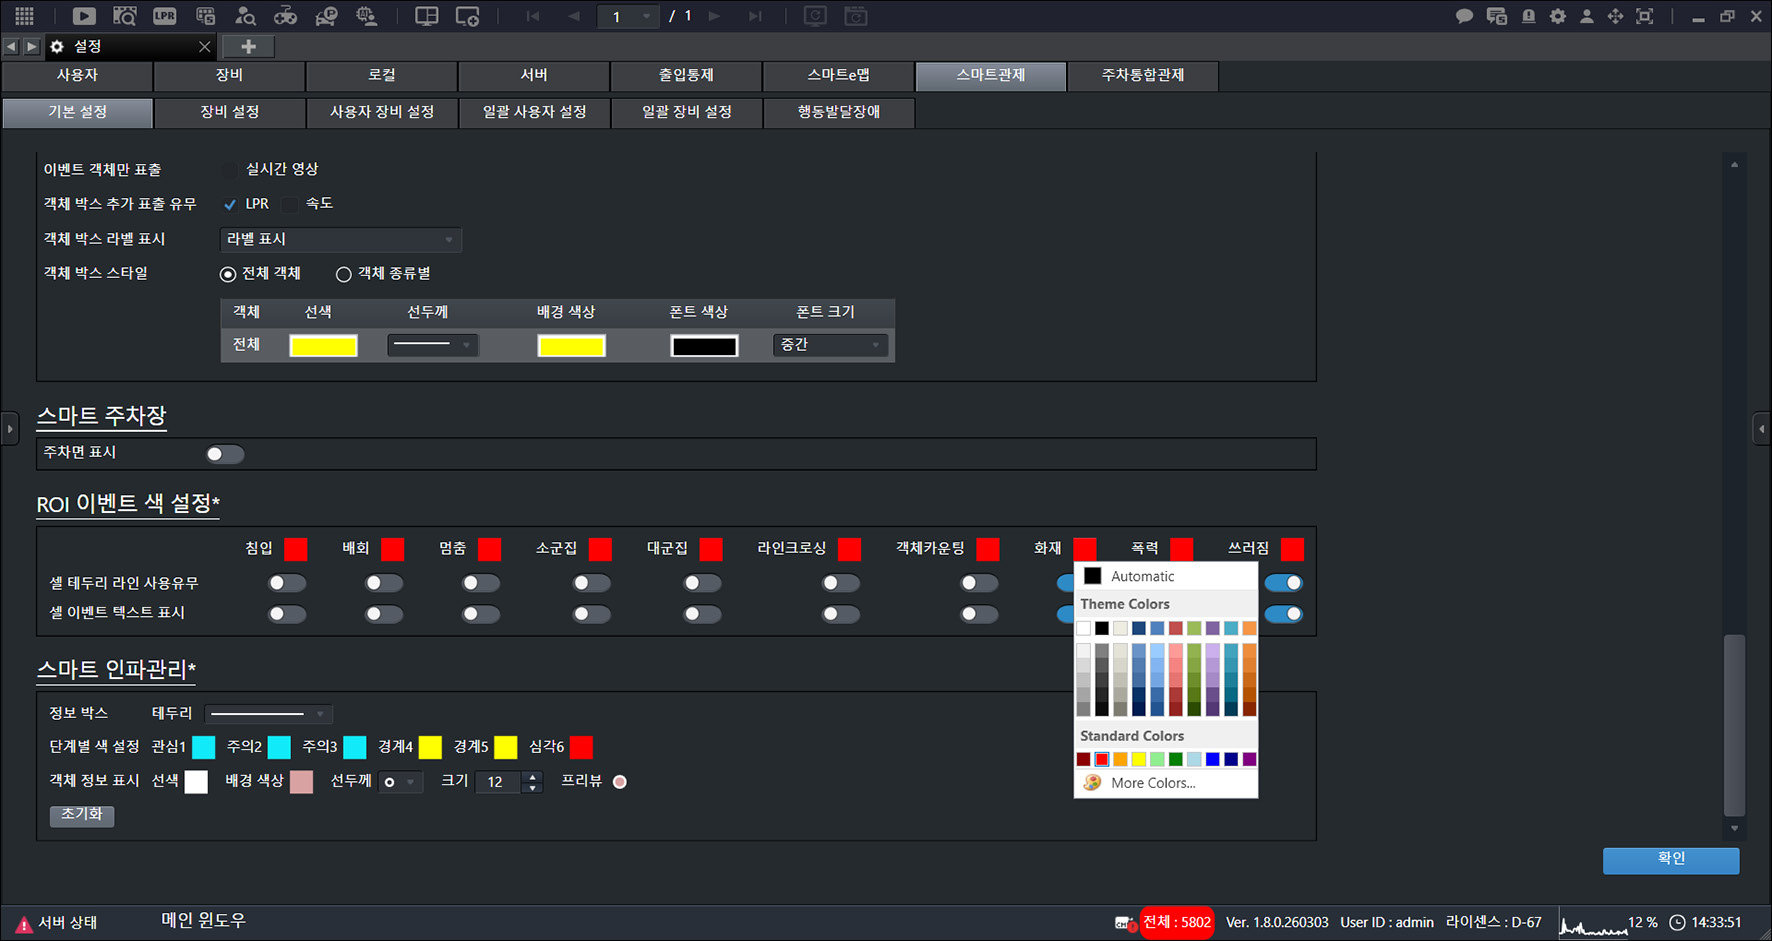
- Click [OK].
Set Crowd Management Event Colors
Set crowd management event colors.
- On the main screen, select [] > [Smart Monitoring] > [Basic Settings].
![On the main screen, select [{{icon:cog-frame}}] > [Smart Monitoring] > [Basic Settings].](/manual/vurix-admin/images/page161_img1.jpg)
- Set [Smart Crowd Management].
- [Info box]: Set the background color of the event information box.
- [Color by level]: Set the color for each event level.
- [Object information display]: Set the color for object information display.
- Click [OK].
Smart Monitoring Device Settings
Configure Smart Monitoring devices.
Register Smart Monitoring Devices
Register devices to use in Smart Monitoring.
When registering Smart Monitoring devices, the configured objects are monitored.
- On the main screen, select [] > [Smart Monitoring] > [Device Settings].
- Select a device.
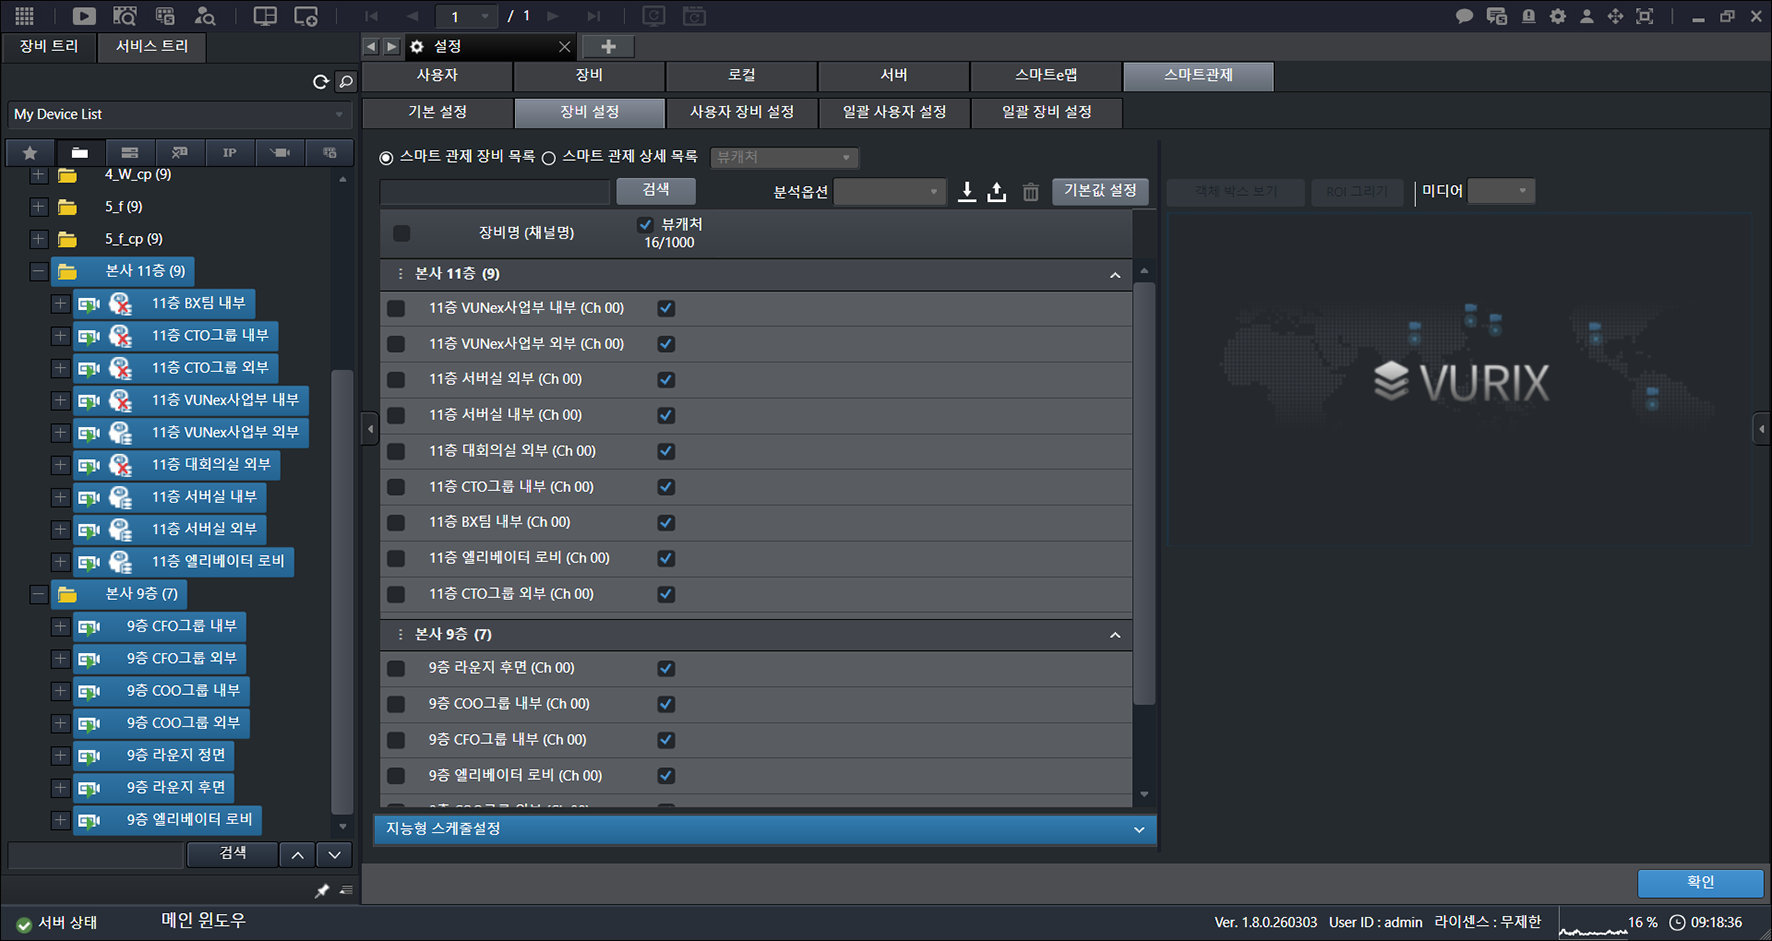
- Drag to the right while holding the mouse button.
- Click [OK].
View Smart Monitoring Device List
Check detection area information, event information, analysis areas, and other details configured on Smart Monitoring devices.
- On the main screen, select [] > [Smart Monitoring] > [Device Settings].
![On the main screen, select [{{icon:cog-frame}}] > [Smart Monitoring] > [Device Settings].](/manual/vurix-admin/images/page163_img1.jpg)
- Click [Smart Monitoring Detail List].
![Click [Smart Monitoring Detail List].](/manual/vurix-admin/images/page163_img2.jpg)
- Select the item you want.
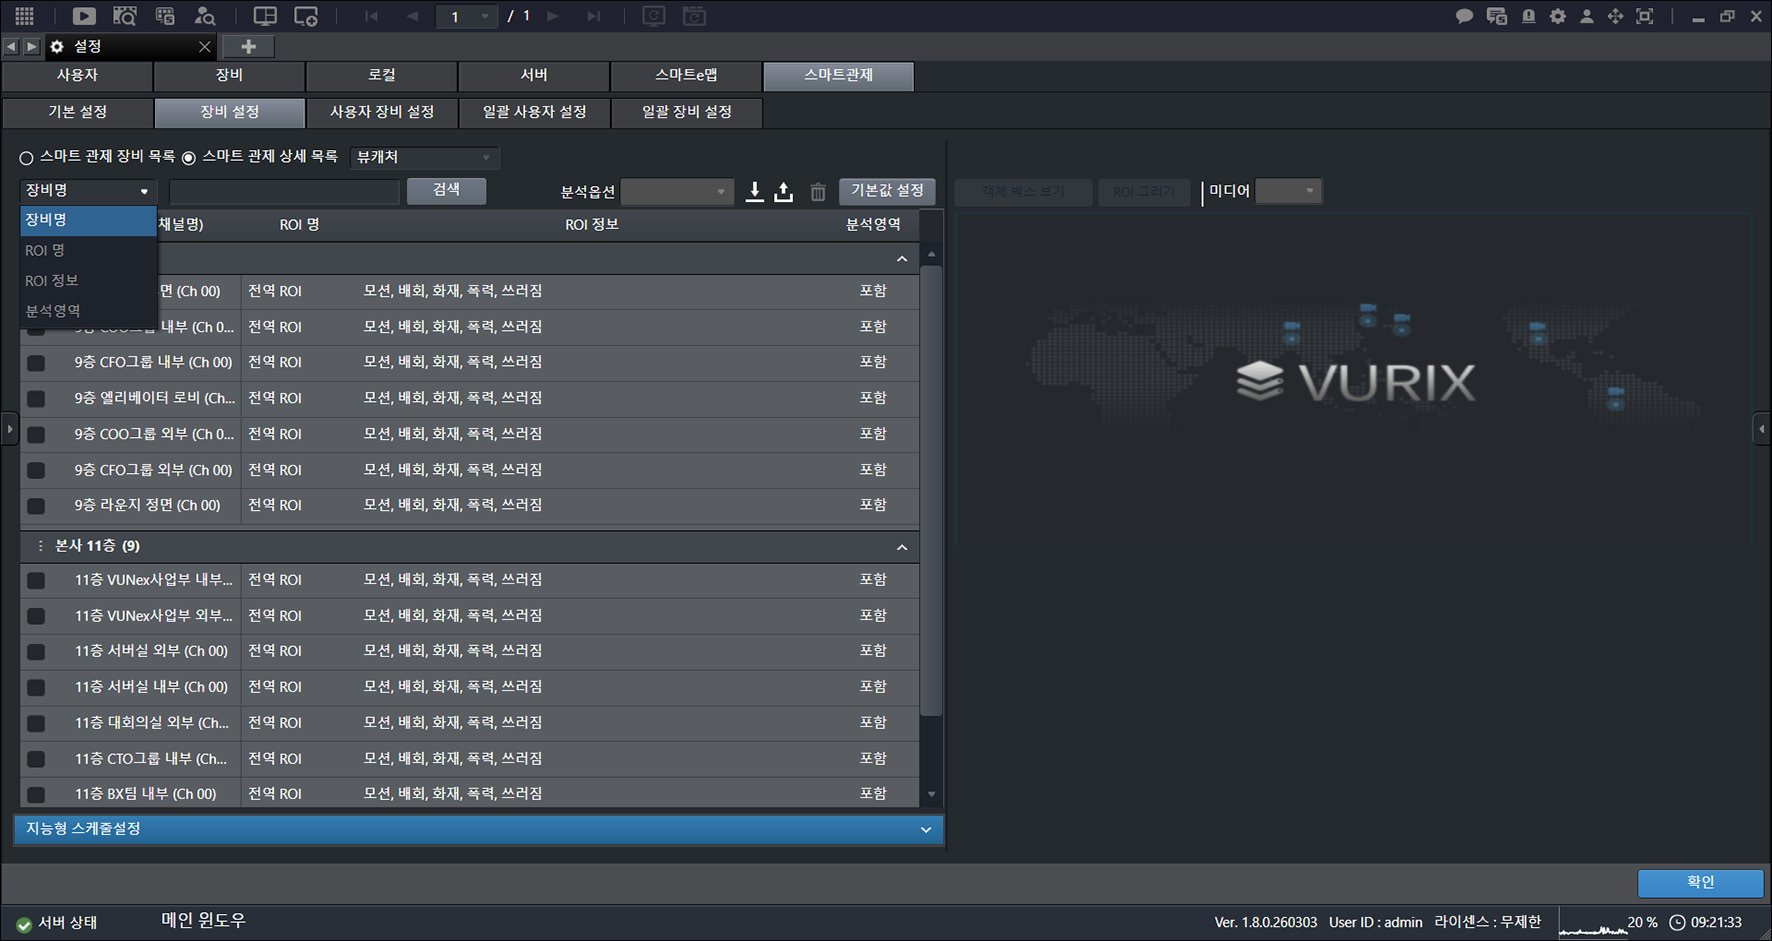
- Set the conditions, then click [Search].
- [Analysis options]: Set the analysis options.
- [] / []: Export the device list saved in the program, or import it into the program.
- []: Delete the item.
- [Set defaults]: Set the default values for video analysis.
![Set the conditions, then click [Search].](/manual/vurix-admin/images/page164_img2.jpg)
- Check the results.
Smart Monitoring ROI Settings
Select a device to check detection area information and edit detection areas.
Creating a detection area (ROI)
Create detection areas for each device.
- On the main screen, select [] > [Smart Monitoring] > [Device Settings].
- Select a device.
- [View Object Box]: Display object boxes on the video.
- [Draw ROI] / [Draw Line]: Draw a shape or line to create a detection area.
- [Media]: Select media.
- [Settings]: Set the smart crosswalk.
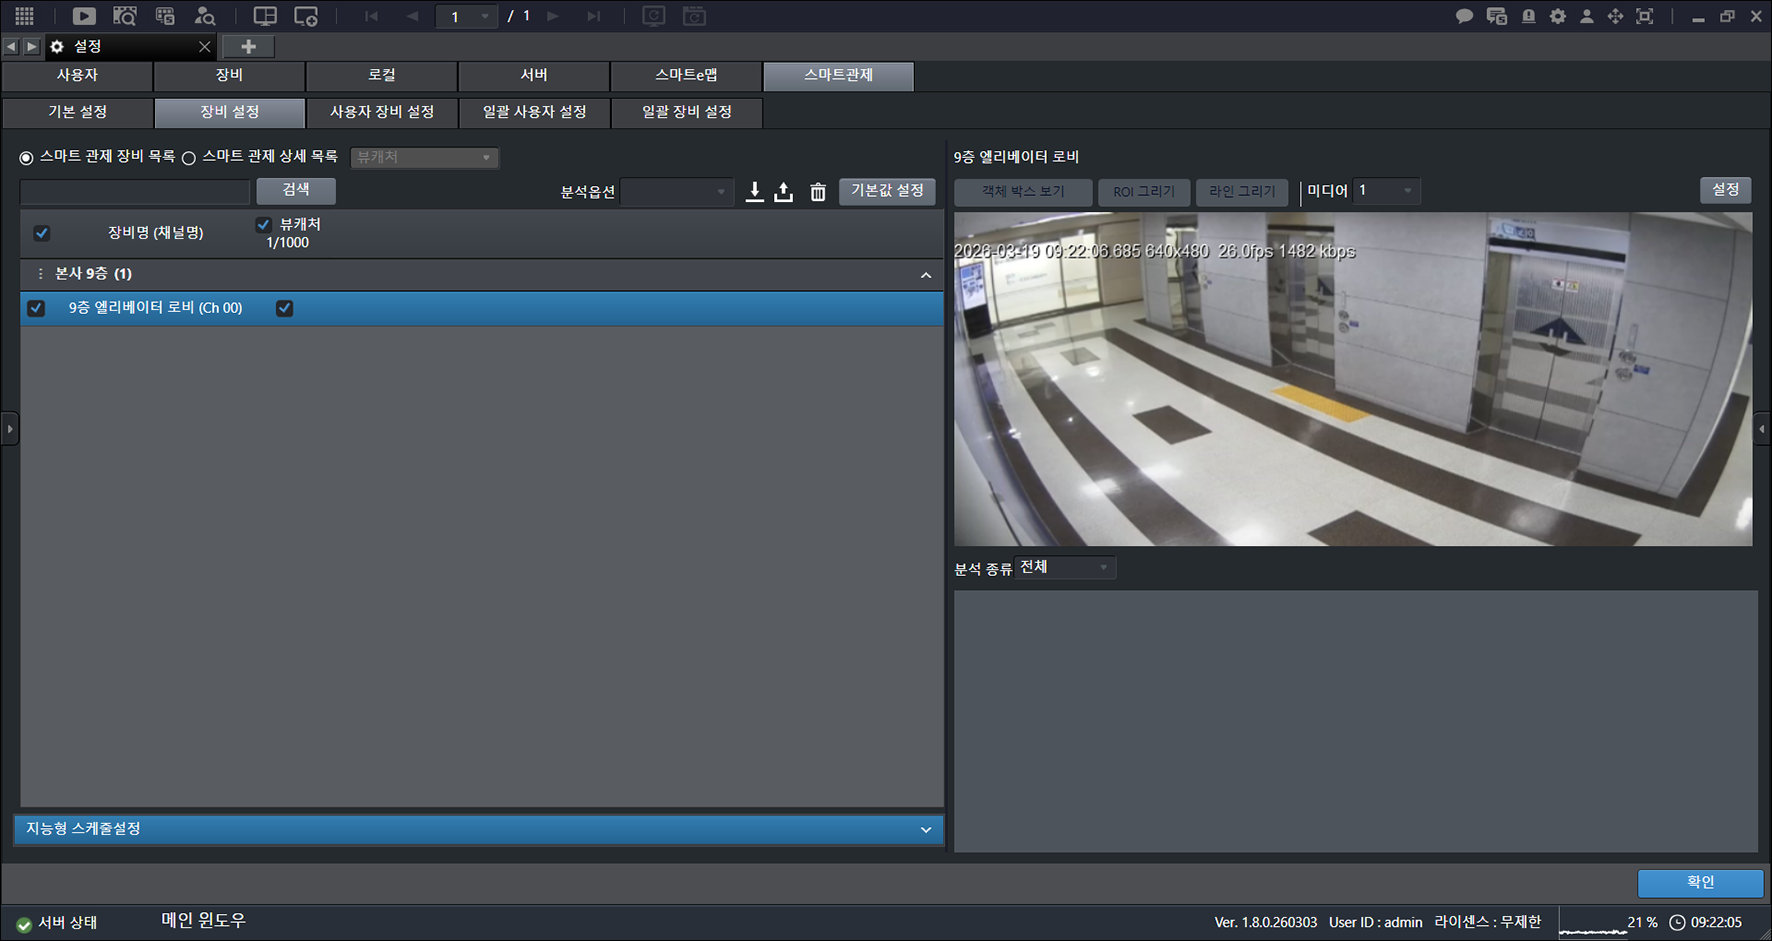
- Click [Draw ROI].
![Click [Draw ROI].](/manual/vurix-admin/images/page166_img1.jpg)
- Select the item you want.
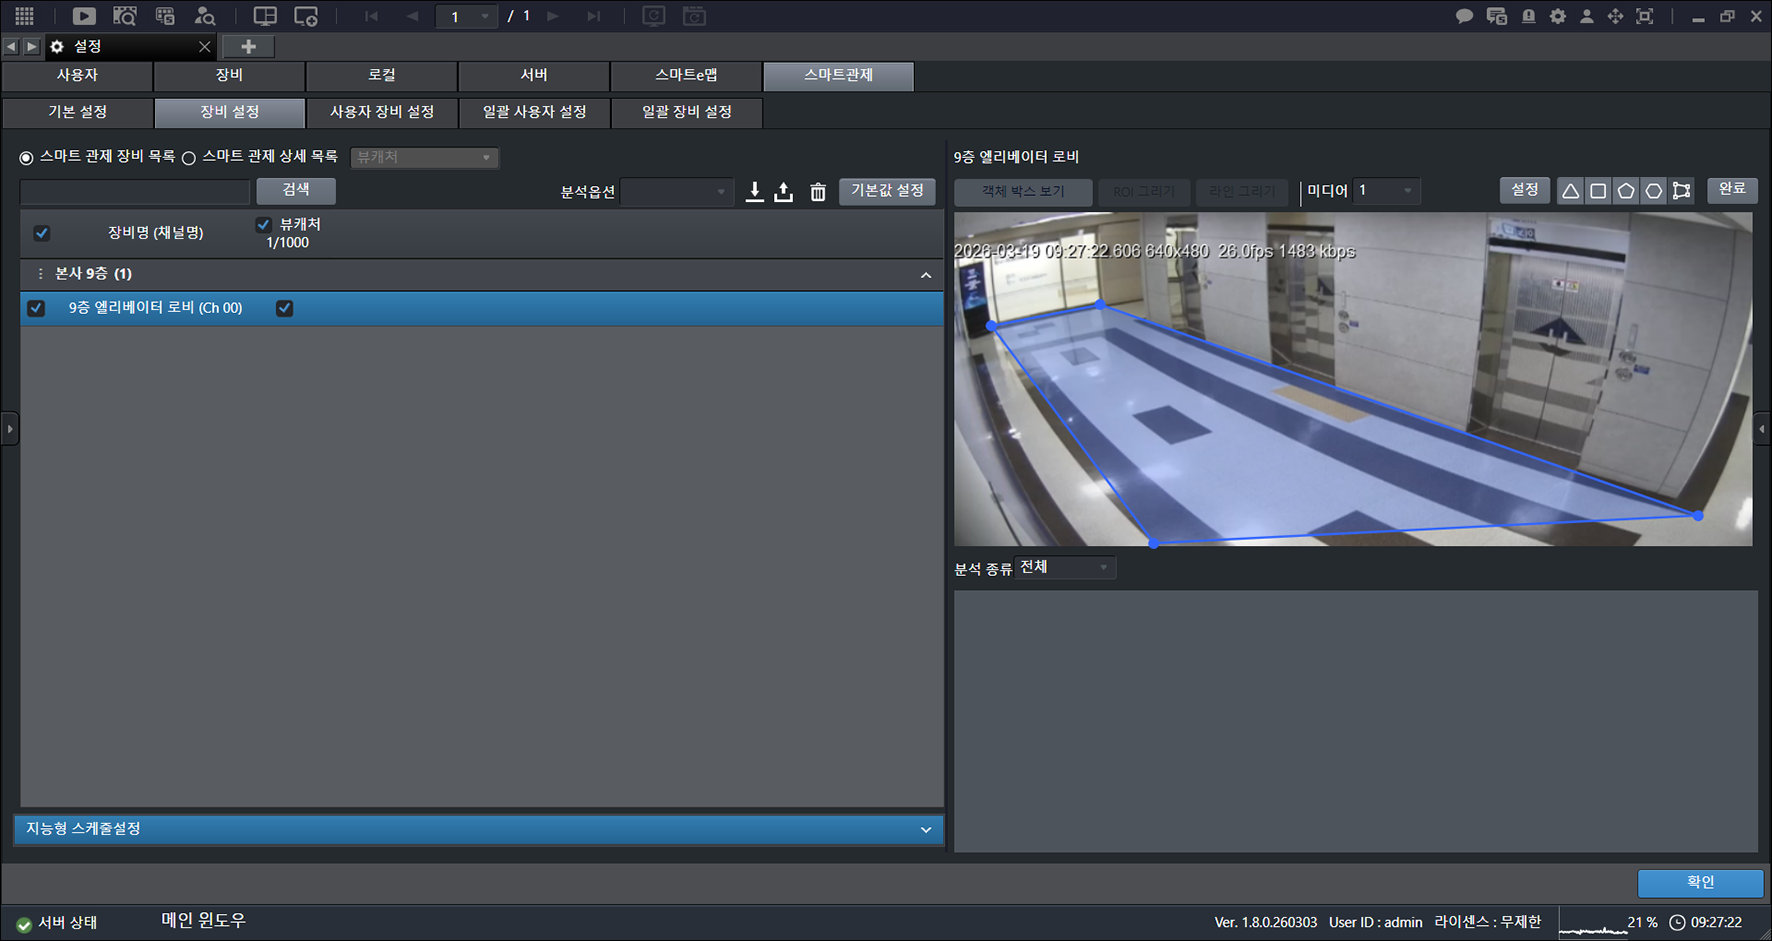
- Click the point you want with the mouse.
- Create an area.
- Click [Complete] > [OK].
Setting detection area (ROI) analysis conditions
Set analysis conditions for the detection area.
- On the main screen, select [] > [Smart Monitoring] > [Device Settings].
- Select a device.
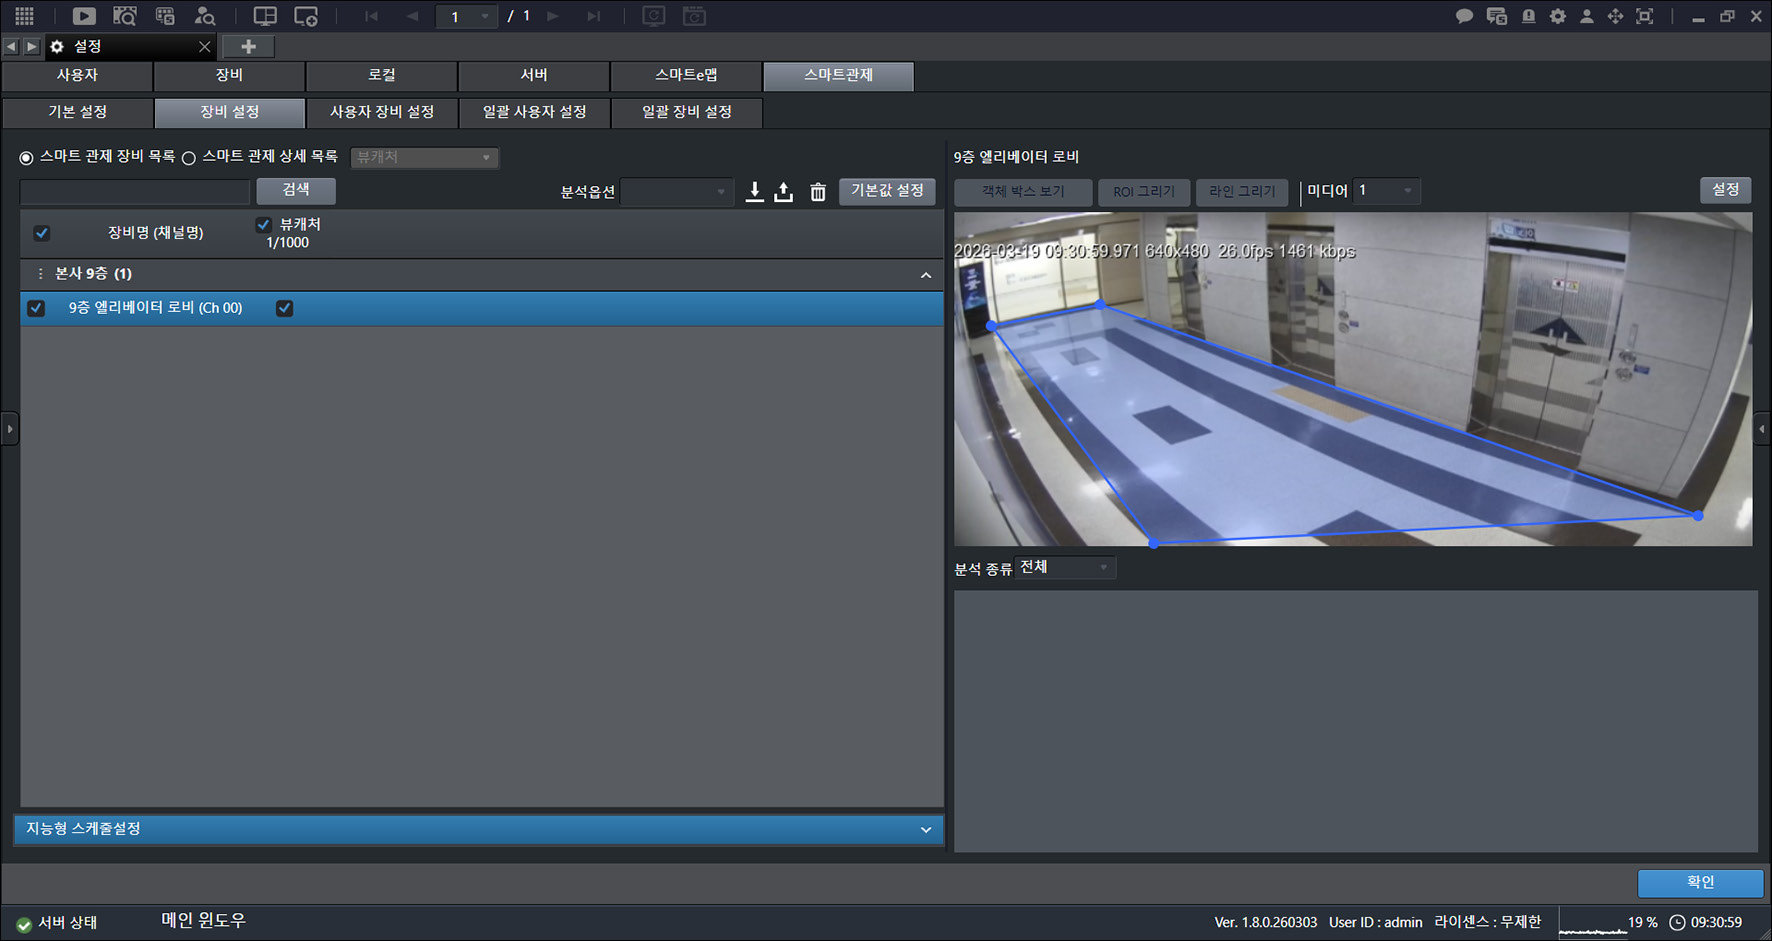
- Click [Analysis Type] > [ROI].
- [ROI Name]: Enter a name.
- [Analysis Area]: Include or exclude the analysis area.
- [Sensitivity Settings]: Set the sensitivity for the detection area.
![Click [Analysis Type] > [ROI].](/manual/vurix-admin/images/page167_img2.jpg)
- Select [ROI].
![Select [ROI].](/manual/vurix-admin/images/page168_img1.jpg)
- Select [Event].
![Select [Event].](/manual/vurix-admin/images/page168_img2.jpg)
- Select [Object].
![Select [Object].](/manual/vurix-admin/images/page169_img1.jpg)
- Click [OK].
Setting detection area (ROI) sensitivity
Set sensitivity for the detection area.
Depending on the event, you can also set event sensitivity and object sensitivity separately. (Example: violence, fall, and more)
- On the main screen, select [] > [Smart Monitoring] > [Device Settings].
- Select a device.
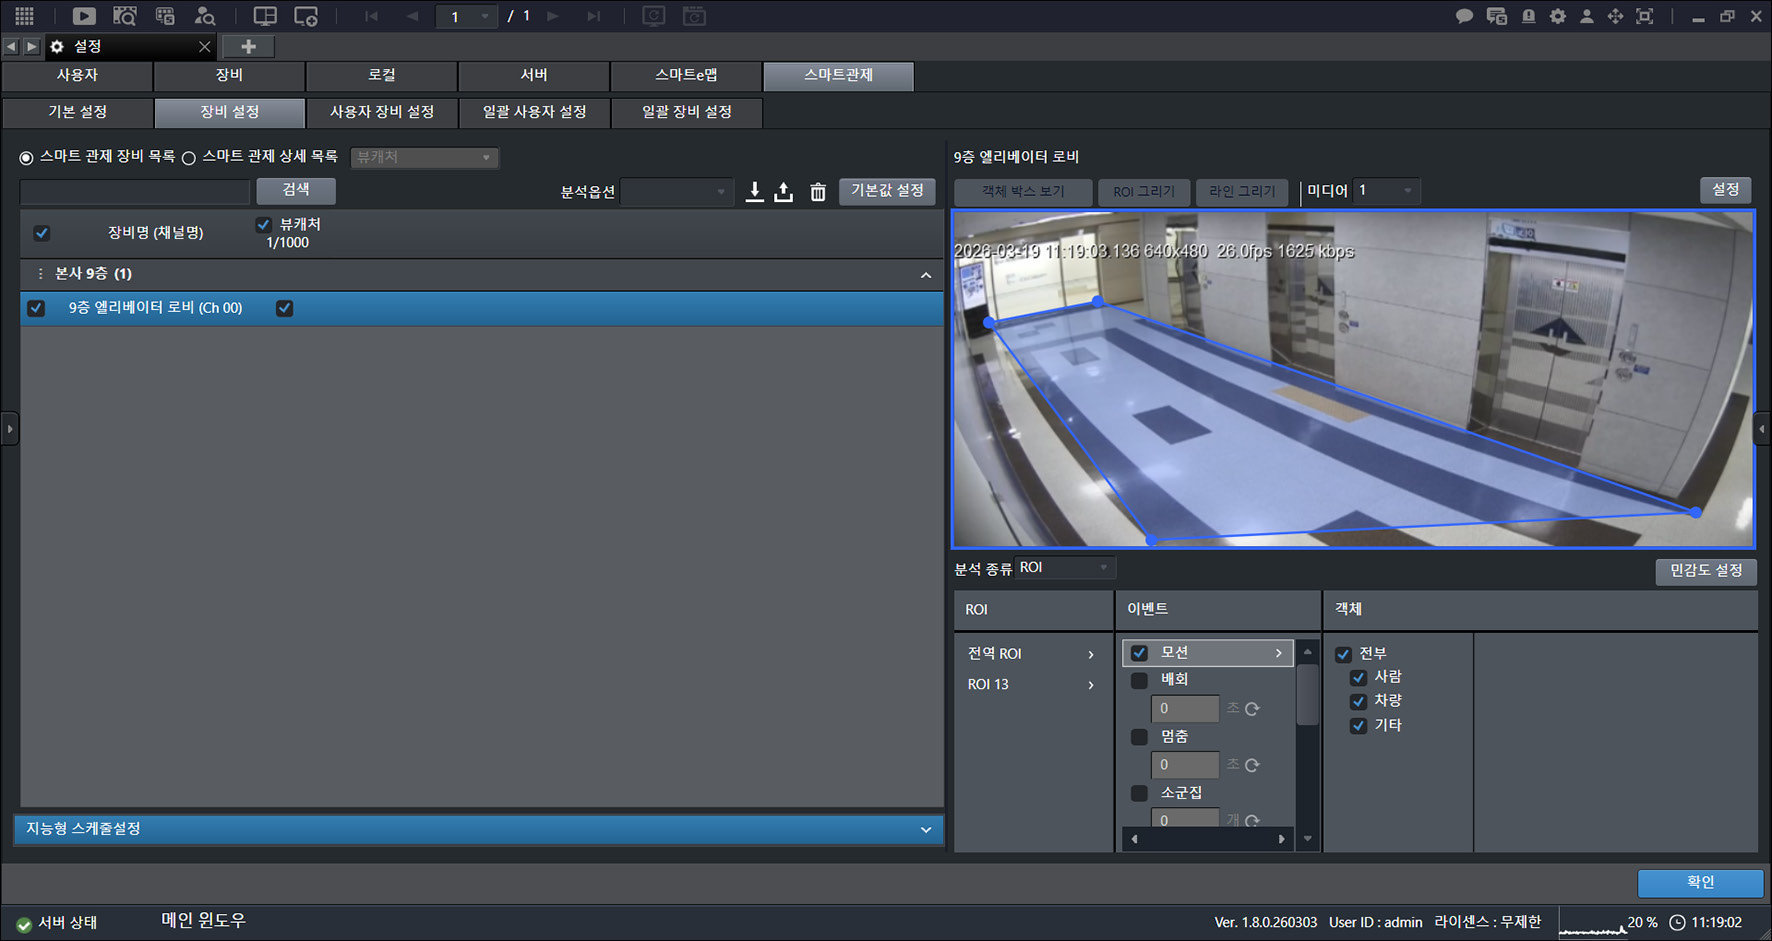
- Select the item you want.
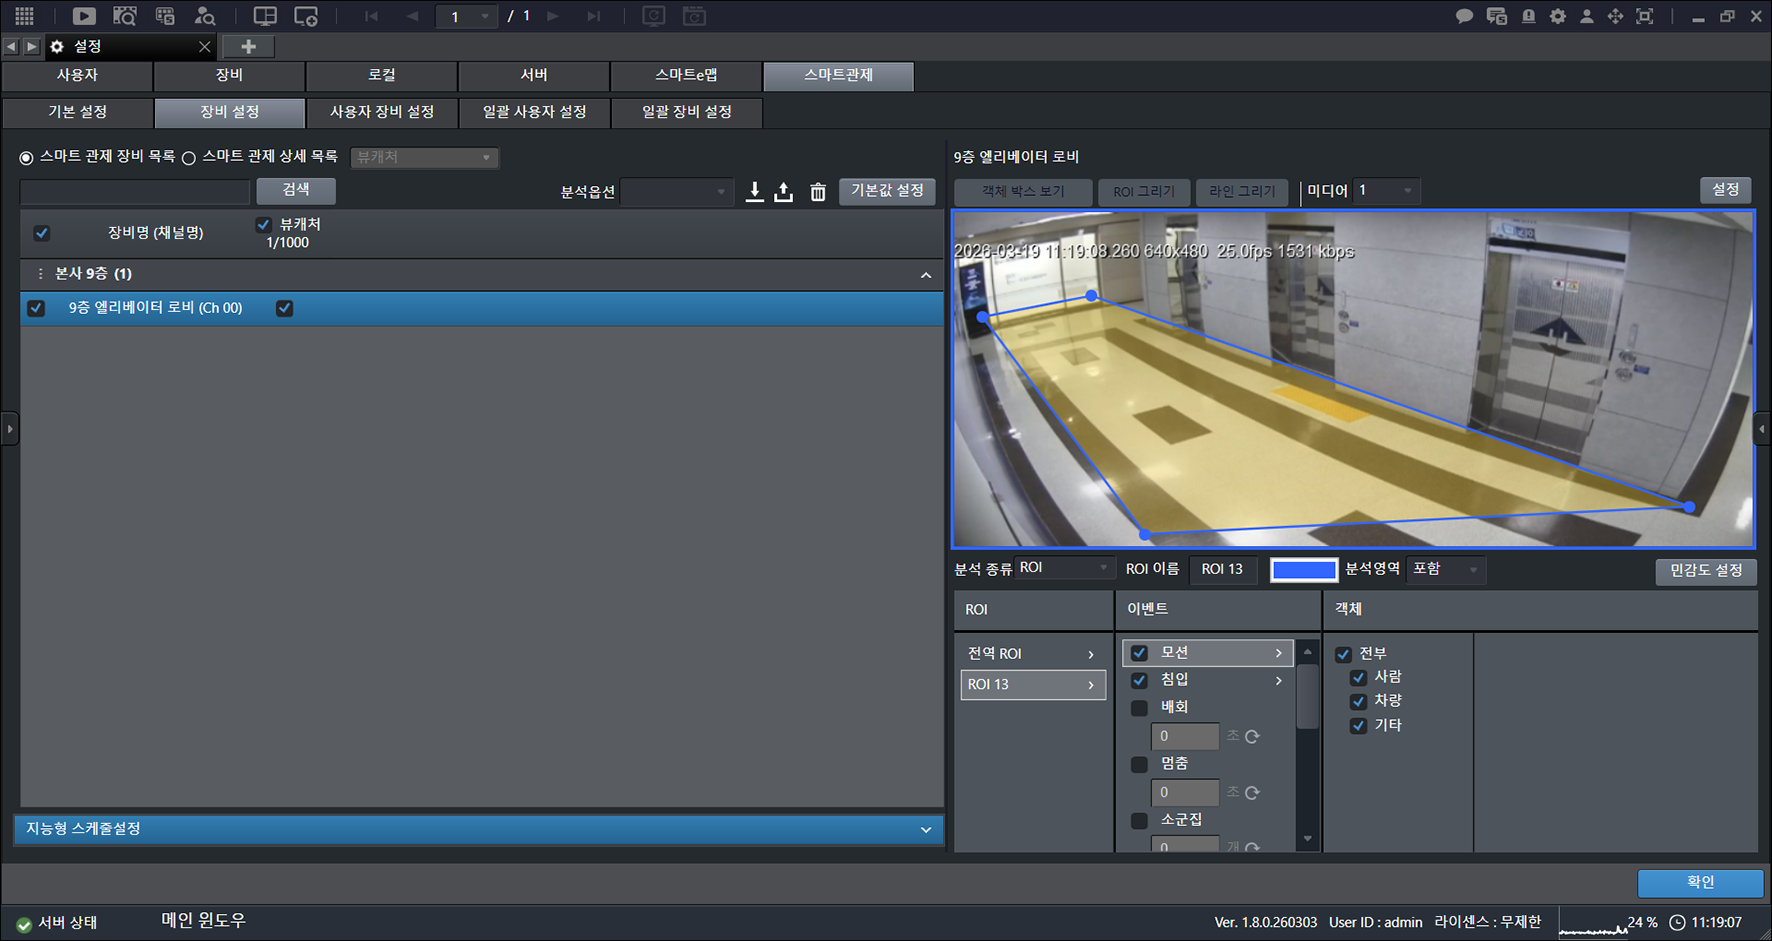
- Click [Sensitivity Settings].
- Set the items you want.
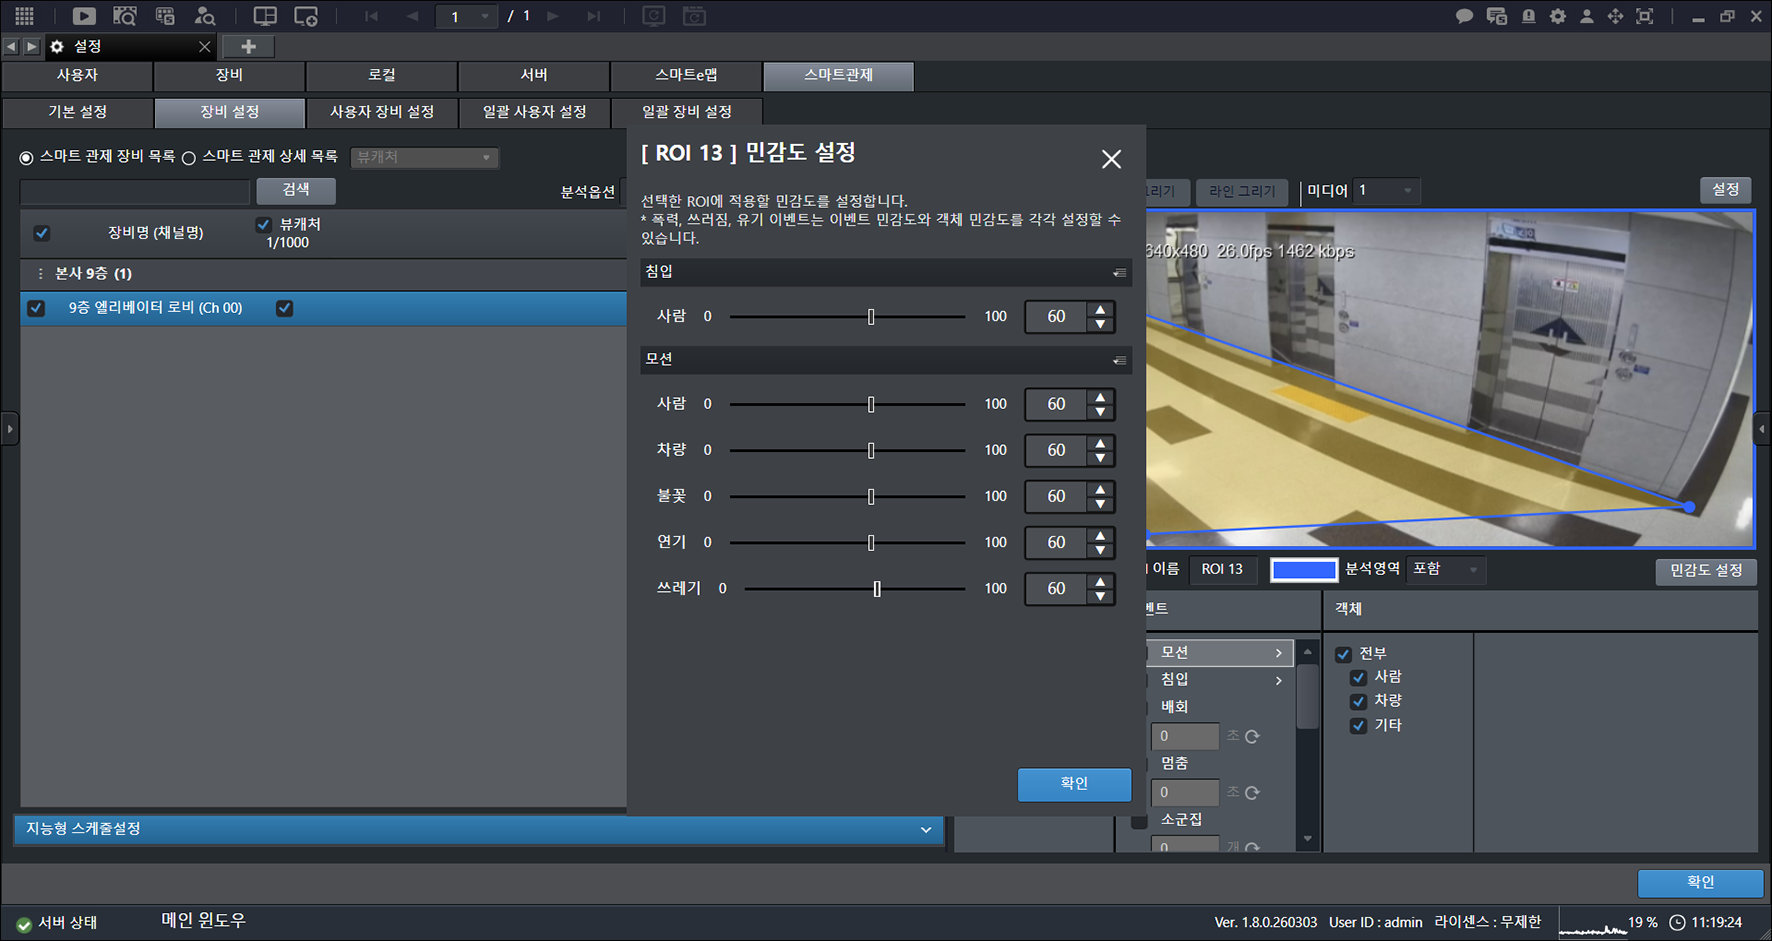
- Hold down the mouse button and move in the direction you want.
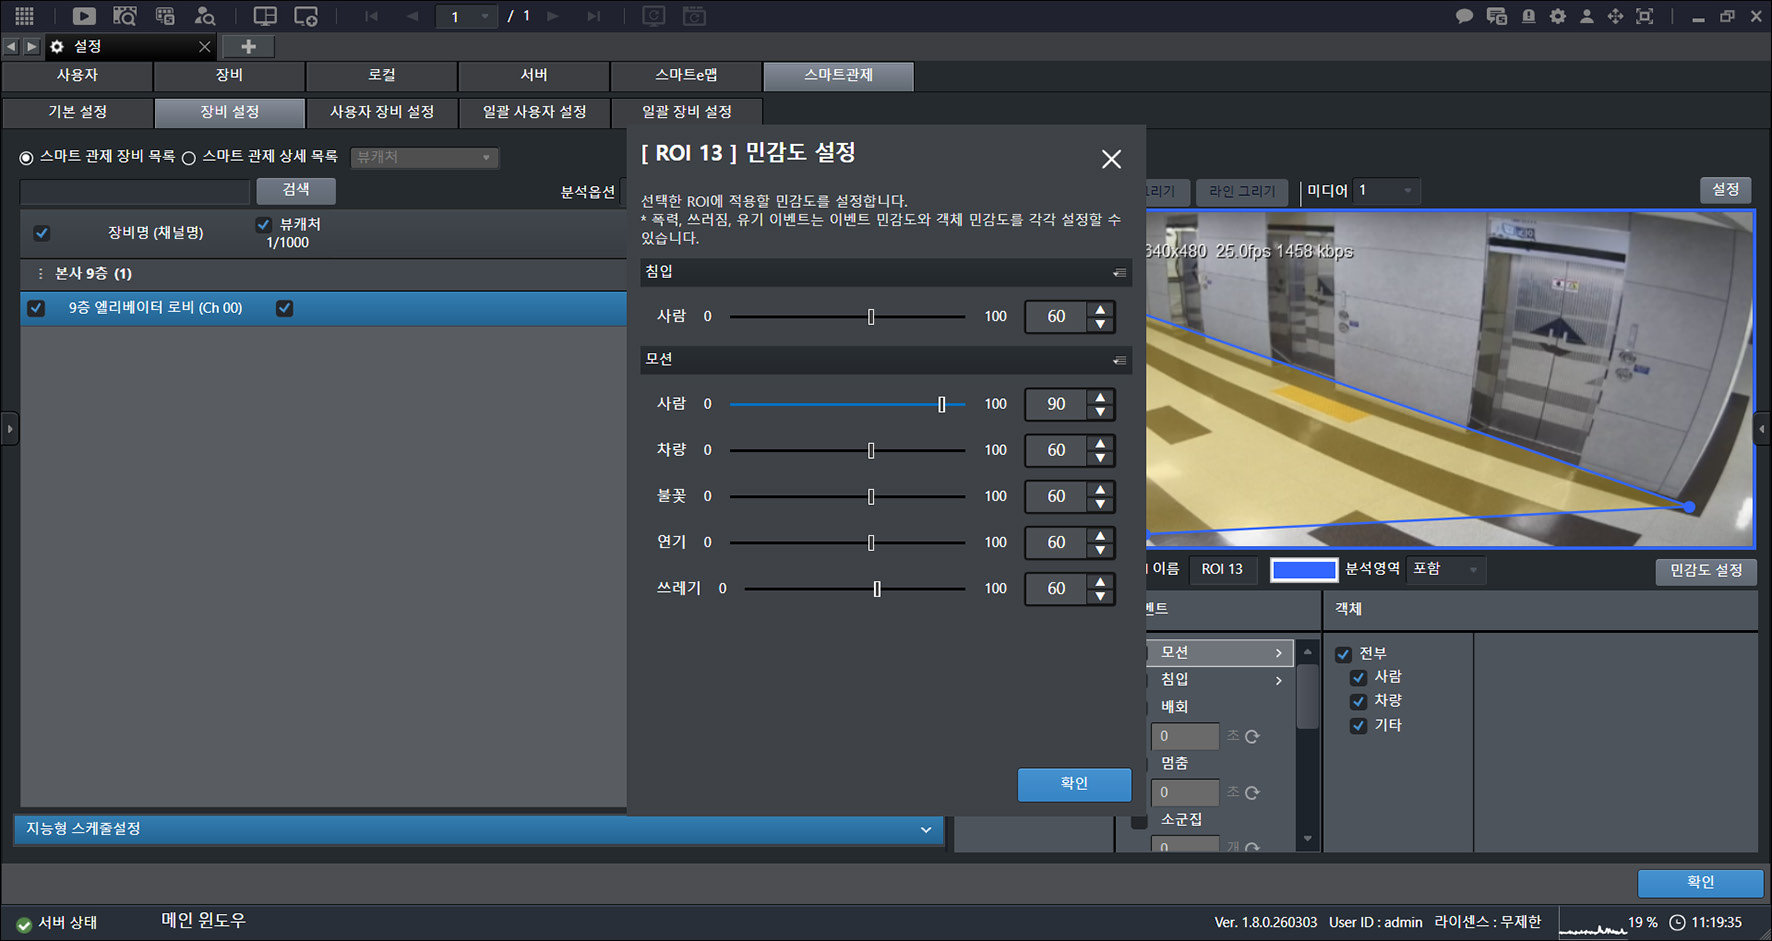
- Click [OK] > [OK].
- Depending on the event, you can also set event sensitivity and object sensitivity separately. (Example: violence, fall, and more)
- See the table below for sensitivity classification by event.
Deleting a detection area (ROI)
Delete the detection area.
- On the main screen, select [] > [Smart Monitoring] > [Device Settings].
- Select a device.
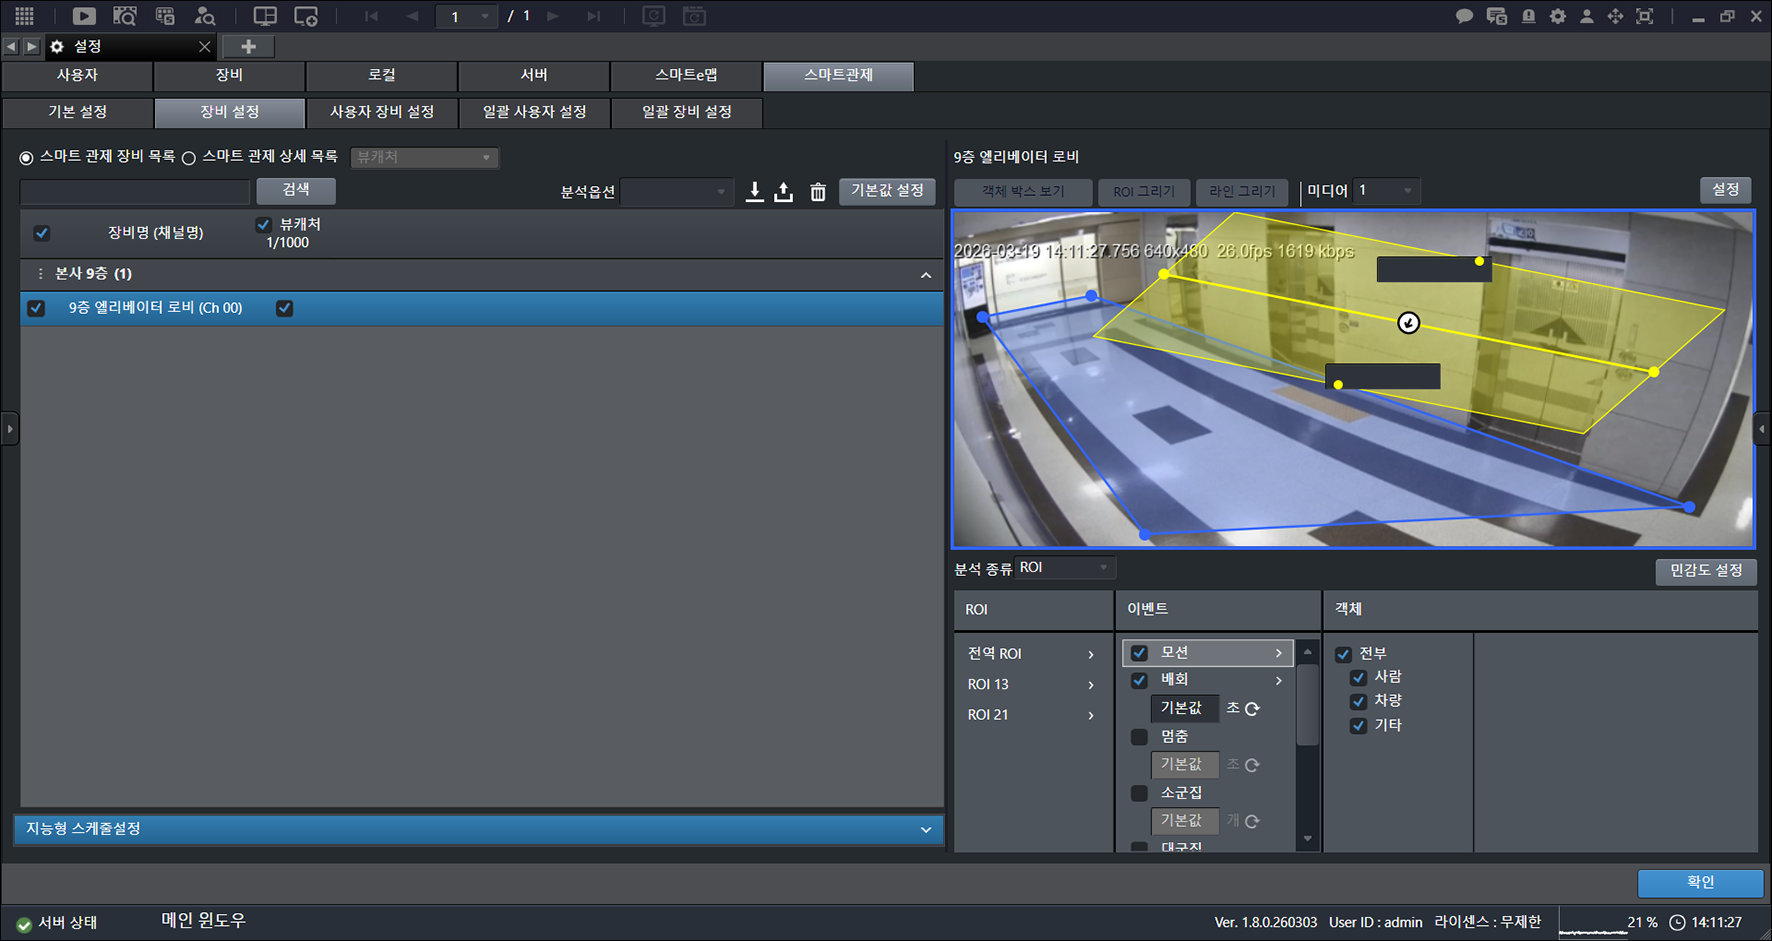
- Select the item you want.
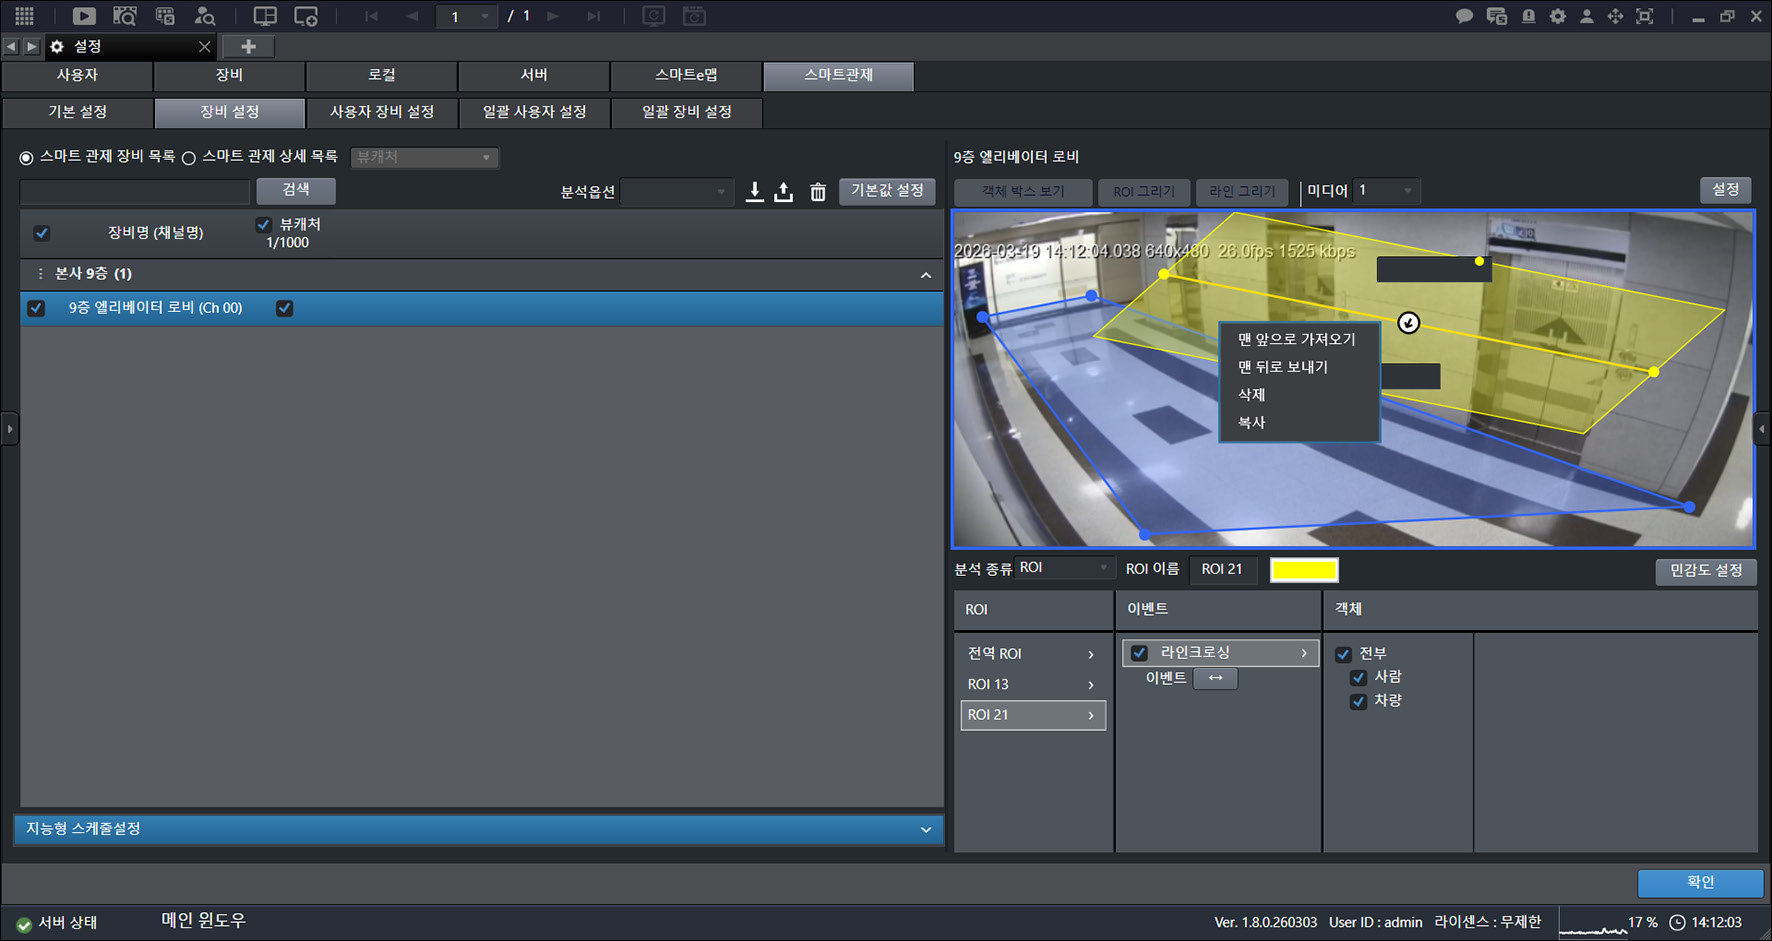
- Right-click to open the context menu.
- [Bring to front]: Brings the item to the front.
- [Send to back]: Sends the item to the back.
- [Delete]: Deletes the item.
- [Copy]: Copies the item.
- Click [Delete] > [OK].
Changing the detection area (ROI) shape
Change the detection area shape, such as by adding or deleting points.
- On the main screen, select [] > [Smart Monitoring] > [Device Settings].
- Select a device.
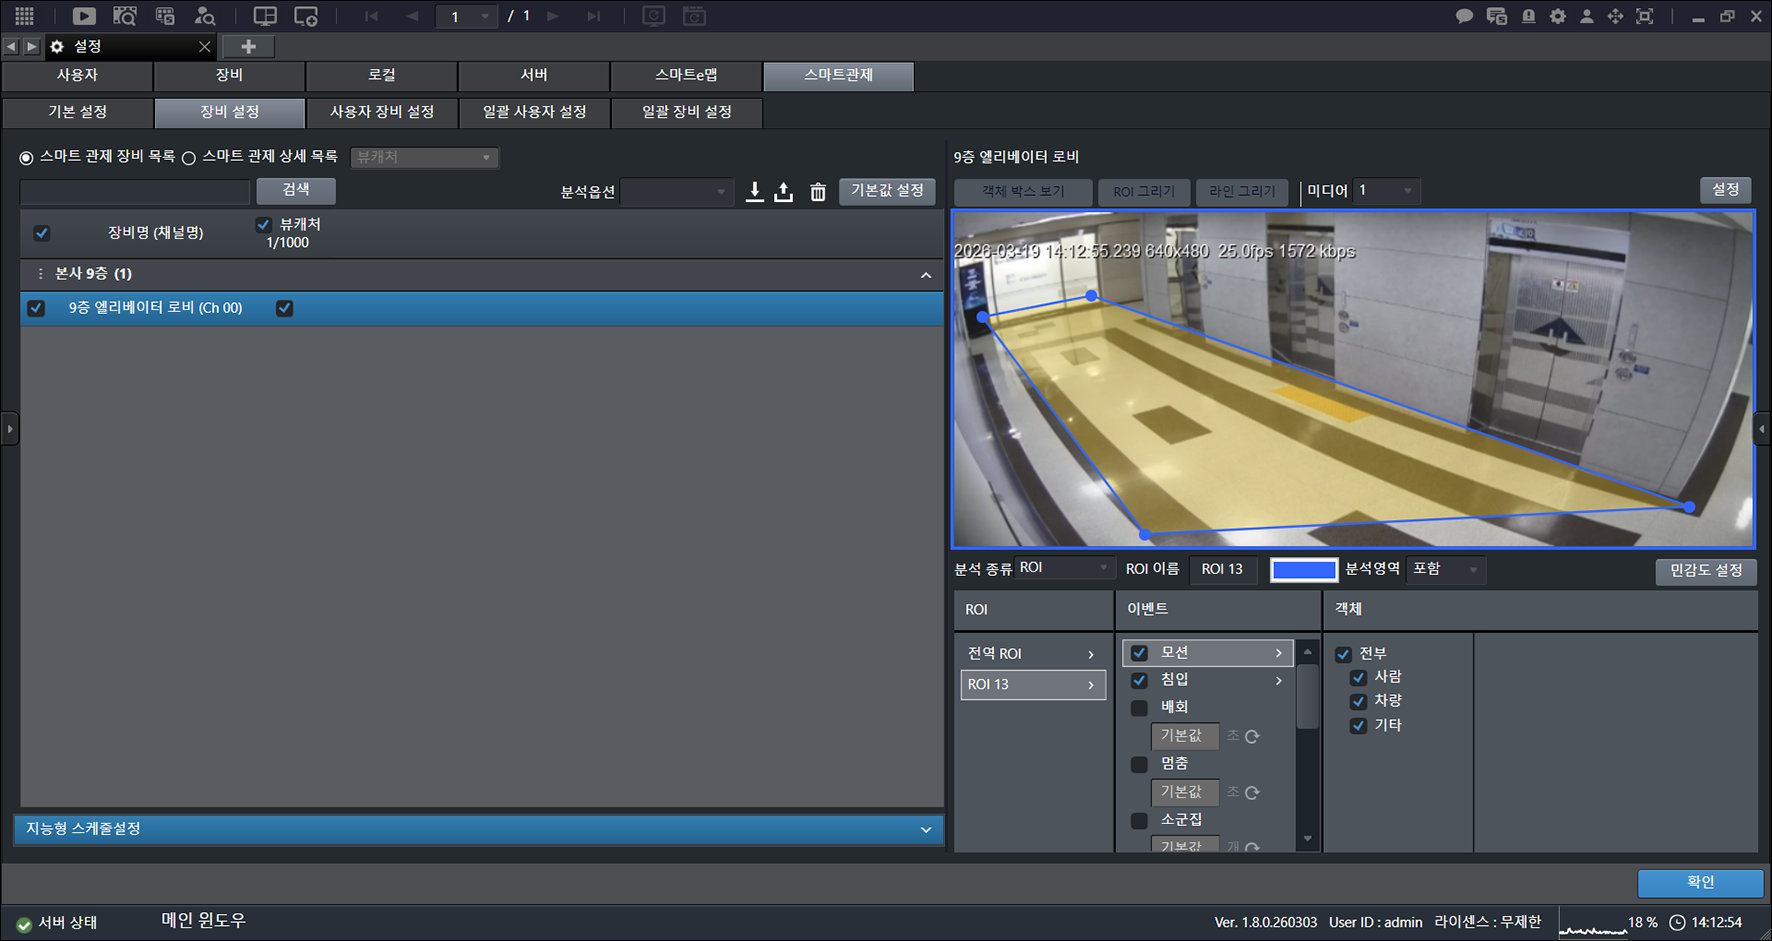
- Select the item you want.
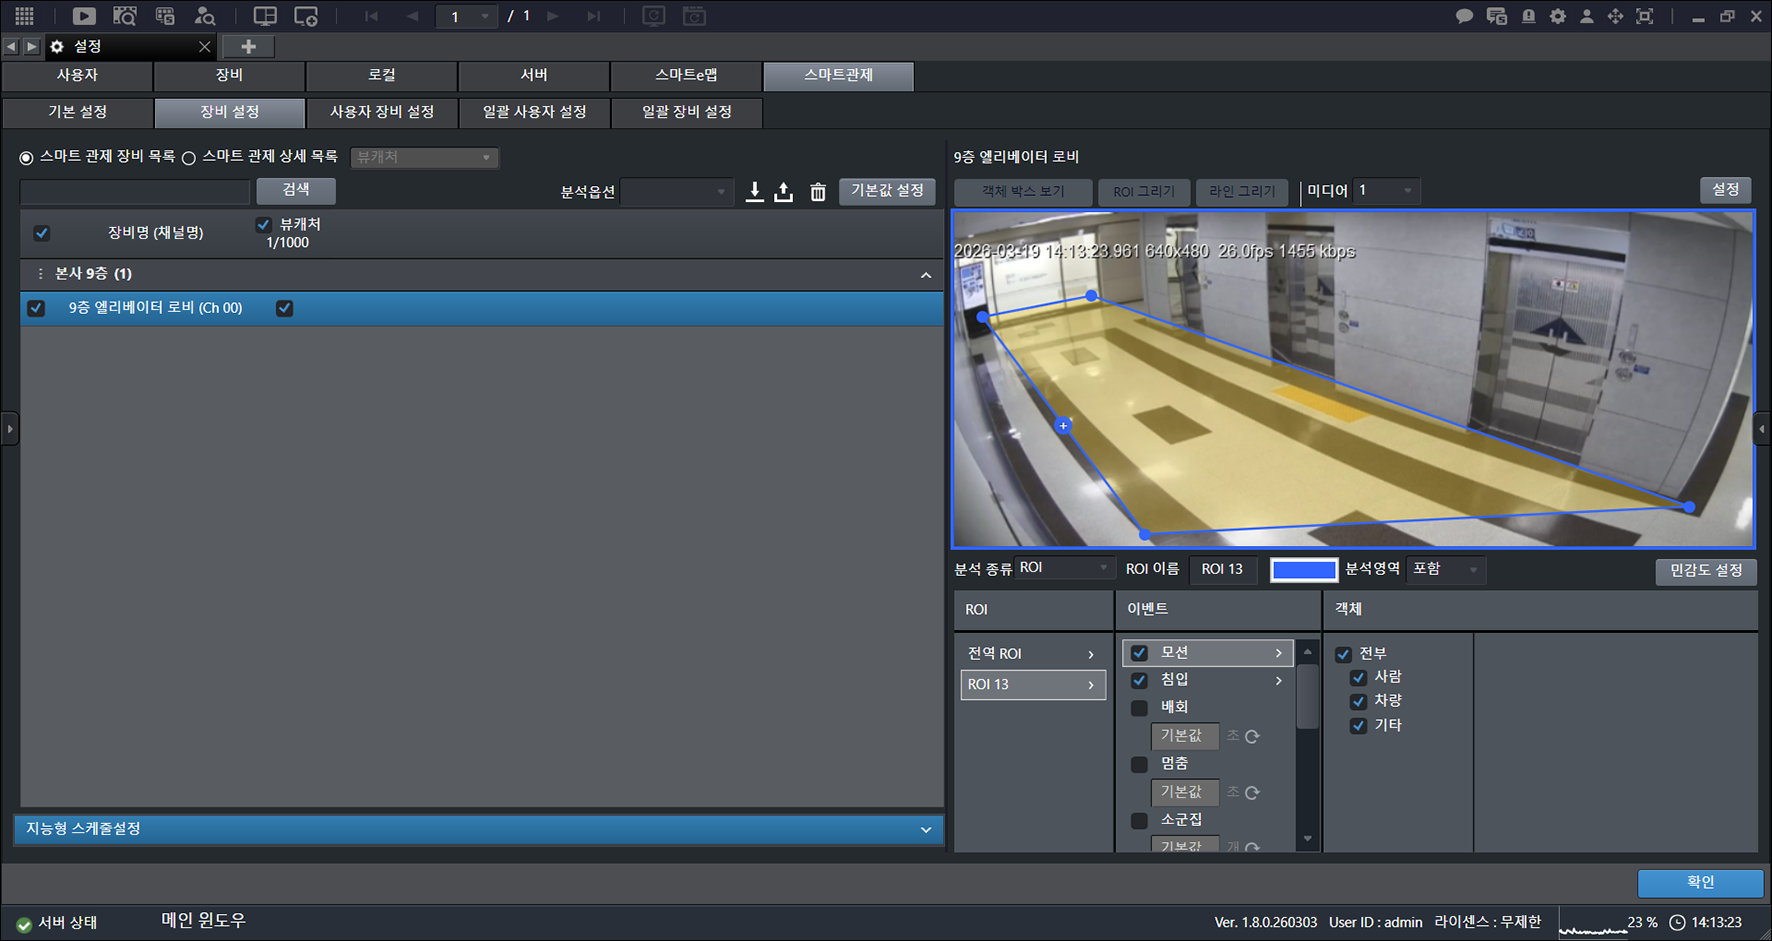
- Click the point you want with the mouse.
- Add a point.
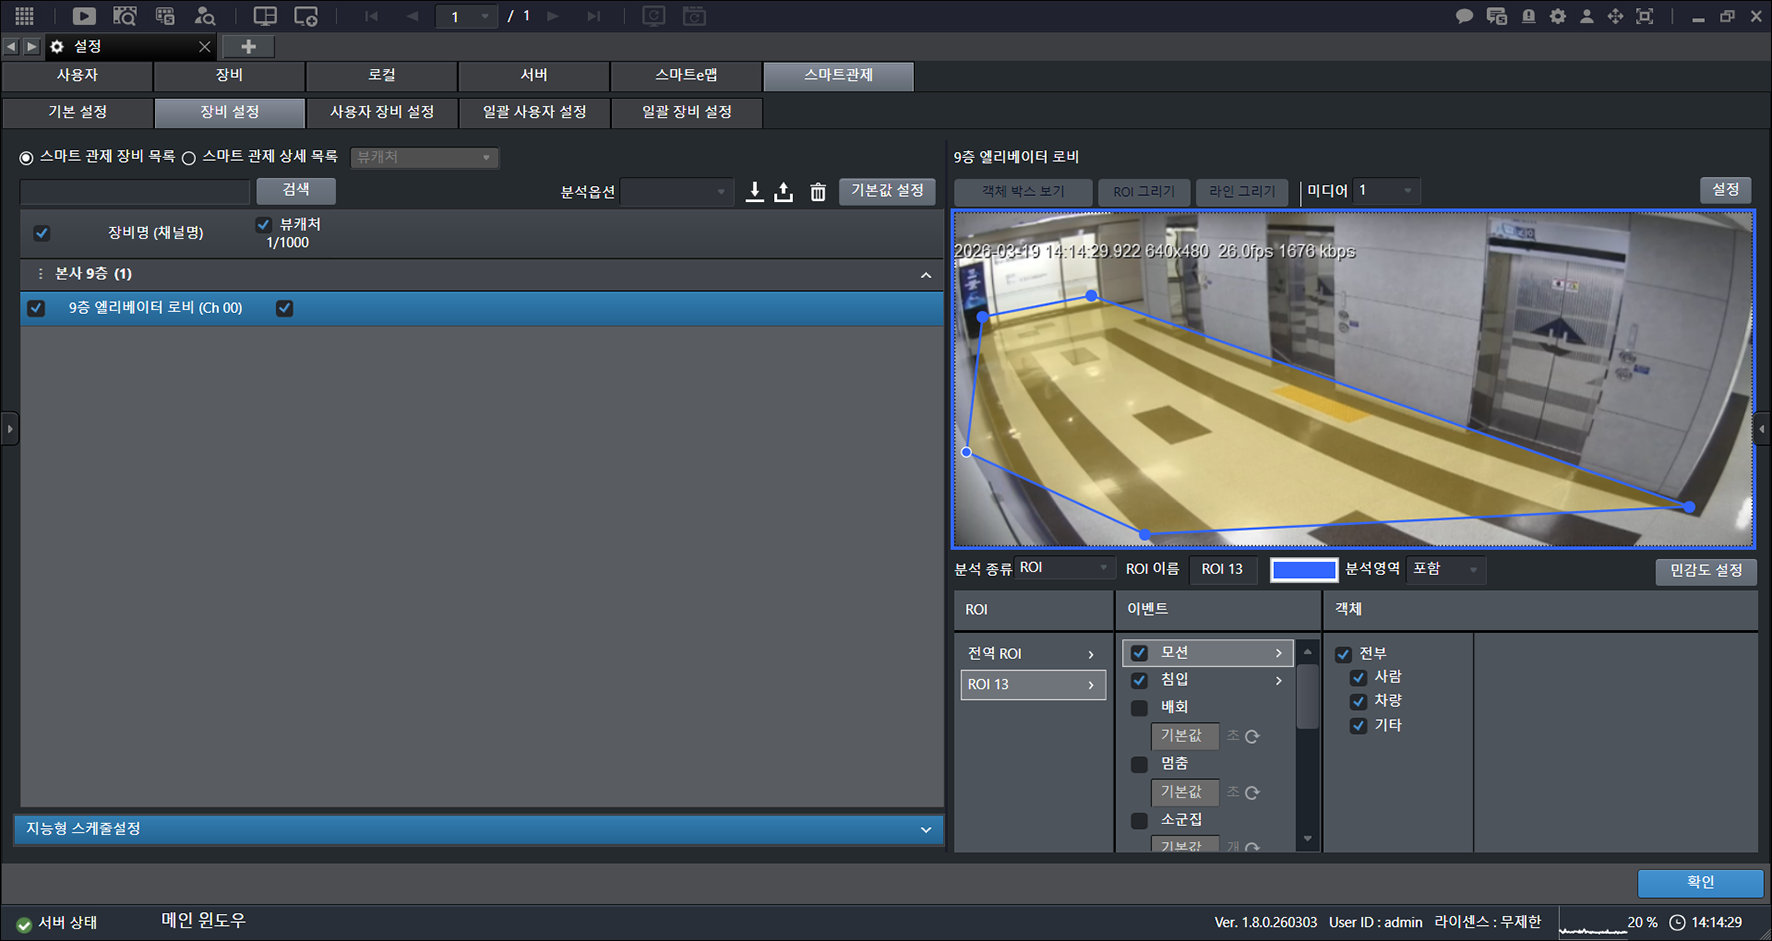
- Hold down the mouse button and move in the direction you want.
- Change the area shape.
- Click [OK].
Setting the detection area (ROI) color
Set the detection area color.
- On the main screen, select [] > [Smart Monitoring] > [Device Settings].
- Select a device.
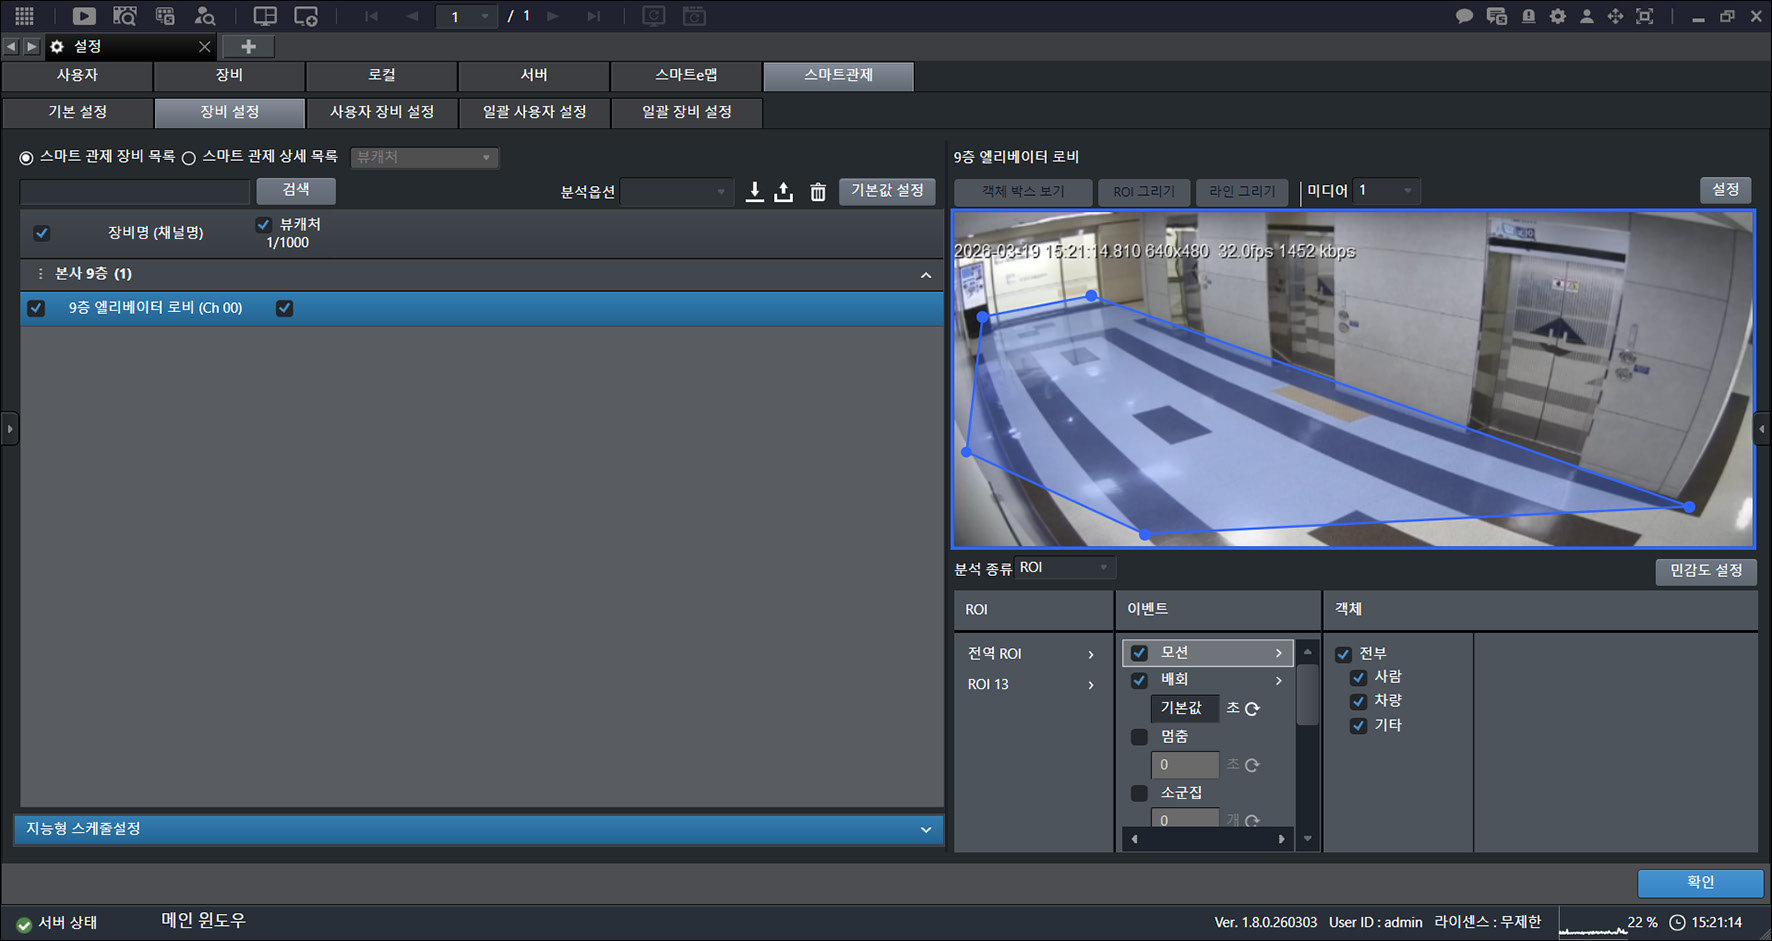
- Select the item you want.
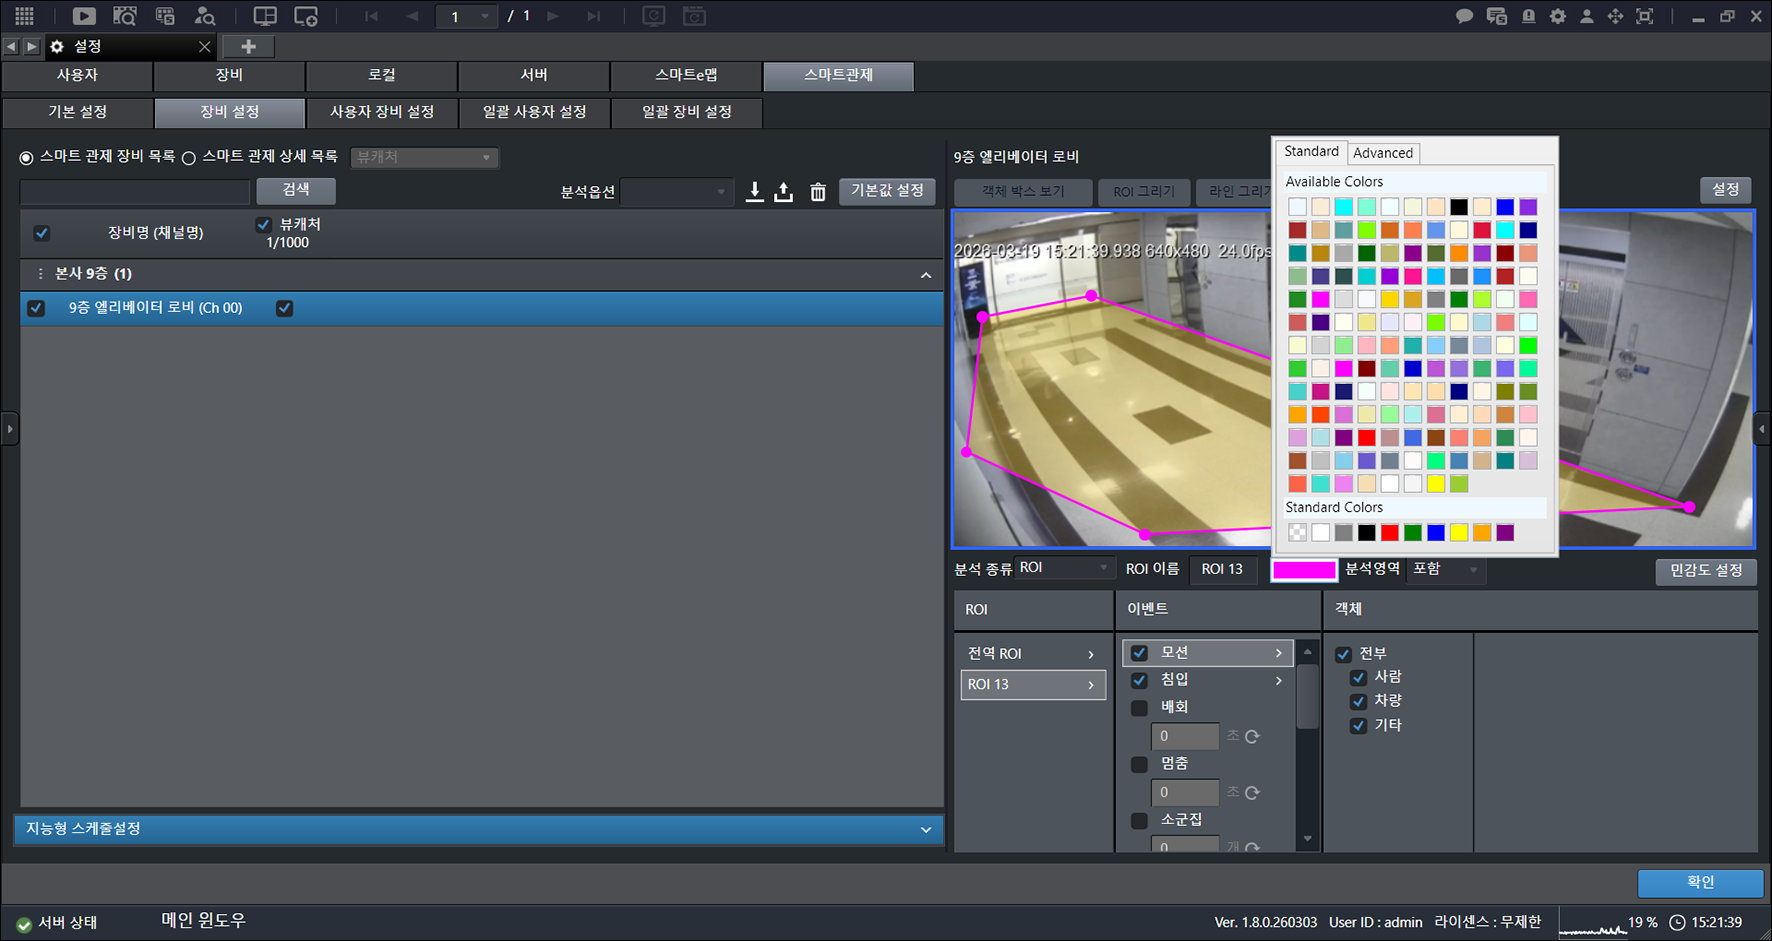
- Click the area marked with a dotted line.
- Select the item you want.
- Click [OK].
![Click [OK].](/manual/vurix-admin/images/page178_img1.jpg)
Configure Smart Crosswalk
The smart crosswalk uses video analytics and a voice guidance system to intelligently recognize pedestrians and vehicles, and warns of hazardous
situations in advance.
- On the main screen, select [] > [Smart Monitoring] > [Device Settings].
- Select a device.
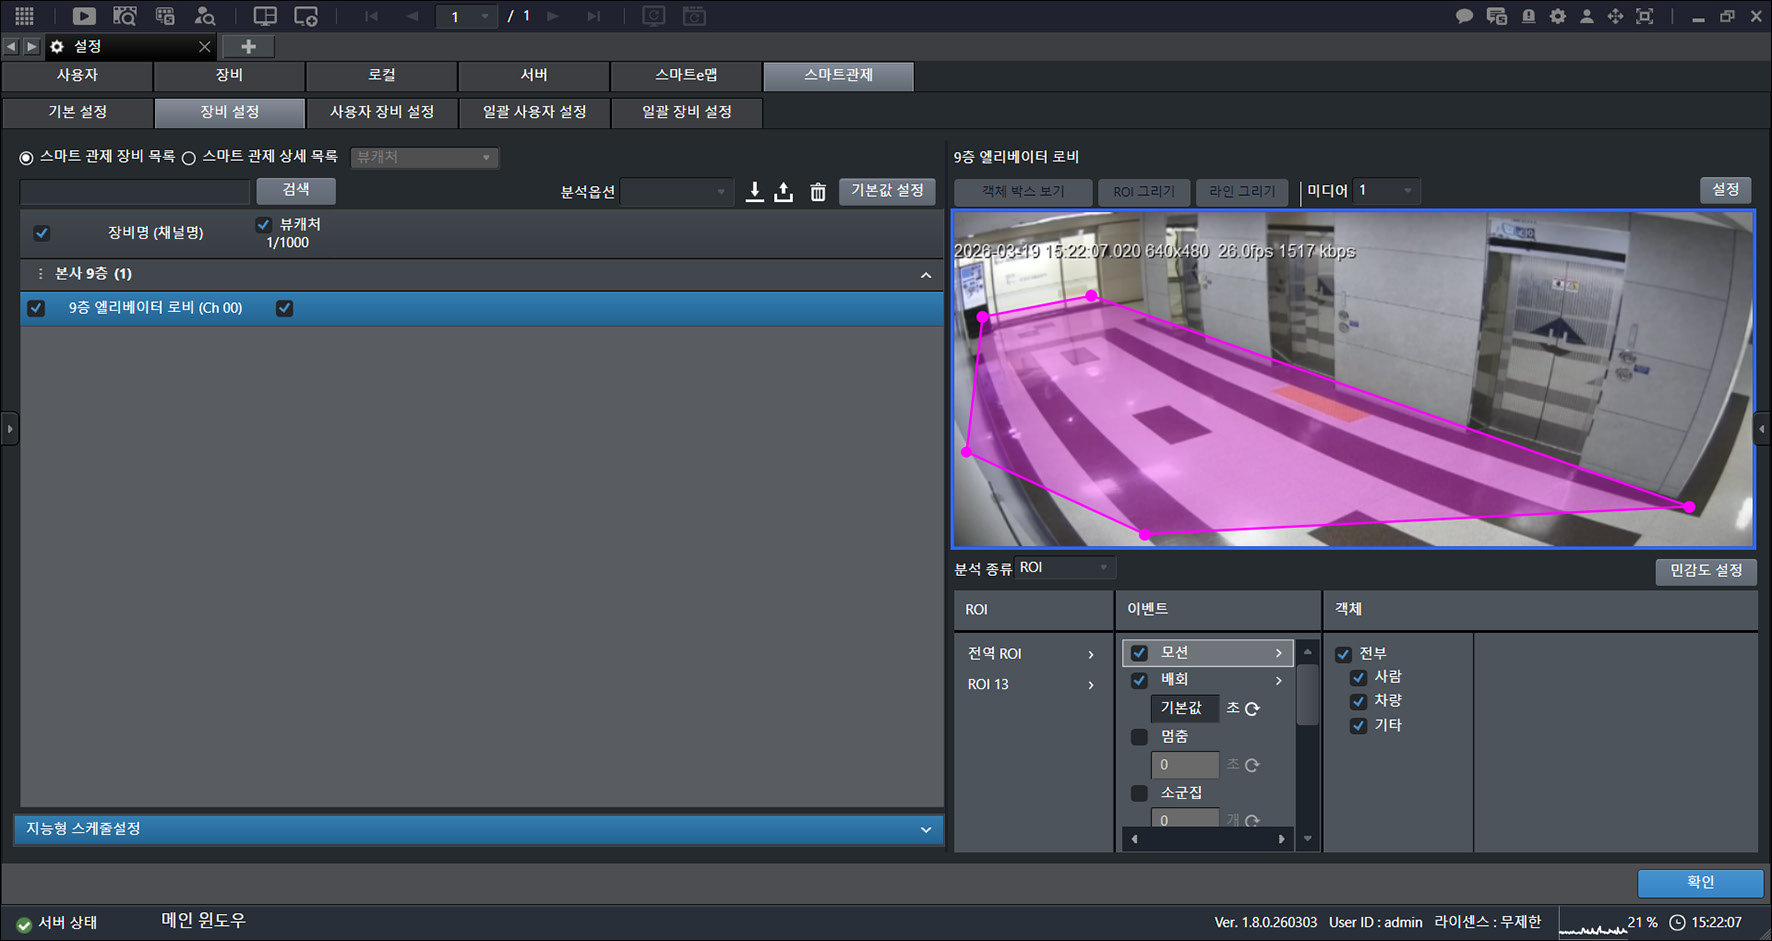
- Click [Settings] > [Smart Crosswalk].
![Click [Settings] > [Smart Crosswalk].](/manual/vurix-admin/images/page179_img2.jpg)
- Select the item you want.
- Click [OK].
Smart Monitoring User Device Settings
To use [User Device Settings], a smart monitoring device must already be assigned to the user account.
Configure Smart Monitoring Devices for a User Account
Assigns a device.
- On the main screen, select [] > [Smart Monitoring] > [User Device Settings].
- Select a user account.
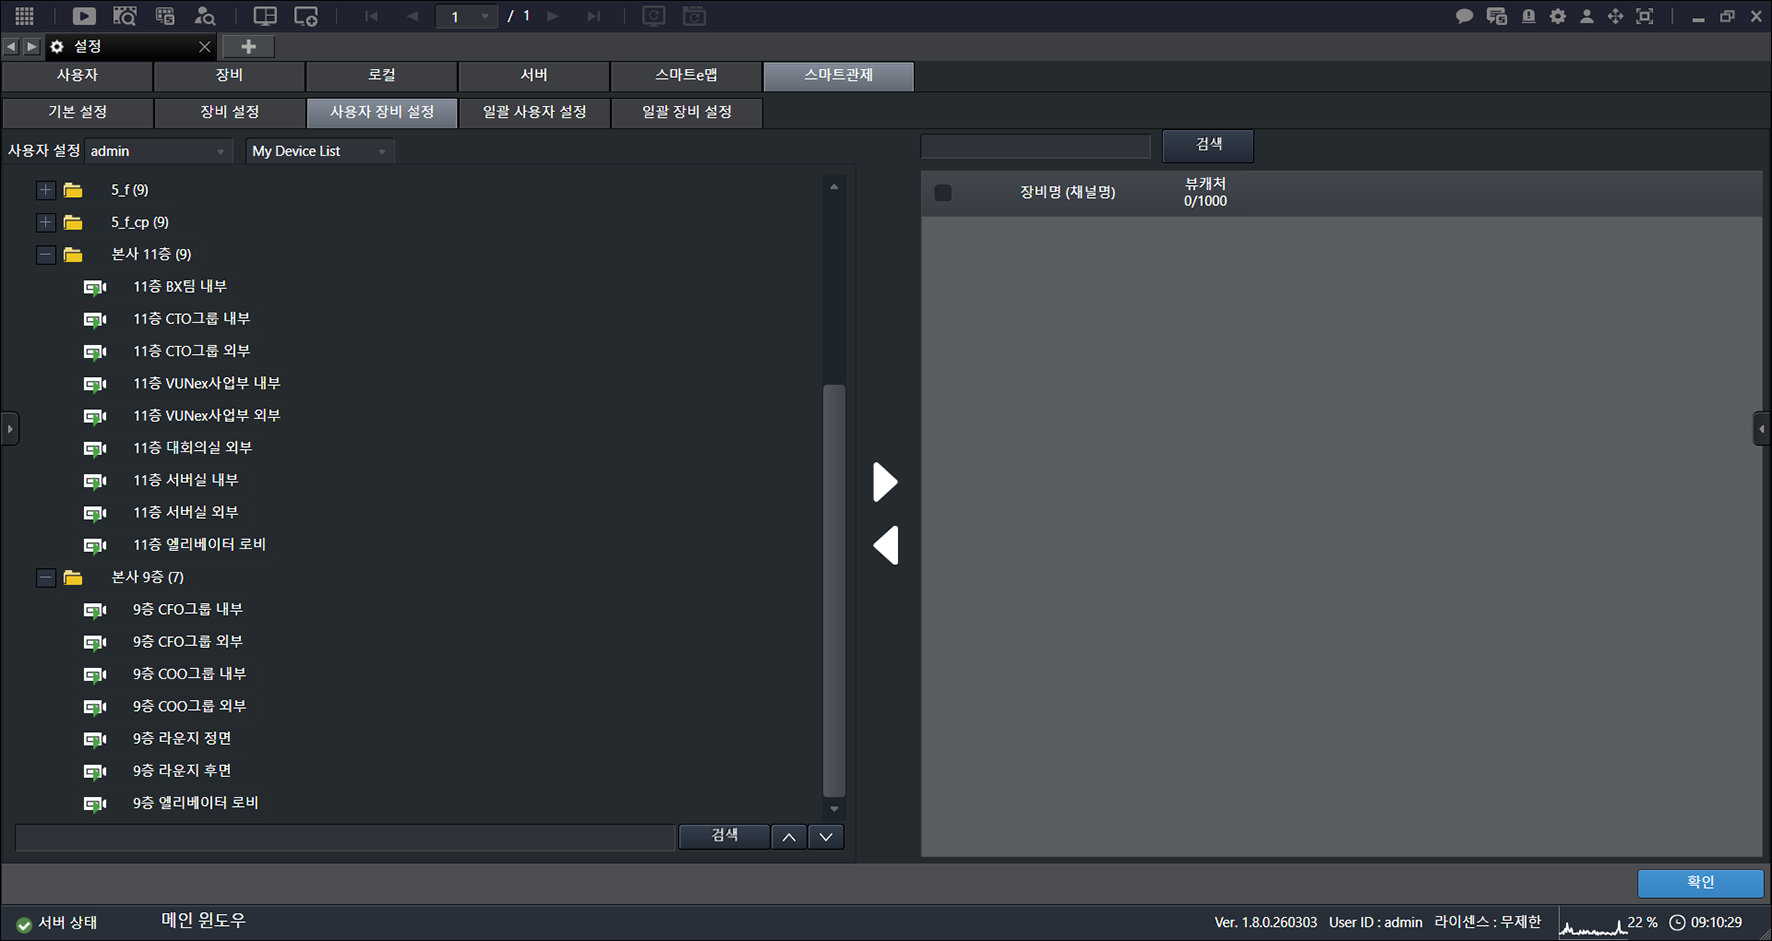
- Select a device.
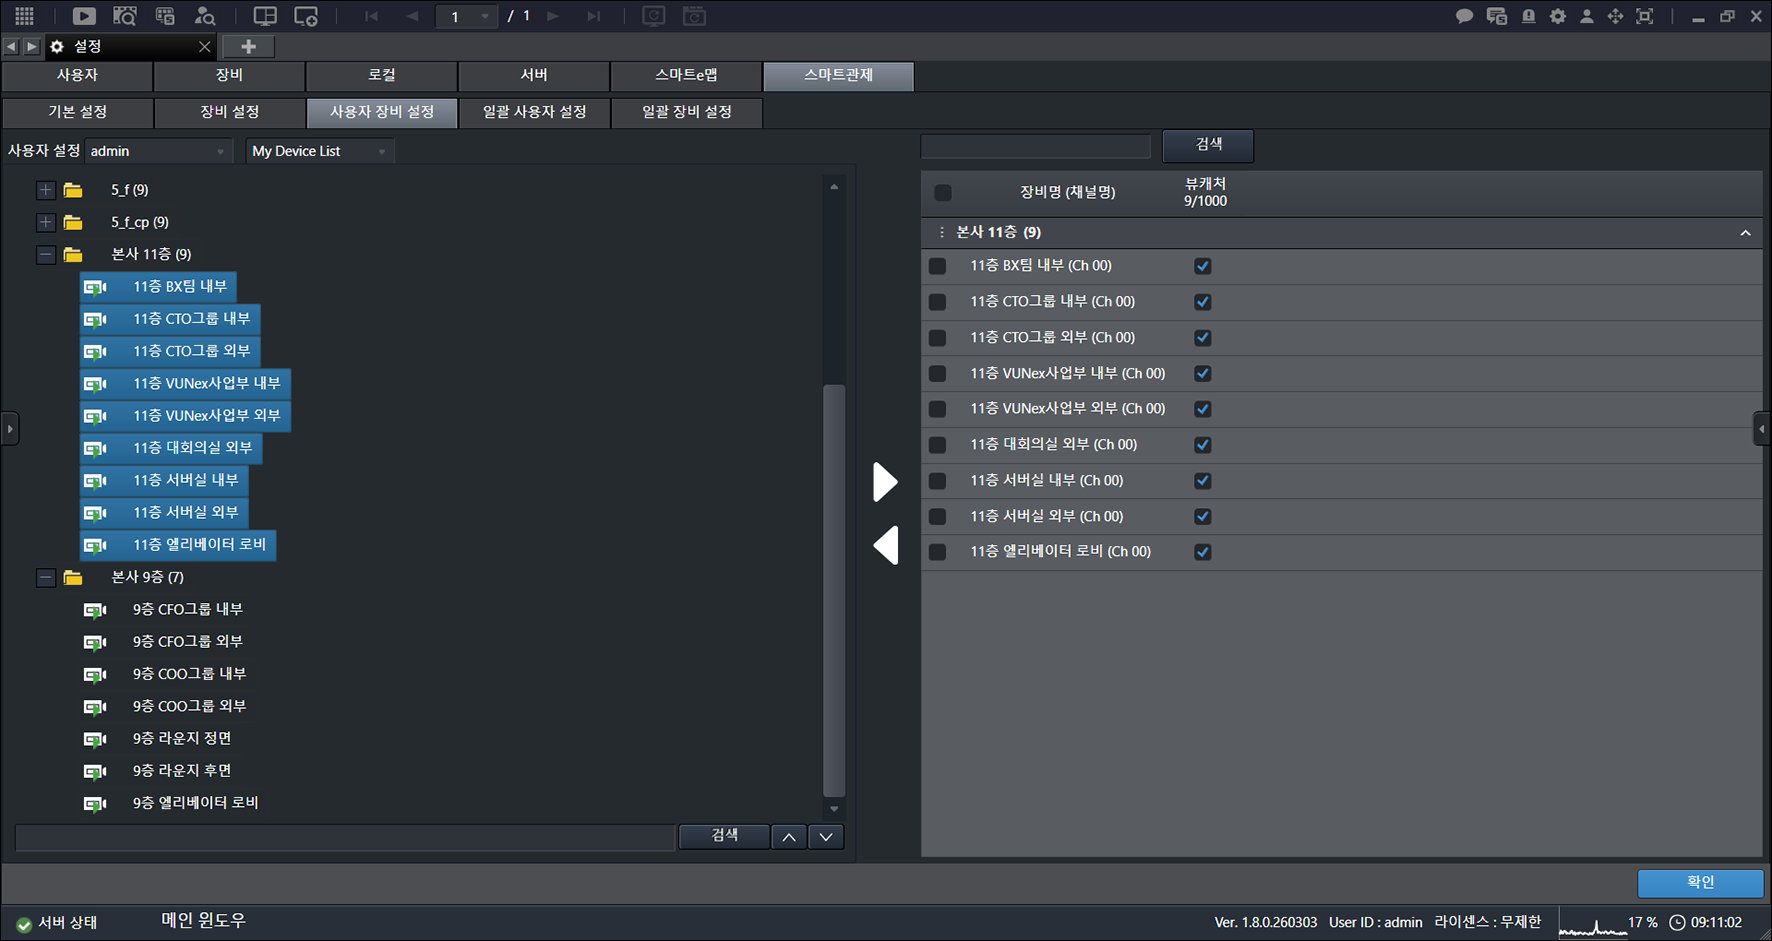
- Click [] > [OK].
Search Smart Monitoring Devices for a User Account
Search assigned equipment.
- On the main screen, select [] > [Smart Monitoring] > [User Device Settings].
- Select a user account.
- Enter a search term in the search box.
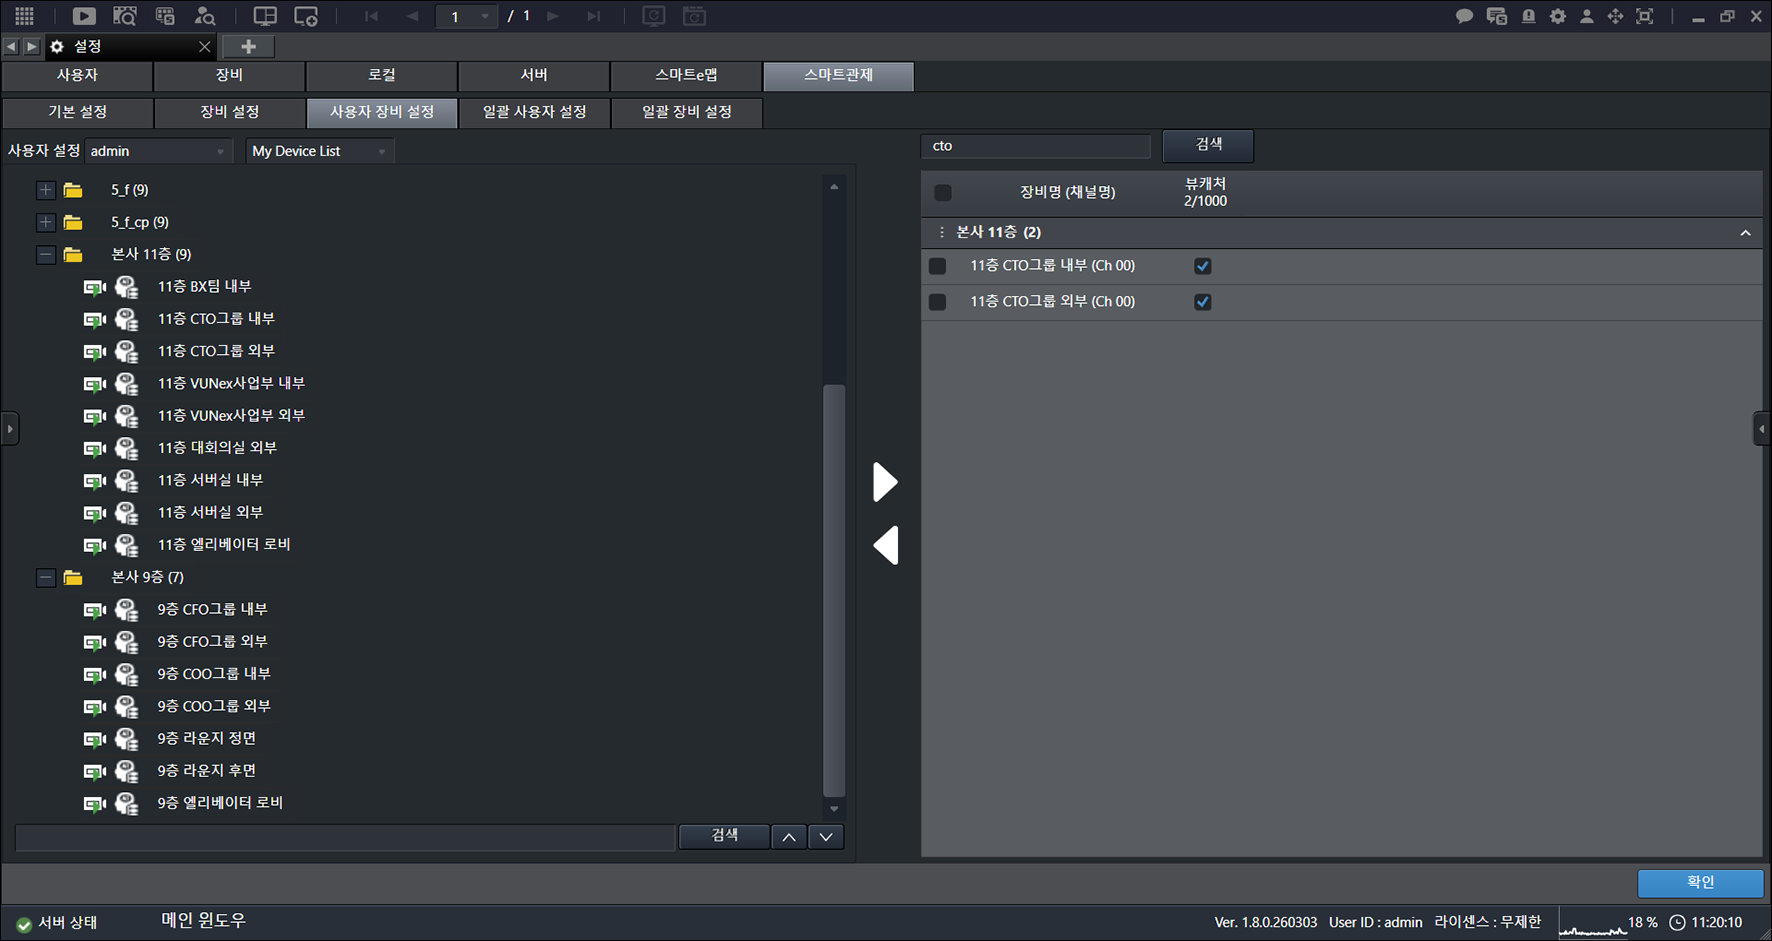
- Check the results.
Smart Monitoring User Batch Settings
Apply device assignment to multiple user accounts in batch.
- On the main screen, select [] > [Smart monitoring] > [Batch user settings].
![On the main screen, select [{{icon:cog-frame}}] > [Smart monitoring] > [Batch user settings].](/manual/vurix-admin/images/page182_img1.jpg)
- Select [Add Mode] or [Delete Mode].
![Select [Add Mode] or [Delete Mode].](/manual/vurix-admin/images/page182_img2.jpg)
- Select a user account.
- Select a device.
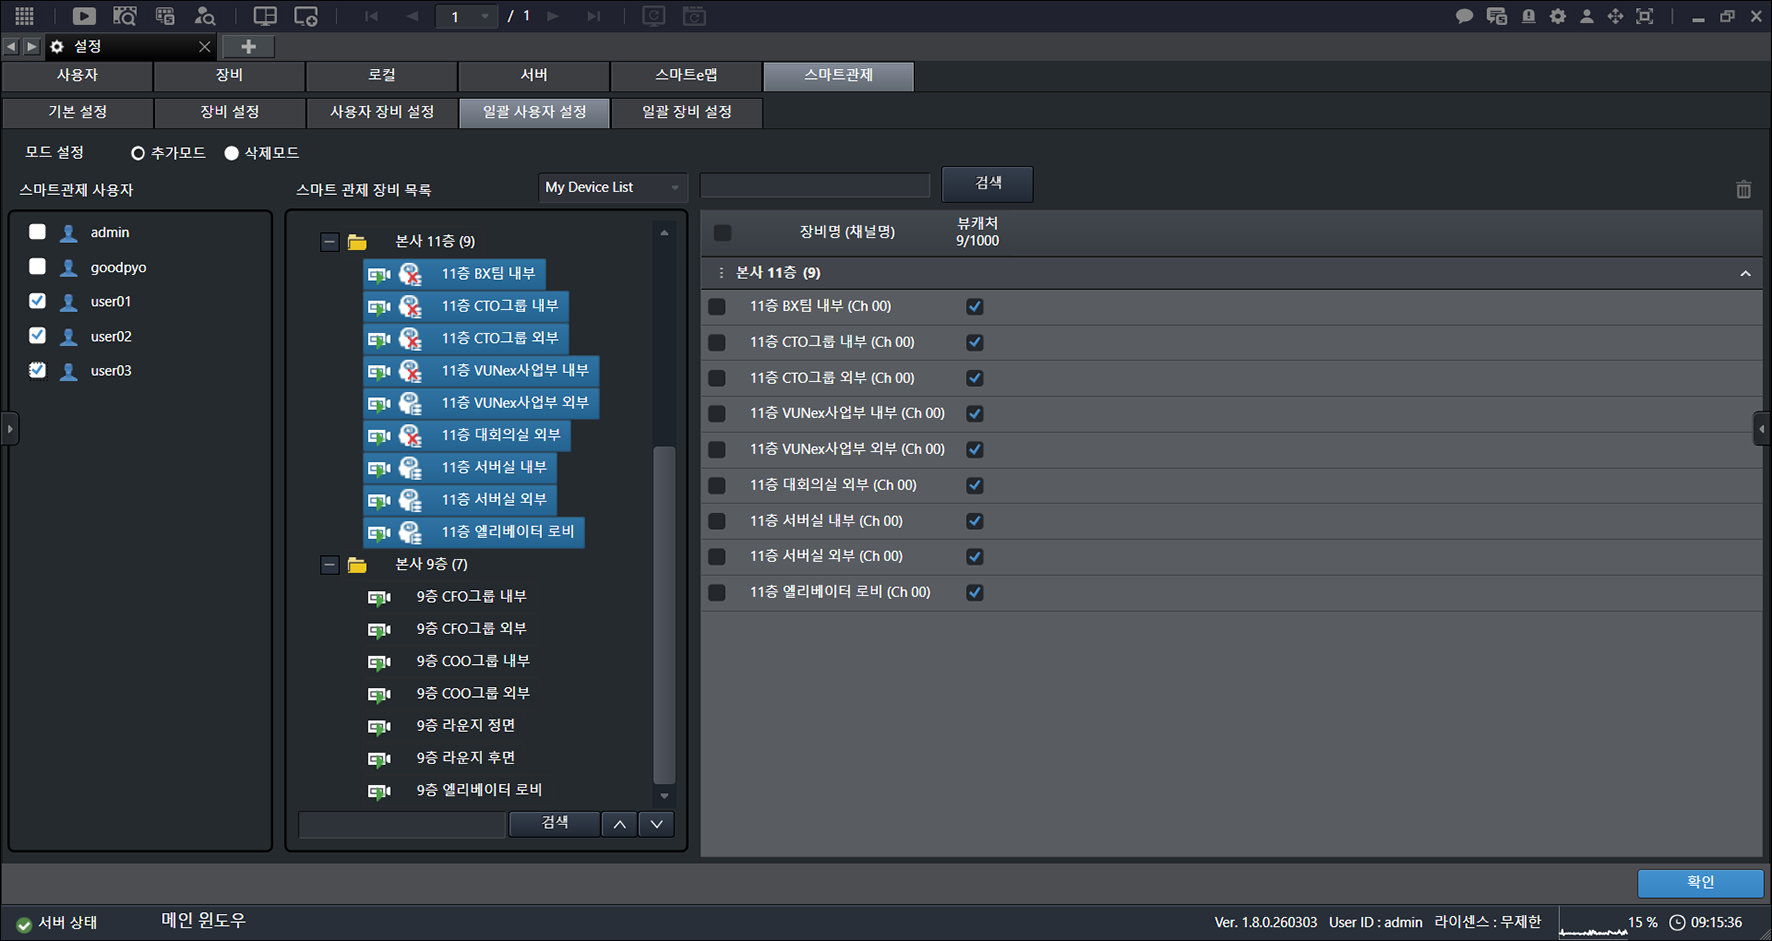
- Drag to the right while holding the mouse button.
- Click [OK].
Smart Monitoring Device Batch Settings
Apply detailed settings such as schedule and event settings to devices in batch.
- On the main screen, select [] > [Smart monitoring] > [Batch device settings].
- Select the item you want.
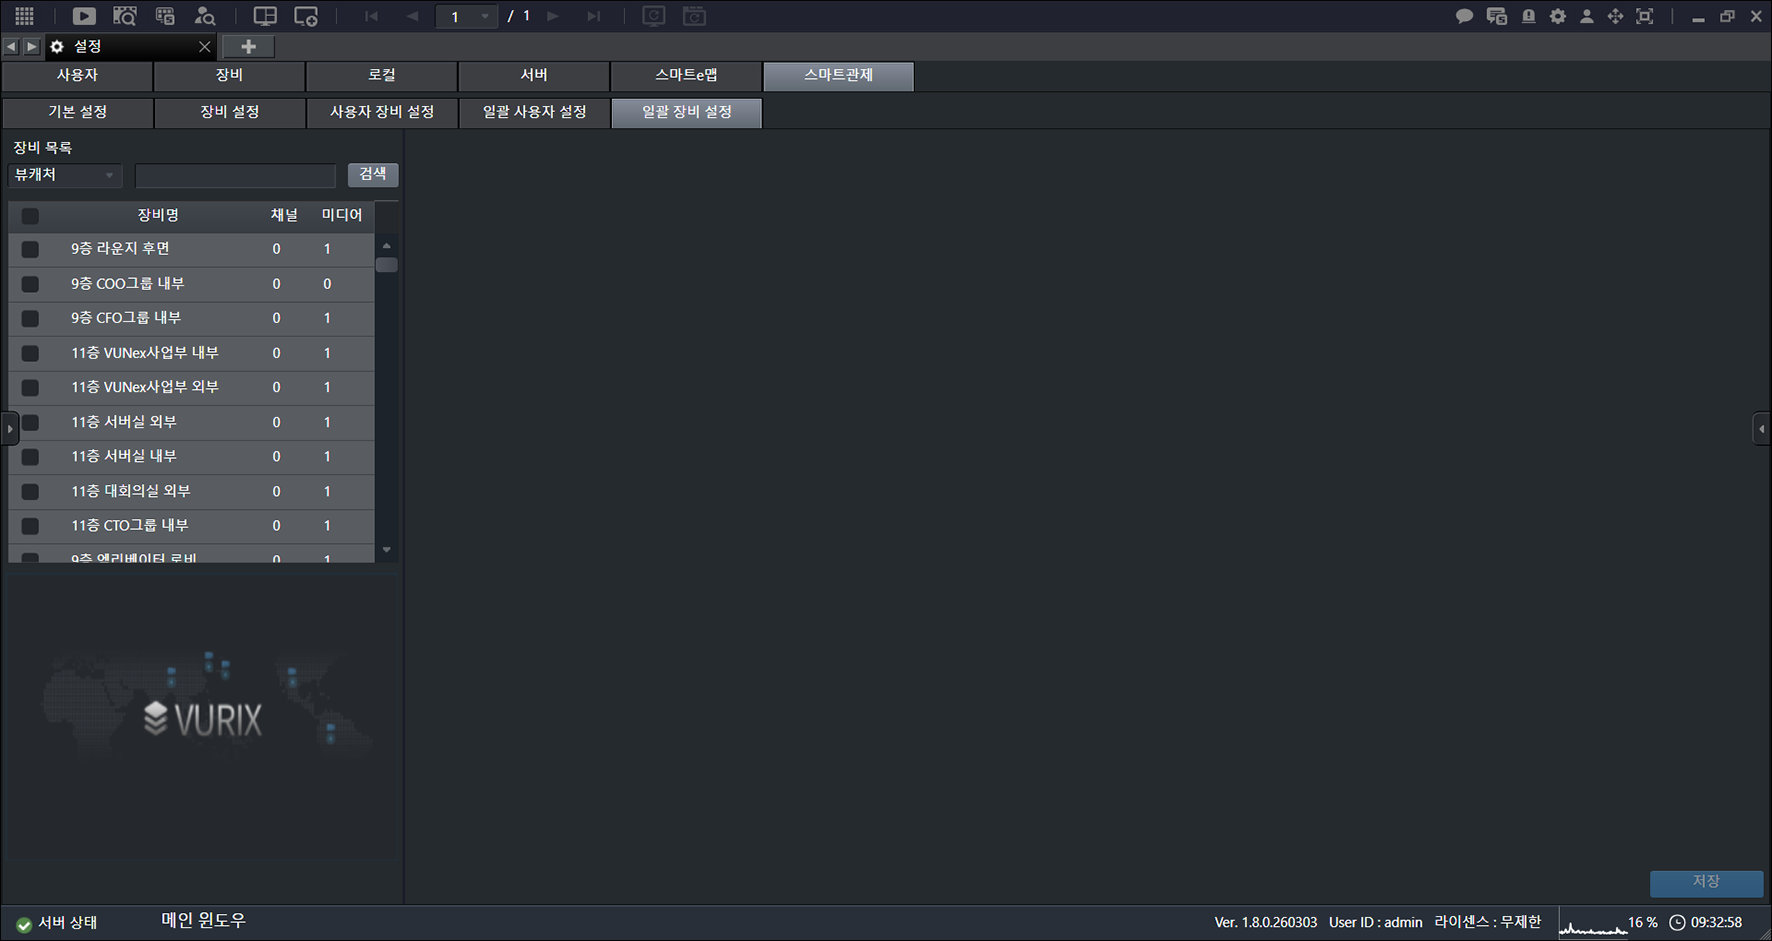
- Select a device.
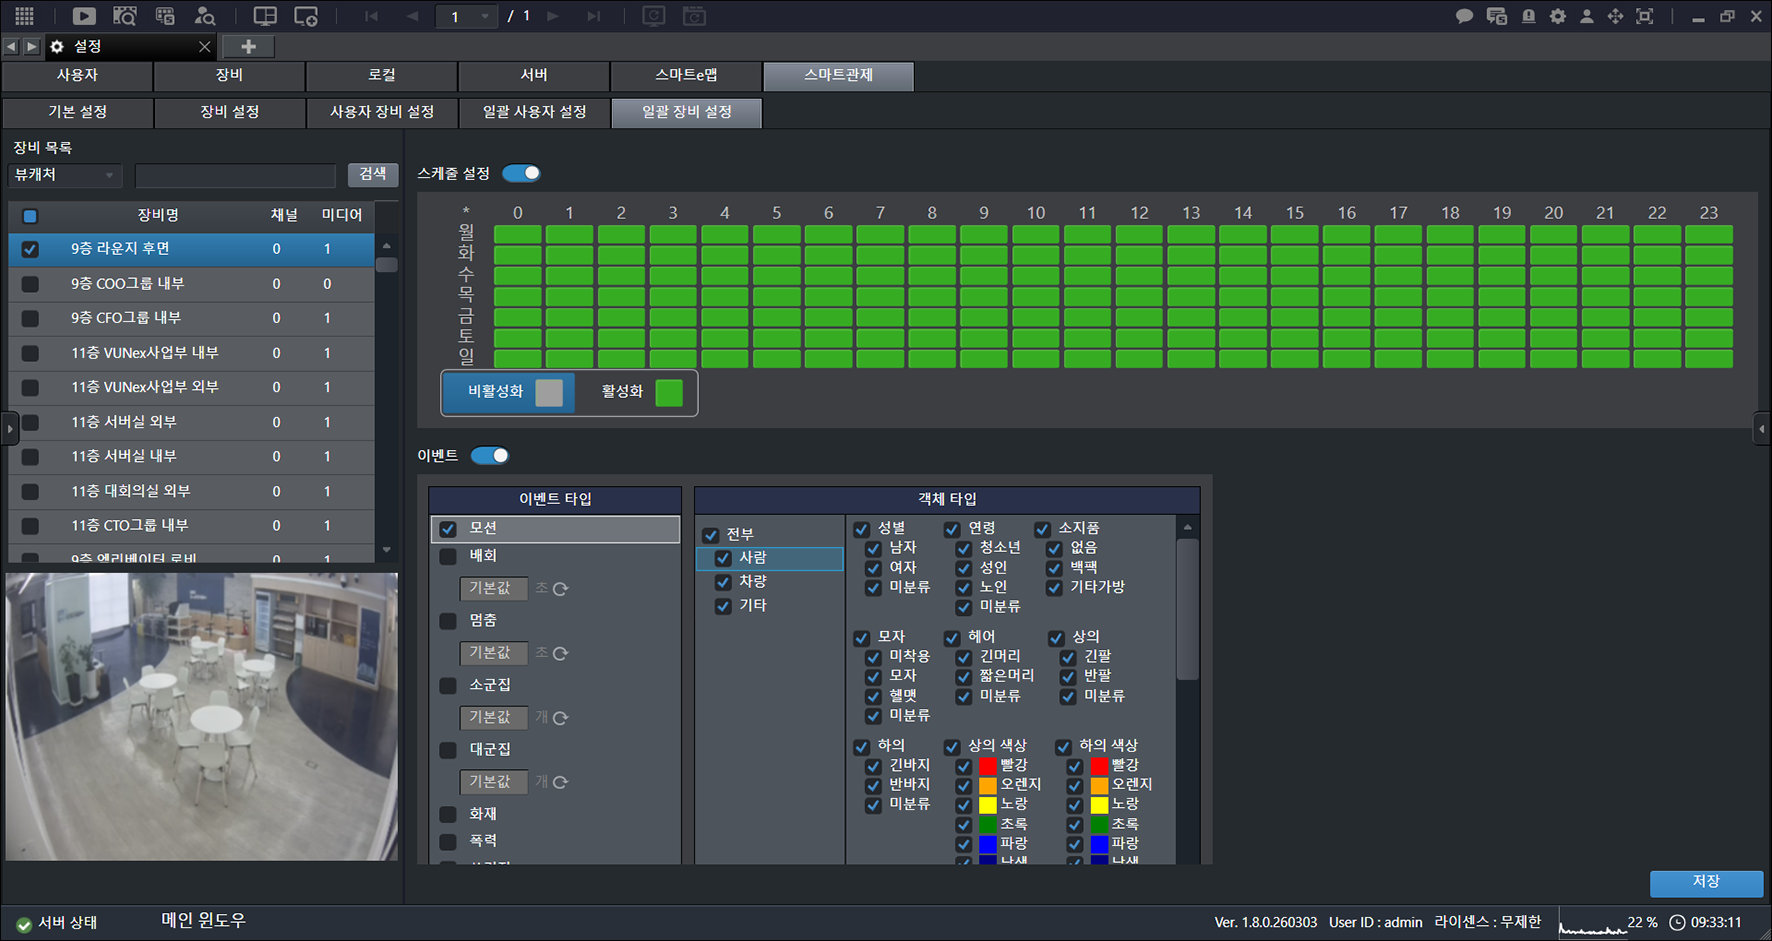
- Set the items you want.
- Click [Save].