05
Devices
This section shows you how to register cameras and access control devices on the Devices screen, and how to manage the registered devices.
Viewing the device list
![[캡처 필요: 장비 화면 - 상태 카운트 + 검색 + Add 버튼 + 장비 리스트]](/_next/image?url=%2Fmanual%2Fvunexhub%2Fimages%2F1779780031036_Device_Default_ko.png&w=1920&q=75&dpl=dpl_9dyqtFAdagPhFoBcUQXwGffUzrM7)
- Click [Devices] in the left menu.Registered cameras and access control devices appear in the list.
- To narrow the list by status, click one of the status counts at the top.
- [Recording] : Show only devices currently recording.
- [Connected] : Show only devices that are connected.
- [Disconnected] : Show only devices whose connection has been lost.
- To find a specific device, use the search field at the top right.Type any part of a device name or IP address. The list filters in real time as you type.
Adding devices with Auto Scan
- Click the [Add] button at the top right of the Devices screen.The device add window opens with the [Auto Scan] tab selected. [Recording Server] is set to the main recording server; choose another server from the list if you want to register the devices elsewhere.
- Click the [Scan] button.Devices on the same network are found automatically and listed by model name. Devices that are already registered are marked with [Added] next to their model name.
![Click the **[Scan]** button.](/manual/vunexhub/images/1779780064754_Device_Add_ko.png)
- Select devices and enter their information.
- Select the devices you want to register.
- Enter a Device name for each selected device.
- Enter ID/Password for devices that need authentication.
- To apply the same credentials to multiple devices, use [Apply ID & Password to All].
- Click [Apply] at the bottom.The Adding Devices result window opens and registers the selected devices in order.
- Success : The device is added to the device list.
- Failed : The failure reason and a [Retry] button are shown. Correct the information and try again.
![Click **[Apply]** at the bottom.](/manual/vunexhub/images/1779780203406_Add_Adding_Devices_ko.png)
Note
VUNex Hub activates channels based on the license.
If the number of activated channels exceeds the limit, the excess channels are registered as inactive.
Adding a device with Manual Add
![[캡처 필요: 장비 추가 창 - 수동 추가 탭 + 제조사/모델 + 정보 입력 영역]](/_next/image?url=%2Fmanual%2Fvunexhub%2Fimages%2F1779780137475_Device_Add_Manual_add_ko.png&w=1920&q=75&dpl=dpl_9dyqtFAdagPhFoBcUQXwGffUzrM7)
- In the device add window, switch to the [Manual Add] tab.The Manual Add form appears. [Recording Server] is set to the main recording server; choose another server from the list if needed.
- Select [Manufacturer] and then [Model].After you choose a manufacturer, the model list for that manufacturer appears. Selecting a model fills in default values such as channel count and codec.
- Enter the device information.
- Device name : Up to 50 characters.
- IP / Port : Camera IP address and port.
- ID / Password : Required only when the camera needs authentication.
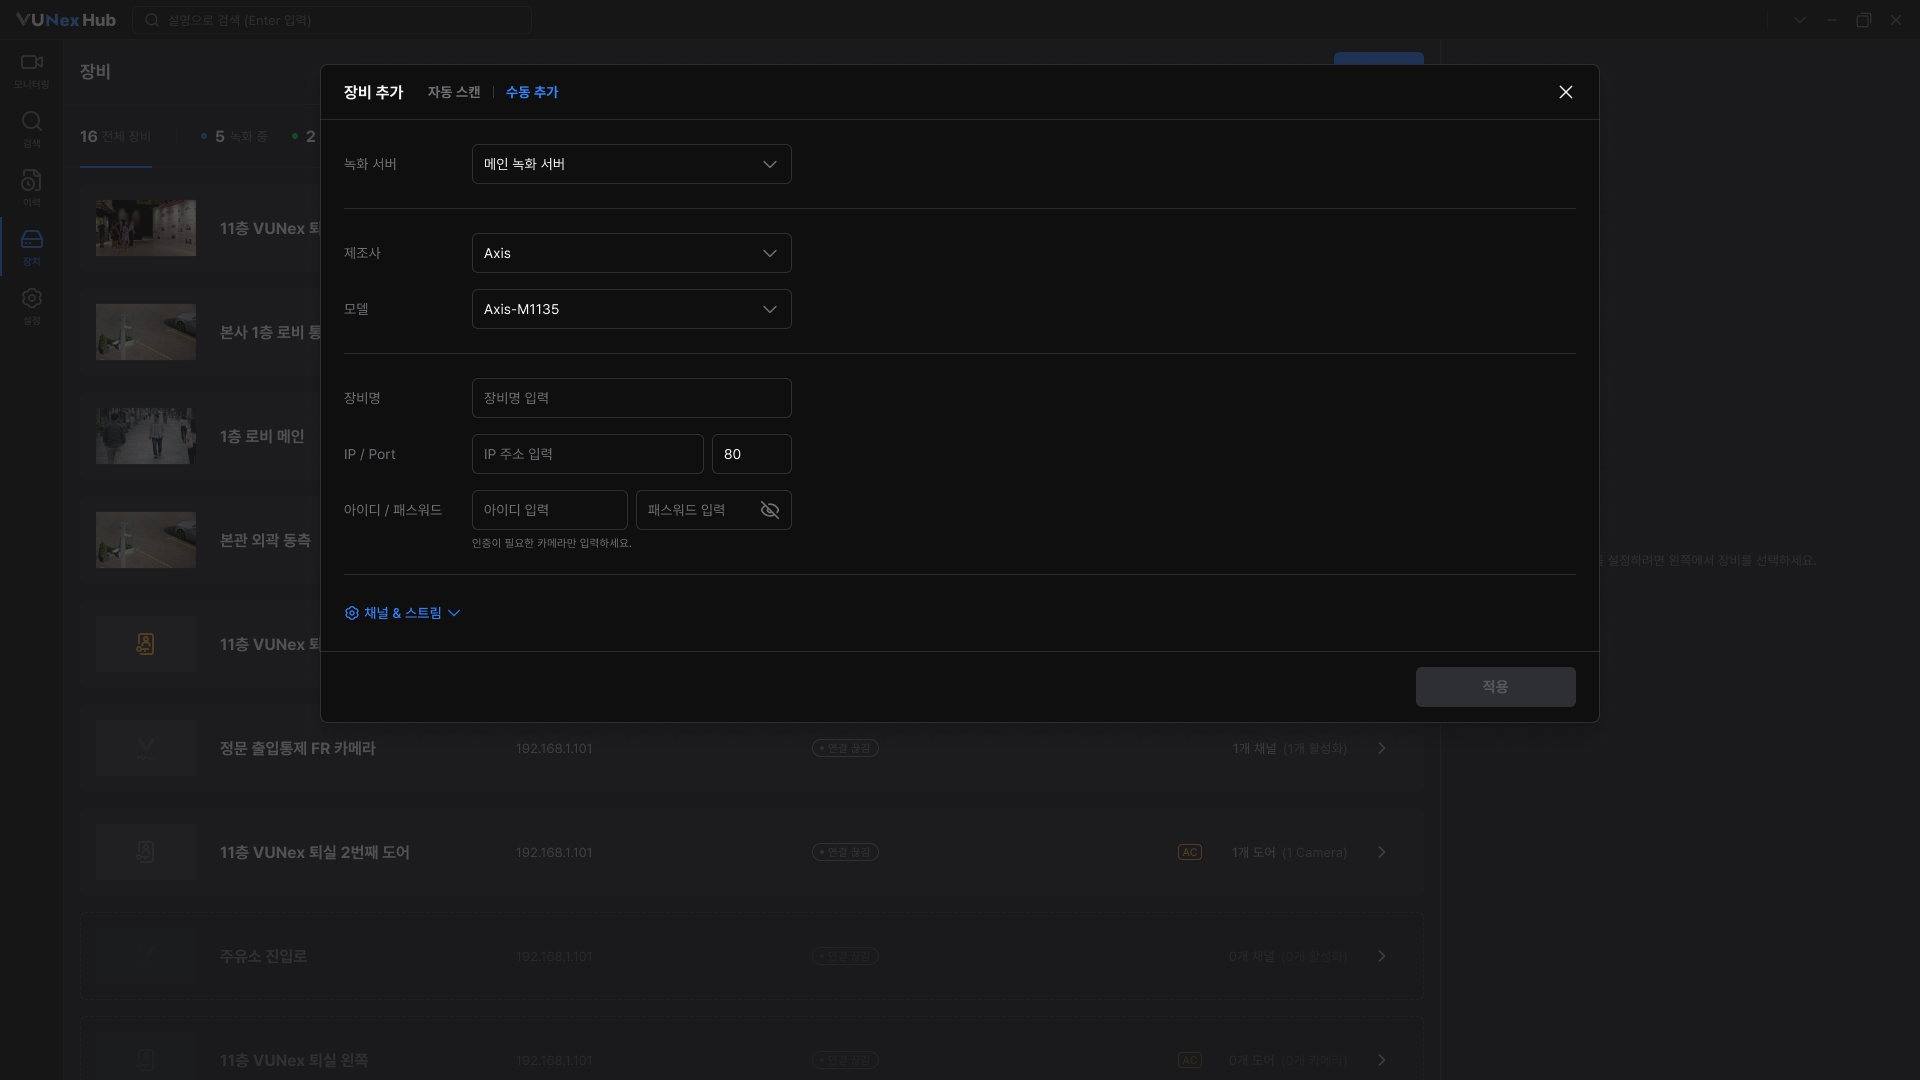
- Click [Apply] at the bottom.The Adding Devices result window opens and registers the device. The result handling is the same as Auto Scan.
Editing camera device information
![[캡처 필요: 카메라 장비 상세 영역 - 장비 사용 스위치 + General + Apply 버튼]](/_next/image?url=%2Fmanual%2Fvunexhub%2Fimages%2F1779780288218_Device_Panel_ko.png&w=1920&q=75&dpl=dpl_9dyqtFAdagPhFoBcUQXwGffUzrM7)
- On the Devices screen, click the row of the camera device you want to edit.The right-side area opens and shows the selected device's information.
- To enable or disable the entire device, use the [Enable Device] switch at the top.When turned off, all event reception from this device stops, and the device is removed from the Monitoring resource tree.
- In the [General] section, edit the device information.
- Device name : Up to 50 characters; duplicate names are not allowed.
- IP / Port : Camera network information.
- ID / Password : Authentication is checked when you apply the changes. If the credentials are wrong, "Check your ID or Password." is shown.
- Click [Apply] at the bottom of the right-side area to save the changes.On success, "Successfully updated." is shown.
Turning channels on and off
![[캡처 필요: 채널 & 기능 영역 - Ch 탭 + 채널 사용 스위치 + 기능 요약]](/_next/image?url=%2Fmanual%2Fvunexhub%2Fimages%2F1779780330872_Device_Panel2_ko.png&w=1920&q=75&dpl=dpl_9dyqtFAdagPhFoBcUQXwGffUzrM7)
- In the device details on the right, open the [Channel & Feature] section.Channel tabs appear, one for each channel registered to the device (Ch 01, Ch 02, ...). Channels that are off show (OFF) next to the tab name.
- Click the channel tab you want to manage.The selected channel's settings appear below the tabs.
- Use the [Enable Channel] switch to turn the channel on or off.The change is reflected in the count on the device list. The channel's recording, AI analysis, face recognition, and PTZ & I/O settings are shown as a read-only summary below the switch.
- Click [Apply] at the bottom of the right-side area.Channel changes do not take effect until you apply them.
Note
If all channels are off, the device is treated as unusable.
When the device is assigned to a live cell, an error message appears in the cell.
Editing channel media streams
![[캡처 필요: 스트림 편집 창 - Serial/이름/URL/코덱/Port/Protocol + 액션(휴지통/VLC) + 스트림 추가]](/_next/image?url=%2Fmanual%2Fvunexhub%2Fimages%2F1779780378545_Device_Panel_Edit_Stream_Func_ko.png&w=1920&q=75&dpl=dpl_9dyqtFAdagPhFoBcUQXwGffUzrM7)
- In the [Channel & Feature] section, select a channel tab and click [Stream].The stream list of the selected channel appears.
- Edit each stream's information directly in the row.
- Name : Stream name.
- URL : RTSP URL.
- Codec : Read-only.
- Port : Streaming port.
- Protocol : Select TCP or UDP.
- To add or delete a stream, use the buttons at the bottom of the list.
- [Add Stream] : Adds a new stream row.
- Trash icon : Deletes the stream from that row. If the stream is currently in use, it is automatically switched to another stream when you save.
- Click [Done] to close the Edit Stream window.The changes are reflected in the right-side area as a preview, but they are not saved permanently until you click [Apply] at the bottom of the right-side area. To discard the changes, click [Cancel] instead.
Configuring channel features
- In the [Channel & Feature] section, select a channel tab and click [Feature].The Edit Feature window opens with four sections - Recording, AI Analytics, Face Recognition, and PTZ & I/O.
- To configure recording, turn on the [Recording] switch and set the options.
- Stream : Select the stream used for recording.
- Recording Server : Read-only. Reassign servers in Settings.
- Recording Mode : Choose Continuous, Event-Based, or Schedule. For details on Schedule mode, see Setting a recording schedule for a channel.
- Retention Period : Set how many days recordings are kept.
![To configure recording, turn on the **[Recording]** switch and set the options.](/manual/vunexhub/images/1779843673962_Device_Panel_Feature_ko.png)
- When you choose Event-Based recording mode, set the event buffer.
- Event Buffer (Pre/Post) : Choose 15, 30, or 60 seconds before and after the event to save.
- Recording is only saved when an event occurs on this channel.
- To use AI analysis on the channel, turn on the [AI Analytics] switch and set the options.
- AI Server : Choose the VUNex AI server to use.
- Stream : Select the stream used for AI analysis.
![To use AI analysis on the channel, turn on the **[AI Analytics]** switch and set the options.](/manual/vunexhub/images/1779780721394_Device_Panel_Feature2_ko.png)
- To use face recognition on the channel, turn on the [Face Recognition] switch and set the options.
- FR Server : Choose the VUNex FR server to use.
- Stream : Select the stream used for face recognition.
- Click [Done] to close the Edit Feature window.The changes are previewed in the right-side area. To save them permanently, click [Apply] at the bottom of the right-side area. To discard the changes, click [Cancel] instead.
Note
PTZ control settings will be available in a future update.
Setting a recording schedule for a channel
![[캡처 필요: 기능 편집 창 - 녹화 모드가 스케줄일 때 그리드 + 빠른 채우기 버튼]](/_next/image?url=%2Fmanual%2Fvunexhub%2Fimages%2F1779781071608_Device_Panel_Feature3_ko.png&w=1920&q=75&dpl=dpl_9dyqtFAdagPhFoBcUQXwGffUzrM7)
- In the Edit Feature window's Recording section, set Recording Mode to Schedule.A 7-day by 24-hour grid appears below the mode selector.
- Choose a mode from the brush tool and drag over the grid cells to paint a time range.
- Continuous (green) : Record continuously.
- Event-Based (orange) : Record only when an event occurs.
- None (gray) : Do not record.
- To fill a large area at once, use the Quick Fill buttons.
- [All] : Applies the currently selected mode to the entire grid.
- [Weekdays] : Applies to Monday through Friday only.
- [Weekends] : Applies to Saturday and Sunday only.
- To apply the same schedule to other channels, click [Copy Settings] below the grid.
- Search by device name and check the channels you want to copy the schedule to.
- The header shows how many channels are selected.
- Click [Copy to Selected].
- Click [Done] to close the window.The schedule changes are previewed in the right-side area. Click [Apply] at the bottom of the right-side area to save them permanently.
Editing an AC device
![[캡처 필요: AC 단말 상세 영역 - 장비 사용 스위치 + General + Door 탭 + 연결 카메라]](/_next/image?url=%2Fmanual%2Fvunexhub%2Fimages%2F1779781487650_Device_Default_ko.png&w=1920&q=75&dpl=dpl_9dyqtFAdagPhFoBcUQXwGffUzrM7)
- On the Devices screen, click the row of the AC device you want to edit.The right-side area opens and shows the selected AC device's information.
- Edit the basic information in the [Enable Device] switch and the [General] section.
- [Enable Device] : When off, all event reception from this device stops.
- Device name / IP / Port / ID / Password : Same as a camera device.
- Manufacturer and Model are shown for reference only.
- In the [Door] section, edit each door's information.
- Door tabs : Doors registered to this AC device appear as tabs (Door 01, Door 02, ...).
- Door name : Up to 50 characters.
- Link Camera : Select a camera to associate with the door. Choose [None] to remove the link.
- Click [Apply] at the bottom of the right-side area to save the changes.On success, "Successfully updated." is shown.
Note
- The [Link Camera] list shows cameras registered in Hub.
- Doors themselves are managed by the AC device, so in Hub they can only be displayed and edited, not added or removed.
Deleting devices
![[캡처 필요: 장비 화면 - 다중 선택 모드, 삭제 버튼이 상단에 표시된 상태]](/_next/image?url=%2Fmanual%2Fvunexhub%2Fimages%2F1779781565460_Device_Delete_ko.png&w=1920&q=75&dpl=dpl_9dyqtFAdagPhFoBcUQXwGffUzrM7)
- To delete a single device, click the row of the device you want to delete on the Devices screen.The right-side area opens with the selected device's information.
- At the bottom of the right-side area, click [Delete].
- A confirmation dialog appears. Click [OK] to delete the device.
- On success, "Successfully deleted." is shown.
- To delete several devices at once, click the multi-select icon at the top of the device list.The list switches to selection mode and a [Delete] button appears at the top.
- Select the devices you want to delete.The selected devices are displayed as selected in the list.
- Click [Delete] at the top of the list.
- A confirmation dialog appears. Click [OK] to delete the selected devices.
- On success, "Successfully deleted." is shown and the list returns to its default view.