VUNex Hub
User Manual
Menu configuration may vary or some features may not be supported depending on the product version.
Table of Contents
Document Information
Sign In
This section explains how to sign in to and out of the VUNex Hub client.
Signing in
Sign in to the VUNex Hub client with the server connection information and your account.
![[캡처 필요: 로그인 화면 기본 상태]](/_next/image?url=%2Fmanual%2Fvunexhub%2Fimages%2F1779431549190_Sign_In_ko.jpg&w=1920&q=75&dpl=dpl_9dyqtFAdagPhFoBcUQXwGffUzrM7)
- Enter the server information.
- [Server] : Enter the IP address of the Hub server to connect to.
- [Port] : Enter the port number of the Hub server.
- Enter your account information.
- [ID] : Enter your account ID.
- [Password] : Enter your password.
- [Initial Account Information] : For the initial login, the default username and password are admin/admin.
- Click [Sign In].After sign-in is complete, you are taken to the VUNex Hub main screen (Monitoring). If you signed in with the default account (admin / admin), the [Change Default Password] screen appears first.
- If you signed in with the default account, set a new password.
- [Password] : Enter a new password.
- [Confirm Password] : Enter the new password again.
- The [Password Policy] items below the fields turn into check marks as each condition is met. Click [Apply] once all conditions are met.
- After the password is changed, you are signed in immediately and taken to the Monitoring screen. You do not need to sign in again.
- Click [Back to the Sign In] to cancel and return to the sign-in screen. You will be asked to change the password again at the next sign-in.
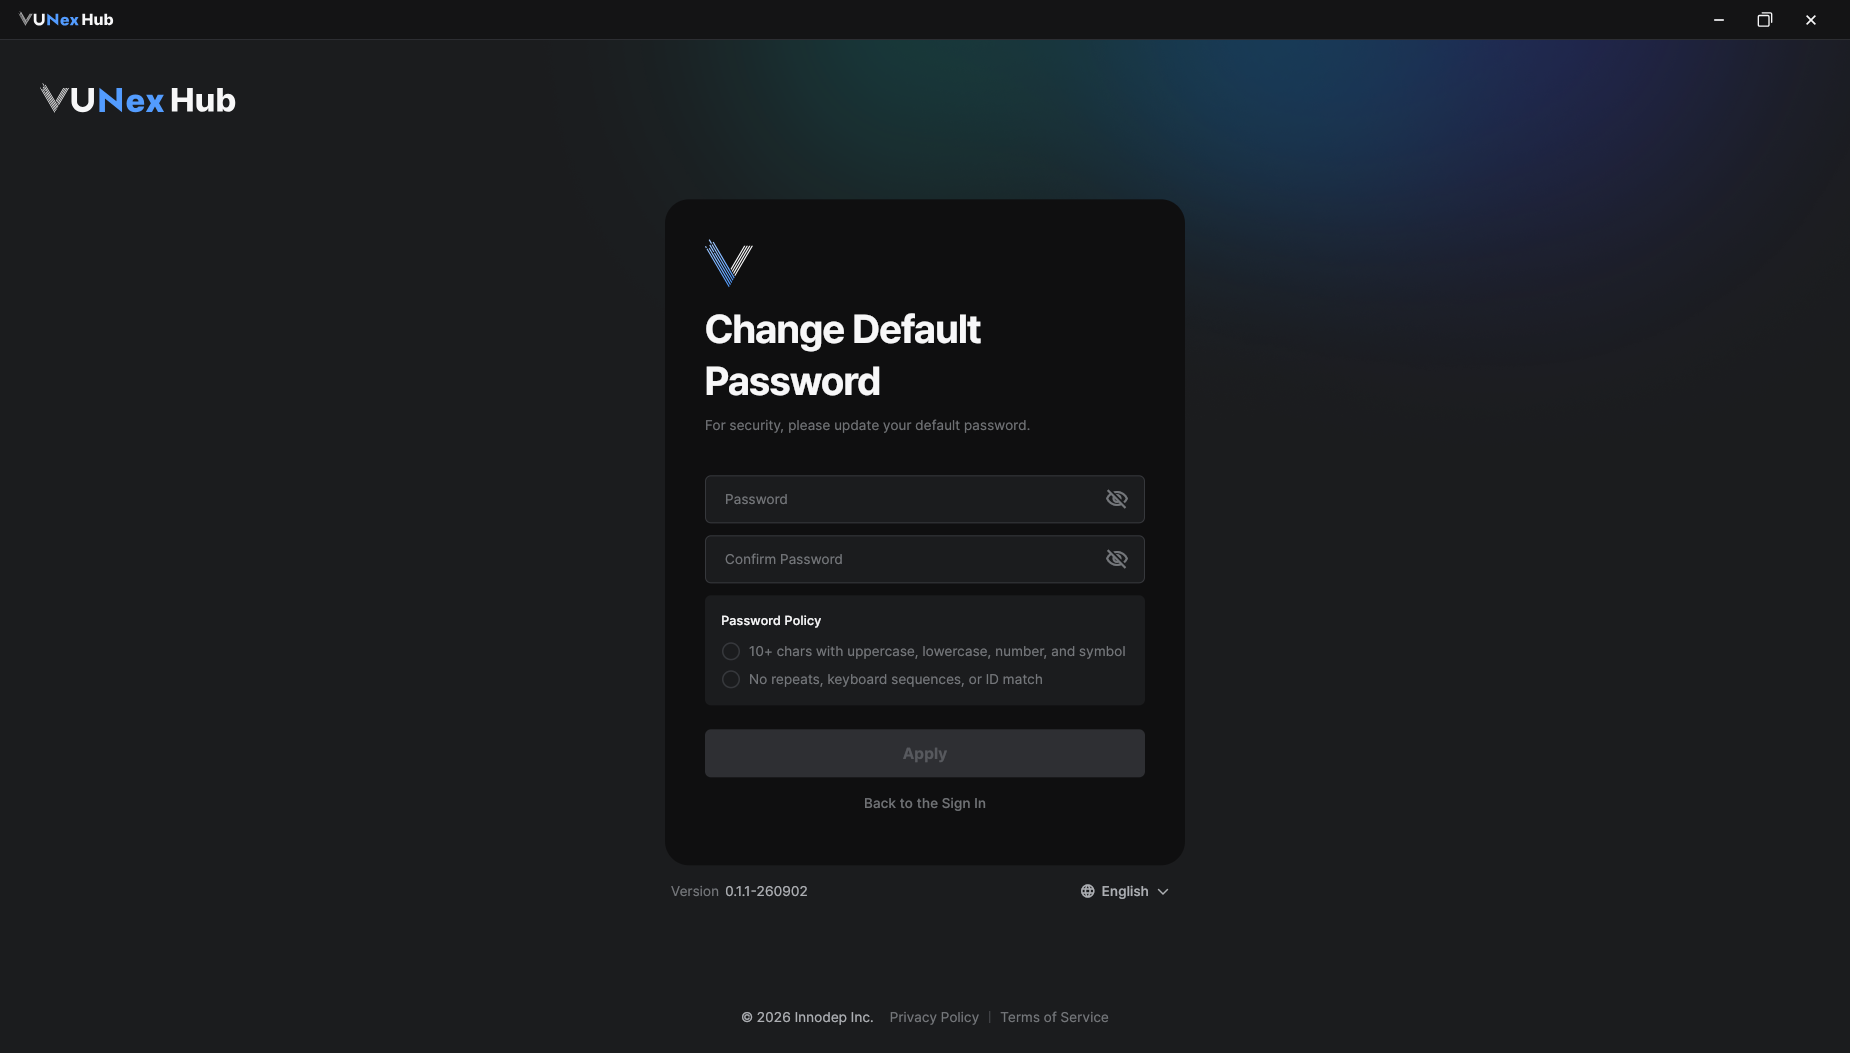 기본 비밀번호 변경 화면
- 10 or more characters including at least one uppercase letter, lowercase letter, number, and symbol
- No character repeated 3 or more times, no keyboard sequence of 4 or more characters, and no 3 or more consecutive characters of the ID
- To change the language, click the language menu at the bottom of the sign-in screen and choose 한국어, English, 日本語, or Español.
Troubleshooting sign-in
Explains what to do if you forgot your password or your account is locked after repeated sign-in failures.
- If you forgot your password, click [Forgot password?] on the sign-in screen.Recovery steps are shown by account type.
- Manager / Viewer : Contact your administrator to reset the password.
- Administrator : Ask another administrator to reset the password, or contact Customer Support (Email / Phone) shown in the window.
- If you enter the wrong password several times, check the remaining attempts.
- From the third failure, the number of attempts left before lockout appears below the fields.
- When it reaches 0, the account is locked and the remaining time (in minutes) until it unlocks is shown. Try again after that time has passed.
- If the message "Cannot connect to the server" appears, check the server information.Check that the server IP address and port are correct, the Hub server is running, and the network connection is working, then sign in again.
Exploring the header menu
Click the More options(▾) button at the top right of the screen to open a menu for changing the language and theme, and signing out.
 버튼을 클릭해 열린 메뉴 (프로필 정보, 언어, 테마, 전원, 로그아웃)]](/_next/image?url=%2Fmanual%2Fvunexhub%2Fimages%2FMonitoring_en_0914.jpeg&w=1920&q=75&dpl=dpl_9dyqtFAdagPhFoBcUQXwGffUzrM7)
- Click the [More options] (▾) button at the top right of the screen.The [Profile] area at the top of the menu shows your display name, the connected server [IP], the client [Version], and the [Last sign in] time.
- Change the [Language] and [Theme].
- [Language] : Choose from 한국어, English, 日本語, or Español. The screen language changes immediately.
- [Theme] : Choose [Dark mode] or [Light mode].
Signing out
End the current session and return to the sign-in screen.
- Click the [More options] (▾) button at the top right of the screen.
- Click [Sign out].A confirmation window appears.
- Click [OK].You are signed out and returned to the sign-in screen.
Monitoring
This section explains how to view live video and monitor real-time events on the Monitoring screen.
Viewing camera video
![[캡처 필요: 모니터링 메인 화면 - 리소스/그리드/이벤트 영역 전체 구조]](/_next/image?url=%2Fmanual%2Fvunexhub%2Fimages%2F1779435622906_Monitoring_main_k.png&w=1920&q=75&dpl=dpl_9dyqtFAdagPhFoBcUQXwGffUzrM7)
- Click [Monitoring] in the left menu.The Monitoring screen appears. The [Resource] and [Events] areas are on the left, and the grid is in the center.
- Assign cameras from the [Resource] area to grid cells.
- Single camera : Double-click the camera, or drag and drop it onto a cell.
- Multiple cameras : Hold Ctrl (Cmd on macOS) and click to select several cameras, then drag and drop them onto a cell.
- All cameras : Press Ctrl + A (Cmd + A on macOS) to select all cameras, then drag and drop them into a cell.
- To narrow down the list, use the search field or the type filter at the top of the [Resource] area. The type filter only appears when devices of that type are registered.
- When multiple cameras are dragged at once, they are placed in order starting from the drop position, filling empty cells. When the current page is full, the remaining cameras continue on the next page.
Controlling video cells
Right-click a video cell to open the right-click menu, where you can zoom, play recordings, and turn display options for that cell on or off.
![[캡처 필요: 셀 마우스 오른쪽 버튼 메뉴 - Controls + Display Options 그룹]](/_next/image?url=%2Fmanual%2Fvunexhub%2Fimages%2F1779435629426_Monitoring_main_-context_menu_ko.png&w=1920&q=75&dpl=dpl_9dyqtFAdagPhFoBcUQXwGffUzrM7)
- Right-click on a video cell to open the menu.The menu has two groups, [Controls] for video actions and [Display Options] for turning cell display items on or off.
- From [Controls], choose the action you want.
- [Zoom(PIP)] : Show a zoomed-in area inside the same cell (Picture-in-Picture).
- [Playback] : Open the recorded video player for this camera. See the Playback section for details.
- [Full screen] : Enter full-screen mode. See Using full-screen mode for details.
- [Select in tree] : Focus the device in the [Resource] tree.
- From [Display Options], turn the items to display on the cell on or off.
- [Camera Name] : Pin the camera name on top of the video.
- [Video Information] : Show resolution, fps, and kbps.
- [Detection Boxes] : Show AI object detection boxes (only for AI-enabled cameras).
- [AI Exclusion Area] : Show areas excluded from AI analysis (only for AI-enabled cameras).
- When you hover over a cell, an [X] button appears at the top right. Click it to remove the video from that cell and return it to an empty state.
- When the video cannot be displayed normally, the cell shows the current status.
Managing layouts
- Click the grid mode (for example, [16 Grids]) at the top right to change the number of cells.You can choose from the grid options. The new grid applies to the current page, and the videos are rearranged automatically.
![Click the grid mode (for example, **[16 Grids]**) at the top right to change the number of cells.](/manual/vunexhub/images/1779435632375_Monitoring_-Grids_ko.png)
- Click [⋮] (more) next to the layout name.
- [Add New Layout] : Create a new empty layout.
- [Duplicate Layout] : Duplicate the current layout with the same cell assignments.
- [Clear All Cells] : Remove all videos from the cells of the current layout. A confirmation window appears; this action cannot be undone.
- [Full screen] : Enter full-screen mode. See Using full-screen mode for details.
![Click **[⋮]** (more) next to the layout name.](/manual/vunexhub/images/1779435638209_Monitoring_-_Layout_control_ko.png)
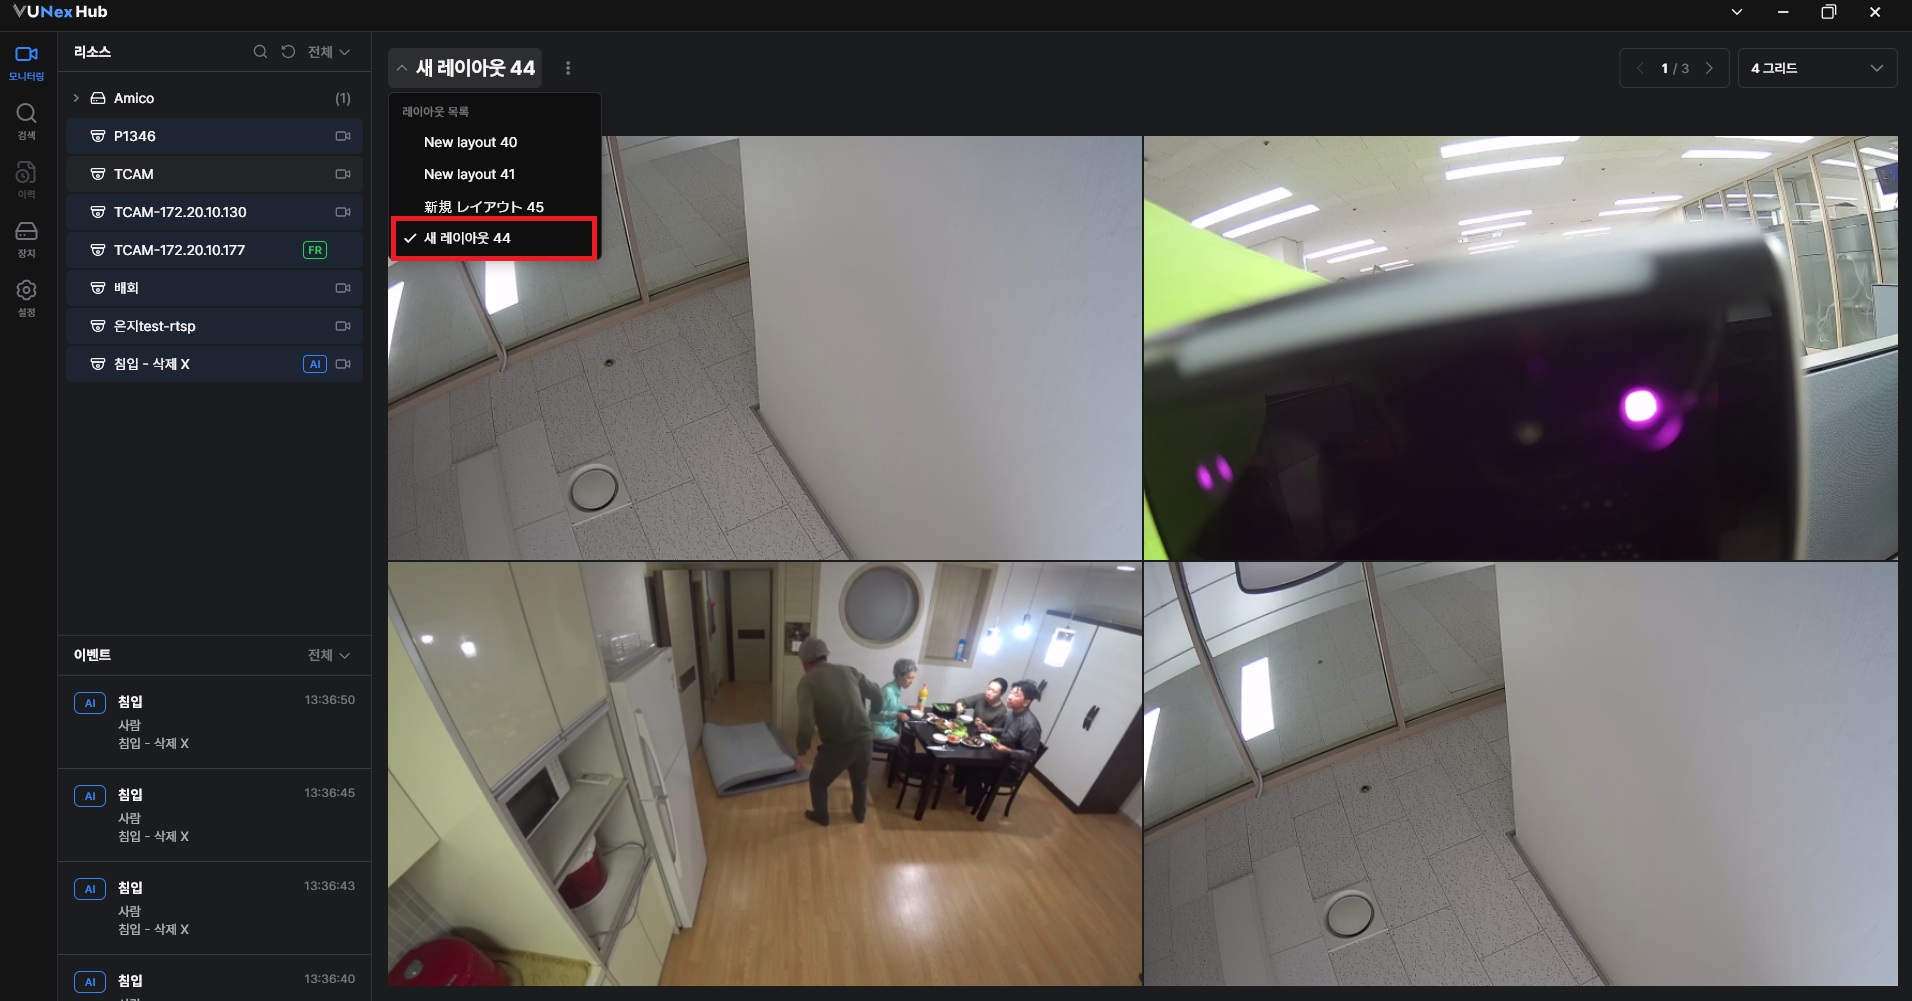
- To delete a layout, expand the layout list, click the delete icon on the right side of the layout you want to delete, and select [Delete Layout].A confirmation window appears. Once deleted, the layout cannot be recovered.
![To delete a layout, expand the layout list, click the delete icon on the right side of the layout you want to delete, and select **[Delete Layout]**.](/manual/vunexhub/images/1779435635786_Monitoring_-_Layout_name_ko.png)
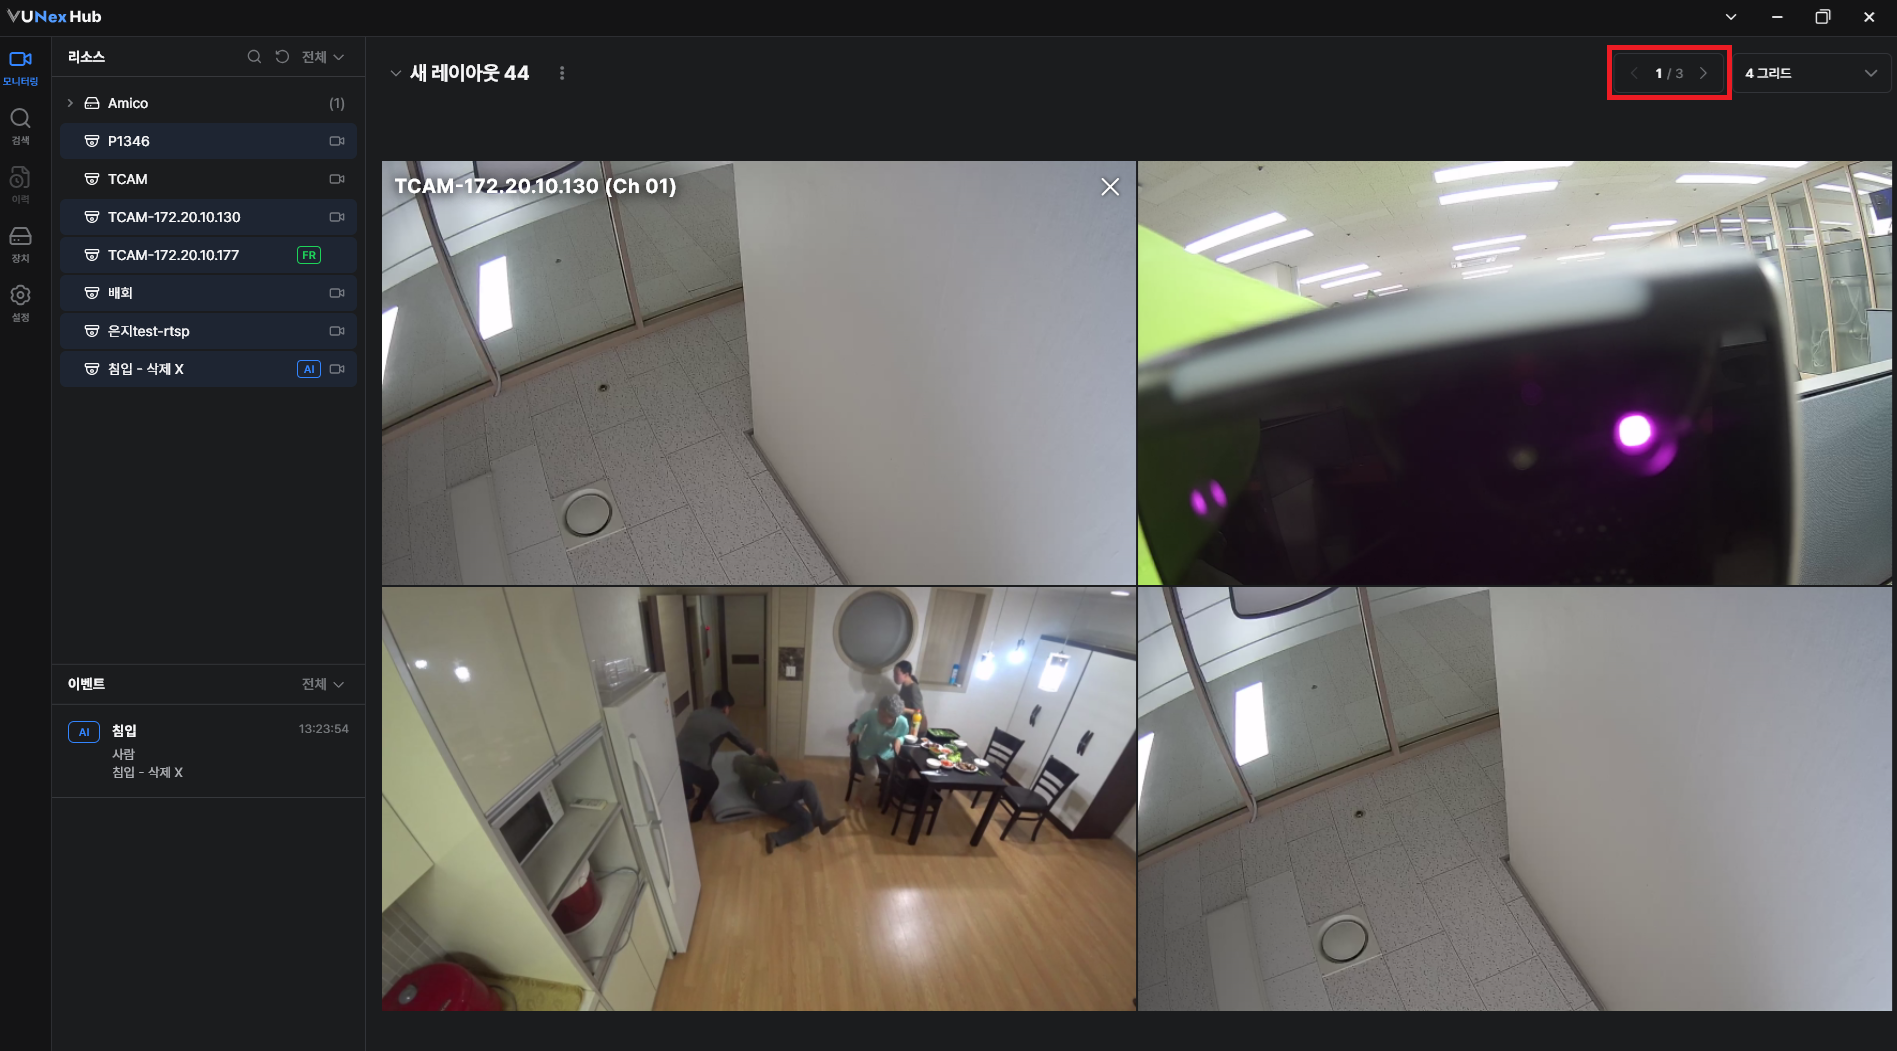
- Click the left or right arrow in the page indicator at the top right to switch pages.The current page and total number of pages are displayed. Click the left or right arrow to move to the previous or next page.
- To edit a layout name, expand the layout list, then click the edit icon on the right side of the layout you want to edit and change the layout name.The edit window appears. Change the layout name and save it to apply the changes.
- You can drag a video assigned to one cell into another cell.
- If the target cell is empty, the video moves there; if the target cell already has a video, the two videos swap positions.
Using full-screen mode
![[캡처 필요: 전체 화면 모드 - n분할 전체화면 및 1분할 확대 상태]](/_next/image?url=%2Fmanual%2Fvunexhub%2Fimages%2F1779757865580_Fullscreen_ko.png&w=1920&q=75&dpl=dpl_9dyqtFAdagPhFoBcUQXwGffUzrM7)
- Enter full-screen mode through one of the following.
- Double-click on a video cell area.
- Right-click on a video cell and choose [Full screen].
- Click [⋮] (more) next to the layout name and choose [Full screen].
- Switch between the grid view and a single video view.In full-screen mode, double-click a specific video to expand it to a single view. Double-click again to return to the original grid full screen.
- Press the ESC key, or hover over the top of the screen and click the [X] button to exit full-screen mode.Full-screen mode ends immediately regardless of whether you are viewing the grid or a single video. The previous grid layout and playback state (playing, paused, etc.) are preserved.
- When you enter full-screen mode, a notice on how to exit appears at the top center and then disappears automatically.
- The [X] button is hidden by default and only appears when you hover the mouse over the top of the screen.
Checking real-time events
- Check the event list in the [Events] area on the left.Detected events appear as cards in chronological order (most recent first). Up to 30 events are kept in the list, after which the oldest are removed automatically.
- Click the filter at the top of the [Events] area to choose an event type.Choose from [All], [AI], [AC], [FR], or [Camera] to show only events of that type.
- Click an event card to see its details.An event detail window opens. See Viewing event details for more.
- Drag the divider line between the [Resource] and [Events] areas to adjust the height of the events list.
- Each event card shows the event type badge (AI/AC/FR), event name, source device, and timestamp.
- Additional information such as user name or door is shown depending on the event type.
Viewing event details
![[캡처 필요: 이벤트 상세 창 - AI/AC/FR 유형별]](/_next/image?url=%2Fmanual%2Fvunexhub%2Fimages%2F1779435634204_Monitoring_Events_Detail_ko.png&w=1920&q=75&dpl=dpl_9dyqtFAdagPhFoBcUQXwGffUzrM7)
- Click an event card in the [Events] area.The event detail window opens.
- Check the information in the window. The fields shown depend on the event type.
- AI events : Source camera, occurrence time, and the event clip video.
- AC events (Access Control) : User group, user name (Unknown User if not registered), door, linked camera (displayed as “Link Connection” if not registered), AC device, occurrence time, and a thumbnail captured at the device.
- FR events (Face Recognition) : User type, user name with match accuracy (%), camera, occurrence time, the registered face image and cropped face image, and the event clip video.
- To continue analyzing the event with the recorded video, click [Playback] at the bottom (available for AI and FR events).The recorded video player opens for that camera. For details, see the Playback section.
Playback
This section explains how to play back recorded video and navigate to a specific moment.
Basic playback controls
![[캡처 필요: 영상 재생 창 - 영상 영역 + 하단 컨트롤 + 우측 하단 메뉴]](/_next/image?url=%2Fmanual%2Fvunexhub%2Fimages%2F1779760951917_Playback_Single_View_Ko.png&w=1920&q=75&dpl=dpl_9dyqtFAdagPhFoBcUQXwGffUzrM7)
- Open the Playback window through one of the following.
- Right-click a monitoring cell and choose [Playback].
- Click [Playback] from event details.
- Click [Playback] from search results.
- Use the play controls at the bottom.
- Forward play / pause : Play the video forward or pause it.
- Reverse play / pause : Play the video in reverse, or pause.
- Step backward / forward (10 seconds) : Click the arrow buttons, or press the ← / → keys.
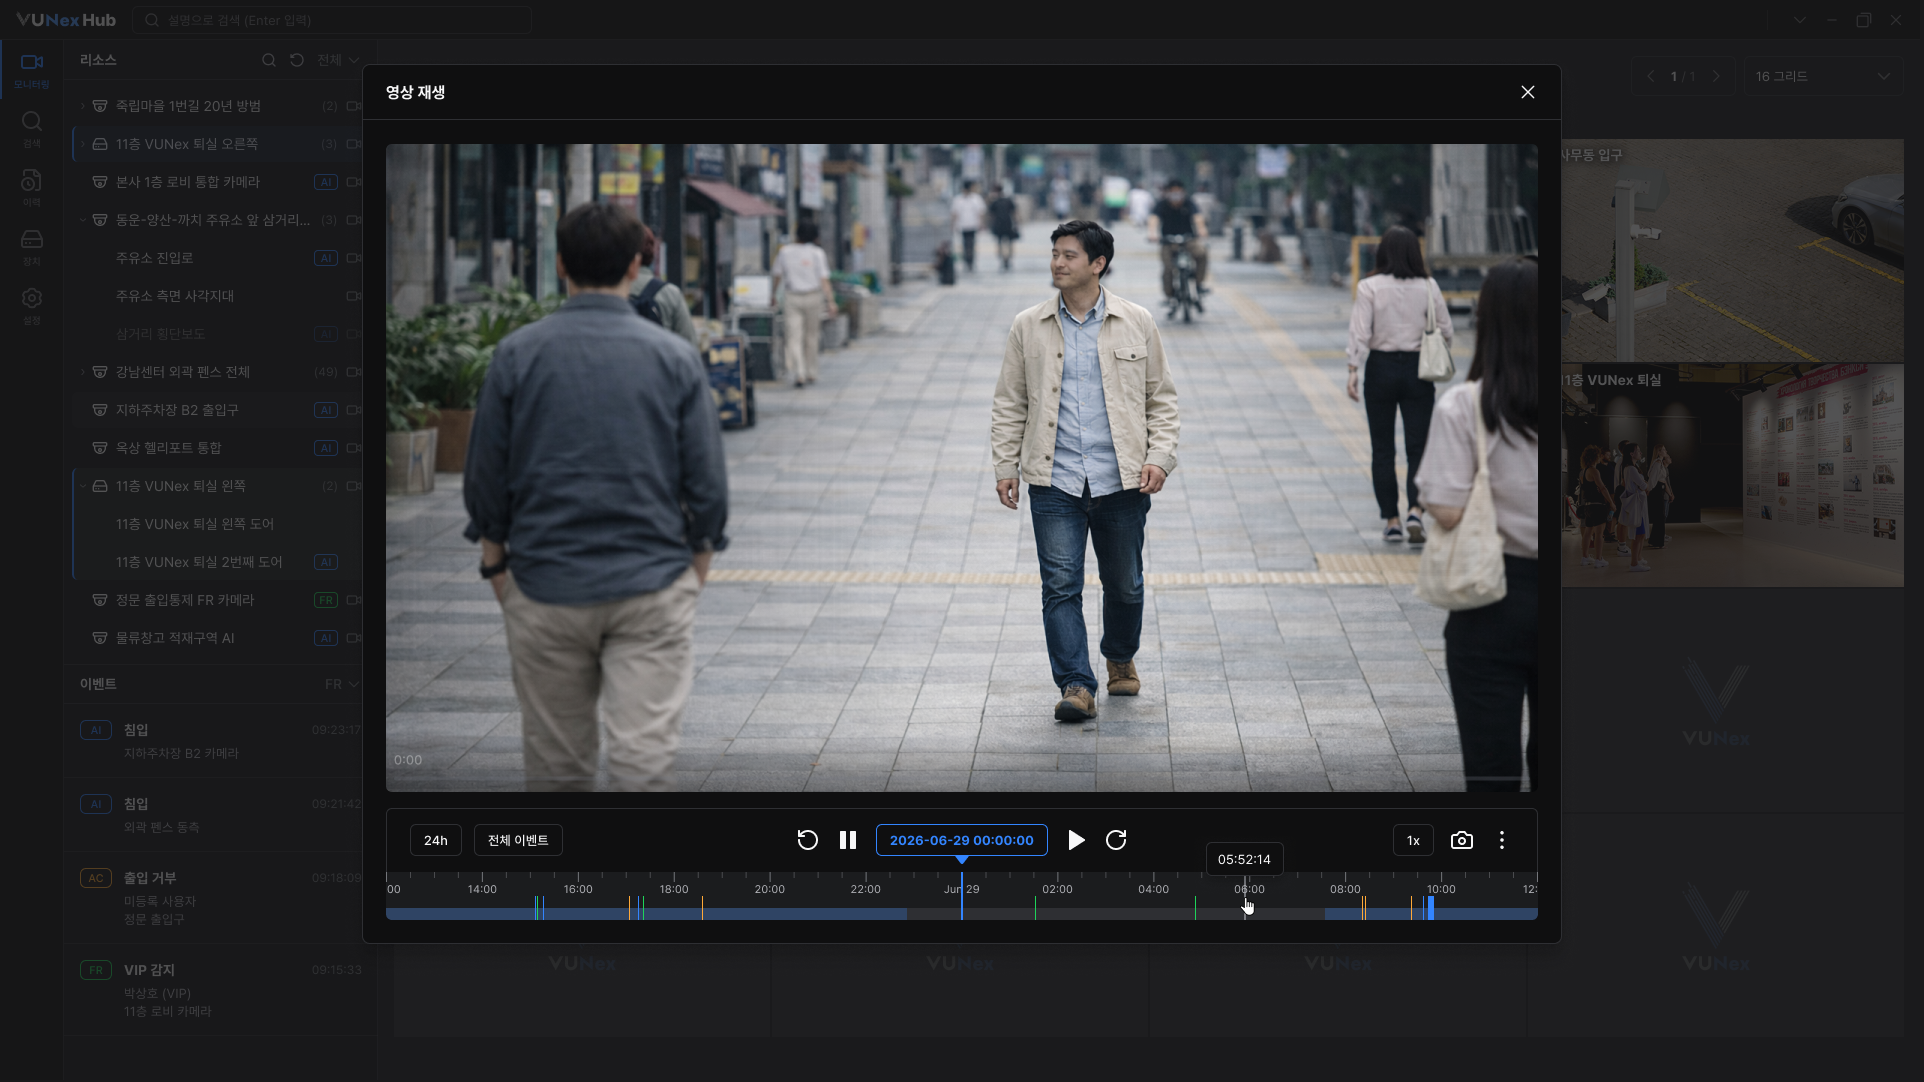
- To change the playback speed, click the speed button and select a value from the [Speed] menu.Choose from 0.5x, 1x, 2x, 4x, 8x, or 16x. The selected speed appears on the button.
![To change the playback speed, click the speed button and select a value from the **[Speed]** menu.](/manual/vunexhub/images/1779760996778_Playback_Single_View_-_Speed_Ko.png)
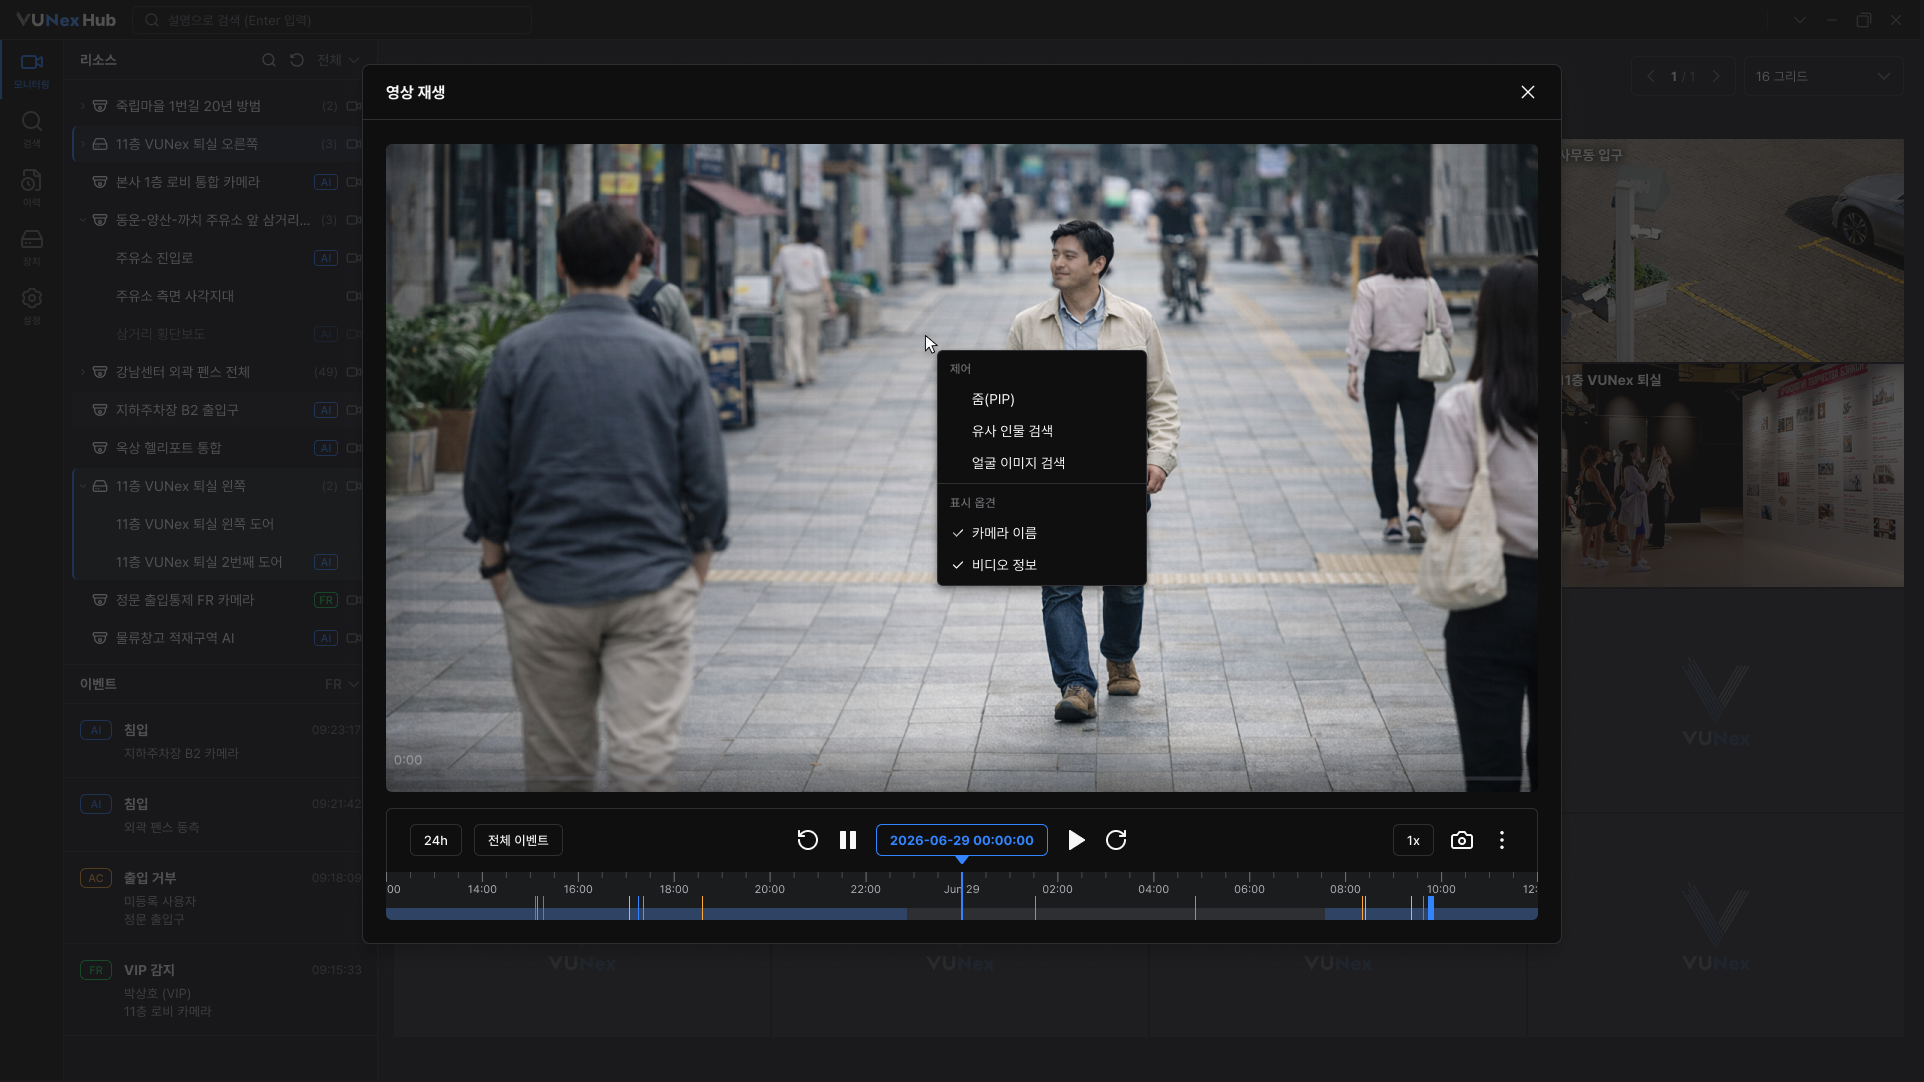
- Right-click on the video to open the menu and turn display options on or off.
- [Zoom(PIP)] : Show a zoomed-in area inside the video (Picture-in-Picture).
- [Camera Name] : Pin the camera name on top of the video.
- [Video Information] : Show resolution, fps, and kbps.
- If there is no recorded data at the entry point, the player automatically moves forward to the nearest recorded segment.
- The [Face image search] menu will be supported in a future update.
Navigating with the timeline
![[캡처 필요: 타임라인 영역 - 눈금/녹화 구간/이벤트 마커]](/_next/image?url=%2Fmanual%2Fvunexhub%2Fimages%2F1779760985978_Playback_Single_View_-_Timeline_Ko.png&w=1920&q=75&dpl=dpl_9dyqtFAdagPhFoBcUQXwGffUzrM7)
- Move to a specific point on the timeline.Click any point on the timeline to jump to that time. Drag left or right to scrub through the video.
- Zoom the timeline in or out.Hover over the timeline and use the mouse wheel to change the time unit.
- Scroll up : Zoom in (narrower time unit, more detail).
- Scroll down : Zoom out (wider time unit, broader view).
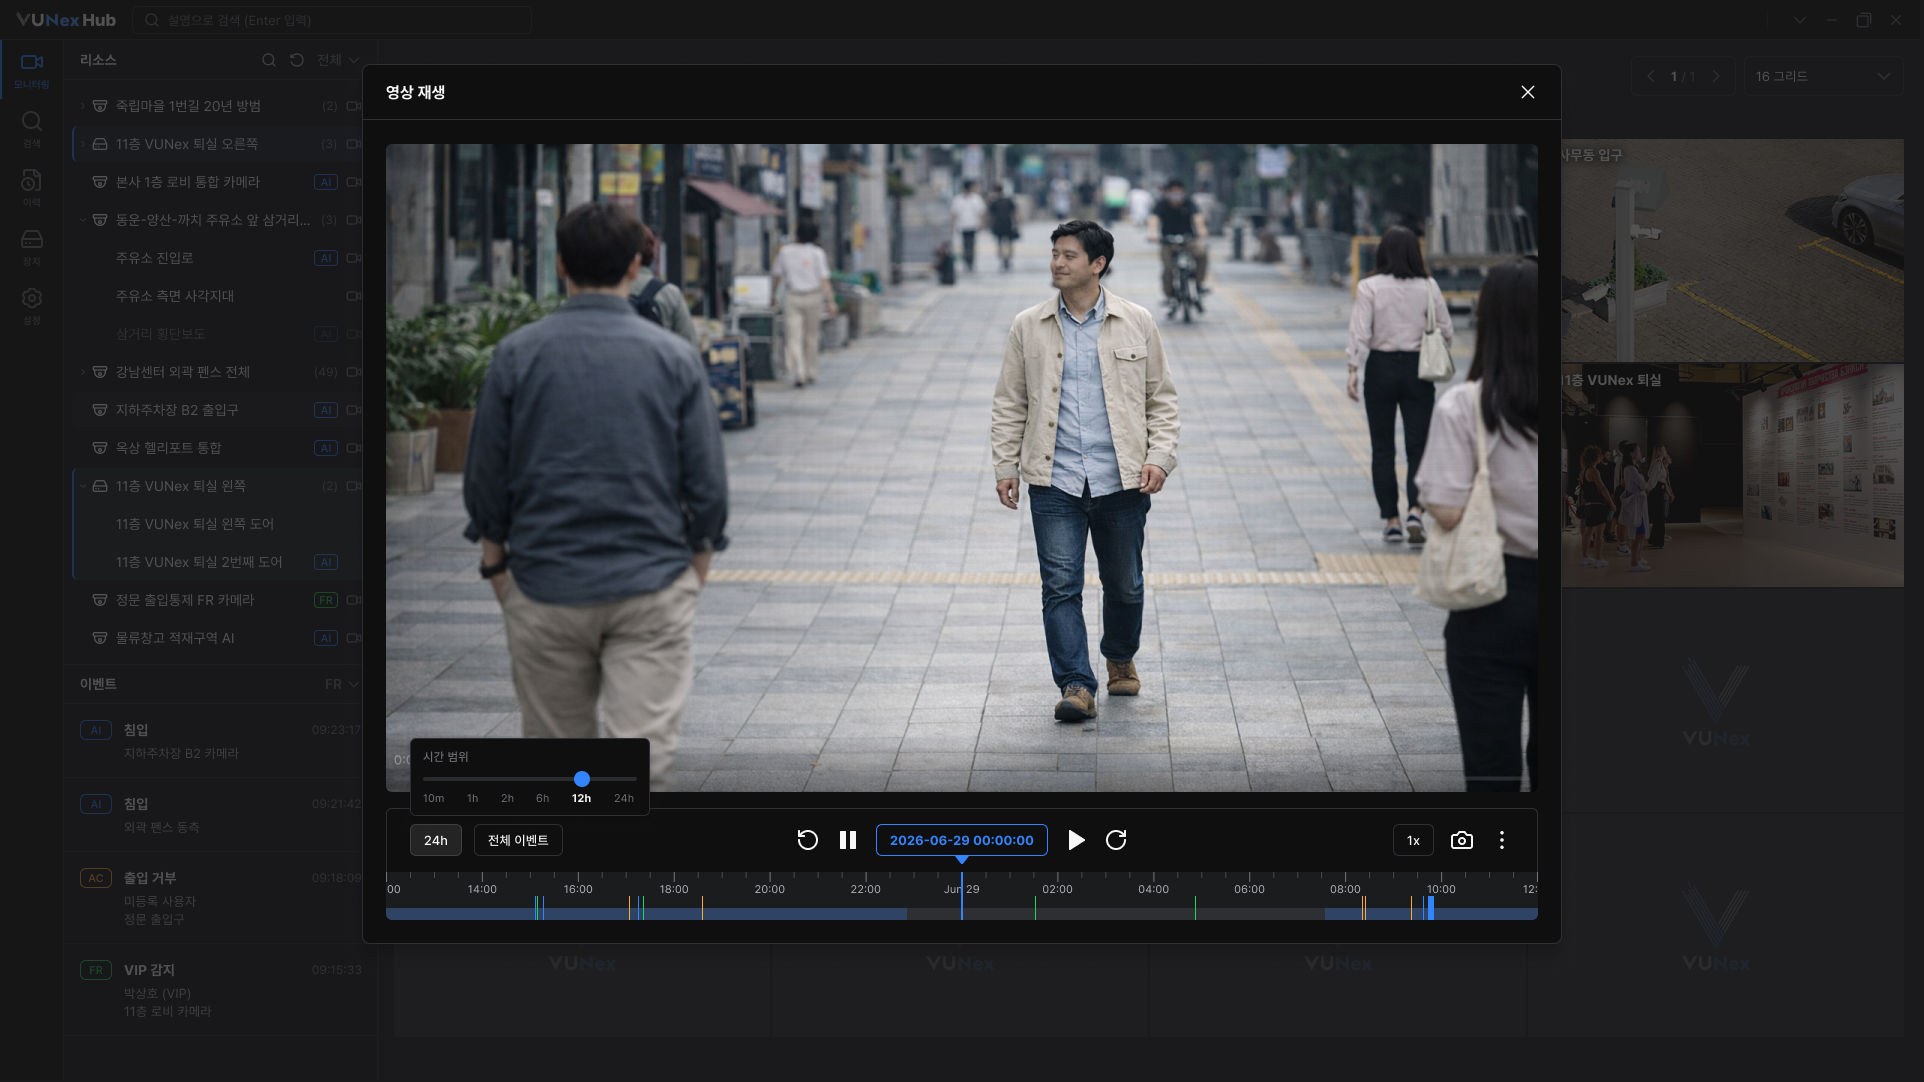
- Recorded segments are shown as blue bars on the timeline.
- When you jump to a moment with no recording, the player skips forward to the next recorded segment.
- The playhead cannot be moved beyond the current time; sections in the future are not selectable.
Filtering event markers
![[캡처 필요: 이벤트 마커 필터 - [전체 이벤트] 목록 펼침 상태]](/_next/image?url=%2Fmanual%2Fvunexhub%2Fimages%2F1779761038583_Playback_Single_View_-_Event_marker_ko.png&w=1920&q=75&dpl=dpl_9dyqtFAdagPhFoBcUQXwGffUzrM7)
- To filter event markers on the timeline, click the [All Events] list at the left of the timeline.A list of event types grouped by source opens.
- [All Events] : Show every event marker.
- AI Type : Choose specific AI event types.
- AC Type : Choose access control events.
- FR Type : Choose face recognition events.
Jumping to a specific date and time
![[캡처 필요: 단일 날짜·시간 선택기 - 캘린더 + 시·분·초 스크롤]](/_next/image?url=%2Fmanual%2Fvunexhub%2Fimages%2F1779761047474_Playback_Single_View_-_Datetime_picker_ko.png&w=1920&q=75&dpl=dpl_9dyqtFAdagPhFoBcUQXwGffUzrM7)
- Click the current time display in the play controls.The date and time picker appears.
- Select a date in the calendar.Days with recorded data are marked with a dot. Days outside the recording retention period are disabled.
- Scroll the time columns to select hour, minute, and second.
- Hour : 0–23
- Minute : 0–59
- Second : 0–59
- Click outside the picker area to apply.The playback position moves to the selected date and time.
Saving a screenshot
![[캡처 필요: 재생 컨트롤 우측의 스크린샷 버튼 + 저장 완료 안내]](/_next/image?url=%2Fmanual%2Fvunexhub%2Fimages%2F1779761088951_Playback_Single_View_-_Snapshot_ko.png&w=1920&q=75&dpl=dpl_9dyqtFAdagPhFoBcUQXwGffUzrM7)
- Click the camera icon (screenshot) at the right side of the play controls.The current frame is saved immediately, and a confirmation message appears.
- Click the Open Folder button in the snackbar to check the snapshot image file from that point in time.
- Windows : C:\Users\{username}\Pictures\VUNexHub\
- macOS : /Users/{username}/Pictures/VUNexHub/
- Linux : /home/{username}/Pictures/VUNexHub/
Search
This section explains how to search data across multiple modes and how to launch a quick search from the header.
Getting started with Search
Select a mode, set conditions, and run a search from the common Search screen.
![[캡처 필요: 검색 화면 기본 구성 - 좌측 모드 / 상단 조건 / 중앙 결과 / 우측 상세]](/_next/image?url=%2Fmanual%2Fvunexhub%2Fimages%2F1779777400539_Search_-_Default_ko.png&w=1920&q=75&dpl=dpl_9dyqtFAdagPhFoBcUQXwGffUzrM7)
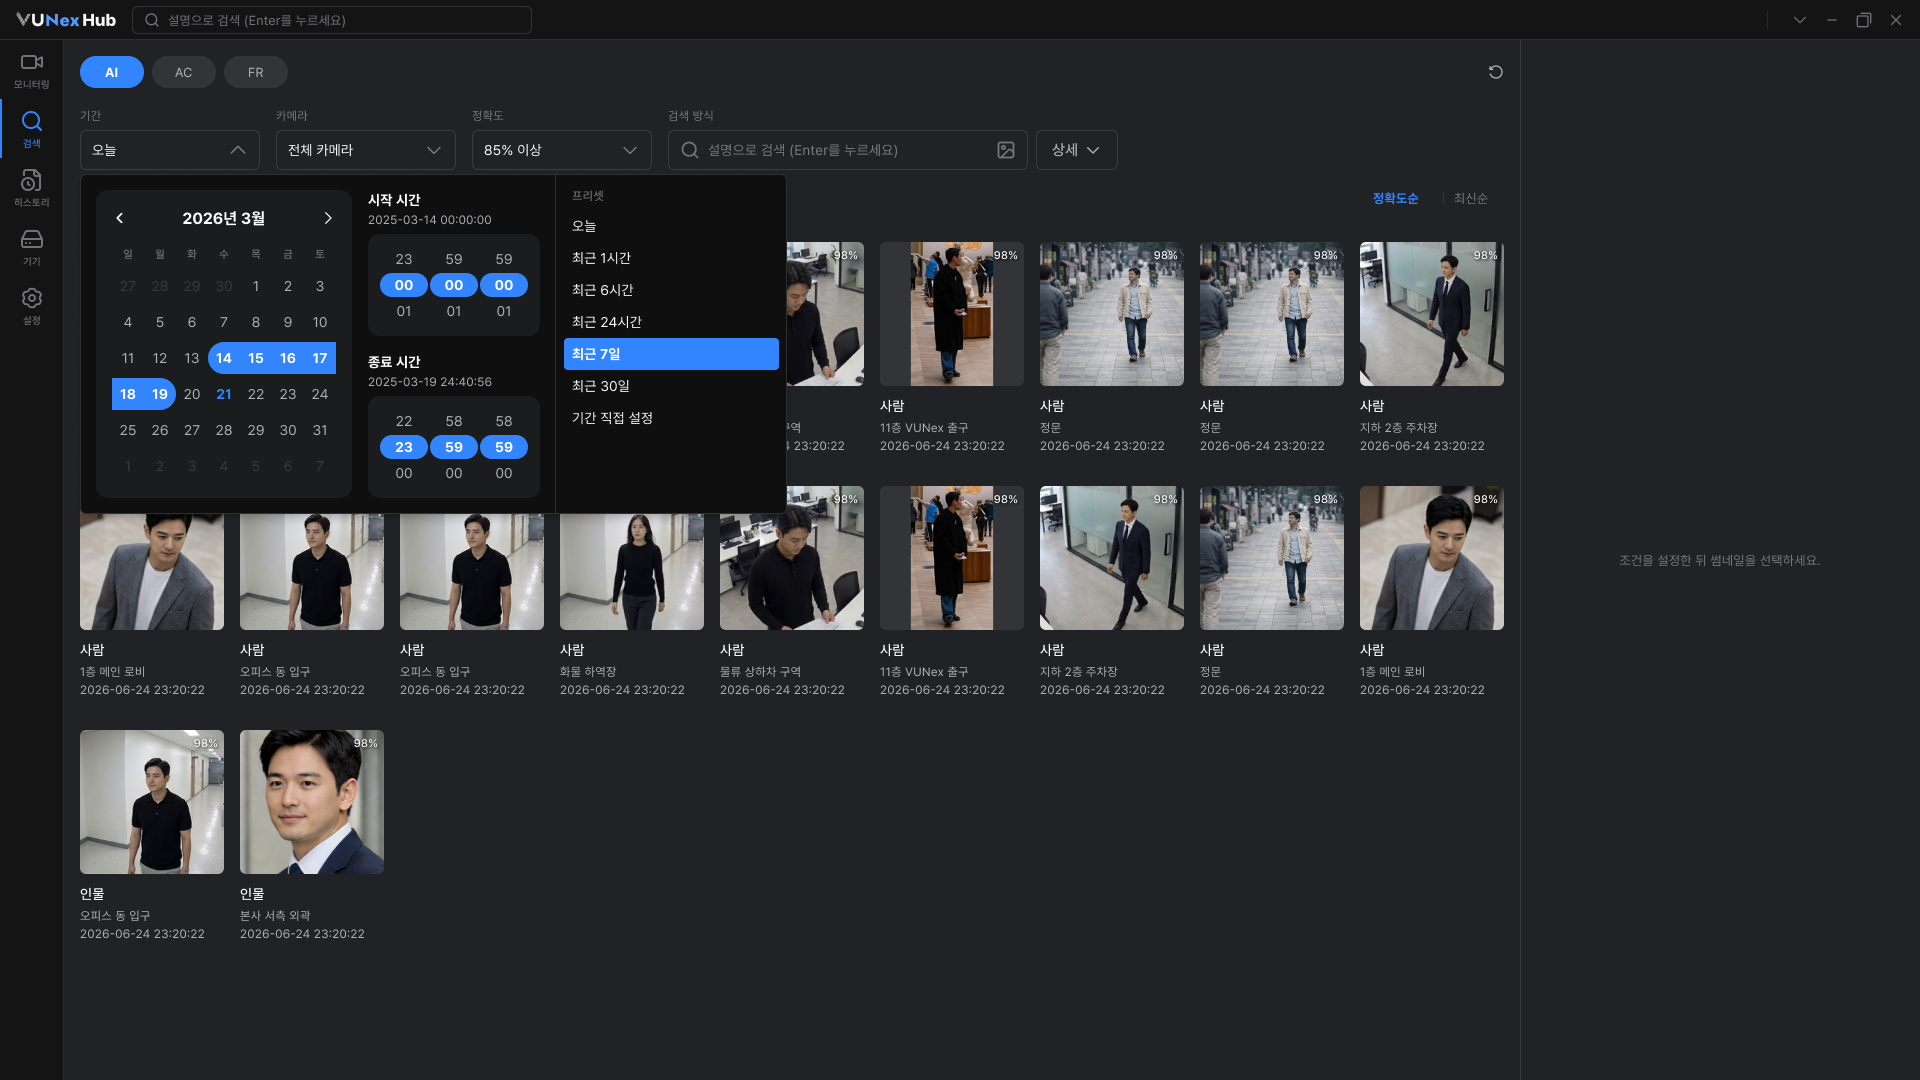
- Click [Search] in the left menu to open the Search screen.The Search screen opens with [AI] mode selected by default. Click [AI], [AC], or [FR] at the top to switch modes.
- Set conditions to narrow down the search results.When you set conditions in the condition area, you can see results that match those conditions. The condition fields vary by mode—see the guide for each mode for details.
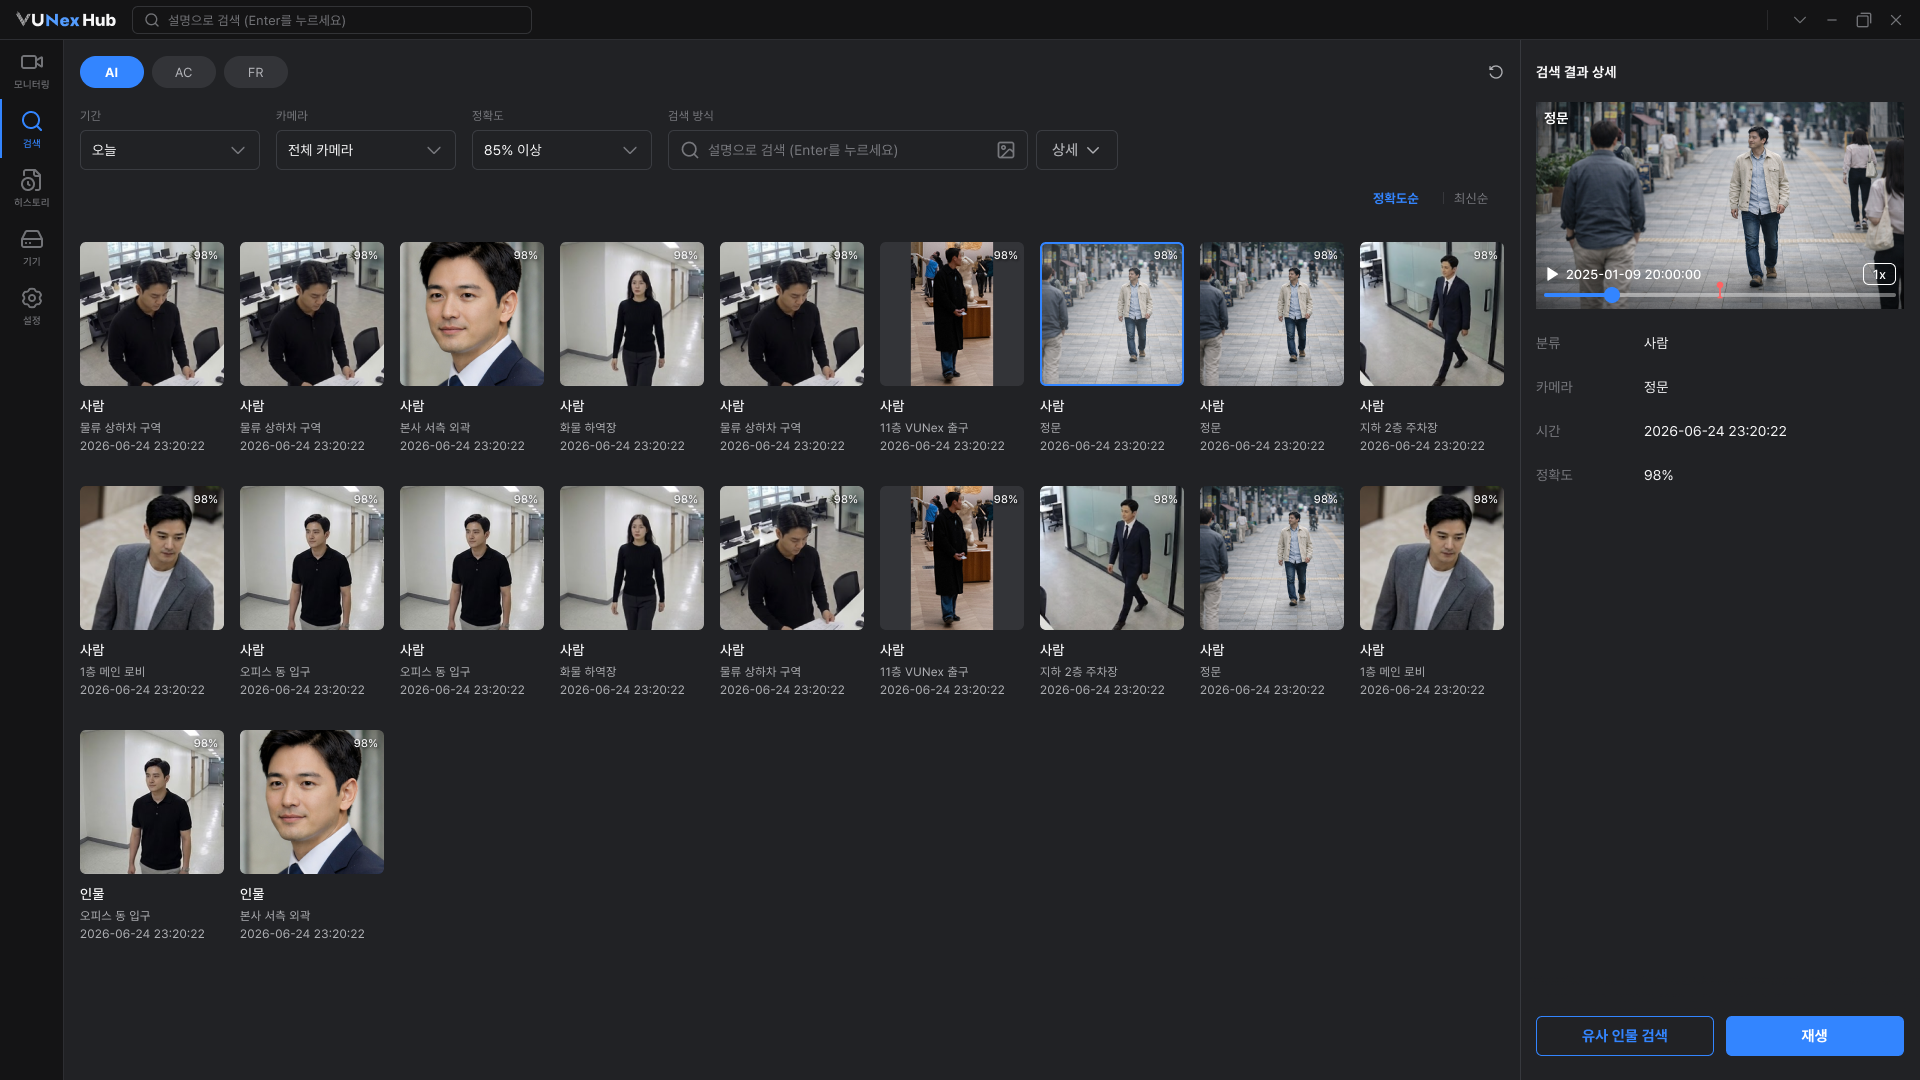
- Click a result card to review its details.The [View Result Detail] area opens on the right. The metadata items shown vary by search mode—see the guide for each mode for details.
- Click the X on a Chip at the top of the result area to remove a condition.The condition is removed and the results update immediately. Set new conditions and run the search again to refresh the results.
- If the search service is disabled in the VUNex AI module, search is not available. Ask the system administrator to verify the VUNex AI settings.
- Only English letters and spaces can be entered.
Quick search from the header
![[캡처 필요: 헤더 AI Quick Search 바 - Default / Focus(최근 검색어) / Input 상태]](/_next/image?url=%2Fmanual%2Fvunexhub%2Fimages%2F1779777557753_Search_-_Header_ko.png&w=1920&q=75&dpl=dpl_9dyqtFAdagPhFoBcUQXwGffUzrM7)
- Enter a natural-language query in the header search bar and press Enter.The app moves to the Search screen and displays the results. Default conditions on entry are Today, All Cameras, and [AI] mode.
- Focus the search bar to reuse a term from [Recent Searches].Up to five recent terms are shown (duplicates removed). Clicking an item fills the search bar with that term, and pressing Enter runs the search.
Searching with AI
- Enter a natural-language description in the [Search By] field and press Enter to run a text search.
- Examples: blue top man, person with red backpack.
- Results are sorted by [Accuracy] by default. Click [Newest] to sort by most recent.
![Enter a natural-language description in the **[Search By]** field and press **Enter** to run a text search.](/manual/vunexhub/images/1779777569950_Search_-_prompt_ko.png)
- Click the image icon in the [Search By] field to upload an image and find similar persons.Drag and drop an image into the upload area, or click to select a file. After upload, the search runs automatically using the uploaded image as the reference.
![Click the image icon in the **[Search By]** field to upload an image and find similar persons.](/manual/vunexhub/images/1779777721284_Search_-_Similar_person_search_ko.png)
- Click [Detail] in the condition area to open the [Detail Search] window and search by attributes or events.Set values for [Class], [Event], [Gender], [Top], [Bottom], [Hat], and [Carried Item], then click [Search]. Items left as Any are not applied as filters.
![Click **[Detail]** in the condition area to open the **[Detail Search]** window and search by attributes or events.](/manual/vunexhub/images/1779777683310_Search_-_Attribute_search_ko.png)
- Click a result card to open the [View Result Detail] area and run follow-up actions.
- [Similar Person Search] : Search again using the selected image.
- [Playback] : Open the camera's single playback view.
- [Detailed Search] is displayed when a [Class] value is selected.
- For best image search accuracy, use a photo where only one person is clearly visible and the full body is shown.
- Image upload supports .jpg, .png, and .jpeg formats, up to 5MB per file.
Searching access events (AC)
![[캡처 필요: AC 검색 - 조건(기간/장치/이벤트) + 결과 카드 + 검색 결과 상세 영역]](/_next/image?url=%2Fmanual%2Fvunexhub%2Fimages%2F1779777733512_Search_-AC_ko.png&w=1920&q=75&dpl=dpl_9dyqtFAdagPhFoBcUQXwGffUzrM7)
- Switch to [AC] mode and set [Time Range], [Device], and [Event].
- [Time Range] : Today (default)
- [Device] : All (default), multiple selection supported
- [Event] : All (default), multiple selection supported
- When the search is executed, please check the result card.Each result card shows the event name, user name, device name, and time.
- Click a result card to review the access details in the [View Result Detail] area.The area shows the event name, [User Group], [User], [Door], [Device] name, and time. If a registered face image exists, it appears next to the cropped face captured at the event.
![Click a result card to review the access details in the **[View Result Detail]** area.](/manual/vunexhub/images/1779777745658_Search_-AC_result_ko.png)
Searching by face (FR)
![[캡처 필요: FR 검색 - 사용자 이름 검색 / 얼굴 이미지 검색 창 / 검색 결과 상세]](/_next/image?url=%2Fmanual%2Fvunexhub%2Fimages%2F1779777942378_Search_-FR_ko.png&w=1920&q=75&dpl=dpl_9dyqtFAdagPhFoBcUQXwGffUzrM7)
- Switch to [FR] mode and set [Time Range], [Camera], and [Accuracy].
- [Time Range] : Today (default)
- [Camera] : All cameras (default)
- [Accuracy] : 80% or higher (default), range 70–100
- Enter a user name in the [Search By] field and press Enter to search by name.Focusing the field opens a guide panel with Registered users (up to 5), Unregistered users, and [Recent Searches]. Click any list item to fill the field automatically.
- Click a result card to open the [View Result Detail] area and run follow-up actions.The area shows the [User Type], [User], [Camera], and [Time] values.
- [Face Image Search] : Search again using the selected face image.
- [Playback] : Open the camera's single playback view.
![Click a result card to open the **[View Result Detail]** area and run follow-up actions.](/manual/vunexhub/images/1779777957566_Search_-FR_result_ko.png)
- The result card displays the user type before the user name. Faces not registered in the user list are displayed as Unregistered User.
- Face image search and face matching threshold features will be supported in a future update.
Search from the Recorded Video Playback Screen
Crop a specific area directly from the playback video to search for similar persons.
![[캡처 필요: 재생 화면 Image Crop 모드 - 사각형 크롭 영역 + Search/Undo/Out 메뉴]](/_next/image?url=%2Fmanual%2Fvunexhub%2Fimages%2F1779777969102_Playback_Single_View_Menu_ko.png&w=1920&q=75&dpl=dpl_9dyqtFAdagPhFoBcUQXwGffUzrM7)
- Click [⋮] (more) at the right of the play controls and choose [Similar Person Search].The video pauses and switches to area selection mode. Areas outside the video cannot be clicked, and the mouse pointer changes.
- Drag on the video to draw a rectangular area to search.When you release the mouse, the cropped area is fixed and the menu appears.
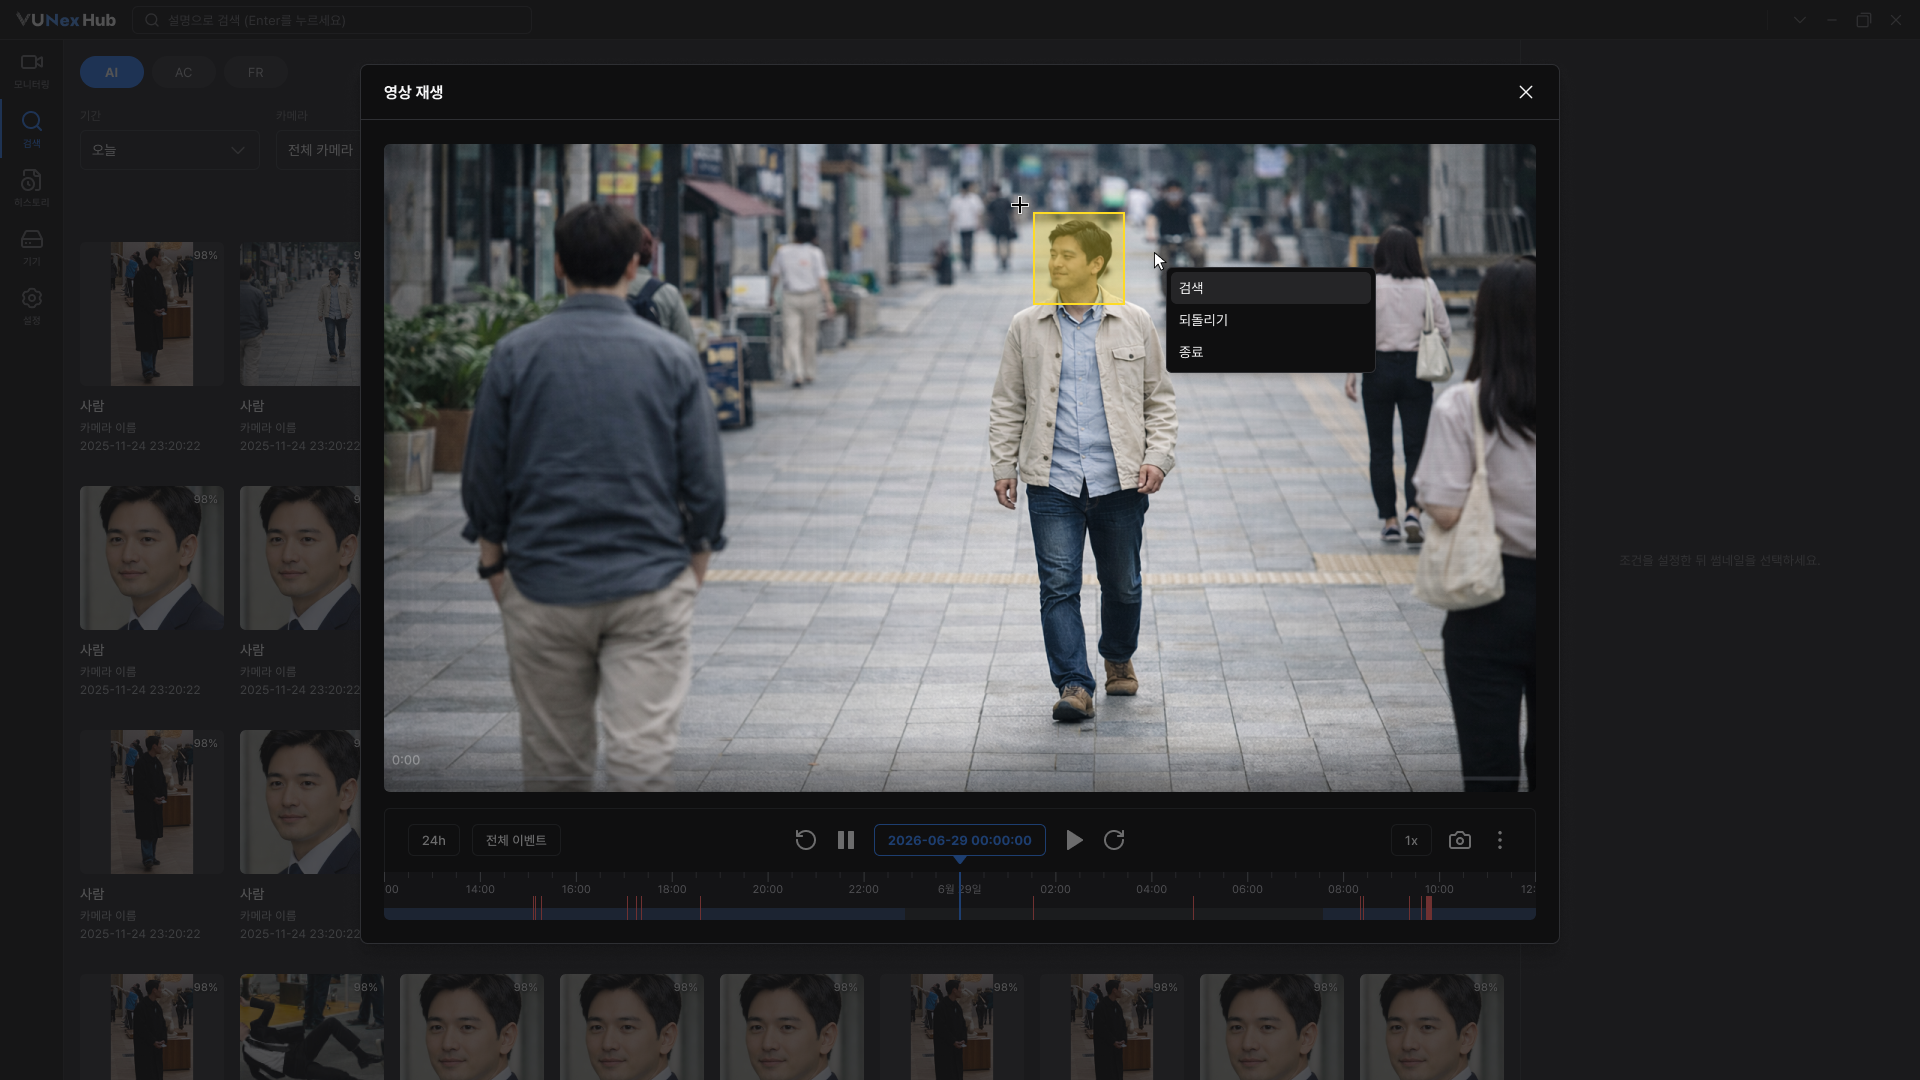
- Choose an action from the menu that appears.
- [Search] : Run a search using the cropped image. The app moves to the Search screen automatically.
- [Undo] : Cancel the crop and return to the area selection state.
- [Out] : Exit the area selection mode and return to the playback screen.
Devices
This section shows you how to register cameras and access control devices on the Devices screen, and how to manage the registered devices.
Viewing the device list
![[캡처 필요: 장비 화면 - 상태 카운트 + 검색 + Add 버튼 + 장비 리스트]](/_next/image?url=%2Fmanual%2Fvunexhub%2Fimages%2F1779780031036_Device_Default_ko.png&w=1920&q=75&dpl=dpl_9dyqtFAdagPhFoBcUQXwGffUzrM7)
- Click [Devices] in the left menu.Registered cameras and access control devices appear in the list.
- To narrow the list by status, click one of the status counts at the top.
- [Recording] : Show only devices currently recording.
- [Connected] : Show only devices that are connected.
- [Disconnected] : Show only devices whose connection has been lost.
- To find a specific device, use the search field at the top right.Type any part of a device name or IP address. The list filters in real time as you type.
Adding devices with Auto Scan
- Click the [Add] button at the top right of the Devices screen.The device add window opens with the [Auto Scan] tab selected. [Recording Server] is set to the main recording server; choose another server from the list if you want to register the devices elsewhere.
- Click the [Scan] button.Devices on the same network are found automatically and listed by model name. Devices that are already registered are marked with [Added] next to their model name.
![Click the **[Scan]** button.](/manual/vunexhub/images/1779780064754_Device_Add_ko.png)
- Select devices and enter their information.
- Select the devices you want to register.
- Enter a Device name for each selected device.
- Enter ID/Password for devices that need authentication.
- To apply the same credentials to multiple devices, use [Apply ID & Password to All].
- Click [Apply] at the bottom.The Adding Devices result window opens and registers the selected devices in order.
- Success : The device is added to the device list.
- Failed : The failure reason and a [Retry] button are shown. Correct the information and try again.
![Click **[Apply]** at the bottom.](/manual/vunexhub/images/1779780203406_Add_Adding_Devices_ko.png)
Adding a device with Manual Add
![[캡처 필요: 장비 추가 창 - 수동 추가 탭 + 제조사/모델 + 정보 입력 영역]](/_next/image?url=%2Fmanual%2Fvunexhub%2Fimages%2F1779780137475_Device_Add_Manual_add_ko.png&w=1920&q=75&dpl=dpl_9dyqtFAdagPhFoBcUQXwGffUzrM7)
- In the device add window, switch to the [Manual Add] tab.The Manual Add form appears. [Recording Server] is set to the main recording server; choose another server from the list if needed.
- Select [Manufacturer] and then [Model].After you choose a manufacturer, the model list for that manufacturer appears. Selecting a model fills in default values such as channel count and codec.
- Enter the device information.
- Device name : Up to 50 characters.
- IP / Port : Camera IP address and port.
- ID / Password : Required only when the camera needs authentication.
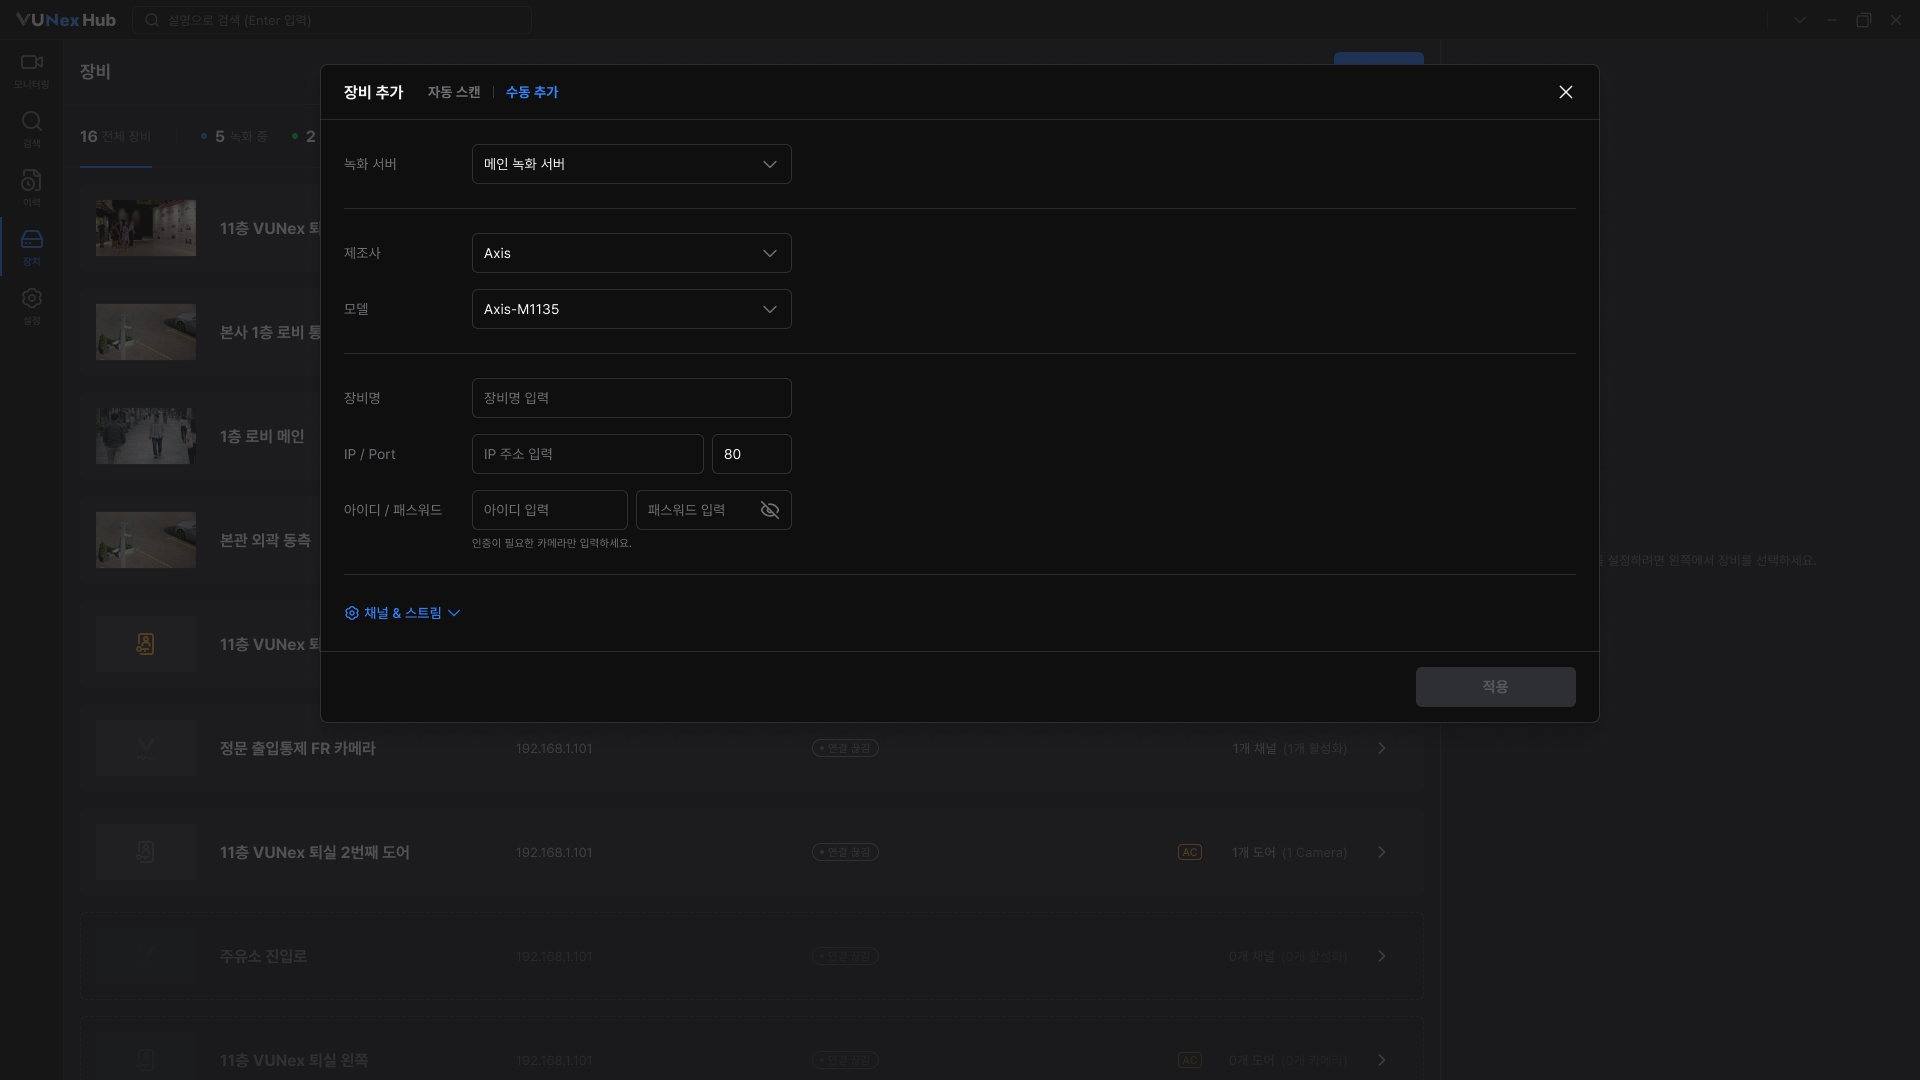
- Click [Apply] at the bottom.The Adding Devices result window opens and registers the device. The result handling is the same as Auto Scan.
Editing camera device information
![[캡처 필요: 카메라 장비 상세 영역 - 장비 사용 스위치 + General + Apply 버튼]](/_next/image?url=%2Fmanual%2Fvunexhub%2Fimages%2F1779780288218_Device_Panel_ko.png&w=1920&q=75&dpl=dpl_9dyqtFAdagPhFoBcUQXwGffUzrM7)
- On the Devices screen, click the row of the camera device you want to edit.The right-side area opens and shows the selected device's information.
- To enable or disable the entire device, use the [Enable Device] switch at the top.When turned off, all event reception from this device stops, and the device is removed from the Monitoring resource tree.
- In the [General] section, edit the device information.
- Device name : Up to 50 characters; duplicate names are not allowed.
- IP / Port : Camera network information.
- ID / Password : Authentication is checked when you apply the changes. If the credentials are wrong, "Check your ID or Password." is shown.
- Click [Apply] at the bottom of the right-side area to save the changes.On success, "Successfully updated." is shown.
Turning channels on and off
![[캡처 필요: 채널 & 기능 영역 - Ch 탭 + 채널 사용 스위치 + 기능 요약]](/_next/image?url=%2Fmanual%2Fvunexhub%2Fimages%2F1779780330872_Device_Panel2_ko.png&w=1920&q=75&dpl=dpl_9dyqtFAdagPhFoBcUQXwGffUzrM7)
- In the device details on the right, open the [Channel & Feature] section.Channel tabs appear, one for each channel registered to the device (Ch 01, Ch 02, ...). Channels that are off show (OFF) next to the tab name.
- Click the channel tab you want to manage.The selected channel's settings appear below the tabs.
- Use the [Enable Channel] switch to turn the channel on or off.The change is reflected in the count on the device list. The channel's recording, AI analysis, face recognition, and PTZ & I/O settings are shown as a read-only summary below the switch.
- Click [Apply] at the bottom of the right-side area.Channel changes do not take effect until you apply them.
Editing channel media streams
![[캡처 필요: 스트림 편집 창 - Serial/이름/URL/코덱/Port/Protocol + 액션(휴지통/VLC) + 스트림 추가]](/_next/image?url=%2Fmanual%2Fvunexhub%2Fimages%2F1779780378545_Device_Panel_Edit_Stream_Func_ko.png&w=1920&q=75&dpl=dpl_9dyqtFAdagPhFoBcUQXwGffUzrM7)
- In the [Channel & Feature] section, select a channel tab and click [Stream].The stream list of the selected channel appears.
- Edit each stream's information directly in the row.
- Name : Stream name.
- URL : RTSP URL.
- Codec : Read-only.
- Port : Streaming port.
- Protocol : Select TCP or UDP.
- To add or delete a stream, use the buttons at the bottom of the list.
- [Add Stream] : Adds a new stream row.
- Trash icon : Deletes the stream from that row. If the stream is currently in use, it is automatically switched to another stream when you save.
- Click [Done] to close the Edit Stream window.The changes are reflected in the right-side area as a preview, but they are not saved permanently until you click [Apply] at the bottom of the right-side area. To discard the changes, click [Cancel] instead.
Configuring channel features
- In the [Channel & Feature] section, select a channel tab and click [Feature].The Edit Feature window opens with four sections - Recording, AI Analytics, Face Recognition, and PTZ & I/O.
- To configure recording, turn on the [Recording] switch and set the options.
- Stream : Select the stream used for recording.
- Recording Server : Read-only. Reassign servers in Settings.
- Recording Mode : Choose Continuous, Event-Based, or Schedule. For details on Schedule mode, see Setting a recording schedule for a channel.
- Retention Period : Set how many days recordings are kept.
![To configure recording, turn on the **[Recording]** switch and set the options.](/manual/vunexhub/images/1779843673962_Device_Panel_Feature_ko.png)
- When you choose Event-Based recording mode, set the event buffer.
- Event Buffer (Pre/Post) : Choose 15, 30, or 60 seconds before and after the event to save.
- Recording is only saved when an event occurs on this channel.
- To use AI analysis on the channel, turn on the [AI Analytics] switch and set the options.
- AI Server : Choose the VUNex AI server to use.
- Stream : Select the stream used for AI analysis.
![To use AI analysis on the channel, turn on the **[AI Analytics]** switch and set the options.](/manual/vunexhub/images/1779780721394_Device_Panel_Feature2_ko.png)
- To use face recognition on the channel, turn on the [Face Recognition] switch and set the options.
- FR Server : Choose the VUNex FR server to use.
- Stream : Select the stream used for face recognition.
- Click [Done] to close the Edit Feature window.The changes are previewed in the right-side area. To save them permanently, click [Apply] at the bottom of the right-side area. To discard the changes, click [Cancel] instead.
Setting a recording schedule for a channel
![[캡처 필요: 기능 편집 창 - 녹화 모드가 스케줄일 때 그리드 + 빠른 채우기 버튼]](/_next/image?url=%2Fmanual%2Fvunexhub%2Fimages%2F1779781071608_Device_Panel_Feature3_ko.png&w=1920&q=75&dpl=dpl_9dyqtFAdagPhFoBcUQXwGffUzrM7)
- In the Edit Feature window's Recording section, set Recording Mode to Schedule.A 7-day by 24-hour grid appears below the mode selector.
- Choose a mode from the brush tool and drag over the grid cells to paint a time range.
- Continuous (green) : Record continuously.
- Event-Based (orange) : Record only when an event occurs.
- None (gray) : Do not record.
- To fill a large area at once, use the Quick Fill buttons.
- [All] : Applies the currently selected mode to the entire grid.
- [Weekdays] : Applies to Monday through Friday only.
- [Weekends] : Applies to Saturday and Sunday only.
- To apply the same schedule to other channels, click [Copy Settings] below the grid.
- Search by device name and check the channels you want to copy the schedule to.
- The header shows how many channels are selected.
- Click [Copy to Selected].
- Click [Done] to close the window.The schedule changes are previewed in the right-side area. Click [Apply] at the bottom of the right-side area to save them permanently.
Editing an AC device
![[캡처 필요: AC 단말 상세 영역 - 장비 사용 스위치 + General + Door 탭 + 연결 카메라]](/_next/image?url=%2Fmanual%2Fvunexhub%2Fimages%2F1779781487650_Device_Default_ko.png&w=1920&q=75&dpl=dpl_9dyqtFAdagPhFoBcUQXwGffUzrM7)
- On the Devices screen, click the row of the AC device you want to edit.The right-side area opens and shows the selected AC device's information.
- Edit the basic information in the [Enable Device] switch and the [General] section.
- [Enable Device] : When off, all event reception from this device stops.
- Device name / IP / Port / ID / Password : Same as a camera device.
- Manufacturer and Model are shown for reference only.
- In the [Door] section, edit each door's information.
- Door tabs : Doors registered to this AC device appear as tabs (Door 01, Door 02, ...).
- Door name : Up to 50 characters.
- Link Camera : Select a camera to associate with the door. Choose [None] to remove the link.
- Click [Apply] at the bottom of the right-side area to save the changes.On success, "Successfully updated." is shown.
- The [Link Camera] list shows cameras registered in Hub.
- Doors themselves are managed by the AC device, so in Hub they can only be displayed and edited, not added or removed.
Deleting devices
![[캡처 필요: 장비 화면 - 다중 선택 모드, 삭제 버튼이 상단에 표시된 상태]](/_next/image?url=%2Fmanual%2Fvunexhub%2Fimages%2F1779781565460_Device_Delete_ko.png&w=1920&q=75&dpl=dpl_9dyqtFAdagPhFoBcUQXwGffUzrM7)
- To delete a single device, click the row of the device you want to delete on the Devices screen.The right-side area opens with the selected device's information.
- At the bottom of the right-side area, click [Delete].
- A confirmation dialog appears. Click [OK] to delete the device.
- On success, "Successfully deleted." is shown.
- To delete several devices at once, click the multi-select icon at the top of the device list.The list switches to selection mode and a [Delete] button appears at the top.
- Select the devices you want to delete.The selected devices are displayed as selected in the list.
- Click [Delete] at the top of the list.
- A confirmation dialog appears. Click [OK] to delete the selected devices.
- On success, "Successfully deleted." is shown and the list returns to its default view.
Settings
This section explains how to manage the settings required to operate Hub.
Exploring the Settings Screen
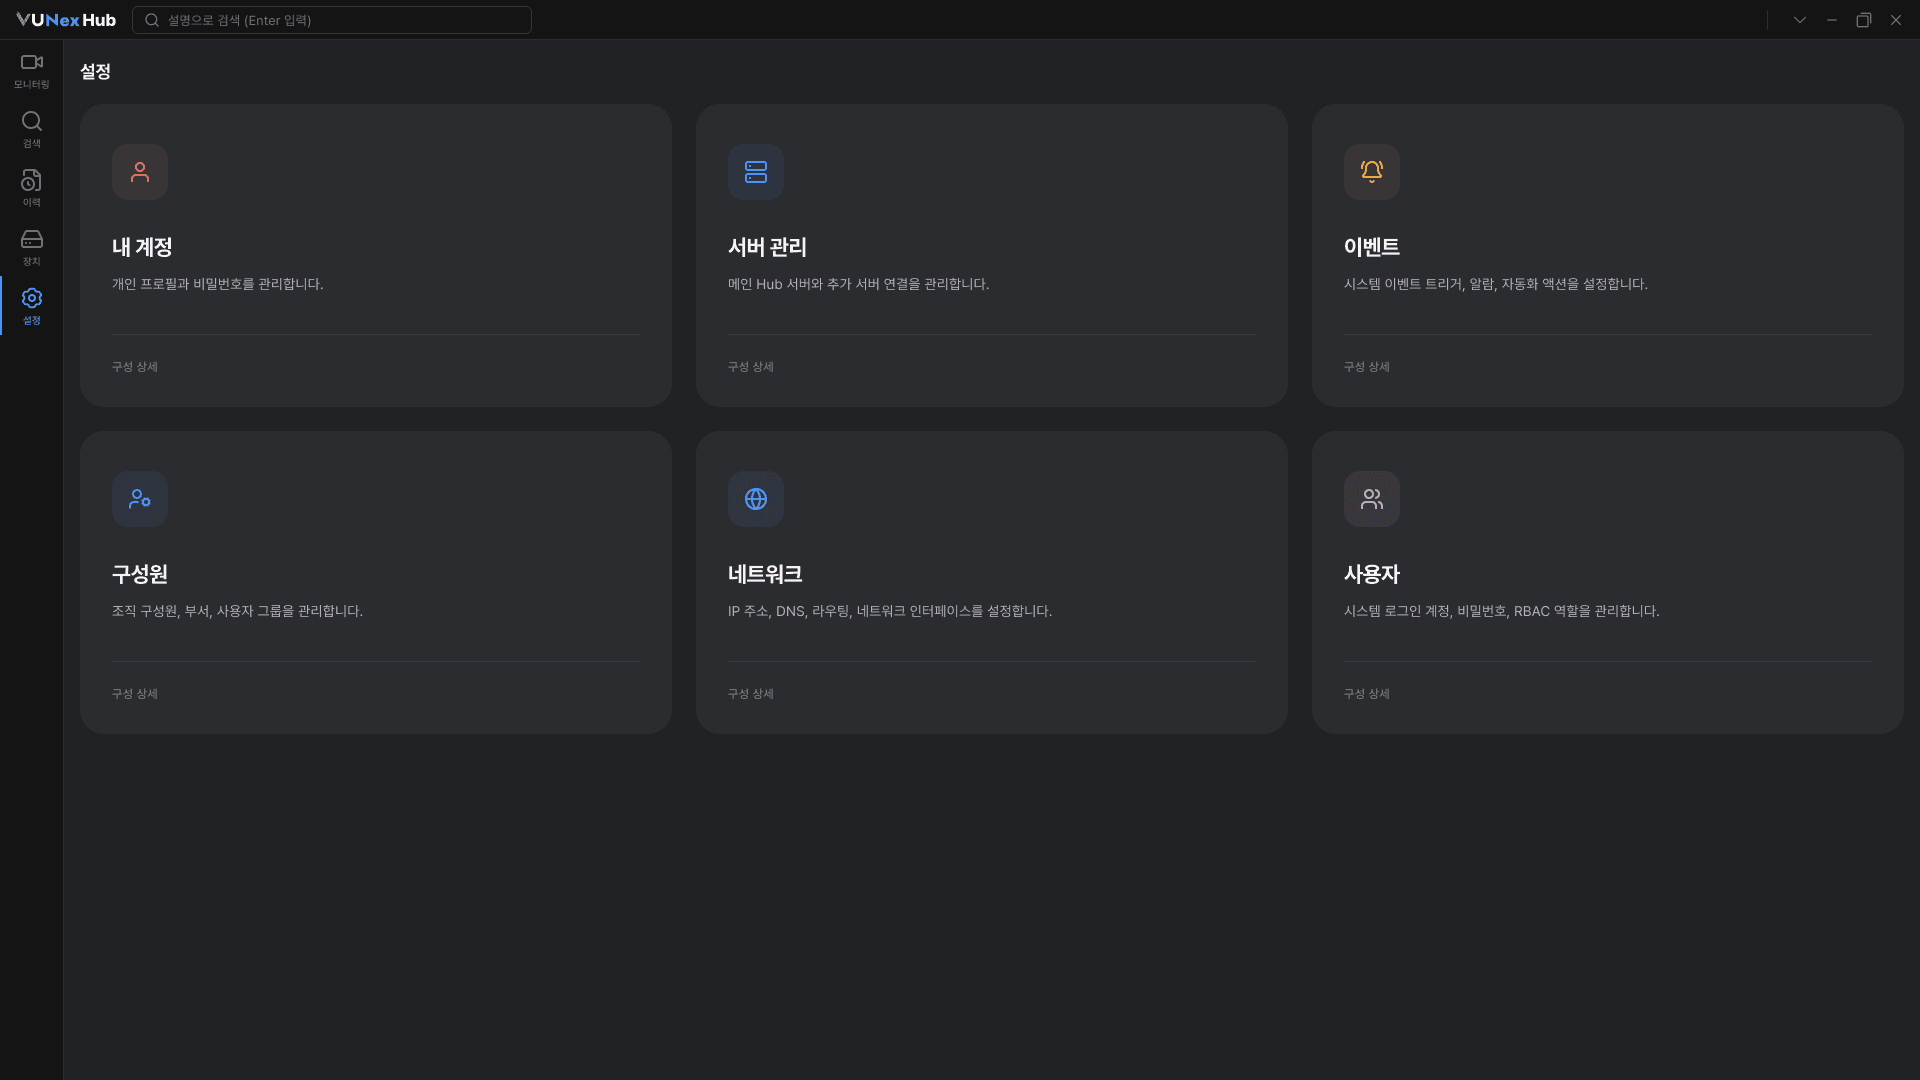
- In the left menu, click [Settings].The available settings items appear as cards.
- Click the card of the settings item you want.You move to the selected settings screen.
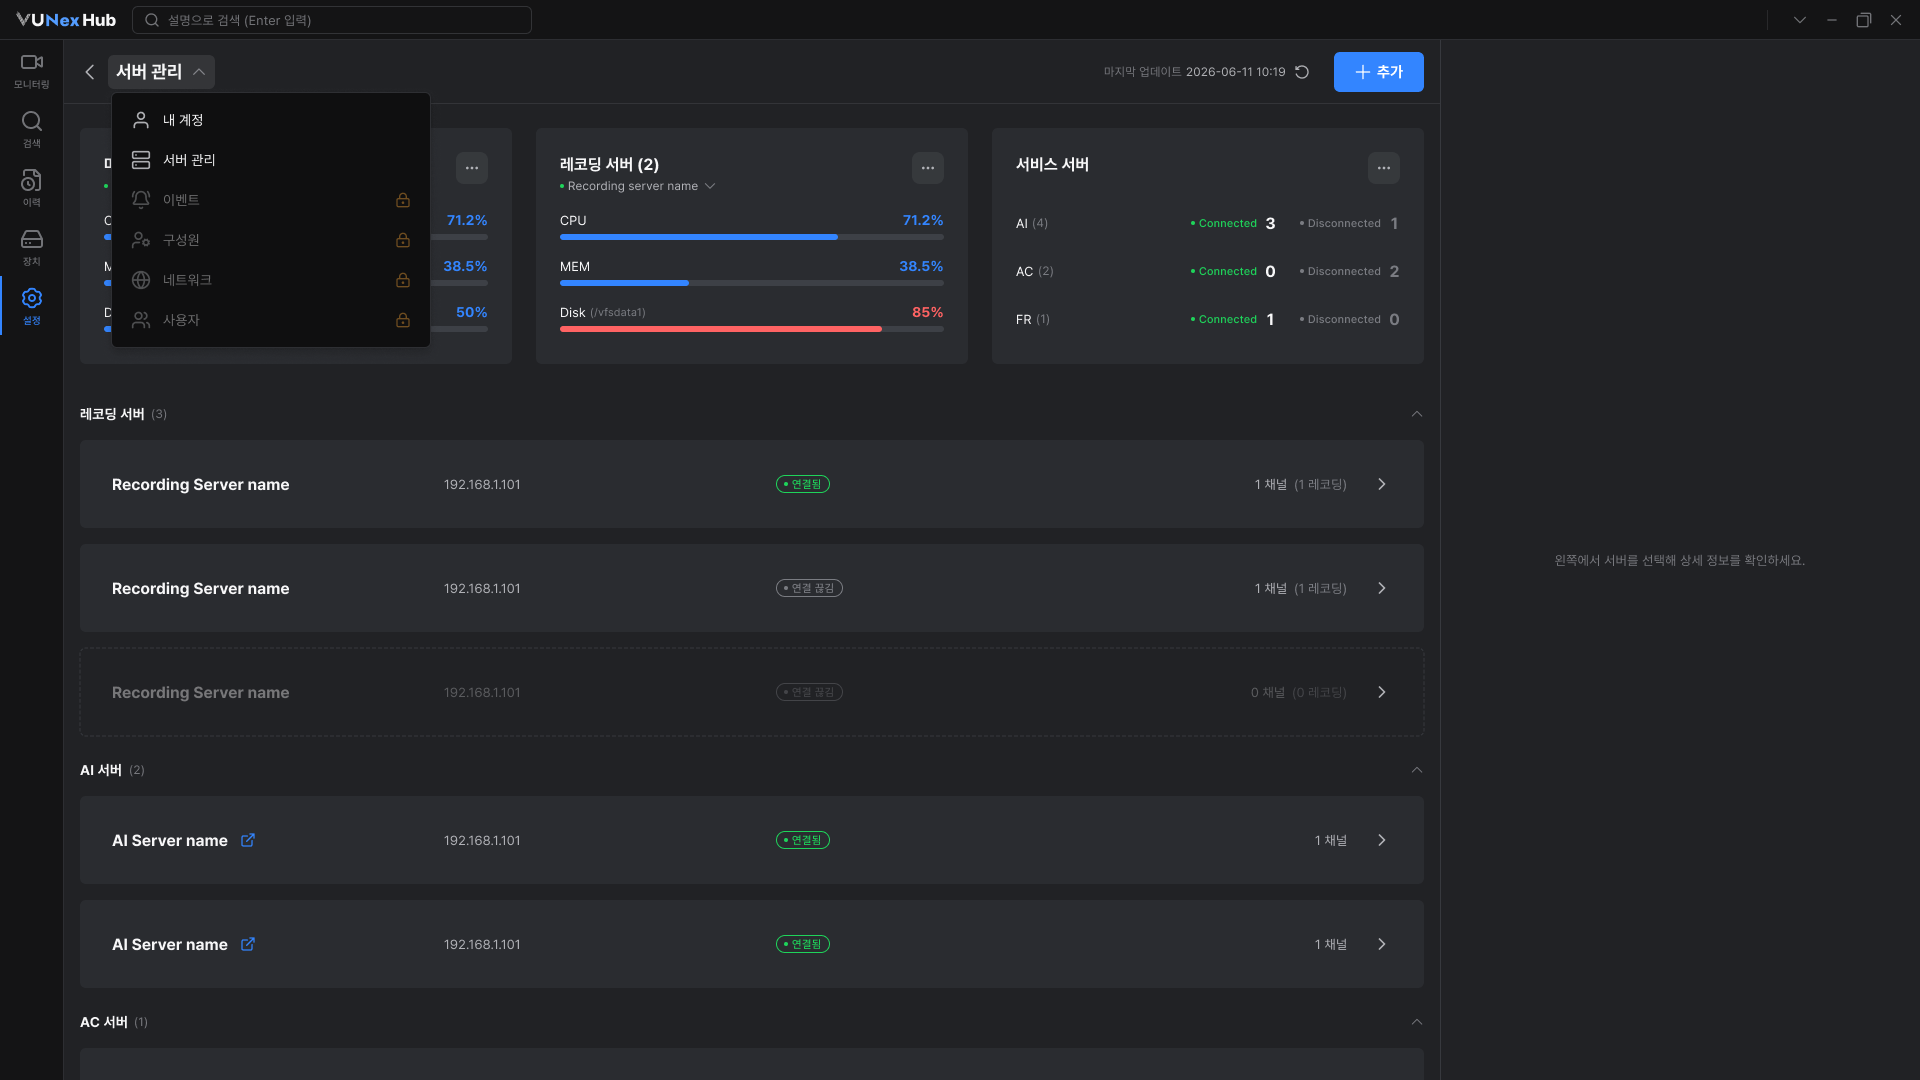
- To move to another item, click the settings name at the top of the screen.You can switch to another item without leaving the Settings screen.
Checking the Server List
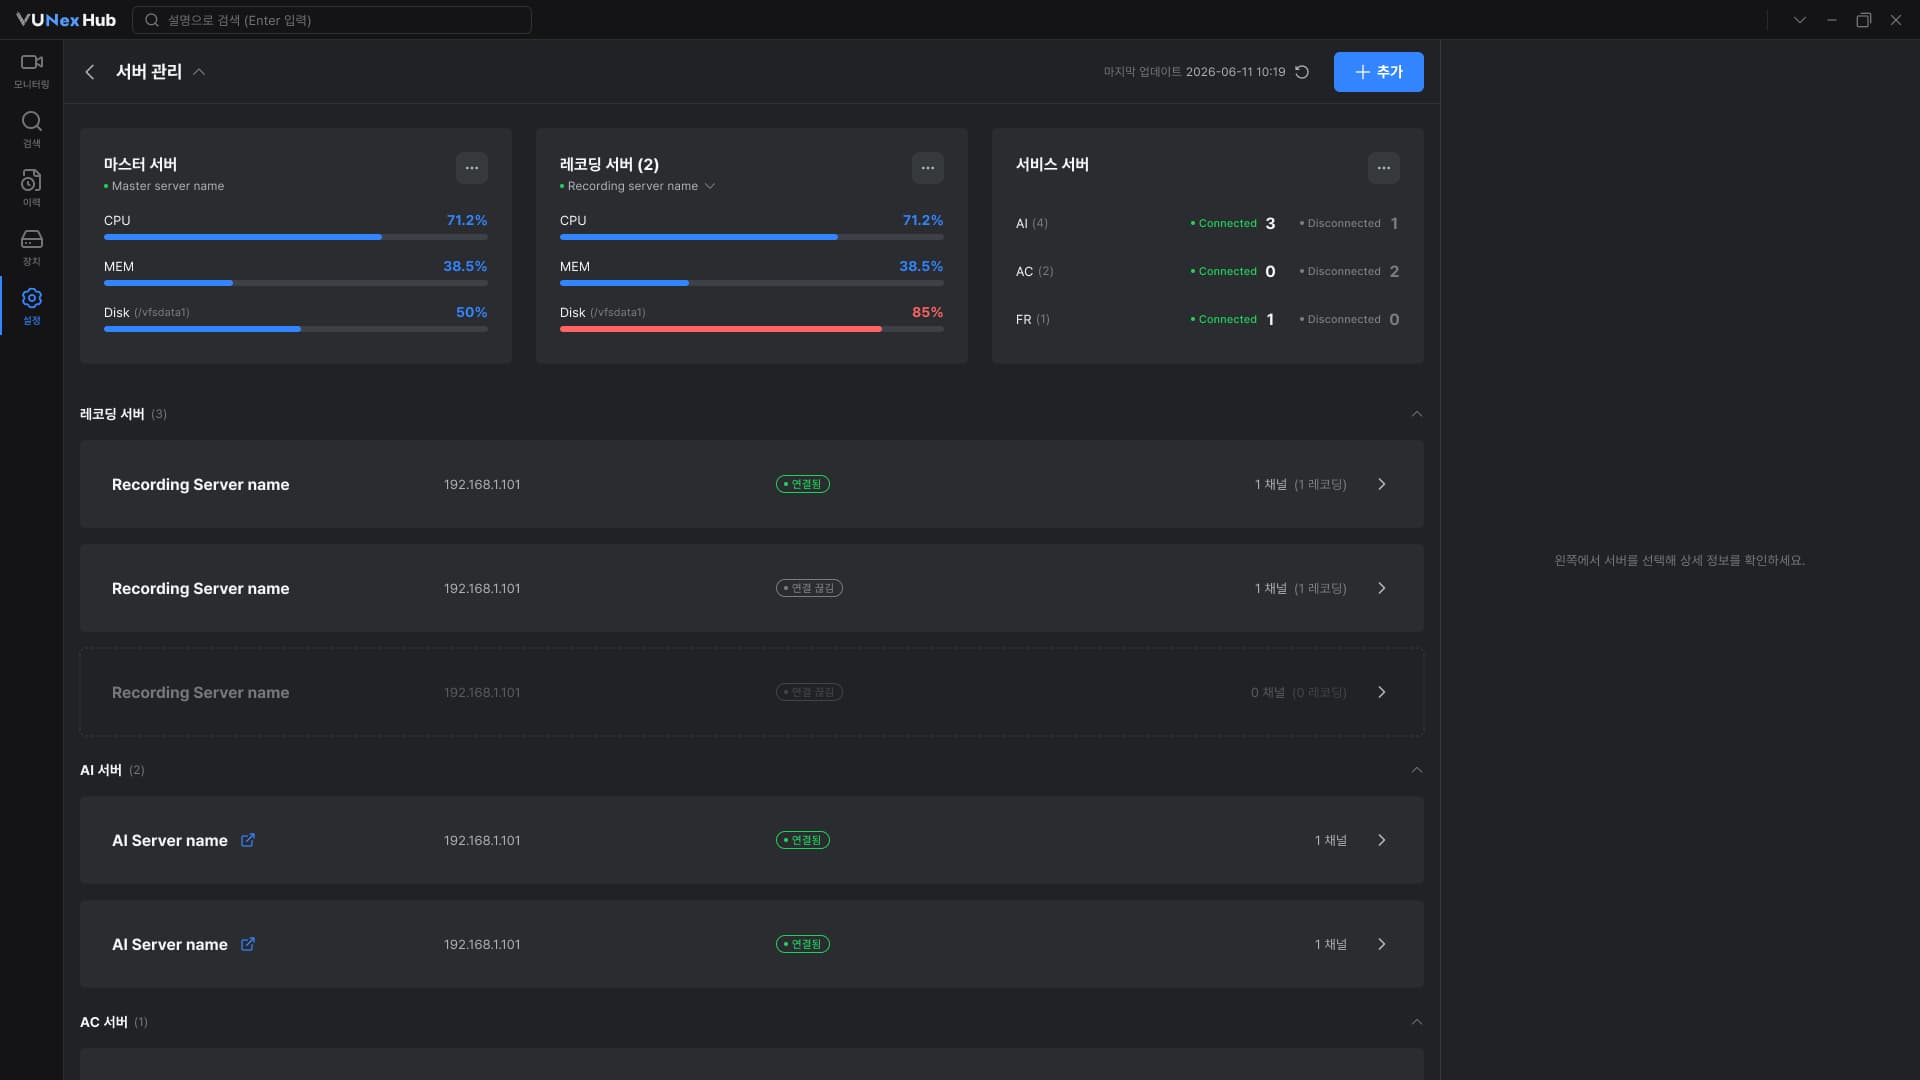
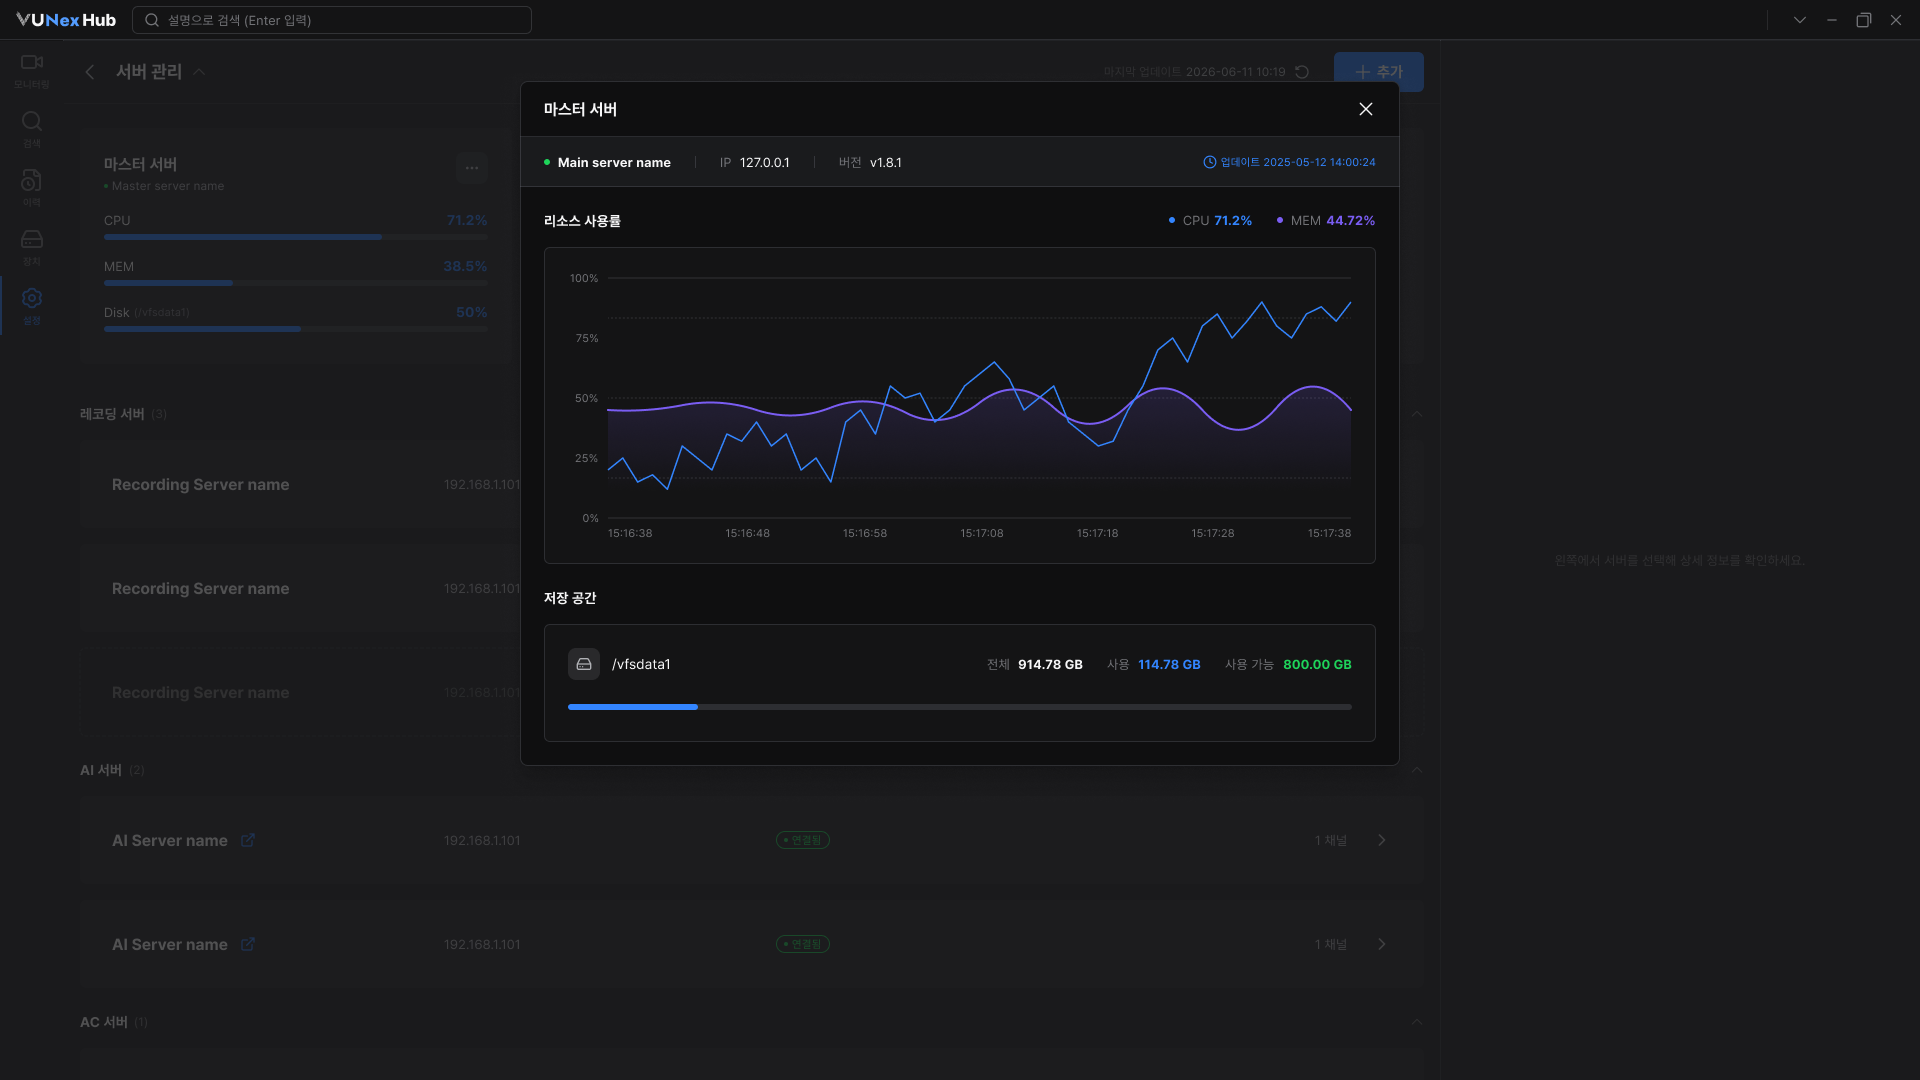
- On the card of the server you want to inspect, click the more button (⋯).The selected server's resource utilization over time, store space, and other details are displayed.
- Click the [Web Page] icon in the AI, AC, or FR server list.You will be redirected to the login page for the selected server’s web page.
Adding a Server
![[캡처 필요: 서버 추가 창 — 서버 유형 선택 + 입력 폼]](/_next/image?url=%2Fmanual%2Fvunexhub%2Fimages%2F1781585253687_Server_Management_Add_server_ko.png&w=1920&q=75&dpl=dpl_9dyqtFAdagPhFoBcUQXwGffUzrM7)
- Click [Add].The [Add Server] window opens.
- Select the type of server to add.Under [Server type], choose [AI Server], [FR Server], or [AC Server].
- Enter the server connection details.Enter the [Server name], [IP / Port], and [ID / Password]. For AC and FR servers, also enter the [Token].
- Click [Test connection] to verify the connection. (Optional)It checks whether the server connects with the entered details and shows the result right away. The test is recommended but not required to add the server.
- Click [Apply] to add the server.The added server appears in the server list.
Managing a Recording Server
![[캡처 필요: 레코딩 서버 상세·수정 패널]](/_next/image?url=%2Fmanual%2Fvunexhub%2Fimages%2F1781585486099_Server_Management_Recording_ko.png&w=1920&q=75&dpl=dpl_9dyqtFAdagPhFoBcUQXwGffUzrM7)
- In the [Recording Server] list, click the server you want to manage.The server's detail area opens. Under [General] and [Detail Information], you can review basic details such as the server name, IP, serial number, and version.
- Use [Enable Recording] to turn recording on or off.When recording is on, you can change the [Recording Operations] settings below.
- In [Auto Delete Threshold], select the auto-delete level.The current retained capacity is shown next to the selected level.
- Click [Assign Device] to assign the channels to record.In the [Assign Devices] window, search for and select devices, then click [Confirm Selection]. The change takes effect only after you click [Apply] in the panel.
![Click **[Assign Device]** to assign the channels to record.](/manual/vunexhub/images/1781585827780_Server_Management_Recording_Assign_Devices_ko.png)
- Click [Apply] to save your changes.Your changes are applied to the server.
- Turning off [Enable Recording] stops recording for all channels assigned to this server.
- When the auto-delete level is reached, the oldest recordings are deleted automatically and cannot be recovered.
- Recording servers cannot be added or removed from this panel; you can only change their connection and recording settings.
- If you move a device that is assigned to another recording server, a confirmation window appears, and the previous recordings remain intact.
Deleting a Server
![[캡처 필요: 서버 삭제 확인 다이얼로그 (Delete server?)]](/_next/image?url=%2Fmanual%2Fvunexhub%2Fimages%2F1781585979793_Servermanagement_Delete_ko.png&w=1920&q=75&dpl=dpl_9dyqtFAdagPhFoBcUQXwGffUzrM7)
- In the detail panel of the AI, FR, or AC server you want to delete, click [Delete].The [Delete server?] confirmation window opens.
- Click [OK] to delete the server.The server is deleted and removed from the list. To keep the server, click [Cancel] instead.
- Deleting a server permanently erases all associated data except logs, and cannot be undone.
- Deleting an AC server also removes its terminals and doors from the [Device] menu and unlinks the connected cameras.
- Deleting an AI or FR server automatically disables the AI features on the channels connected to that server.
Managing Your Account
![[캡처 필요: 내 계정 화면 (프로필·보안)]](/_next/image?url=%2Fmanual%2Fvunexhub%2Fimages%2F1781586360305_My_Account_ko.png&w=1920&q=75&dpl=dpl_9dyqtFAdagPhFoBcUQXwGffUzrM7)
- In [Settings], click [My Account].Under [Profile], you can see your [ID] and [Role]. Both are read-only, and your role is assigned by an administrator.
- Edit your [Display Name], then click [Apply].Your new display name is saved.
- To change your password, click [Change] under [Security].The [Change Password] window opens.
Changing Your Password
![[캡처 필요: 비밀번호 변경 창]](/_next/image?url=%2Fmanual%2Fvunexhub%2Fimages%2F1781586417424_My_Account_Change_Password_ko.png&w=1920&q=75&dpl=dpl_9dyqtFAdagPhFoBcUQXwGffUzrM7)
- Enter your [Current Password].Use the show/hide icon in each field to check the password you typed.
- Enter your [New Password] and [Confirm Password].Each [Password Policy] item is checked automatically once you meet it. If the two passwords do not match, a message appears.
- Click [Apply] to change your password.Your password is changed and the window closes. If your current password is incorrect, the change is not applied.
Release Notes
This section covers what changed in each version of VUNex Hub and what to check before you upgrade. The versions currently provided are pre-release versions, and their version numbers include the build date.
Before You Upgrade
This page lists the items that require action when you upgrade, together with the version in which each change was introduced.
Items are kept here permanently, so if you are skipping several versions, review every item that applies to you.
- [Sign In] From 0.1.1-260723, you must change the password when you sign in with the default administrator account for the first time. No other feature is available until the change is complete.
- [Monitoring] From 0.1.1-260713, hardware decoding is disabled by default. To use hardware decoding, specify the number of hardware decoding channels in the settings file.
- [Settings] From 0.1.1-260727, recording cannot be enabled on a recording server that has no store space in use. After upgrading, open the recording server details and make sure a store space is mounted and in use.
- At least 10 characters
- At least one uppercase letter, one lowercase letter, one number and one special character
- The same letter or number cannot be repeated three or more times in a row
- Cannot contain a string of three or more characters that matches the account ID
- Cannot contain four or more consecutive keyboard characters or numbers, in either direction
0.1.1-260727 (2026-07-27)
- This release extends video control on the monitoring screen and adds store space management for recording servers.
- Live video now supports per-cell rotation and dewarping, AI display options and layouts of up to 100 cells, and the sign-in screen adds password reset and legal notices.
- New Features
- [Settings] You can manage store spaces from the recording server details. Set up a disk automatically or mount and unmount it, and partitions used by the system are shown separately.
- [Sign In] You can reset your password from the sign-in screen and review the privacy policy and terms of use. The server address and port are validated as you type.
- [Monitoring] You can rotate and flip video per cell, and apply dewarping to fisheye cameras in single, panoramic or quad view. The settings you apply are saved with the layout.
- [Monitoring] You can select an area inside a cell and display it magnified in another cell.
- [Monitoring] Right-click a cell to run cell actions such as zoom, full screen, playback and PTZ.
- [Monitoring] You can show or hide AI detection zones and unanalyzed areas.
- [Monitoring] Layouts with 25, 36, 64 and 100 cells are available.
- [Monitoring] You can specify the number of channels that use hardware decoding in the settings file. Each cell shows whether hardware or software decoding is in use.
- [Monitoring] You can specify in the settings file which layouts use the primary stream.
- Improvements
- [System] The size and header of the main dialogs are now consistent. Dialogs no longer close when you press the Esc key or click outside them; use the close or cancel button instead.
- [Monitoring] AI, face recognition and access control tags bound to an unavailable server can no longer be selected in the tree.
- [Device] When you add a stream, the stream name and address are filled in automatically.
- [Device] Disabling a device also releases its AI, face recognition and access control integrations.
- [Device] A door name on an access control device is limited to 50 bytes.
- [Settings] A manual refresh button has been added to the server details.
- Fixed Issues
- [Monitoring] Fixed an issue where video did not appear after signing out and signing in again.
- [Monitoring] Fixed an issue where the magnified view of a previous cell remained after a cell was replaced by dragging a device from the tree.
- [Monitoring] Fixed an issue where detection boxes and real-time events were shown for the wrong device when multiple recording servers were in use.
- [Monitoring] Fixed an issue where rotated or dewarped video flickered when a cell was magnified or shown in full screen.
- [Playback] Fixed an issue where recorded video of some channels did not play when multiple recording servers were in use.
- [Device] Fixed an issue where AI and face recognition analysis kept using the previous channel after a channel was reassigned.
- [Device] Fixed an issue where the resource tree was not refreshed after a device was added or deleted.
- [Settings] Fixed an issue where the swap partition used by the system was shown as an unmounted disk.
0.1.1-260616 (2026-06-16)
This release adds the settings and device management screens, so you can register servers, add devices and configure recording schedules from the client.
On the playback screen, reverse playback and timeline event markers let you reach the moment you need faster, and you can search for a person from a face image.
- New Features
- [Settings] A settings screen has been added where you can register recording, AI, face recognition and access control servers and check their connection status. Add a server through ONVIF auto scan or by entering the information directly, then assign devices to the registered server.
- [Settings] You can open a server's web configuration page from Server Management. On Linux, the page opens in the system browser.
- [Settings] You can change your user information and password on the My Account screen.
- [Device] You can add a device through ONVIF auto scan or by entering the information directly. The device screen shows the licensed quantity, and devices beyond the limit cannot be added.
- [Device] You can edit the recording schedule and retention period for each channel, and copy a schedule you have configured to other channels.
- [Device] You can add and edit device streams.
- [Device] You can link a camera to a door on an access control device. Video from the linked camera plays directly from the access event details.
- [Monitoring] A cell where an event occurs is highlighted with a border.
- [Playback] You can play recorded video in reverse.
- [Playback] AI, access control and face recognition events appear on the timeline in different colors, and hovering over the timeline shows the corresponding time. Select an event type to view the event timetable.
- [Playback] You can save the current view as an image.
- [Playback] You can select an area on the playback screen to search for a similar person.
- [Search] You can search for a person using a face image.
- [Search] For AI image search, you can drag and drop or paste an external image.
- Improvements
- [Playback] Entering and leaving full screen has changed. Double-click the video to switch to full screen and press the Esc key to leave it.
- [Playback] Playback stops at a gap in the recording and a message prompts you to move to the next segment.
- [Playback] The calendar marks the dates that have recordings, and only those dates can be selected.
- [Monitoring] When a tree search returns no result, a message is shown.
- [Monitoring] Selecting Select in Tree from the cell menu moves the corresponding device to the center of the tree and highlights it.
- [Monitoring] You can resize the resource tree and the event panel.
- [Settings] Actions that cannot be used are disabled according to the server status.
- [Device] If you move to another item while changes to a device or server are unsaved, a confirmation dialog is shown.
- [Device] The default stream transport protocol is now TCP when you add a device.
- Fixed Issues
- [Search] Fixed an issue where the program closed when the search tab was clicked.
- [Playback] Fixed an issue where the play button state did not match the actual playback state after the time was changed.
- [Playback] Fixed an issue where recording dates were shown incorrectly.
- [Monitoring] Fixed an issue where assigning a camera by double-click overwrote the existing layout.
- [Monitoring] Fixed an issue where an empty page remained after all cells were unassigned.
- [Device] Fixed an issue where the active channel license usage was not updated after a device was changed.
- [Device] Fixed an issue where a period could not be entered in a device name.
- [System] Fixed incorrect translations on some screens.
Offices and Technical Support
Contact us for questions about a release or for technical support.
- Headquarters: 서울특별시 금천구 디지털로 9길 47, 9층·11층 (가산동, 한신IT타워 2차)
- Anyang Center: 경기도 안양시 동안구 시민대로 109번길 62
- Email: sales_division@innodep.com
- Fax: 02-6336-3368
- Call center: 1661-6806 (24 hours, all year round)