VUNex Link
User Manual
Menu configuration may vary or some features may not be supported depending on the product version.
Table of Contents
Document Information
Installation and Sign In
This section explains how to install the VUNex Link app, sign in, and manage your account.
Installing the app
- Download the app from the app store for your device.
- iPhone : Search for 'VUNex Link' on the App Store and download it. Requires iOS 15.6 or later.
- Android : Search for 'VUNex Link' on Google Play and download it. Requires Android 7.0 or later.
- Install the app.When the installation is complete, the VUNex Link icon appears on your home screen.
Before you start
- Your account must be activated.Your account must be activated by your company administrator on VUNex Cloud. If it is pending approval, you cannot use the app.
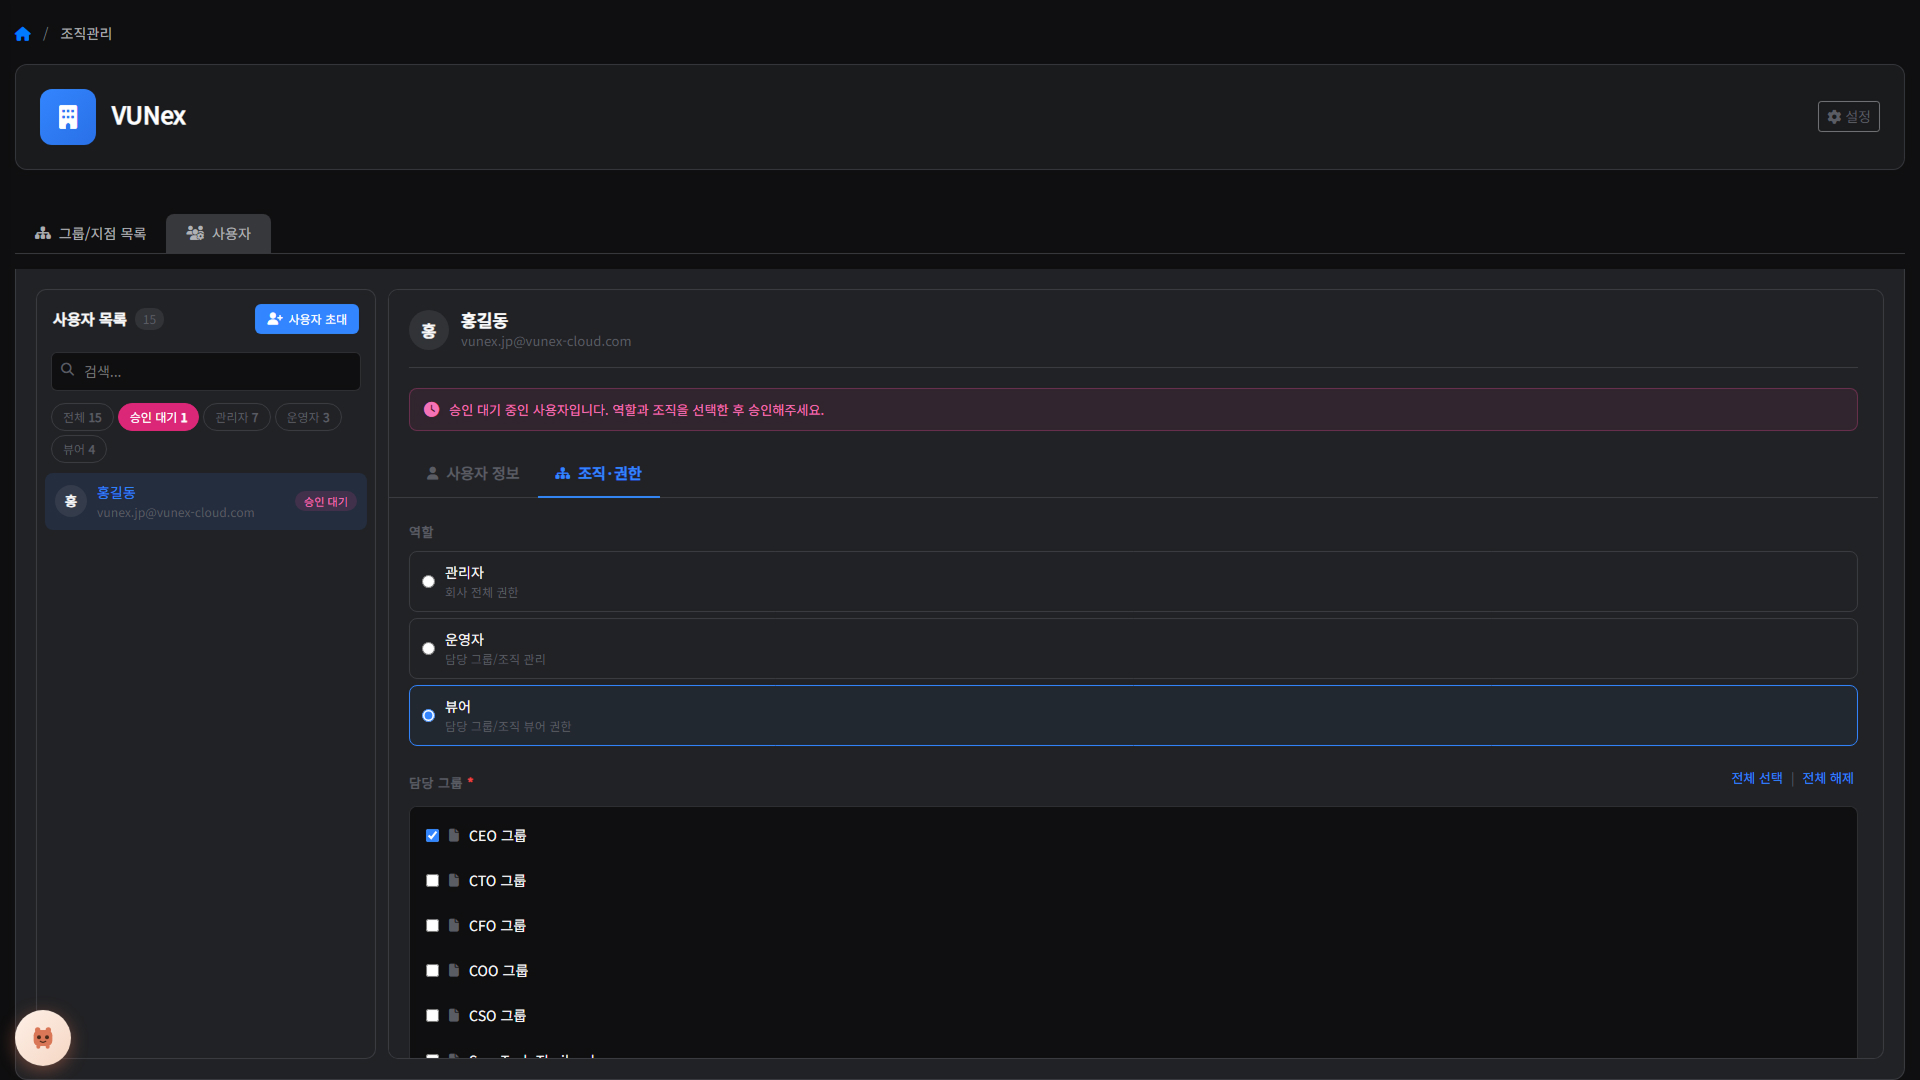
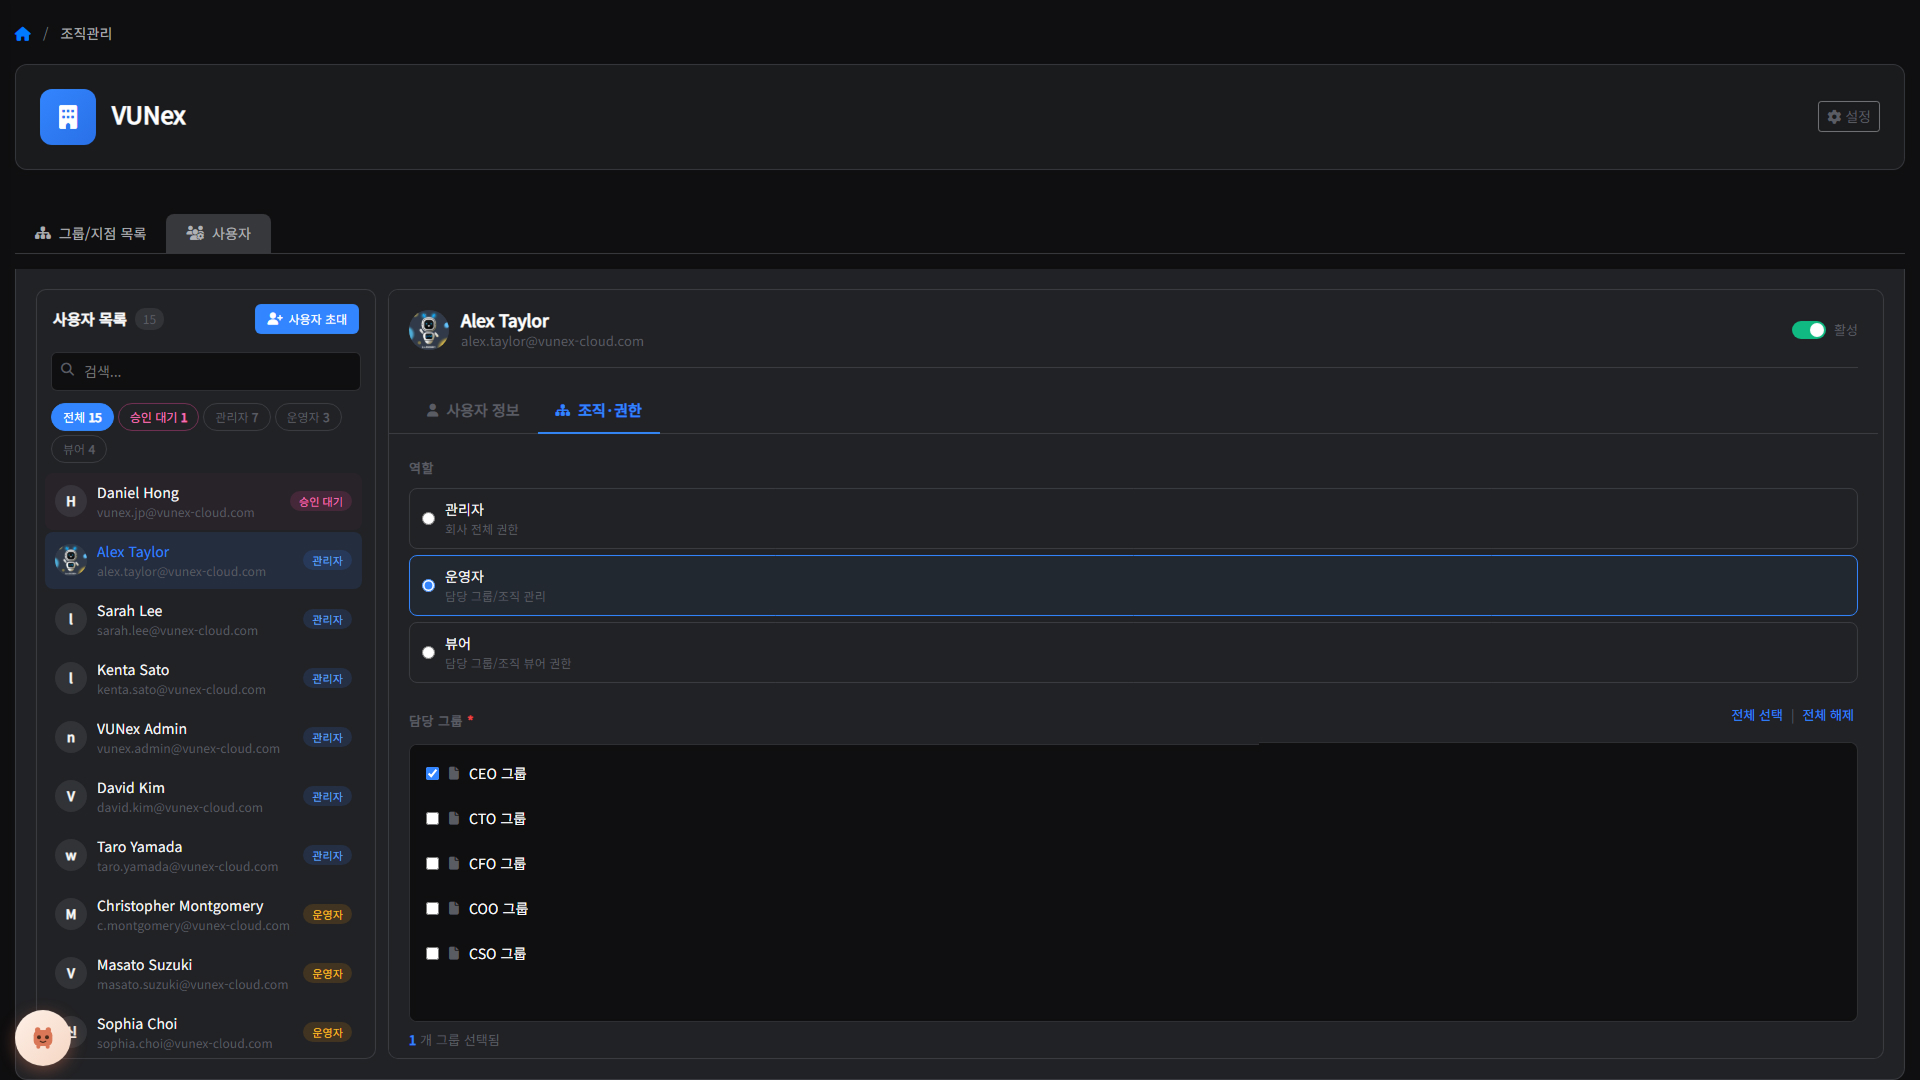
- A role and groups/branches must be assigned.Your role (Manager, Operator, or Viewer) and the groups/branches you are in charge of must be assigned to your account. Managers can access all groups/branches; operators and viewers can access only their assigned groups/branches.
Signing in
- Allow notifications when you first launch the app.When you launch the app for the first time, a notification permission request appears. You must allow it to receive event push notifications.
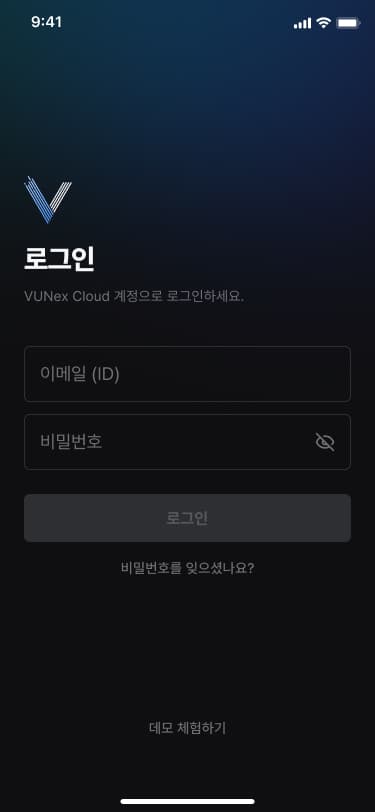
- Enter your account information.
- [Email (ID)] Enter your VUNex Cloud email (ID).
- [Password] Enter your password.
- Tap [Sign In].You sign in to the VUNex Link app.
- When you launch the app, an intro screen appears and then the Sign In screen opens. If your sign-in is still active, the app goes directly to the Home screen, and you need to sign in again when the session expires.
- Automatic sign-in is not supported; your session is kept for at least 30 days, and you only need to sign in again after it expires.
- Tap [Try Demo] to use demo mode without an account and try out the features.
Resetting your password
- Tap [Forgot password?].
![Tap **[Forgot password?]**.](/manual/vunexlink/images/Sign_main_ko.jpg)
- Enter your [Email].Enter your VUNex Cloud email (ID).
![Enter your **[Email]**.](/manual/vunexlink/images/Sign_password_ko.jpg)
- Tap [Send].A verification email is sent to the email you entered.
- Enter the [Verification Code].Enter the 6-digit verification code sent to your email.
![Enter the **[Verification Code]**.](/manual/vunexlink/images/Sign_email_ko.jpg)
- Tap [Apply].After verification is complete, you go to the new password setup screen.
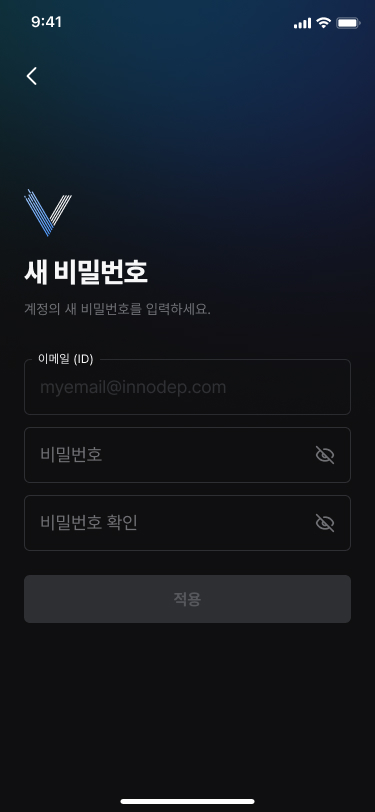
- Set your new password.
- [Password] : Enter a new password. It must be 10–30 characters long with no spaces, must include letters, numbers, and special characters, and cannot include the same character 3 or more times in a row.
- [Confirm Password] : Enter the password again.
- [Apply] : Completes the password change and goes to the Sign In screen.
Resolving sign-in problems
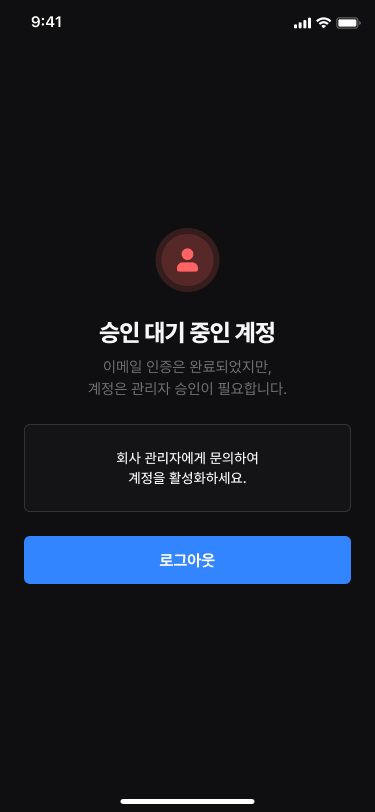
- When your account is pending approvalYour sign-up is pending approval on VUNex Cloud. Please contact your company administrator to request approval.
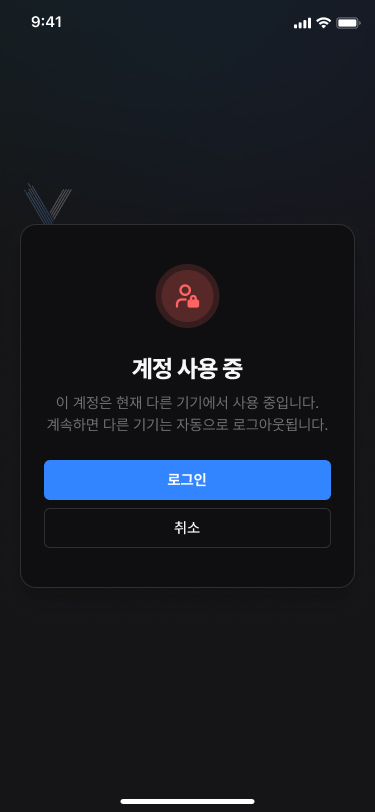
- When the account is in use on another deviceThe same account is already in use on another mobile device. Only one mobile device can be signed in per account. Tap [Sign In] to sign out of the other device and sign in on the current one. Tap [Cancel] to cancel the sign-in.
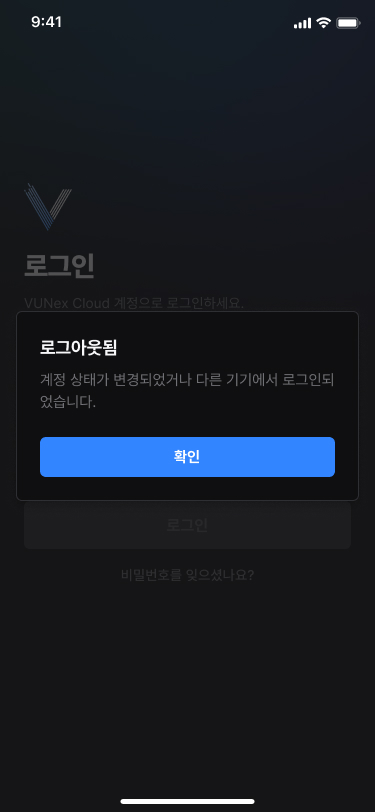
- When you are signed out by another device's sign-inYou are automatically signed out when the same account signs in on another device or when the session expires. Tap [OK] to go to the Sign In screen.
Events
Check and respond to all events detected by VUNex (AI, AC, FR) and User Events created by users, in a real-time feed.
Viewing the event list
![[이미지 교체: 이벤트 목록 — User 탭 + 보관함 아이콘 노출]](/_next/image?url=%2Fmanual%2Fvunexlink%2Fimages%2FEvent_main_ko.jpg&w=1920&q=75&dpl=dpl_9dyqtFAdagPhFoBcUQXwGffUzrM7)
- Tap [Events] in the bottom navigation bar.The Events screen opens.
- Tap [All Group/Branch].You can view events from a specific group or branch only.
- Tap the event type you want to view.
- [All] : View all types of events, including resolved ones.
- [Unresolved] : View only events that still need action.
- [AI], [AC], [FR] : View only AI analysis, access control, or face recognition events, respectively.
- [User] : View only User Events created by users.
- Check the information you need.
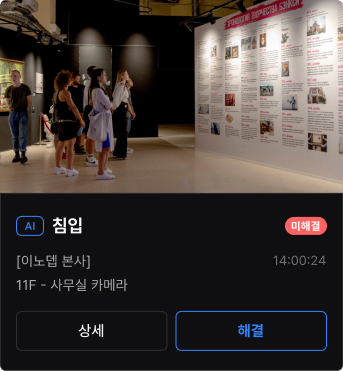
- [Event Type] : The badge at the top left of the card shows the event type (AI/AC/FR/User).
- [Event Info] : The video or image from the time of the event is shown, along with the group/branch, camera (or door), and time of occurrence.
- [Status Badge] : Shows the current processing status of the event (Unresolved, etc.).
- [Details] : Tap the button to open the event detail screen.
- [Resolve] : Tap the button to resolve the event. Available for AI events and User Events registered as requiring resolution.
Searching for events
- Tap [Search] at the top right of the Events screen.The search screen opens with the input field automatically focused.
- Enter a search term.You can search by event name, group/branch name, camera name, or door name. Face recognition (FR) events can also be searched by user name.
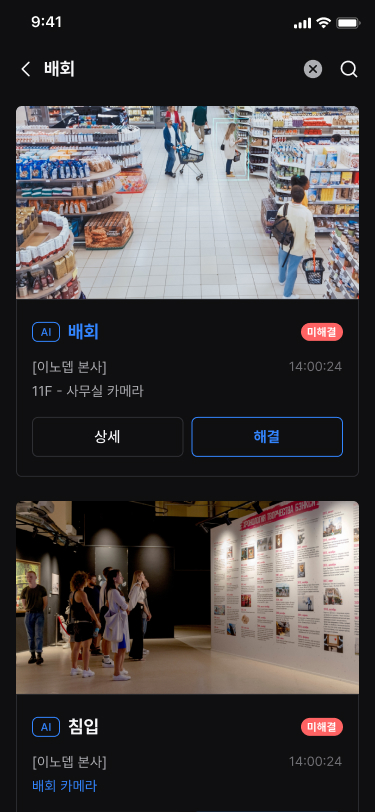
- Check the search results.Events matching the search term are shown as a list of cards.
Resolving an event
Check the situation of an event, record the classification and response action, and change it to resolved.
- Tap [Resolve] on the event list or detail screen.The event resolution screen opens.
- Select a classification or response action for the event.
- [Classification] : Make a final judgment on the nature of the event. Select either [No Action Required] or [False Alarm].
- [Response Action] : Record the actions actually taken. You can select multiple options among [On-site Check], [External Coordination], [Warning Broadcast], and [Others].
- [Classification] and [Response Action] cannot be selected together; selecting one automatically clears the other.
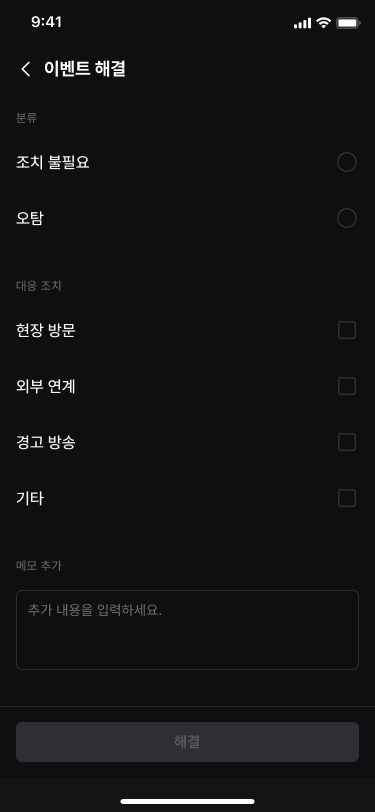
- If needed, enter additional details in [Add Notes].Enter any additional details you would like to include, such as on-site response details. If [Others] is selected, a note is required. If only a [Note] is entered, you must select either [Classification] or [Response Action].
- Tap [Resolve].The event changes to the resolved status. To return a resolved event to the unresolved status, see 'Reopening an event.'
- To resolve everything at once, tap [Resolve All].All unresolved events in the list are resolved at once.
![To resolve everything at once, tap **[Resolve All]**.](/manual/vunexlink/images/Event_unresolved_ko.jpg)
Reopening an event
![[이미지 필요: 이벤트 다시 열기 화면 — 사유 입력 상태]](/_next/image?url=%2Fmanual%2Fvunexlink%2Fimages%2FEvent_reopen_ko.jpg&w=1920&q=75&dpl=dpl_9dyqtFAdagPhFoBcUQXwGffUzrM7)
- Tap [Reopen] on a resolved event in the list or on the detail screen.The 'Reopen Event' screen opens.
- Enter the [Reopen Reason].The [Reopen] button becomes active only after you enter a reason.
- Tap [Reopen].The event returns to the unresolved status, and the reason you entered is recorded in the activity log.
![Tap **[Reopen]**.](/manual/vunexlink/images/Event_reopen_page_ko.jpg)
Creating a User Event
![[이미지 필요: 사용자 이벤트 생성 화면 — 조치 필요 토글 노출]](/_next/image?url=%2Fmanual%2Fvunexlink%2Fimages%2FUserevent_main_ko.jpg&w=1920&q=75&dpl=dpl_9dyqtFAdagPhFoBcUQXwGffUzrM7)
- Tap [Add] at the bottom right of the Events screen.The 'New User Event' screen opens. If you belong to multiple groups/branches, first select the group/branch to send the event to.
- Record or type the situation.
- [Tap to record] : Record your voice. The recording is automatically converted to text and entered in [Description(Auto)]. Tap [Tap to rerecord] to record again.
- [Type instead] : Type the description yourself. It is entered in [Description(Manual)].
- The description can be up to 250 characters.
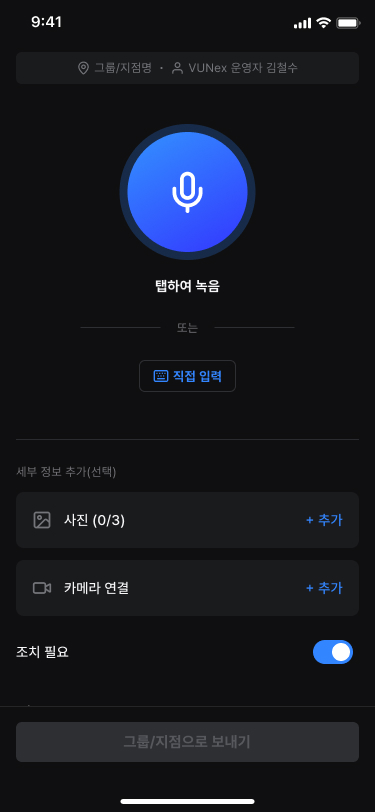
- If needed, attach information in [Add details (Optional)].
- [Photo] : Attach photos by taking a photo or choosing from the gallery.
- [Link camera] : Select and link a camera related to the situation. The linked camera can be viewed as live video on the event detail screen.
- If other members need to take action, turn on [Requires resolution].The [Resolve] button is shown only for events registered with [Requires resolution] turned on. It is on by default.
- Tap [Send to Group/Branch].The event is registered for the selected group/branch, and a push notification is sent to its members. No notification is sent to yourself.
![Tap **[Send to Group/Branch]**.](/manual/vunexlink/images/Userevent_add_ko.jpg)
Managing User Events
- Tap [Details] on a User Event in the list.Tap [User] in the event type filter to view User Events only. On the detail screen, you can play the recorded voice and check the description, photos, linked camera, and [Creator].
- To resolve the event, tap [Resolve].This button is shown only for events registered with [Requires resolution]. Managers and operators of the same group/branch can resolve or reopen the event. The [False Alarm] classification is not provided on the resolve screen for User Events.
- To delete the event, tap [Delete] at the top right of the screen.Only the person who created the event can delete it, and a deleted event cannot be recovered.
![To delete the event, tap **[Delete]** at the top right of the screen.](/manual/vunexlink/images/Userevent_detail_ko.jpg)
Event details
- Tap [Details] for the event you want in the list.The event detail screen opens.
![Tap **[Details]** for the event you want in the list.](/manual/vunexlink/images/Event_main_ko.jpg)
- Check the event screen.For AI events, the recorded video from the time of the event is shown. Touch the screen to play/pause or move the position. For access control (AC) and face recognition (FR) events, an image from the time of the event is shown instead of video. For the User Event detail screen, see 'Managing User Events.'
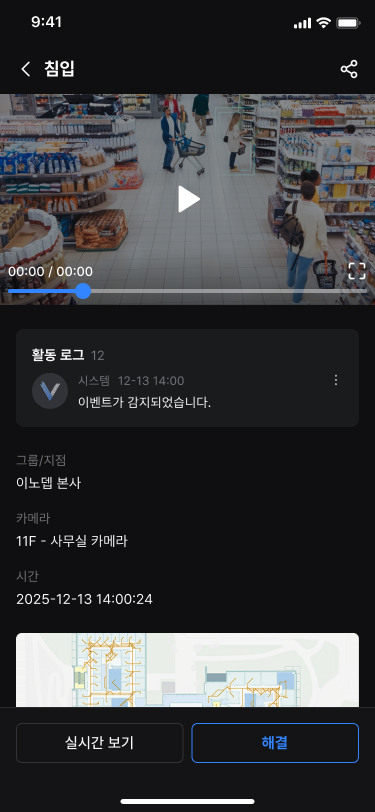
- Check the detailed information.
- [Activity Log] : Check the processing history of the event.
- [Group/Branch], [Camera] or [Door], [Time] : Check where and when the event occurred.
- Depending on the event type, additional details such as user, user group, user type, and device are also shown.
- If a map is registered, the location of the event is shown on the map.
- To share the event, tap [Share] at the top right of the screen.You can share event information with users in your company by email. For details, see 'Sharing an event.'
Event history
- Tap [Activity Log] below the video or image.View the full history in chronological order, from event detection to user activity.
![Tap **[Activity Log]** below the video or image.](/manual/vunexlink/images/Event_activitylog_ko.jpg)
- To add a comment, enter text in the input field at the bottom and tap [Send].The comment you entered is recorded in the activity log. You can also tap [Attach] next to the input field to attach a photo.
- To record by voice, tap [Mic] on the right of the input field.Tapping the mic starts recording; tapping [Stop] ends the recording and adds it to the activity log. The voice message is automatically converted to text and saved together.
![To record by voice, tap **[Mic]** on the right of the input field.](/manual/vunexlink/images/Event_activitylog_recording_ko.jpg)
- You can delete comments or voice messages you created from [More].Tap [More] on the right of the item, select Delete, and confirm to remove the item.
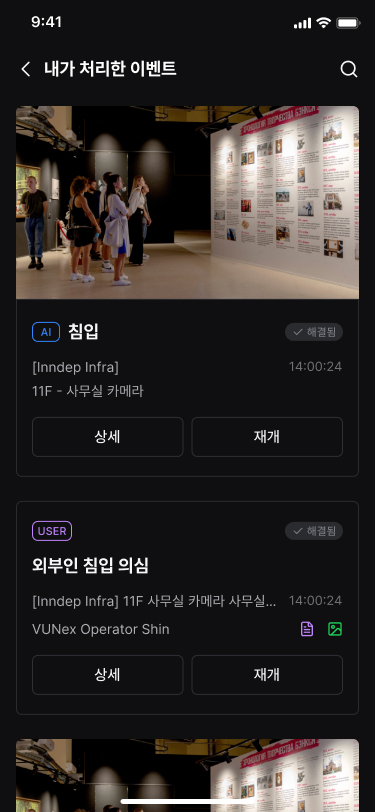
Viewing events you resolved
- Tap the [Archive] icon at the top right of the Events screen.The 'Resolved by me' screen opens, showing a list of the events you resolved.
- To find an event, tap [Search] and enter a search term.You can search by event name, group/branch name, camera name, or door name. The matching text in the results is highlighted.
- Check the event you want in the list.Tap [Details] to open the event detail screen, or tap [Reopen] to return the event to the unresolved status.
Sharing an event
![[이미지 필요: 이벤트 공유 화면 — 디자인 완료 후 캡처]](/_next/image?url=%2Fmanual%2Fvunexlink%2Fimages%2FEvent_view_ko.jpg&w=1920&q=75&dpl=dpl_9dyqtFAdagPhFoBcUQXwGffUzrM7)
- Tap [Share] at the top right of the event detail screen.The screen for selecting recipients opens.
- Select the users to share with.You can search for users by name or email and select multiple users.
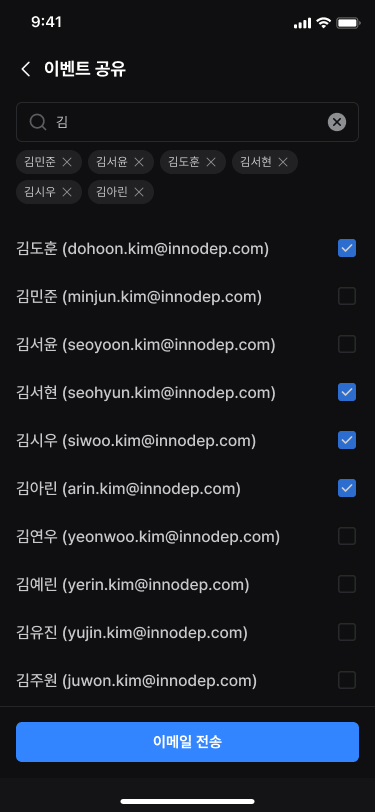
- Tap [Send Email].The event information is sent by email to the selected users.
Devices
등록된 장비의 연결 상태를 확인하고 실시간 영상을 모니터링합니다.
장비 목록 확인하기
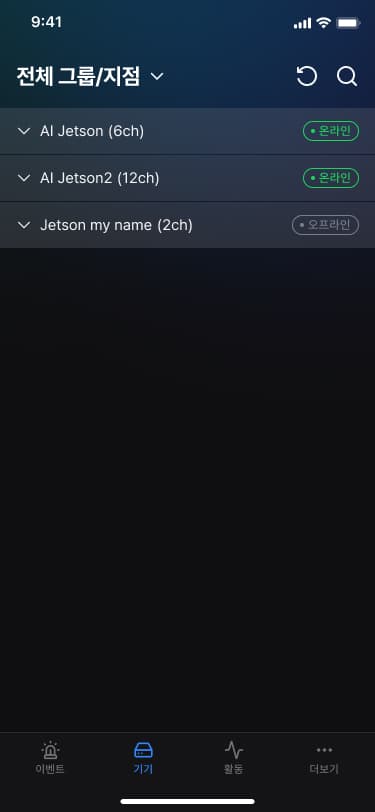
- [전체 그룹/지점]을 누르세요.원하는 그룹/지점에 속한 장비만 모아서 볼 수 있습니다.
- 장비를 눌러 카메라 목록을 확인하세요.목록에서 장비를 누르면 하단에 연결된 카메라 목록이 펼쳐집니다. 카메라 이름 옆의 아이콘을 통해 연결 상태를 확인할 수 있습니다.
- [Online] : 정상적으로 연결되어 모니터링 가능한 상태입니다.
- [Offline] : 네트워크 연결이 끊겨 영상을 확인할 수 없는 상태입니다.
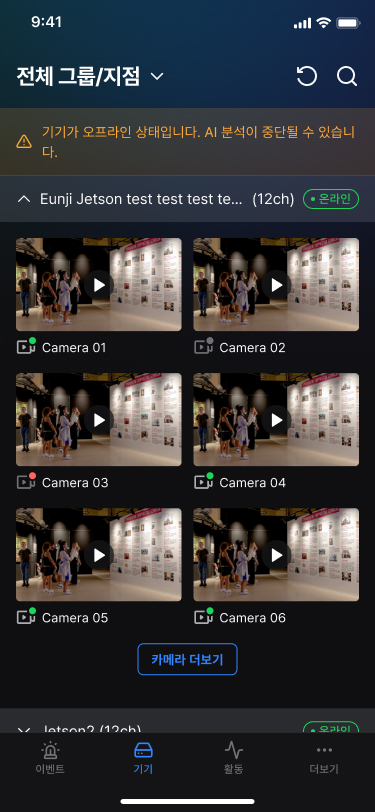
- 원하는 카메라를 선택하세요.섬네일 이미지를 통해 카메라의 화면을 미리 볼 수 있습니다. 목록에서 카메라를 누르면 상세 화면으로 이동합니다.
실시간 영상 확인하기
- 실시간 영상을 확인하세요.선택한 카메라의 현재 촬영 화면을 실시간으로 모니터링 합니다. 실시간 영상은 1분간 확인할 수 있습니다.
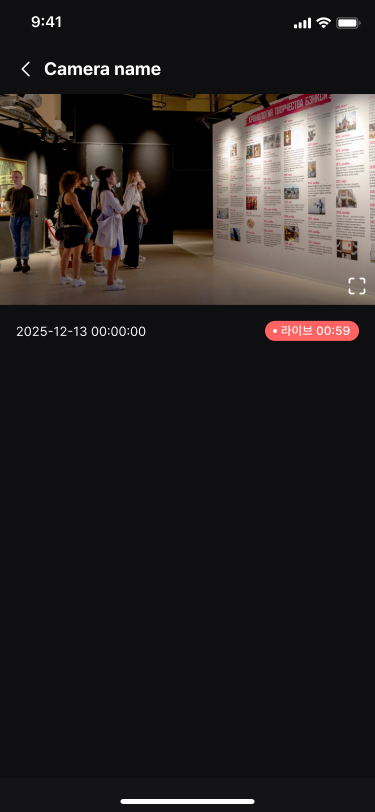
- 원하는 정보를 확인하세요.
- [시각] : 해당 카메라의 실시간 영상을 처음 재생한 시각을 나타냅니다.
- [잔여 시간] : 남은 실시간 영상 시청 시간을 확인합니다.
카메라 검색하기
- 상단의 [검색] 아이콘을 누르세요.검색 화면으로 이동합니다.
![상단의 **[검색]** 아이콘을 누르세요.](/manual/vunexlink/images/Device_default_ko.jpg)
- 검색어를 입력하고 [검색 버튼]을 누르세요.입력한 검색어가 포함된 카메라 목록을 표시합니다. 검색 결과가 없는 경우 "검색 결과가 없습니다" 메시지가 표시됩니다.
![검색어를 입력하고 [검색 버튼]을 누르세요.](/manual/vunexlink/images/Device_search_ko.jpg)
- 검색 결과에서 카메라를 선택하세요.검색된 카메라를 누르면 실시간 영상 화면으로 이동합니다.
Activity
View activities on events, such as status changes and comments, in a single feed and follow up without missing anything.
Viewing the activity feed
![[이미지 필요: 활동 메인 화면 — 전체/읽지 않음/내 활동/팀 탭 노출]](/_next/image?url=%2Fmanual%2Fvunexlink%2Fimages%2FActivity_main_ko.jpg&w=1920&q=75&dpl=dpl_9dyqtFAdagPhFoBcUQXwGffUzrM7)
- Tap [Activity] in the bottom navigation bar.The Activity screen opens.
- Tap [All Group/Branch].You can view activities from a specific group or branch only. It works the same way as on the Events screen.
- Tap the tab you want to view.
- [All] : View the entire activity list.
- [Unread] : View unchecked activities only, with the unread count badge.
- [My] : View activities related to what you did, such as someone reopening your resolution or commenting on your event.
- [Team] : View your team members' activities, such as resolving events or creating User Events.
- Check the information you need.Each item shows the user's avatar, nickname, group/branch, time, activity message, and content.
Checking activities and marking them as read
![[이미지 필요: 모두 읽음으로 표시 확인 알럿]](/_next/image?url=%2Fmanual%2Fvunexlink%2Fimages%2FActivity_unread_ko.jpg&w=1920&q=75&dpl=dpl_9dyqtFAdagPhFoBcUQXwGffUzrM7)
- Tap the activity you want to check in the feed.The activity log of the event opens, and the tapped item is highlighted for a moment. The blue dot on the right of an unread item disappears once you check it.
- To clear all unread activities at once, tap [Mark all as read].Tap [Mark all as read] at the top of the [Unread] tab, then tap [OK] in the confirmation dialog. All unread activities are marked as read.
Searching activities
![[이미지 필요: 활동 검색 화면]](/_next/image?url=%2Fmanual%2Fvunexlink%2Fimages%2FActivity_search_ko.jpg&w=1920&q=75&dpl=dpl_9dyqtFAdagPhFoBcUQXwGffUzrM7)
- Tap [Search] at the top right of the Activity screen.The search screen opens.
- Enter a search term.You can search by user nickname or activity text.
- Check the search results.Tap an activity in the results to open the activity log of the event.
More
Manage your account information and configure app settings such as notifications and theme.
Viewing the More menu
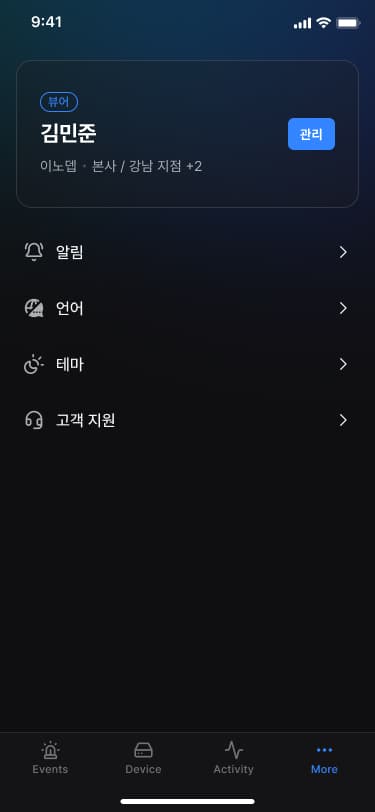
- Tap [More] in the bottom navigation bar.The More screen opens.
- Check the information you need.
- [Profile] : Check your user profile information.
- [Notifications] : Go to the push notification settings screen.
- [Language] : Go to the language settings screen.
- [Theme] : Go to the screen theme (light/dark mode) settings screen.
- [Customer Support] : Check customer support information.
Checking your profile
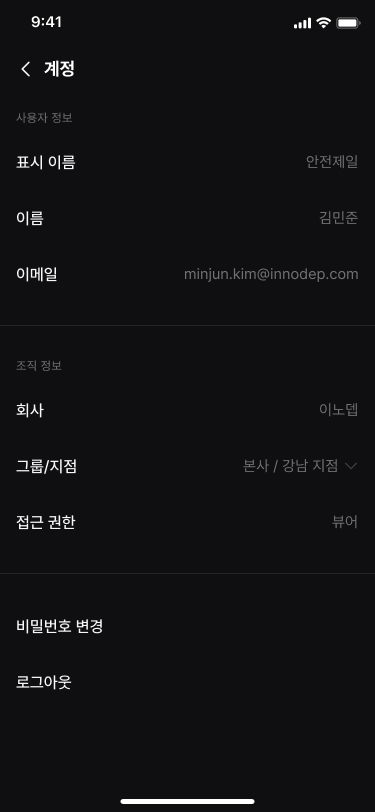
- Tap [Manage] in the profile information.The profile detail screen opens.
![Tap **[Manage]** in the profile information.](/manual/vunexlink/images/More_main_ko.jpg)
- Check the information you need.
- [User Information] : Check your VUNex Cloud user information.
- [Organization Information] : Check the information of the organizations you belong to.
- [Change Password] : Go to the password change screen.
- [Sign Out] : Sign out of the app.
Setting up notifications
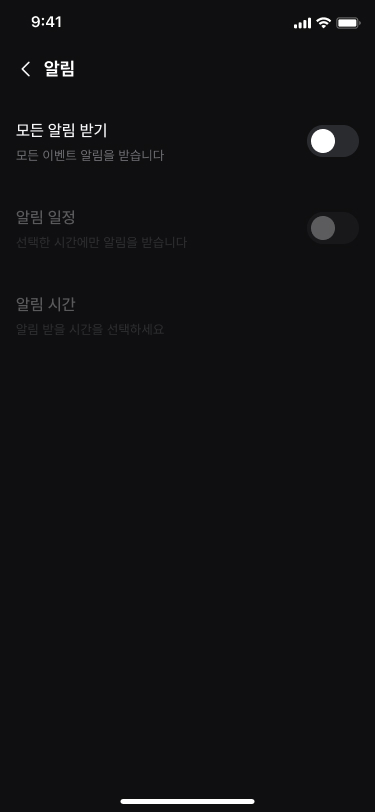
- Tap [Notifications] in the list.The notification settings screen opens.
- Tap the item you want.
- [Receive All Notifications] : Receive all event notifications.
- [Notification Schedule] : Receive notifications only during the set hours.
- [Notification Hours] : Set the notification schedule hours.
Setting a notification schedule
- Turn on [Notification Schedule] on the notification settings screen.The [Notification Hours] menu is enabled.
![Turn on **[Notification Schedule]** on the notification settings screen.](/manual/vunexlink/images/More_notifications_on_ko.jpg)
- Tap [Notification Hours].Set the days and hours to receive notifications.
- [Start time / End time] : Select when notifications start and end.
- [Active days] : Select the days to receive notifications.
![Tap **[Notification Hours]**.](/manual/vunexlink/images/More_schedule_ko.jpg)
- Tap [Apply].The notification schedule setup is complete.
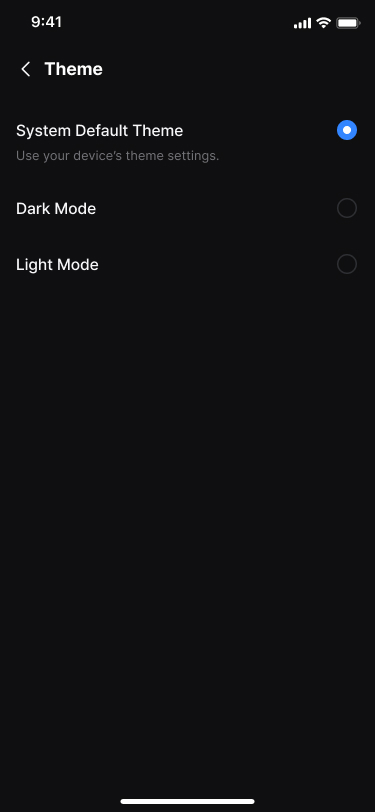
Changing the theme
- Tap [Theme] in the list.The theme settings screen opens.
- Select the screen mode you want.
- [System Default] : Apply the theme automatically according to the device system settings.
- [Dark Mode] : Apply the dark screen theme.
- [Light Mode] : Apply the light screen theme.
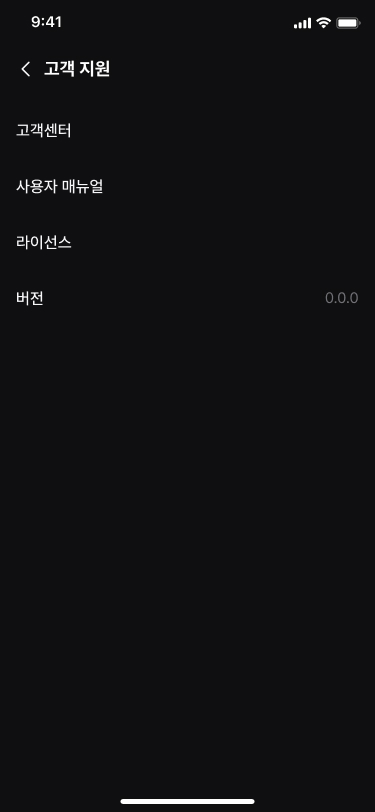
Customer support
- Tap [Customer Support] in the list.
- Tap the item you want.
- [Customer Center] : Go to the customer center page.
- [User Manual] : Go to the user manual link.
- [License Agreement] : Go to the open source license link.
- [Version] : Check the app version information.
Reference
개인정보 처리방침
- 수집하는 개인정보
- 로그 기록, 서비스 이용 기록 등 서비스 이용 과정에서 자동으로 생성되는 정보
- 개인정보 이용 목적수집된 정보는 다음과 같은 목적으로 사용됩니다.
- 서비스 이용
- 서비스 제공(예시 : VUNex Cloud 서비스 이용 등) 과정에서의 서비스 성능 개선에 활용
- 개인정보 보호 및 보안사용자의 접속 정보는 기기 내에만 저장되어 암호화되어 보호됩니다.
- 개인 정보 보관 기간
- 회원탈퇴 시 또는 서비스 해지 시 지체없이 파기합니다.
- 단, 관계법령에 의해 보관해야 하는 정보는 해당 법령에서 정한 기간만큼 보관합니다.
오픈소스 라이선스 고지
- 라이선스 전문 확인 방법본 앱은 Flutter에서 제공하는 라이선스 페이지를 통해, 라이선스 전문을 표시할 수 있습니다.
- 메뉴 : 설정 → 오픈소스 라이선스
- 표시 내용 : 패키지명, 저작권자(있는 경우), 라이선스 전문
- 사용 오픈소스 목록본 앱은 다음 오픈소스 라이브러리를 포함합니다.
- cached_network_image (v3.4.1) - MIT
- cupertino_icons (v1.0.8) - MIT
- dio (v5.9.0) - MIT
- firebase_core (v4.2.0) - BSD-3-Clause
- firebase_crashlytics (v5.0.3) - BSD-3-Clause
- firebase_messaging (v16.0.3) - BSD-3-Clause
- flutter (SDK) - BSD-3-Clause
- flutter_animate (v4.5.2) - BSD-3-Clause
- flutter_local_notifications (v19.5.0) - BSD-3-Clause
- flutter_localizations (SDK) - BSD-3-Clause
- flutter_native_splash (v2.4.7) - MIT
- flutter_riverpod (v3.0.3) - MIT
- flutter_spinkit (v5.2.2) - MIT
- flutter_svg (v2.2.3) - MIT
- flutter_timezone (v5.0.1) - Apache-2.0
- flutter_webrtc (v1.2.0) - MIT
- fpdart (v1.1.1) - MIT
- gap (v3.0.1) - MIT
- go_router (v16.2.5) - BSD-3-Clause
- go_transitions (v0.8.3) - MIT
- hive_ce (v2.15.0) - Apache-2.0 / BSD-3-Clause (Dual)
- hive_ce_flutter (v2.3.2) - Apache-2.0 / BSD-3-Clause (Dual)
- intl (any) - BSD-3-Clause
- json_annotation (v4.9.0) - BSD-3-Clause
- logging (v1.3.0) - BSD-3-Clause
- media_kit (v1.2.3) - MIT
- media_kit_libs_video (v1.0.7) - MIT
- media_kit_video (v2.0.1) - MIT
- package_info_plus (v9.0.0) - BSD-3-Clause
- permission_handler (v12.0.1) - MIT
- pointycastle (v4.0.0) - MIT
- url_launcher (v6.3.1) - BSD-3-Clause
- uuid (v4.5.2) - MIT
- video_player (v2.10.1) - BSD-3-Clause
- visibility_detector (v0.4.0+2) - BSD-3-Clause
- wheel_picker (v0.2.2) - MIT
- 라이선스 유형별 요약아래 내용은 일반적인 요약이며, 정확한 조건은 각 패키지에 포함된 라이선스 전문이 우선합니다. MIT License
- 상업적 사용/수정/배포 가능
- 저작권 및 라이선스 문구를 포함해야 함
- 상업적 사용/수정/배포 가능
- 저작권 및 라이선스 문구를 포함해야 함
- 원저작자/프로젝트명으로 홍보·보증을 암시하면 안 됨(Non-endorsement)
- 상업적 사용/수정/배포 가능
- 라이선스 사본 제공
- (패키지에 NOTICE가 존재하는 경우) NOTICE 유지
- 특허 관련 조항 포함
오피스 위치
| 지점 | 주소 |
|---|---|
| 본사 | 서울특별시 금천구 디지털로 9길 47, 9층 (가산동, 한신IT타워 2차) |
| 안양 센터 | 경기 안양시 동안구 시민대로 109번길 62 |
Release Notes
This section covers what has changed in each version of VUNex Link and what to check before upgrading.
1.3.0 (2026-08-21)
Release notes are provided starting with this release. VUNex Link receives AI, access control, and face recognition events in real time, so you can handle everything on site — from checking the video to recording your response. The handling history is kept as a thread for each event, so the whole team can share the response status. The app is available on the iOS and Android app stores.
Sign InSign in with your VUNex Cloud account. If you enter the wrong password 5 times in a row, the account is locked for 10 minutes, and you can reset your password with a verification code (6 digits, valid for 10 minutes) sent to your registered email.Sign InIf you sign in with the same account on another device, the session on the existing device is automatically terminated.EventsCheck events from the last 7 days as cards. Narrow down the list with the AI, access control, face recognition, and User Event tabs and the group/branch filter.EventsResolve all unresolved events at once.EventsIn addition to AI detection, you can create and manage on-site situations as User Events yourself. Record your voice for automatic text conversion, and mark an event as requiring resolution so members can resolve it.EventsView and search the events you resolved yourself in one place.Event DetailPlay the recorded clip from around the time of the event, and check the live video of the camera right away.Event DetailStatus changes, comments, and voice messages are recorded in a single thread per event, in chronological order. Voice messages are automatically converted to text and shown together.Event DetailPress and hold the mic button to record your voice and send it to users in the same group/branch.Event DetailShare event details with users in your company by email.Event DetailRecord the classification and response actions when resolving an event. A reason is required when reopening a resolved event.ActivityTrack activities on the events you handled or created (My) and your team members' event handling (Team) on one screen. Activities are shown for 7 days.DevicesView the devices and cameras assigned to your organization and search by camera name. Selecting a camera provides 1 minute of live video. When a device goes offline, a warning banner and status details (last updated, channels, location map) are shown.NotificationsTurn all notifications on or off, or schedule them for specific days and hours only.MoreSupports 4 languages (한국어, English, 日本語, Español) and dark/light themes.
Office Locations and Technical Support
If you have questions about a release or need technical support, contact us below.
- Headquarters : 9F·11F, 47, Digital-ro 9-gil, Geumcheon-gu, Seoul (Gasan-dong, Hanshin IT Tower 2)
- Anyang Center : 62, Simin-daero 109beon-gil, Dongan-gu, Anyang-si, Gyeonggi-do
- Email : sales_division@innodep.com
- Fax : +82-2-6336-3368
- Call Center : 1661-6806 (24/7, year-round)
Legal Notice
Legal notices for the VUNex Link app, including the privacy policy and open source license notice.
Privacy Policy
VUNex Link is a service based on VUNex Cloud accounts, and the processing of personal information follows the VUNex Cloud Privacy Policy.
The following describes the information that the VUNex Link app itself collects and stores.
- Personal Information Collected
- Information automatically generated in the course of using the service, such as log records and service usage records
- Purpose of UseThe collected information is used for the following purposes.
- Use of the service
- Improving service performance in the course of providing the service (e.g., use of the VUNex Cloud service)
- Protection and SecurityThe user's sign-in information is stored only on the device and is protected with encryption.
- Retention Period
- The information is destroyed without delay upon membership withdrawal or termination of the service.
- However, information that must be retained under applicable laws is kept for the period specified by those laws.
Open Source License Notice
This notice is provided to disclose the open source software (OSS) used by VUNex Link (the "App") and the related license information.
The App includes the third-party open source libraries listed below, and provides copyright notices and license texts in accordance with the license terms of each library.
[Notice location] : In-app Settings → Open Source Licenses
- How to View the Full License TextsThe App can display the full license texts through the license page provided by Flutter.
- Menu : Settings → Open Source Licenses
- Displayed content : package name, copyright holder (if any), and the full license text
- List of Open Source Libraries UsedThe App includes the following open source libraries.
- cached_network_image (v3.4.1) - MIT
- cupertino_icons (v1.0.8) - MIT
- dio (v5.9.0) - MIT
- firebase_core (v4.2.0) - BSD-3-Clause
- firebase_crashlytics (v5.0.3) - BSD-3-Clause
- firebase_messaging (v16.0.3) - BSD-3-Clause
- flutter (SDK) - BSD-3-Clause
- flutter_animate (v4.5.2) - BSD-3-Clause
- flutter_local_notifications (v19.5.0) - BSD-3-Clause
- flutter_localizations (SDK) - BSD-3-Clause
- flutter_native_splash (v2.4.7) - MIT
- flutter_riverpod (v3.0.3) - MIT
- flutter_spinkit (v5.2.2) - MIT
- flutter_svg (v2.2.3) - MIT
- flutter_timezone (v5.0.1) - Apache-2.0
- flutter_webrtc (v1.2.0) - MIT
- fpdart (v1.1.1) - MIT
- gap (v3.0.1) - MIT
- go_router (v16.2.5) - BSD-3-Clause
- go_transitions (v0.8.3) - MIT
- hive_ce (v2.15.0) - Apache-2.0 / BSD-3-Clause (Dual)
- hive_ce_flutter (v2.3.2) - Apache-2.0 / BSD-3-Clause (Dual)
- intl (any) - BSD-3-Clause
- json_annotation (v4.9.0) - BSD-3-Clause
- logging (v1.3.0) - BSD-3-Clause
- media_kit (v1.2.3) - MIT
- media_kit_libs_video (v1.0.7) - MIT
- media_kit_video (v2.0.1) - MIT
- package_info_plus (v9.0.0) - BSD-3-Clause
- permission_handler (v12.0.1) - MIT
- pointycastle (v4.0.0) - MIT
- url_launcher (v6.3.1) - BSD-3-Clause
- uuid (v4.5.2) - MIT
- video_player (v2.10.1) - BSD-3-Clause
- visibility_detector (v0.4.0+2) - BSD-3-Clause
- wheel_picker (v0.2.2) - MIT
- Summary by License TypeThe following is a general summary; the exact terms are governed by the full license text included with each package. MIT License
- Commercial use, modification, and distribution permitted
- Copyright and license notices must be included
- Commercial use, modification, and distribution permitted
- Copyright and license notices must be included
- The names of the original authors/projects must not be used to imply endorsement (Non-endorsement)
- Commercial use, modification, and distribution permitted
- A copy of the license must be provided
- The NOTICE file must be preserved (if the package includes one)
- Includes patent-related provisions