VUNex AI
User Manual
Menu configuration may vary or some features may not be supported depending on the product version.
Table of Contents
- 01. Getting Started
- 02. Live Monitoring
- 03. Playback
- 04. Search
- 05. Event Settings
- 06. Settings
- 07. System Management
- 08. AI Teaching
- 09. App Store
Document Information
Getting Started
This section explains the basic usage of the VUNex AI system.
Login and Logout
Log in or out of the system.
- Enter the default URL in your web browser
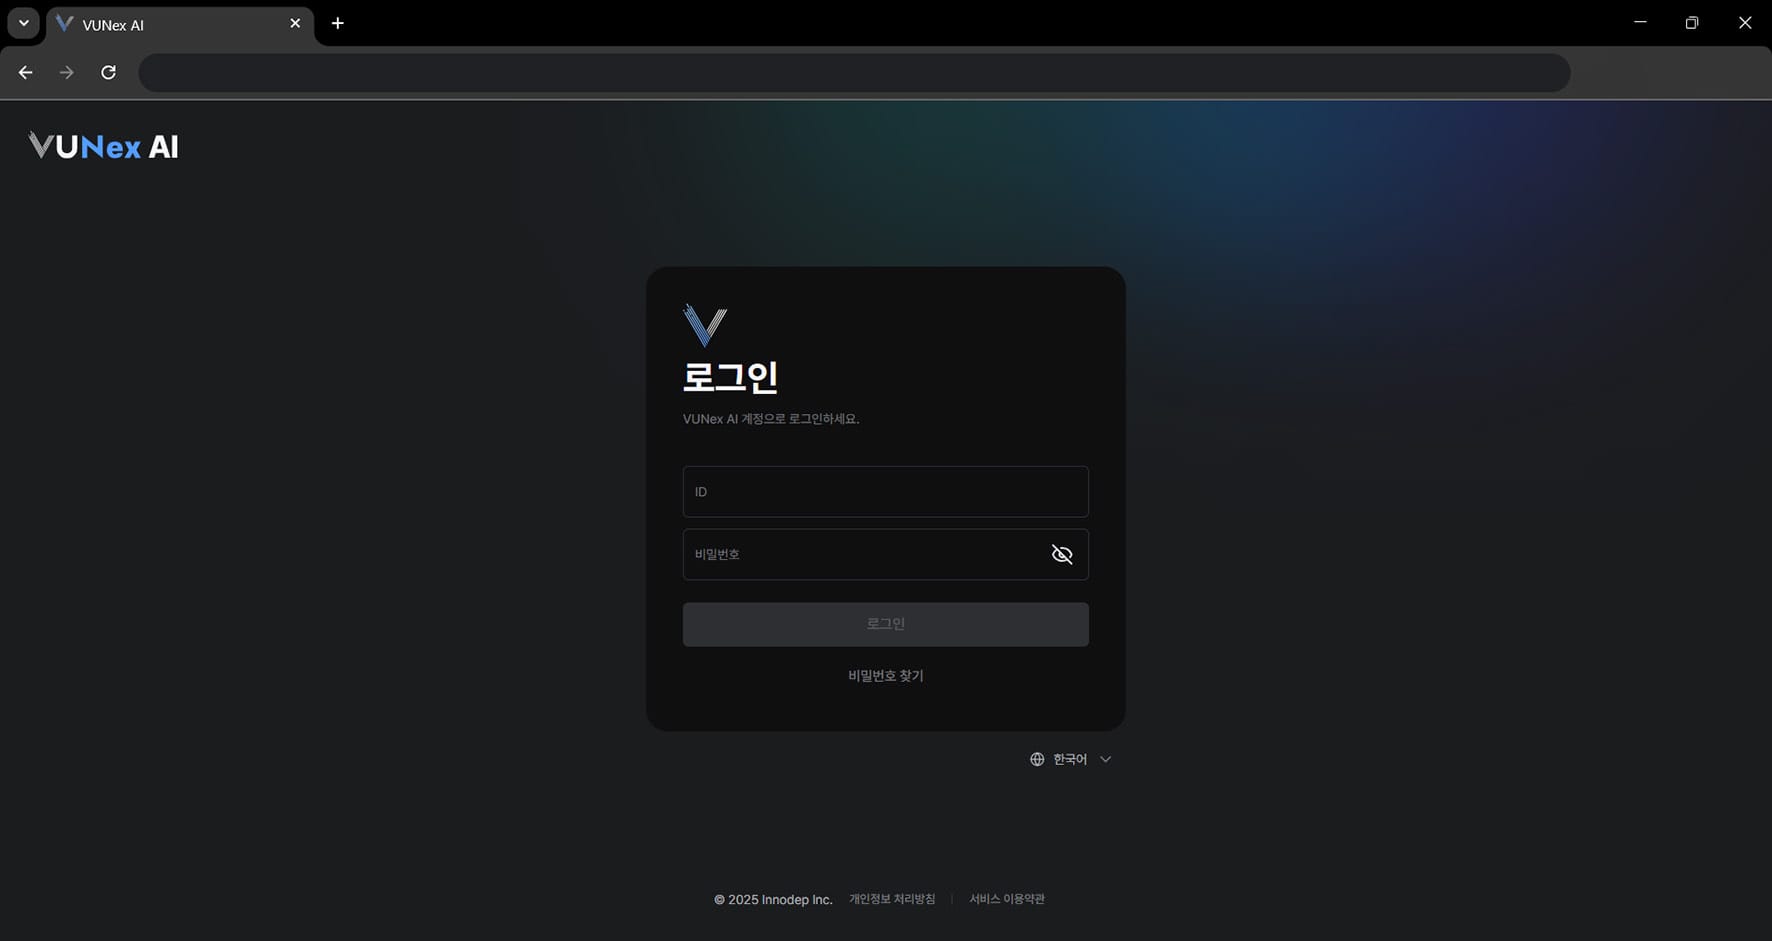 Figure 1-1. VUNex AI Login Screen
 - Enter your information[ID]: Enter your ID. [Password]: Enter your password.
- Click [Login]Access the system.
Initial Login
Access the system for the first time after installation.
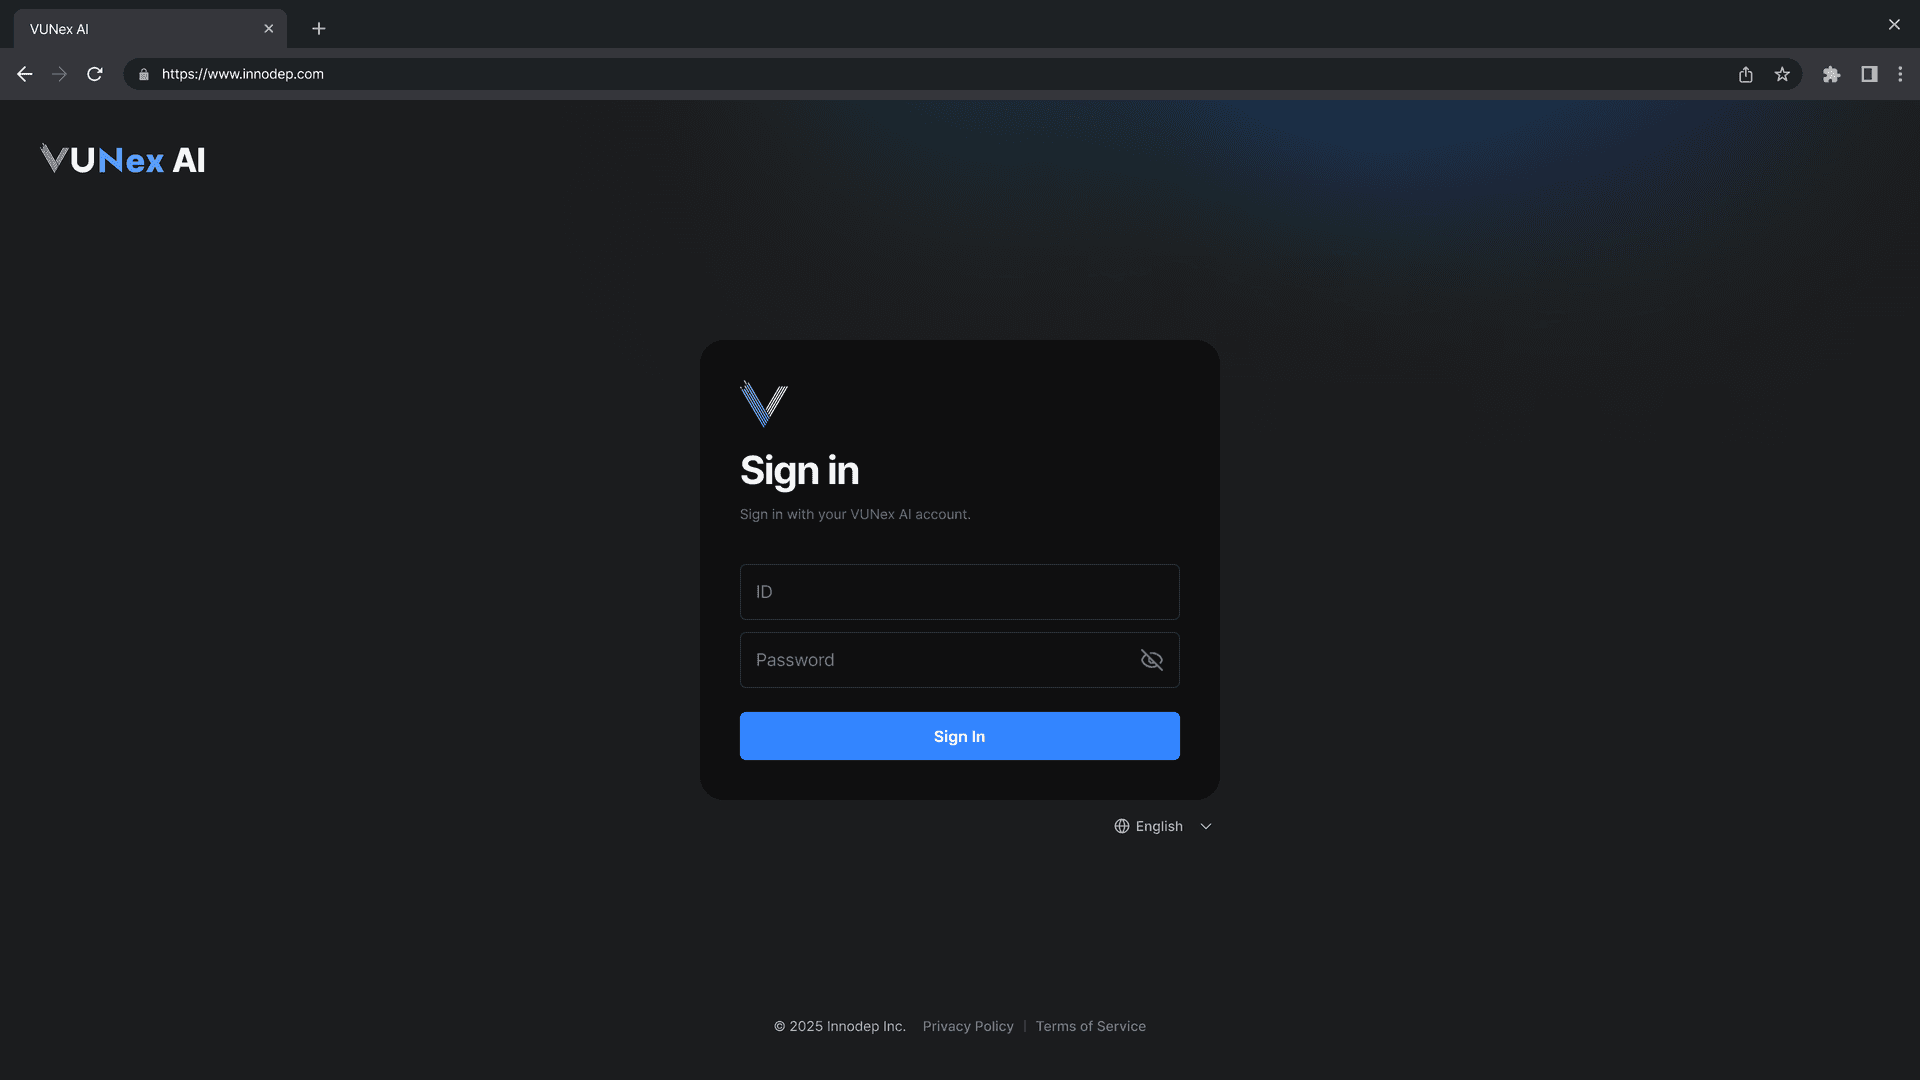
- Enter the system URL in your web browserAccess using the IP address or domain configured during installation.
- Log in with the default account[ID]: admin [Password]: admin
- Click the [Sign In] button
Change Default Password
Change the default password for security.
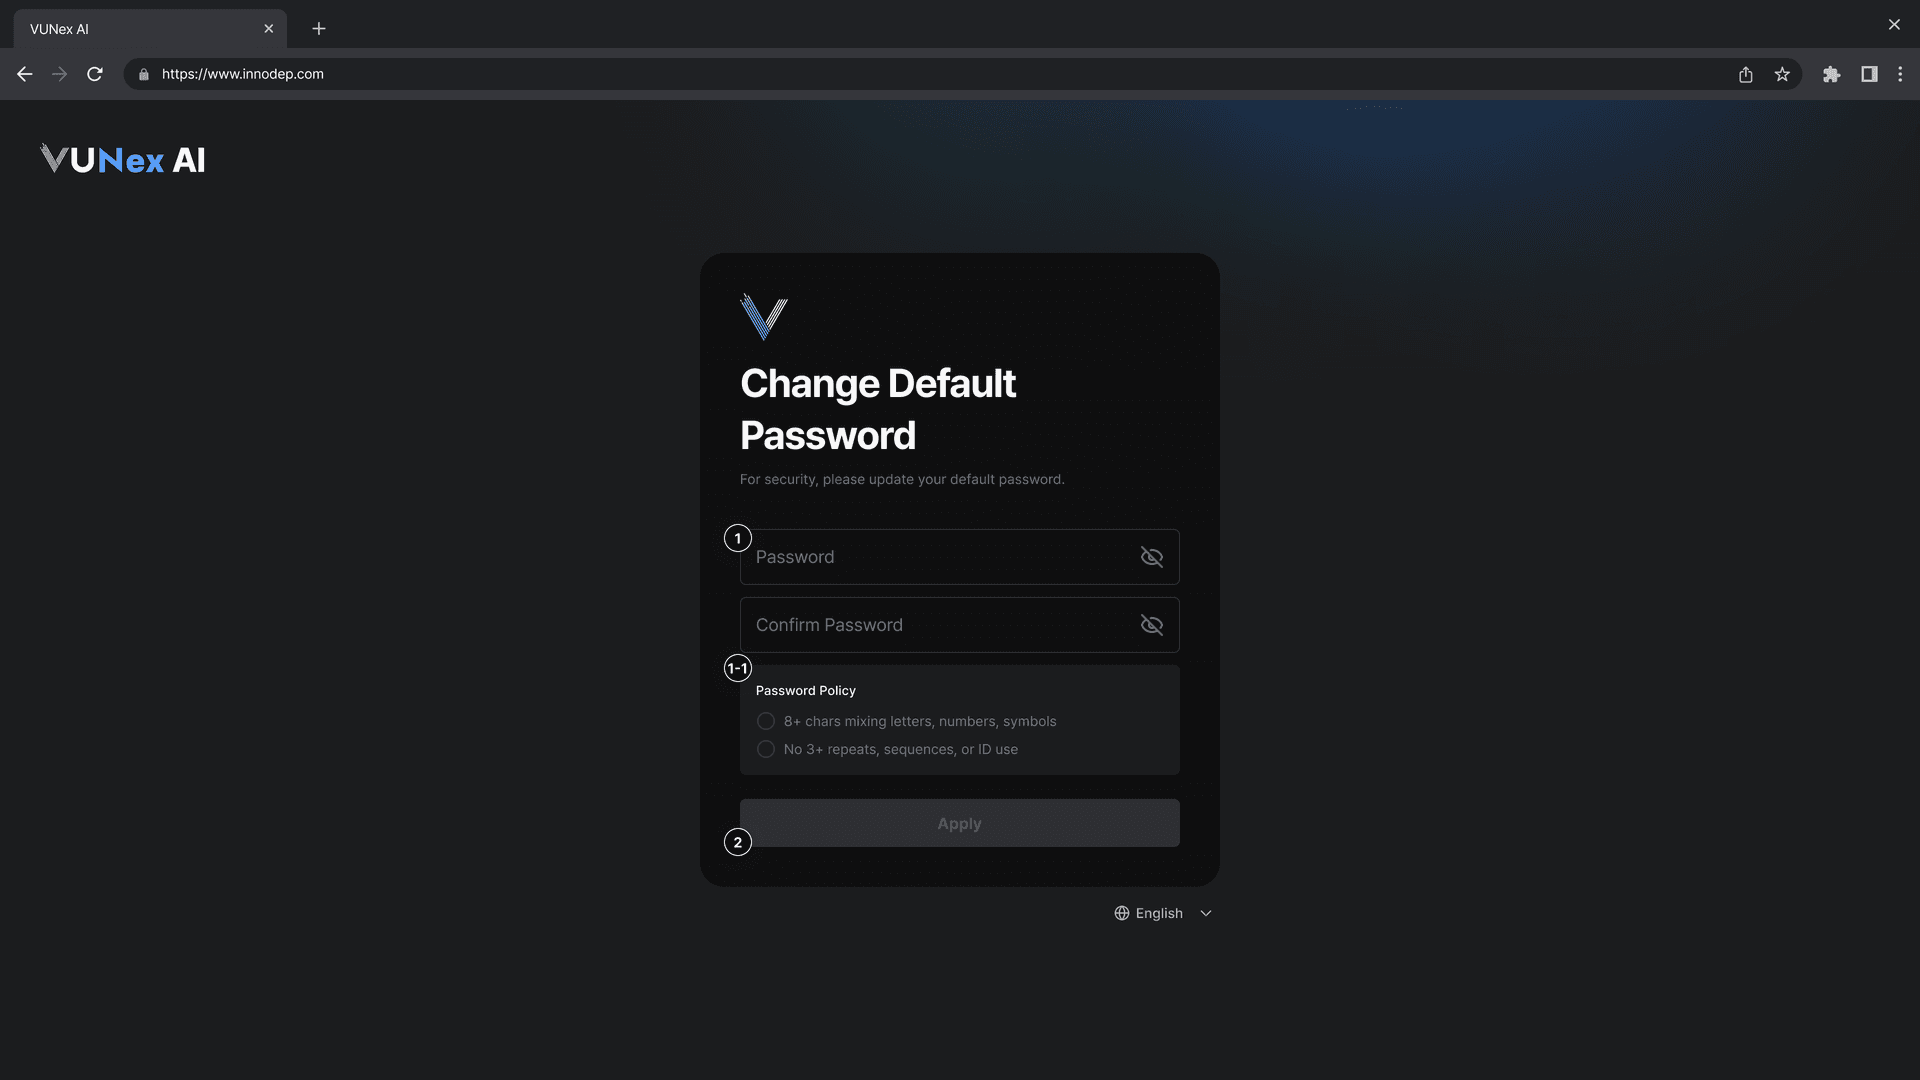
- Enter your new password[Password]: Enter your new password. [Confirm Password]: Re-enter the same password.
- Click the [Apply] button
- 8+ chars mixing letters, numbers, symbols
- No 3+ repeats, sequences, or ID use
Security Questions Setup
Set up security questions for password recovery.
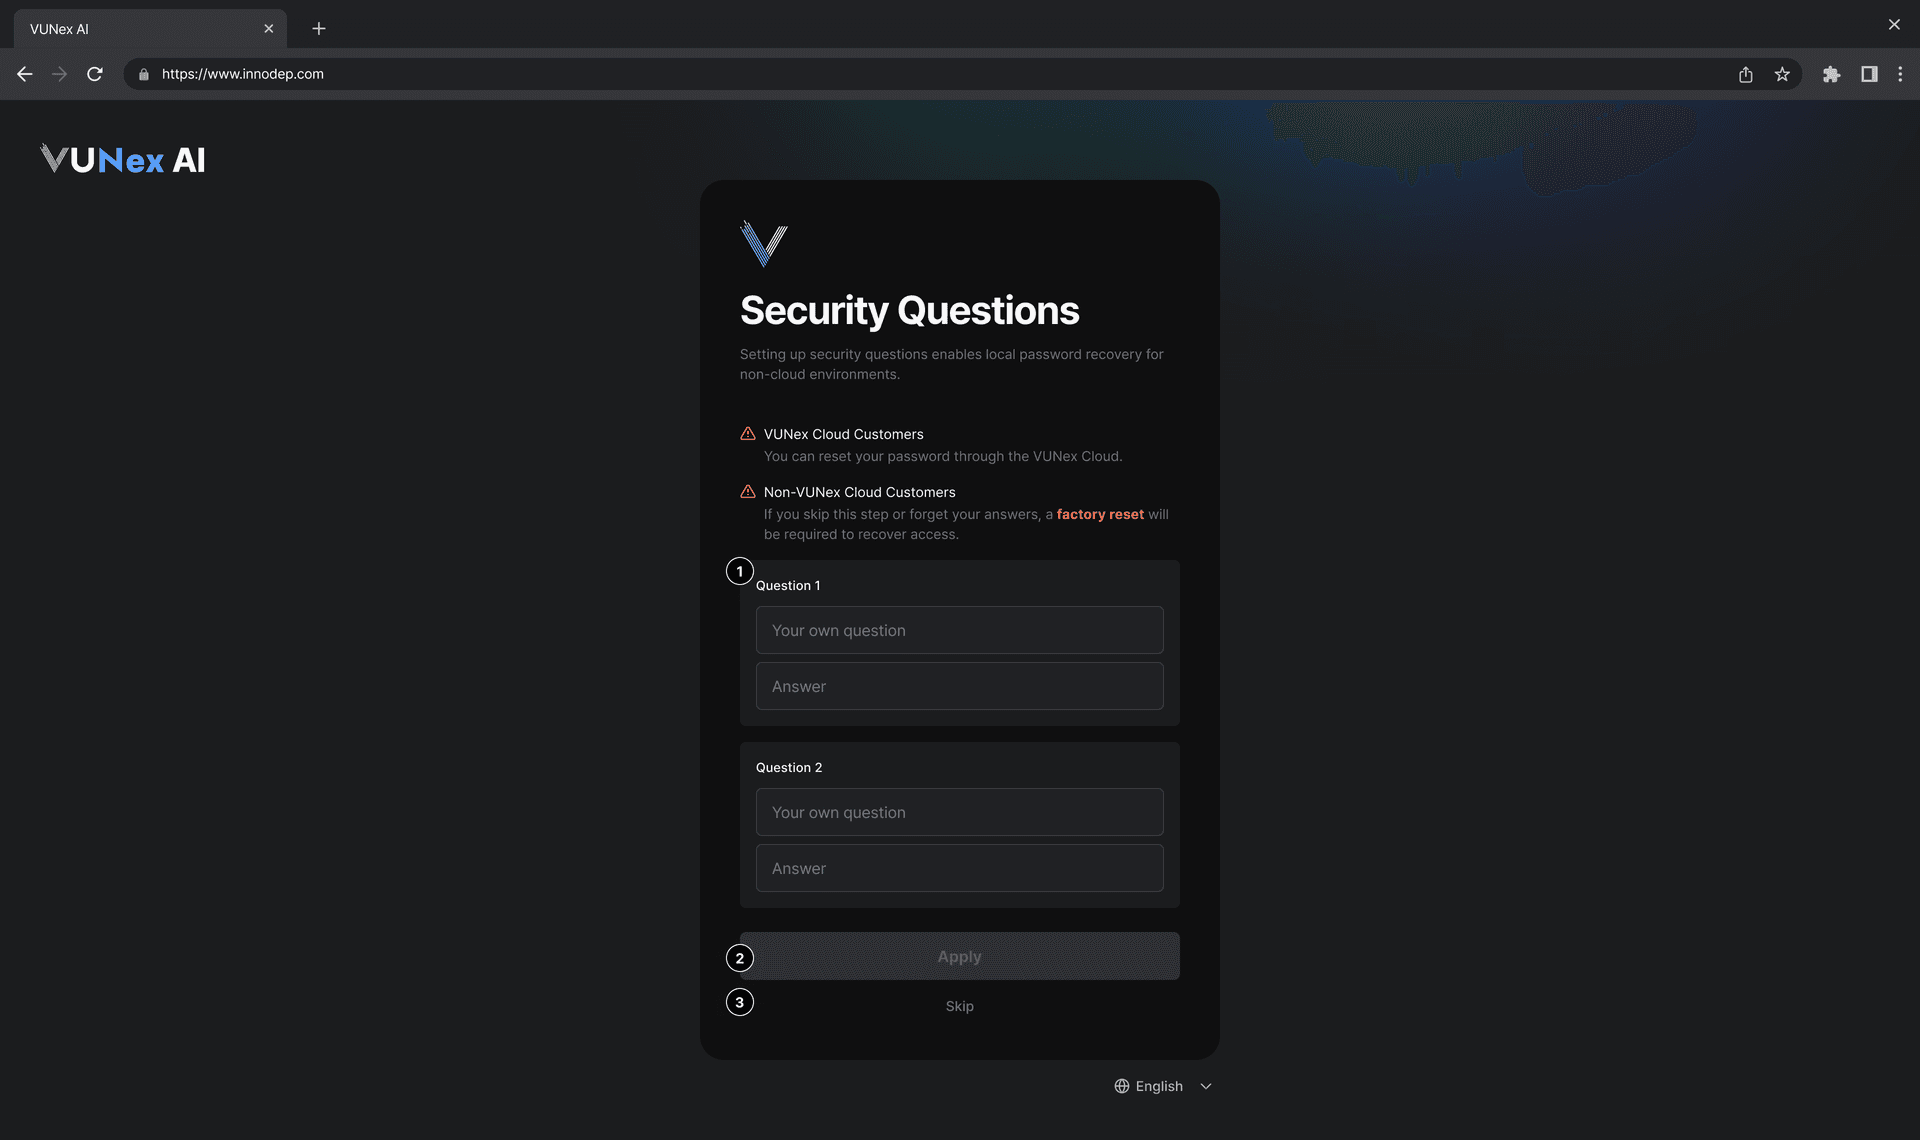
- Set up Security Question 1[Question 1]: Enter your question. [Answer]: Enter your answer.
- Set up Security Question 2[Question 2]: Enter your second question. [Answer]: Enter your answer.
- Click [Apply] or [Skip] button
Forgot Password
Instructions for recovering your password if you forgot it.
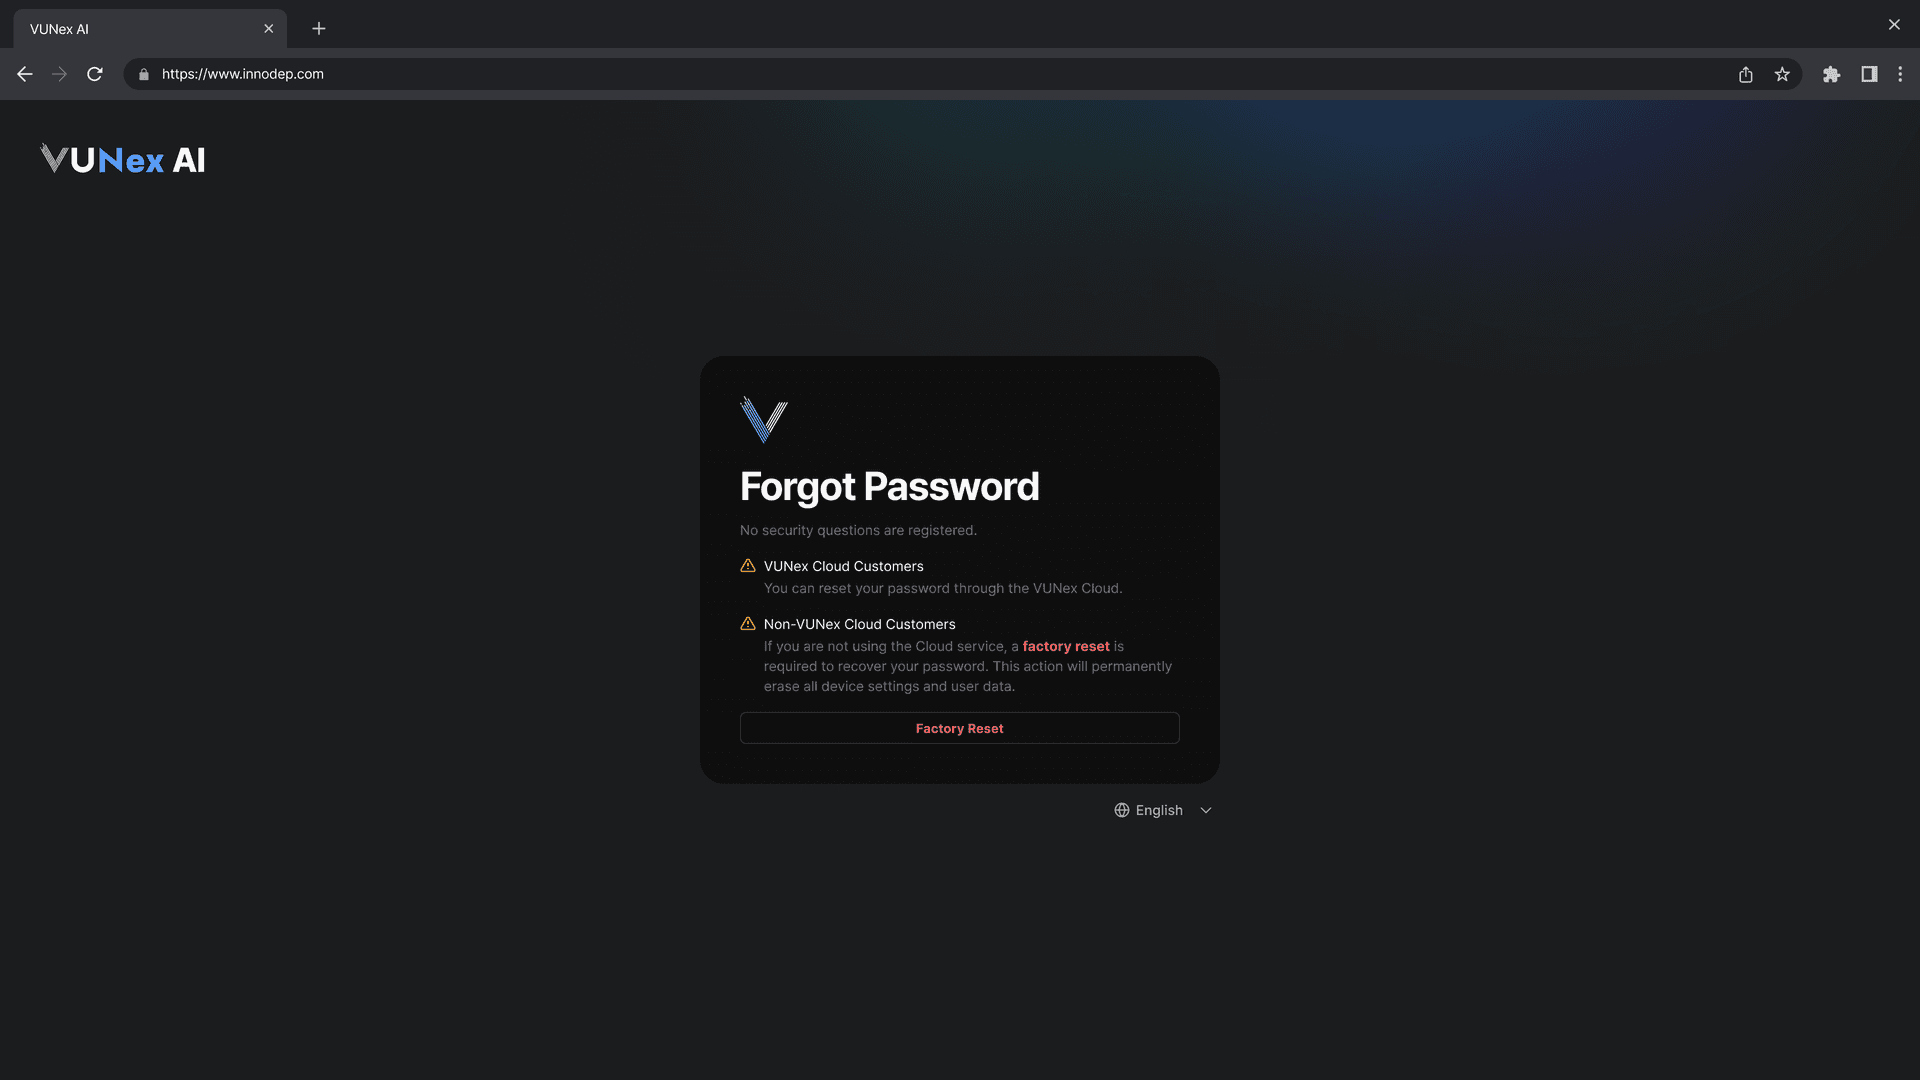
- Click [Forgot password] on the login screen
- Click the [Factory Reset] buttonWarning: This will delete all settings and data.
New Password (Recovery)
Set a new password after security question verification.
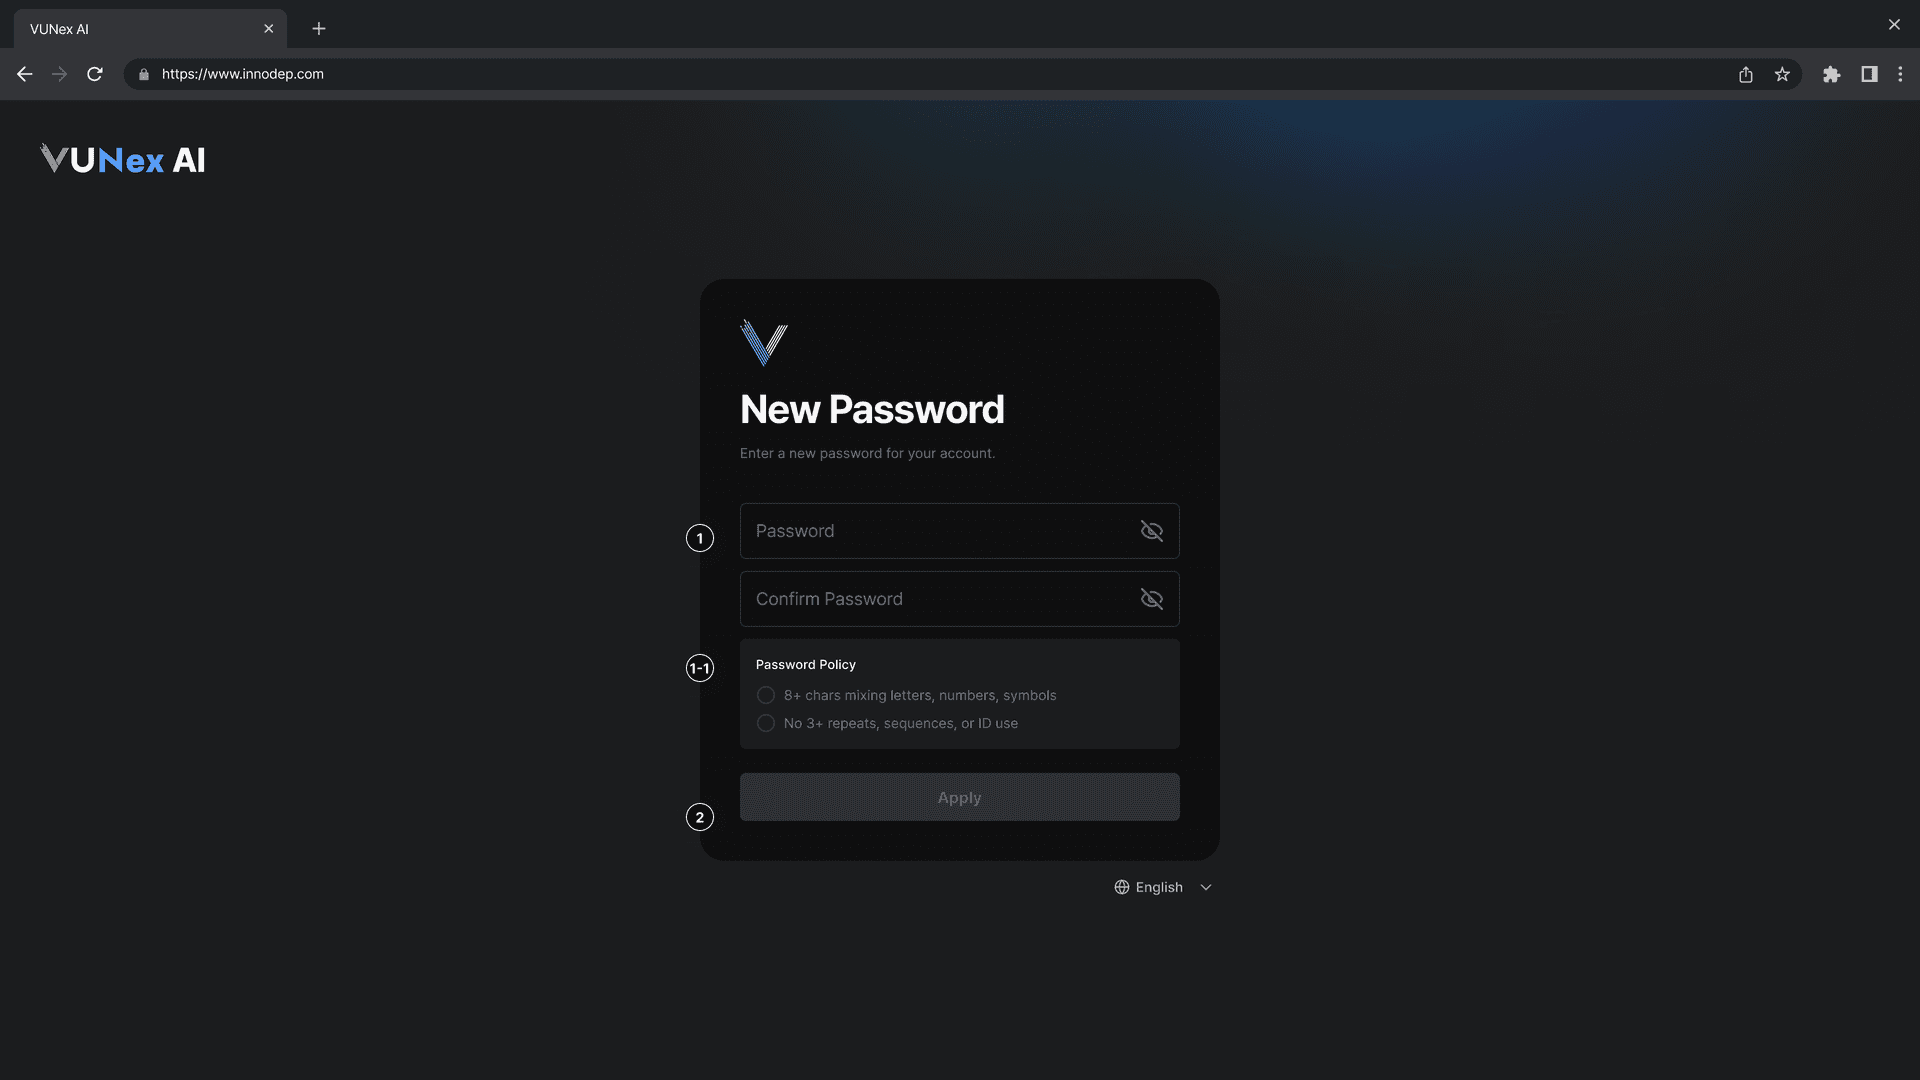
- Enter your new password[Password]: Enter your new password. [Confirm Password]: Re-enter the same password.
- Click the [Apply] buttonYour new password will be applied and you will be redirected to the login screen.
- Minimum 8 characters mixing letters, numbers, and symbols
- No 3+ repeats, sequences, or ID use
Logout
Log out of the system.
- Click the [Sign out] button at the bottom left of the screen.
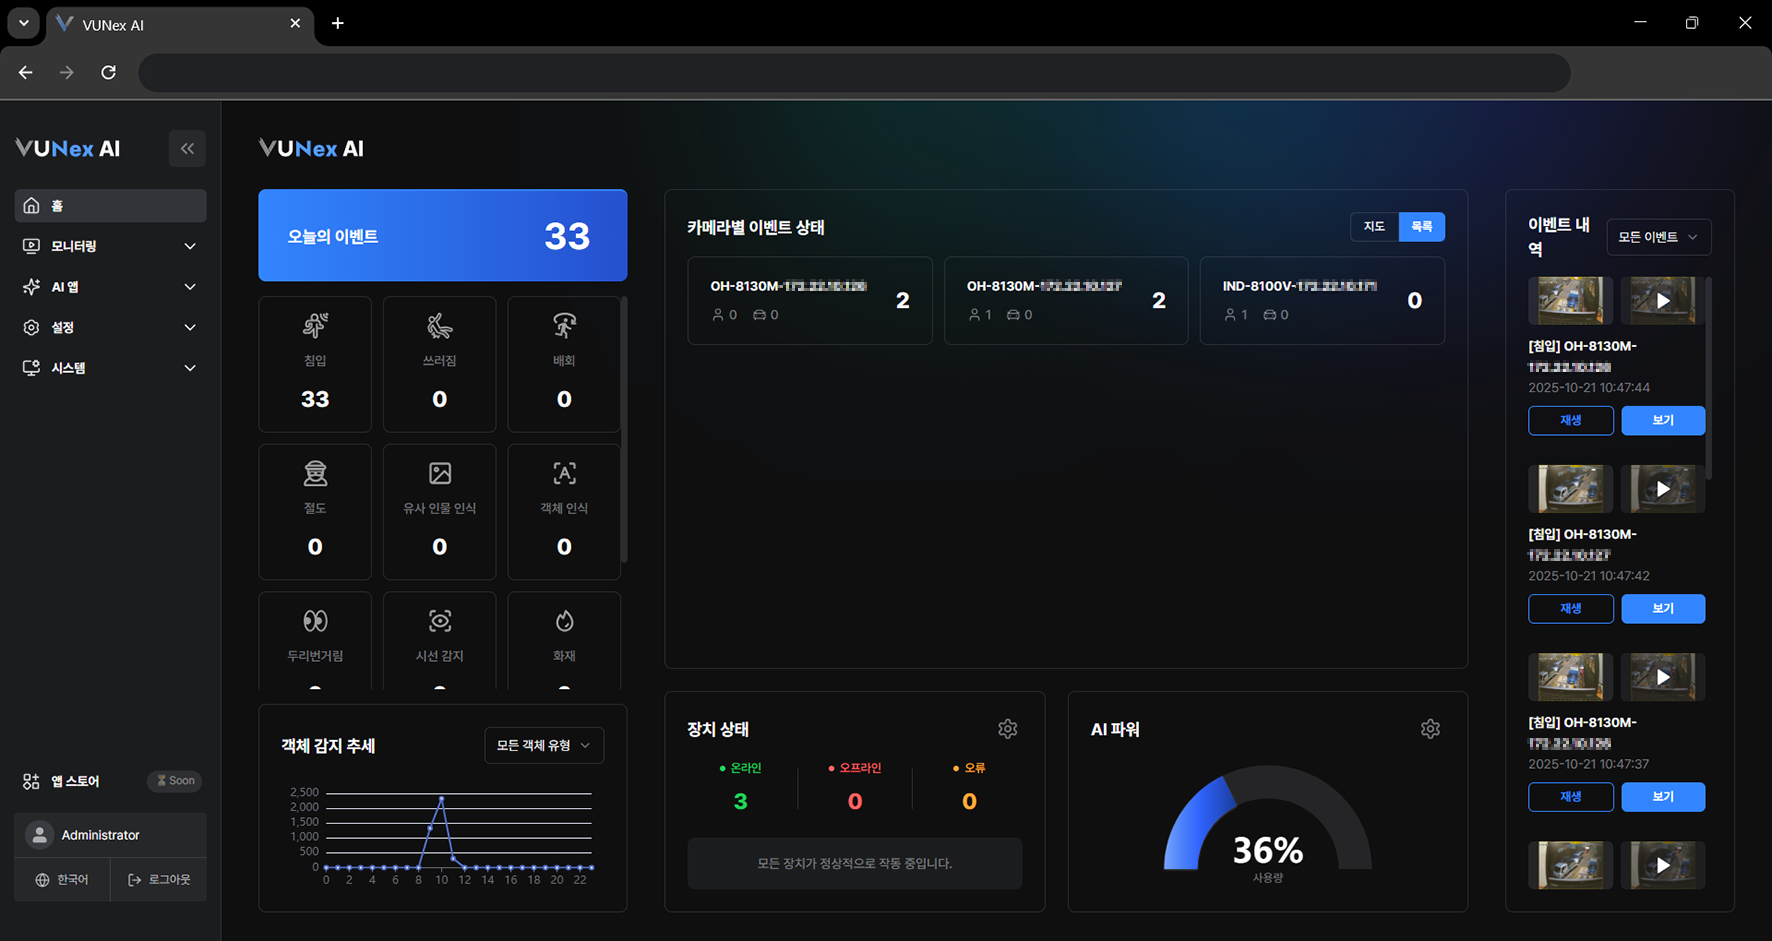 Figure 1-2. Logout Button
 - You will be logged out and returned to the Signin screen.
Main Screen
View the screen and menus.
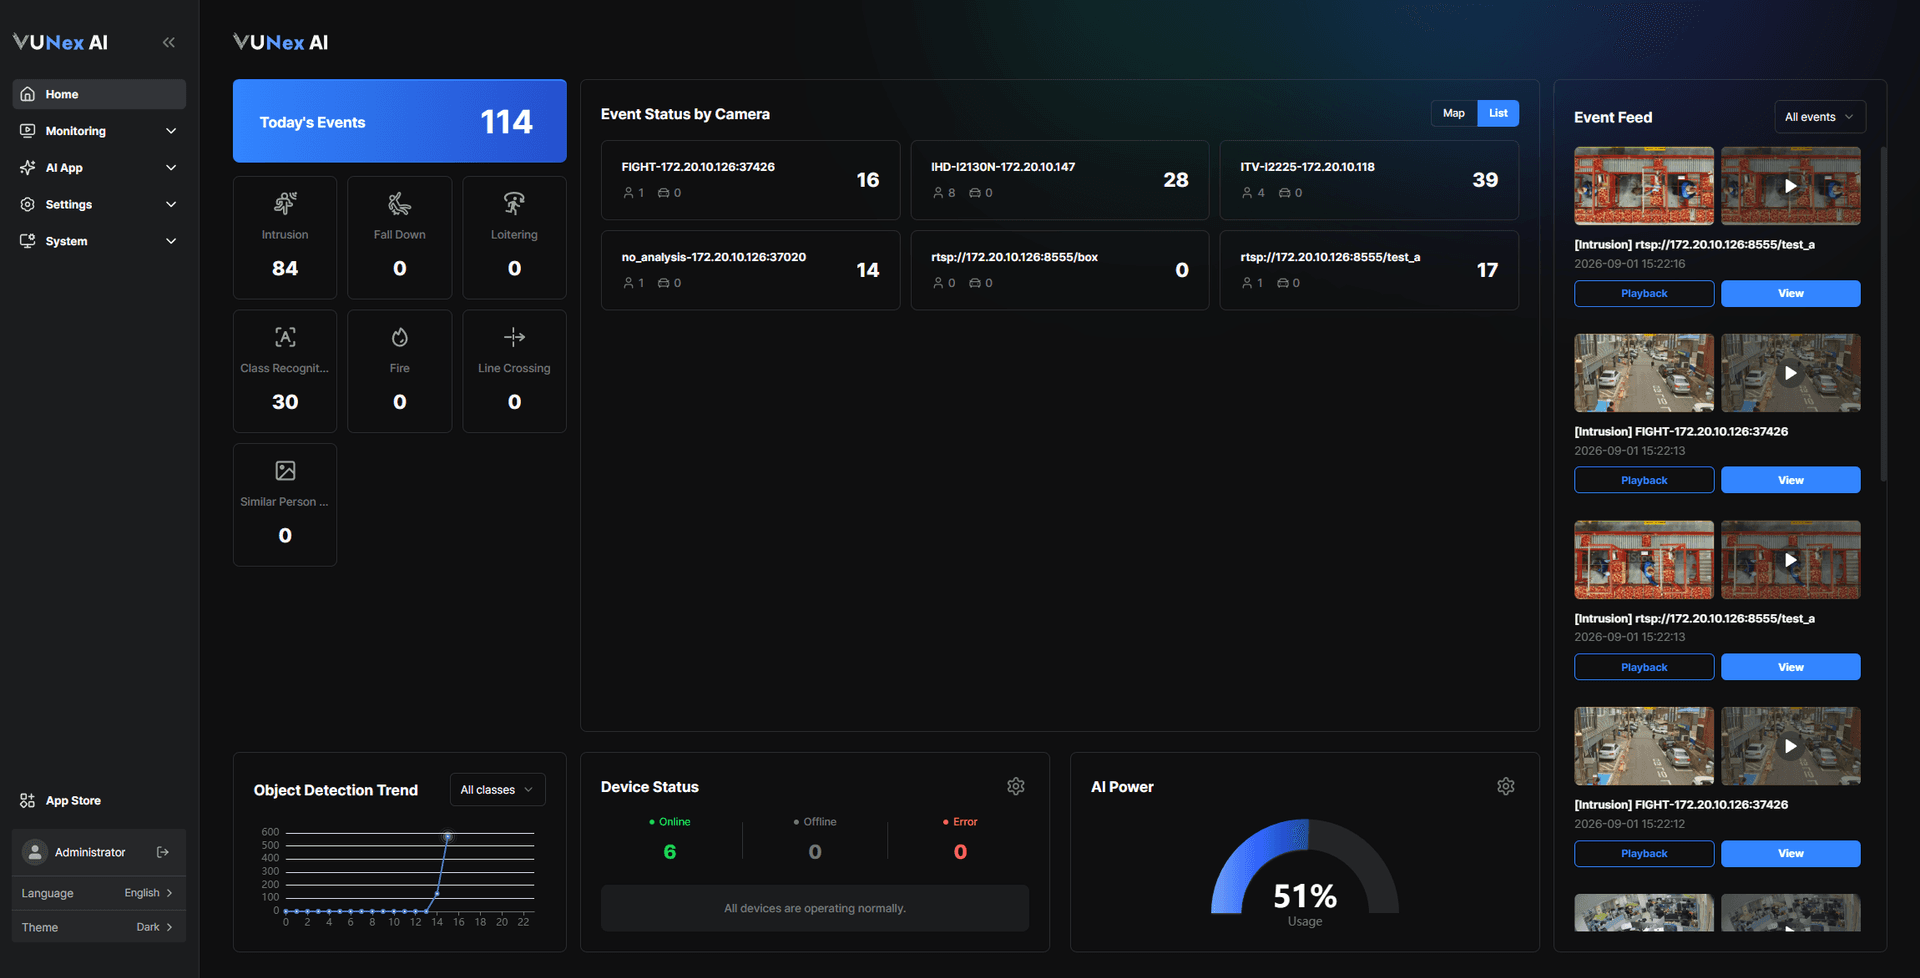
| No. | Menu | Description |
|---|---|---|
| ❶ | Home | Goes to the Home screen. |
| ❷ | Monitoring | Check live and recorded video. |
| ❸ | AI App | Configure AI events and services. |
| ❹ | Settings | Configure the system. |
| ❺ | System | Manage the system, such as updates and reset. |
| ❻ | App Store | Manage the AI model, AI apps and AI Power usage. |
Language Settings
Change the system language.
- Click the language selection button on the login screen
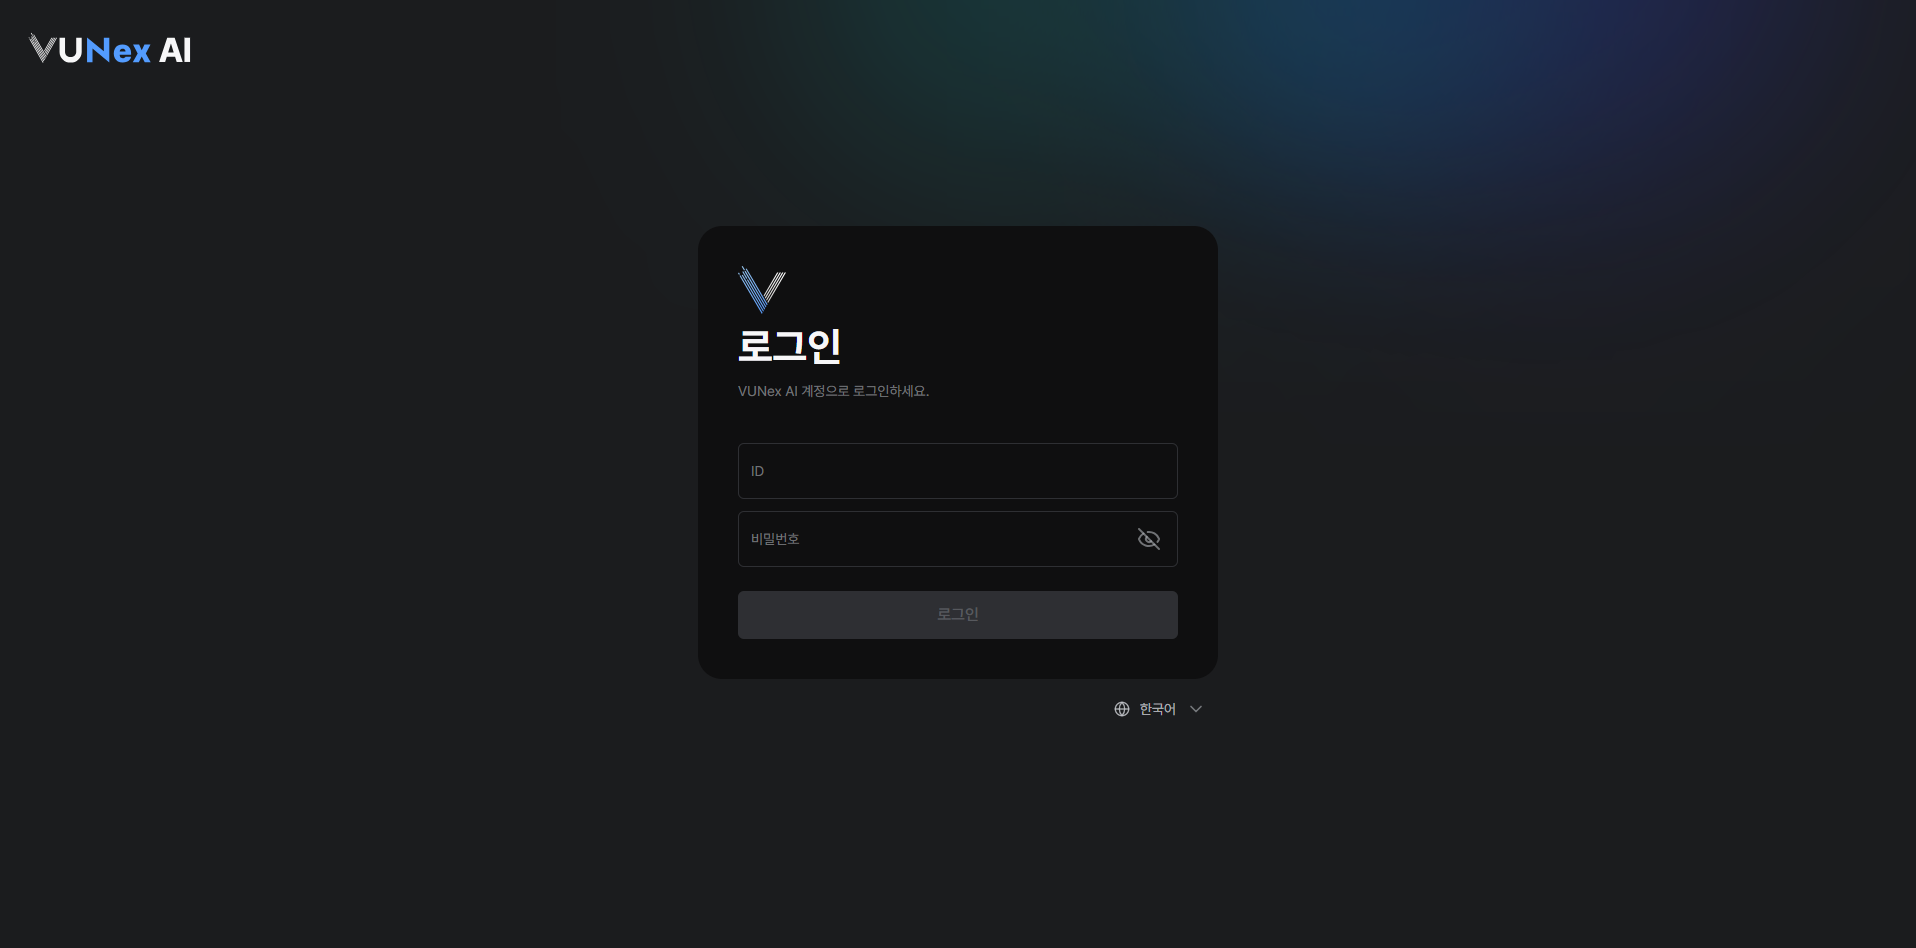 Figure 1-3. Language Settings
 - Select your preferred languageYou can choose from Korean, English, Japanese, or Spanish.
Home Screen
View the home screen.
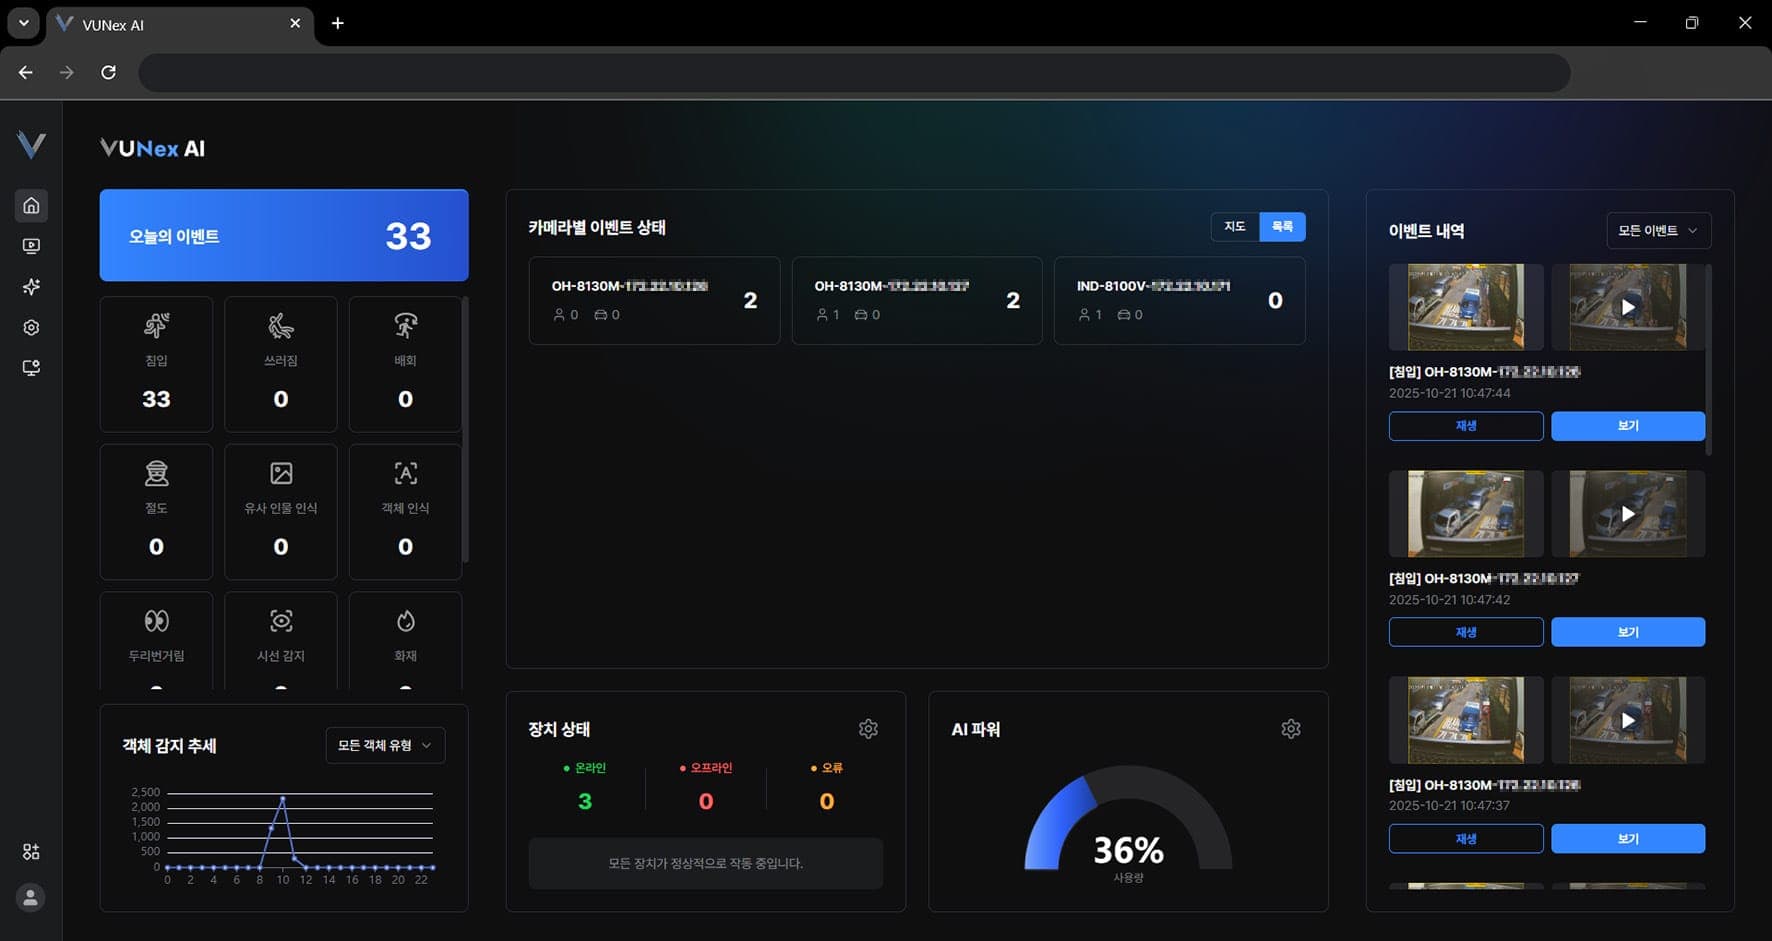
| No. | Item | Description |
|---|---|---|
| ❶ | Device status | Check the number of online, offline and error devices. |
| ❷ | Today's events | Check today's events by type. |
| ❸ | Object detection trend | Check the detection trend per interested object. |
| ❹ | Event feed | Check the list of recent events. |
| ❺ | AI Power | Check the usage and total of AI analysis resources. |
| ❻ | Event status | Check where events occurred as a map, a list or statistics. |
Live Monitoring
Check real-time video and menu.
Viewing Live Video
Check the live video.
- In the main menu, click [] > [AI Live View]The live video screen appears.
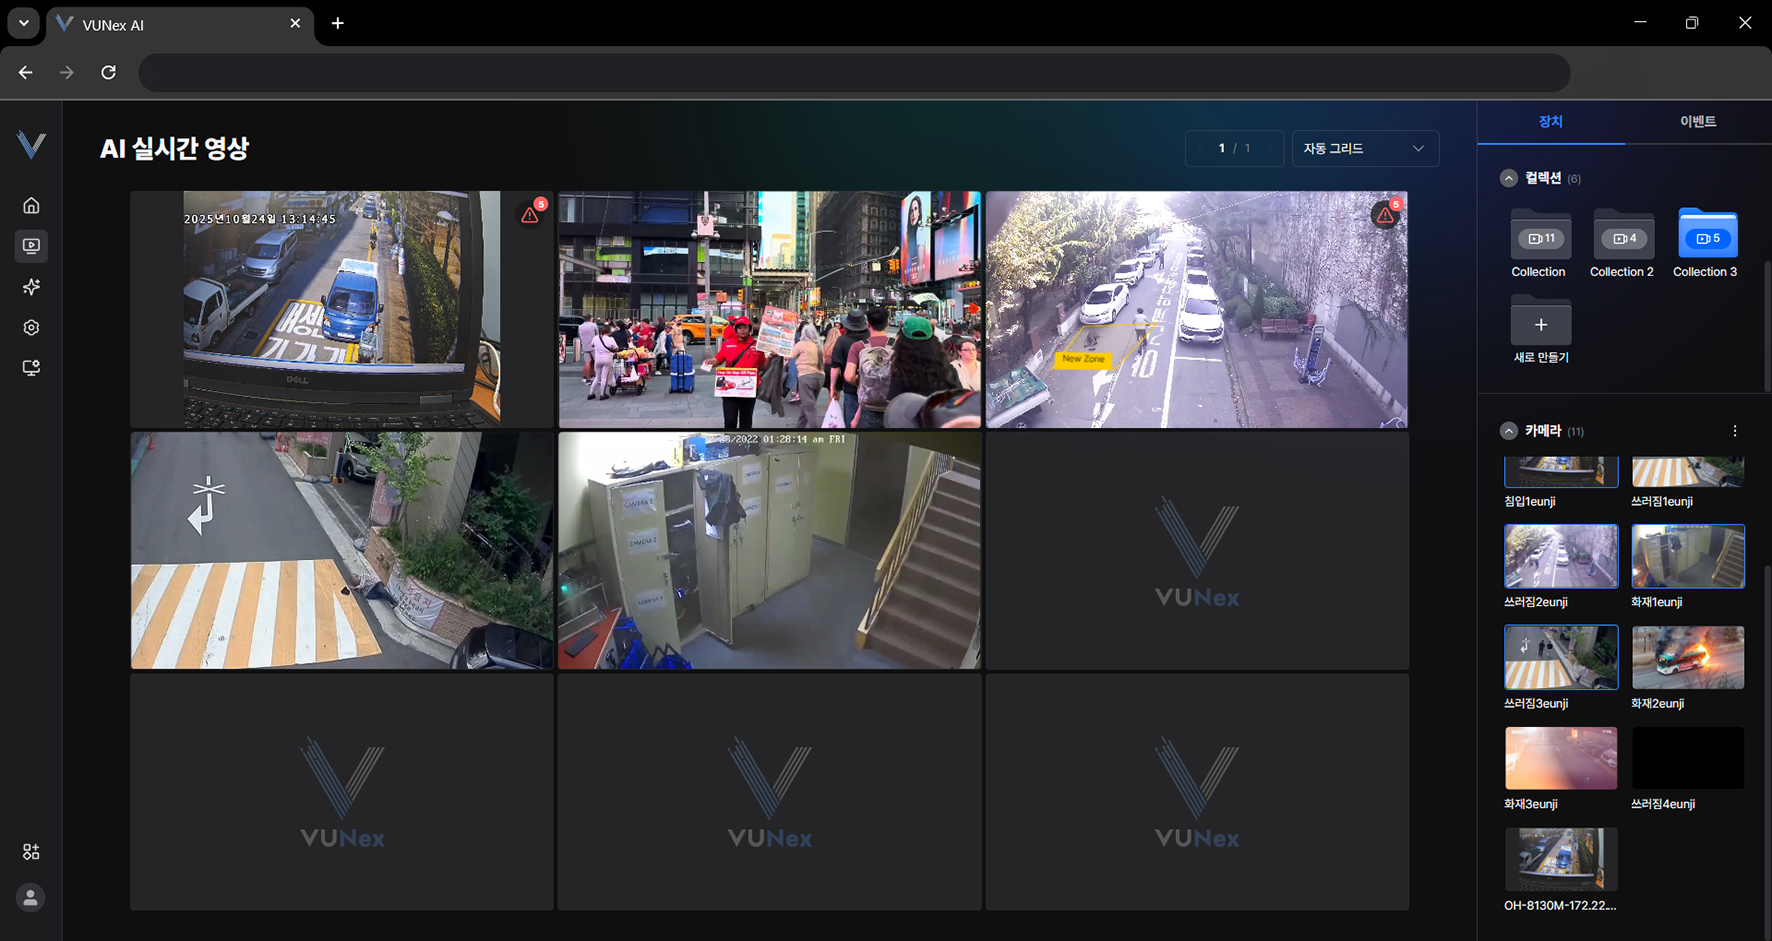 Figure 2-1. Live Video Screen
 - Select a video and double-click itThe video is maximized.
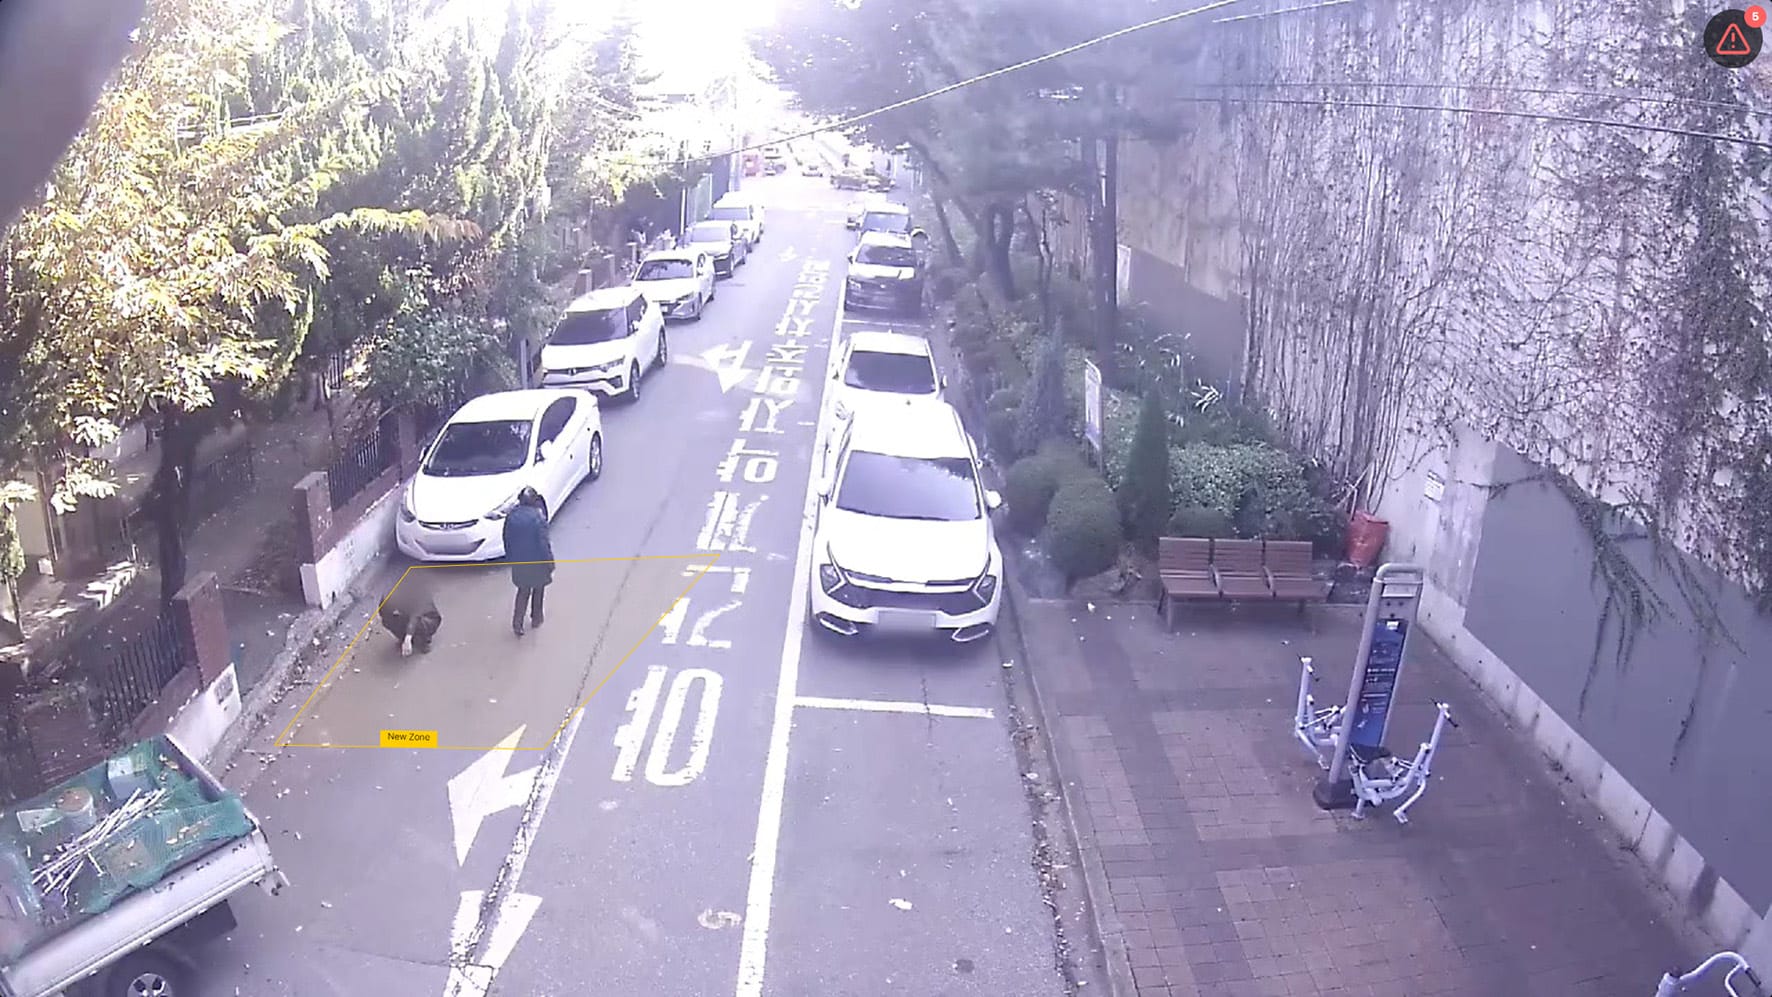 Figure 2-2. Maximizing the Video
 - Check the live video
Viewing Live Video Options
Check the live video options.
- In the main menu, click [] > [AI Live View]The live video screen appears.
- Select a video and double-click itThe video is maximized.
- Right-click on the videoThe pop-up menu appears.
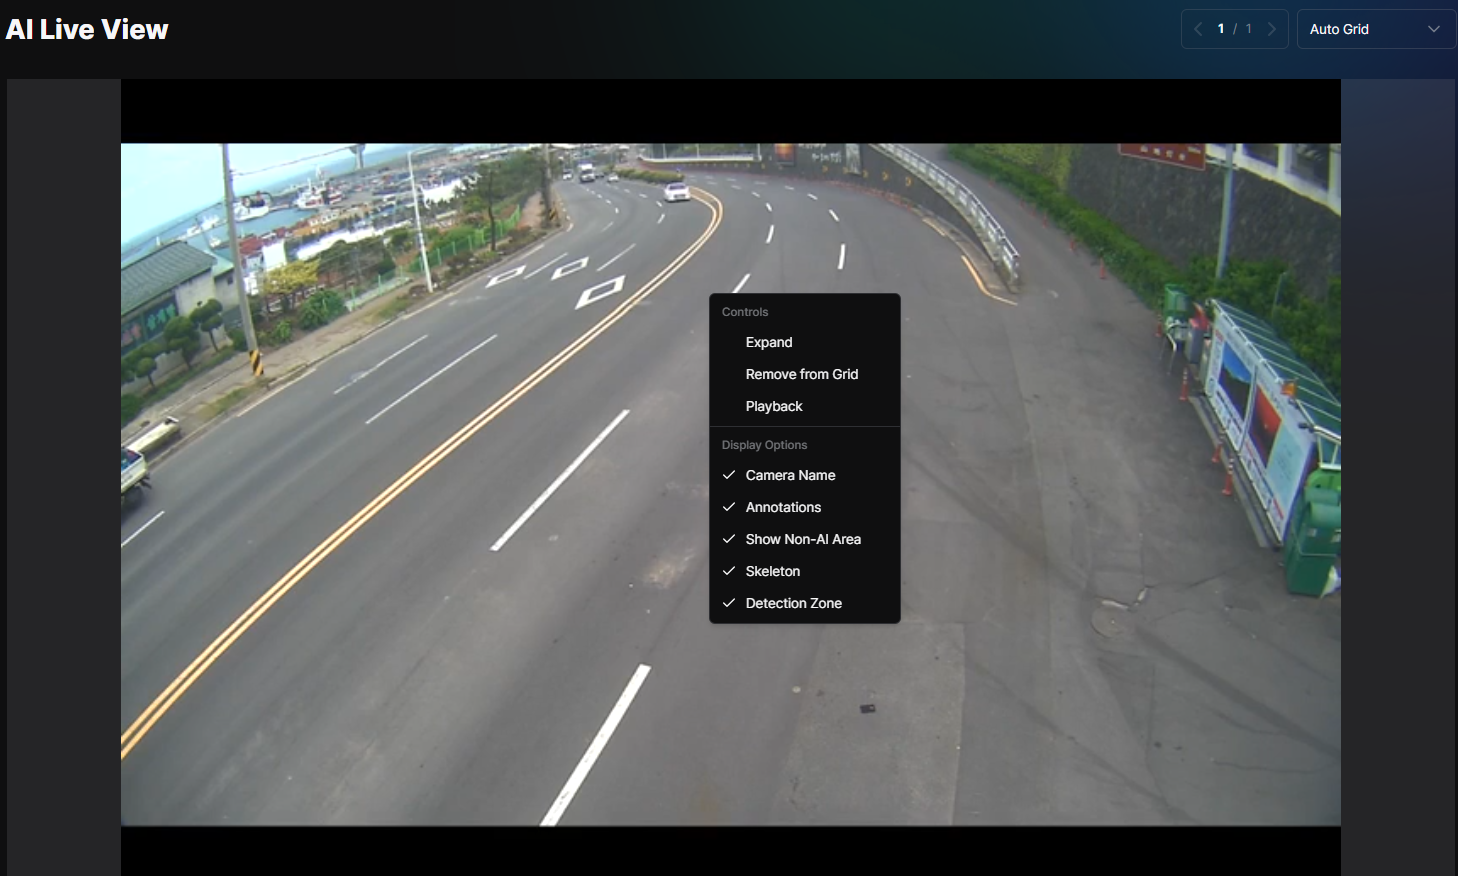 Figure 2-3. Live Video Pop-up Menu
 - Click the item you want
- [Maximize/Minimize]: Maximizes or minimizes the video.
- [Camera name]: shows the camera name on the video.
- [Show object box]: shows object boxes on the video.
- [Show Analysis Exclusion Area]: Displays the area excluded from analysis.
- [Skeleton]: shows skeletons on the video. (When the Pose model is applied)
- [Detection zone]: shows detection zones on the video.
Viewing the Latest Events in Live Video
While monitoring live video, check the latest events that occurred on that camera.
- In the main menu, click [] > [AI Live View]The live video screen appears.
- Select a video and double-click itThe video is maximized.
- Click []
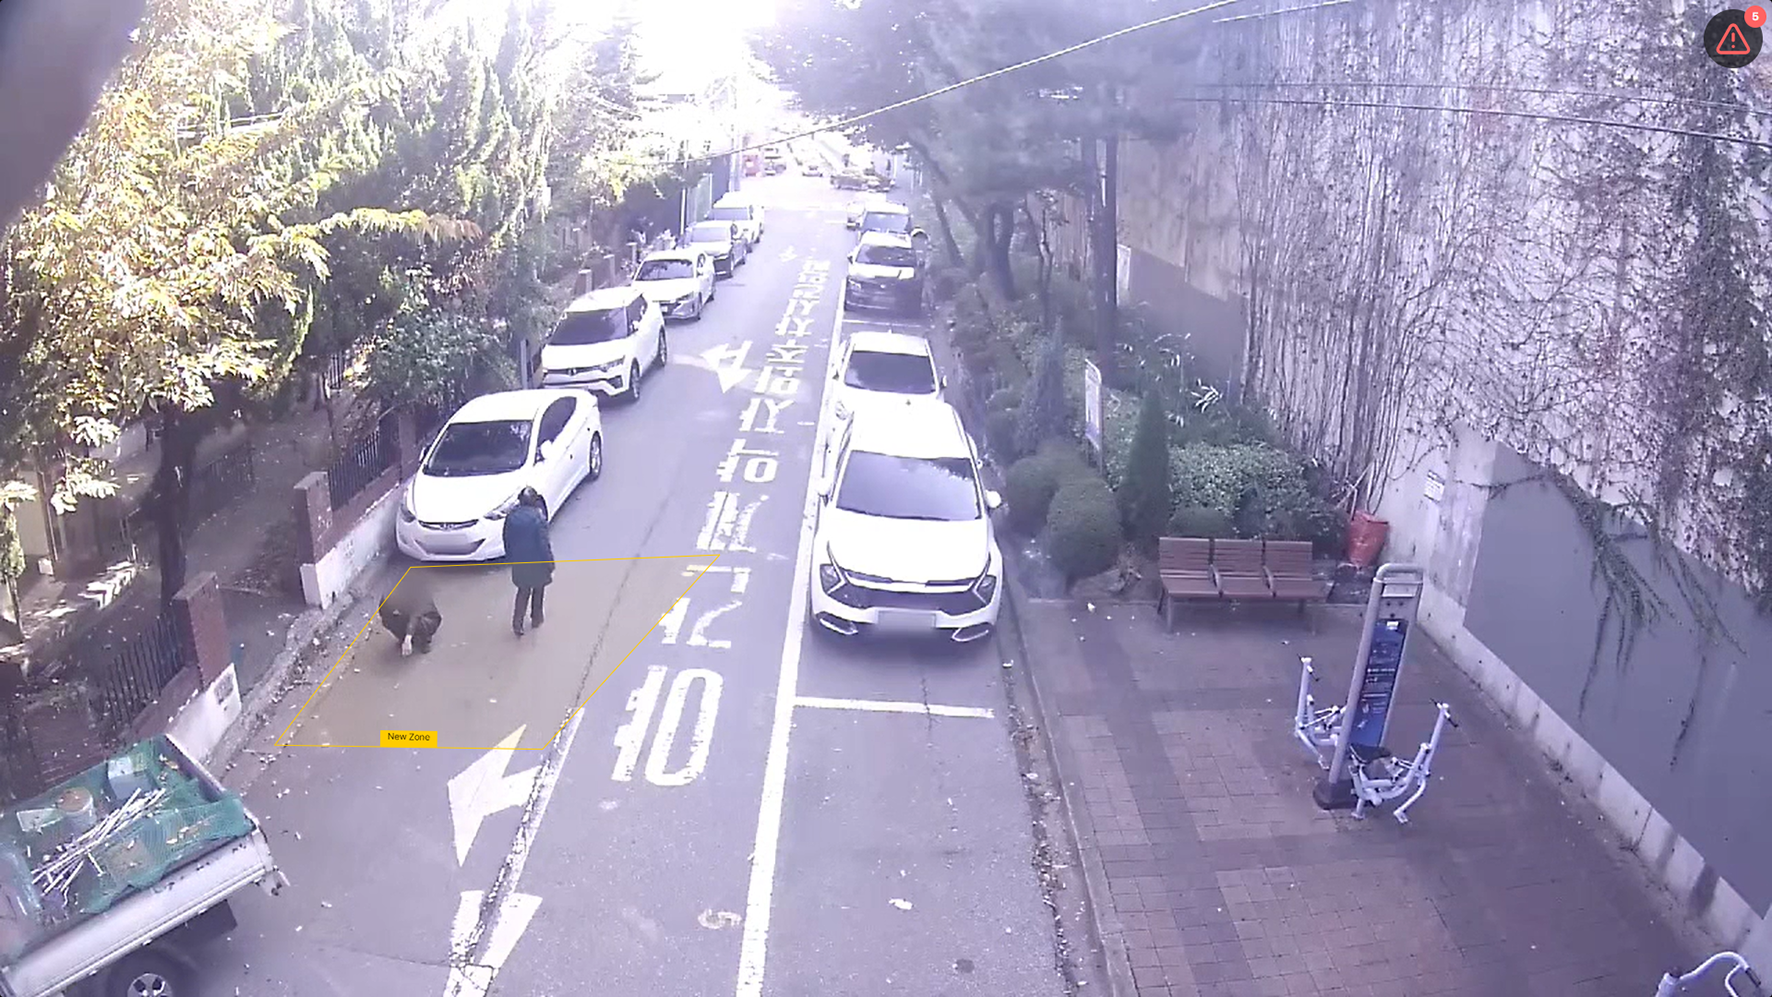 Figure 2-4. Latest Event List
 - Check the list of latest events that occurred on that camera
Viewing the Live Video Menu
The menu is shown.
- In the main menu, click [] > [AI Live View]The live video screen appears.
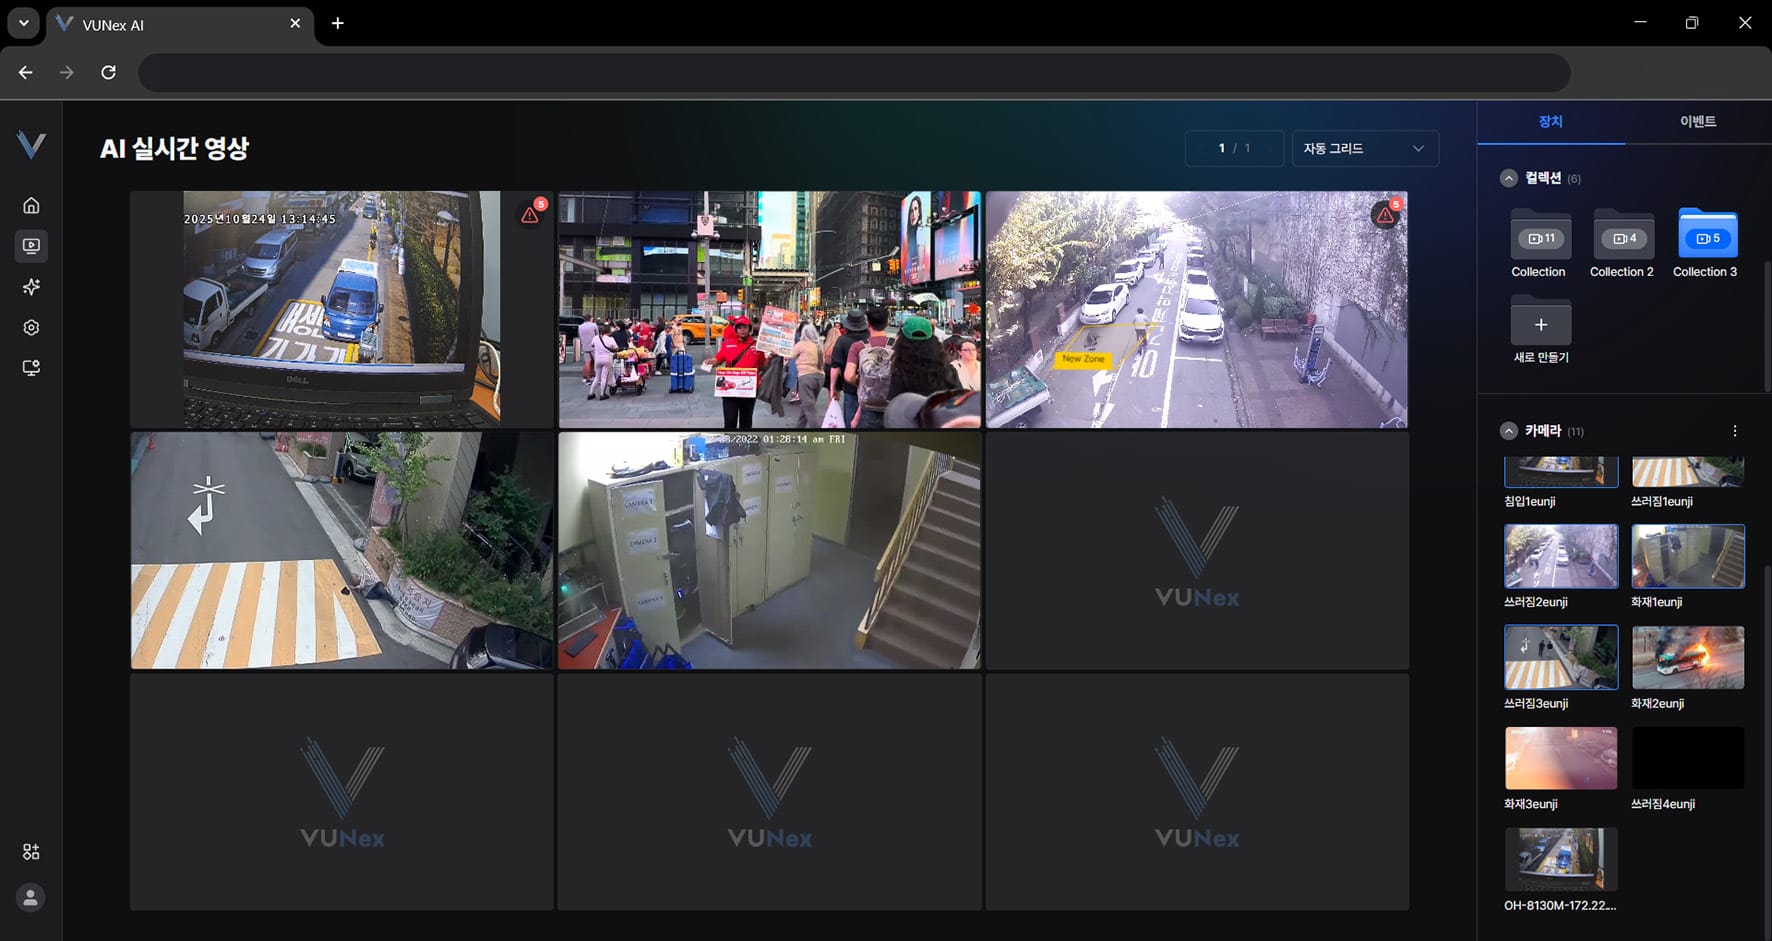 Figure 2-5. Live Video Menu
 - Click the item you want[Device]: check the registered cameras. [Event]: check the event list.
- Right-click on the videoThe pop-up menu appears.
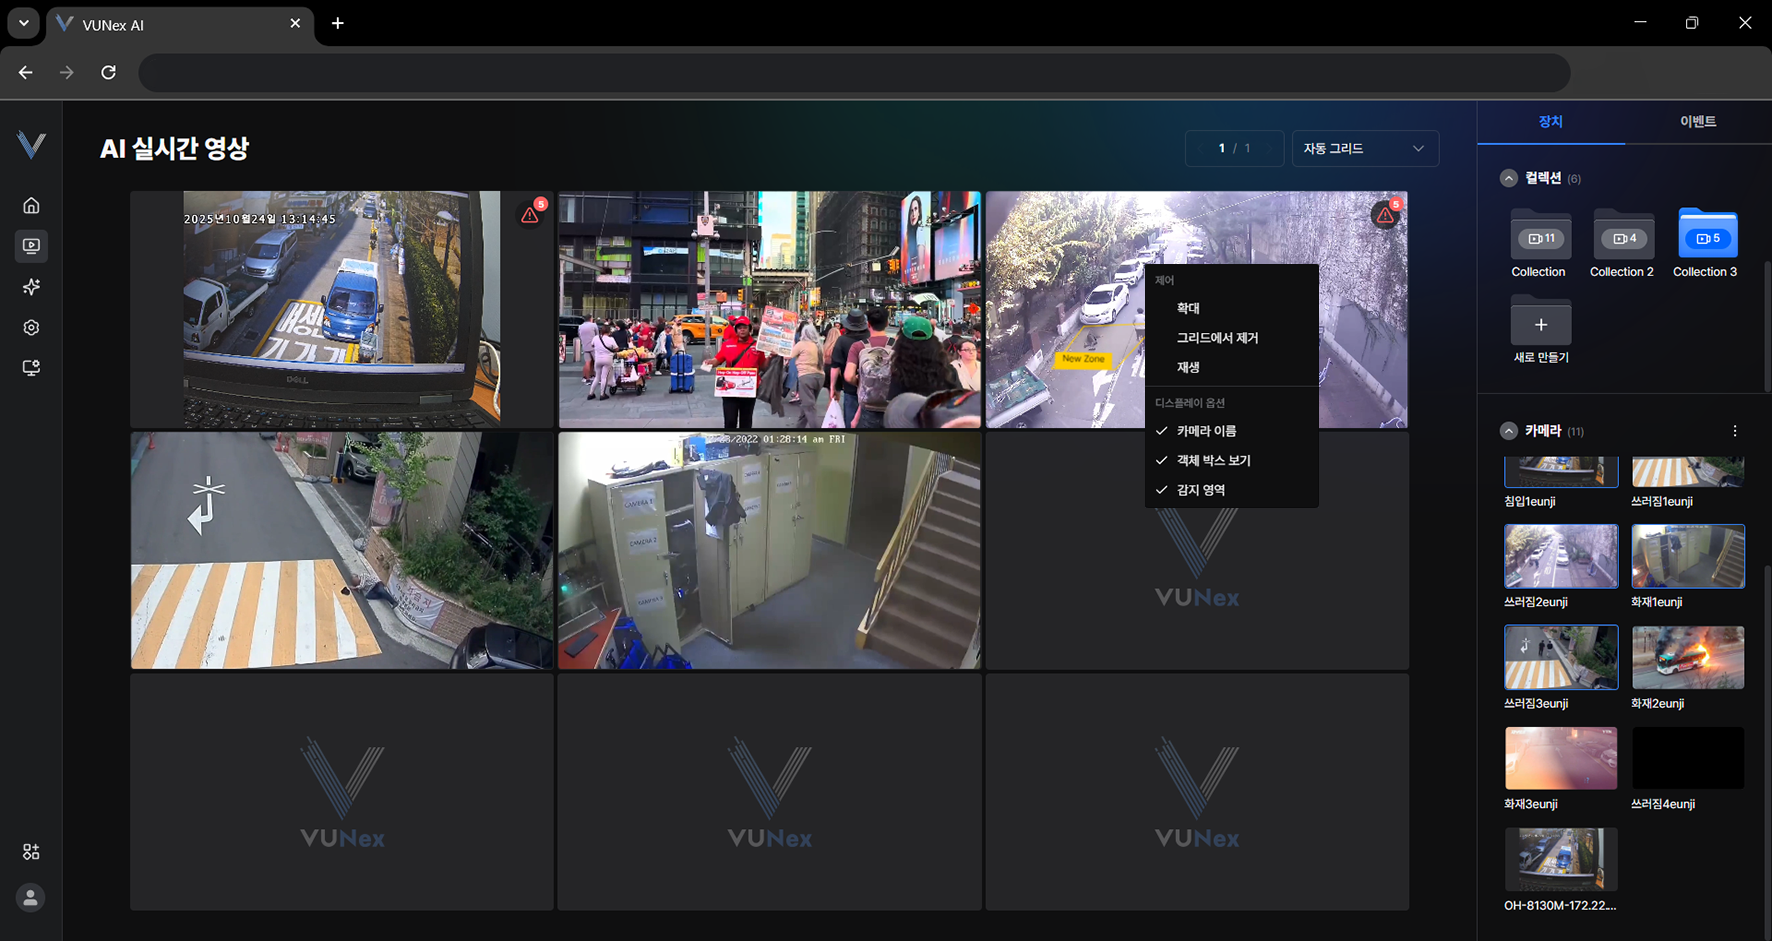 Figure 2-6. Video Cell Pop-up Menu
 - Click the item you want
- [Maximize/Minimize]: Maximizes or minimizes the video.
- [Remove from Grid]: Removes the video from the grid
- [Playback]: Starts playback.
- [Camera name]: shows the camera name on the video.
- [Show object box]: shows object boxes on the video.
- [Show Analysis Exclusion Area]: Displays the area excluded from analysis.
- [Skeleton]: shows skeletons on the video. (When the Pose model is applied)
- [Detection zone]: shows detection zones on the video.
Viewing the Camera List
Set how the camera list is shown.
- In the main menu, click [] > [AI Live View]The live video screen appears.
- Click [Device] > [Camera] > []
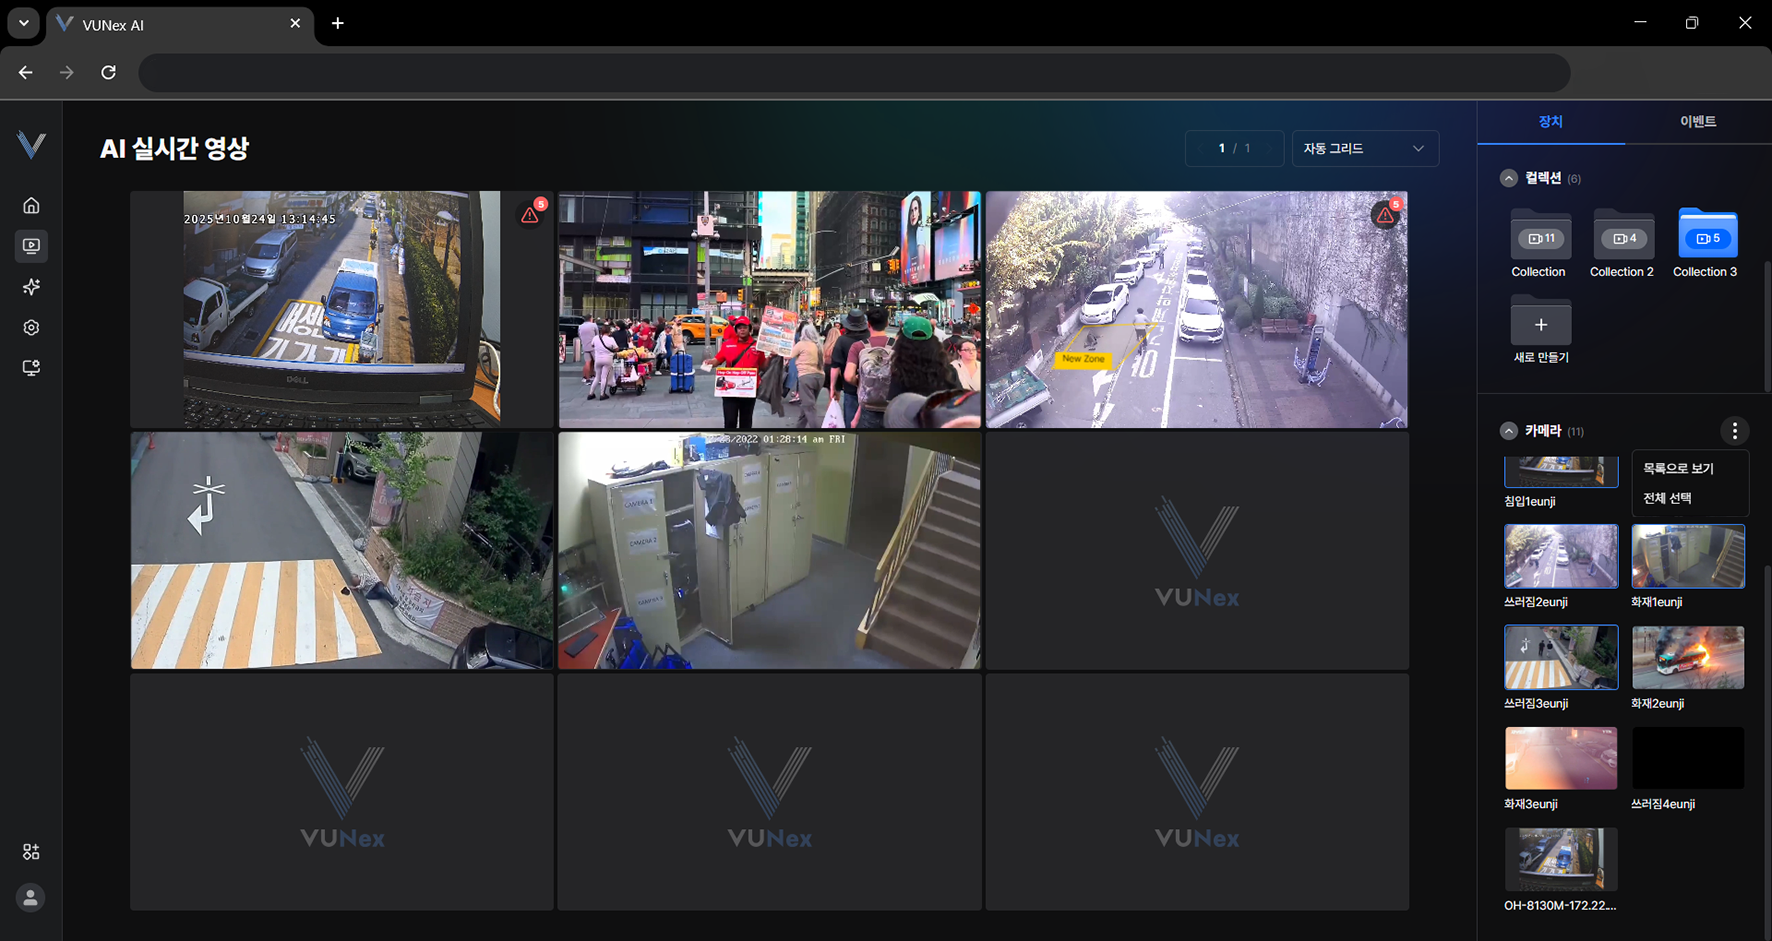 Figure 2-7. Camera List View
 - Click [View as list]
- Set how the camera list is shown
Changing the Grid
Change the number of cells shown on the screen.
- In the main menu, click [] > [AI Live View]The live video screen appears.
- Click [Auto Grid].
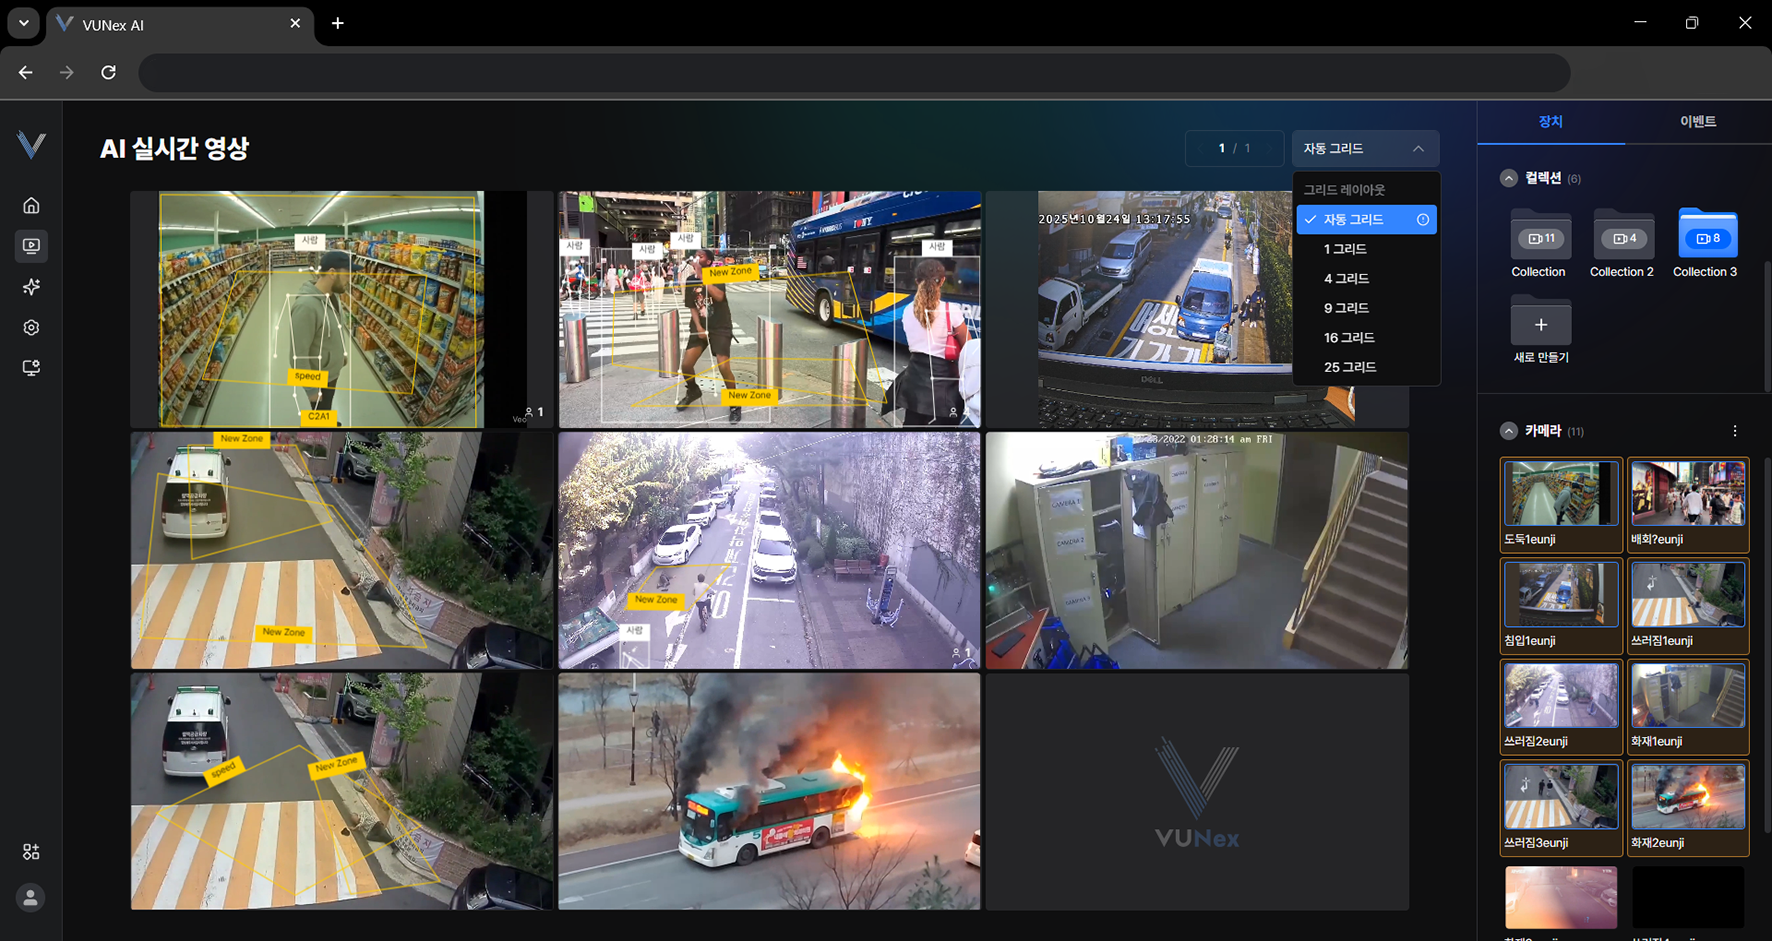 Figure 2-8. Changing the Grid
 - Select the item you wantYou can switch to Custom Mode, and the grid is selected based on the video aspect ratio.
- Change the number of cells shown on the screen
Assigning a Camera to the Video Area
Assign a camera to the video area.
- In the main menu, click [] > [AI Live View] > [Device]
- Select the collection or camera you want
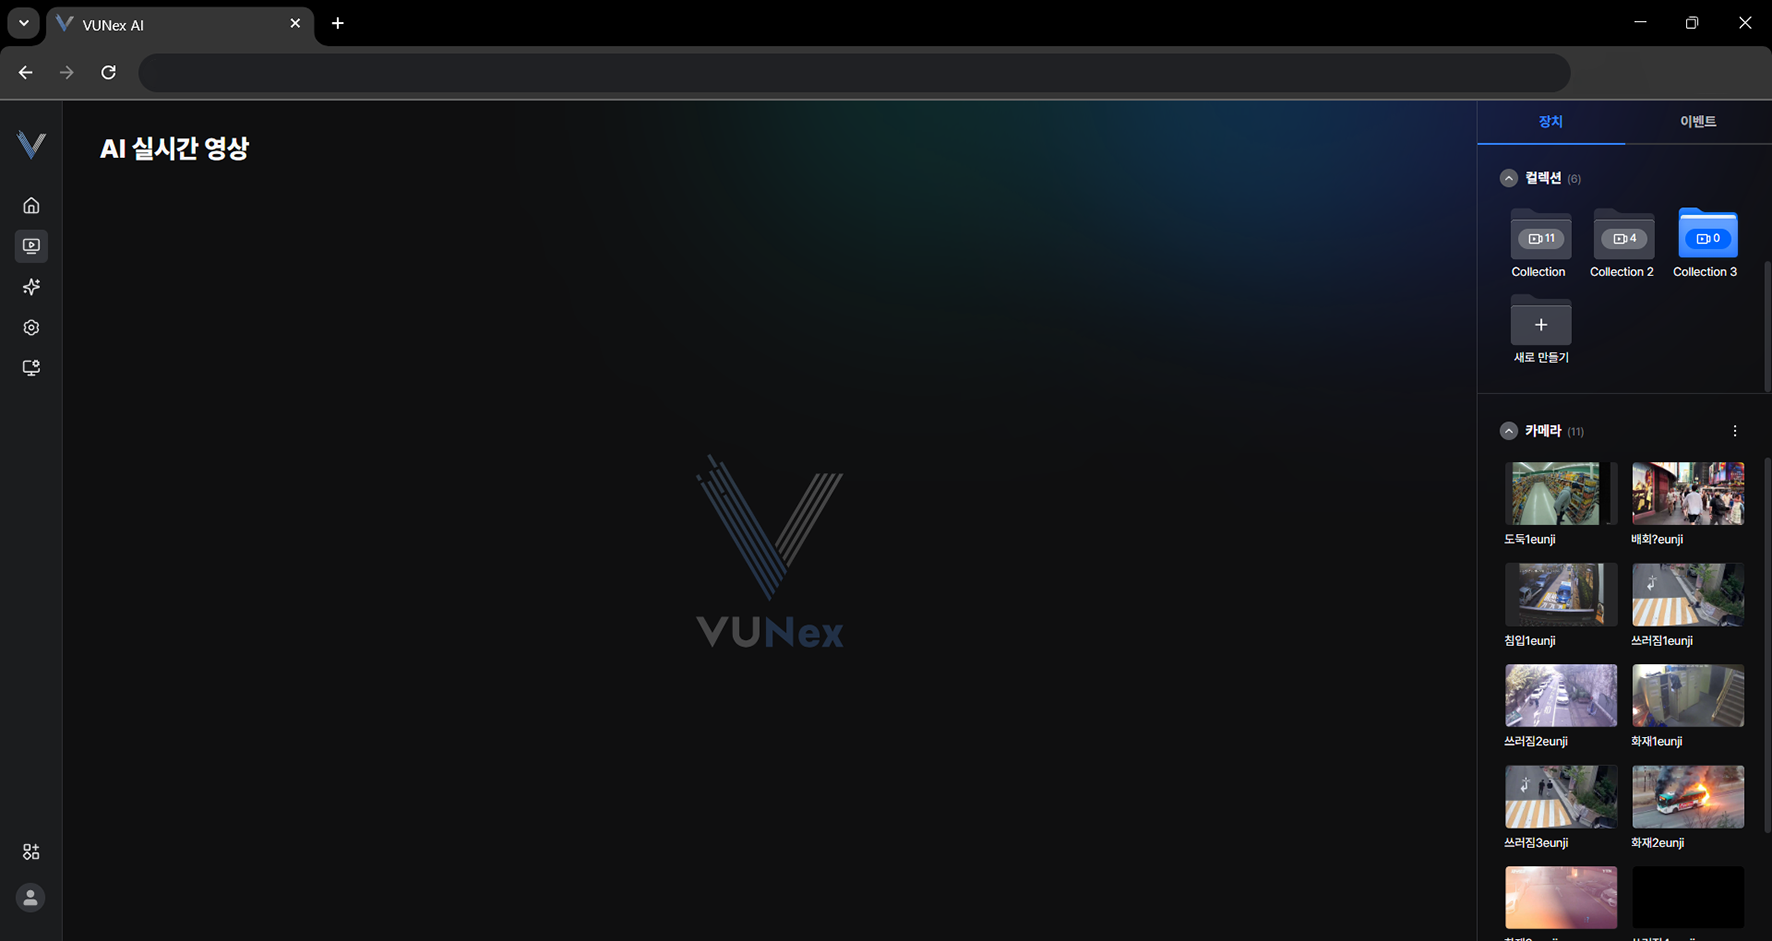 Figure 2-9. Assigning a Camera
 - Drag it to the video area or to a collection
- Assign a camera to the video area
Checking the Non-AI Area
Show the area where AI analysis is not applied on top of the video.
- In the main menu, click [] > [AI Live View]
- Right-click on the video
- Click [Display options] > [Show non-AI area]
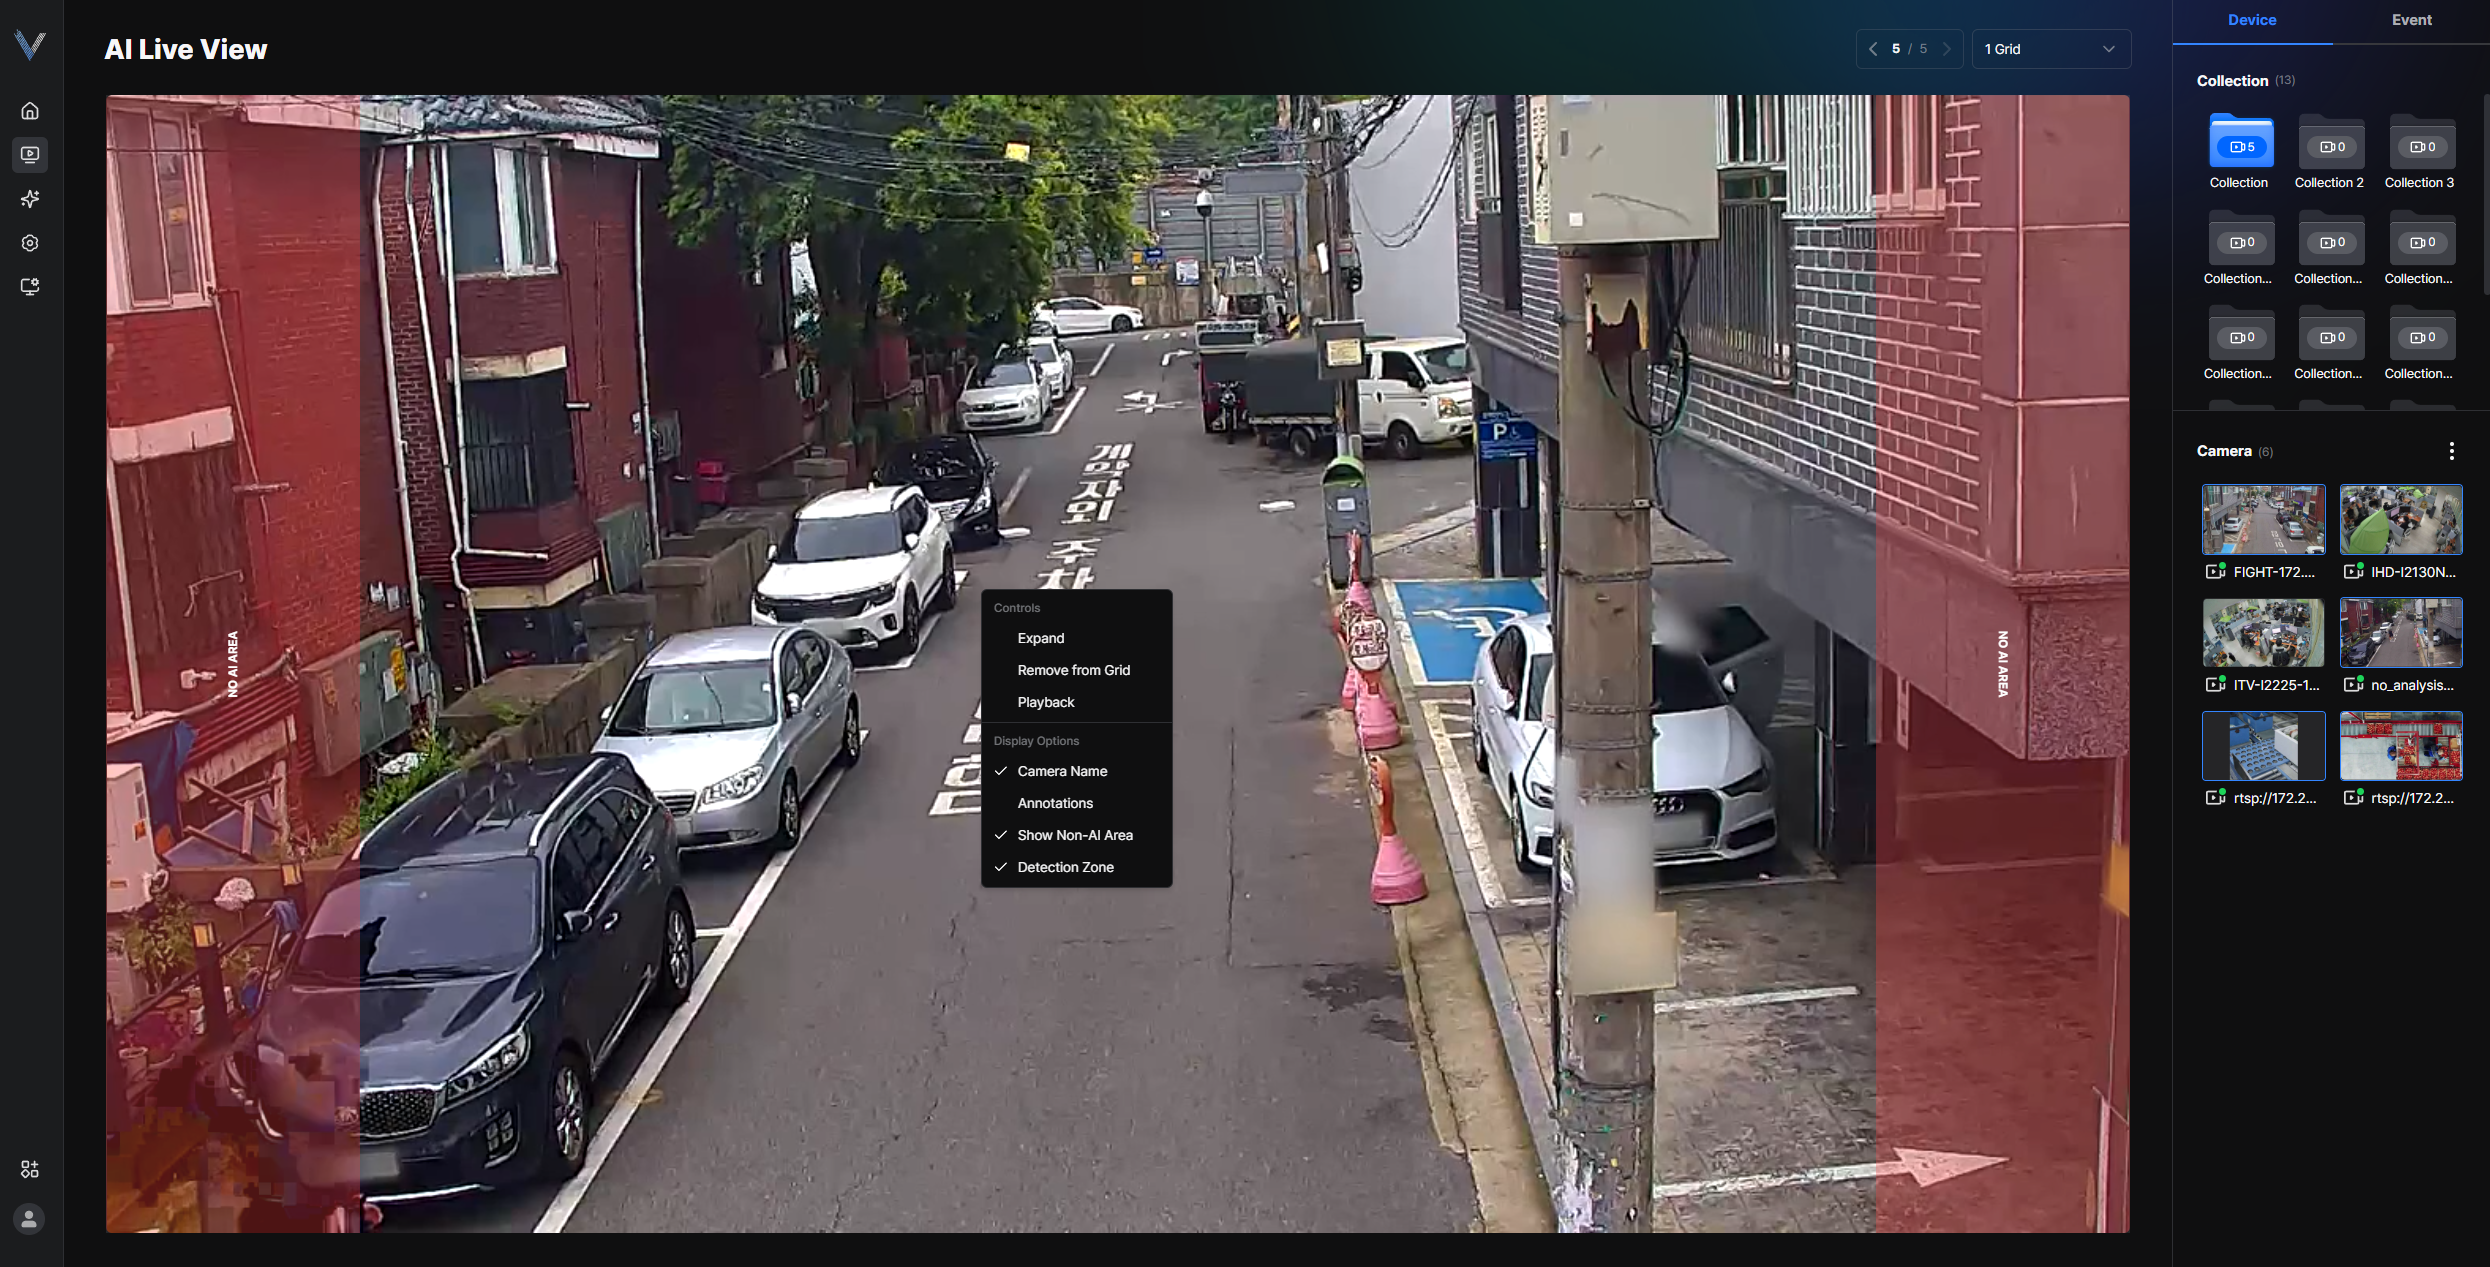 Figure 2-18. Showing the Non-AI Area
Creating a New Collection
Save cameras to a new collection.
- In the main menu, click [] > [AI Live View] > [Device]
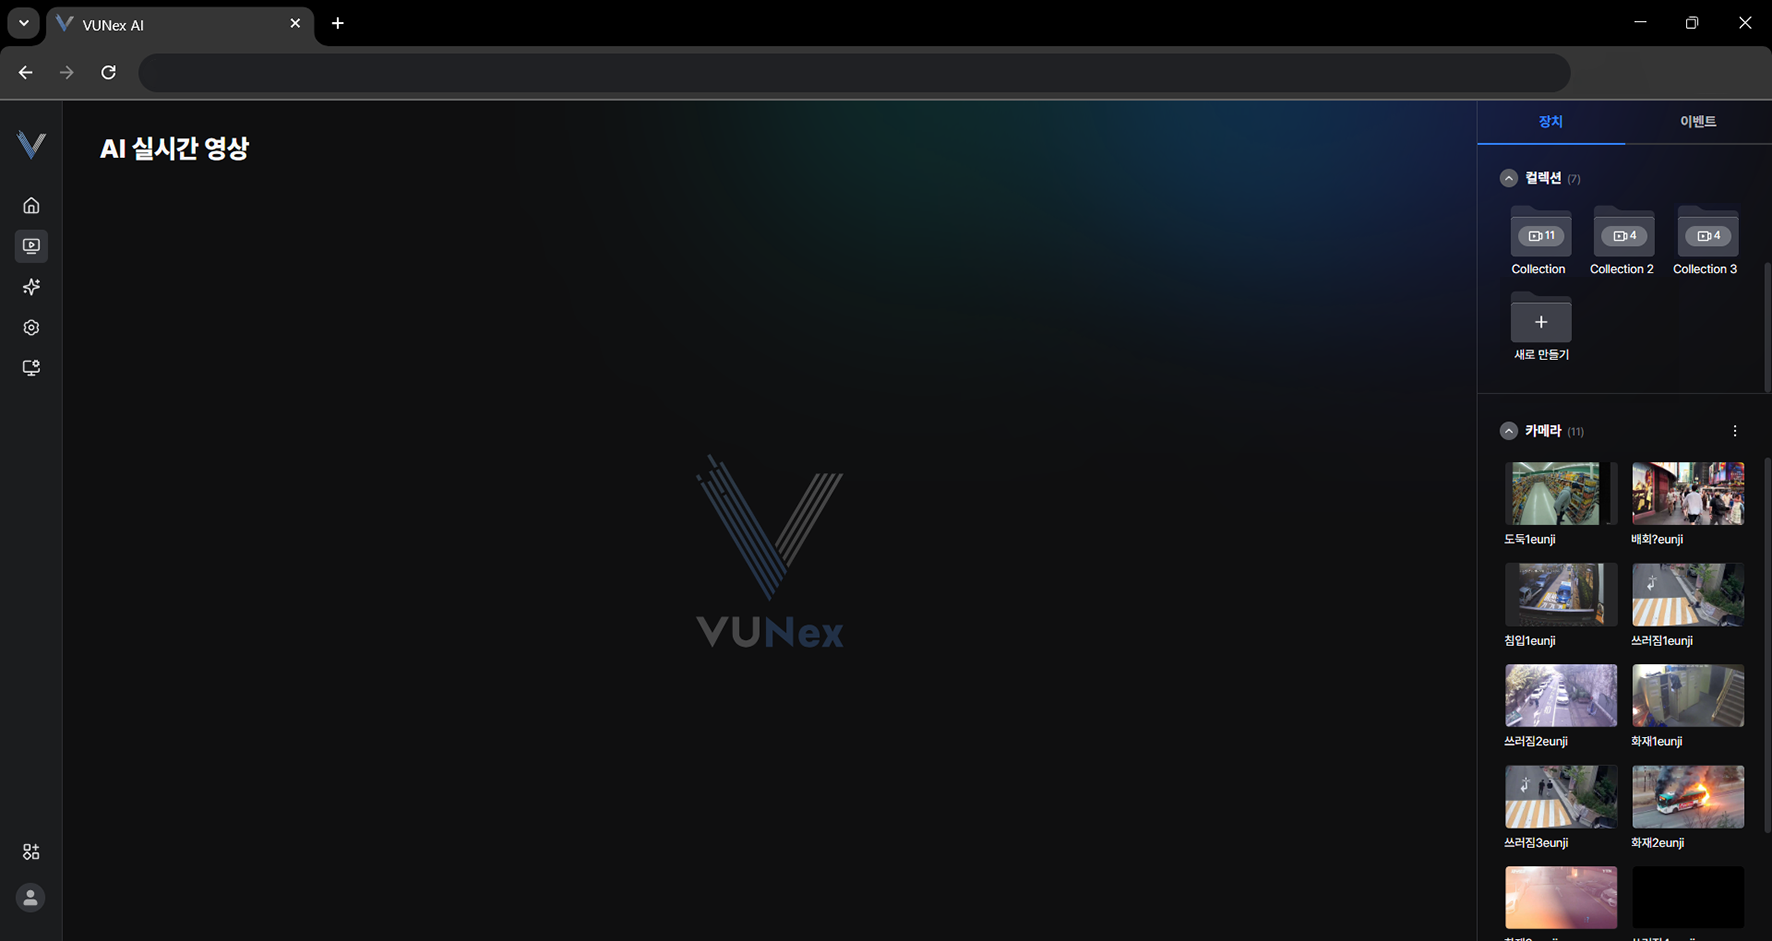 Figure 2-10. Creating a New Collection
 - Click [New]
- Enter a name
- Drag it to the video area or to a collection
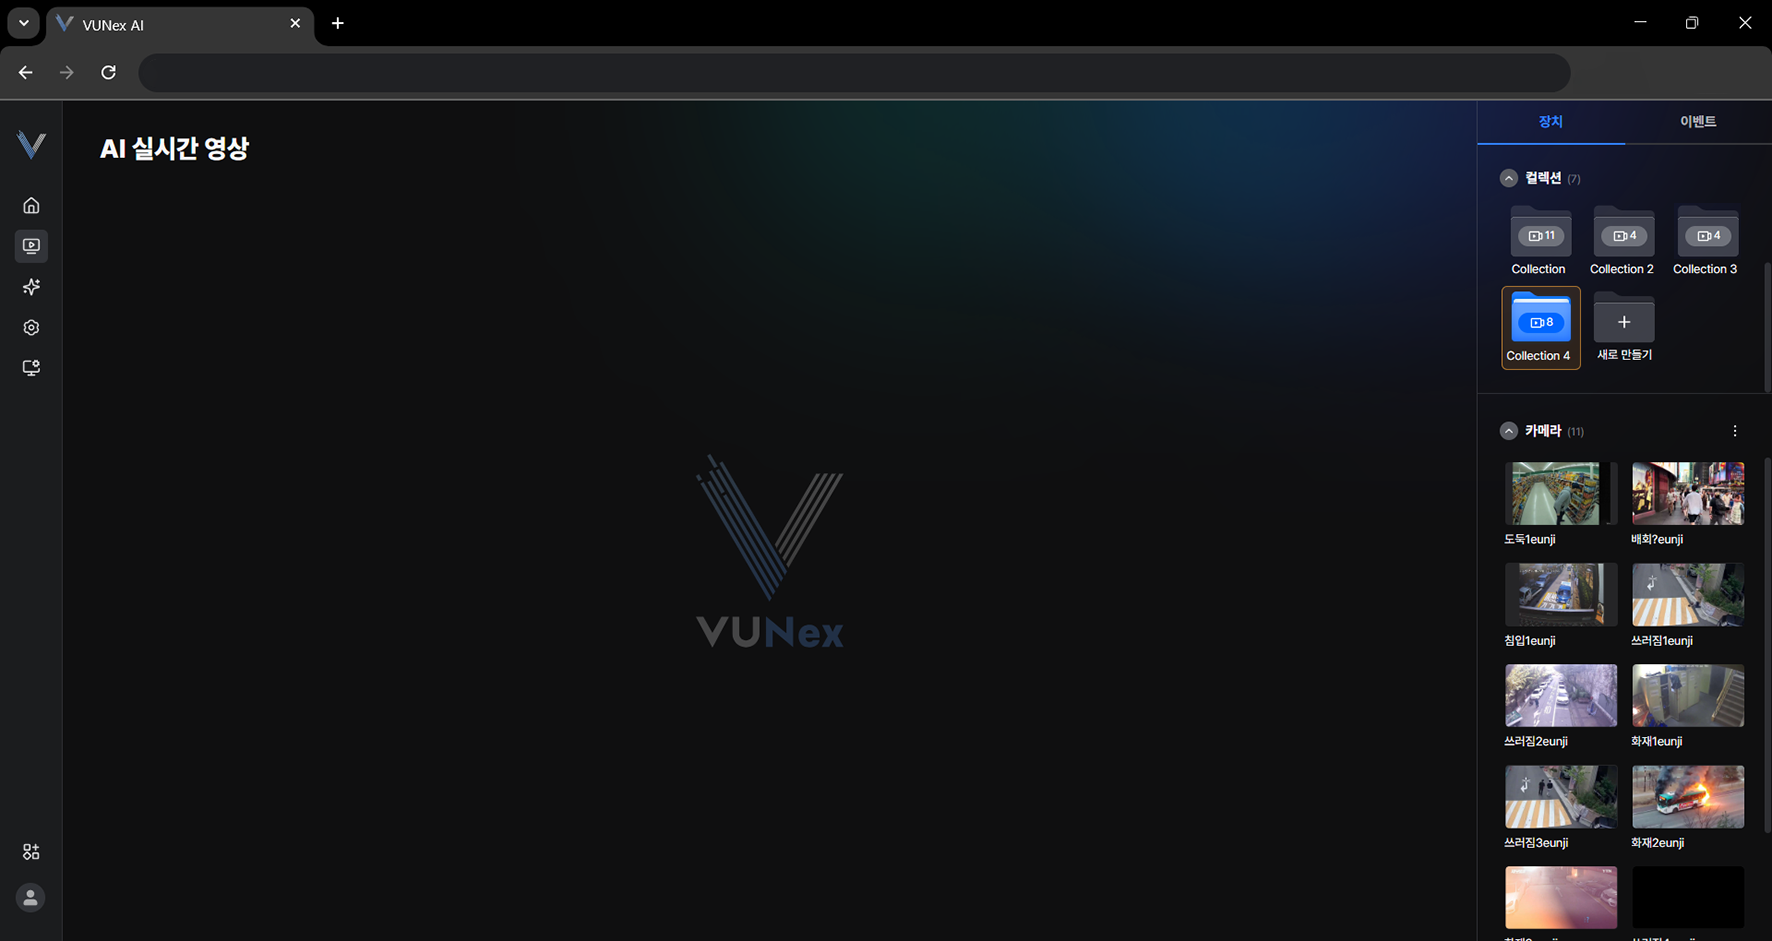 Figure 2-11. Saving Cameras to a Collection
 - Save cameras to the collection
Editing a Collection
Edit a collection.
- In the main menu, click [] > [AI Live View] > [Device]
- Select a collection and right-click itThe pop-up menu appears.
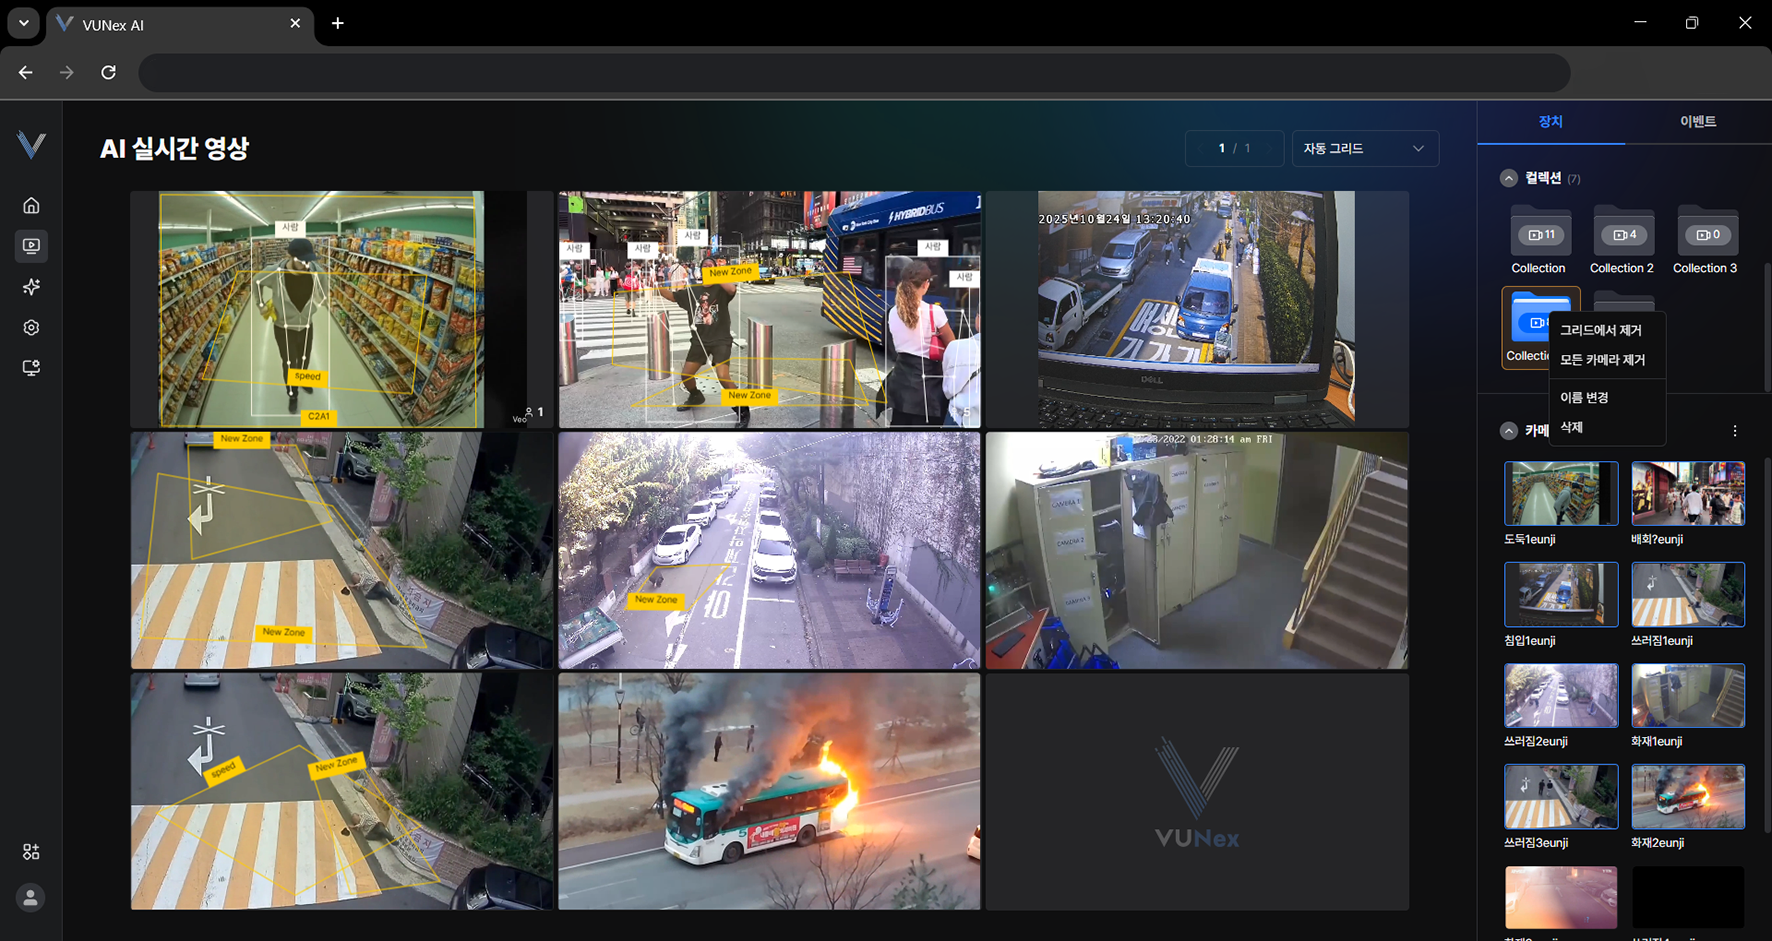 Figure 2-12. Collection Edit Menu
 - Click the item you want[Remove from grid]: unassigns the camera from the video area. [Remove all cameras]: removes every camera saved in the collection. [Rename]: changes the collection name. [Delete]: deletes the collection.
Deleting a Collection
The collection is deleted.
- In the main menu, click [] > [AI Live View] > [Device]
- Select a collection and right-click itThe pop-up menu appears.
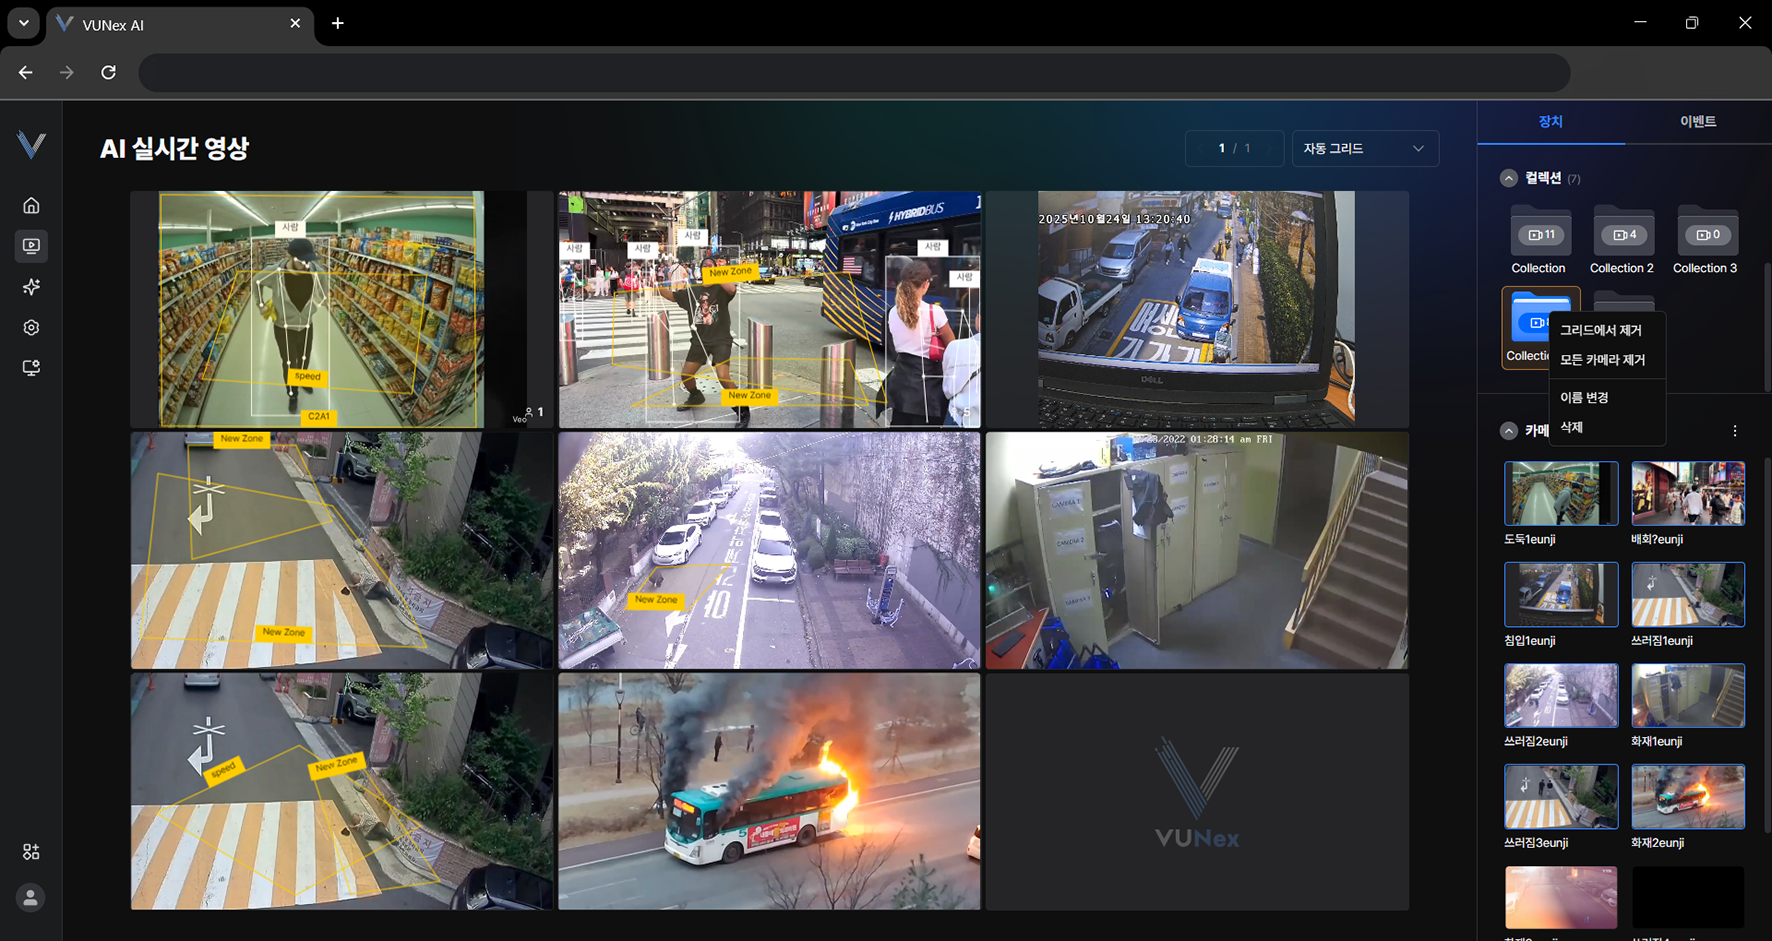 Figure 2-13. Deleting a Collection
 - Click [Delete]
- Click [OK]The collection is deleted.
Notes on Using Collections
This topic covers the limits and behaviors that apply when creating and managing collections.
- Up to 20 collections can be created; the [New] button is disabled once the limit is reached.
- Two collections cannot have the same name.
- If you assign a camera that is already assigned, that camera is skipped and only the remaining cameras are assigned.
- Right-click a collection to use [Show on grid], [Remove from grid], [Remove all cameras], [Rename] and [Delete].
- When the collection list grows long, you can scroll within the list.
Viewing Event Cell Notifications
Check the event notification shown on the cell.
- In the main menu, click [] > [AI Live View]The live video screen appears.
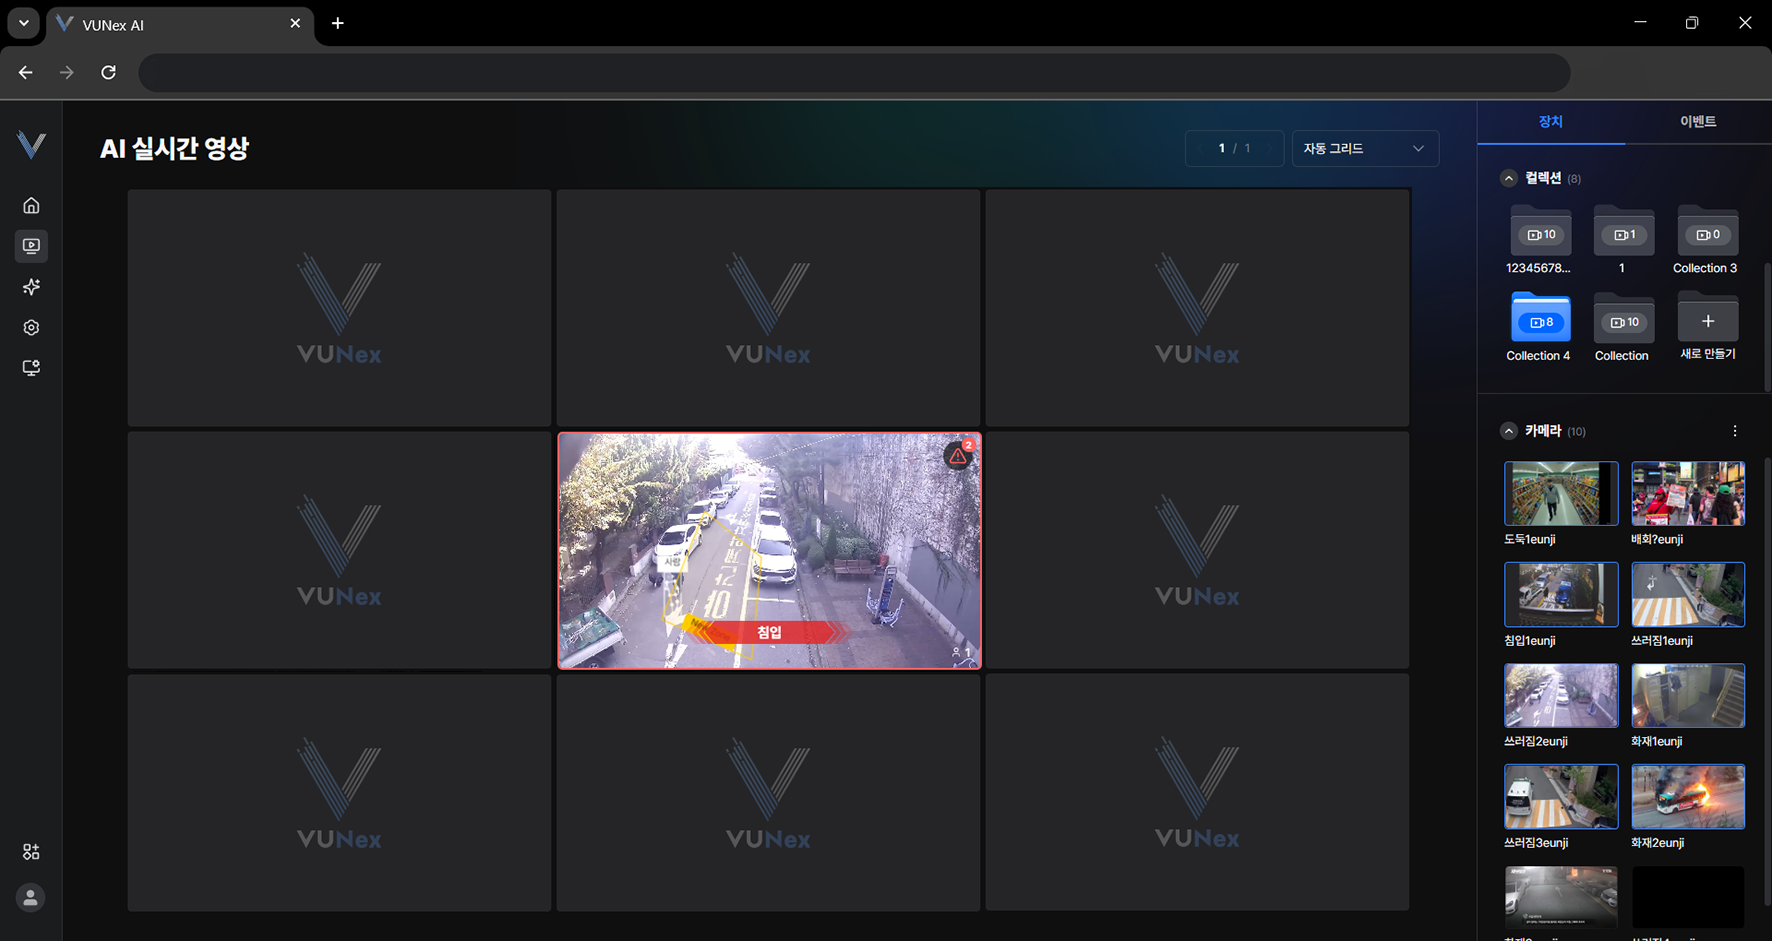 Figure 2-14. Event Cell Notification
 - Check the event notification shown on the cell
- Click []
- Click the item you want
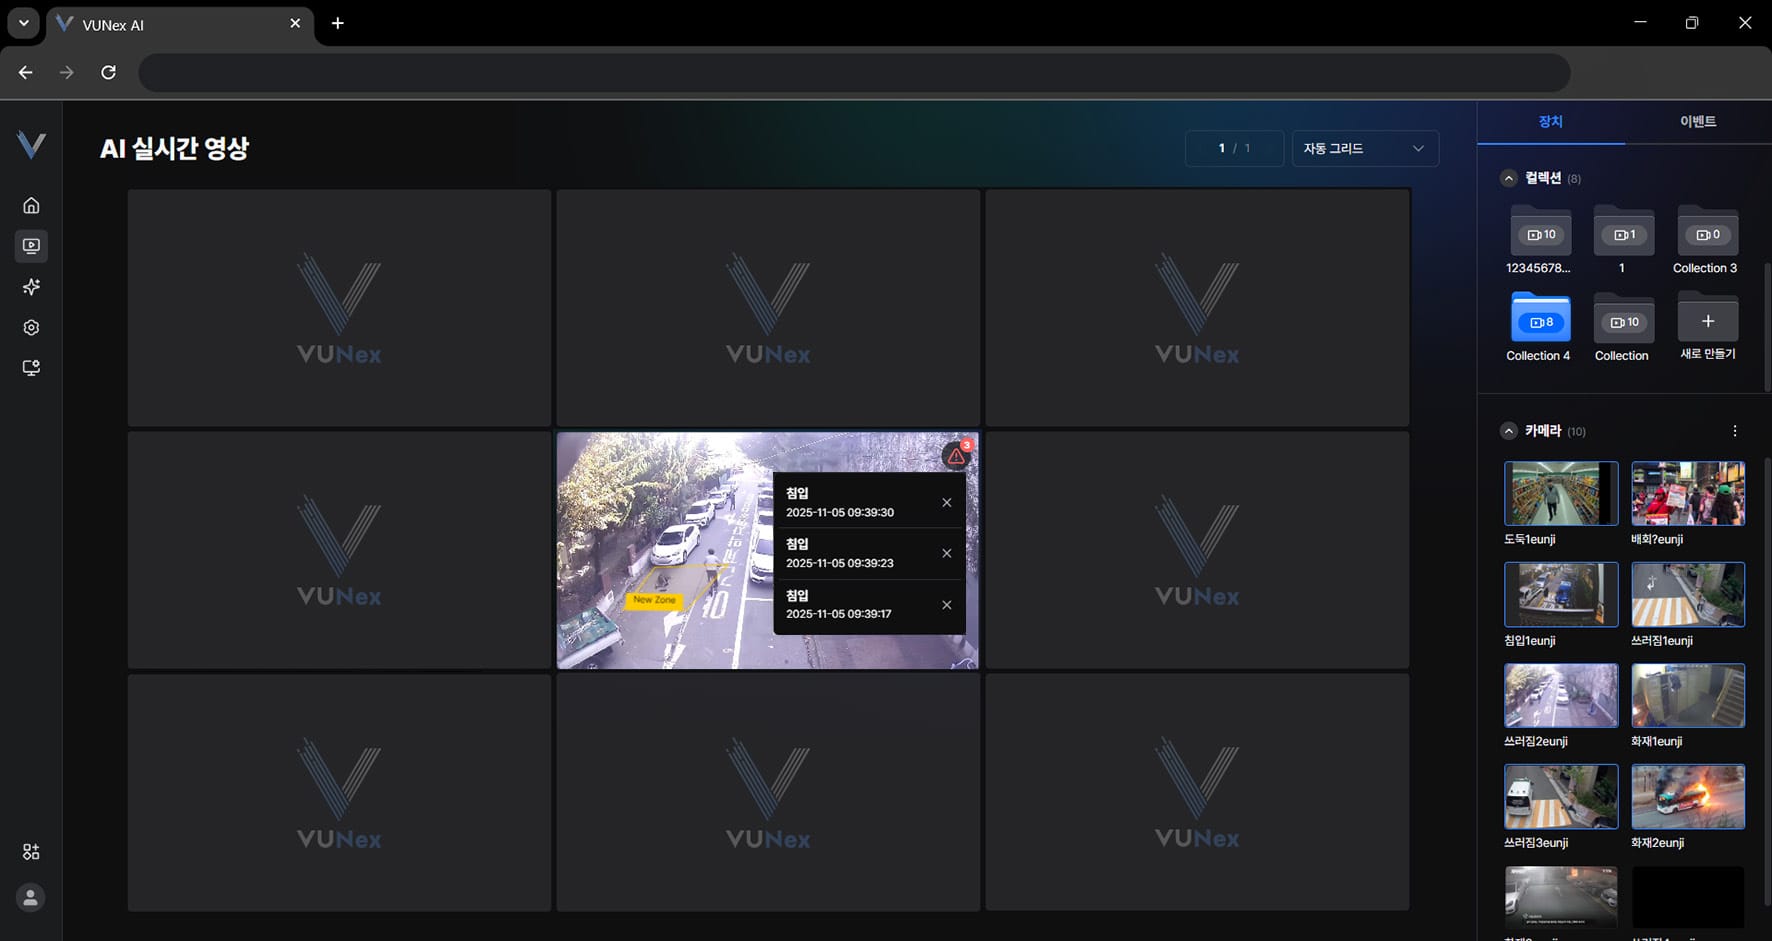 Figure 2-15. Event Details
 - Check the event details
Viewing the Event Notification List
Check the event notification list.
- In the main menu, click [] > [AI Live View] > [Event]
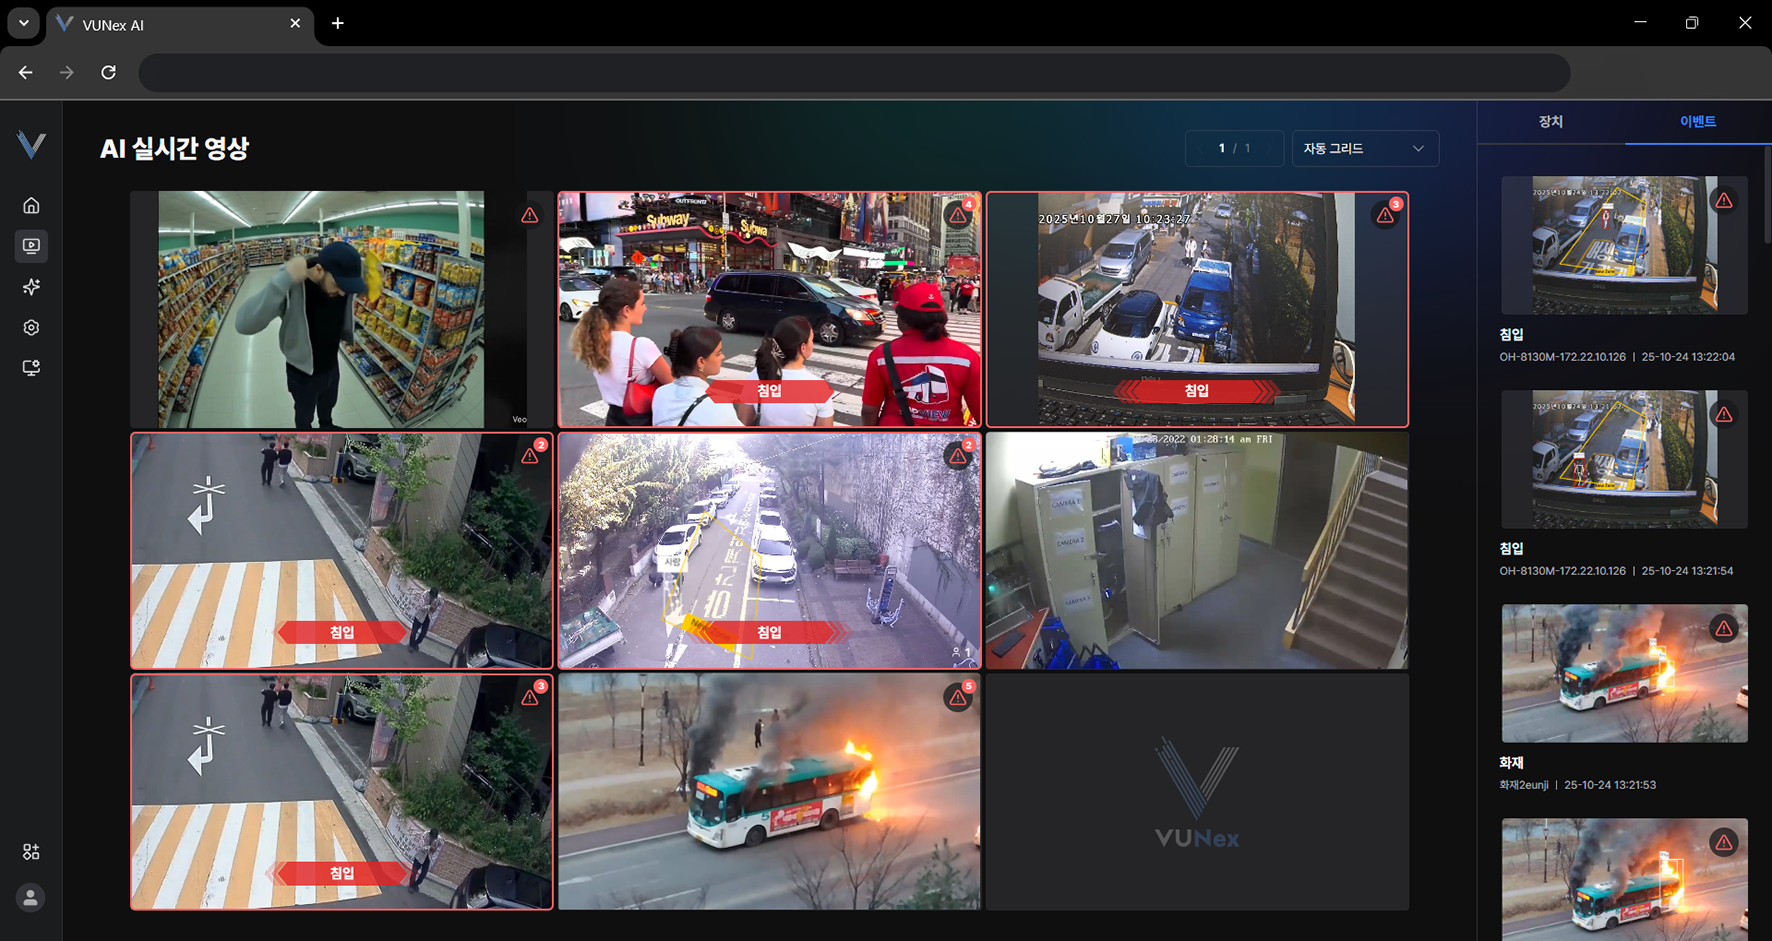 Figure 2-16. Event Notification List
 - Check the event notification list
- Click the item you want
- Check the event details
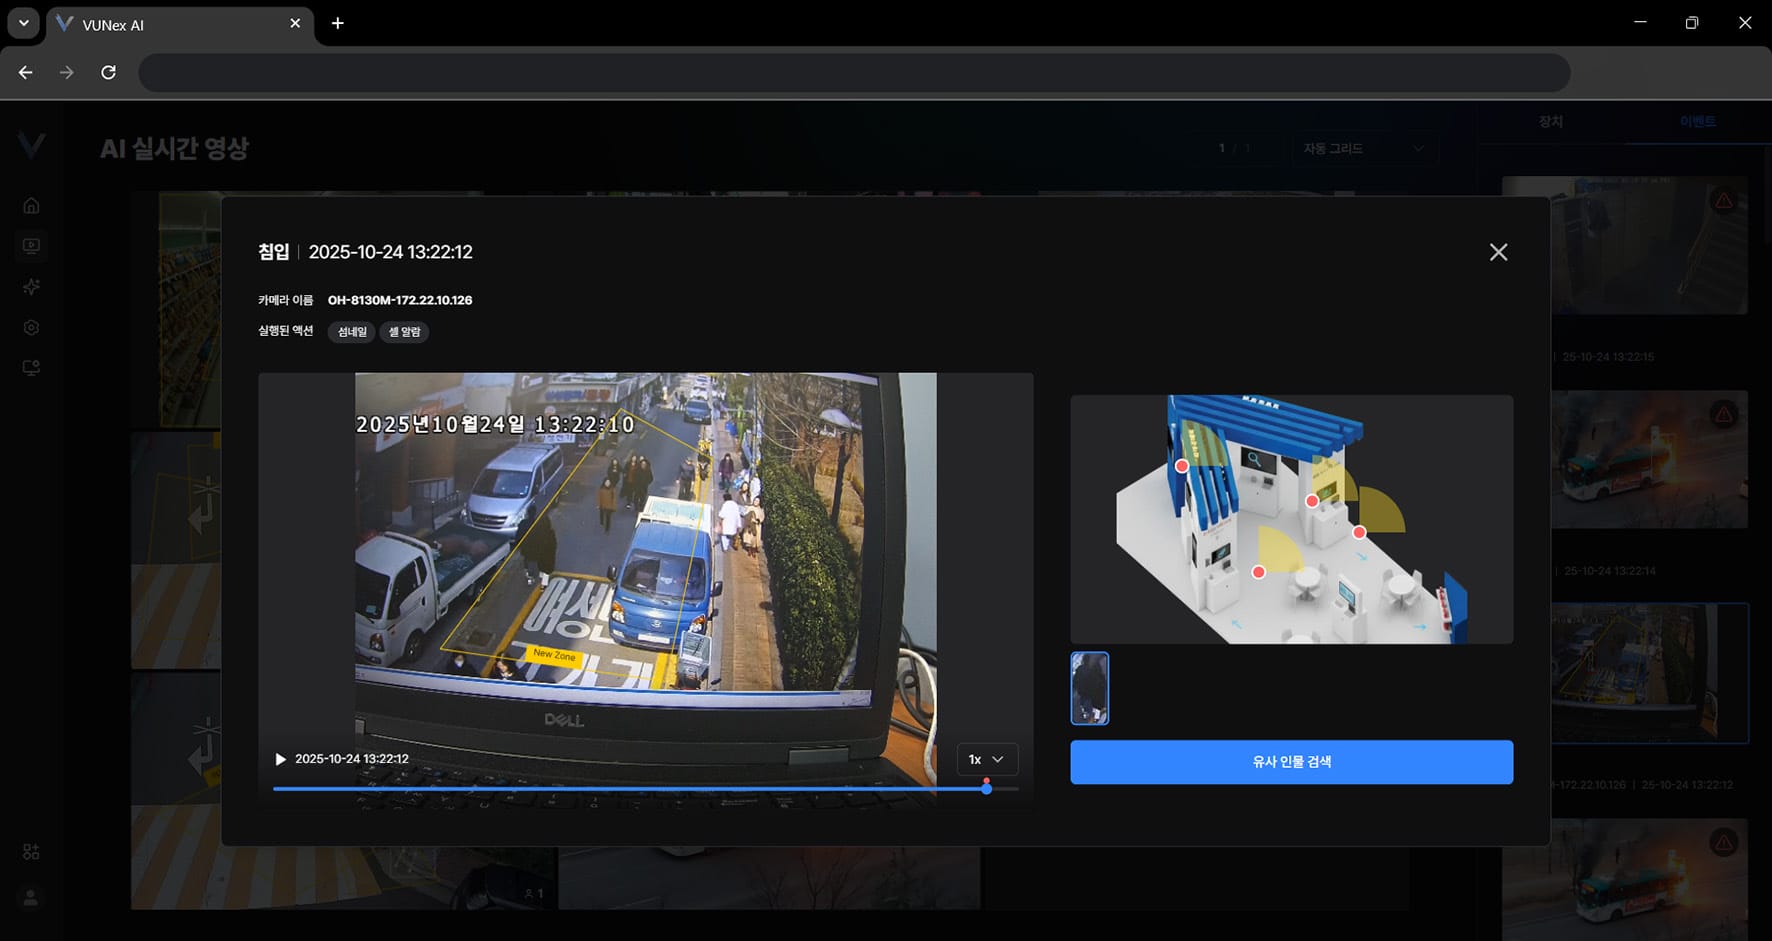 Figure 2-17. Event Details and Similar Person Search
Playback
Check recorded video and menu.
Viewing Recorded Video
Check the recorded video.
- In the main menu, click [] > [Recorded Video]The recorded video screen appears.
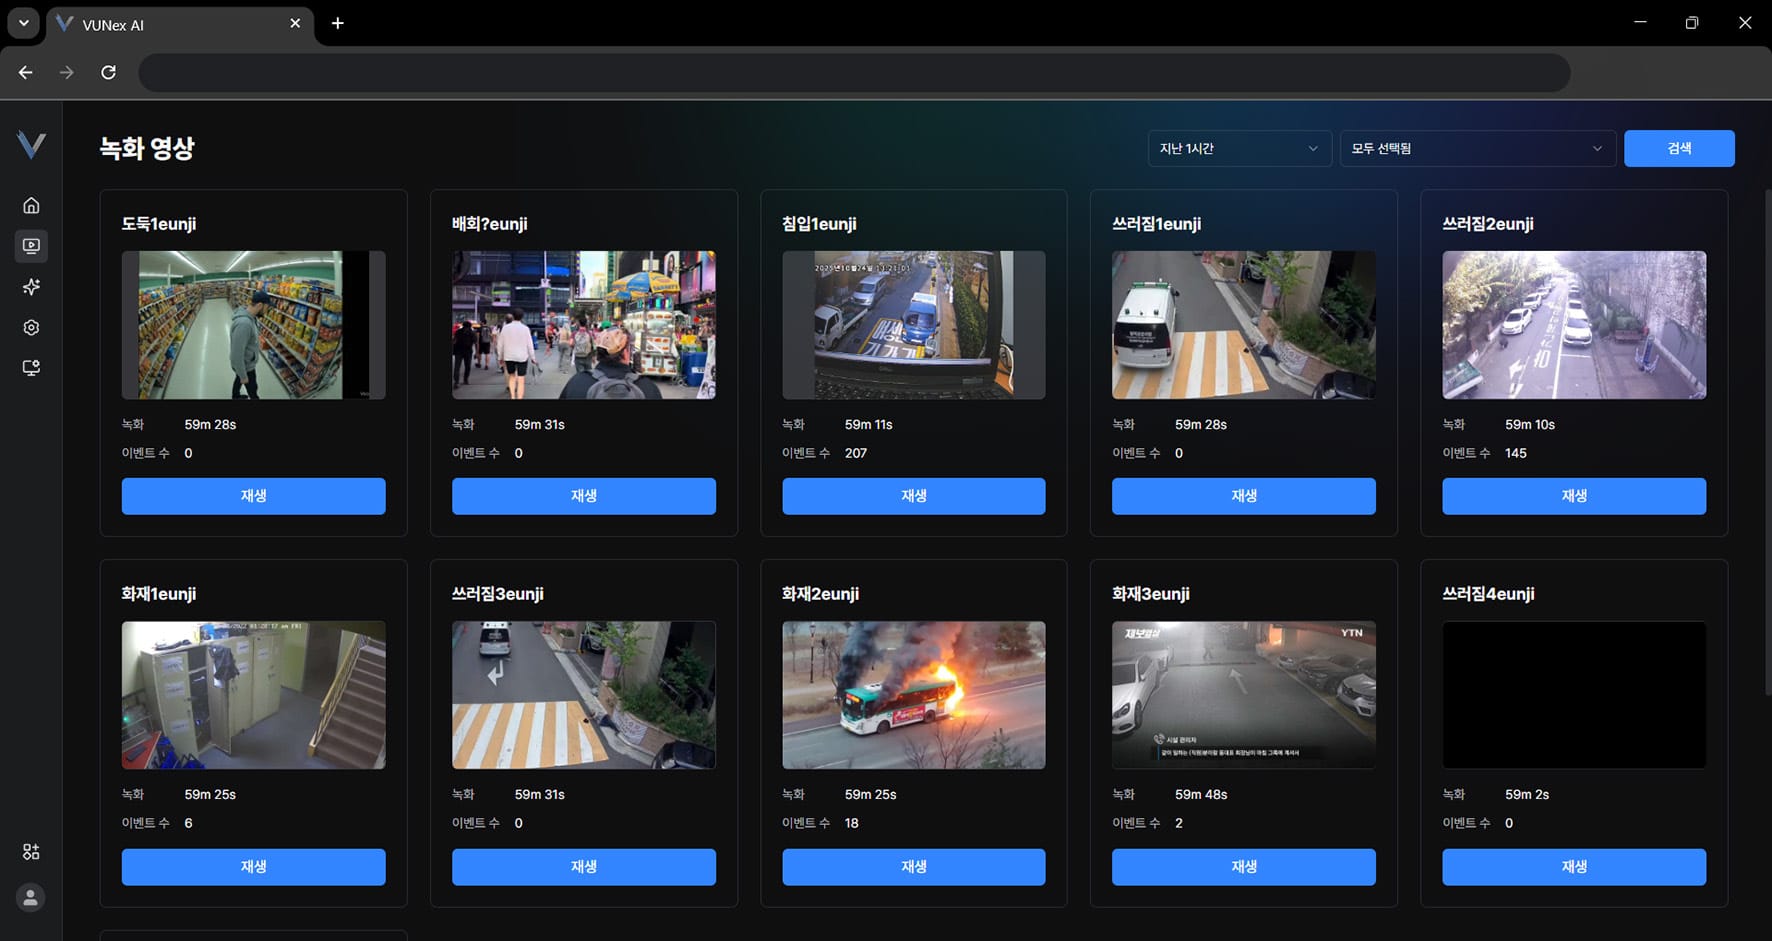 Figure 3-1. Recorded Video Screen
 - Click [Playback]
- Select a video and double-click itThe video is maximized.
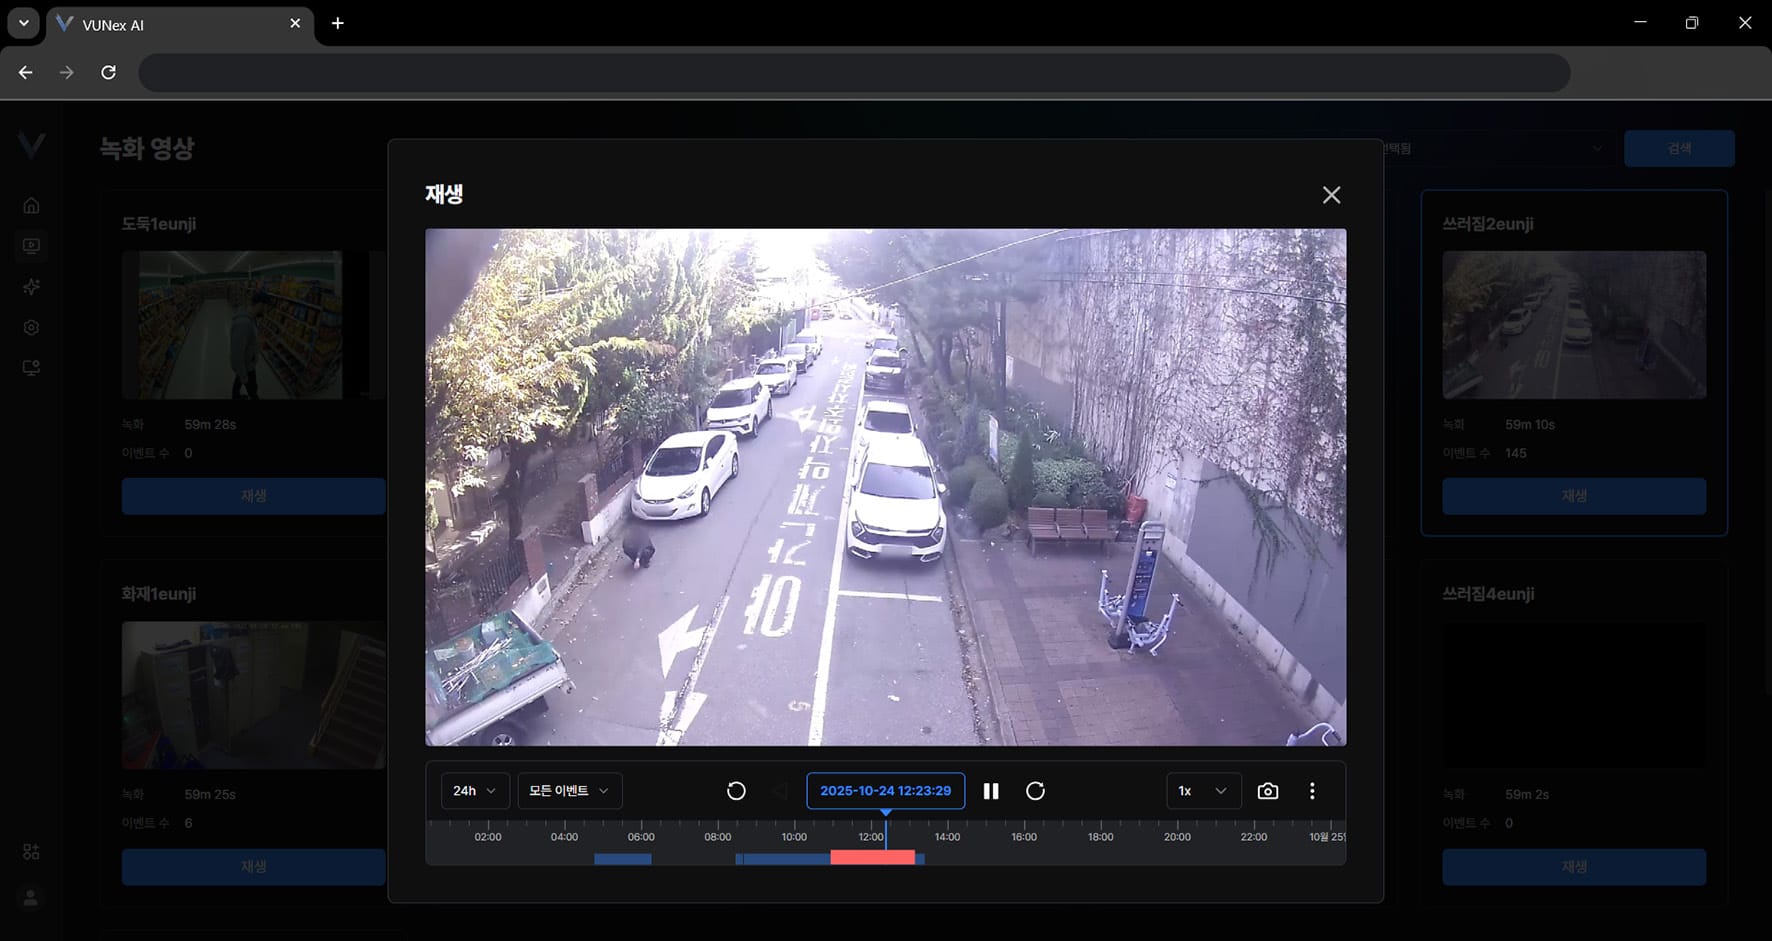 Figure 3-2. Recorded Video Playback
 - Check the recorded video
Viewing Recorded Video Options
Check the recorded video options.
- In the main menu, click [] > [Recorded Video]The recorded video screen appears.
- Click [Playback]
- Select a video and double-click itThe video is maximized.
- Right-click on the videoThe pop-up menu appears.
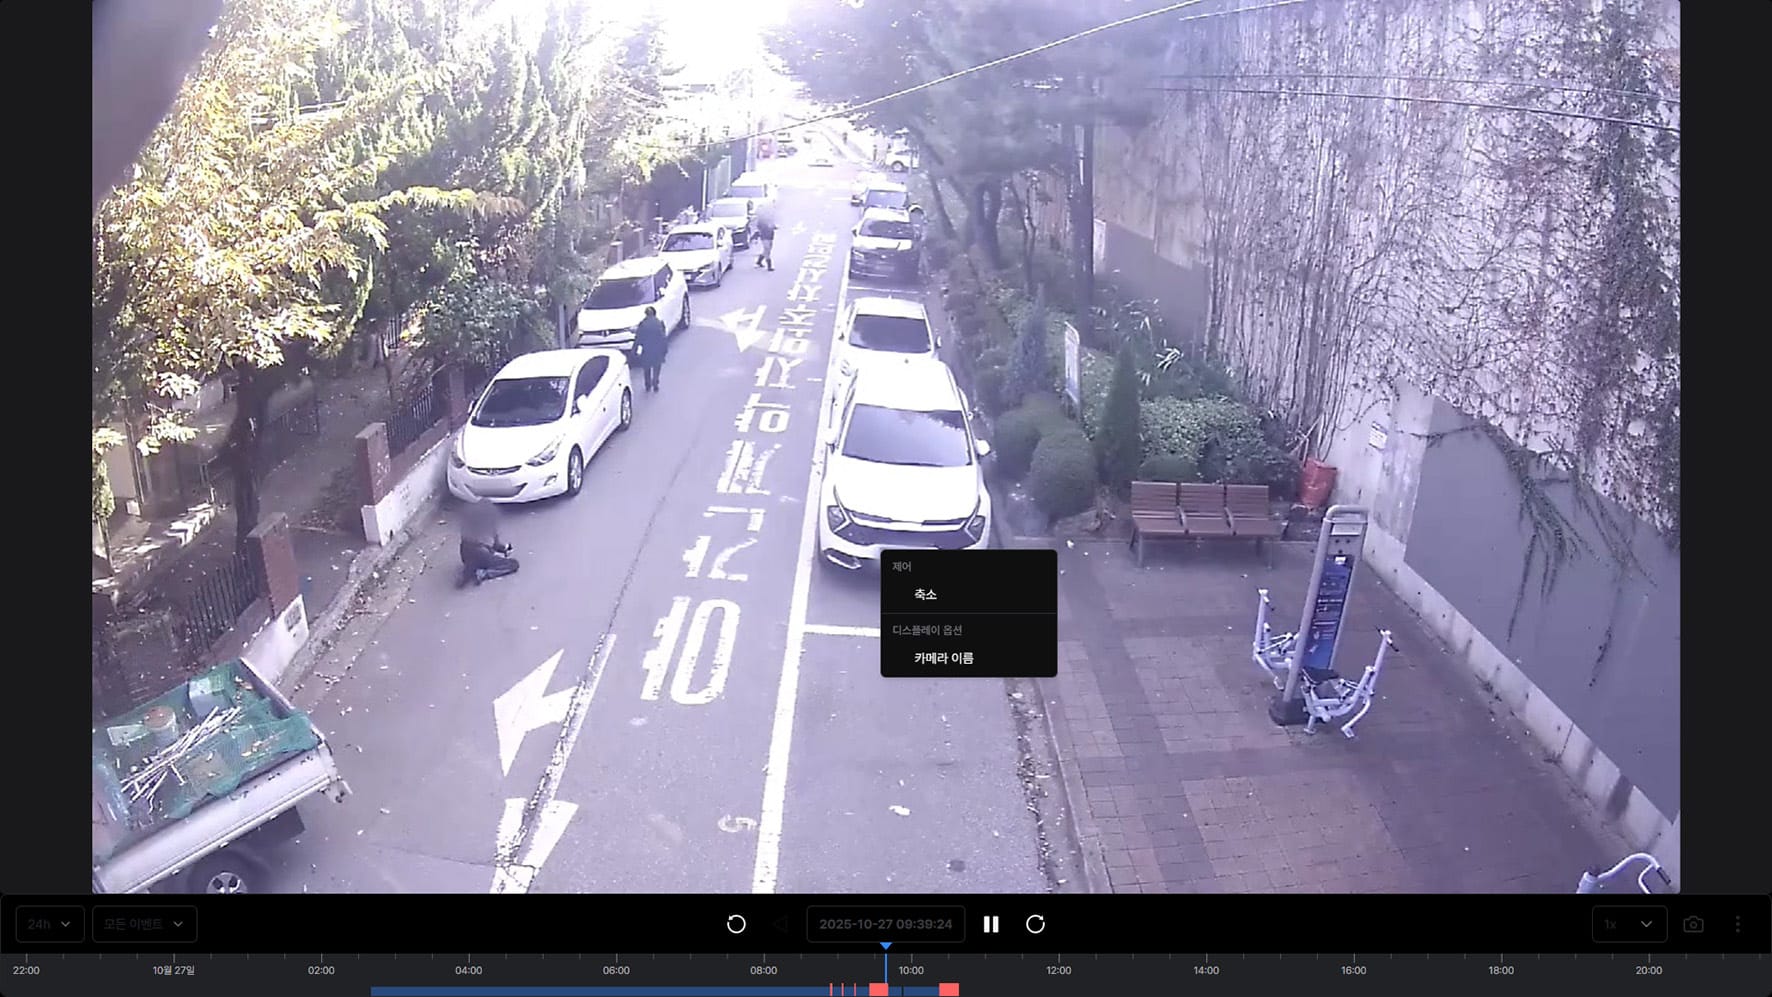 Figure 3-3. Recorded Video Options Menu
 - Click the item you want[Minimize]: minimizes the video. [Camera name]: shows the camera name on the video.
Viewing the Recorded Video Menu
The menu is shown.
- In the main menu, click [] > [Recorded Video]The recorded video screen appears.
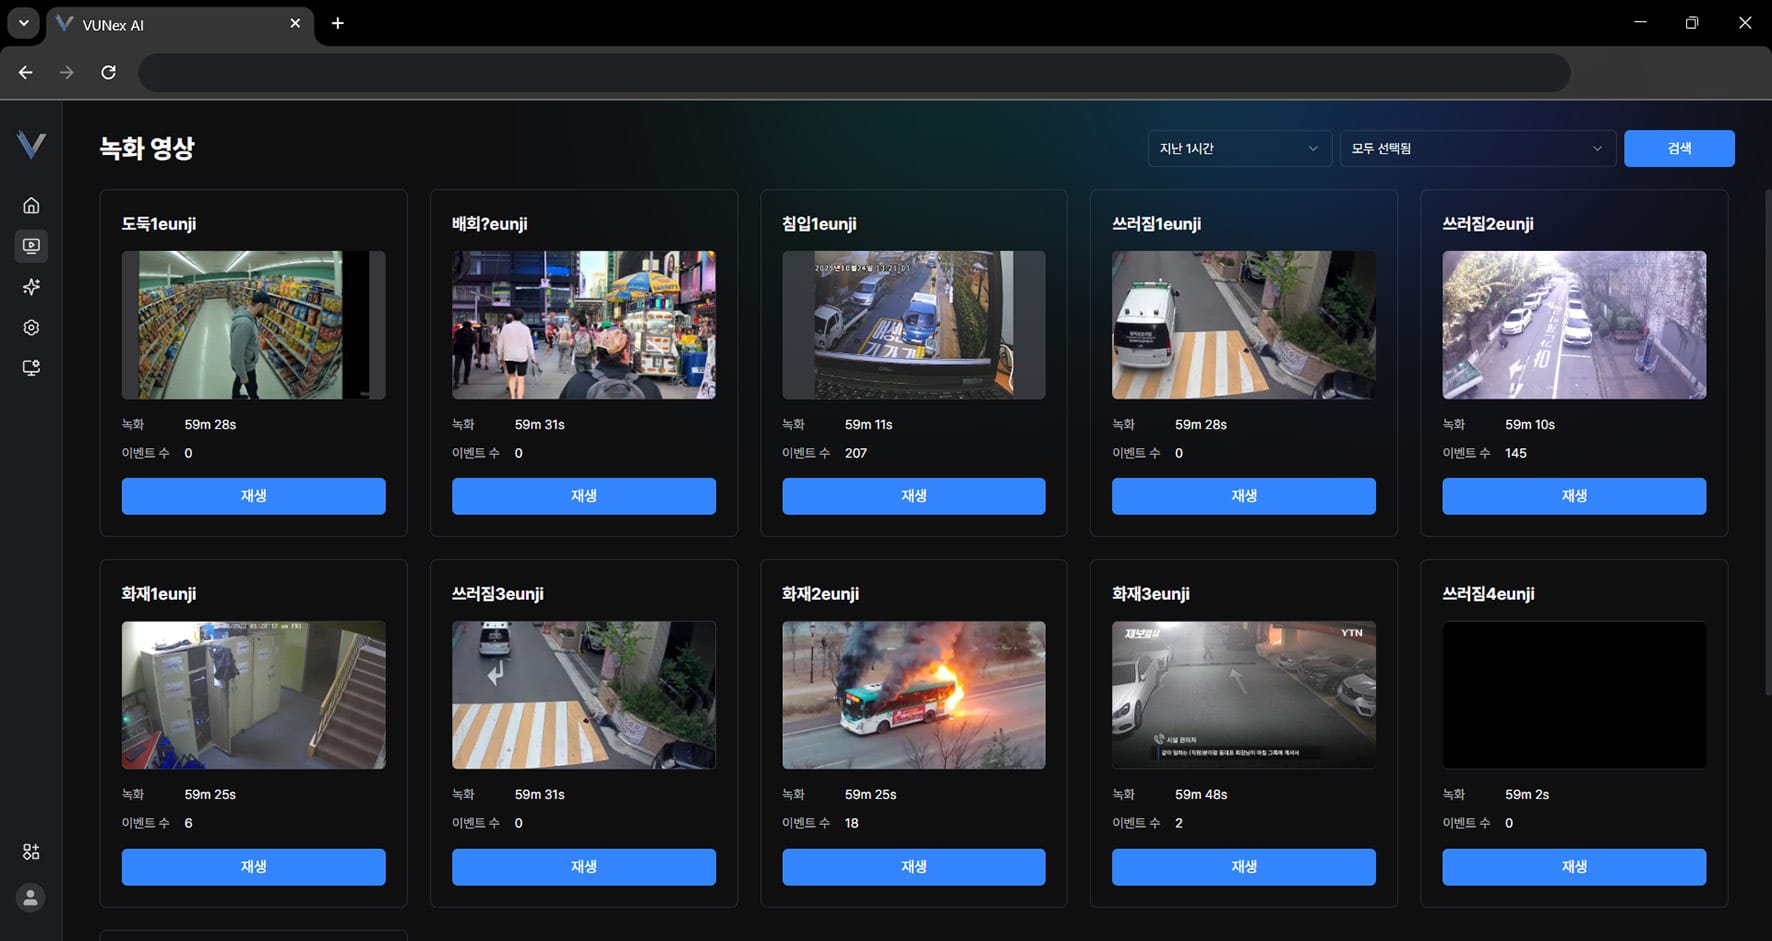 Figure 3-4. Recorded Video Menu
 - Click the item you want[Recording]: shows the recording time. [Event count]: shows the number of events. [Playback]: check the recorded video.
- Click [Playback]
- Right-click on the videoThe pop-up menu appears.
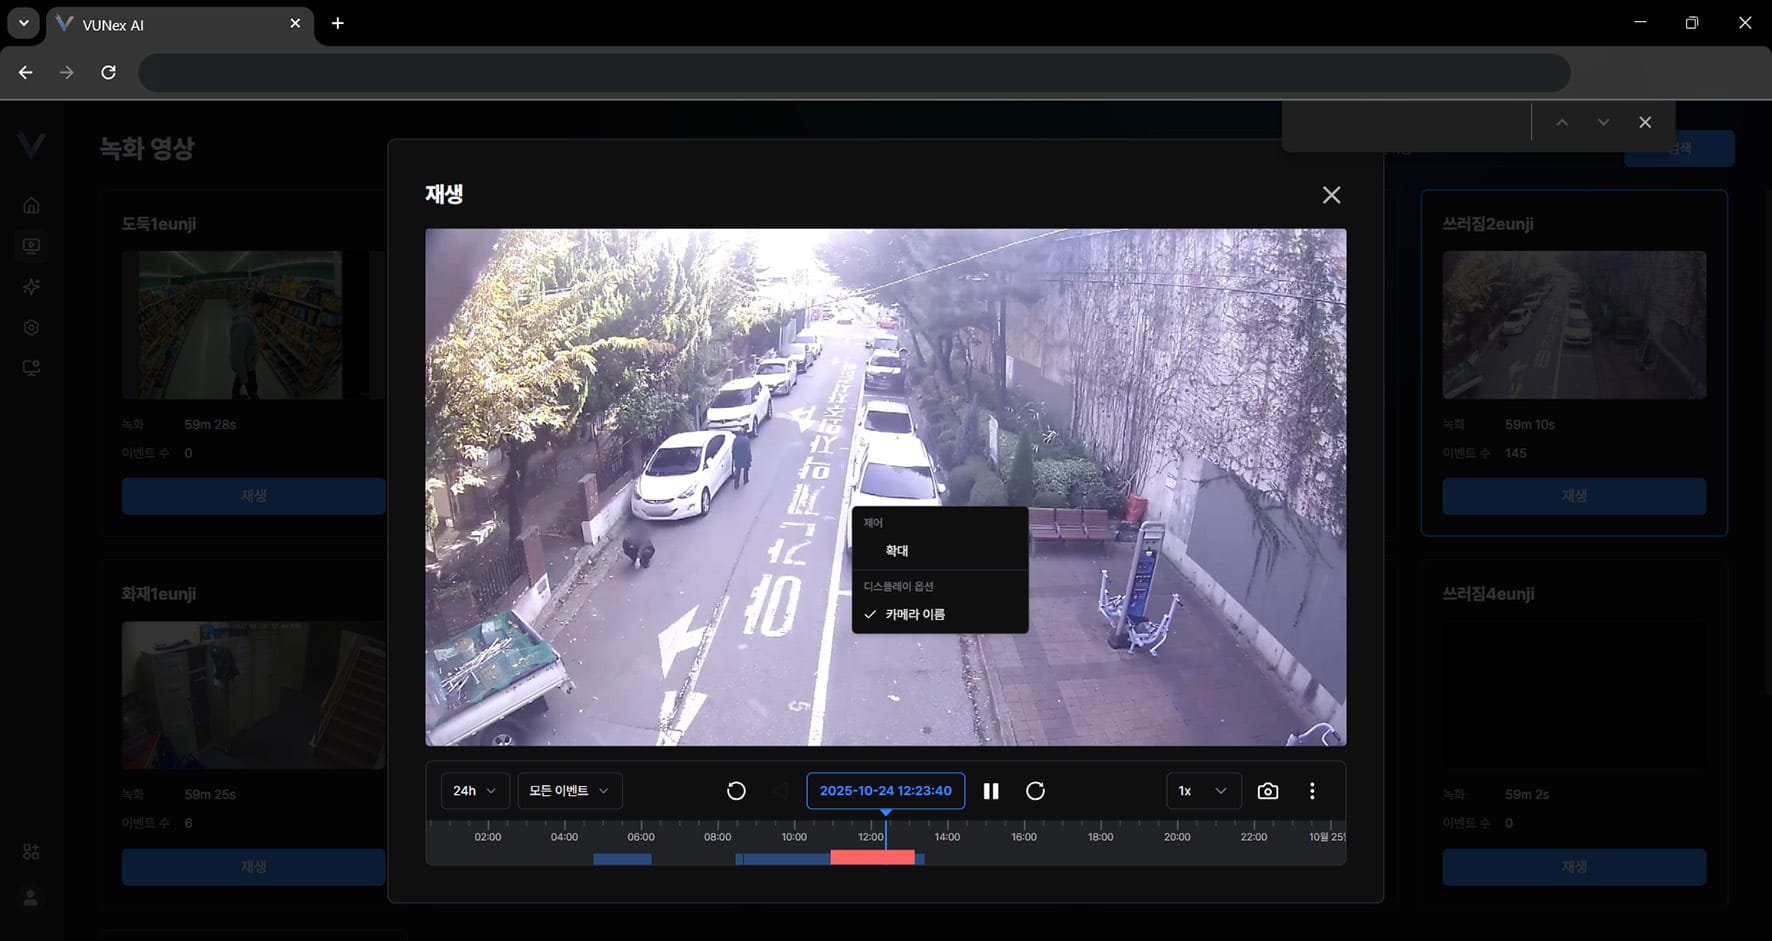 Figure 3-5. Recorded Video Pop-up Menu
 - Click the item you want[Maximize]: maximizes the video. [Camera name]: shows the camera name on the video.
Viewing the Playback Screen Layout
The screen layout is shown.
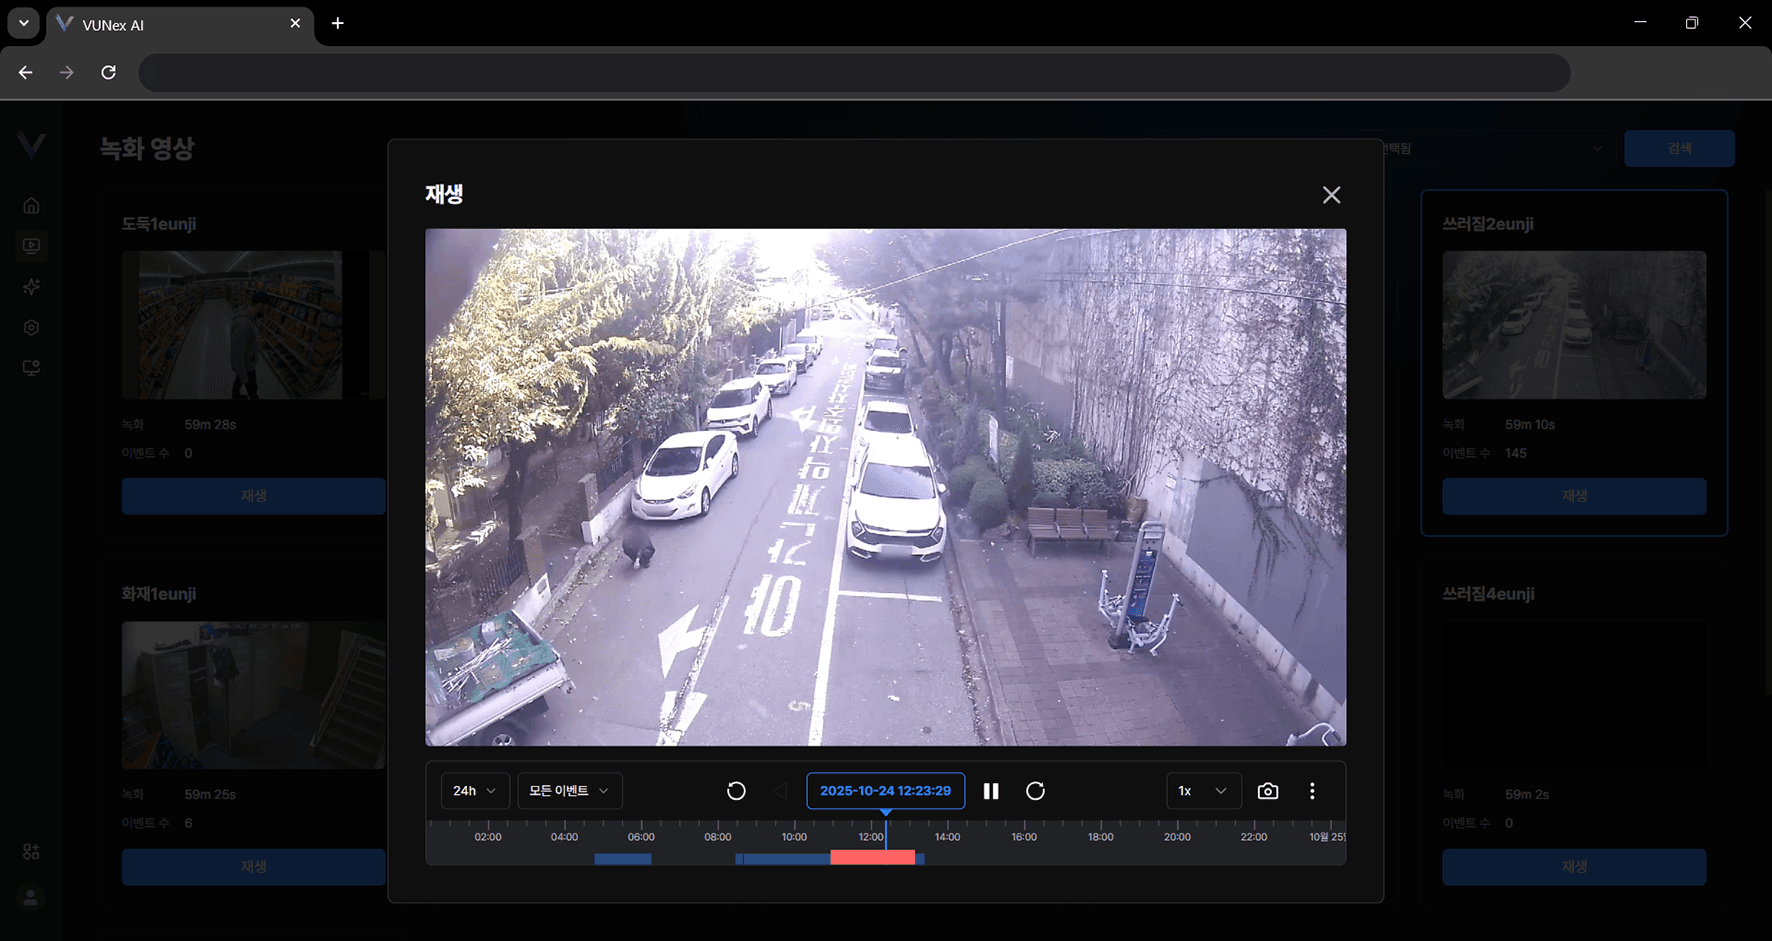
| No. | Item | Description |
|---|---|---|
| ❶ | Time span | Shows the recording time span in steps. The timeline tick interval changes with the step. |
| ❷ | Event filter | Shows the timeline according to events. |
| ❸ | Back 5 seconds | Moves back 5 seconds. |
| ❹ | Date and time | Shows the date and time. Select a date and time to search video. |
| ❺ | Play / Pause | Plays or pauses the video. |
| ❻ | Forward 5 seconds | Moves forward 5 seconds. |
| ❼ | Speed | Sets the playback speed. |
| ❾ | Similar person search | Searches for images similar to the person selected in the video. |
| ❿ | Timeline | Shows the recorded video timeline. |
| ⓫ | Current playback position | Shows the current playback position. |
Checking Recorded Video by Camera
Check the recorded video for each camera.
- In the main menu, click [] > [Recorded Video]The recorded video screen appears.
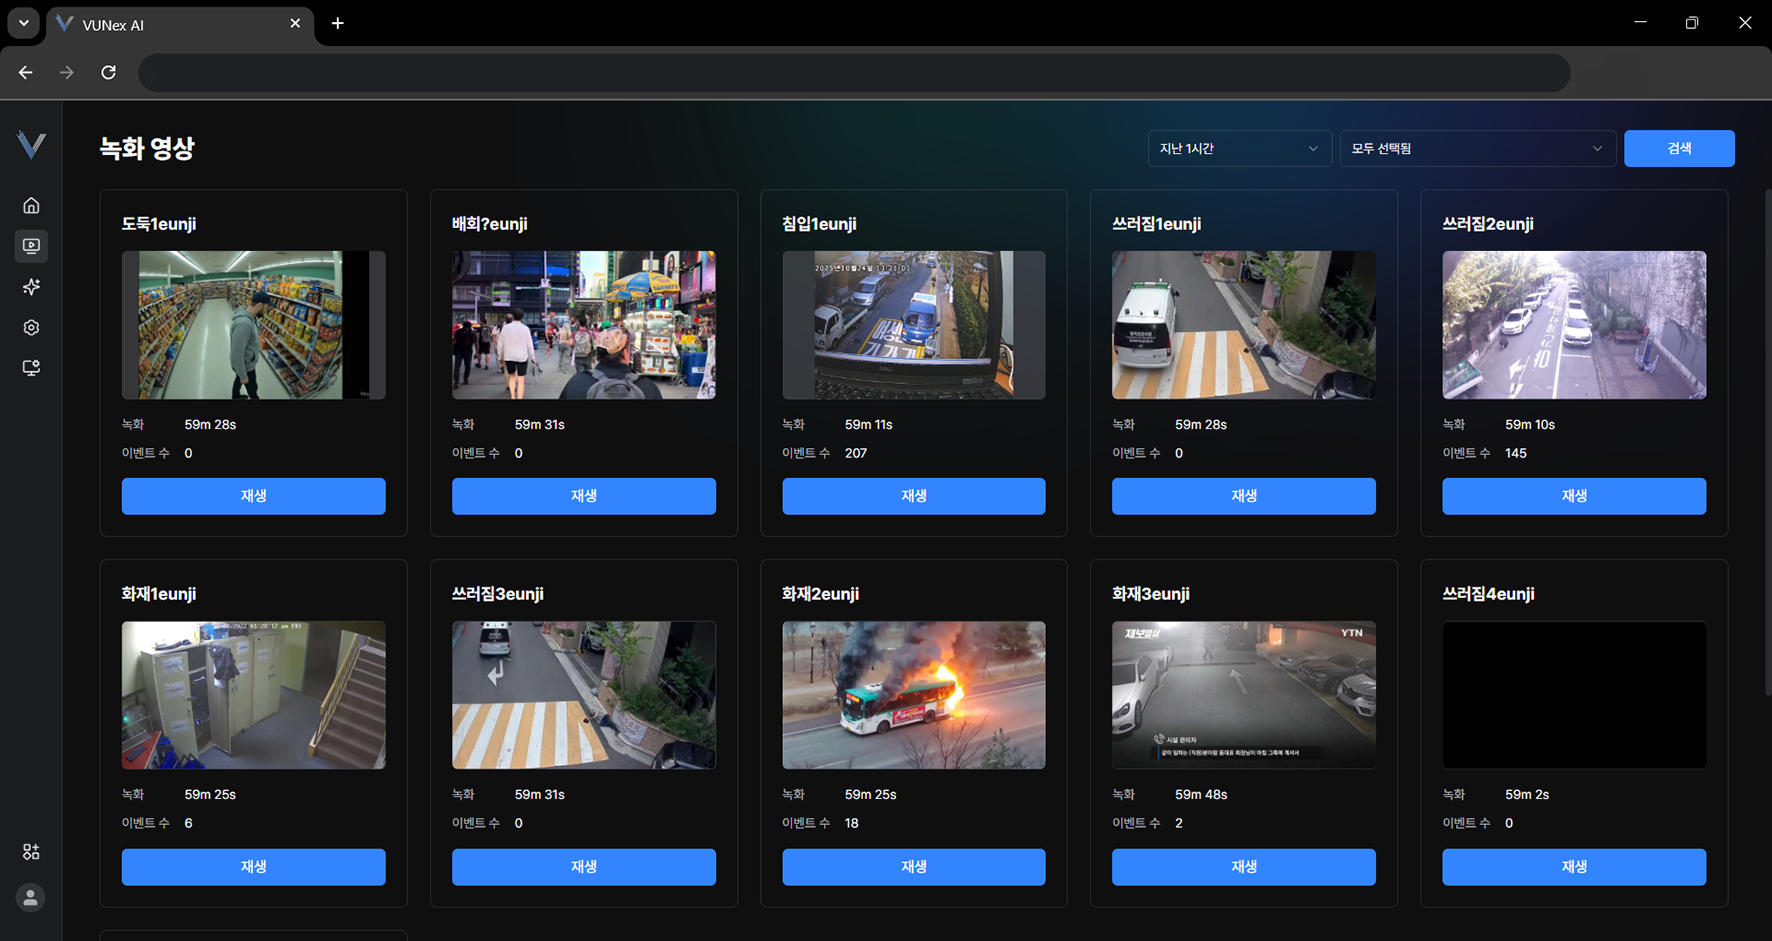 Figure 3-7. Searching Recorded Video by Camera
 - Click the area marked with a dotted line
- Set the conditions and click [Search]
- Check the recorded video
Checking Recorded Video by Search Period
Check the recorded video by search period.
- In the main menu, click [] > [Recorded Video]The recorded video screen appears.
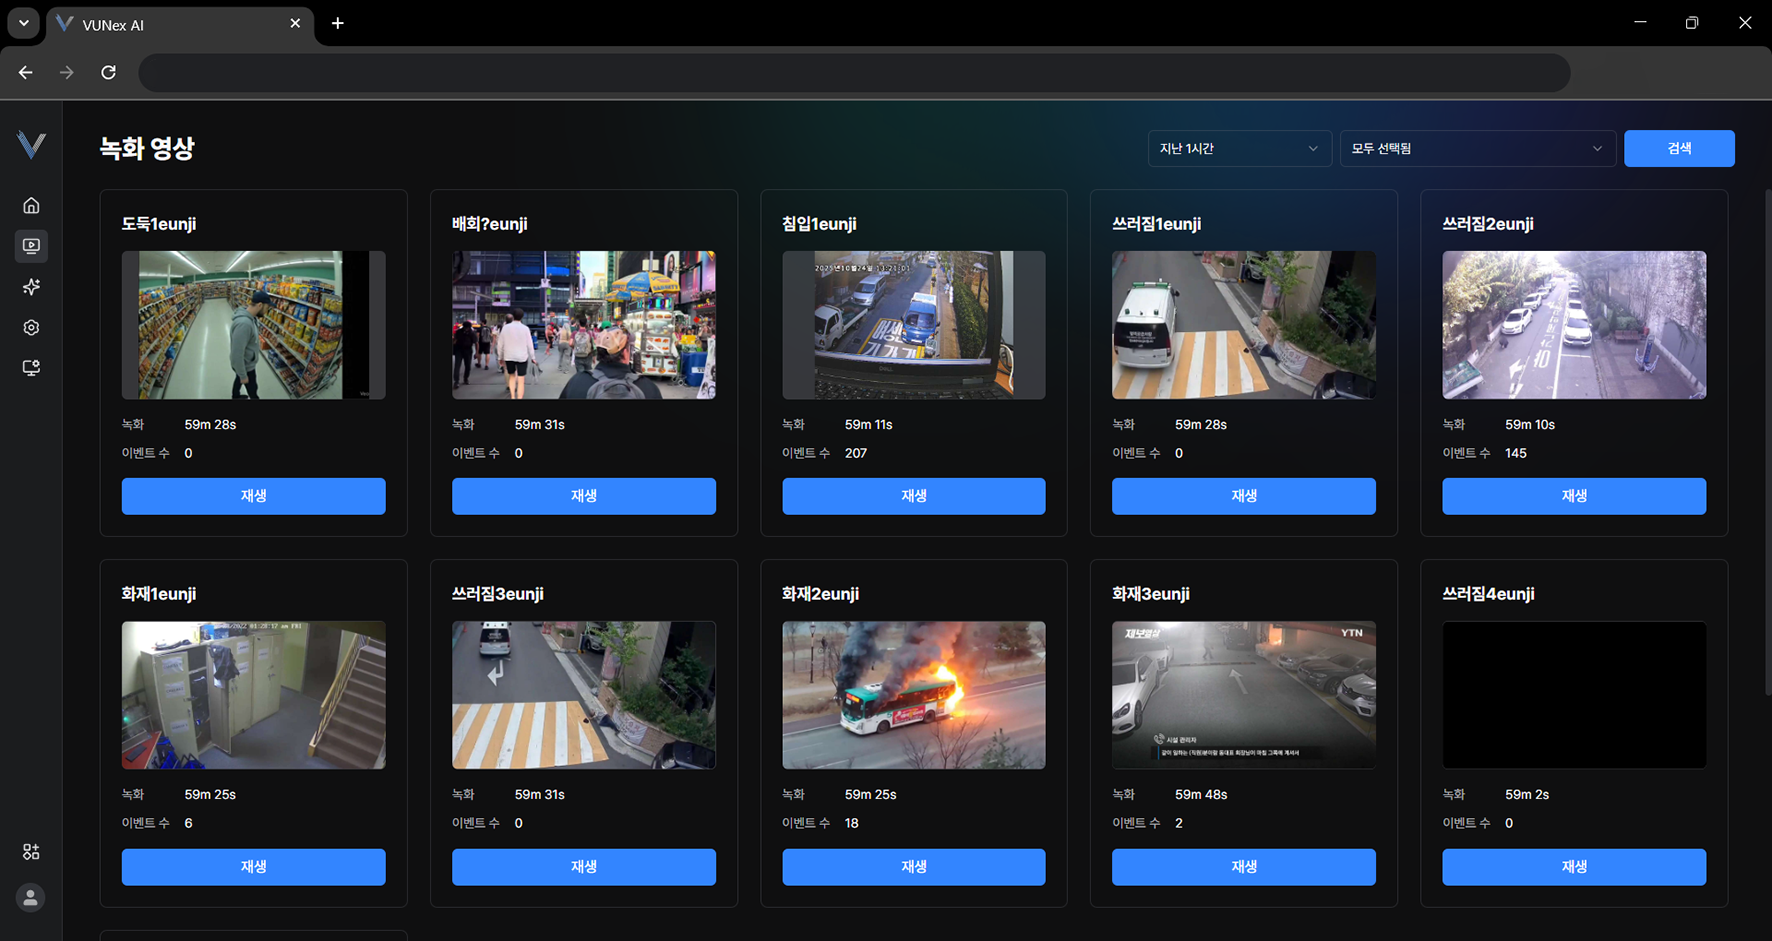 Figure 3-8. Recorded Video by Search Period
 - Click the area marked with a dotted line
- Set the conditions and click [Search]
- Check the recorded video
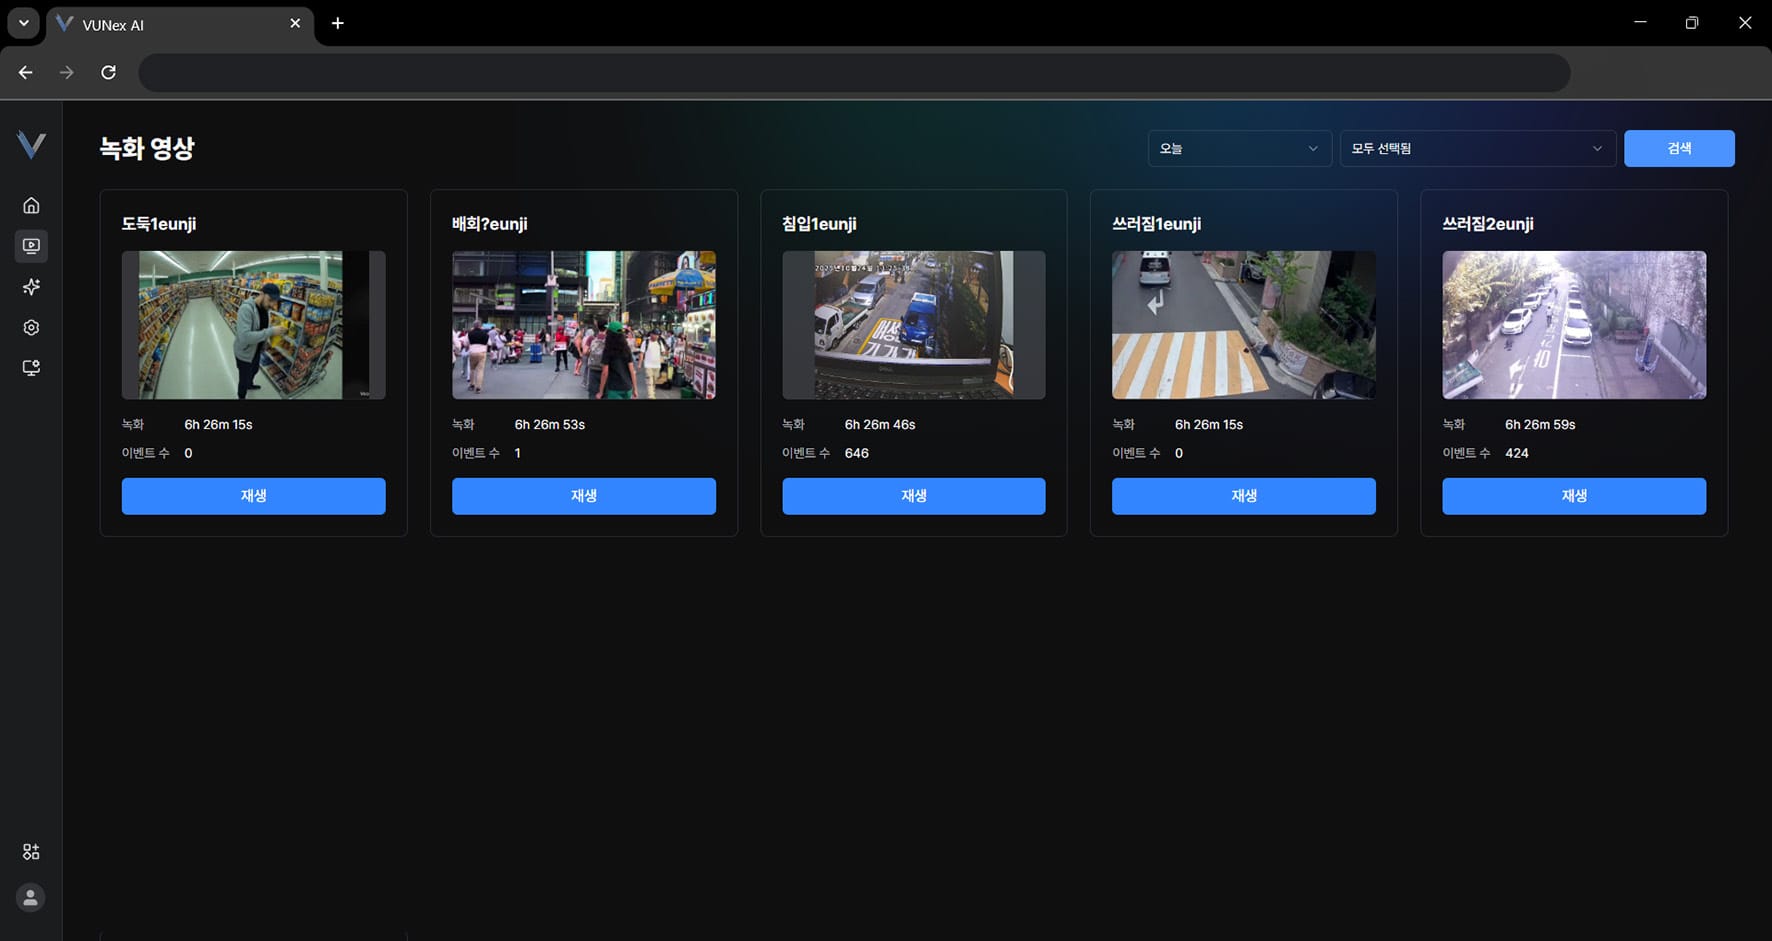 Figure 3-9. Search Results by Period
Playing in Multi View
Check several recorded videos at once.
- In the main menu, click [] > [Recorded Video]The recorded video screen appears.
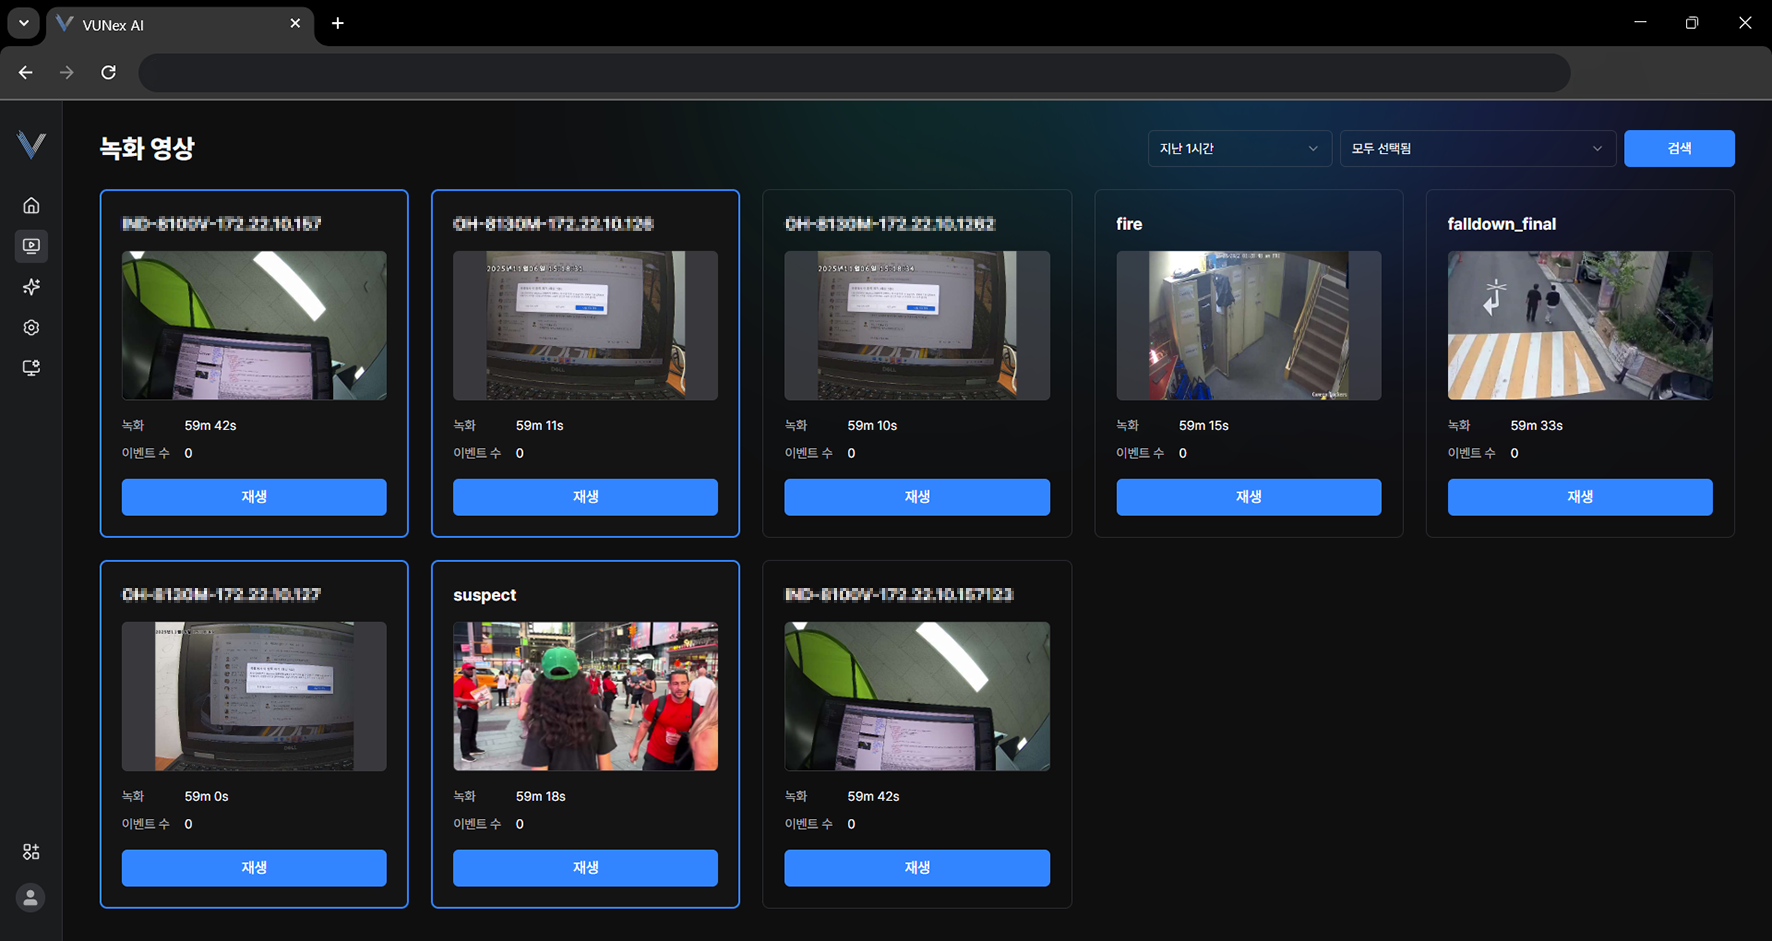 Figure 3-10. Multi View Selection
 - Select the items you want and right-click
- Click [Multi-view playback]
- Check the recorded video
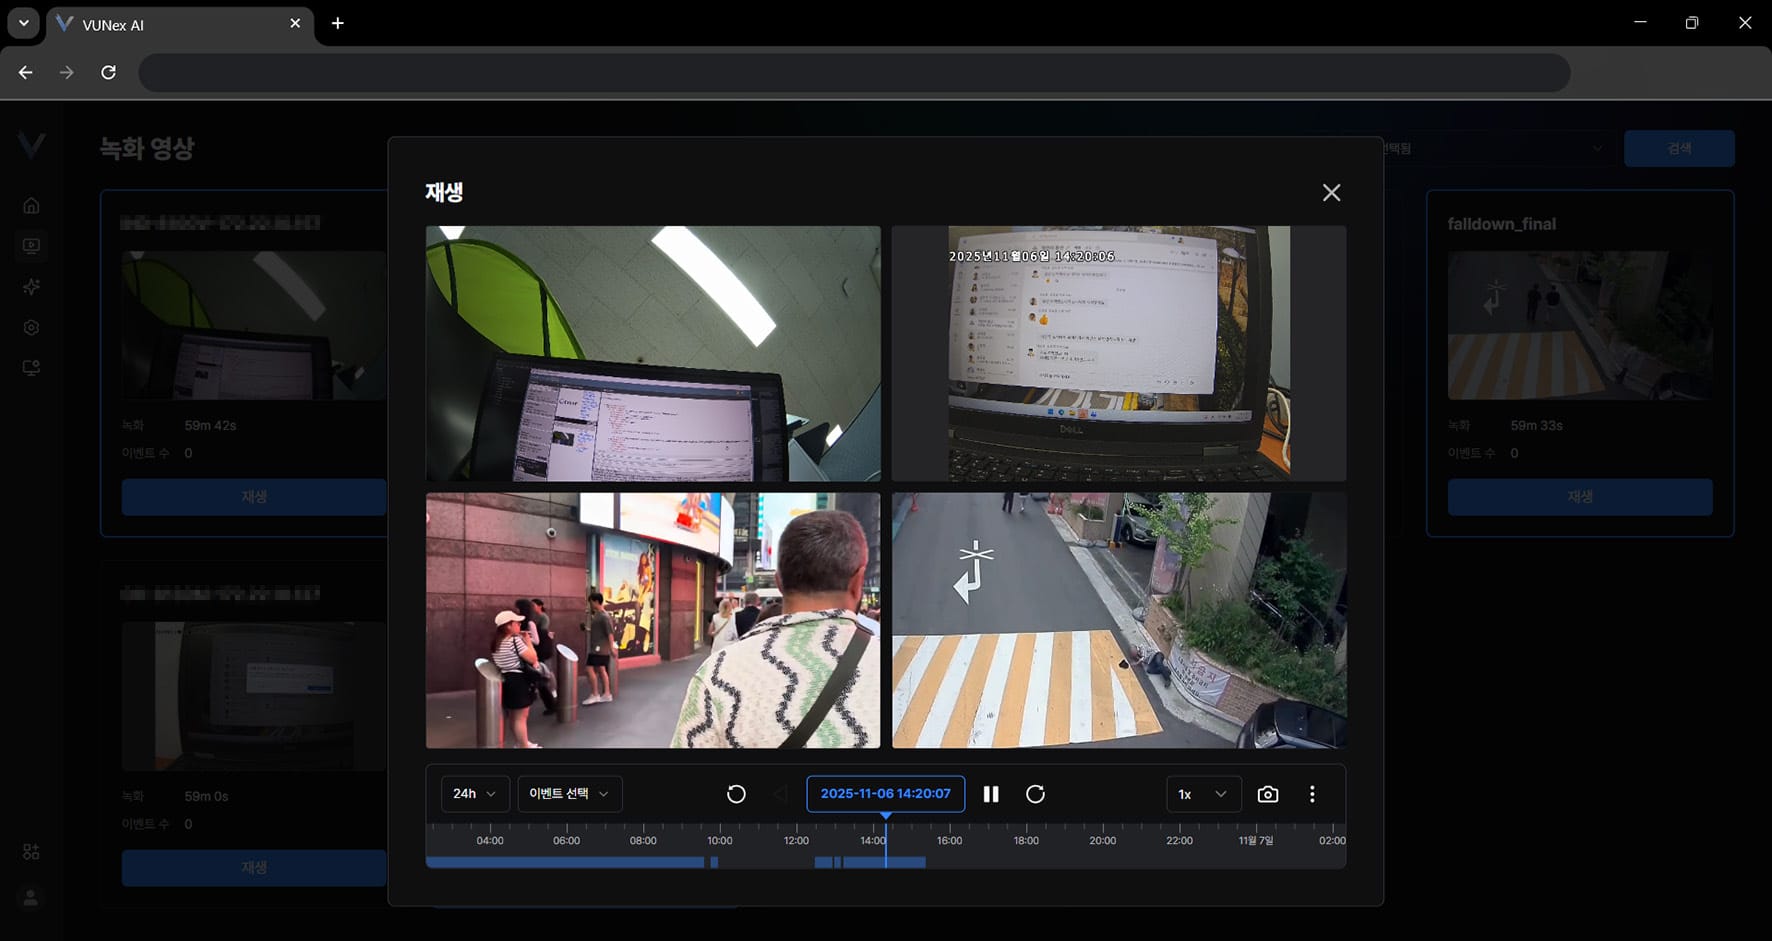 Figure 3-11. Multi View Playback Screen
Searching Video Directly
Search the video directly.
- In the main menu, click [] > [Recorded Video]The recorded video screen appears.
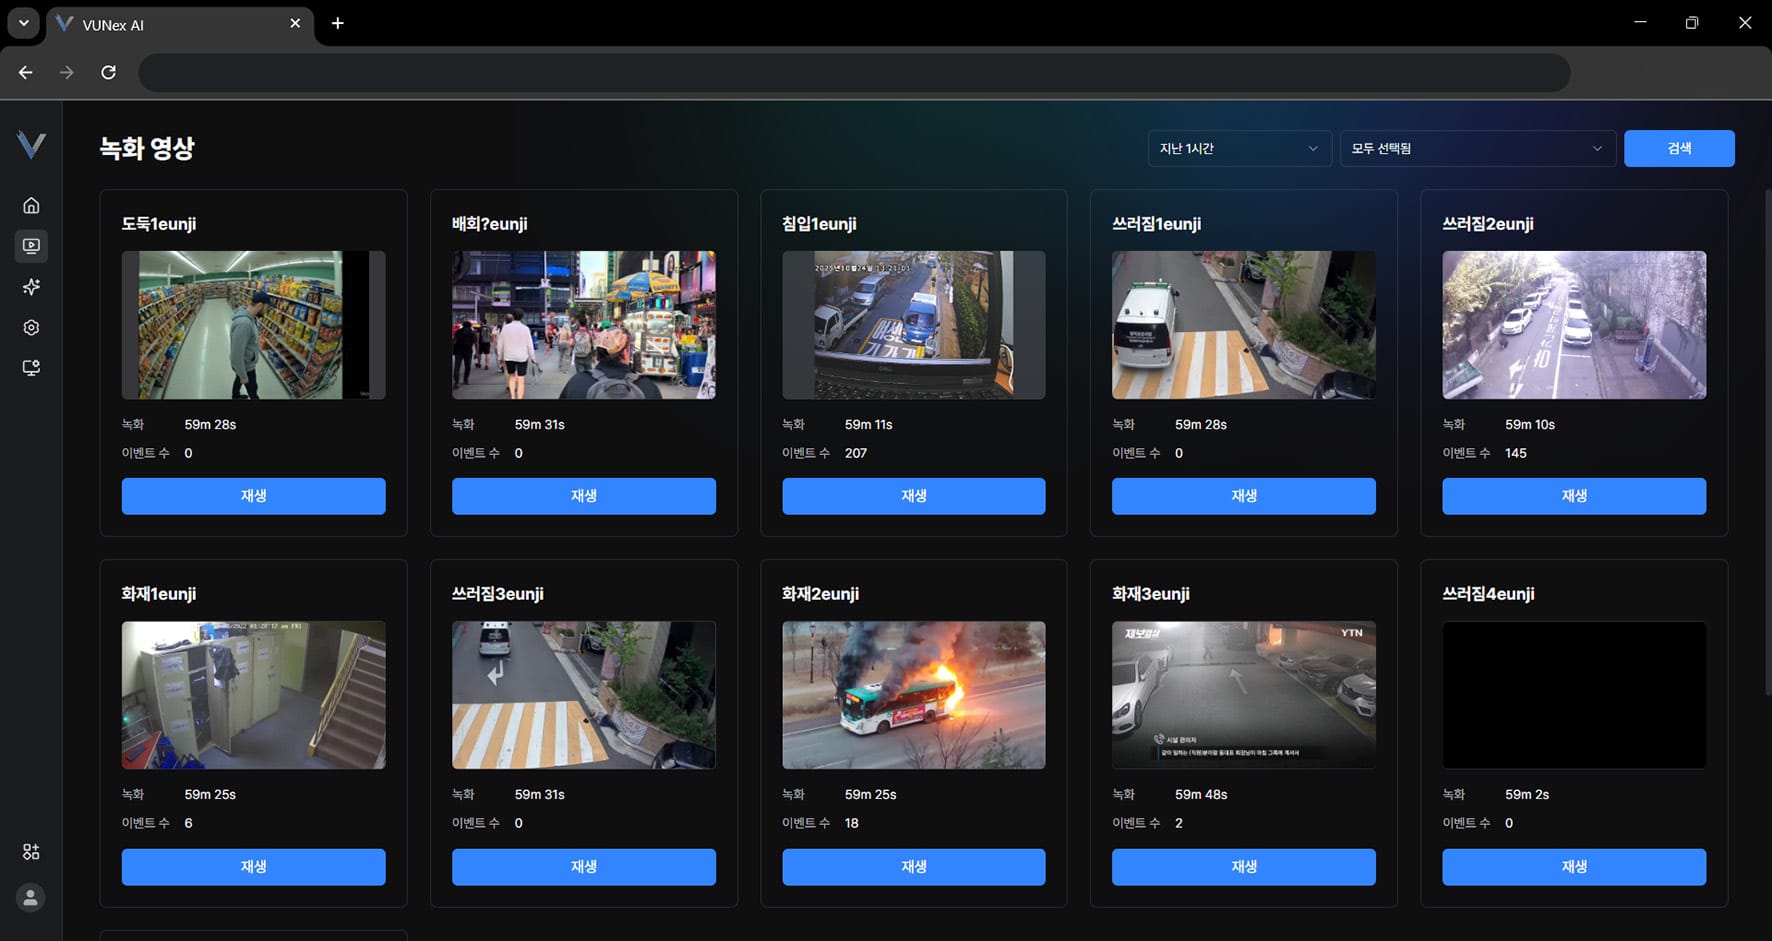 Figure 3-12. Direct Search on the Timeline
 - Click [Playback]
- Drag the timeline left or right
- Search the recorded video
Searching Video by Date and Time
Search video by date and time.
- In the main menu, click [] > [Recorded Video]The recorded video screen appears.
- Click [Playback]
- Click the area marked with a dotted line
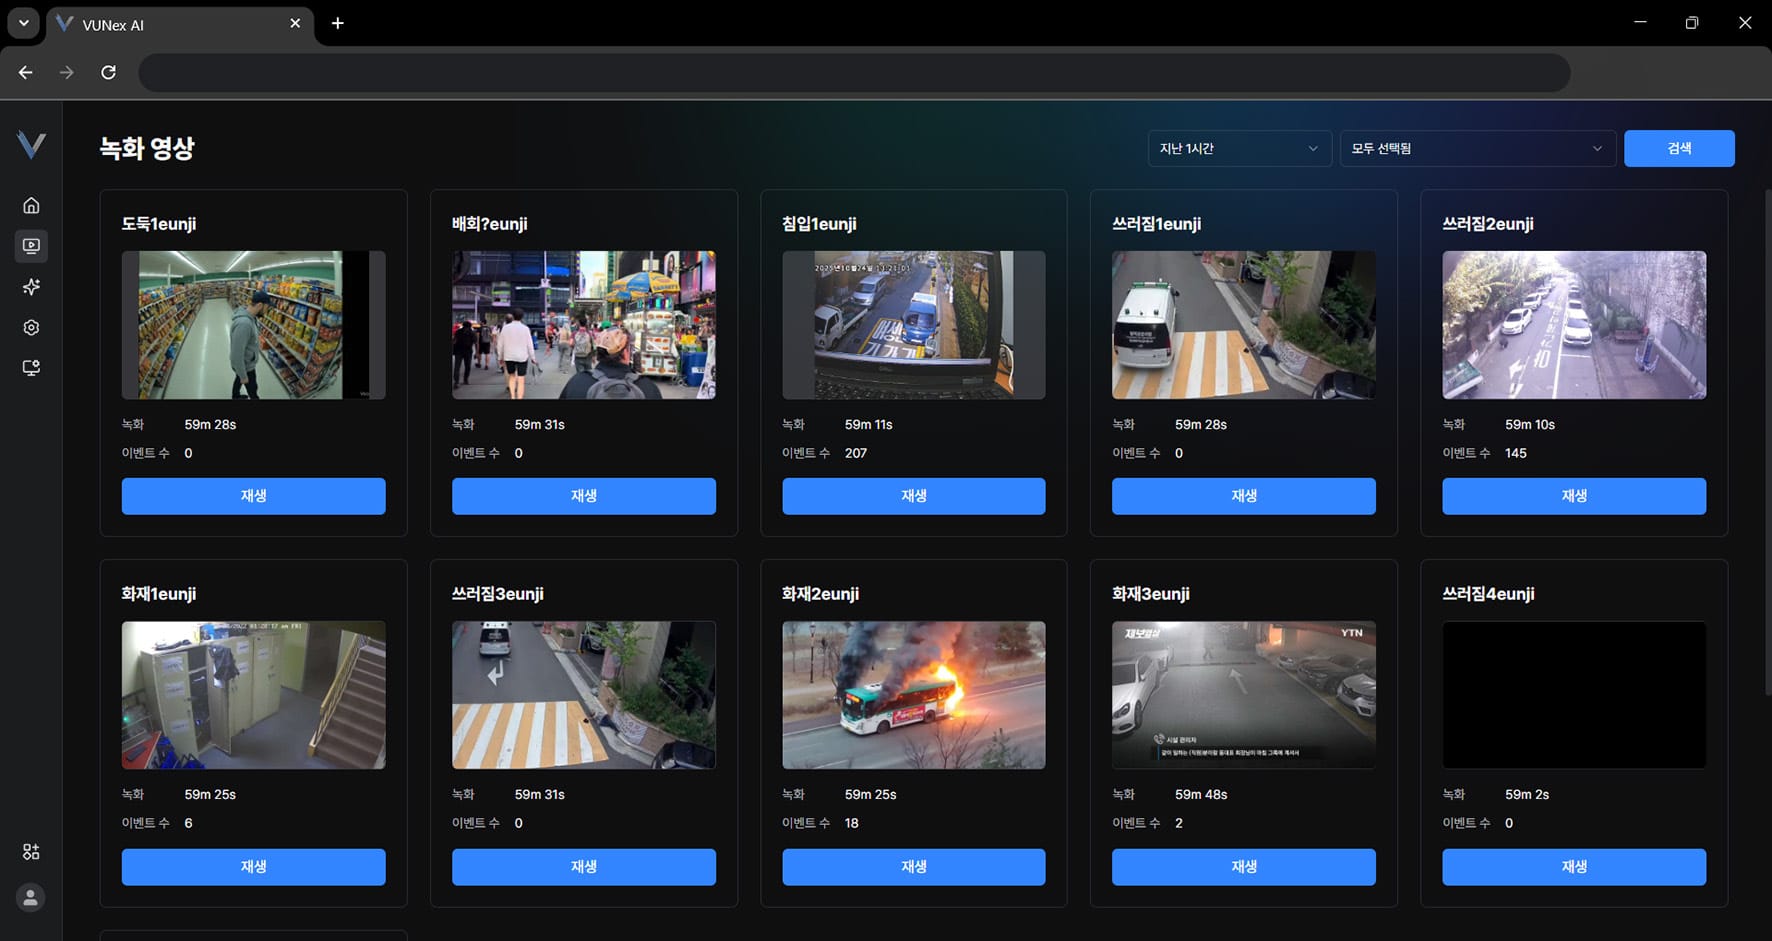 Figure 3-13. Selecting Date and Time
 - Select a date and time to search the video
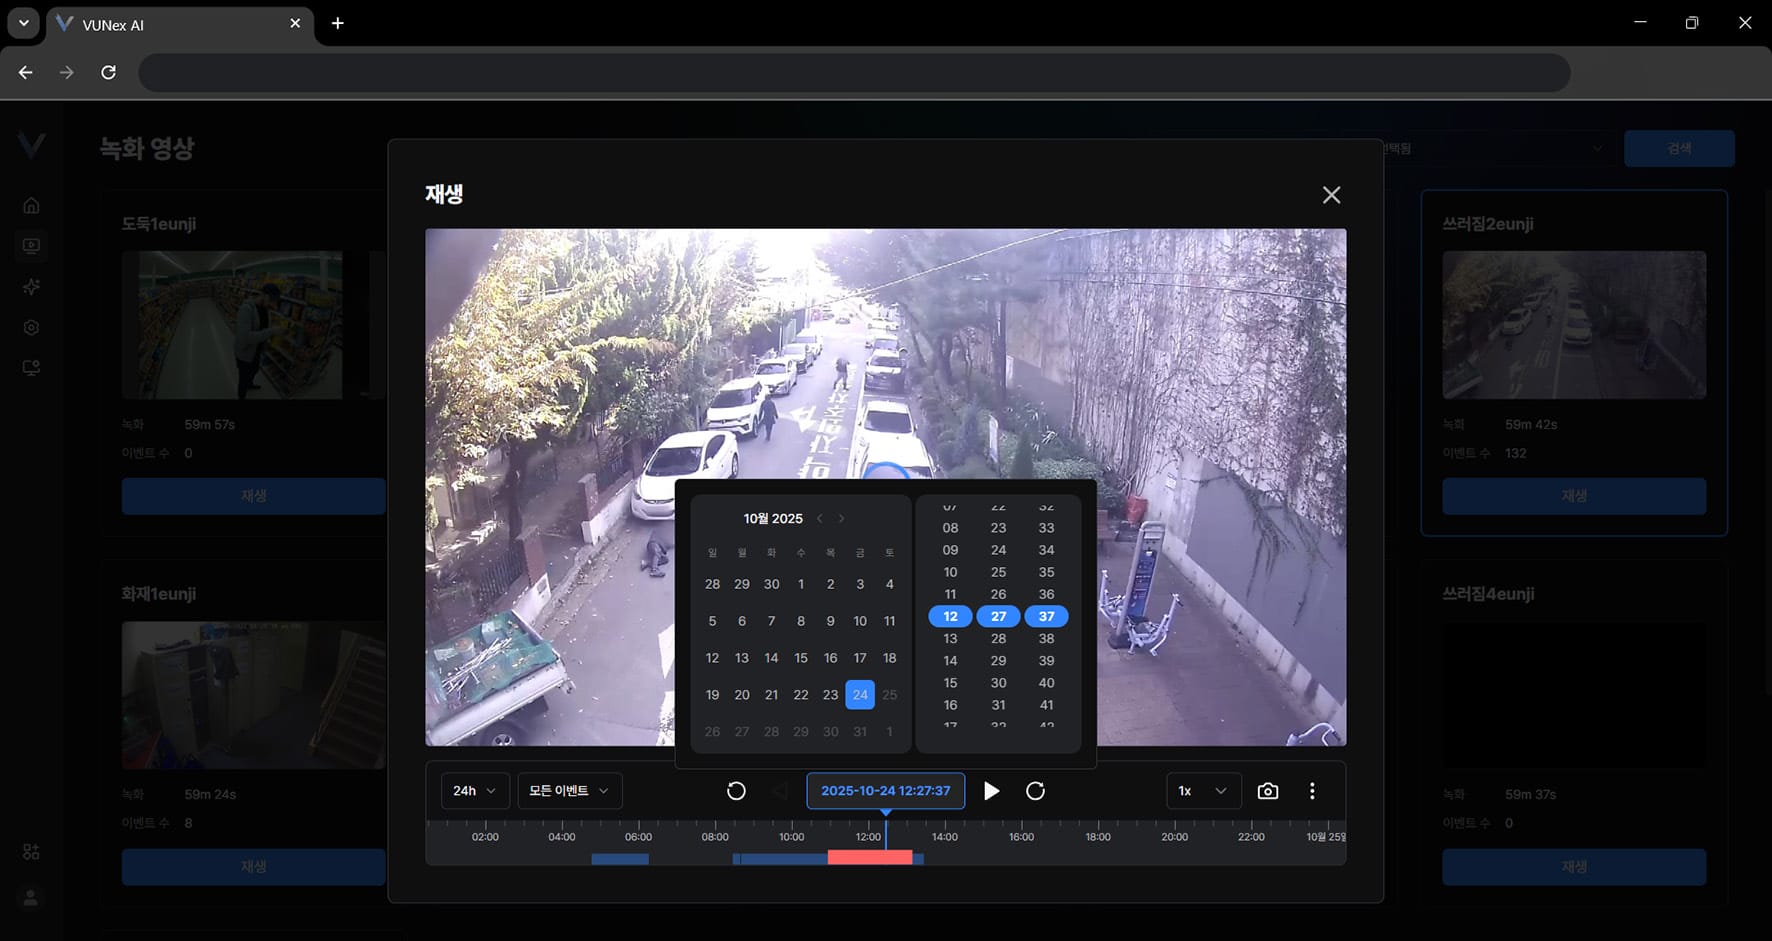 Figure 3-14. Date and Time Search Results
Searching by an Image in the Video
Search by an image in the video.
- In the main menu, click [] > [Recorded Video]The recorded video screen appears.
- Click [Playback]
- Click [] > [Similar Person Search]
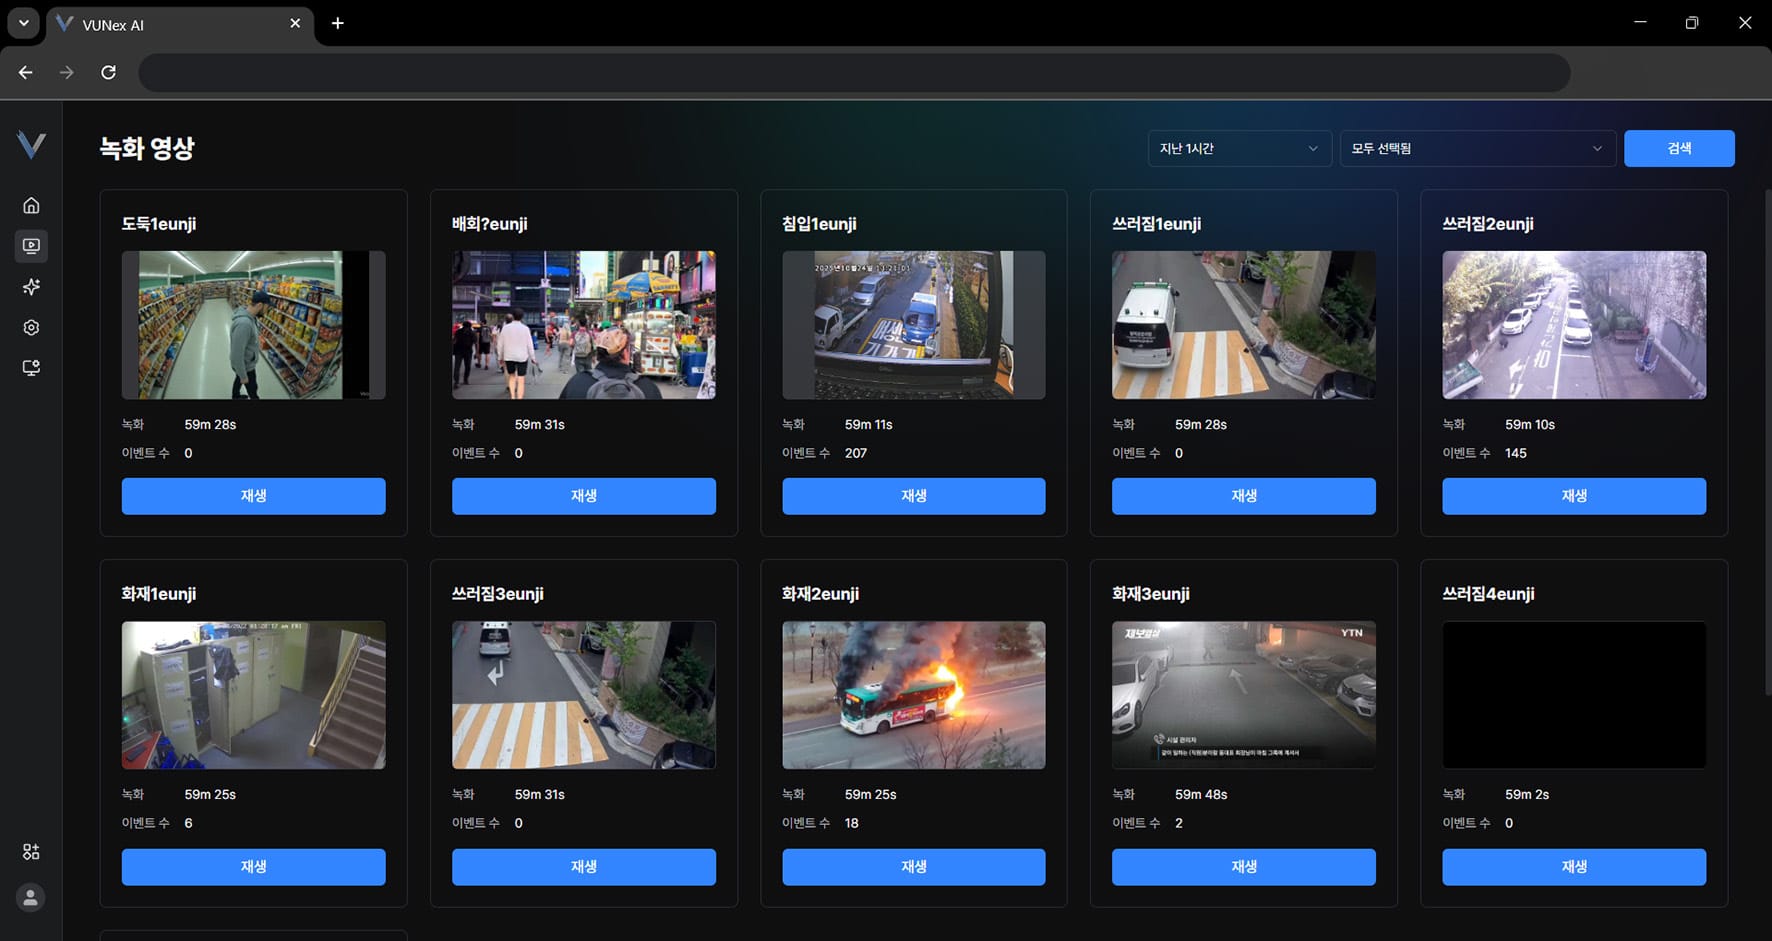 Figure 3-15. Selecting Similar Person Search
 - Drag up, down, left or rightSelect the search area.
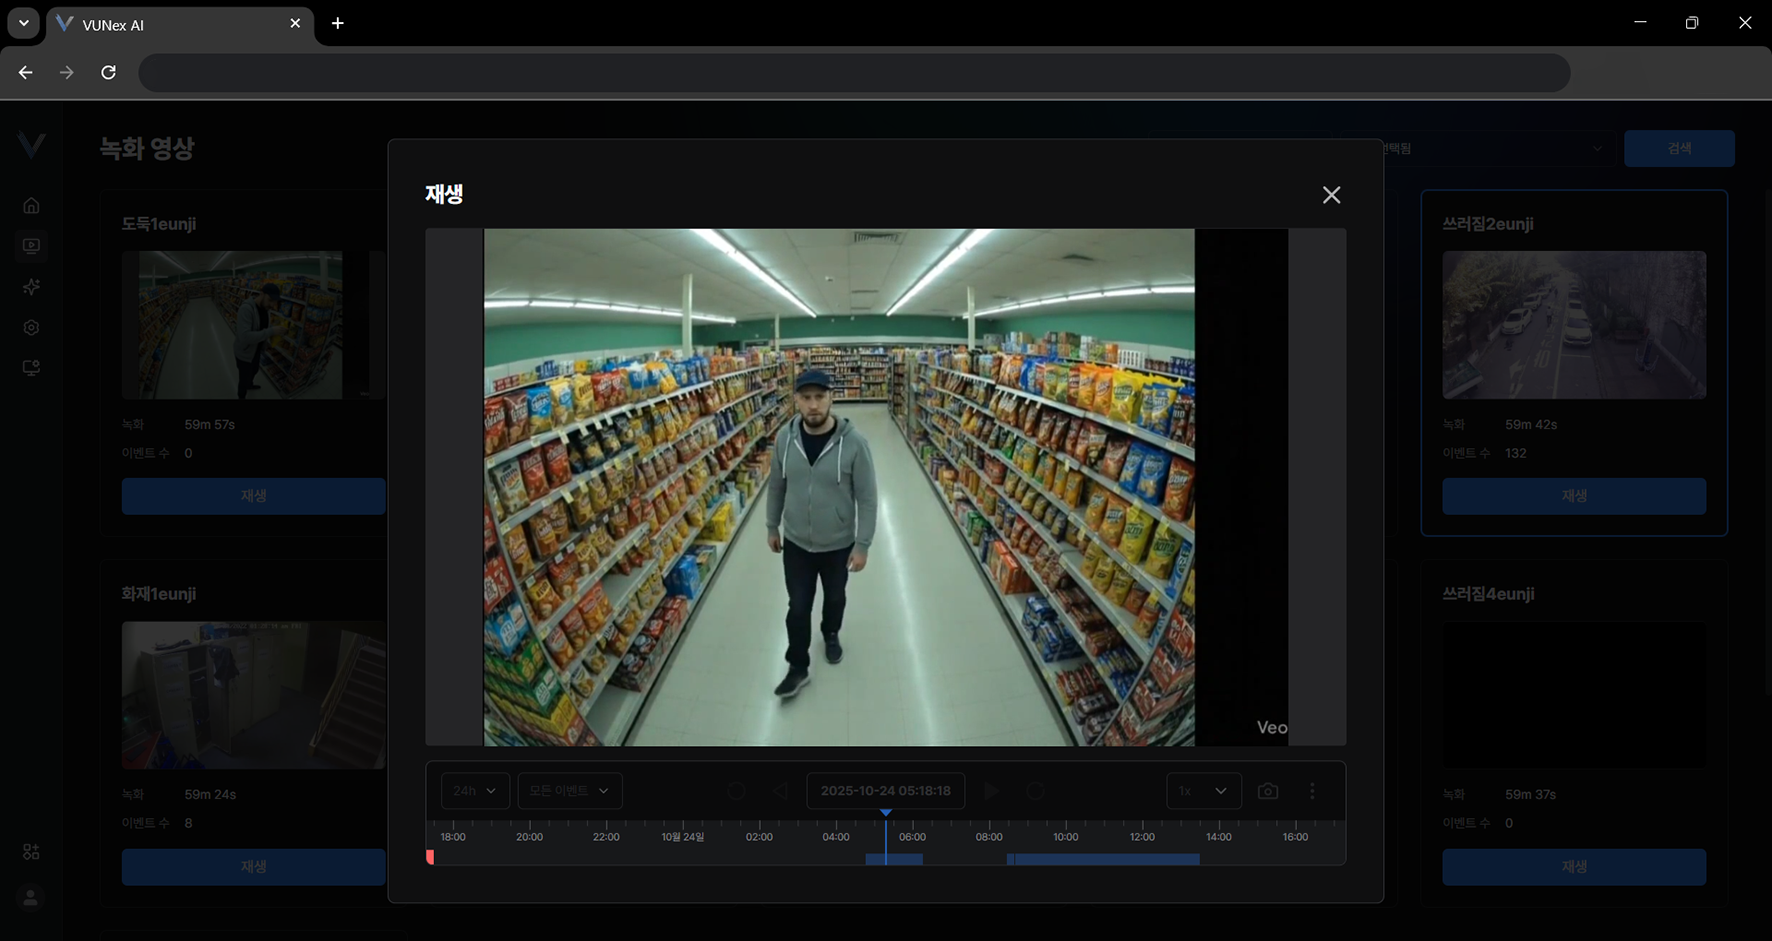 Figure 3-16. Selecting the Search Area
 - Click [Search]
- Search for the image
- Check the search results
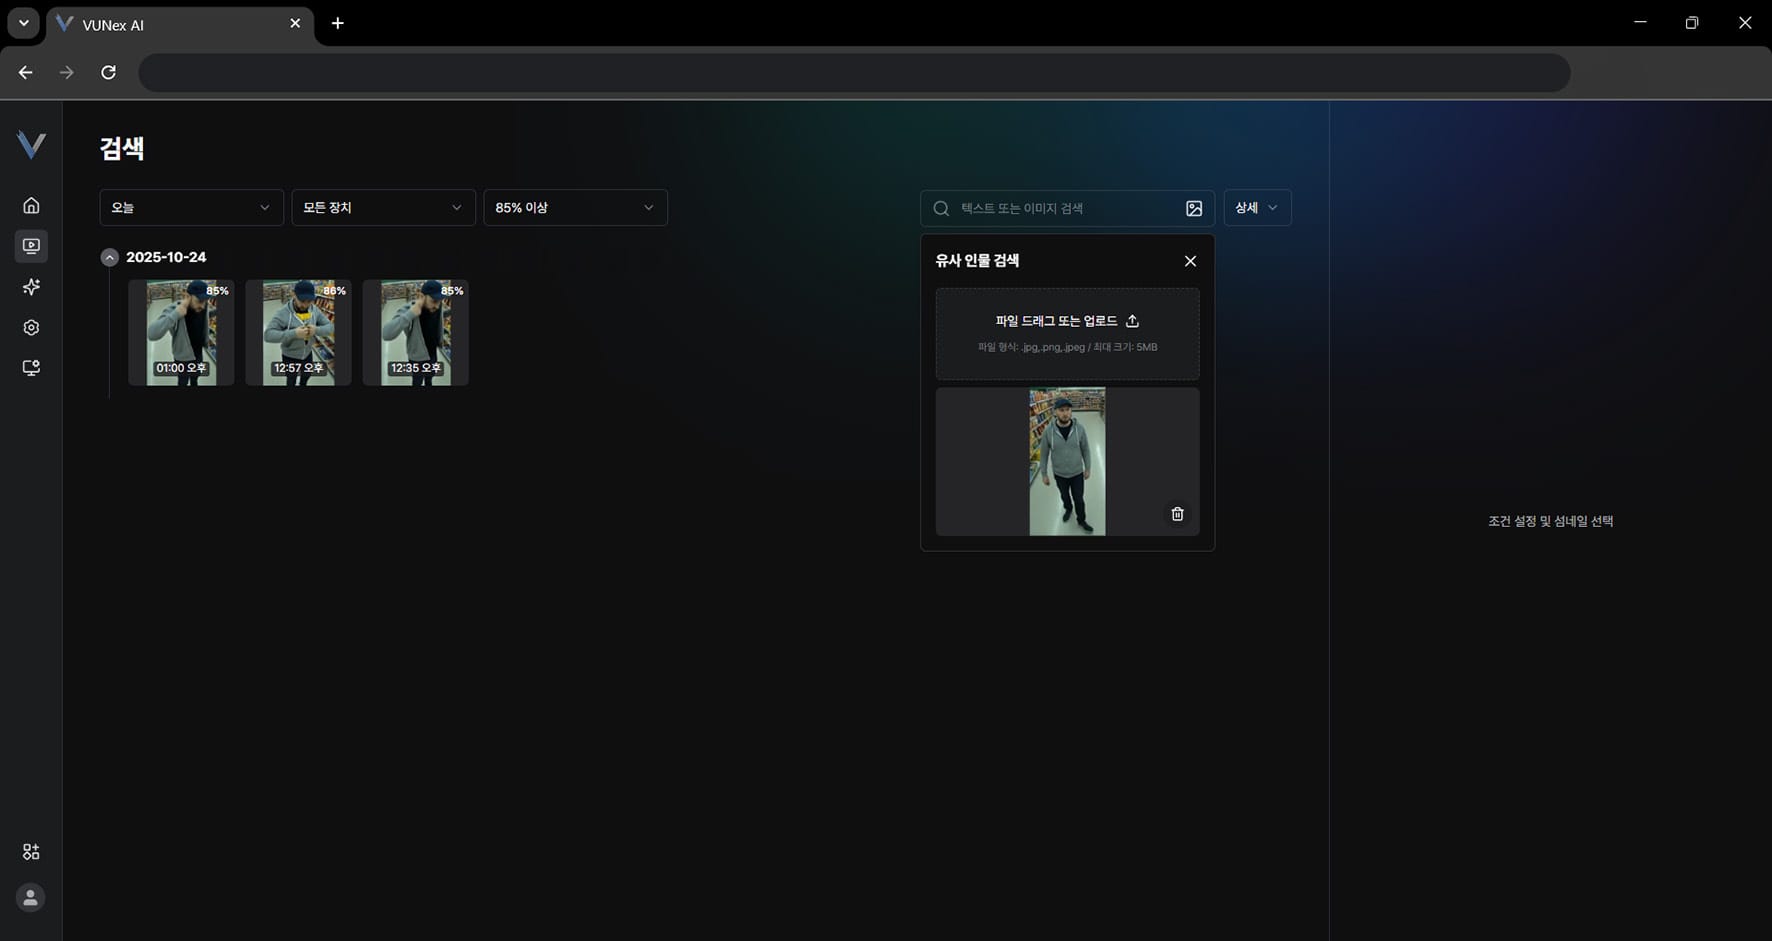 Figure 3-17. Image Search Results
Viewing Recordings in Event Clip Mode
When the recording mode is [Event clip], the recorded video screen is organized around the event list.
- In the main menu, click [] > [Recorded Video]
- Select the camera to review in the [Camera] filterOnly the cameras where events actually occurred are listed.
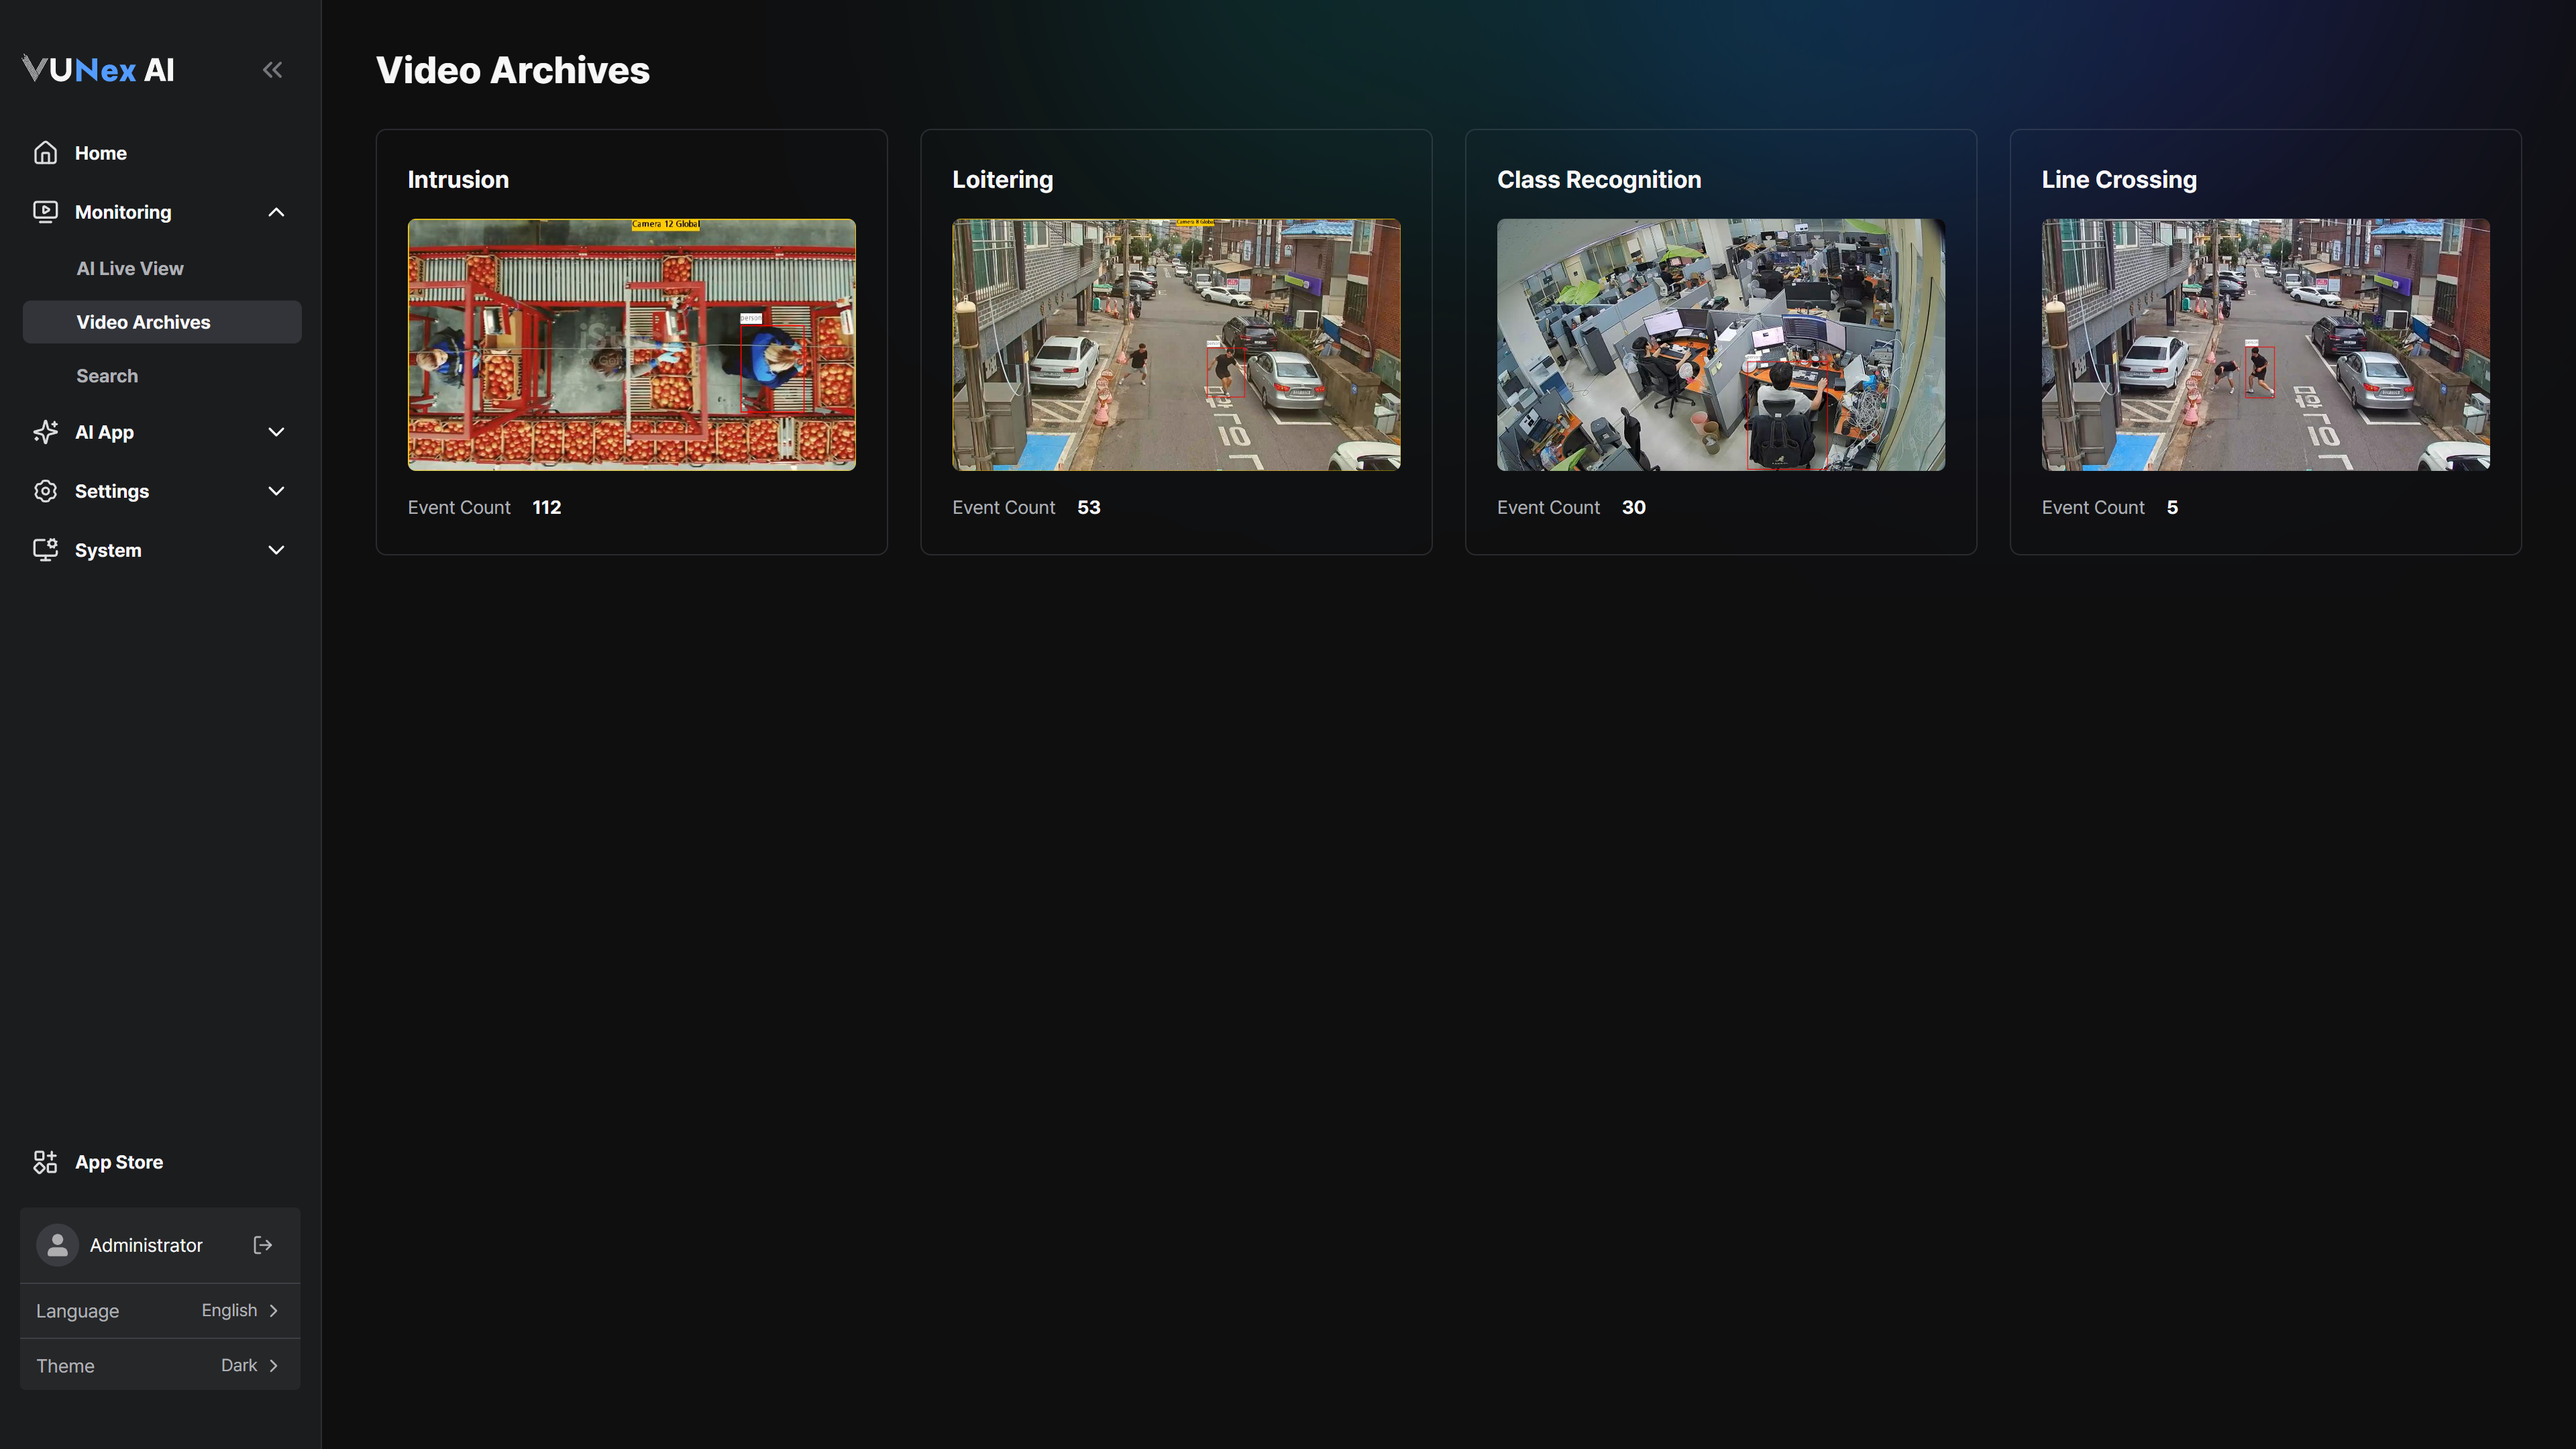 Figure 3-18. Recorded Video in Event Clip Mode
 - Sort by [Newest] or [Oldest]
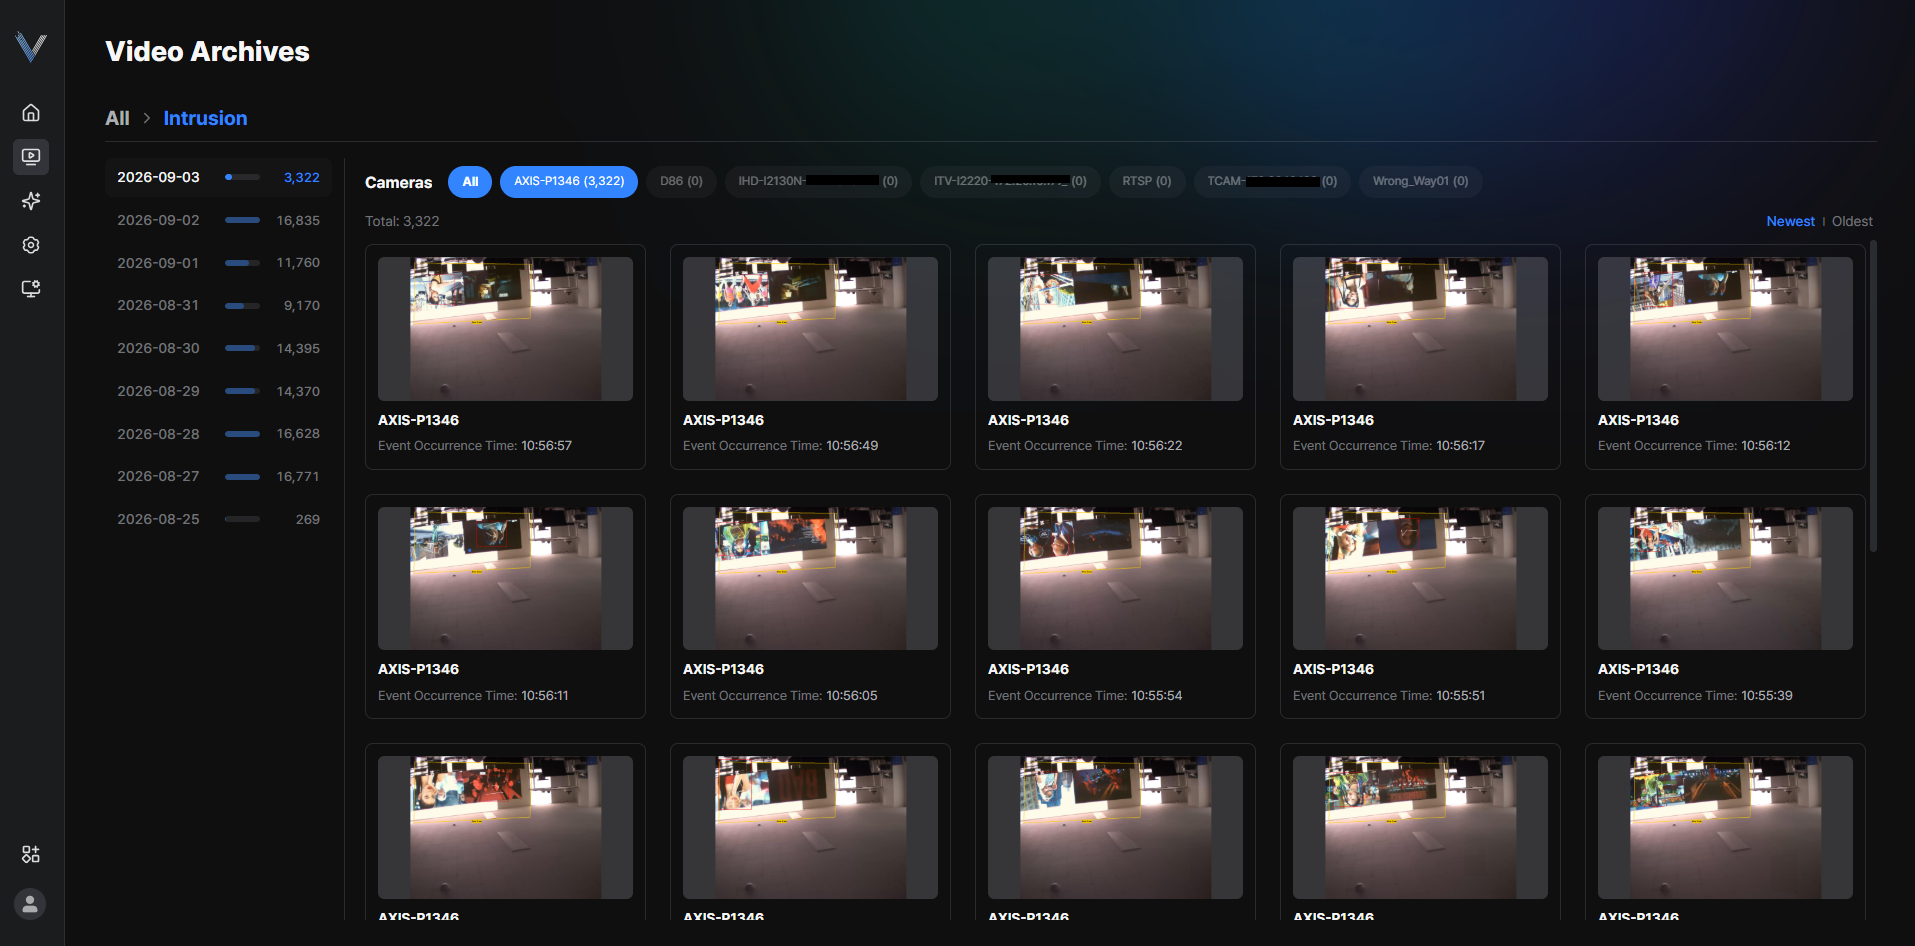 Figure 3-19. Event Clip List
 - Select an event clip and double-click it
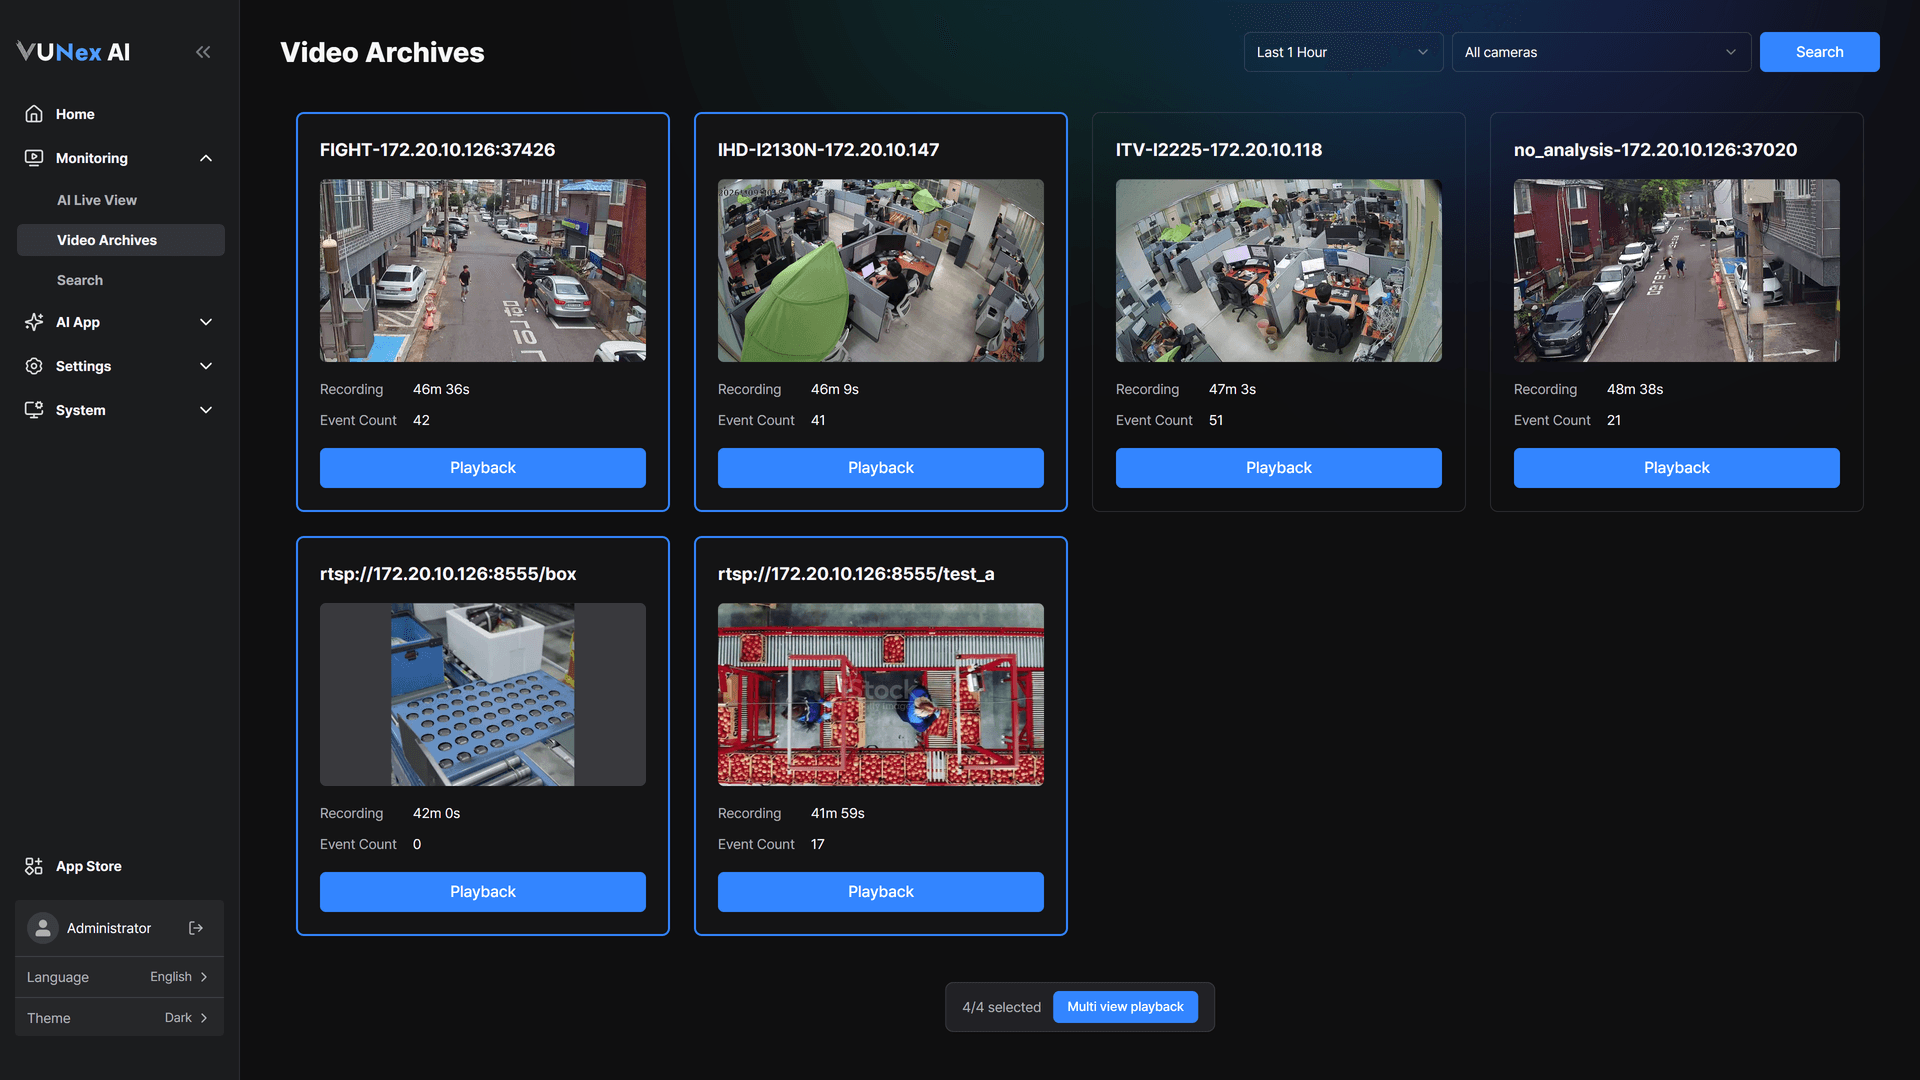
Selecting Multiple Cells
Select several cells at once in recorded video and play them in multi view.
- In the main menu, click [] > [Recorded Video]
- Drag to select several cellsThe [selected/maximum] count is shown below the grid.
- Right-click and click [Multi-view playback]
Search
Search modes such as text search, similar person search, and attribute search can be configured in [AI Service]. The search screen layout may vary depending on the search mode settings.
Searching
- In the main menu, click [] > [Search]The Search screen appears.
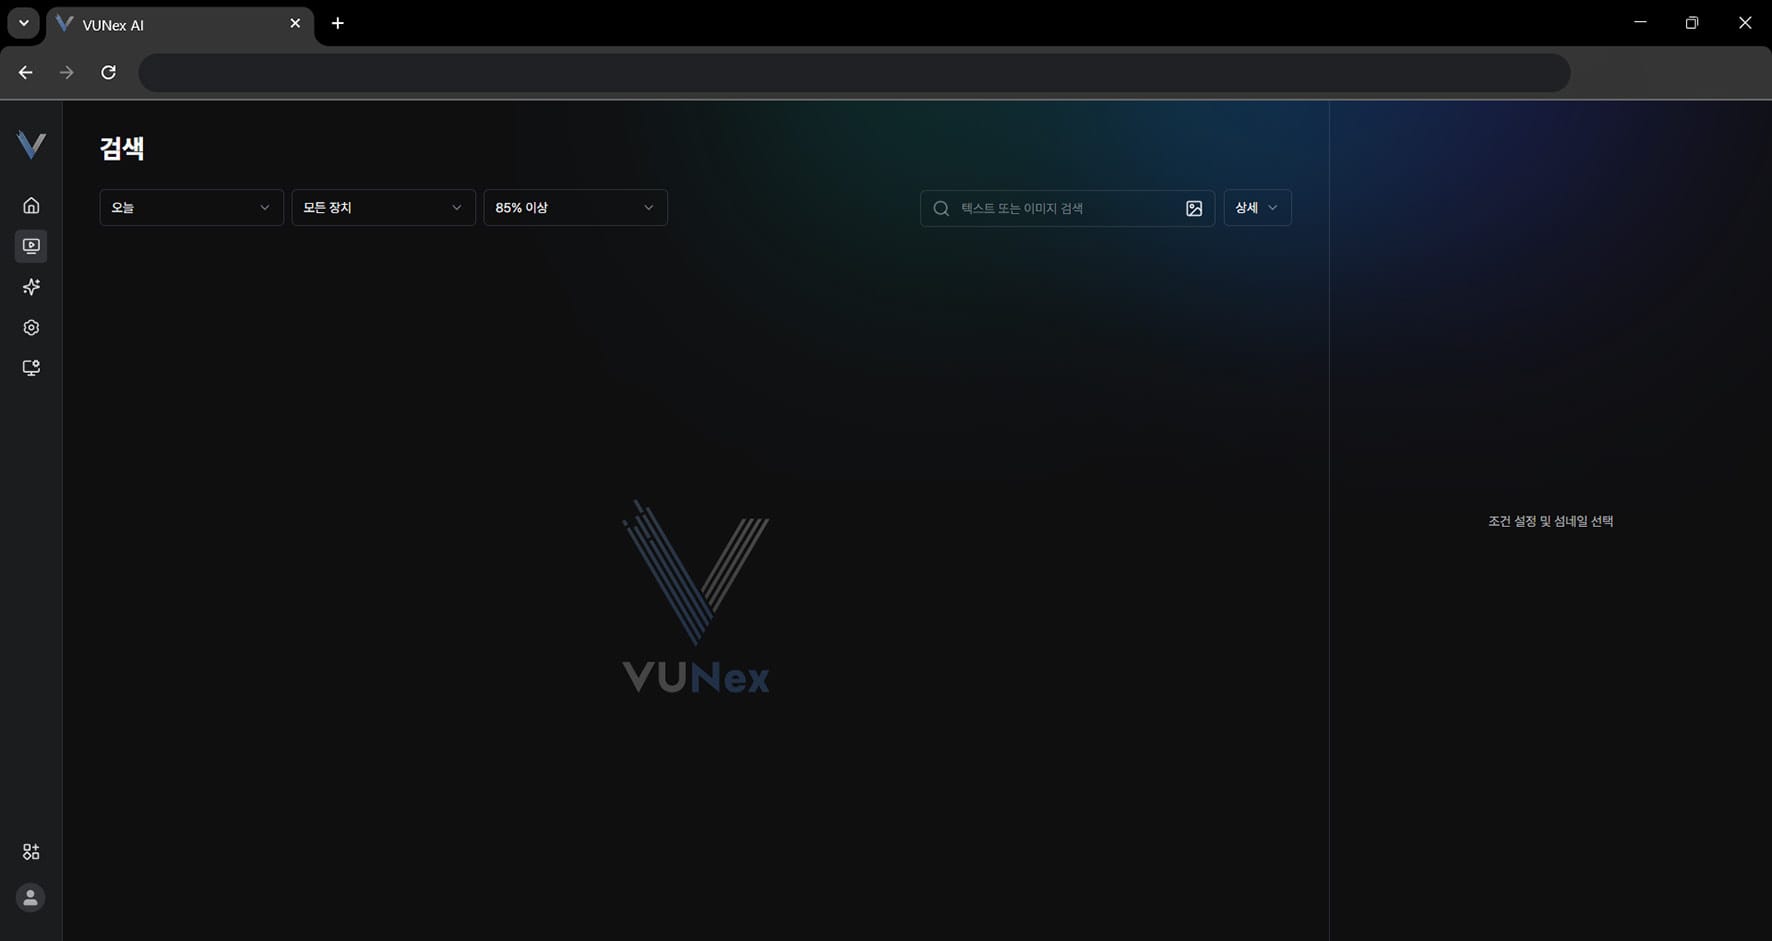 Figure 4-1. Search Screen
 - Set the search conditions
- Check the search results
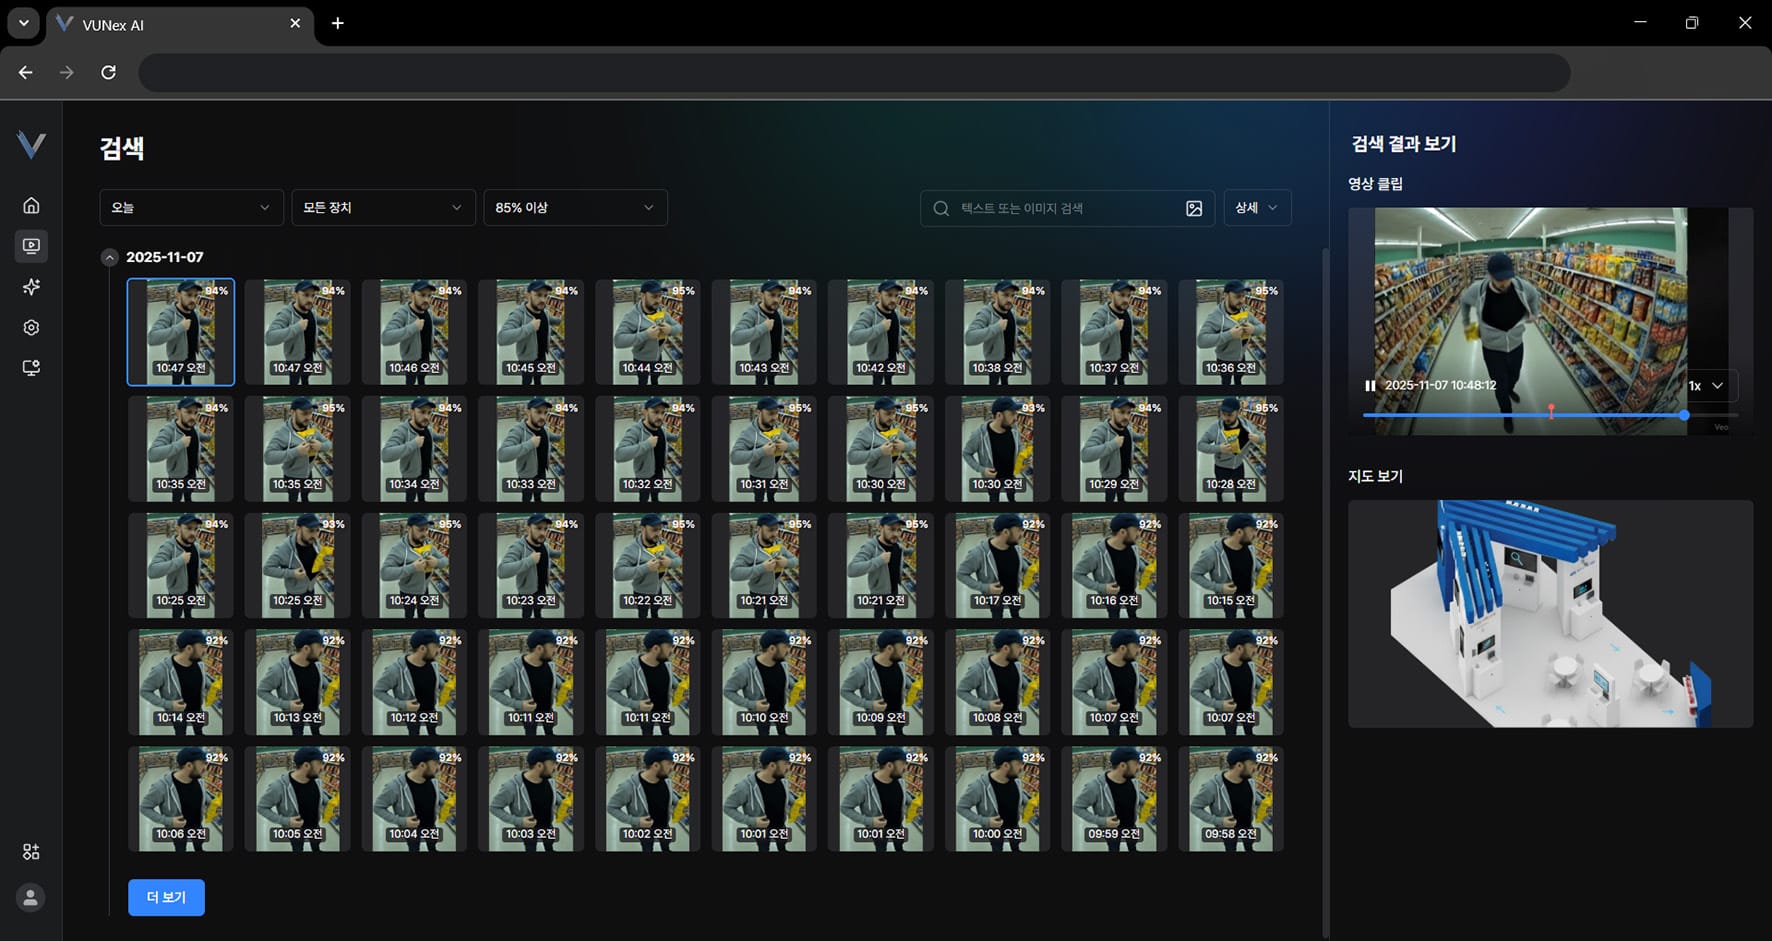 Figure 4-2. Search Results
Viewing the Search Screen Layout
The screen layout is shown.
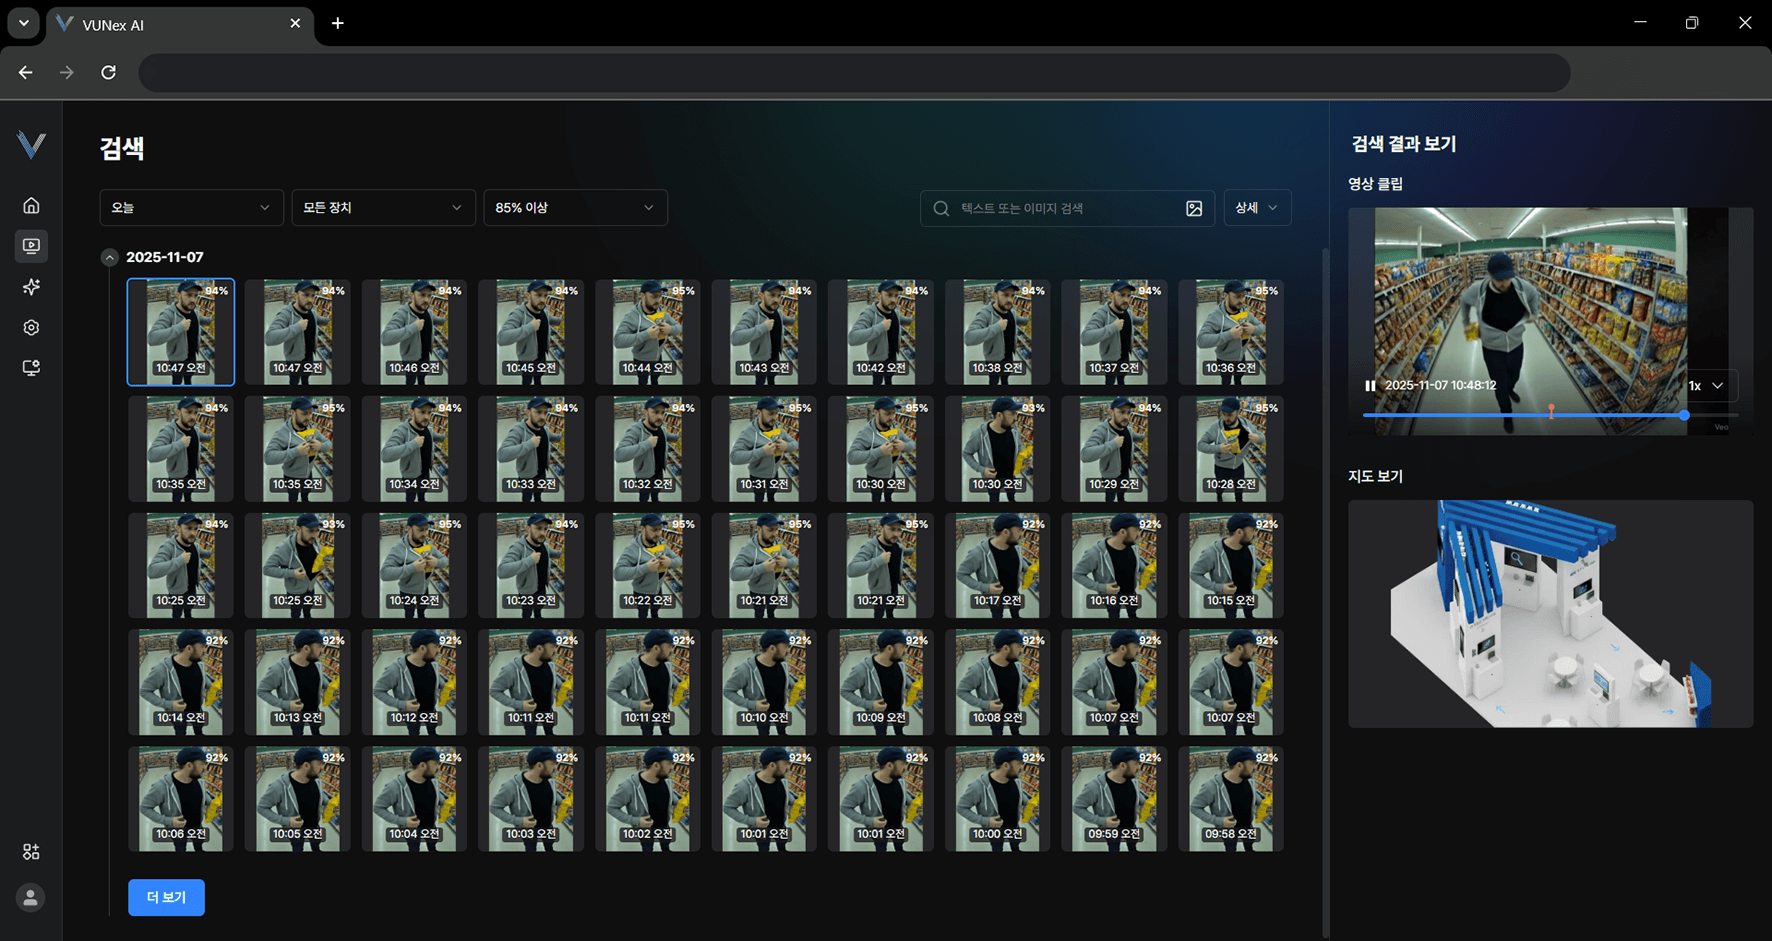
| No. | Item | Description |
|---|---|---|
| ❶ | Search period | Select a date and time. |
| ❷ | Search device | Select a device. |
| ❸ | Search accuracy | Select the search accuracy. |
| ❹ | Search by text or image | Search by entering a query or registering an image. |
| ❺ | Detailed search | Shows the detailed search panel. |
| ❻ | Search results | Shows results matching the search conditions as thumbnails. |
| ❼ | Search result details | Shows result information such as the video and the map. |
Setting Search Conditions
Set the search conditions.
- In the main menu, click [] > [Search]The Search screen appears.
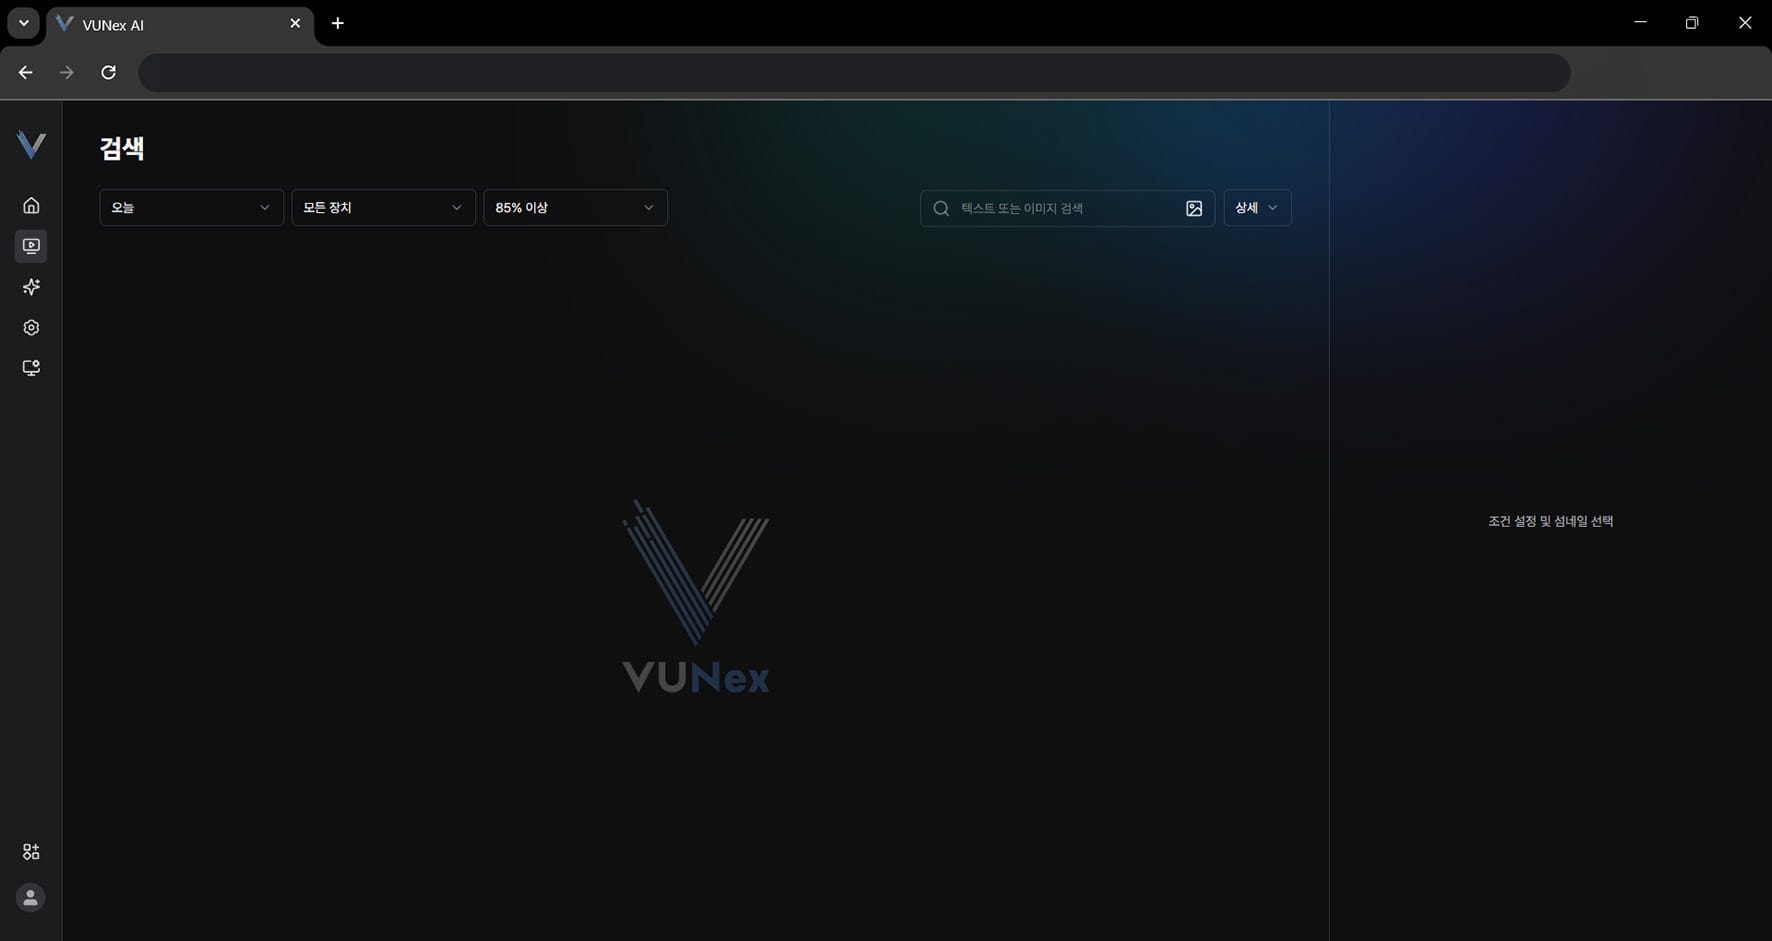 Figure 4-4. Setting the Search Period
 - Select the search period
- Select the device to search
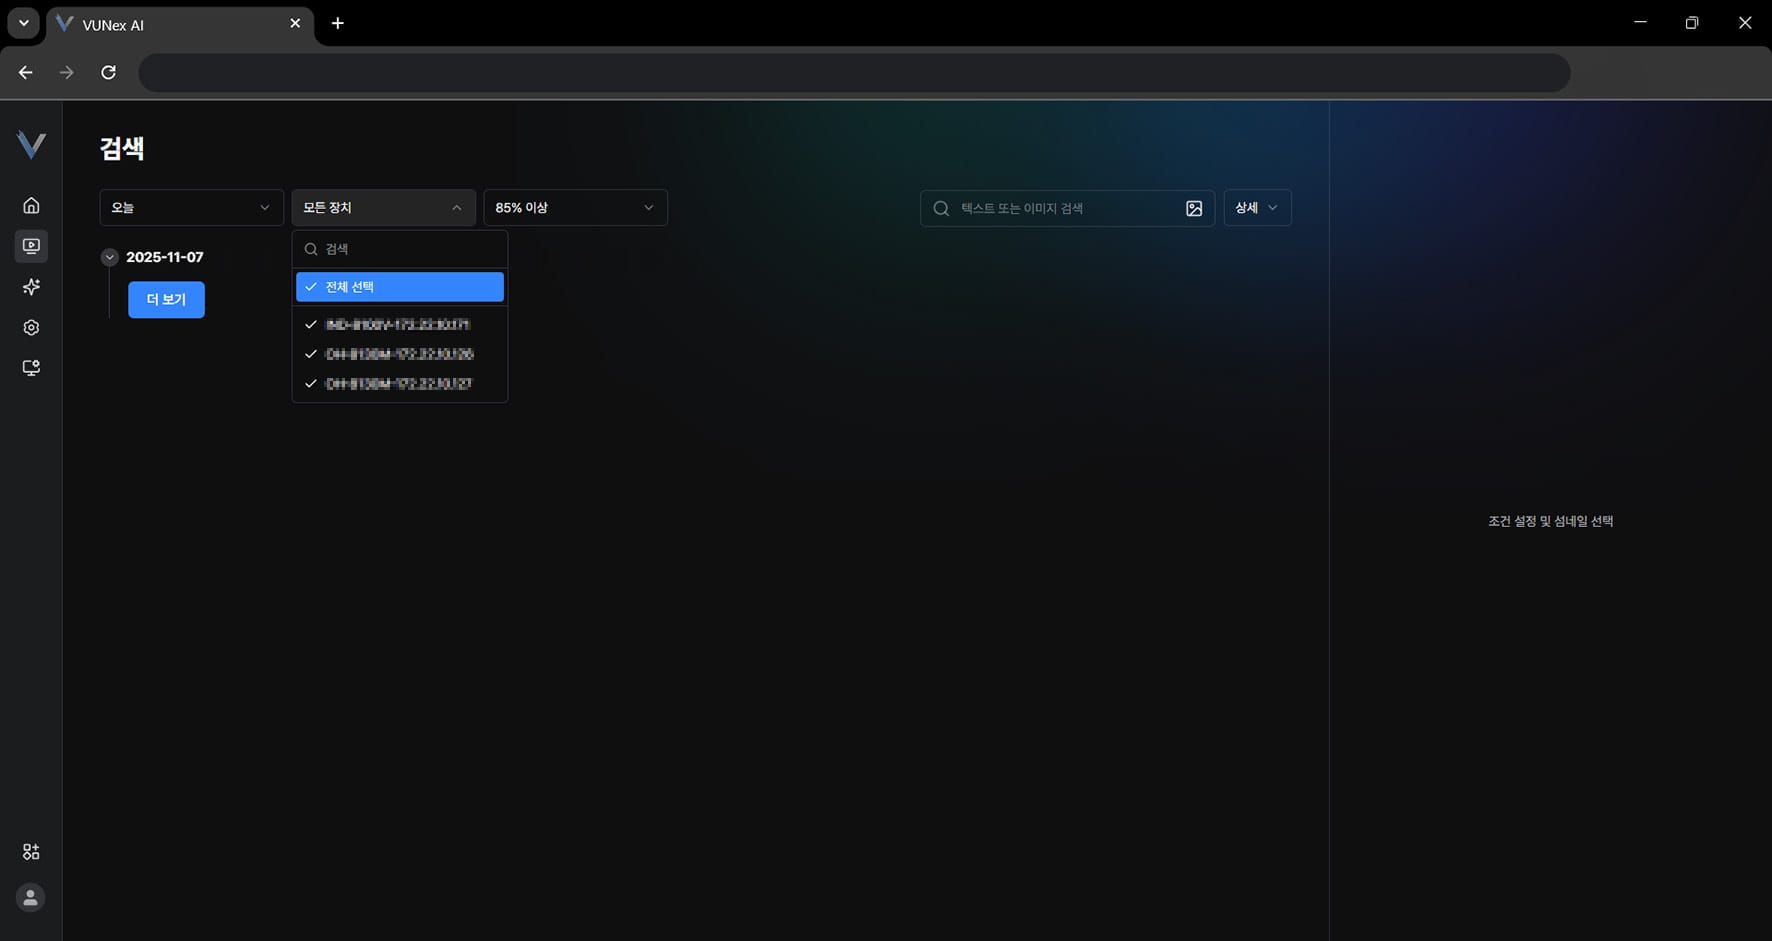 Figure 4-5. Setting the Search Device and Accuracy
 - Select the search accuracy
- Set the conditions and select the item you want
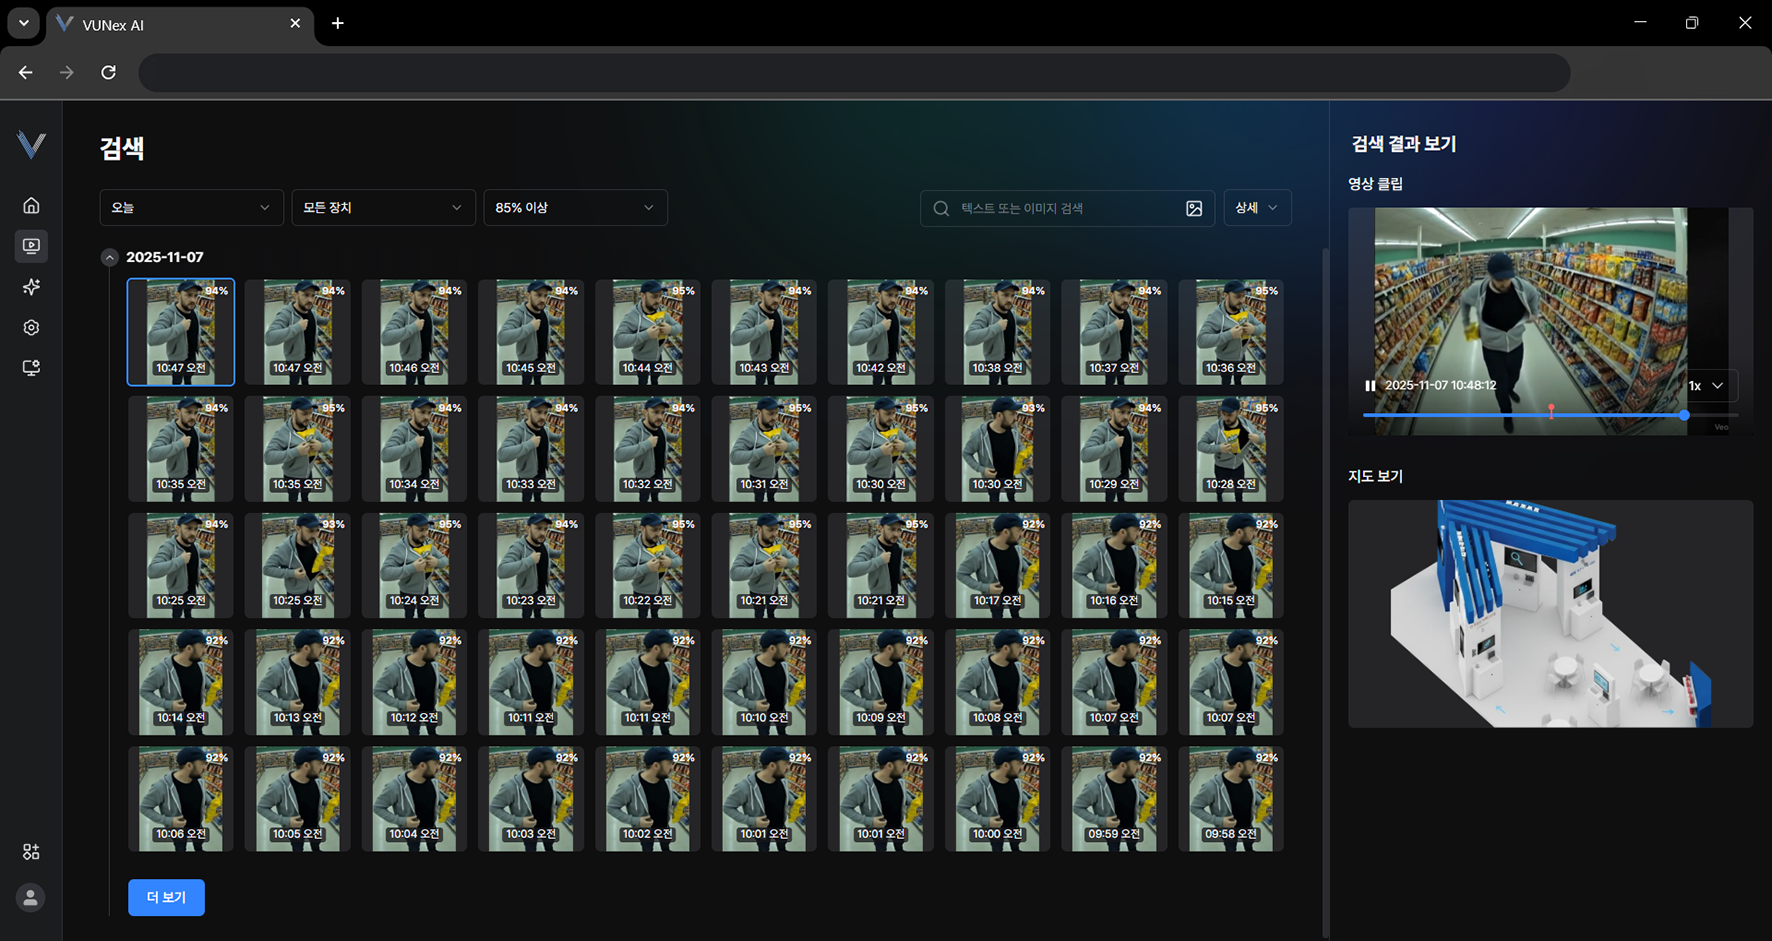 Figure 4-6. Entering a Query and Searching
 - Check the search results
Viewing Search Results
Select a thumbnail that matches the search conditions to check result information such as the video and the map.
- In the main menu, click [] > [Search]The Search screen appears.
- Set the conditions and select the item you want
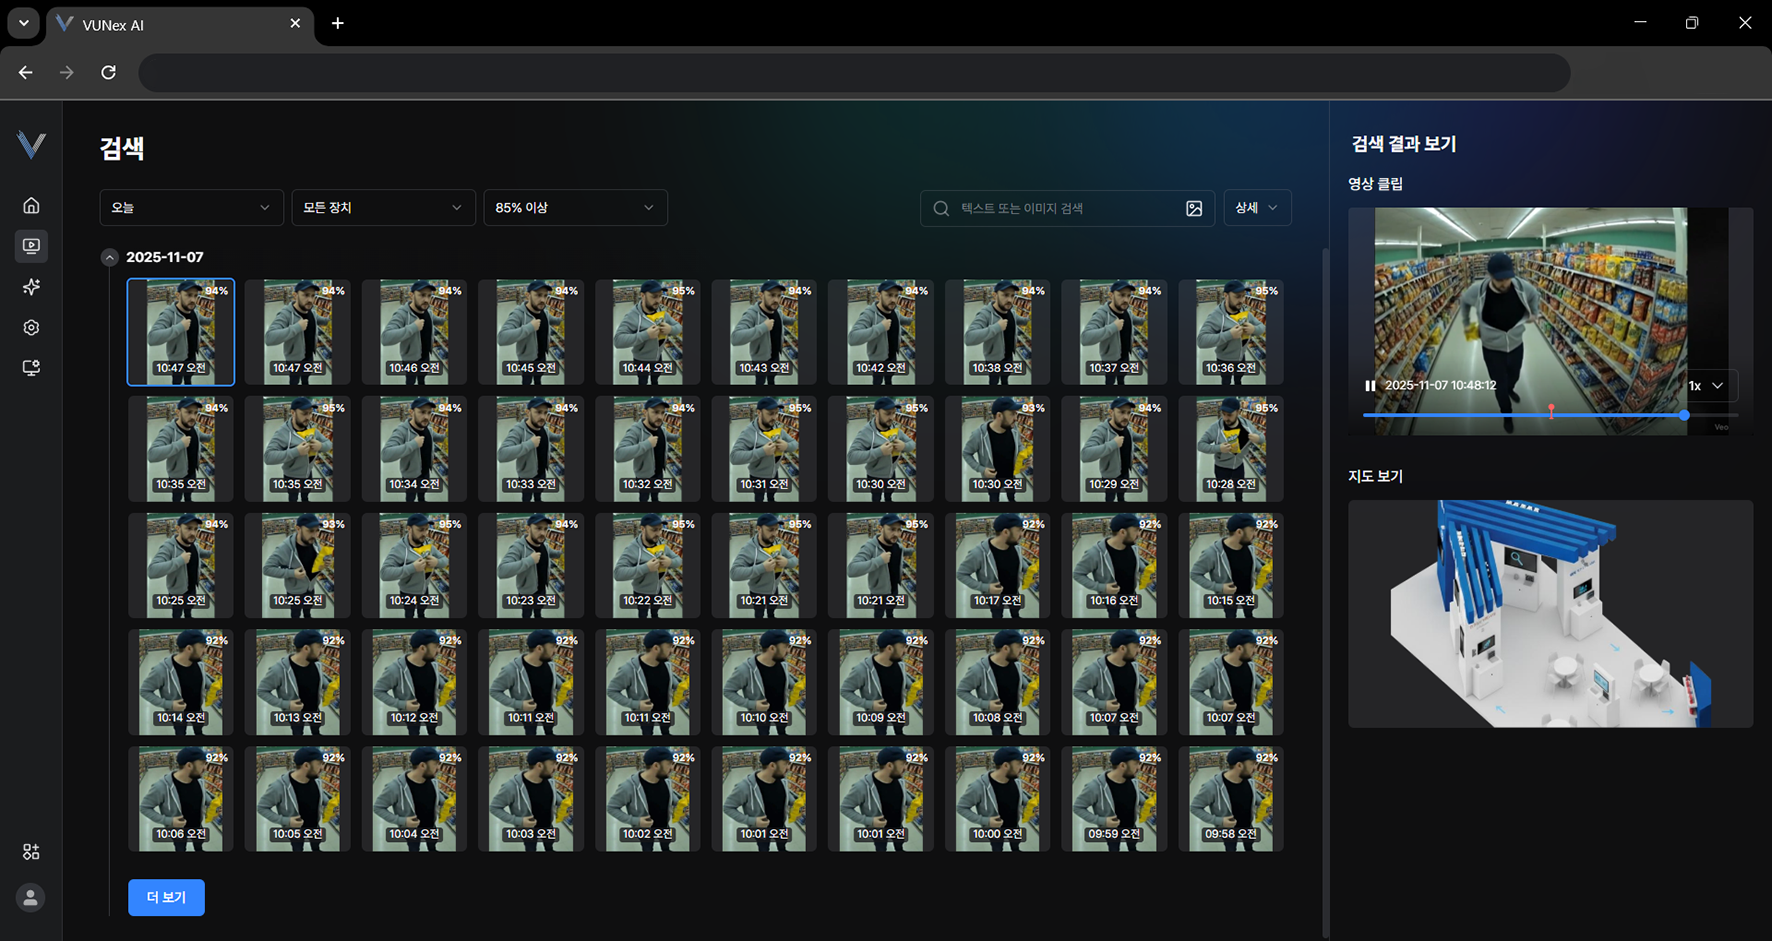 Figure 4-7. Selecting a Search Result
 - Right-click on the videoThe pop-up menu appears.
- Click the item you want[Expand]: maximizes the video. [Playback]: plays the video. [Camera name]: shows the camera name on the video.
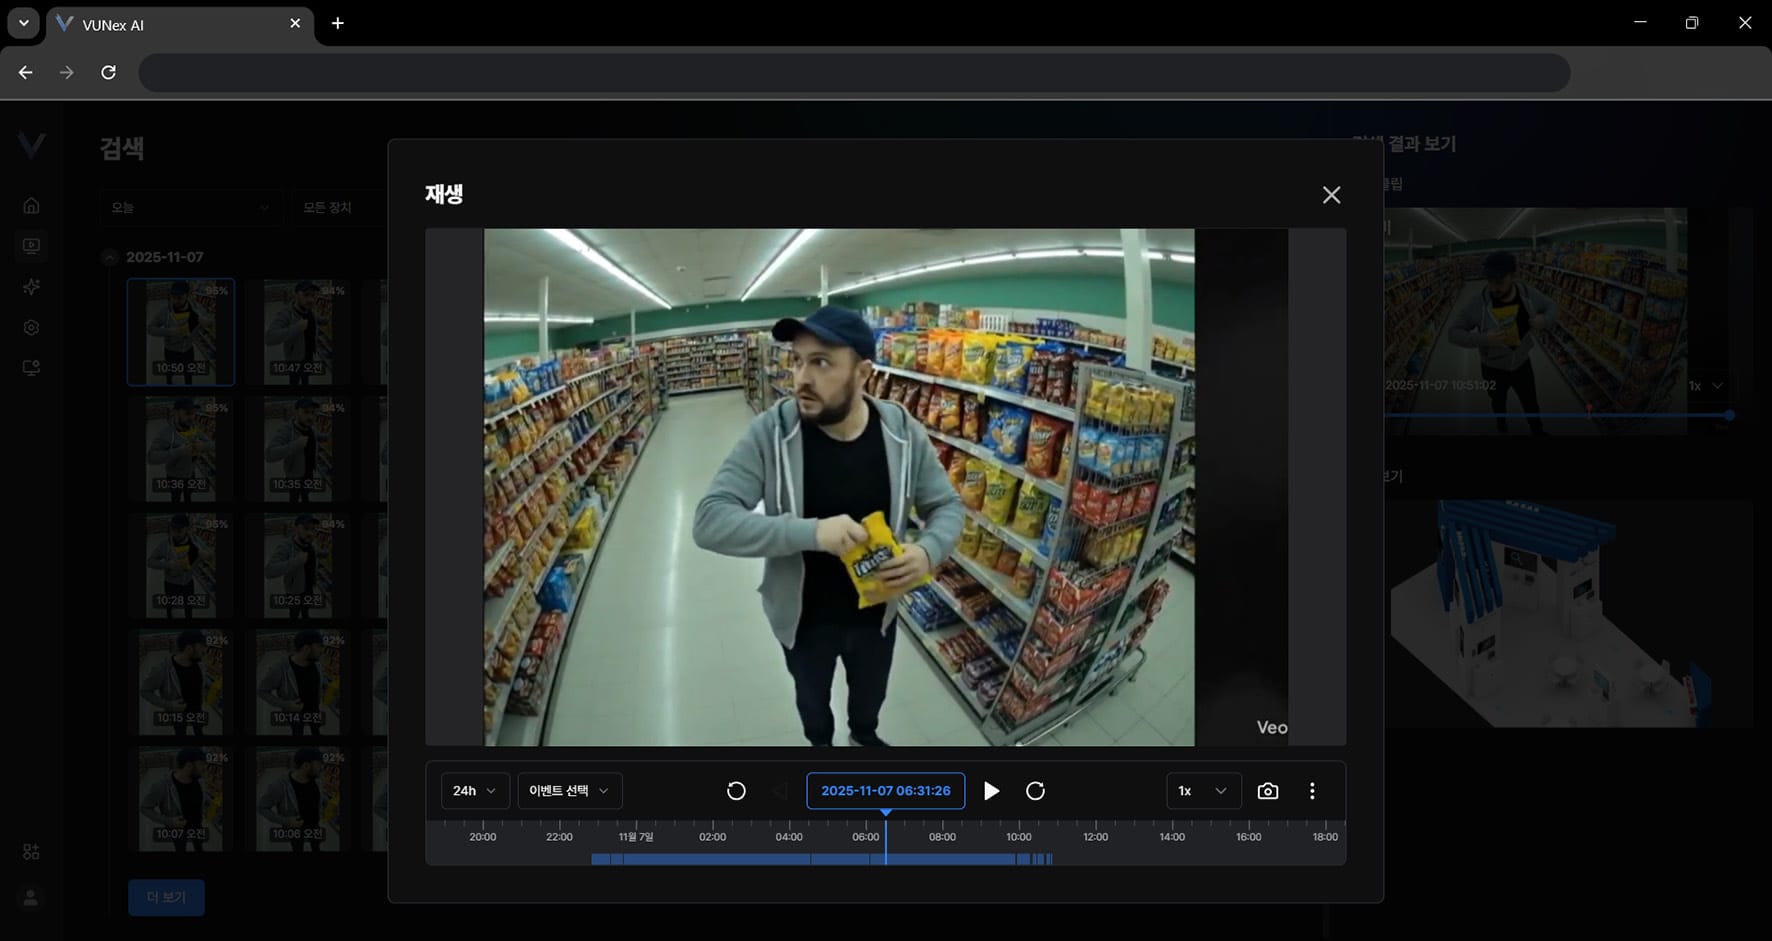 Figure 4-8. Playing a Search Result Video
 - Click [Playback]
- Check the recorded video
Searching by Text or Image
Search by entering a query or registering an image.
- In the main menu, click [] > [Search]The Search screen appears.
- Click [Search by text or image] > [image icon]
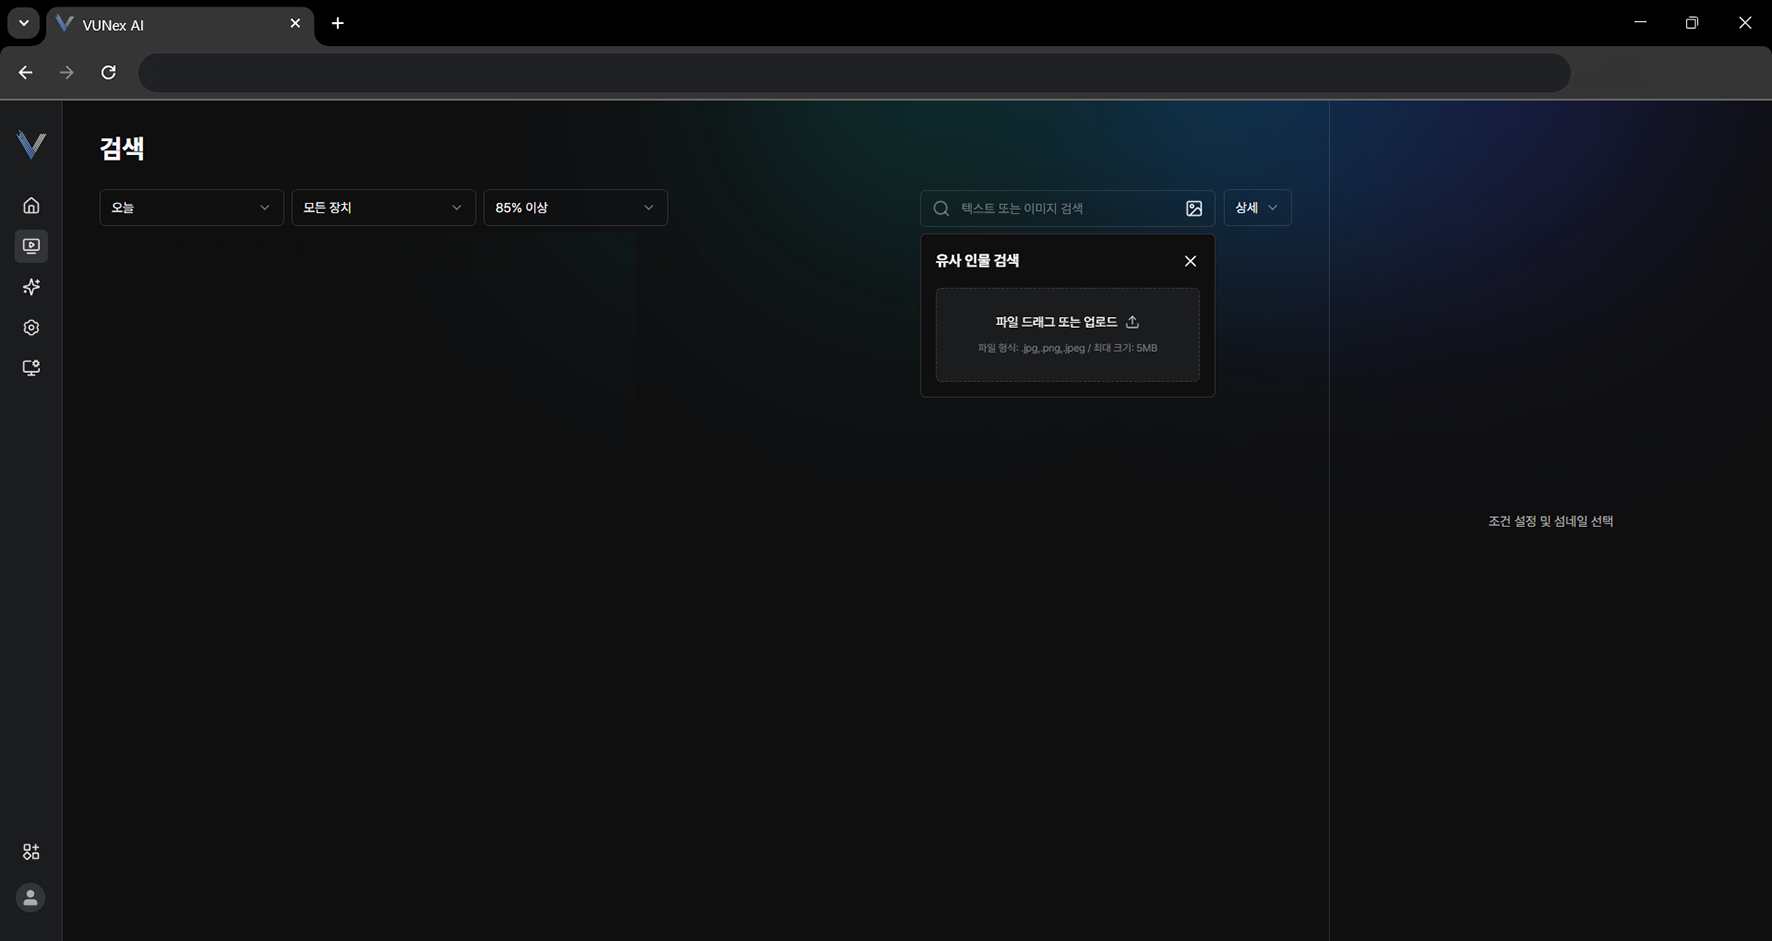 Figure 4-9. Image Search Mode
 - Click the area marked with a dotted line
- Select the file and click [Open]
- Drag the item you want into the search box
- Search for the image
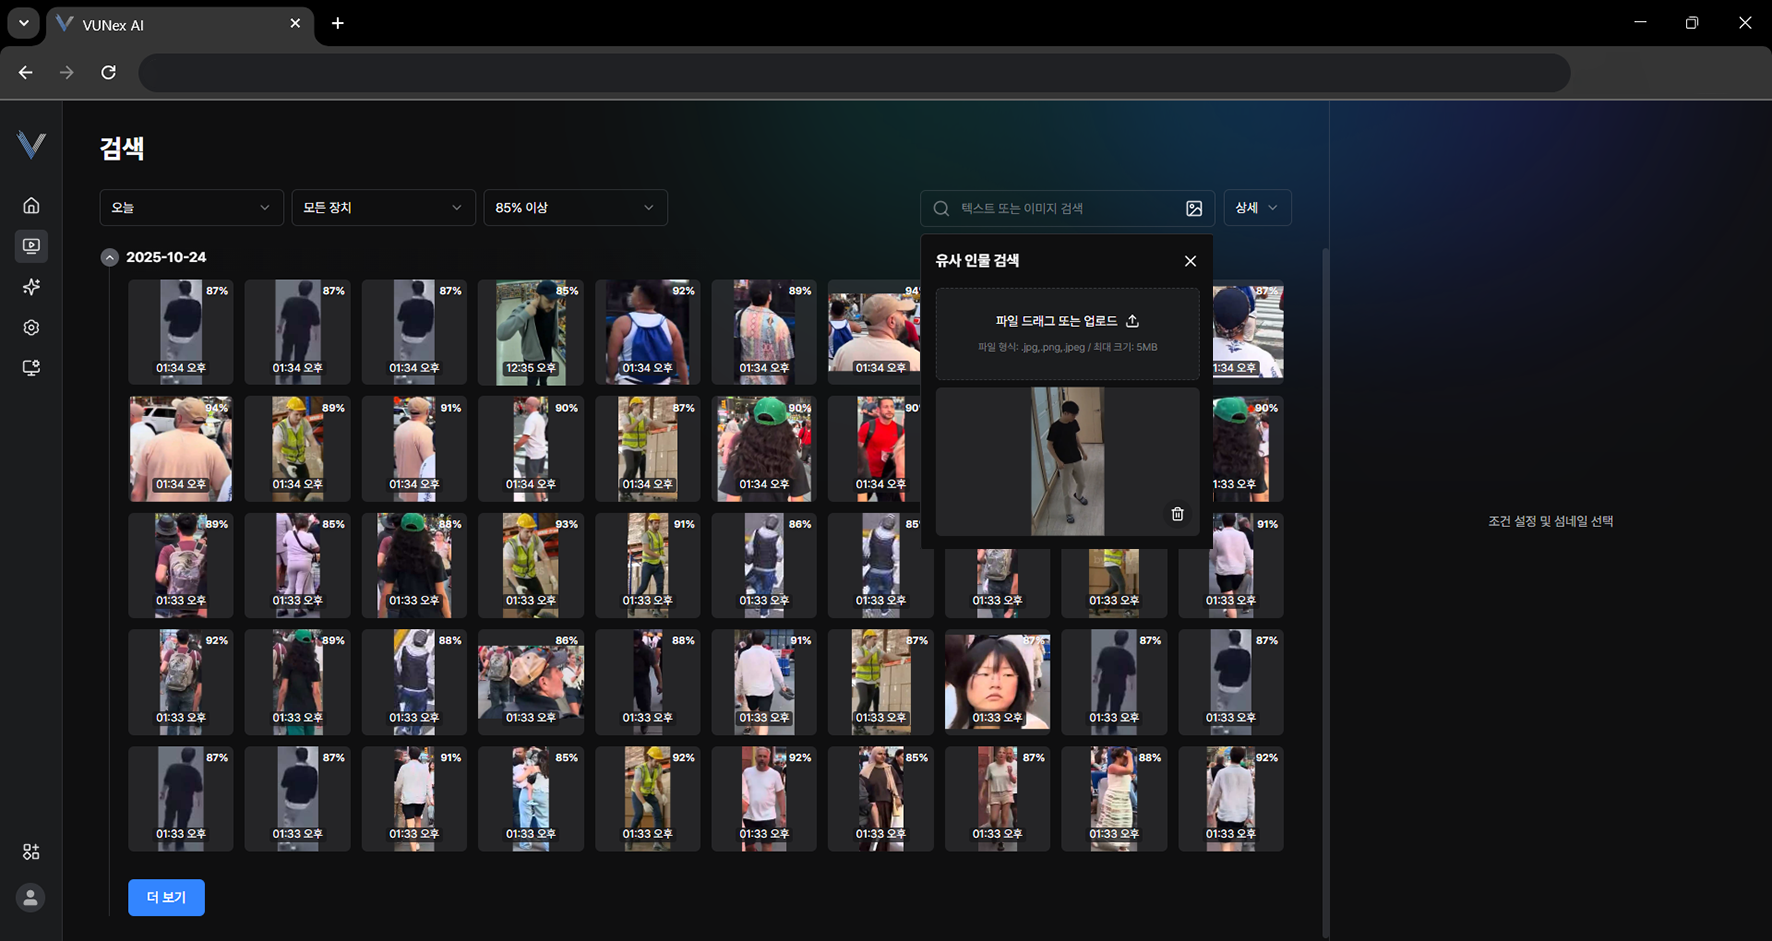 Figure 4-10. Uploading an Image and Searching
 - Select the item you want
- Check the search results
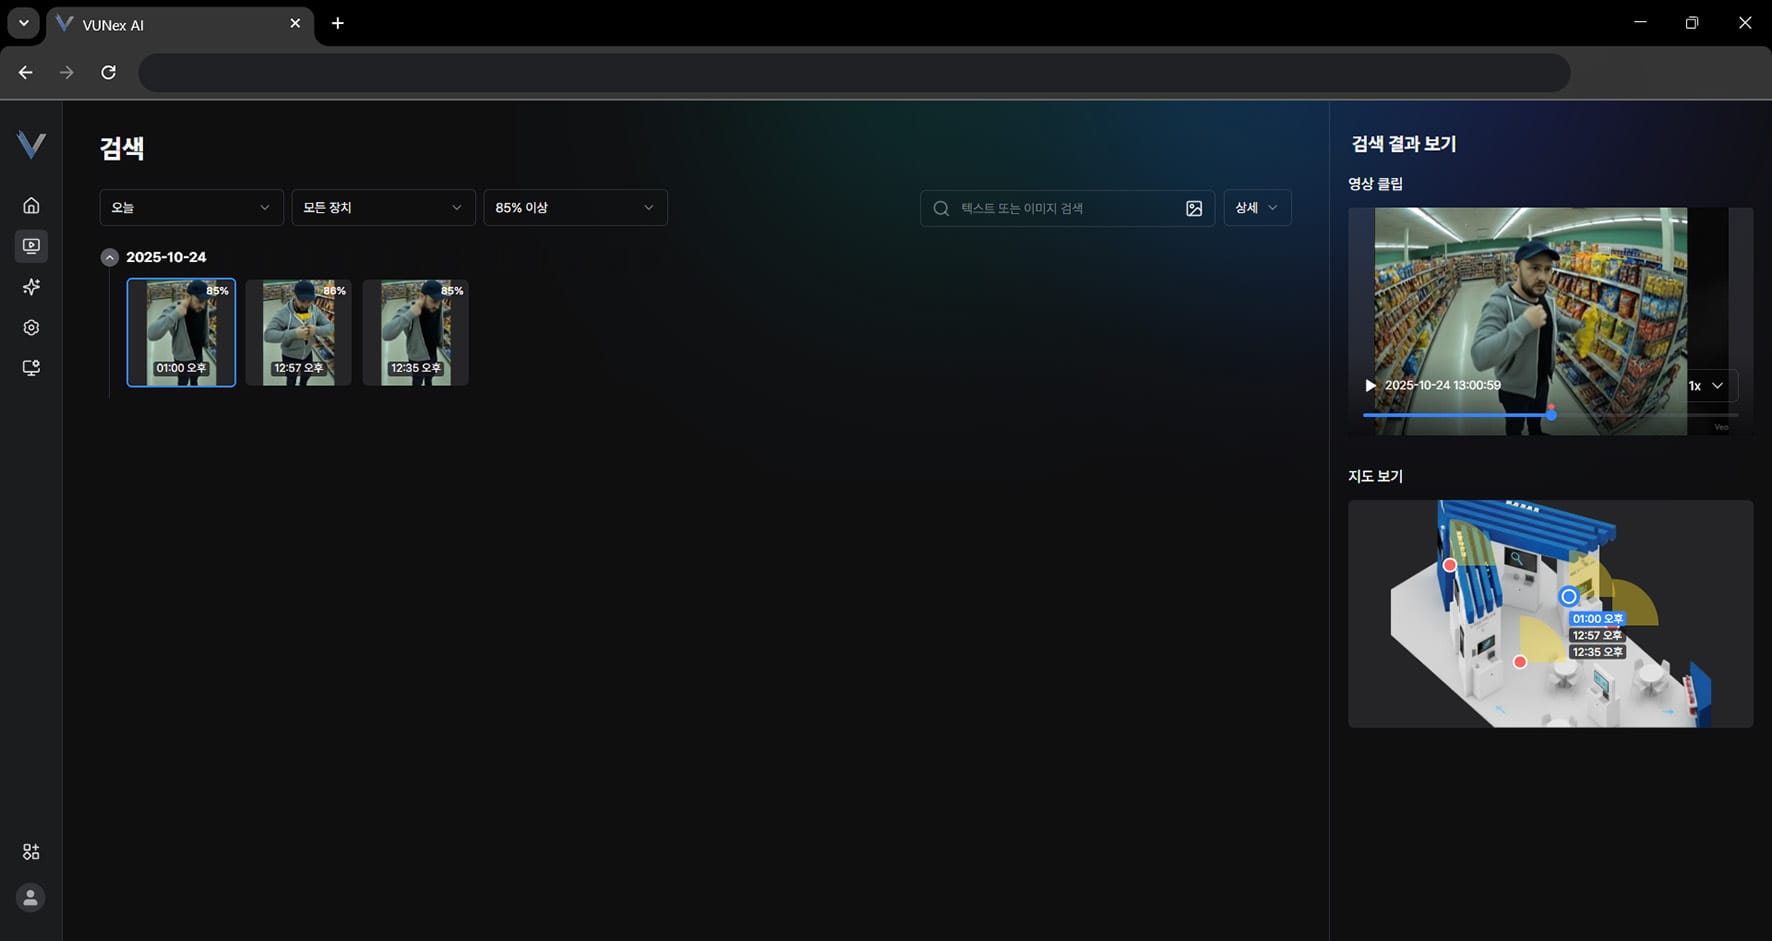 Figure 4-11. Image Search Results
Searching with Detailed Conditions
Search with detailed conditions.
- In the main menu, click [] > [Search]The Search screen appears.
- Click [Detail]
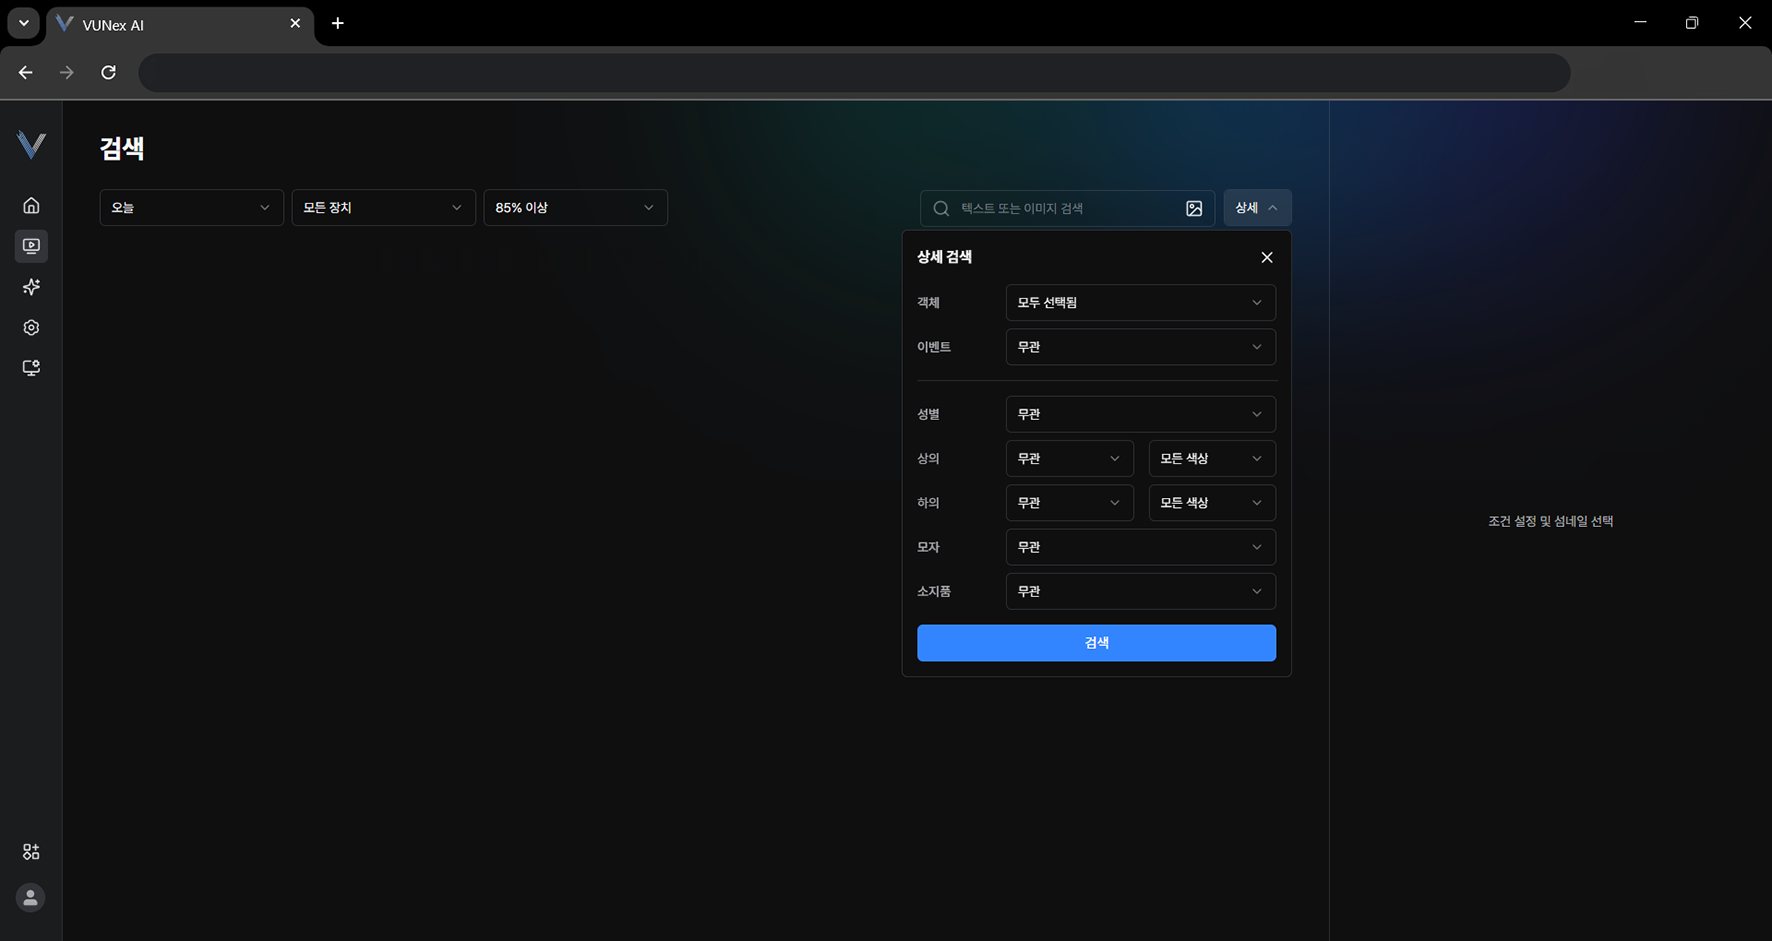 Figure 4-12. Detailed Search Menu
 - Set the conditions and click [Search]
- Select the item you want
- Check the search results
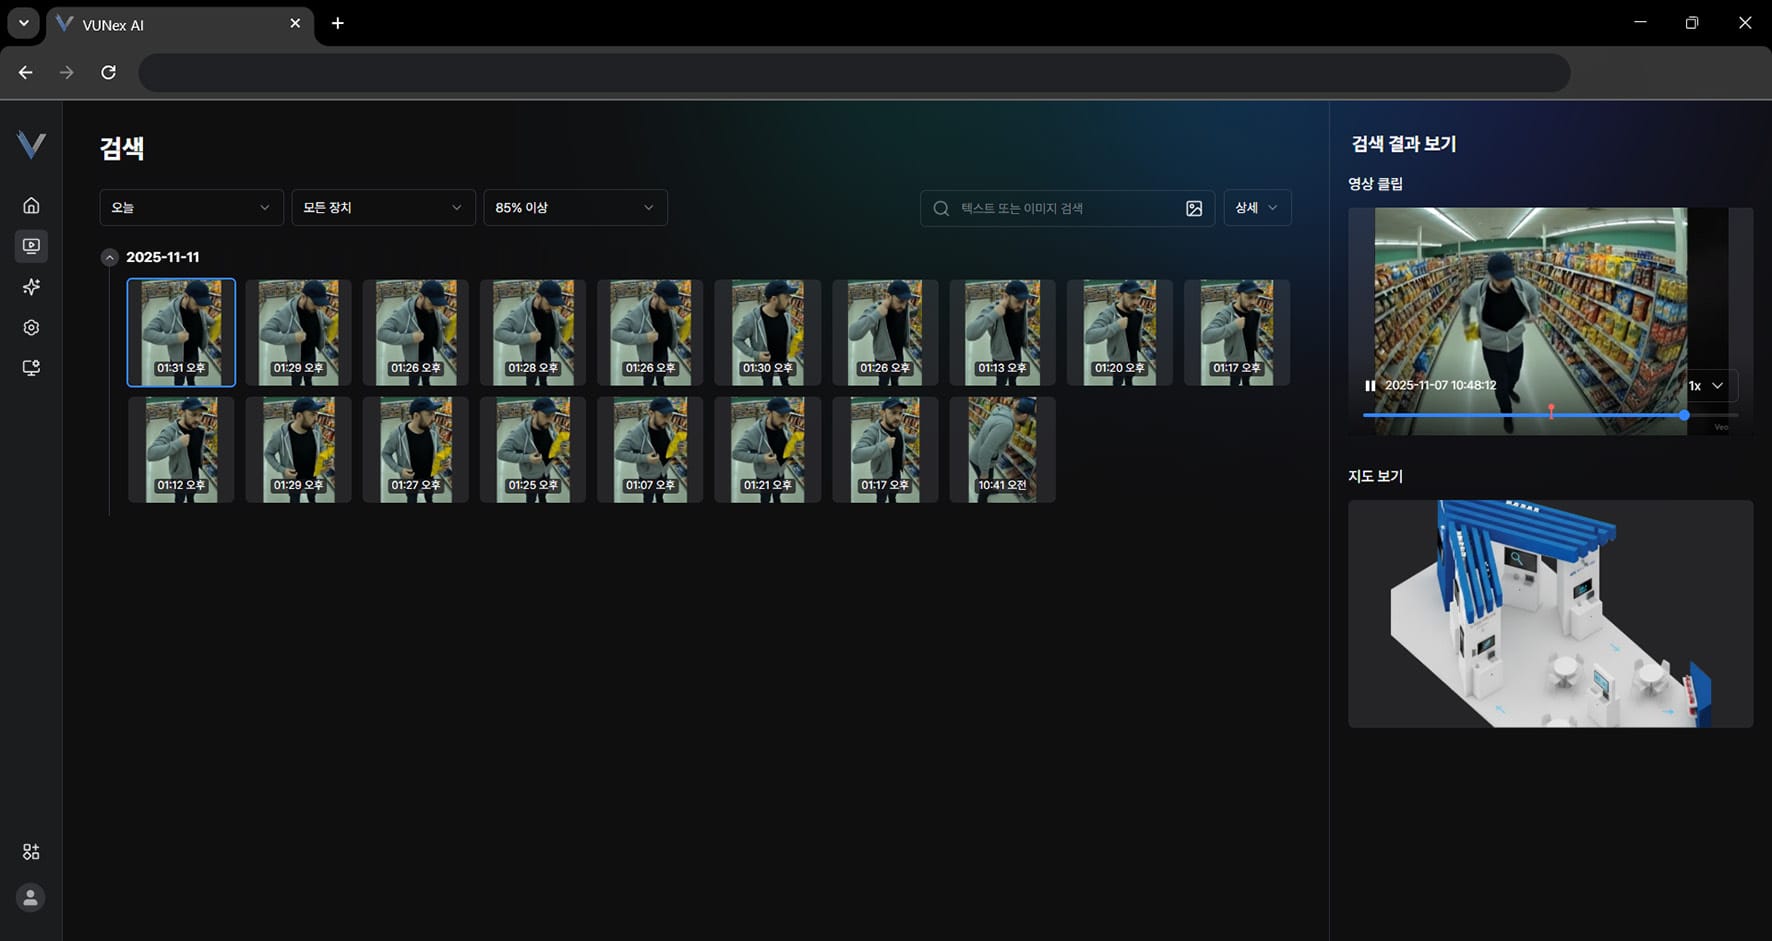 Figure 4-13. Detailed Search Results
Searching by Similar Person
Find scenes containing people similar to the person you selected.
- In the main menu, click [] > [Search]
- Click [Similar Person Search]
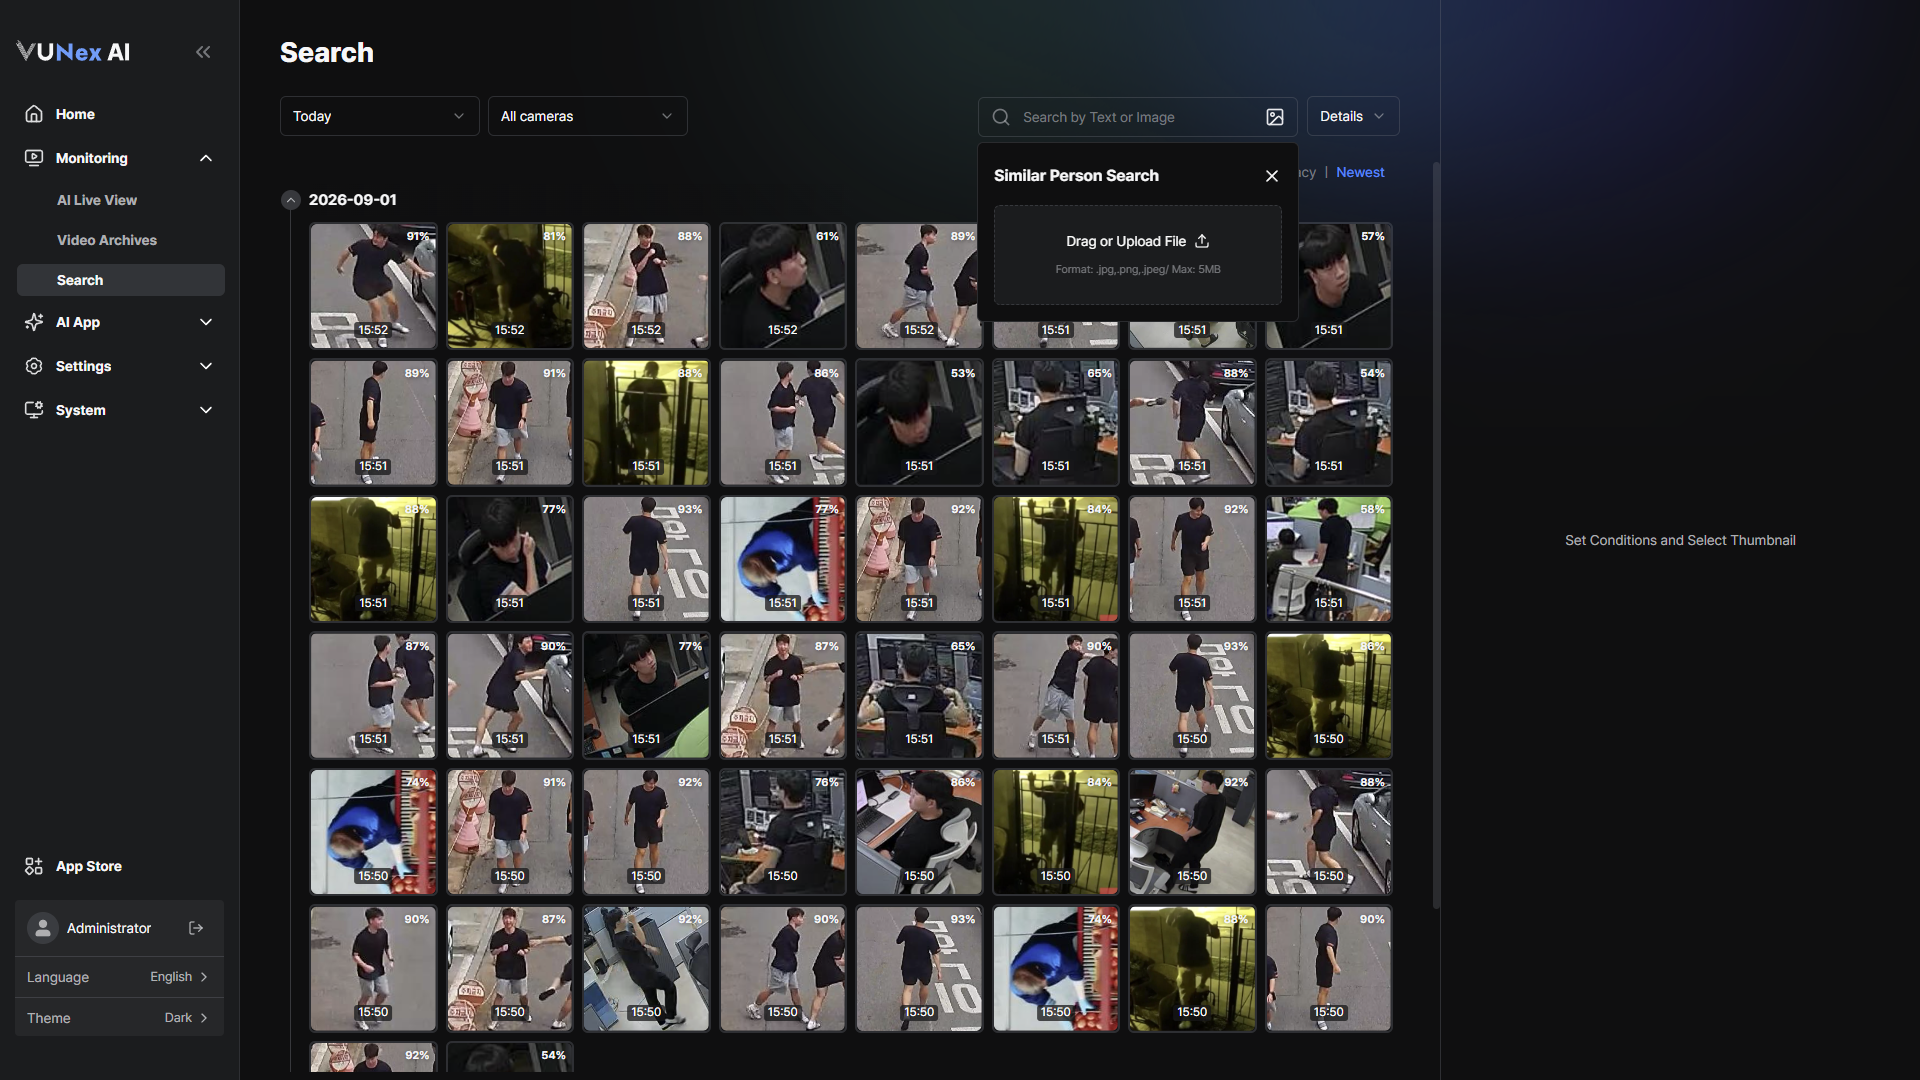 Figure 4-14. Selecting Similar Person Search
 - Select the person to search forOnce person detection finishes, the selectable people are shown. Click [Original] to see the original image.
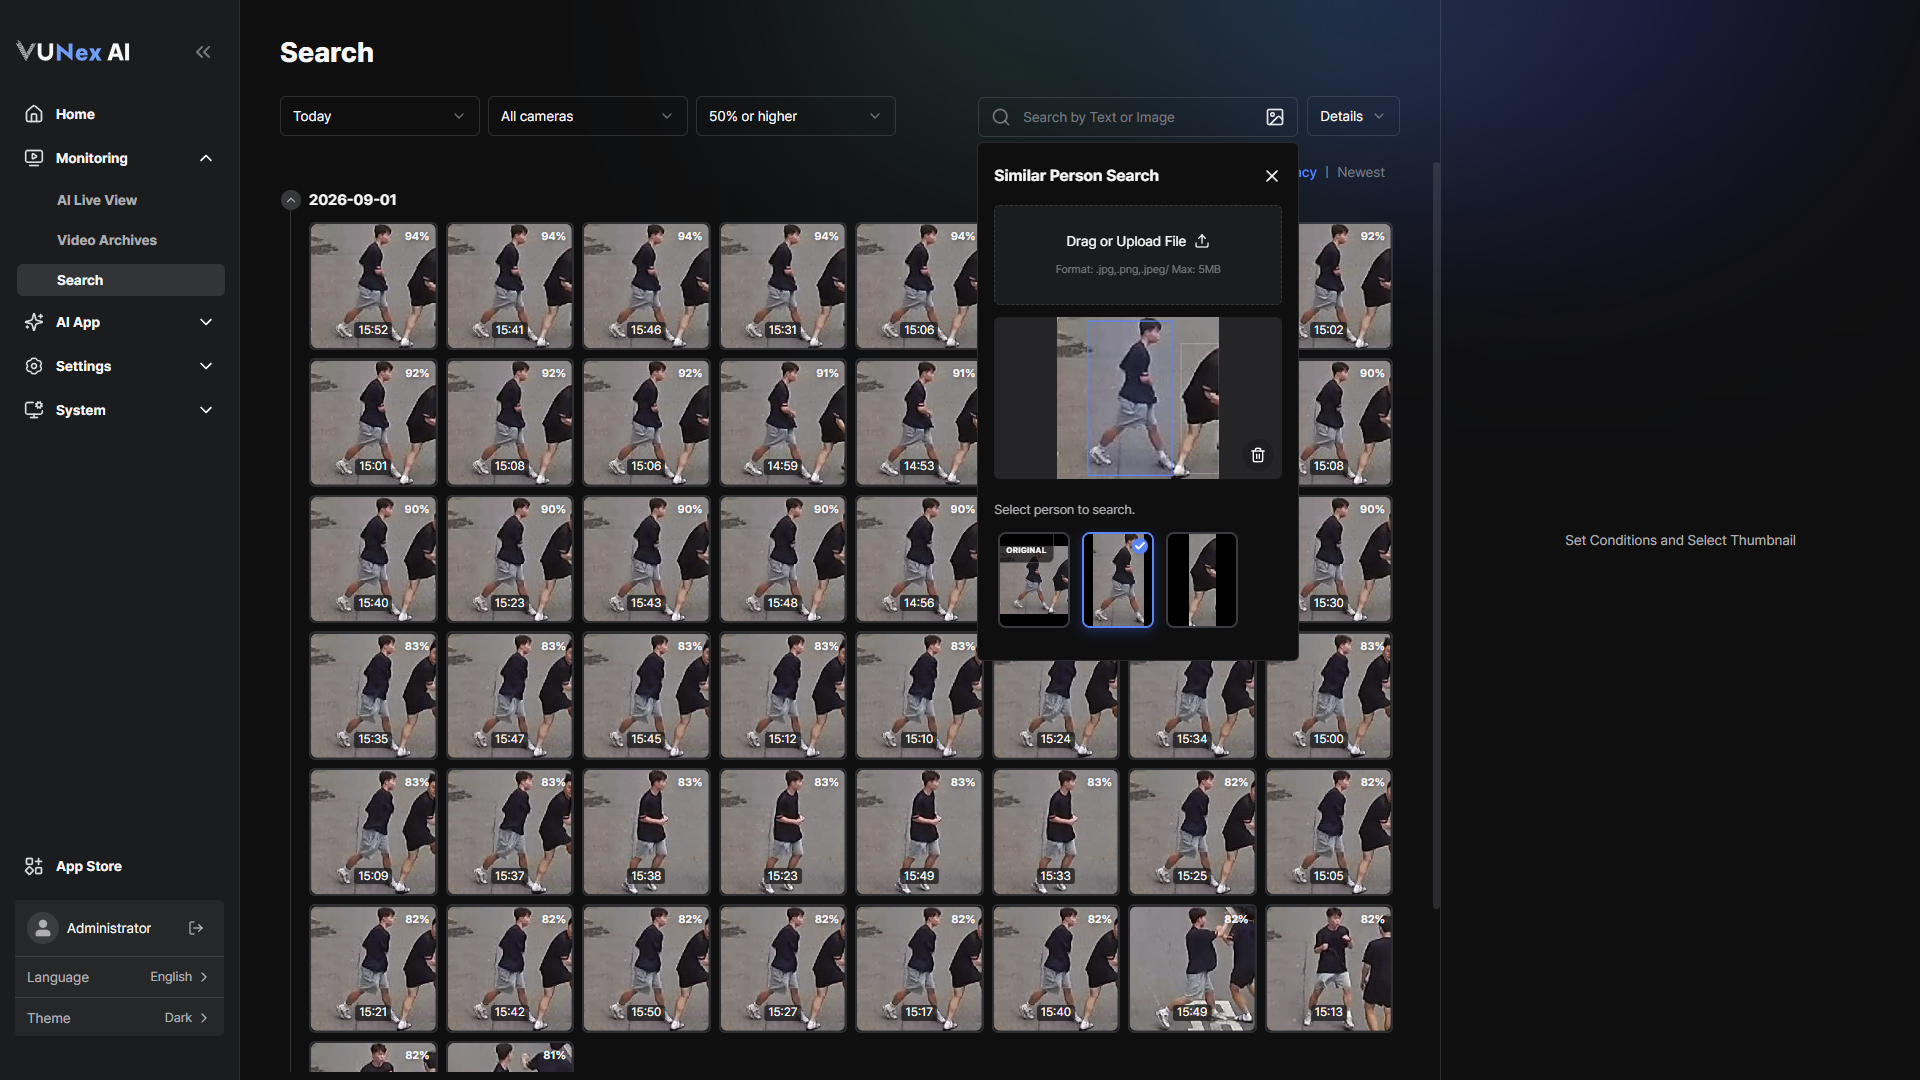 Figure 4-15. Selecting the Person to Search
 - Set the [Accuracy] and click [Search]
- Check the search results
Sorting Results and Viewing Them on the Map
Change how results are sorted, or check where the results occurred on the map.
- In the main menu, click [] > [Search]
- Set the conditions and click [Search]
- Select [By accuracy] or [Newest]
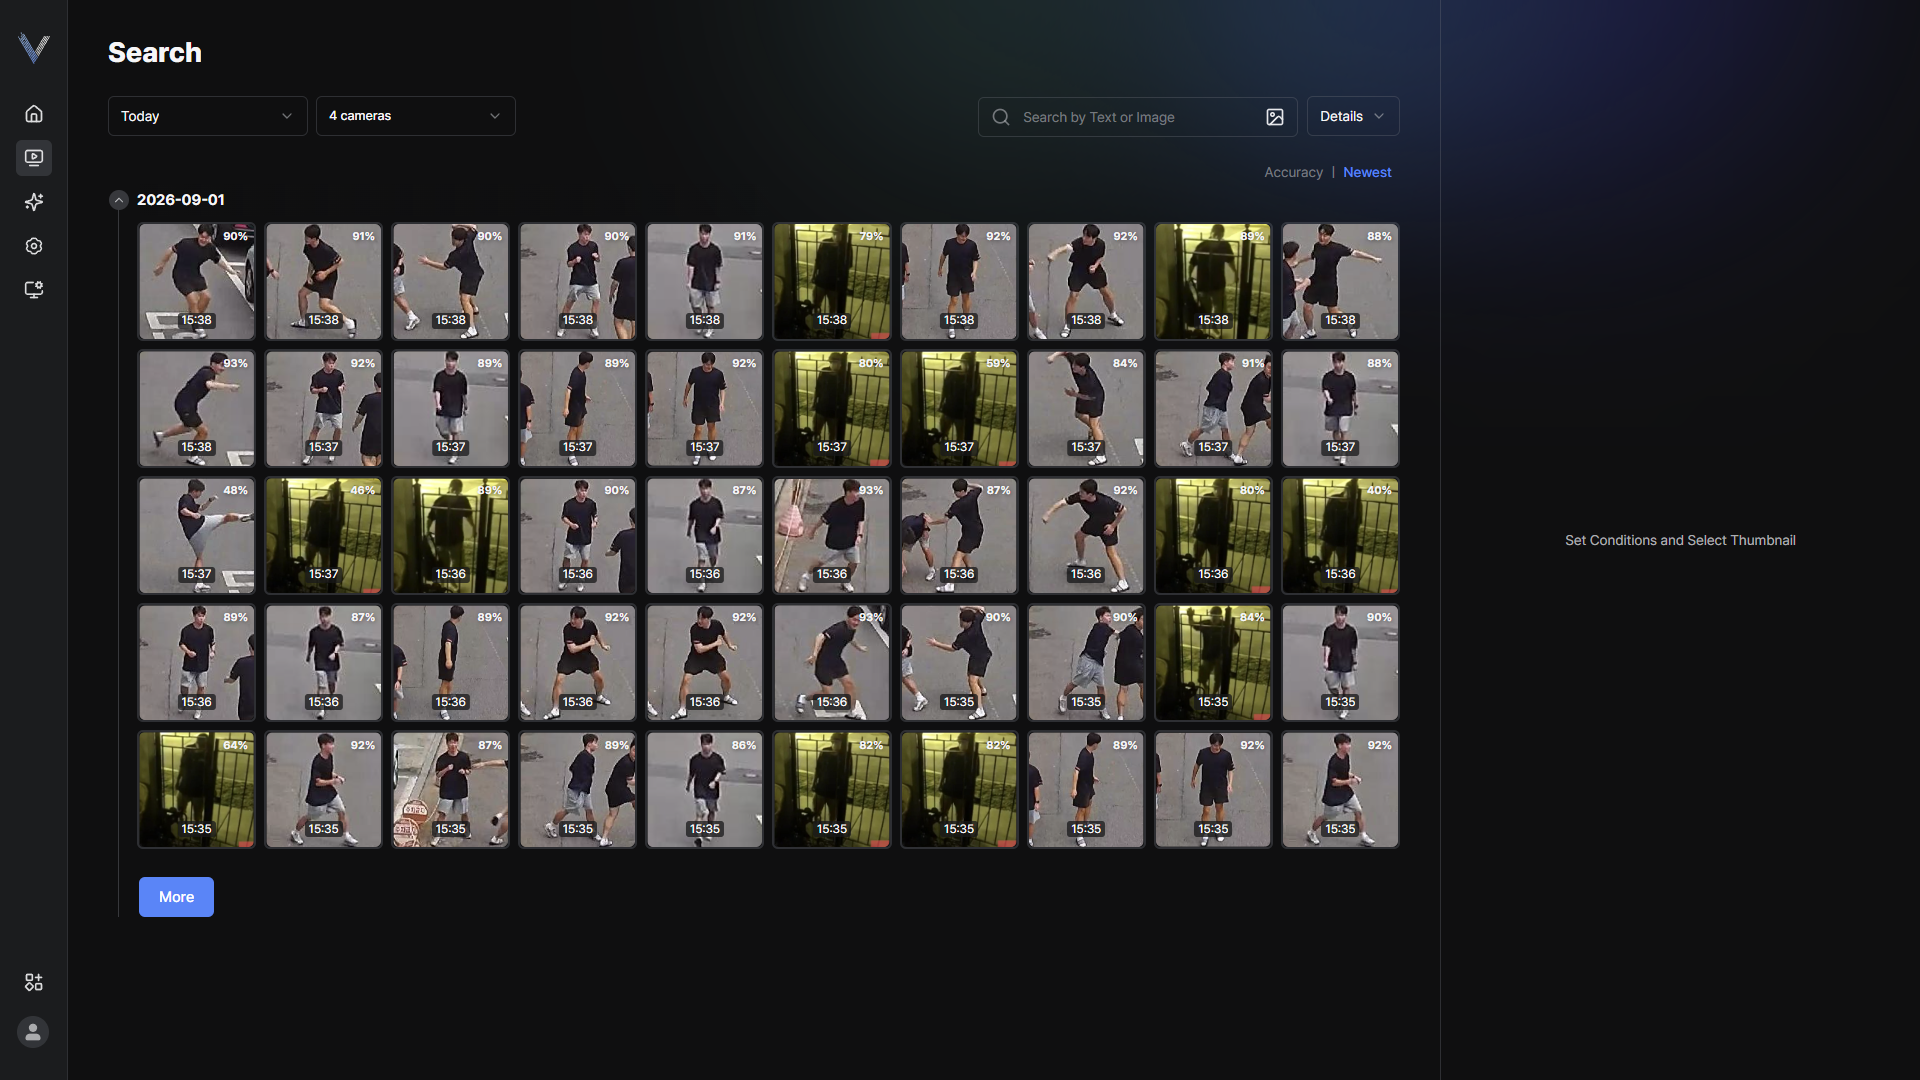 Figure 4-16. Sorting Search Results
 - Select a thumbnail and check [Video clip] and [Map view]
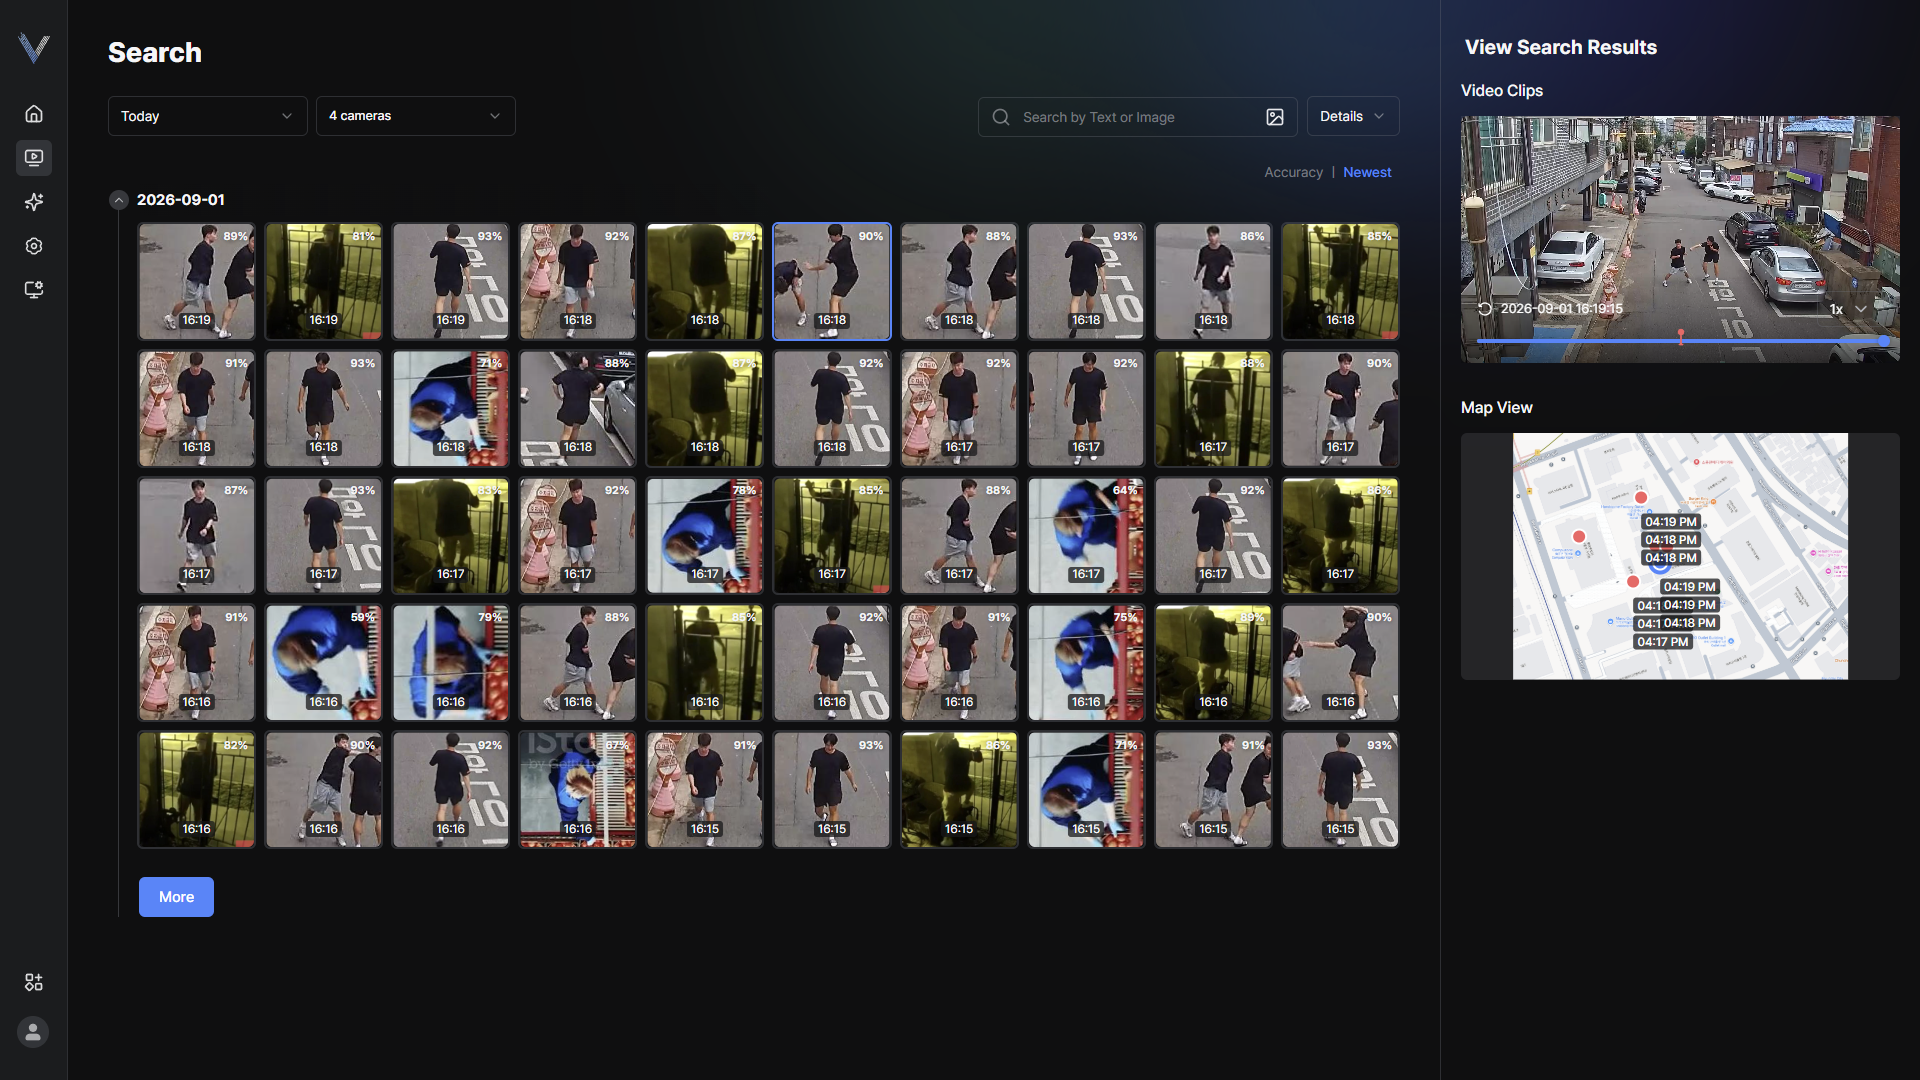 Figure 4-17. Video Clip and Map View
Event Settings
Check events and set actions according to events. The event list may vary depending on the applied model and settings.
Viewing the Event and Action List
Check the recommended actions for each event.
- In the main menu, click [] > [AI Event]The AI Event screen appears.
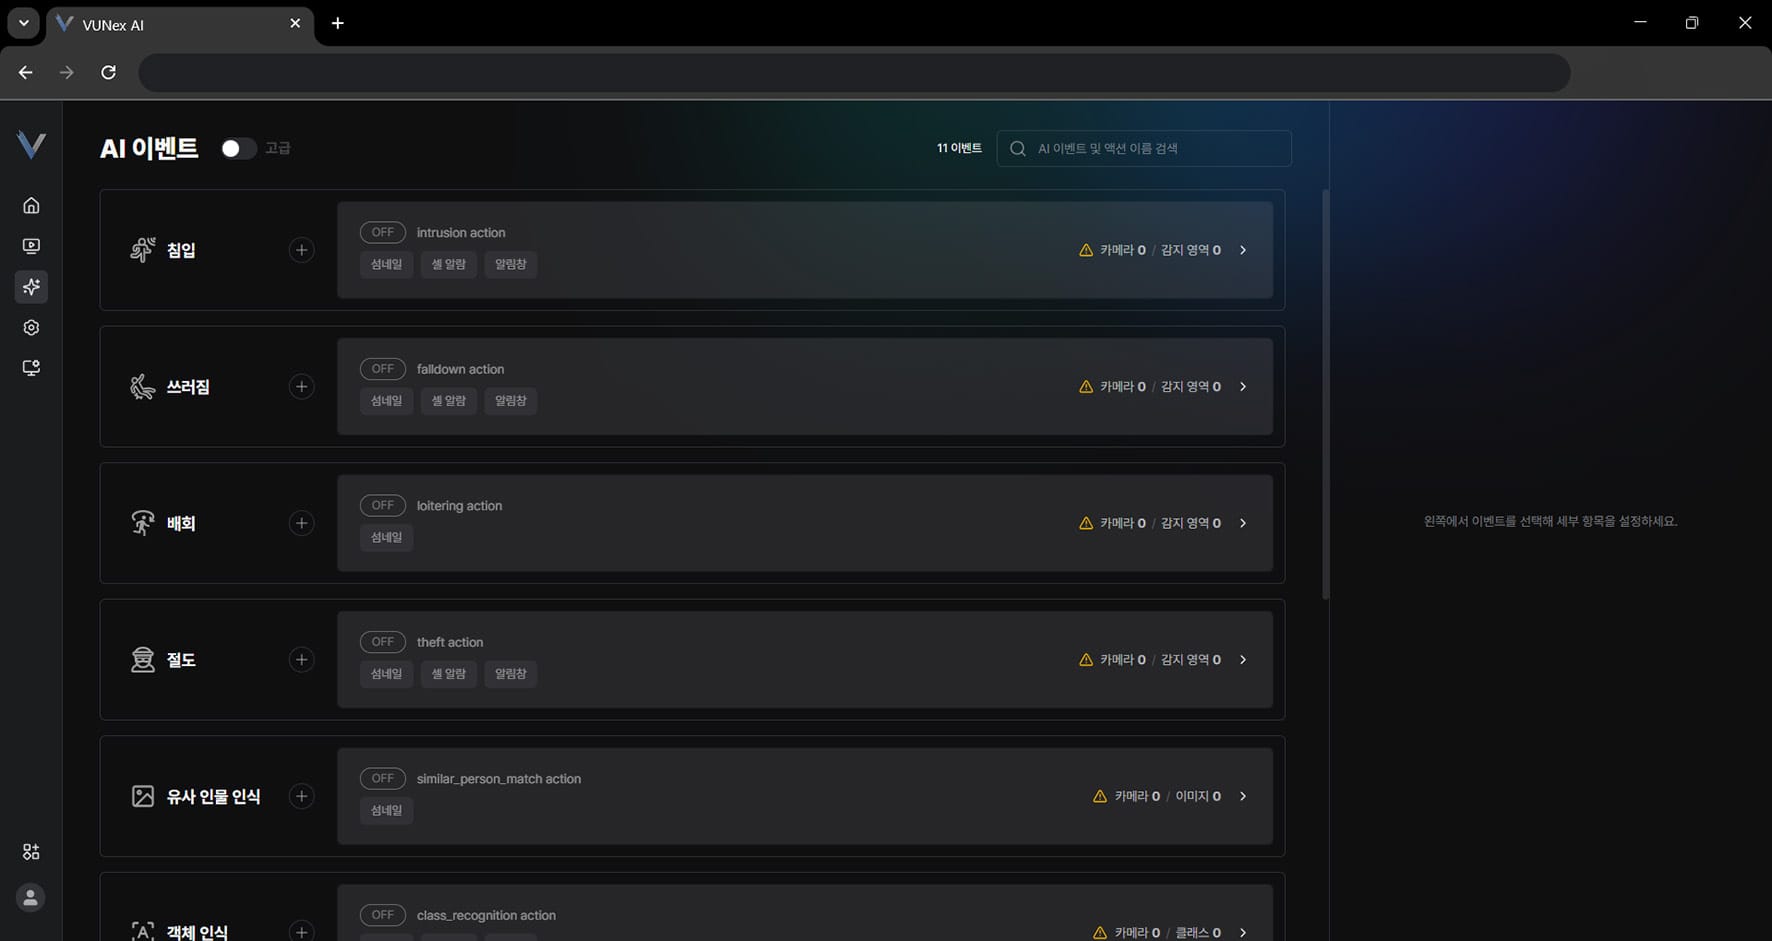 Figure 5-1. AI Event Screen
 - Select the item you want[Intrusion]: detects a person entering the designated detection zone. [Fall down]: detects a person falling or lying down in the designated detection zone. [Loitering]: detects a person staying for a long time in the designated detection zone. [Theft]: detects the act of stealing an item in the designated detection zone. [Similar person match]: register a person image to detect similar people. [Class recognition]: detects a specific object of your choice. [Looking around]: detects looking around in the designated detection zone. [Gaze detection]: detects a gaze toward the camera in the designated detection zone. [Fire]: detects fire such as flames or smoke. [Forklift overspeed]: calculates forklift speed against a reference zone to detect overspeeding. [Wrong-way movement]: detects objects moving against the allowed direction of travel. [Concealing]: detects the act of hiding an item. [Line crossing]: detects objects crossing a defined reference line and counts the crossings.
- Check the recommended actions for each event
Configuring Actions
Add, edit or delete actions.
- In the main menu, click [] > [AI Event]The AI Event screen appears.
- Select the event and action you want
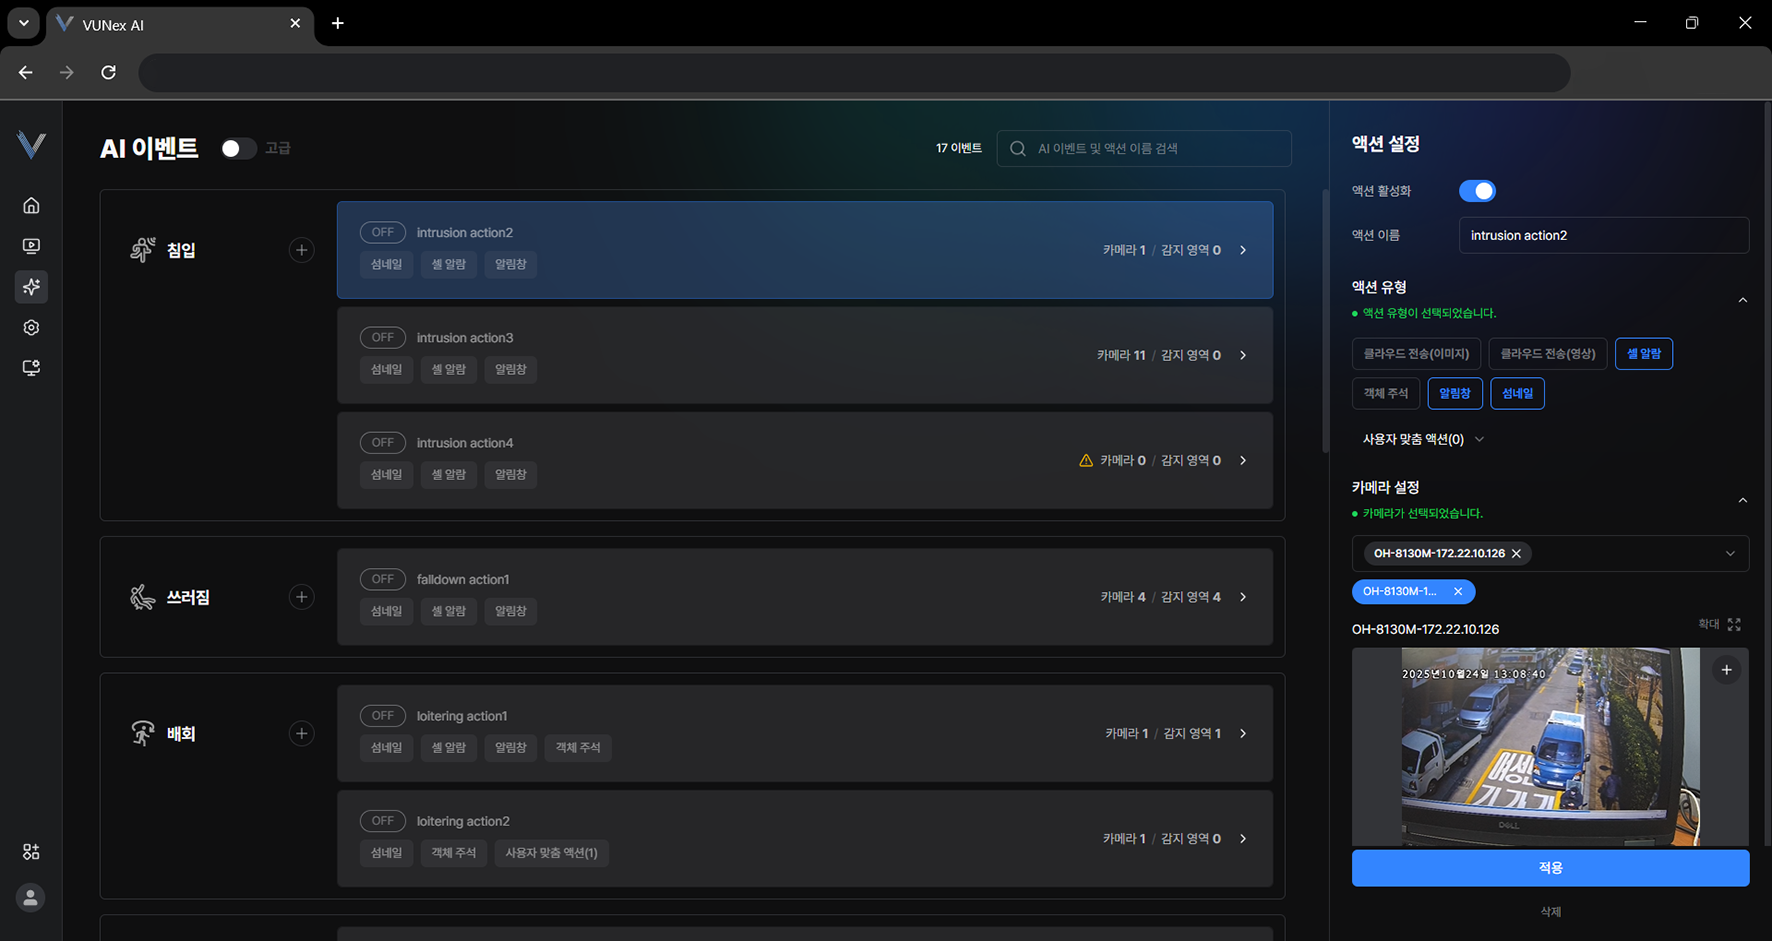 Figure 5-3. Action Settings Screen
 - Configure [Action Trigger][Enable action]: enables the action. [Action name]: enter the action name. [Action type]: choose from cloud transfer (image/video), cell alarm, ONVIF, pop-up message, thumbnail and custom action. [Camera Setup]: select the cameras the event applies to. [Target person image]: register the target person image. Applies only to the [Similar person match] event. [Target object]: select the objects to detect. Applies only to the [Class recognition] event.
- Click [Apply]The action is configured.
Configuring Custom Actions
Configure custom actions.
- In the main menu, click [] > [AI Event]The AI Event screen appears.
- Click [Advanced]
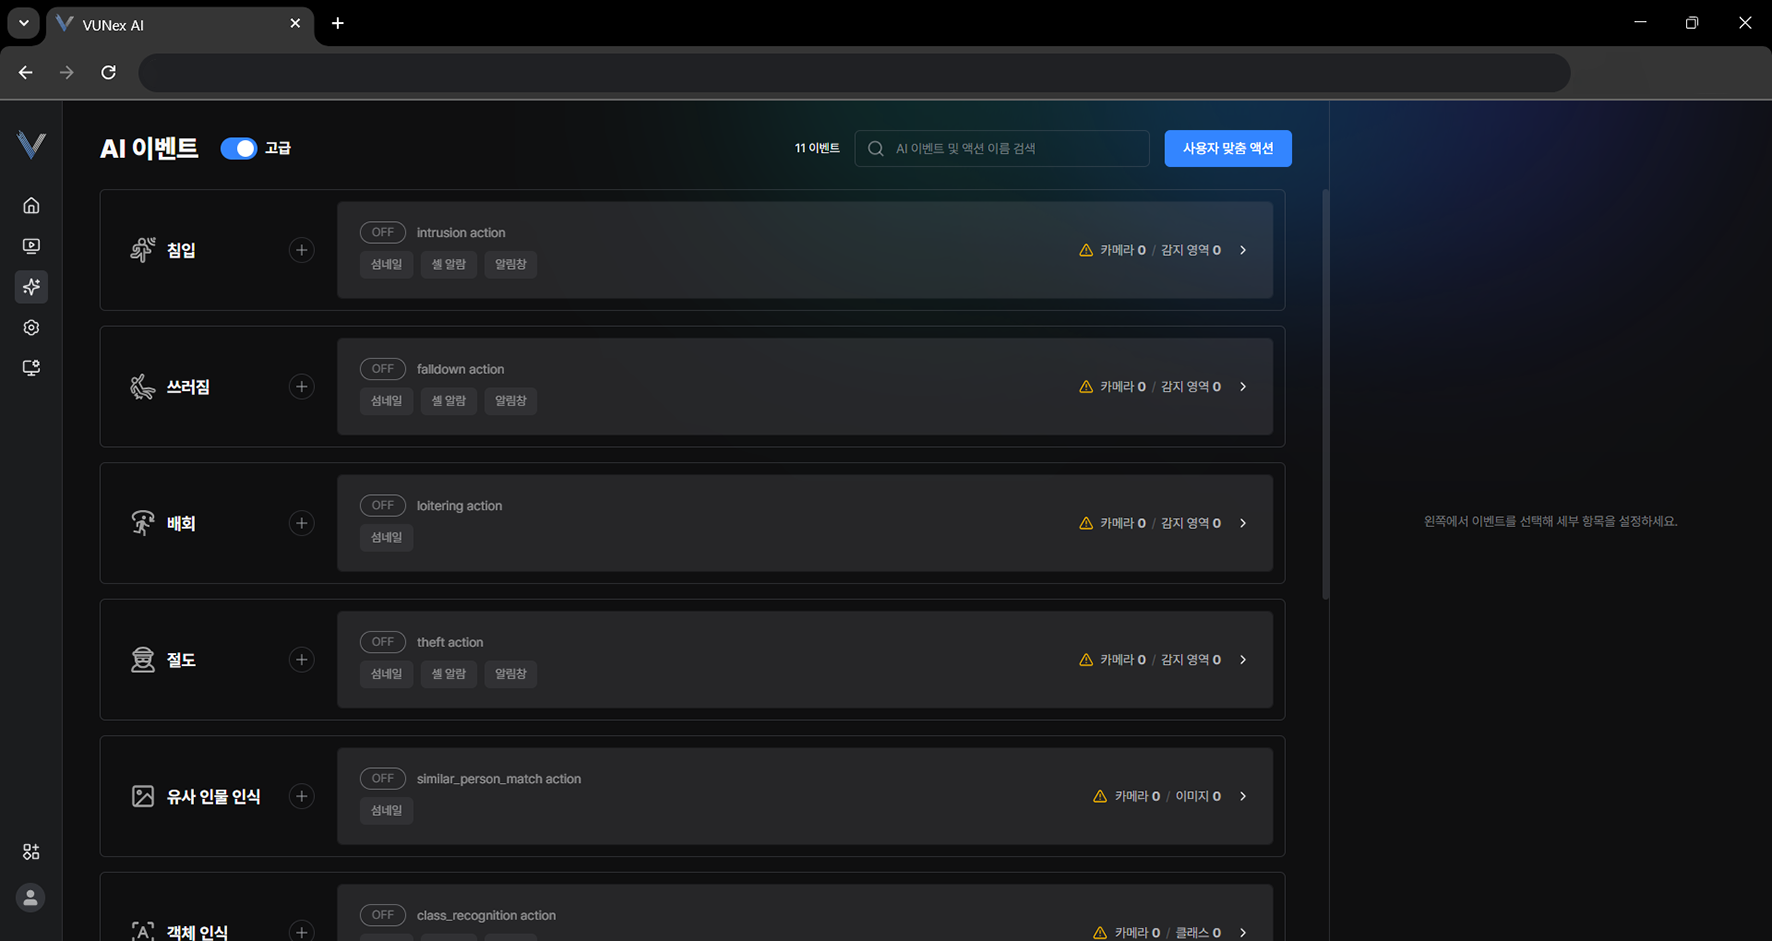 Figure 5-5. Advanced Settings Menu
 - Click [Custom action]
- Click [Add]
- Click the item you want[Action type]: choose from HTTP.
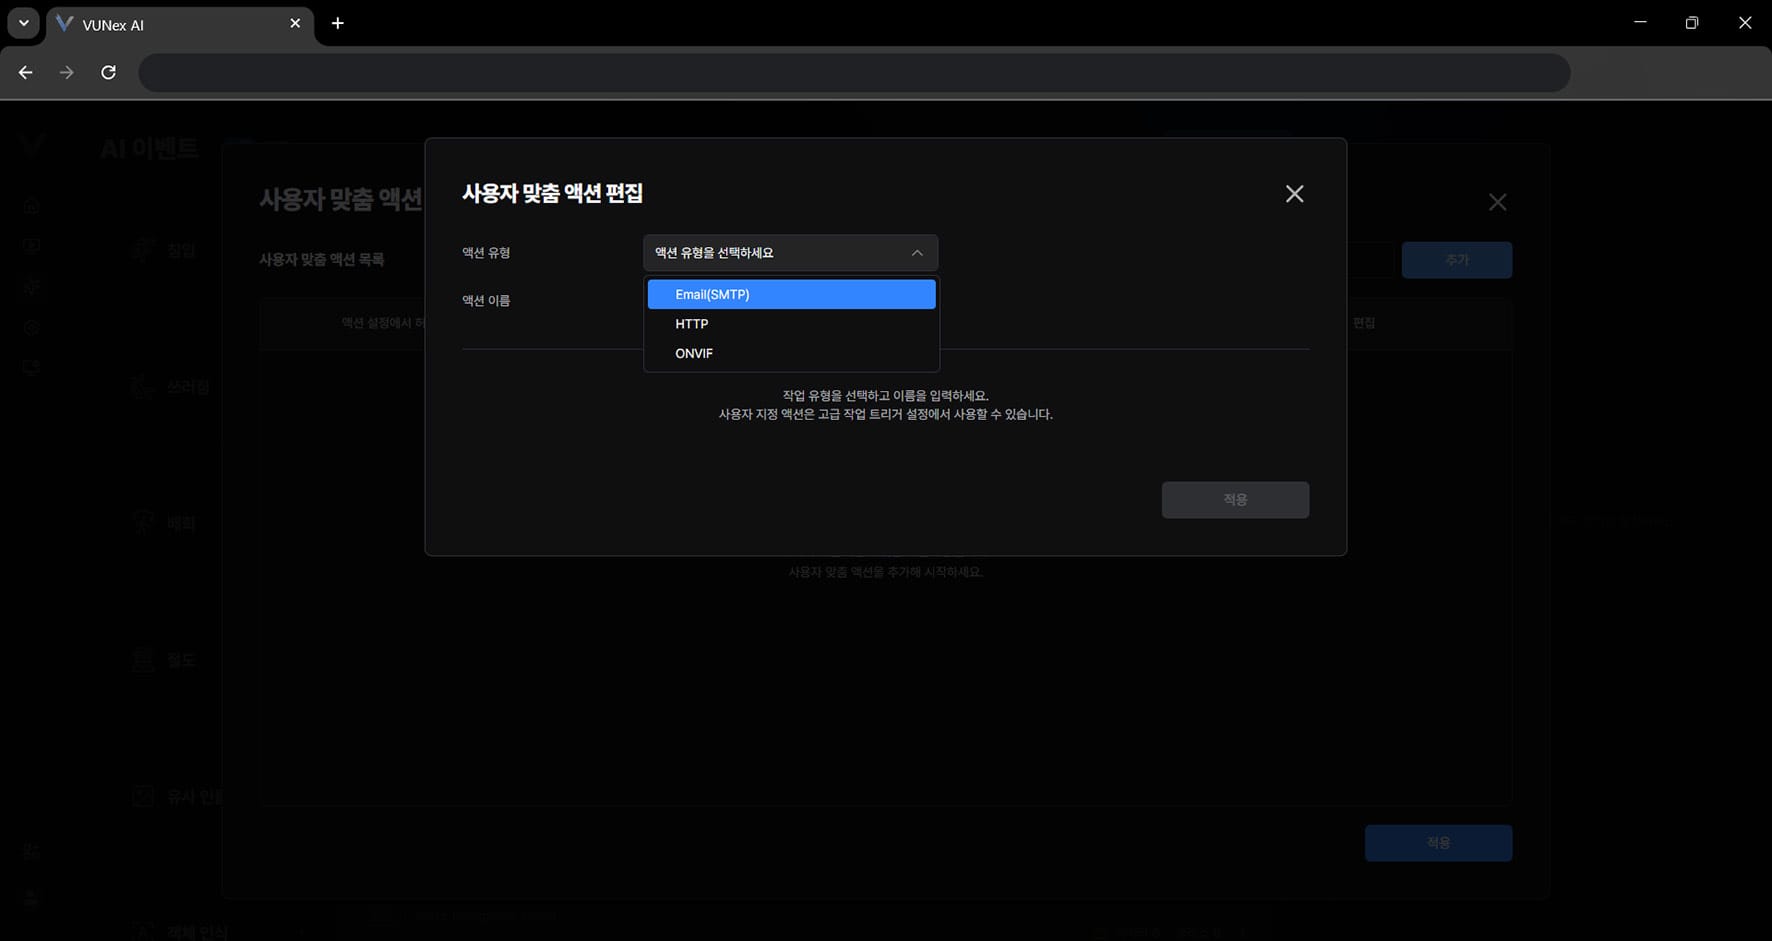 Figure 5-6. Email (SMTP) Action Settings
 - Click [Apply]
- Click the item you want[Allow in action trigger]: makes a custom action added to the list available in the default action settings of an event. [Edit]: edits a custom action added to the list. [Delete]: deletes a custom action added to the list.
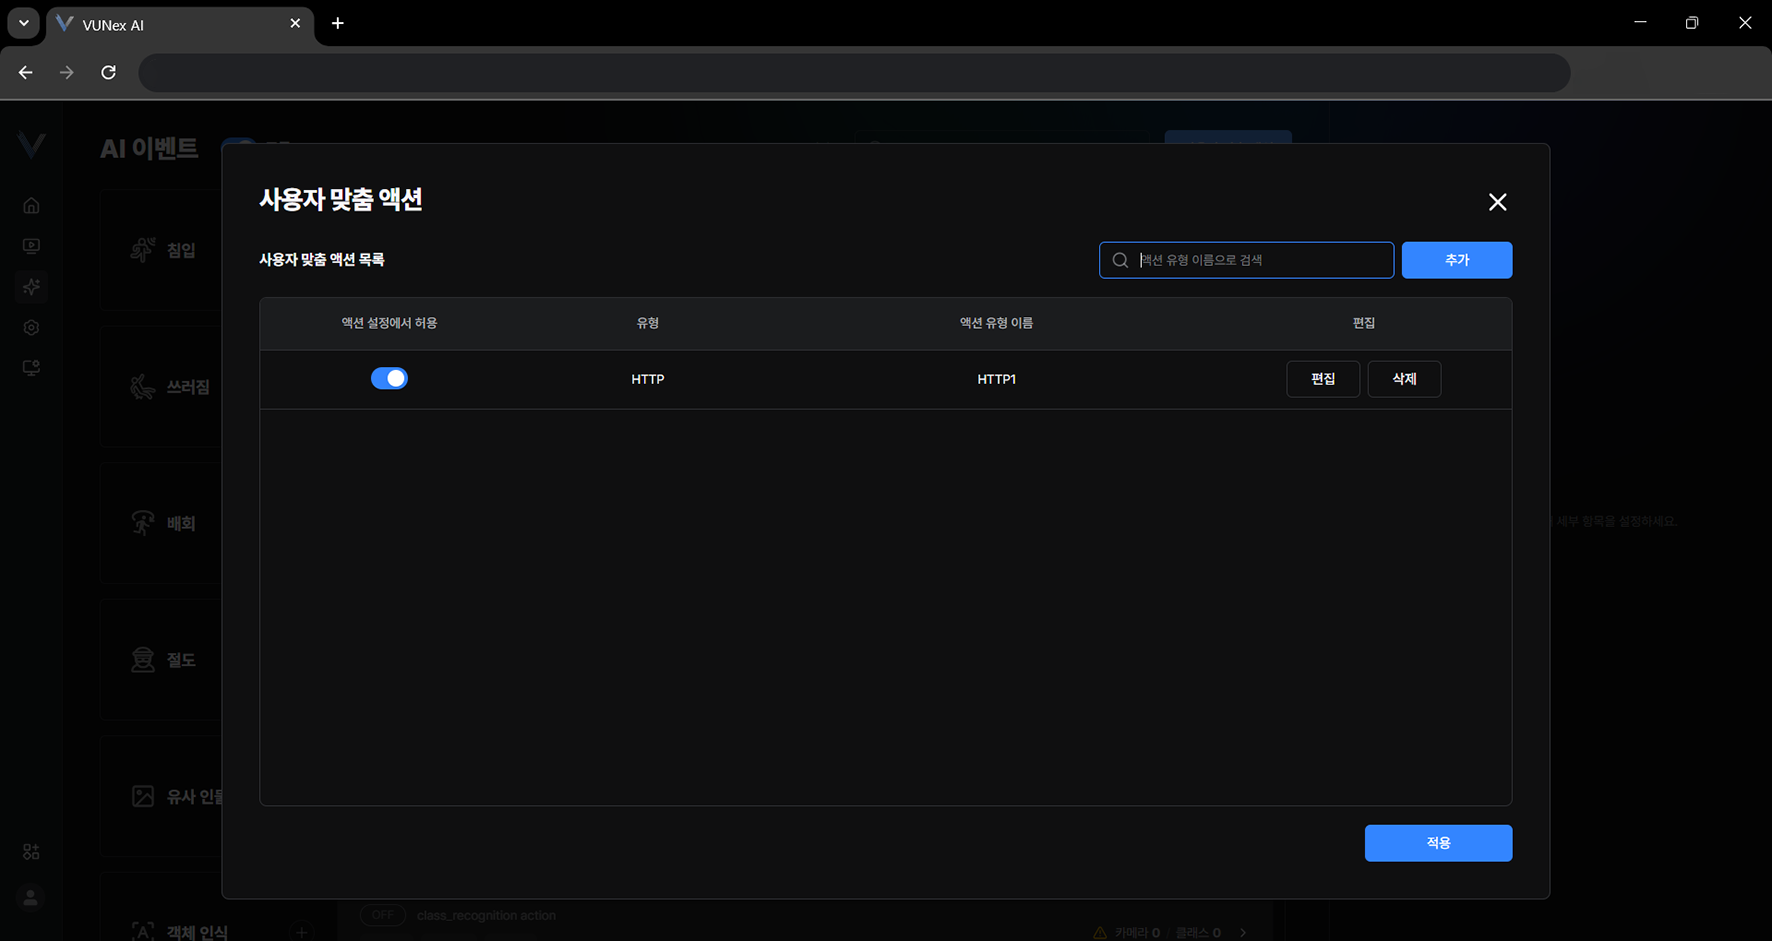 Figure 5-8. Managing Custom Actions
 - Click [Allow in action trigger] > [ ]
- Click [Apply]The action is configured.
Configuring the Action Schedule
Specify the days and time slots in which the action runs when an event occurs.
- In the main menu, click [] > [AI Event]
- Select the event and action you want
- Click [Schedule] > [Use schedule]If the schedule is not used, detection runs at all times.
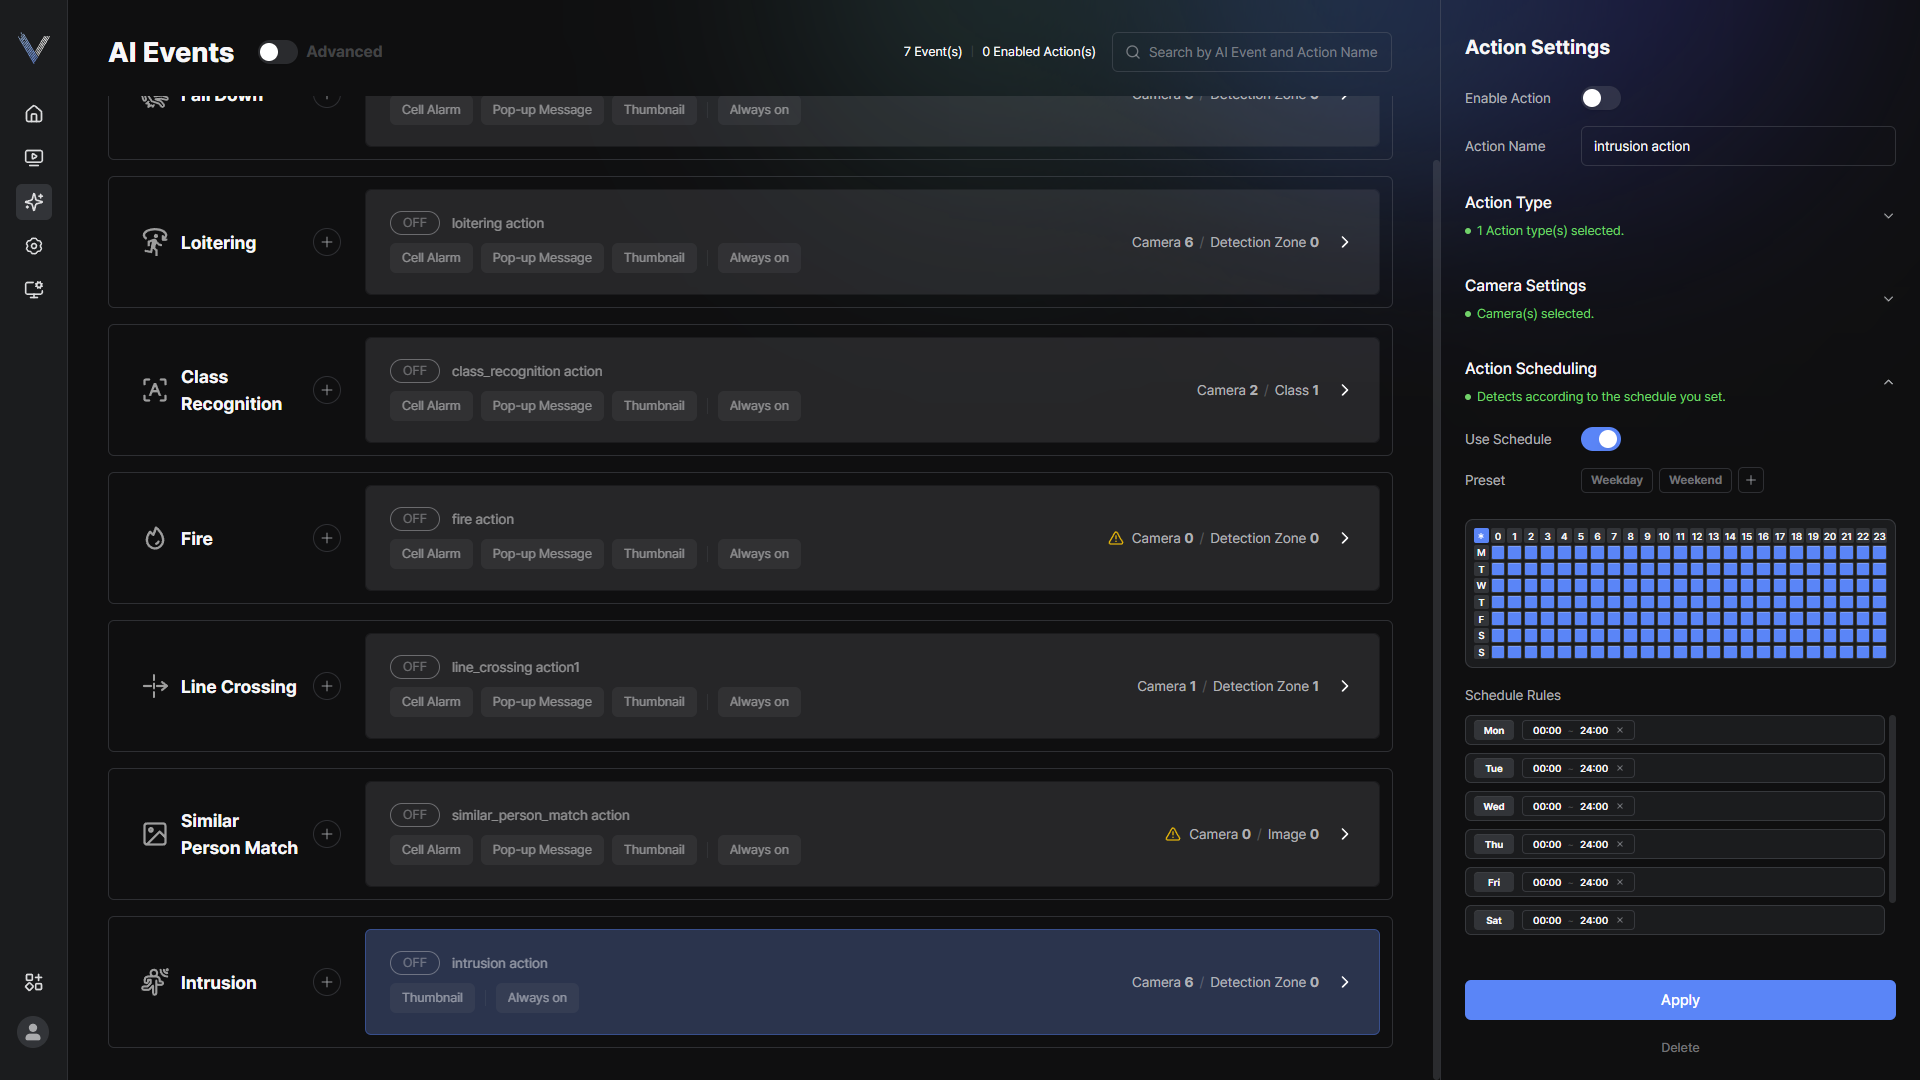 Figure 5-18. Schedule Settings
 - Set the days and the [Start] and [End] times in [Schedule rules]Use [Everyday], [Weekday] or [Weekend] to select days at once; enter times in HH:MM format. A single rule cannot exceed 24 hours.
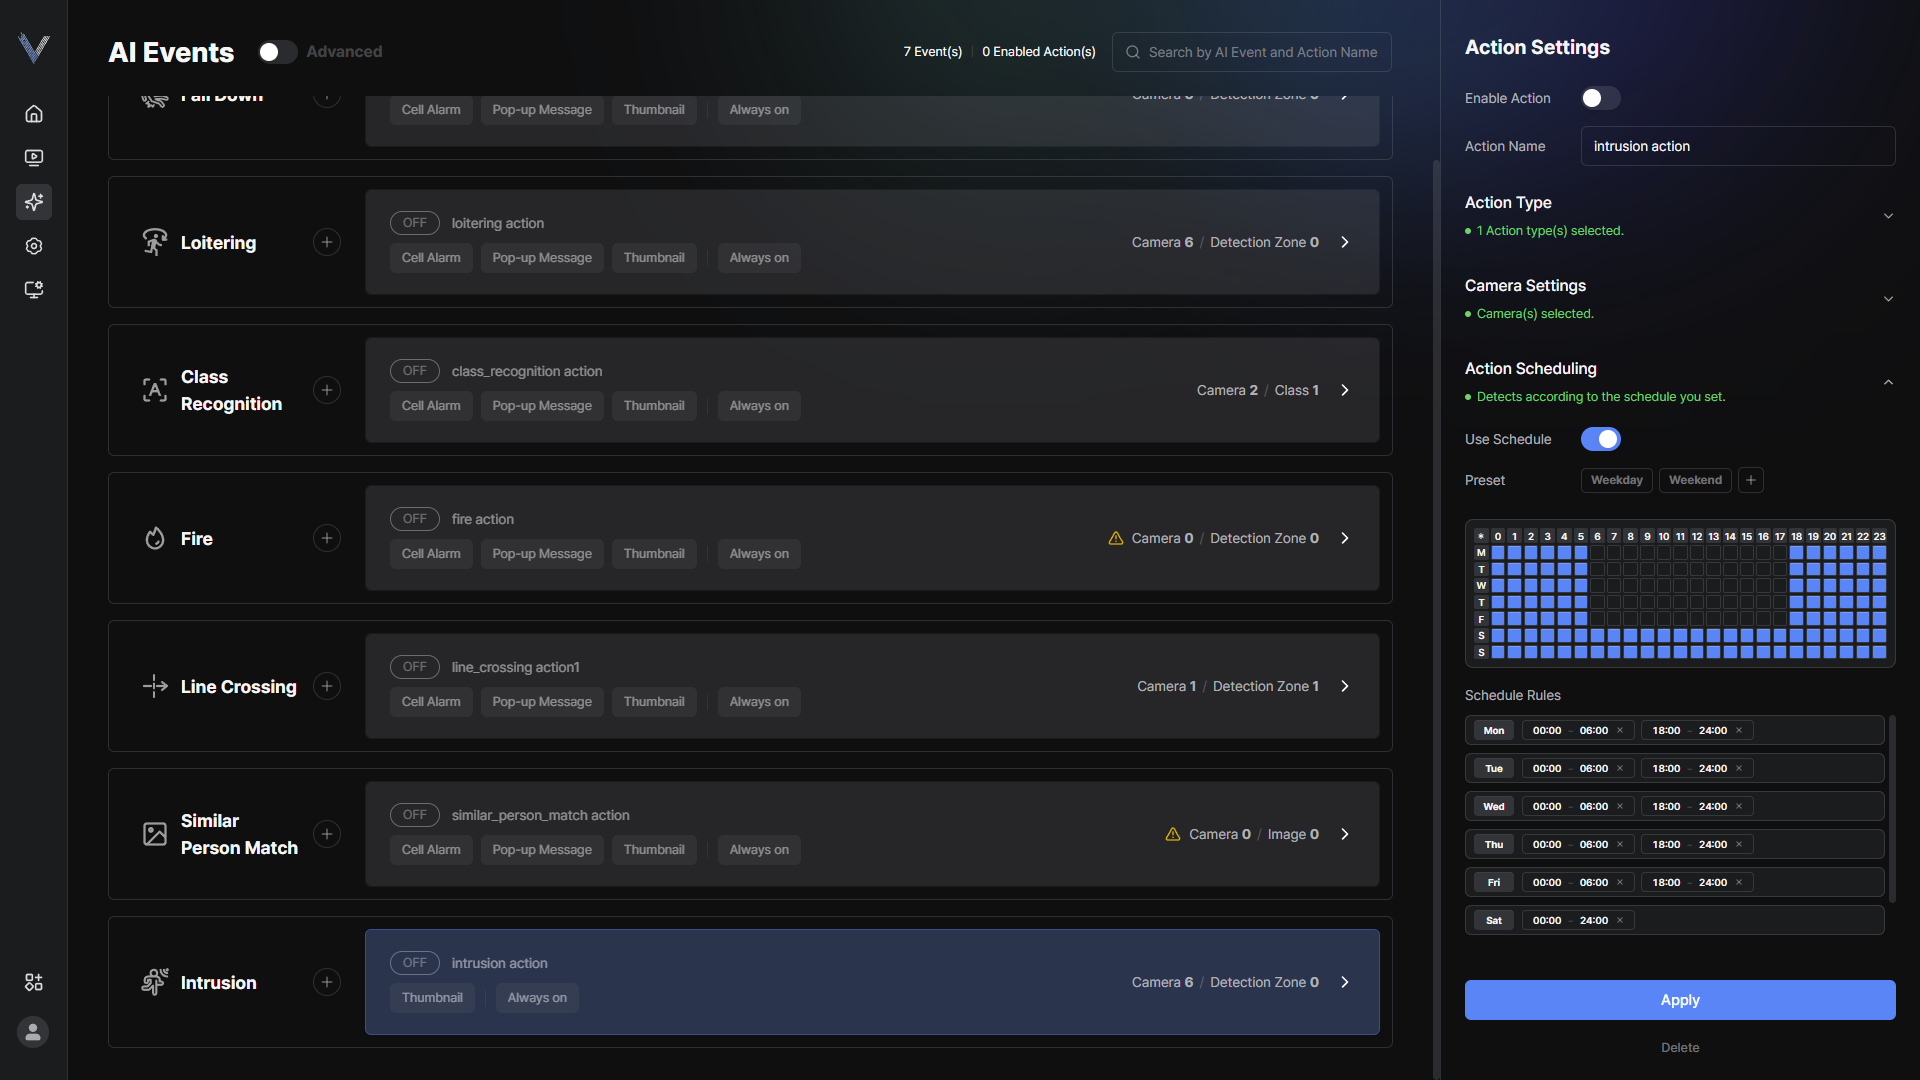 Figure 5-19. Schedule Rules
 - Click [Apply]
Using Schedule Presets
Save frequently used schedules as presets and apply them to other actions.
- In the main menu, click [] > [AI Event]
- Select the event and action you want
- Click [Schedule] > [Preset] > [+]
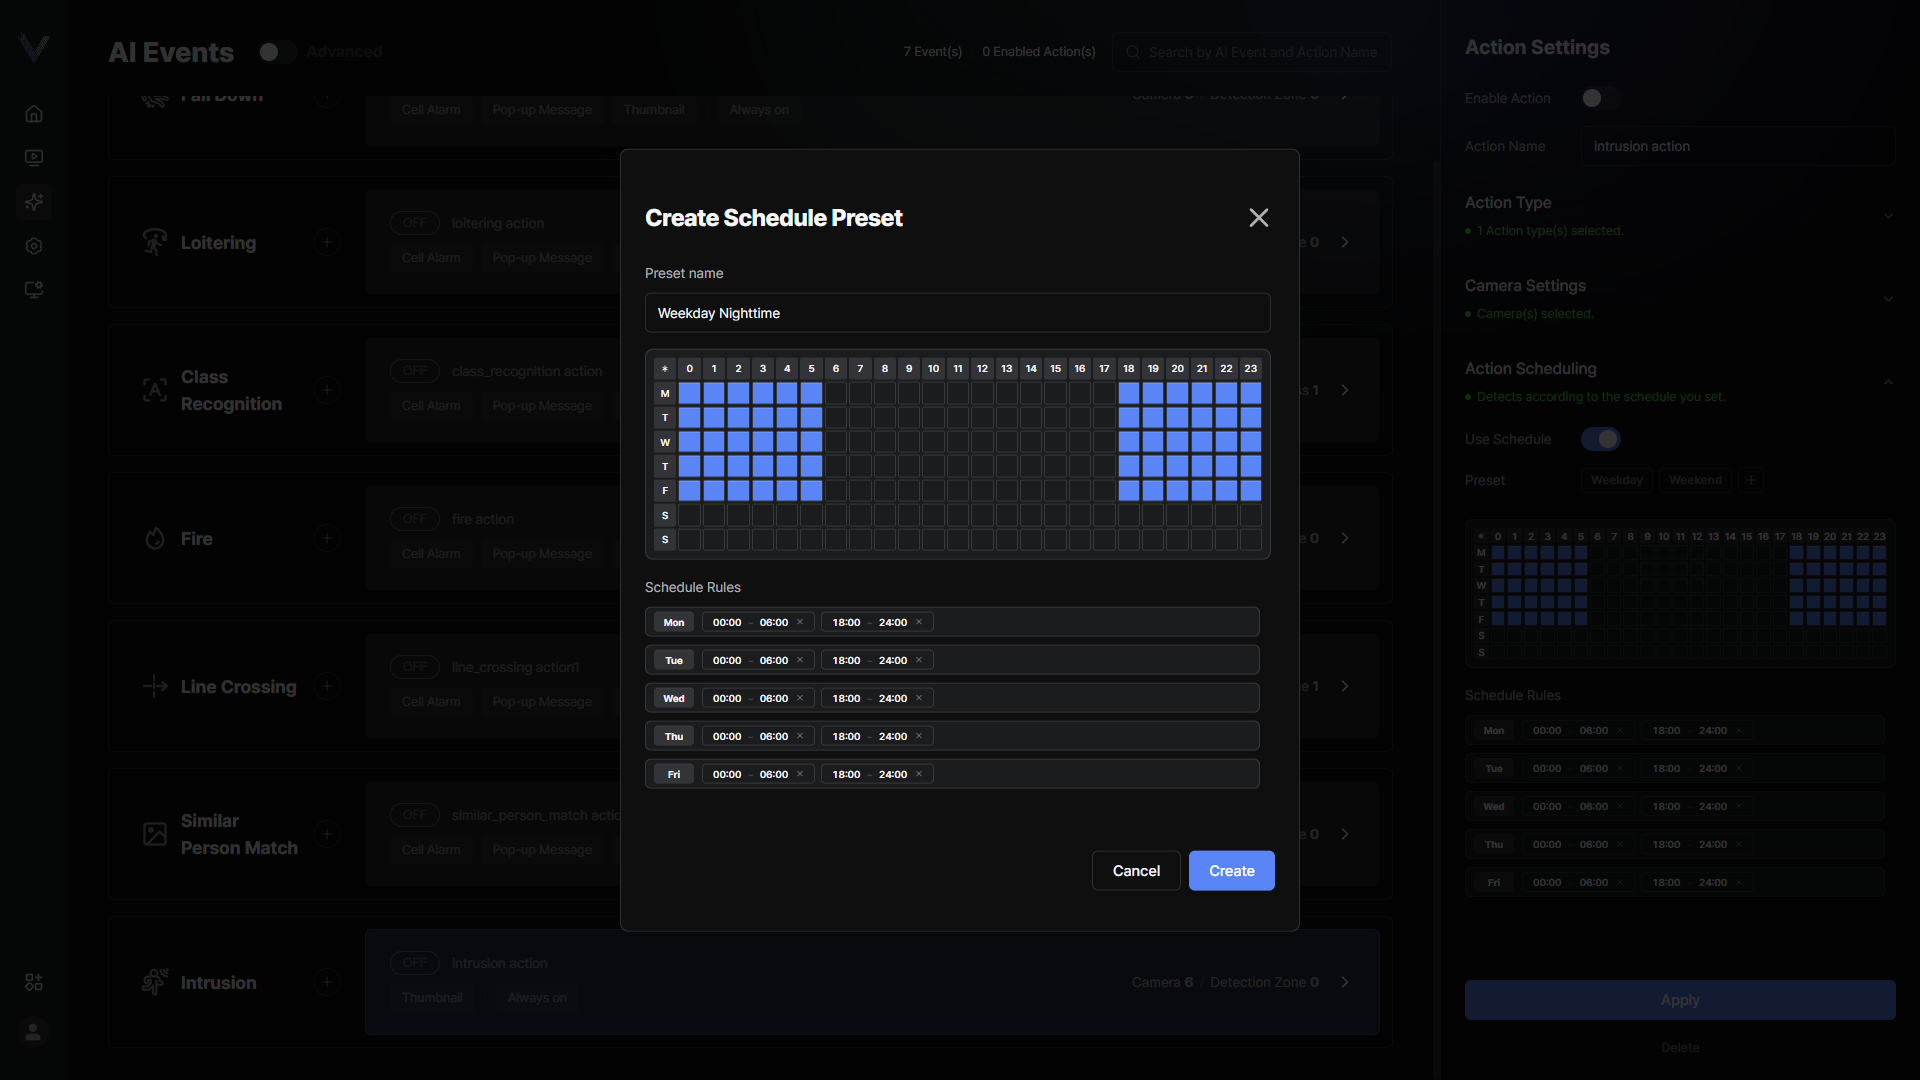 Figure 5-20. Saving a Schedule Preset
 - Enter the [Preset name] and click [Create]
- In another action, select the [Saved preset] and click [Apply]
Creating a Detection Zone
Create and manage detection zones on a camera. A detection zone can be enabled or disabled per event.
- In the main menu, click [] > [AI Event]The AI Event screen appears.
- Select the event and action you want
- Click [Action Trigger] > [Camera Setup]Select a camera.
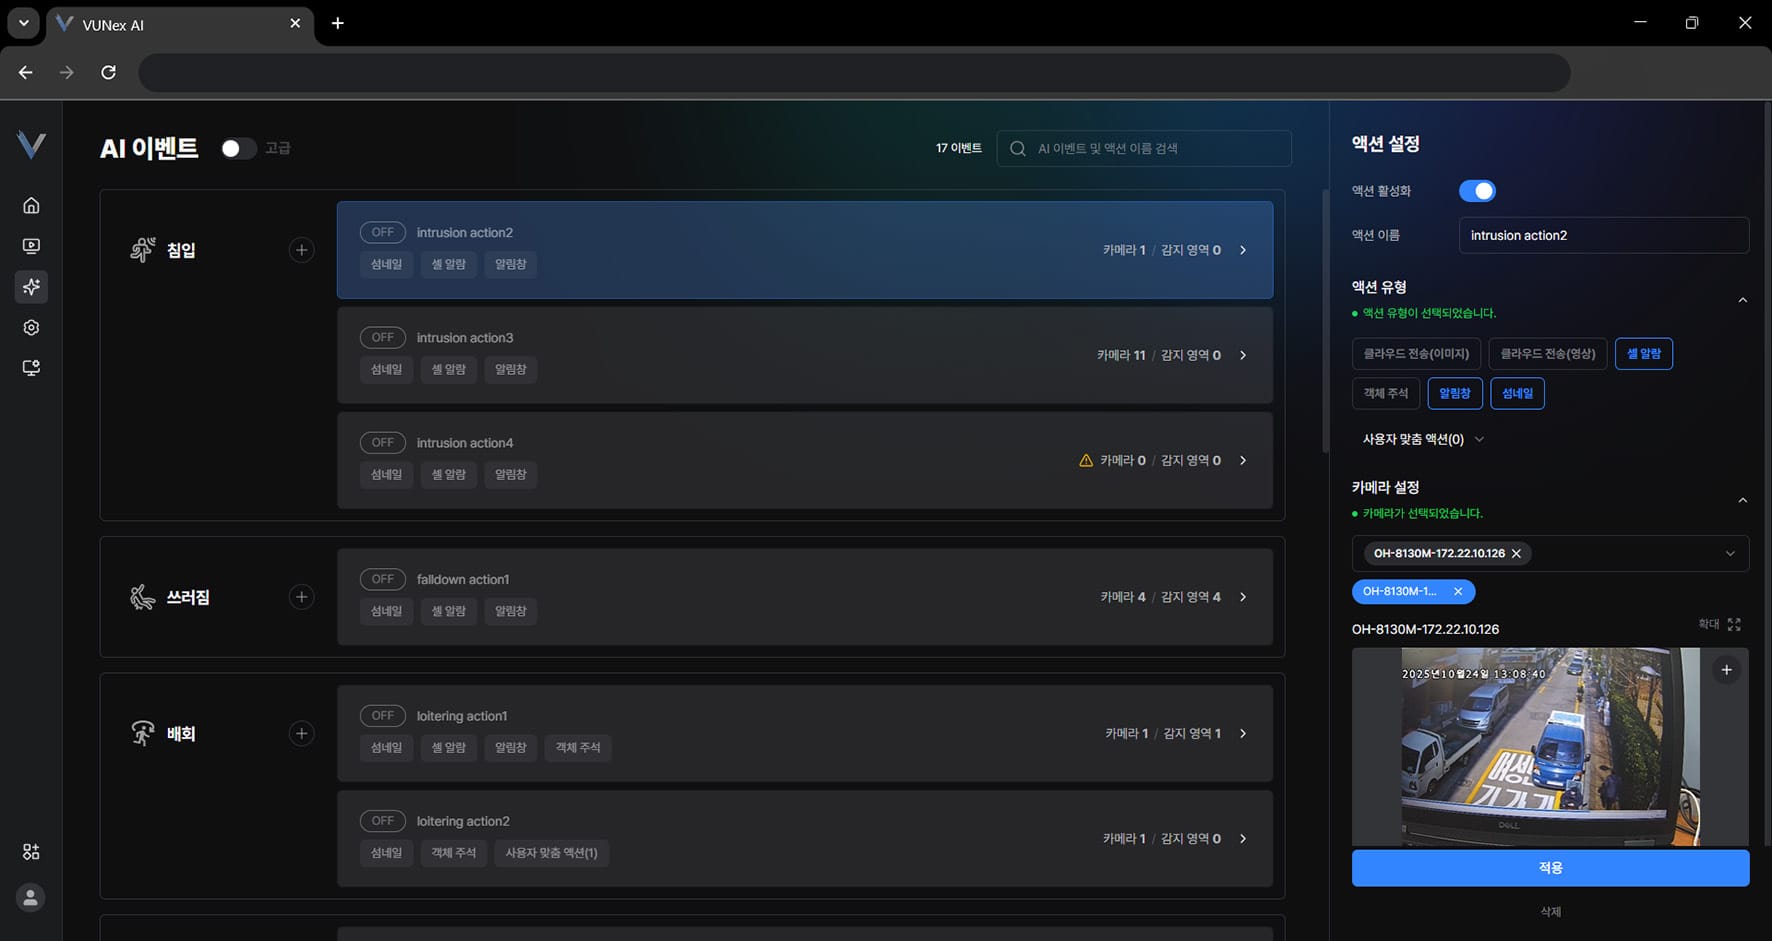 Figure 5-9. Creating a Detection Zone
 - Click [+] on the preview screen
- Click the points you want with the mouseThe zone is created.
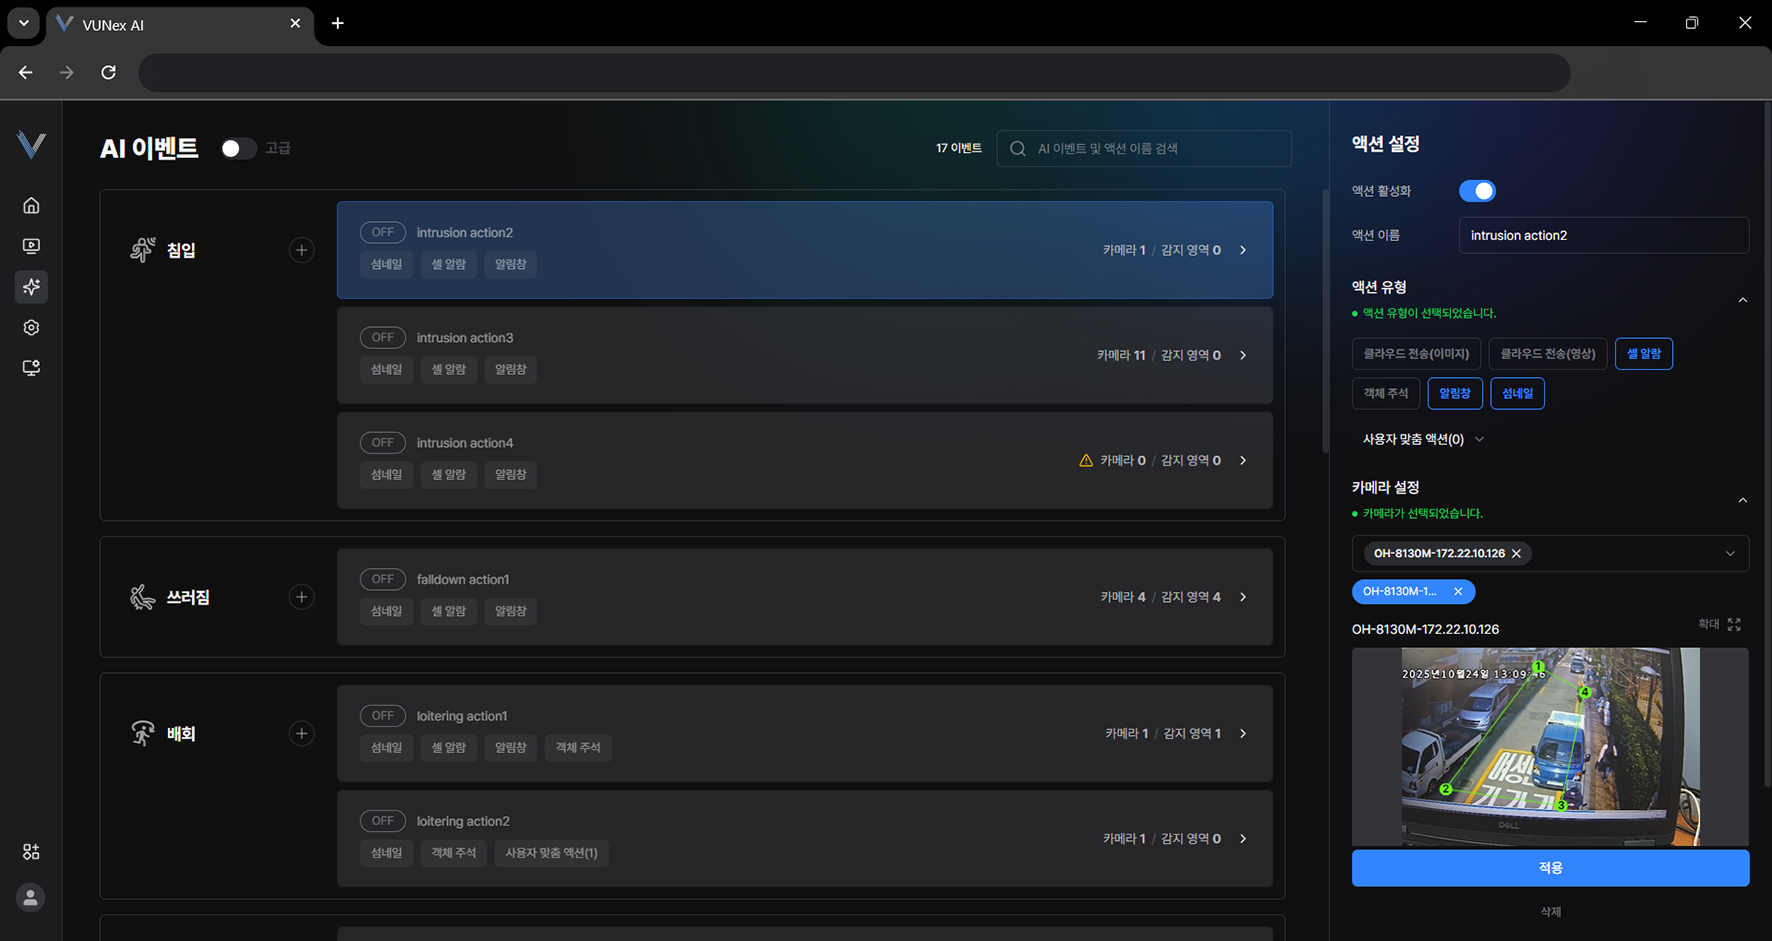 Figure 5-10. Designating a Detection Zone
 - Click [Apply]The detection zone is created.
Deleting a Detection Zone
The detection zone is deleted.
- In the main menu, click [] > [AI Event]The AI Event screen appears.
- Select the event and action you want
- Click [Action Trigger] > [Camera Setup]
- Select a camera
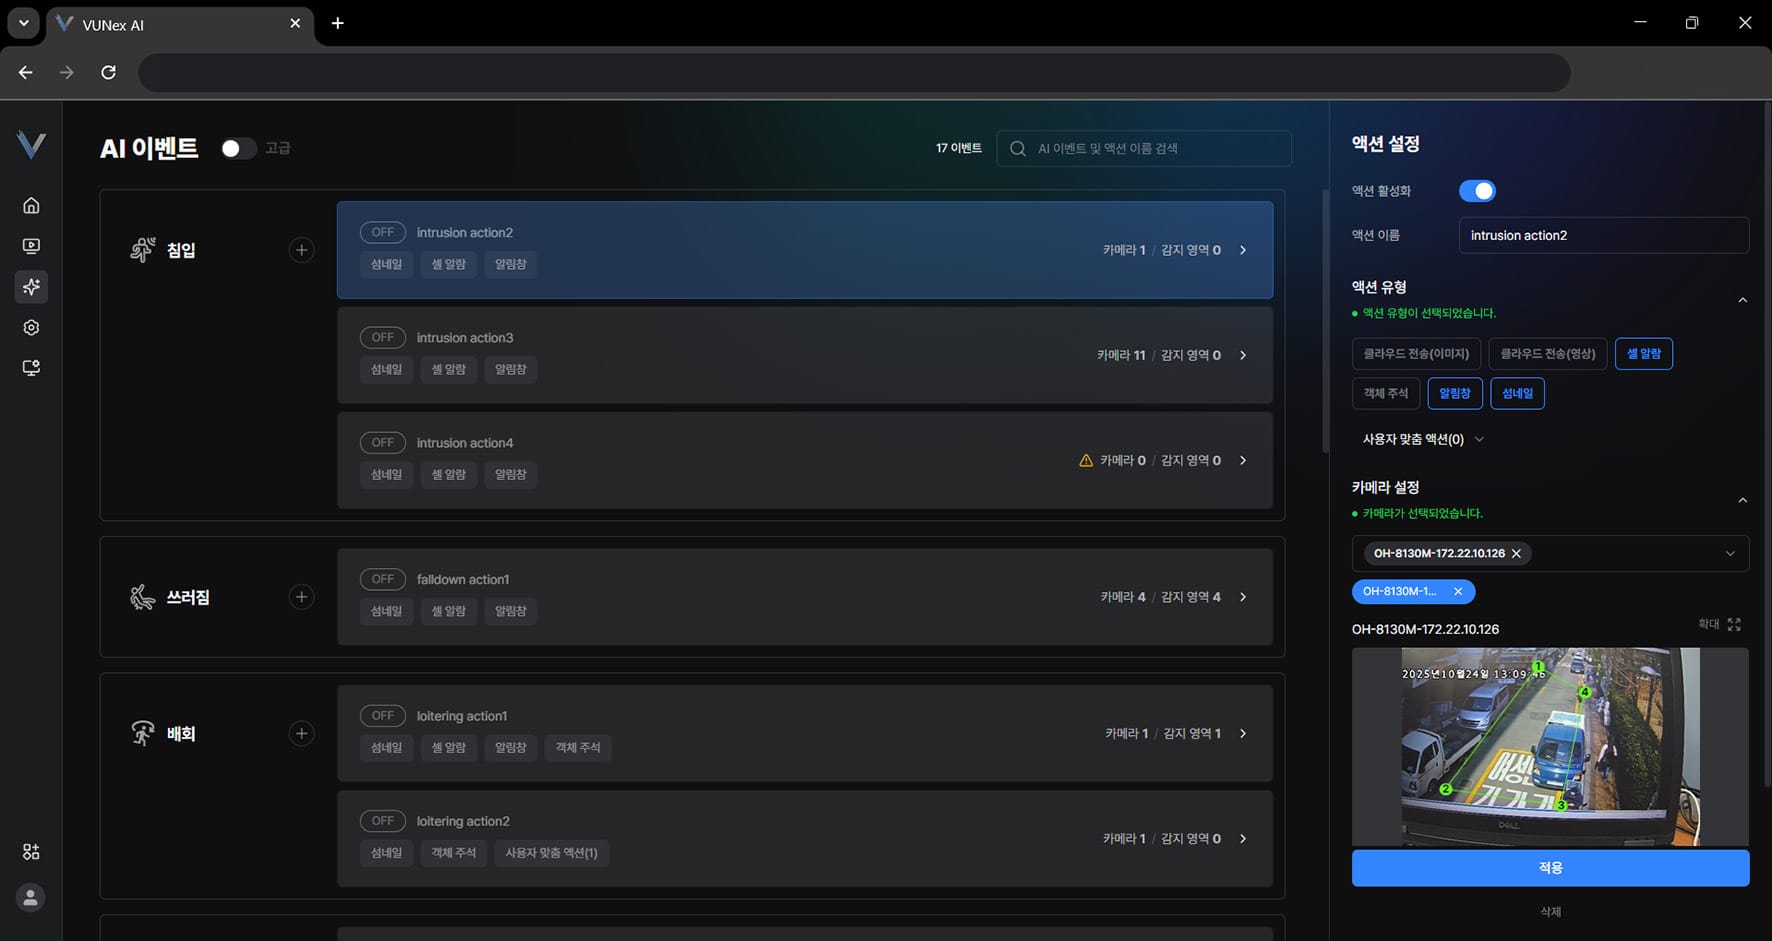 Figure 5-11. Deleting a Detection Zone
 - Click [] > [Delete '(zone name)' zone]
- Click [Apply]The detection zone is deleted.
Configuring Line Crossing
Draw a reference line on the video and detect objects that cross it.
- In the main menu, click [] > [AI Event]
- Select the [Line crossing] event and an action
- Click [Action Trigger] > [Camera & Line Setup]
- Select a camera, then click [+] on the preview screen.
- Drag on the video to draw the reference line.Drag the start and end points of the line to adjust its position.
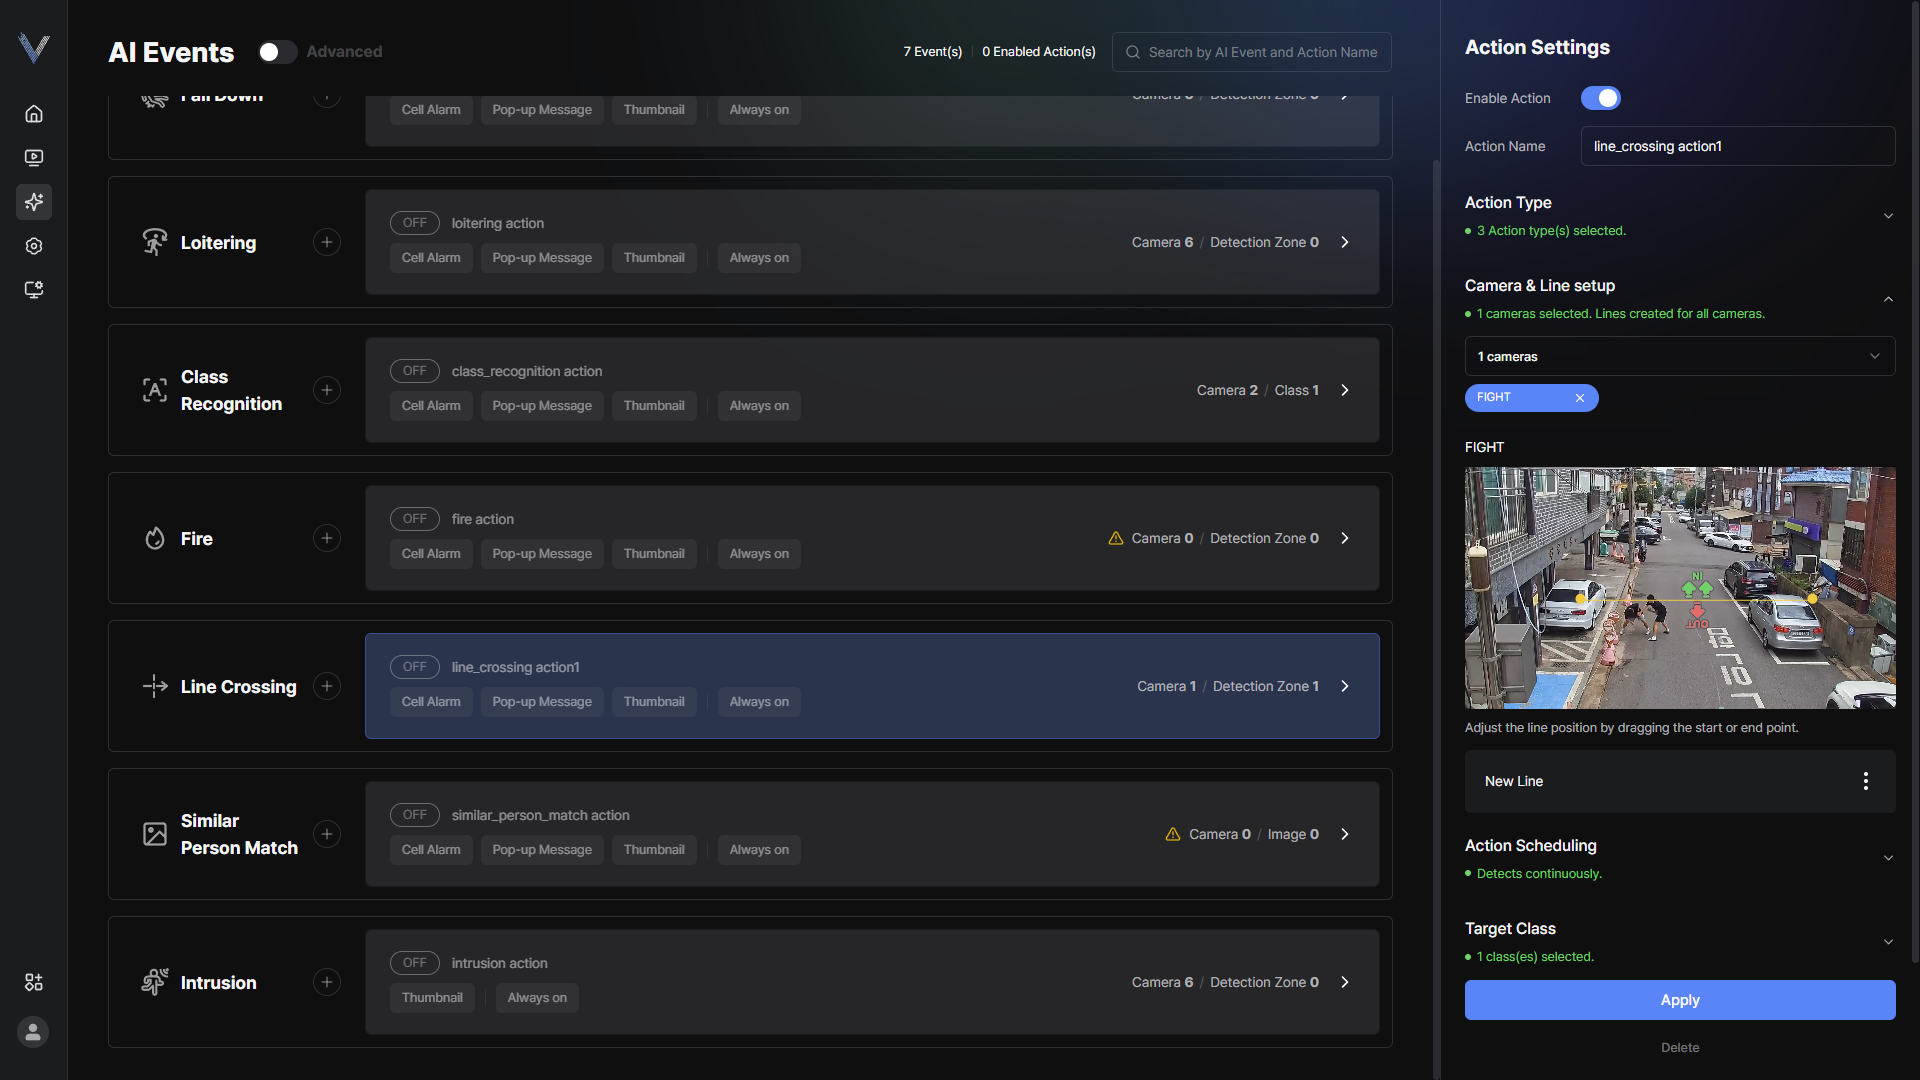 Figure 5-21. Line Crossing Reference Line
 - Enter the [Line name]
- Check the [Allowed direction] and click [Reverse direction] if needed
- Select the objects to detect in [Target object]You can select several object types at once.
- Set the [Trigger condition]Choose [IN] or [OUT] in [Detection direction], then set [Every n] or [More than n] with the count.
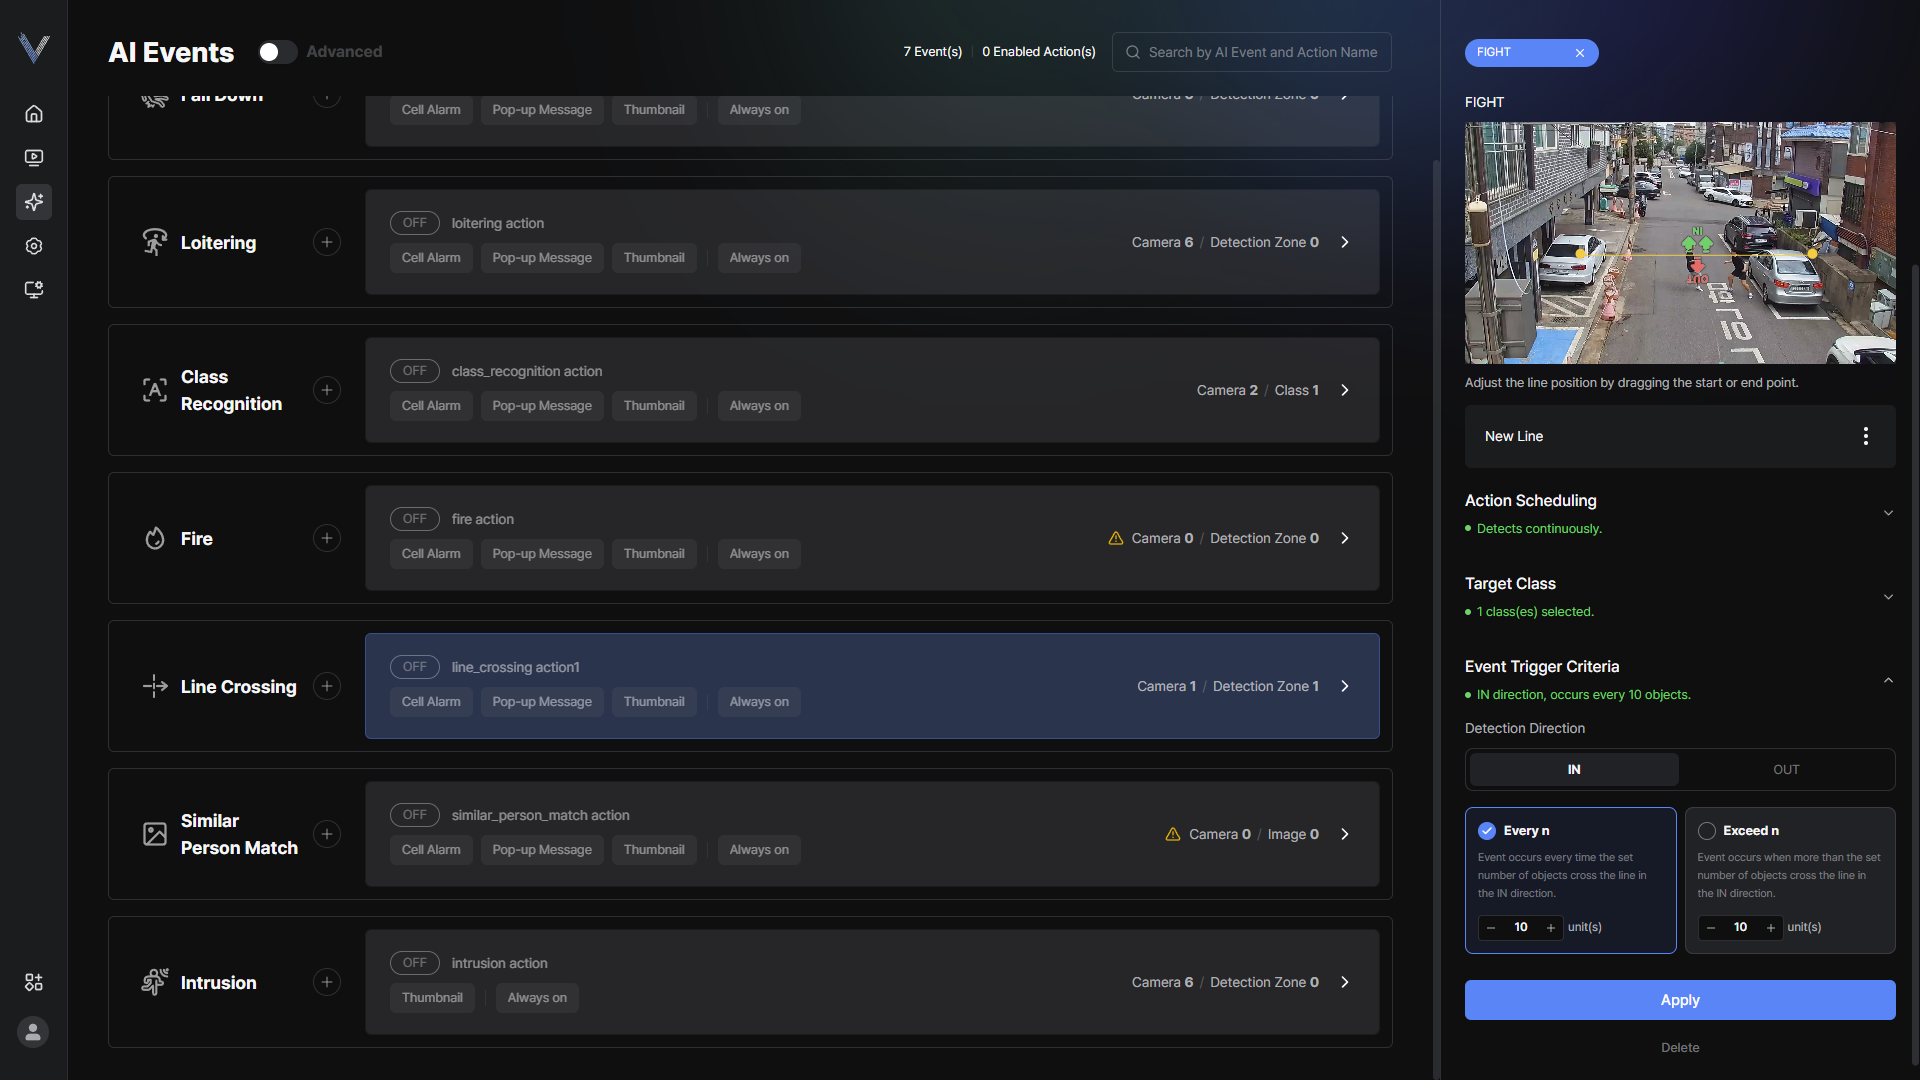 Figure 5-22. Line Crossing Trigger Condition
 - Click [Apply]
- [Every n]: an event occurs each time the set number of objects crosses the line in the chosen direction.
- [More than n]: an event occurs when more than the set number of objects crosses the line in the chosen direction.
- The event name is shown as [(line name) crossed n times].
Configuring Wrong-way Movement
Detect objects moving against the allowed direction of travel.
- In the main menu, click [] > [AI Event]
- Select the [Wrong-way movement] event and an action
- Click [Action Trigger] > [Camera & Line Setup]
- Select a camera, then click [+] on the preview screen.
- Draw the reference line on the video.A detection zone is created automatically based on the reference line.
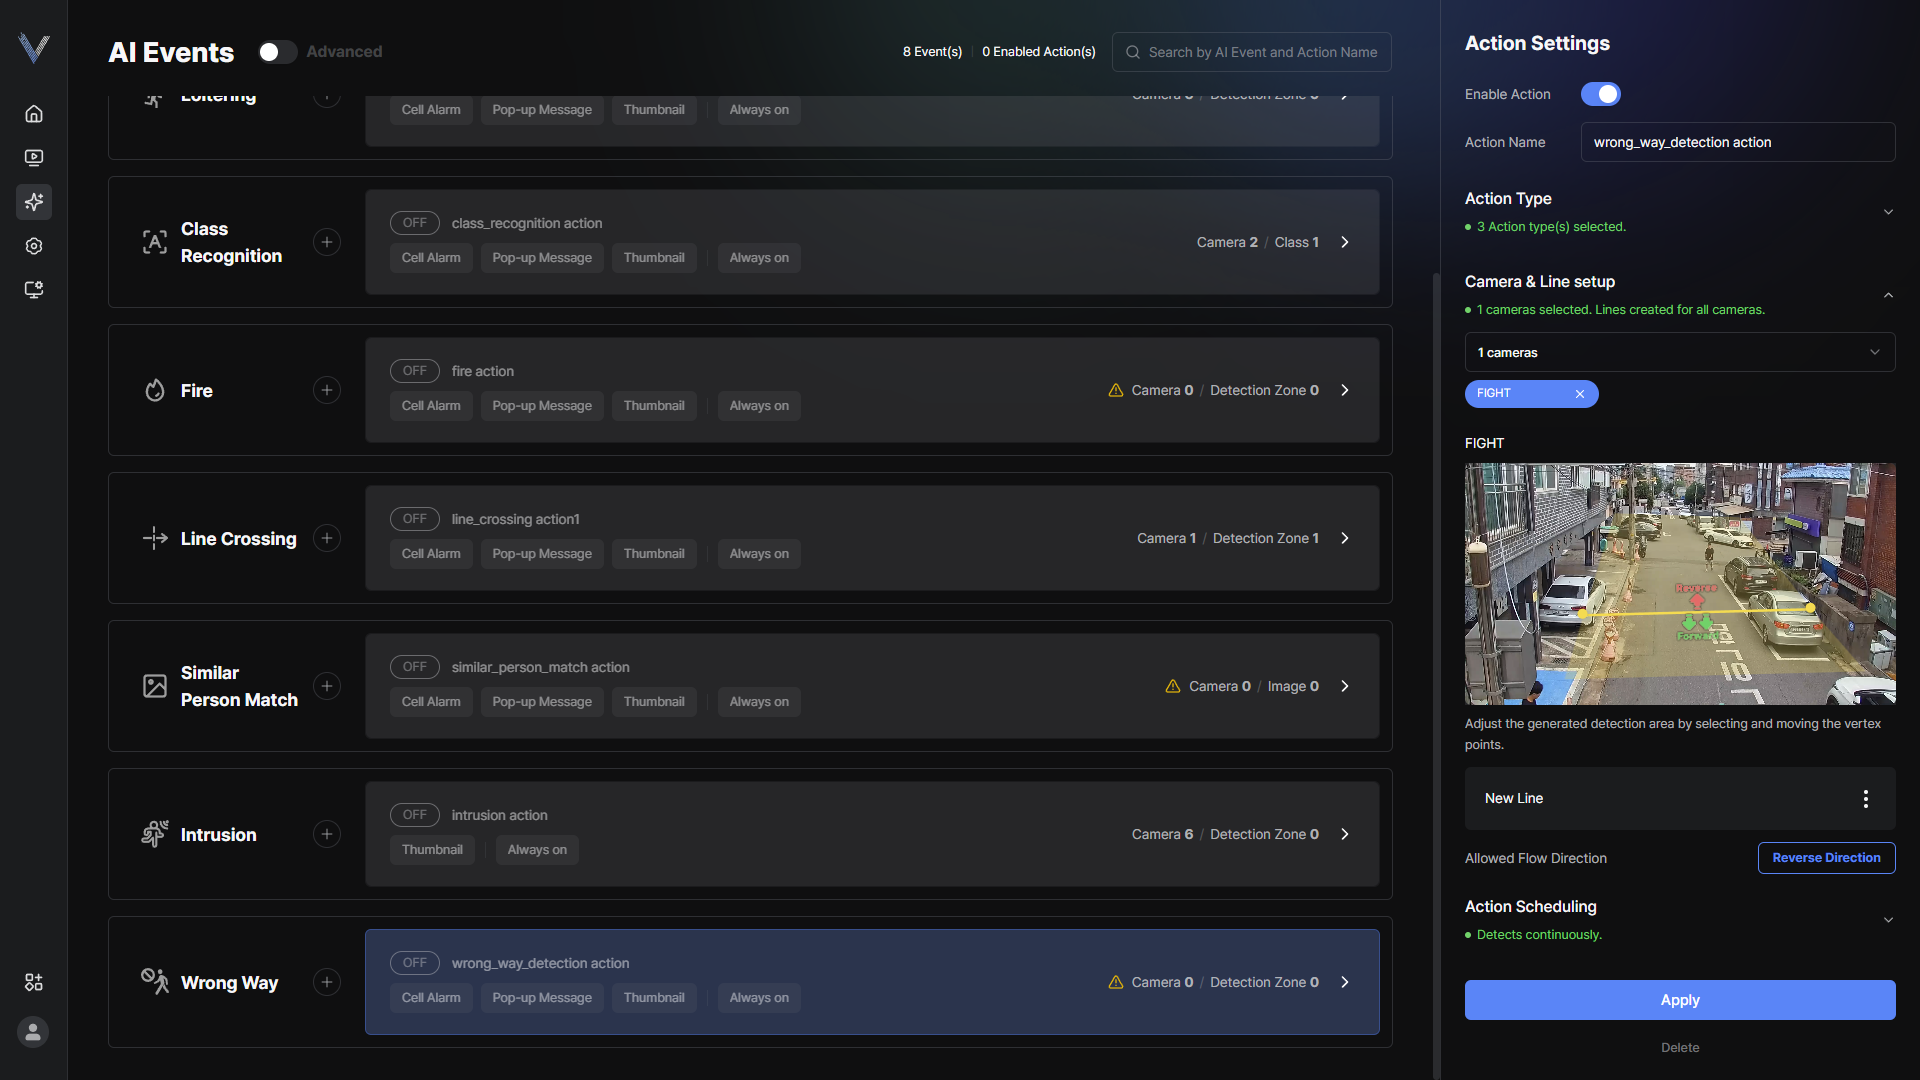 Figure 5-23. Wrong-way Movement Reference Line
 - Drag the vertices of the automatically created detection zone to adjust its range
- Check the [Allowed direction] and click [Reverse direction] if needed
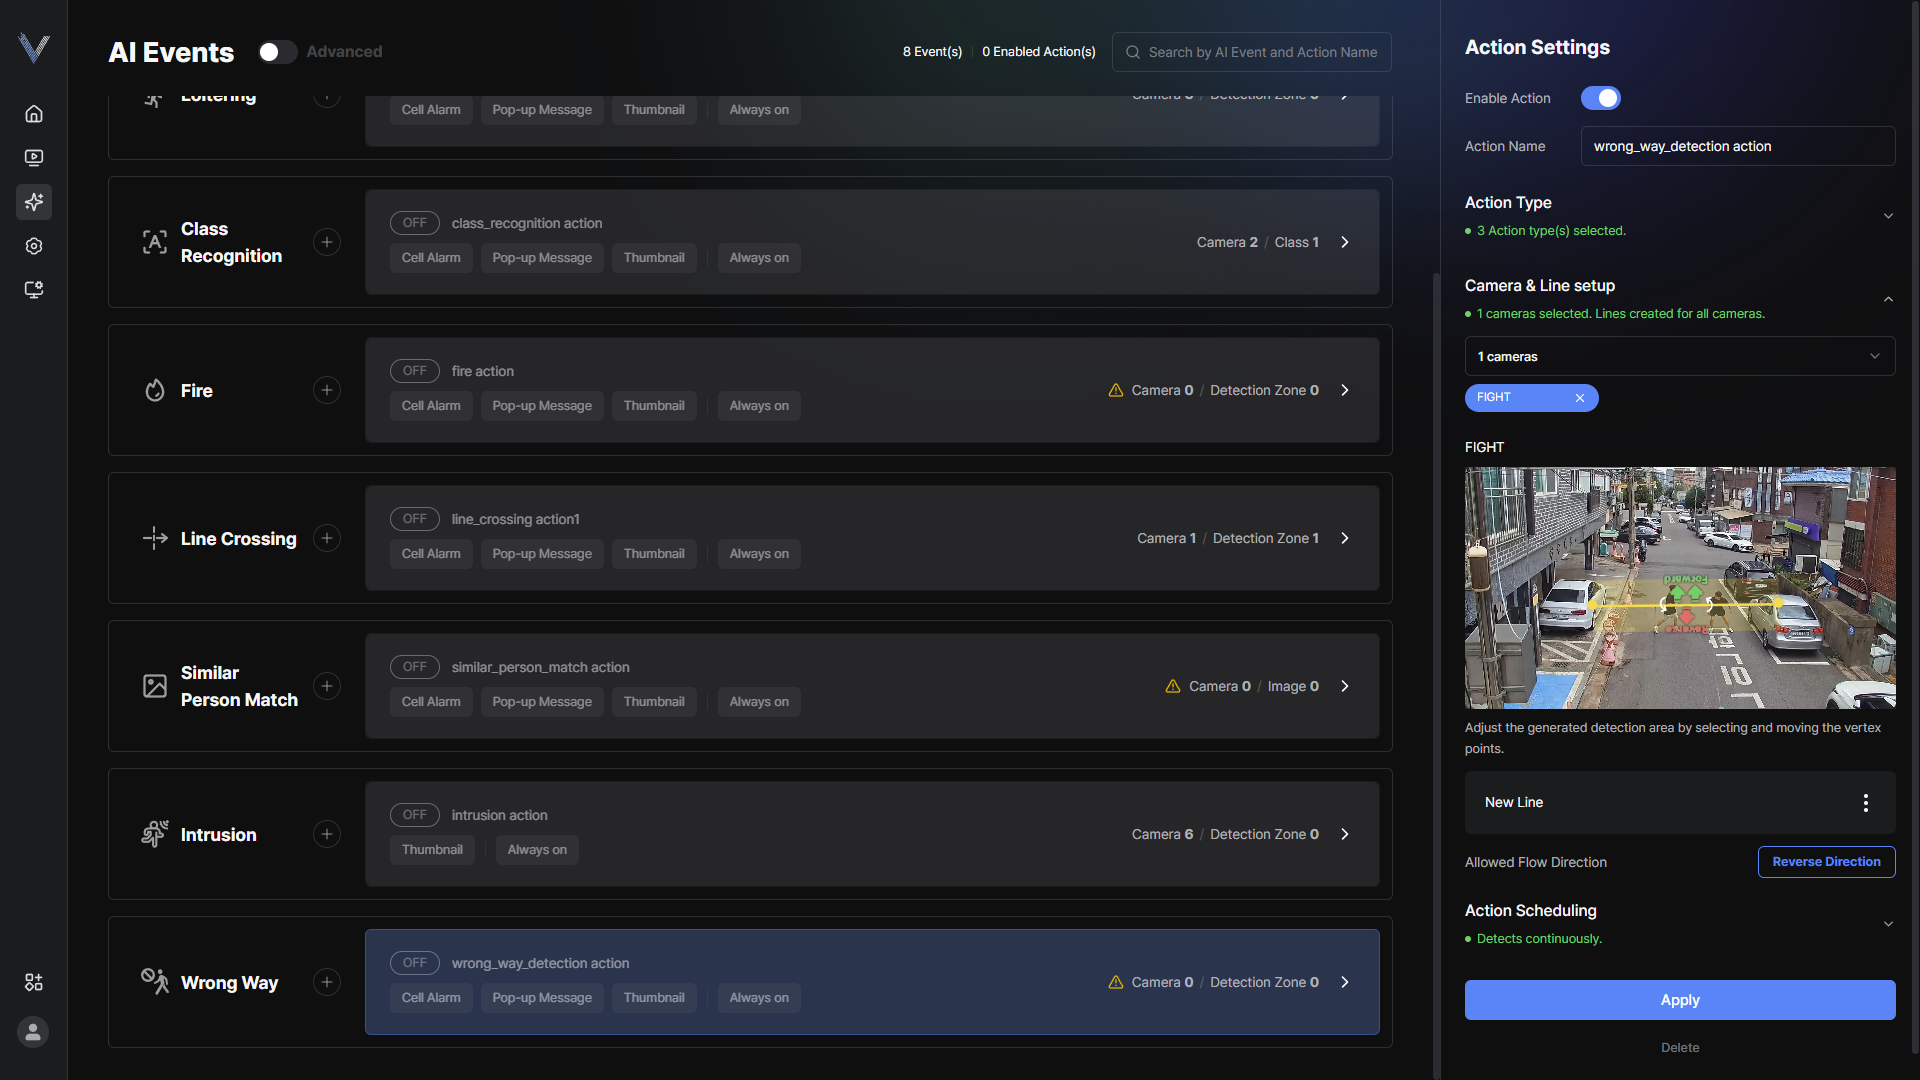 Figure 5-24. Allowed Direction of Travel
 - Click [Apply]
Configuring AI Services
- In the main menu, click [] > [AI Service]The AI Service screen appears.
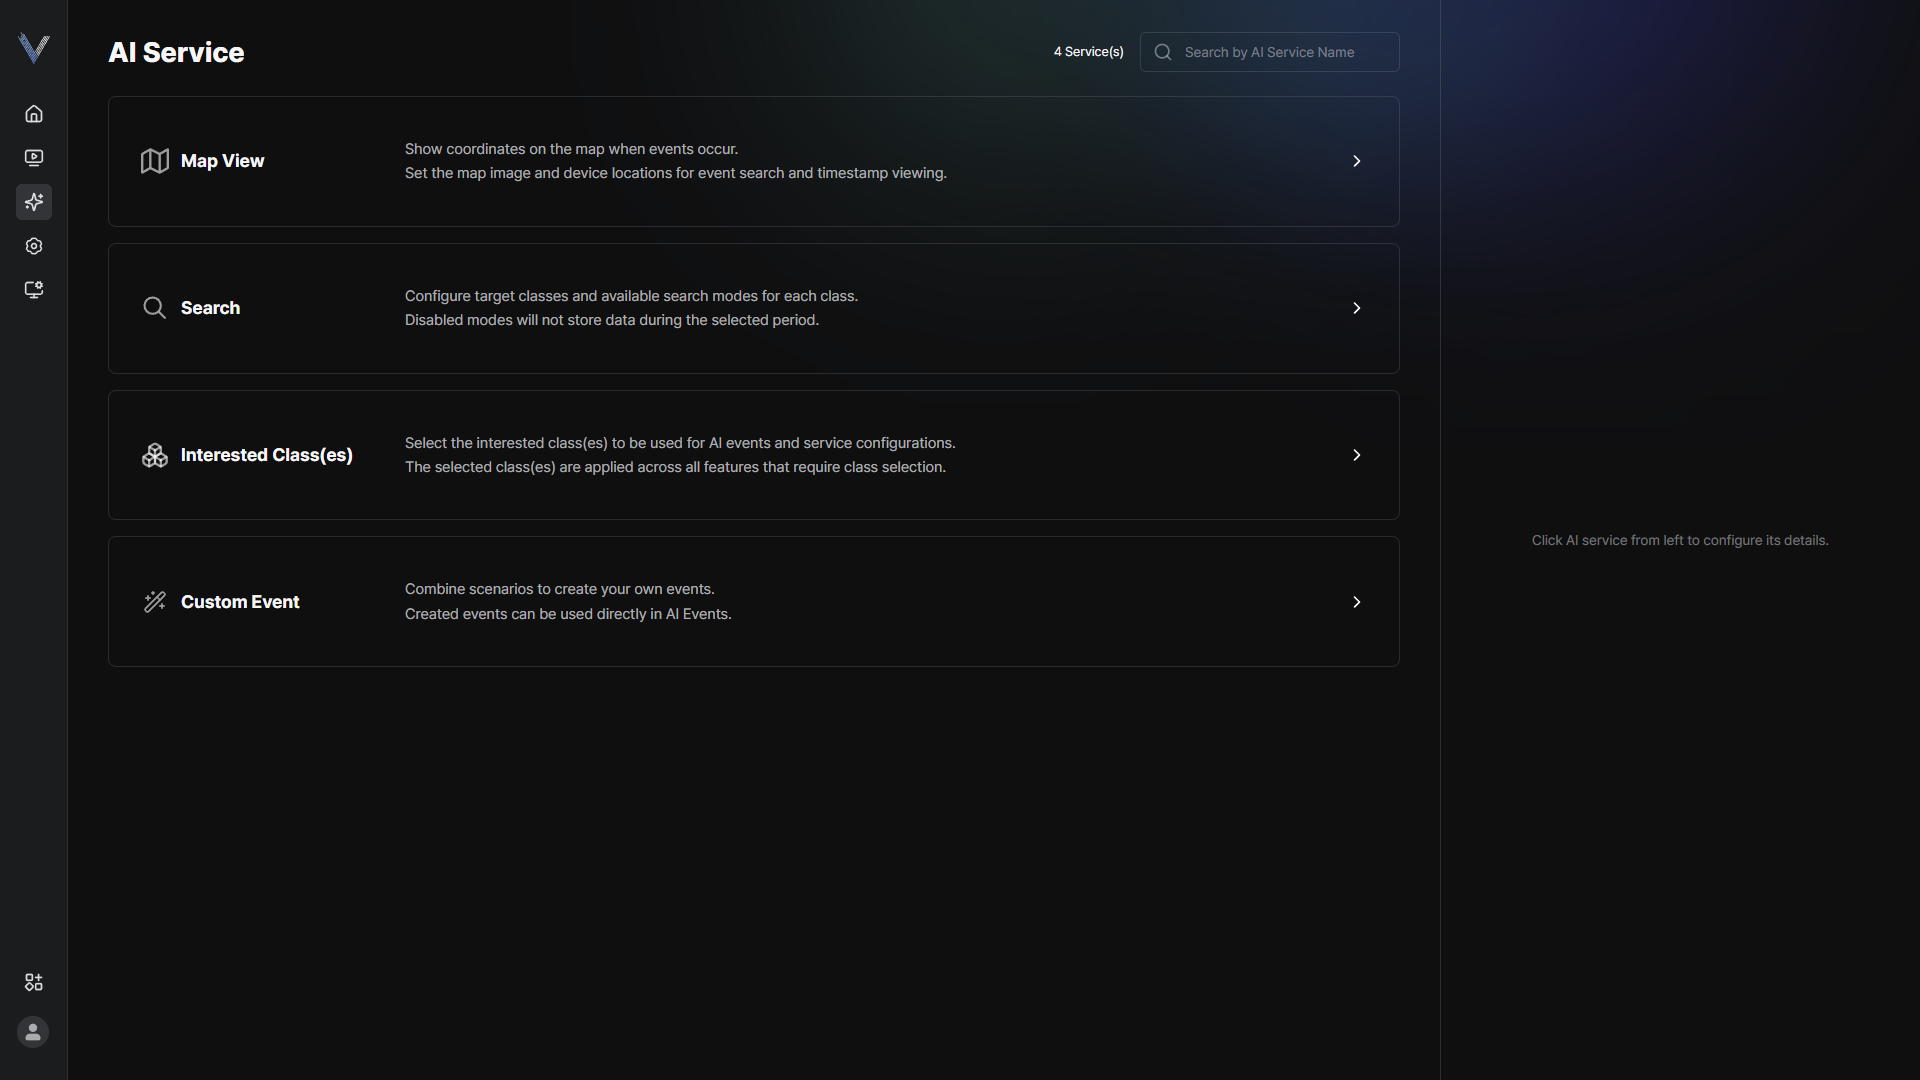 Figure 5-12. AI Service Screen
 - Click the item you wantThe service is configured.
Configuring the Map View Service
Configure the map view service.
- In the main menu, click [] > [AI Service] > [Map view]
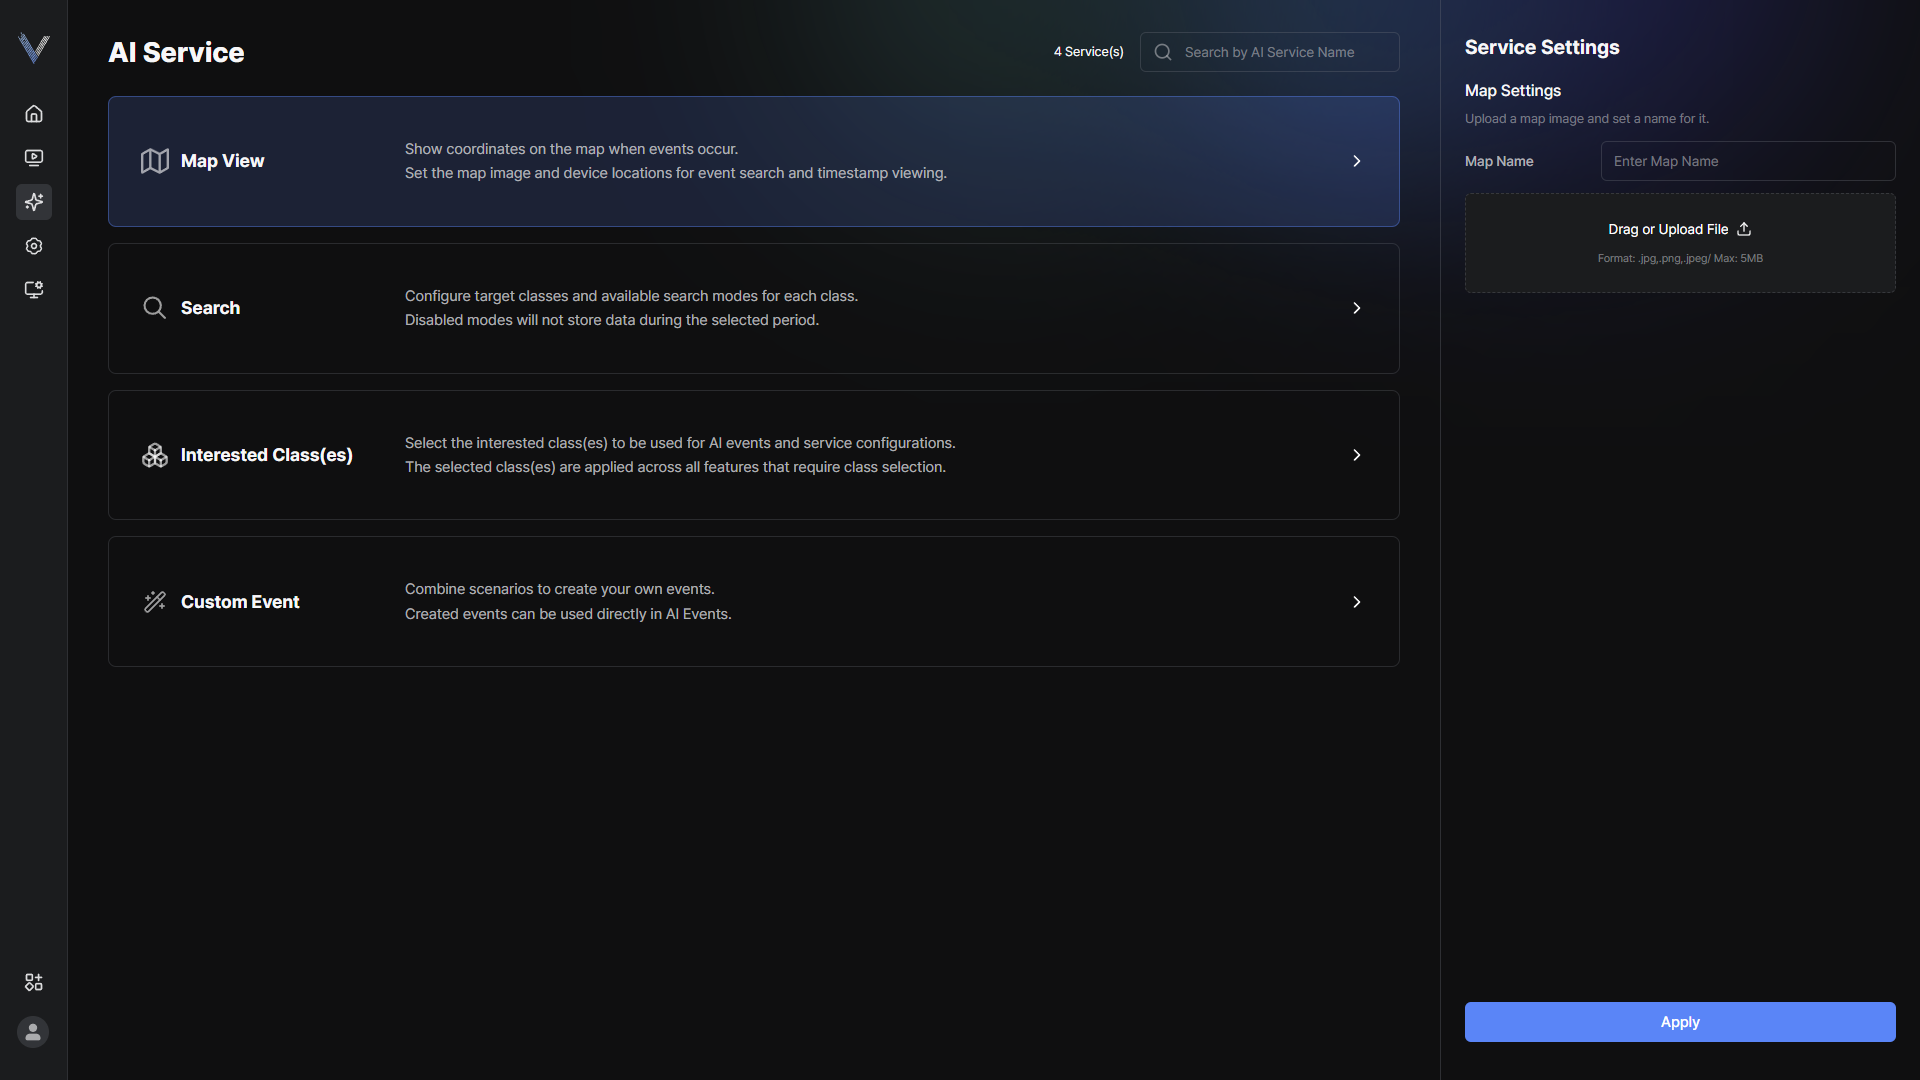 Figure 5-13. Map View Service Settings
 - Select [Drag or Upload File].
- Select the file and click [Open]
- Drag the camera onto the mapClick on the map with the mouse to set the camera position.
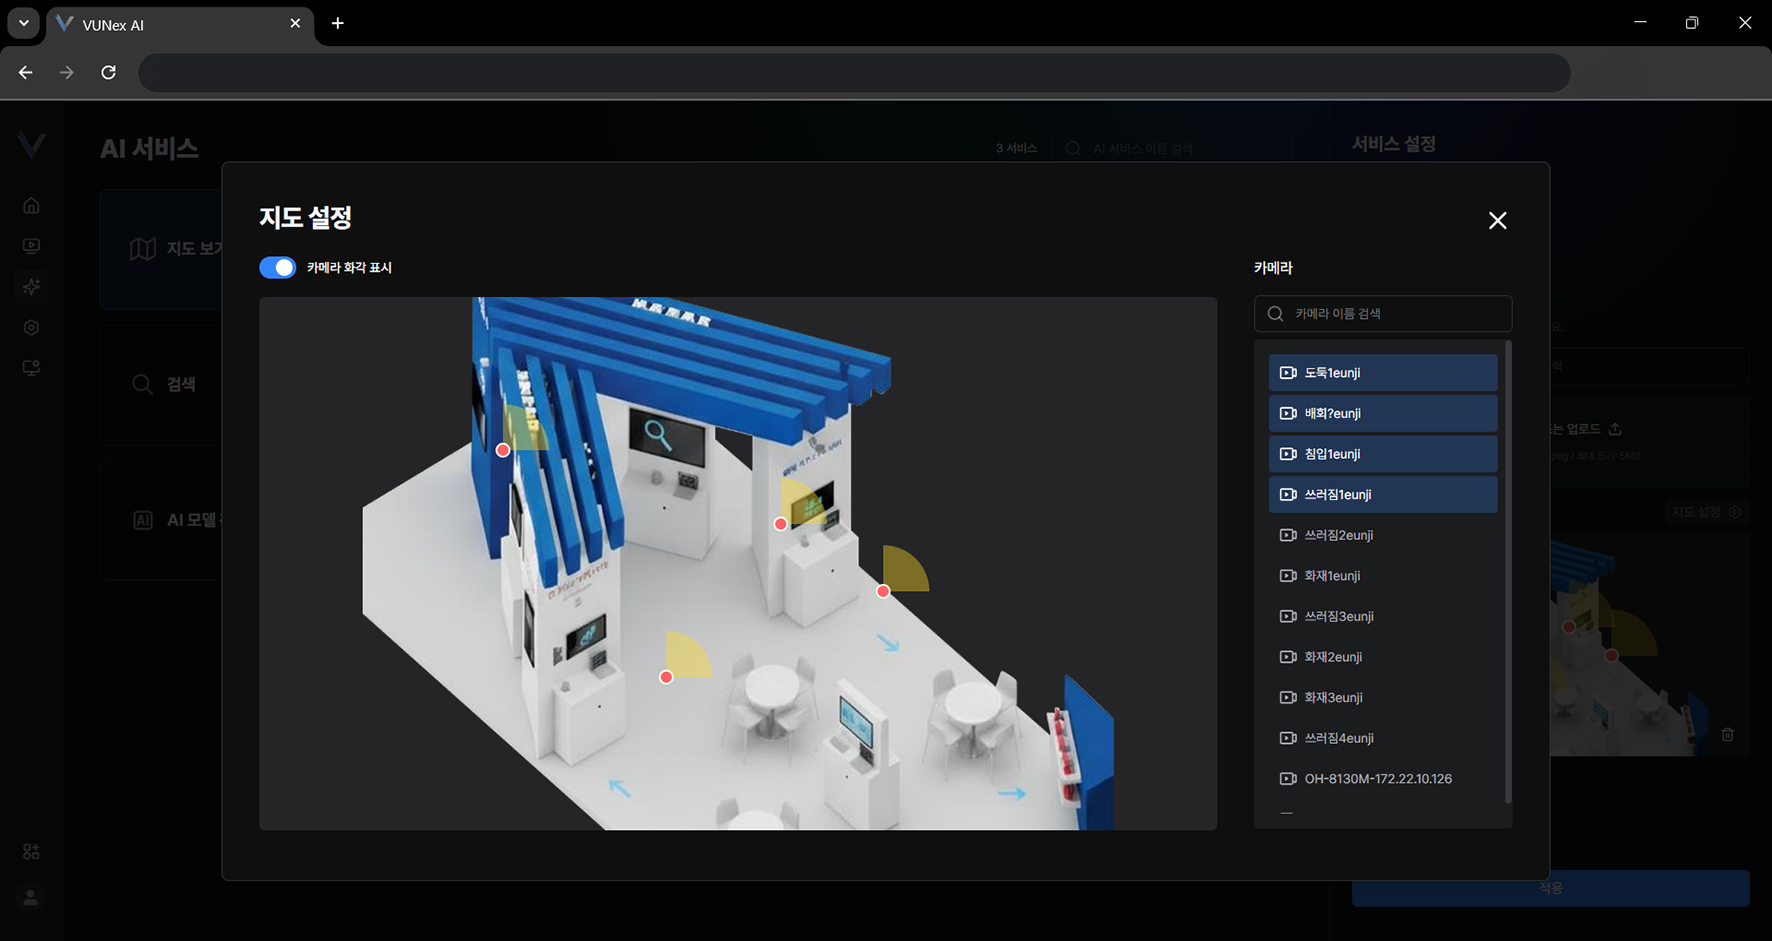 Figure 5-14. Setting Camera Positions on the Map
 - Click [Toggle]The camera field of view is shown.
- Drag the camera field of view left or right
- Click [X]
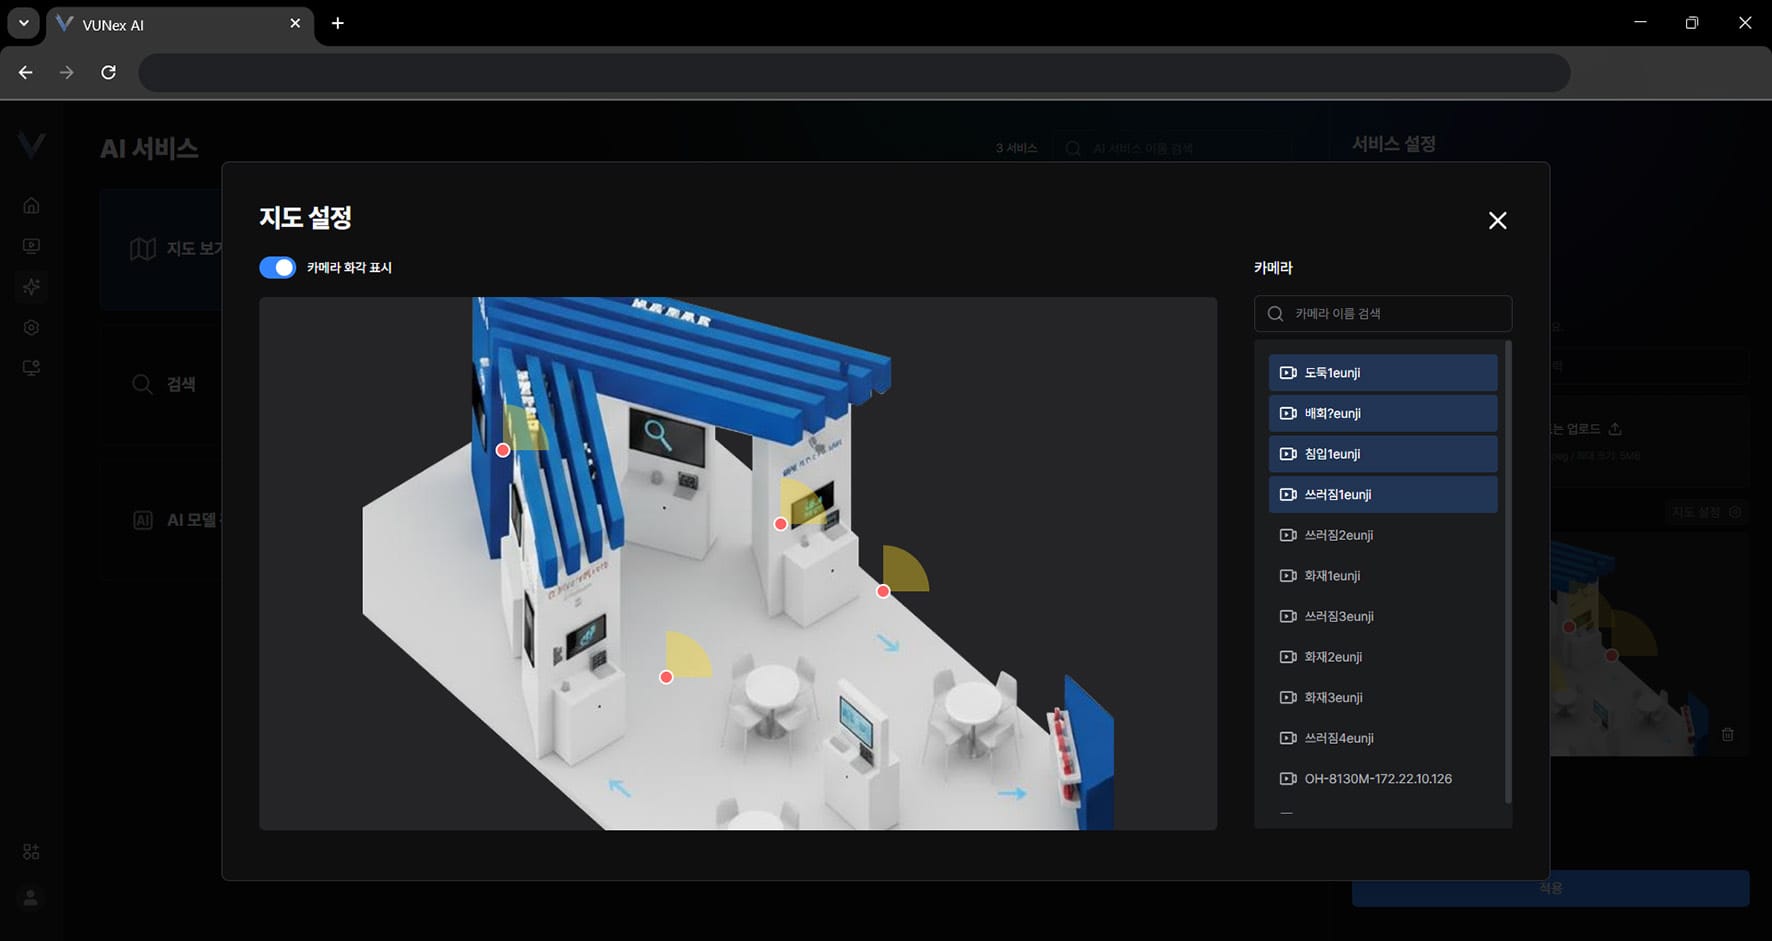 Figure 5-15. Map View Setup Complete
 - Click [Apply]The service is configured.
Configuring the Search Service
Configure the search service.
- In the main menu, click [] > [AI Service] > [Search]
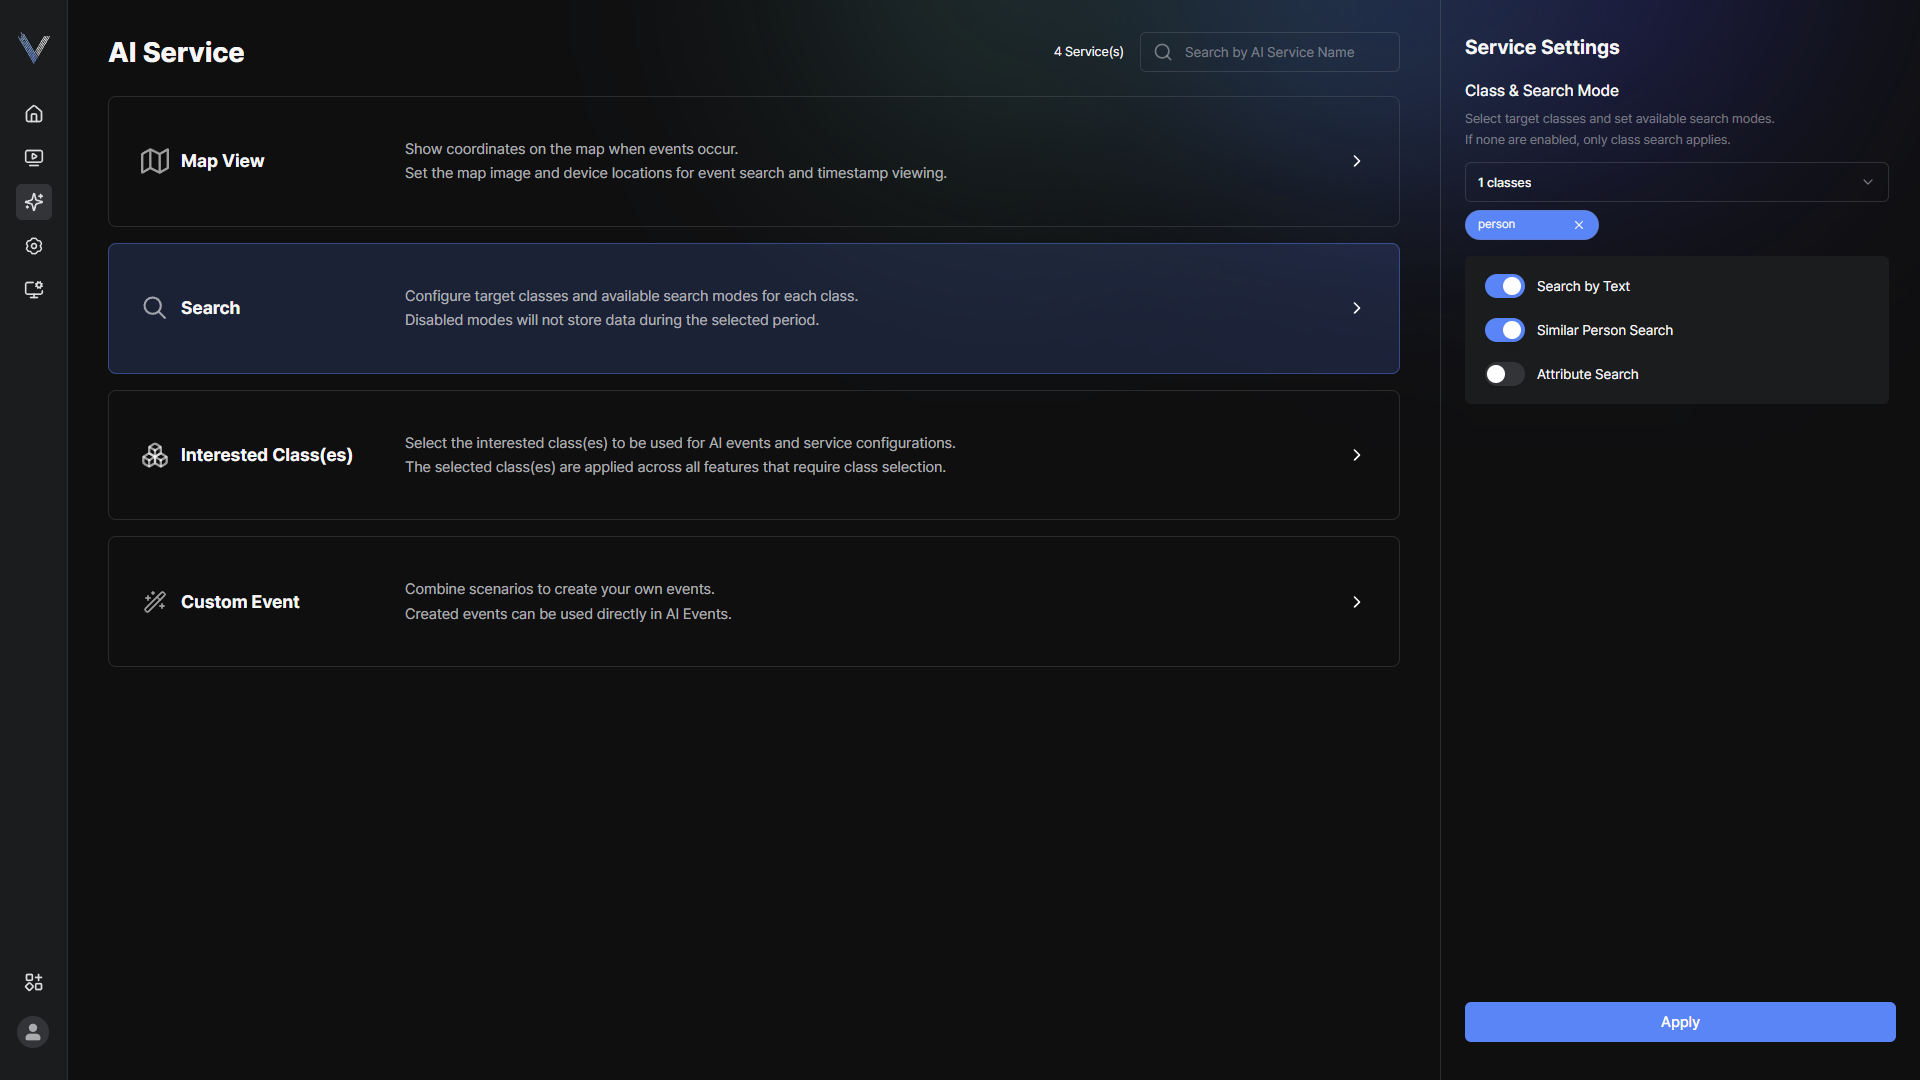 Figure 5-16. Search Service Settings
 - Configure the item you want
- Click [Apply]The service is configured.
Setting Interested Classes
Choose in advance the classes to use in AI Event and AI Service settings.
- In the main menu, click [] > [AI Service] > [Interested class]
- Select the classes to use in [All classes]You can find a class by typing its name in the search box. Selected classes are collected under [My interested classes].
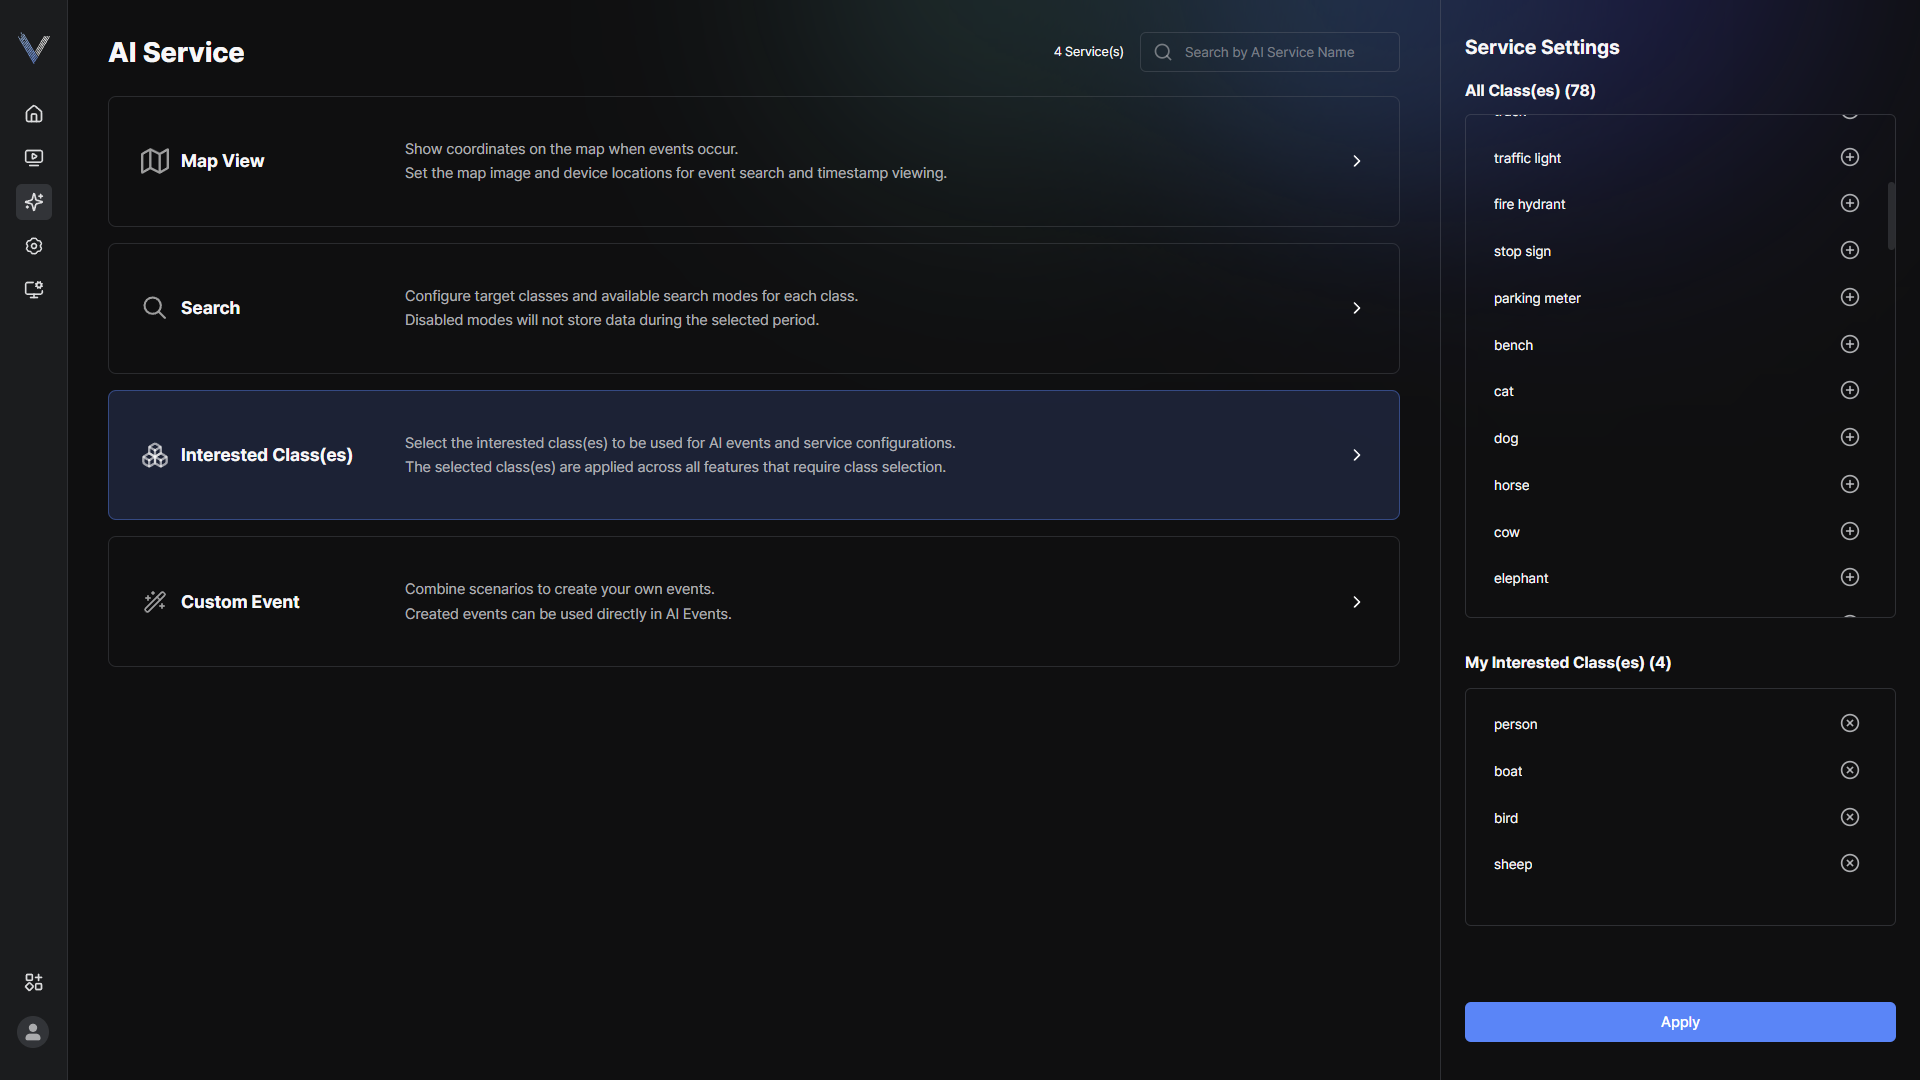 Figure 5-25. Interested Class Settings
 - Click [Apply]
Creating a Custom Event
Combine scenarios to build an event with the conditions you want.
- In the main menu, click [] > [AI Service] > [Custom event]
- Select the model to use in [Detection model]
- Click [Create event]
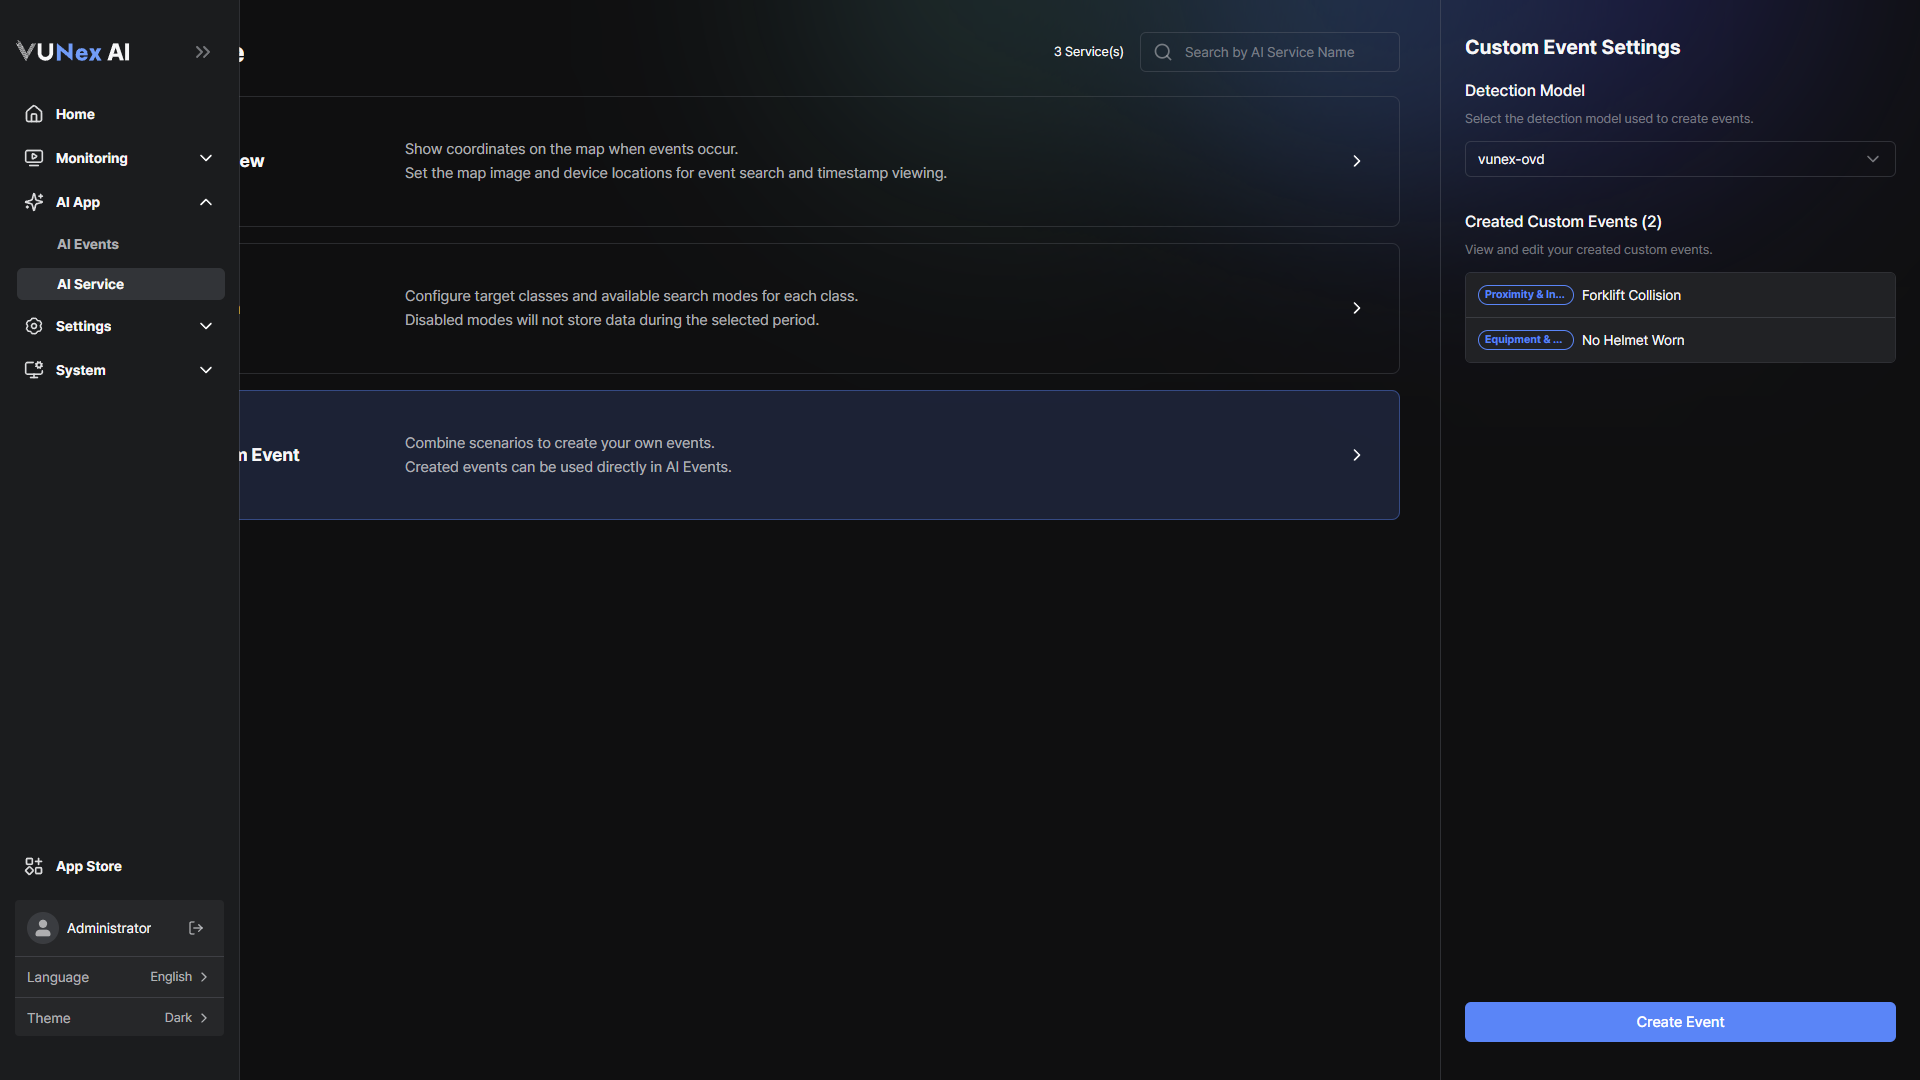 Figure 5-26. Custom Event List
 - Enter the [Event name] and select the [Camera]Only Korean characters, letters, numbers and spaces can be used in the event name.
- Select a scenario in [Step 1. Scenario logic]You can choose [Proximity & Interaction], [Absence & Missing], [Count & Grouping], [Loitering & Dwell] or [Equipment & Wearing].
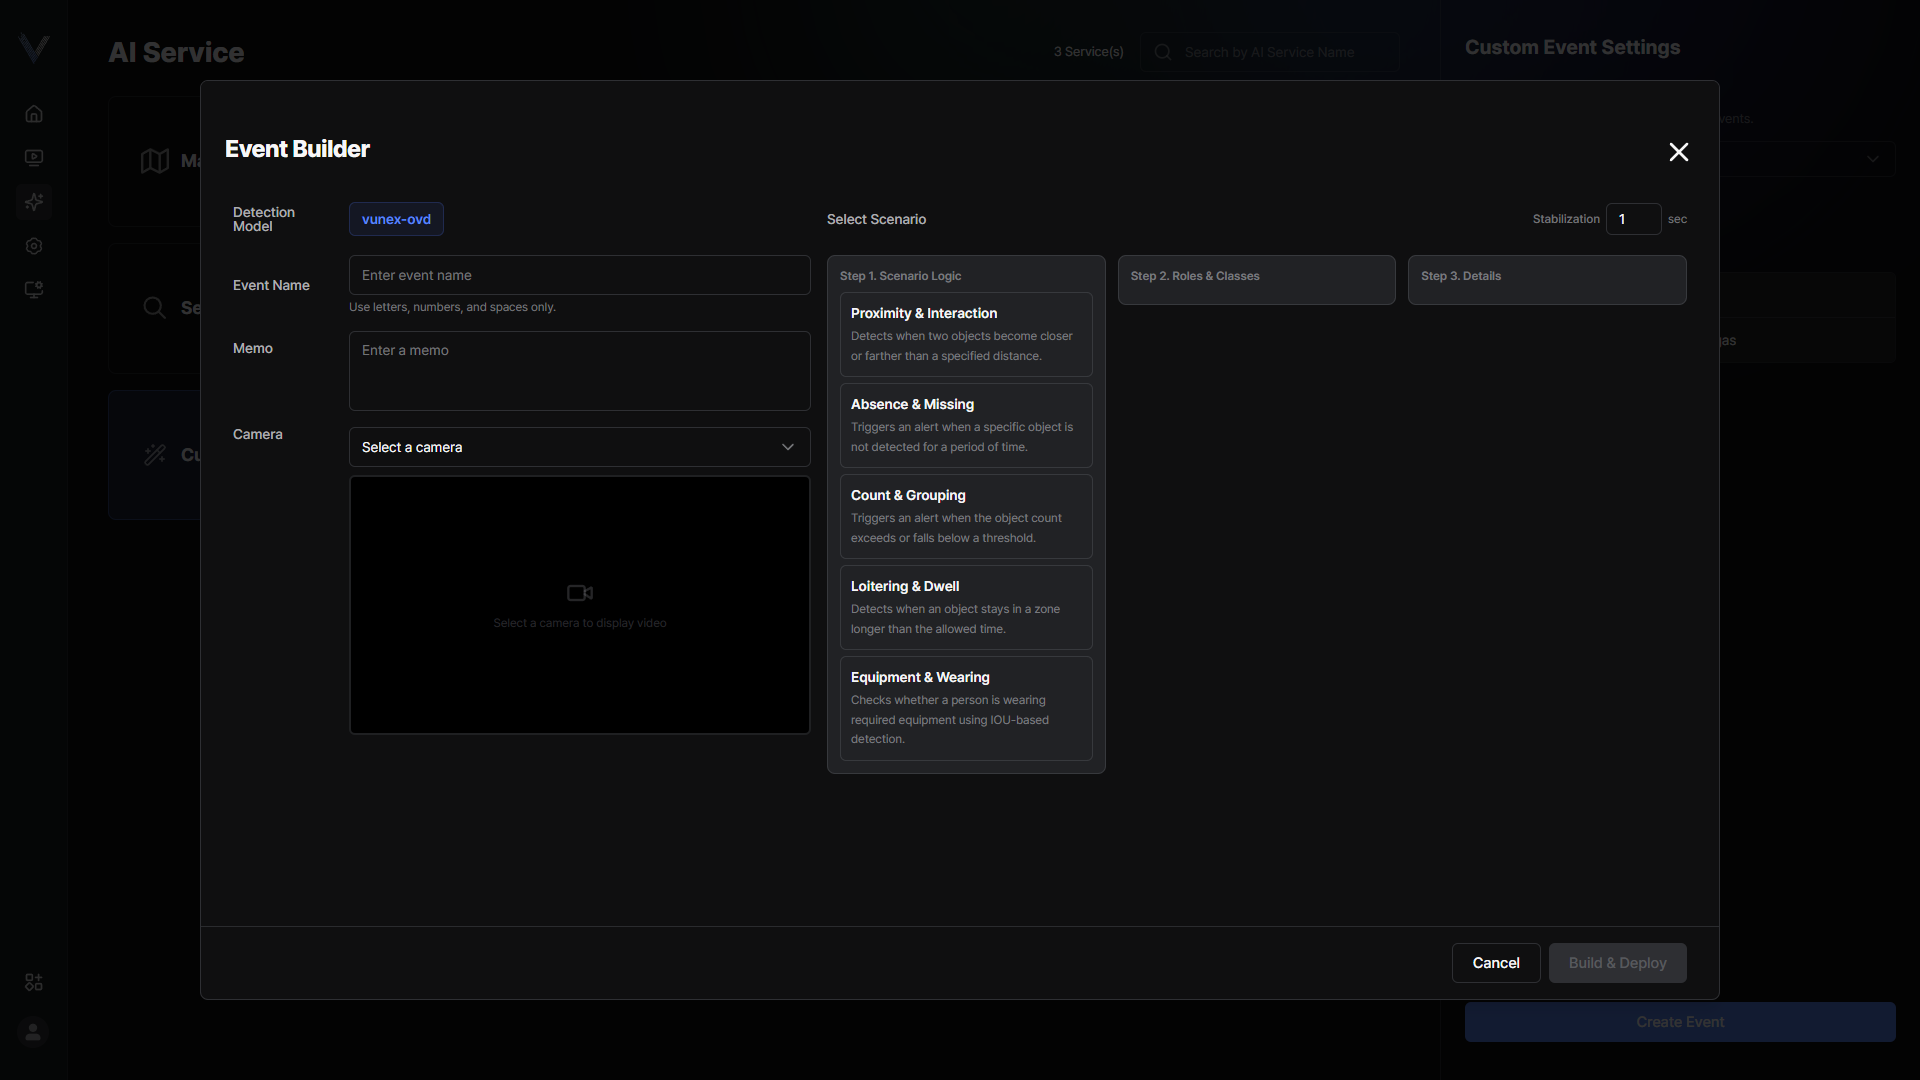 Figure 5-27. Event Builder Scenario
 - Select the target classes in [Step 2. Roles and classes]
- Set the evaluation conditions in [Step 3. Detailed conditions]Depending on the scenario, enter the distance, absence duration, threshold count, dwell duration, IOU threshold and stabilization time.
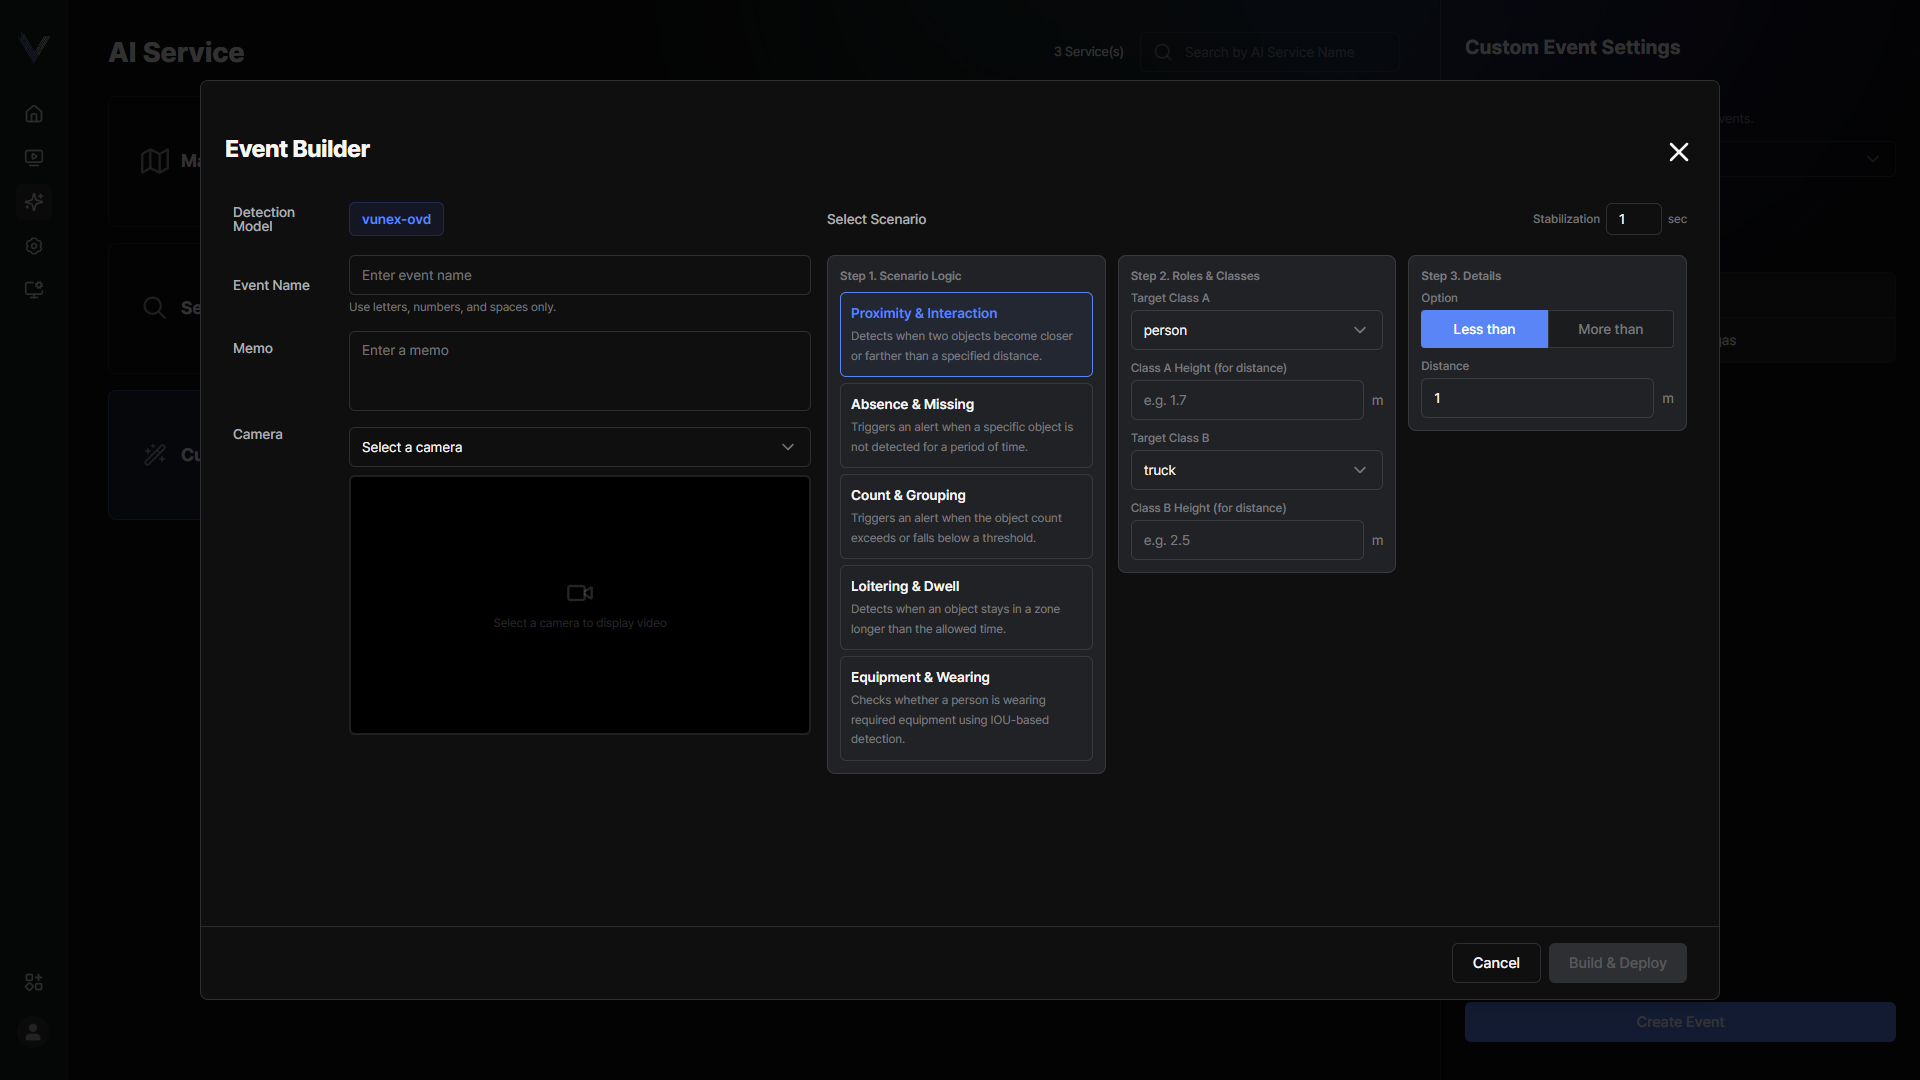 Figure 5-28. Event Builder Detailed Conditions
 - If needed, define an ROI on the videoClick to define the area, and right-click a vertex to remove it.
- Click [Start simulation] to check the behavior
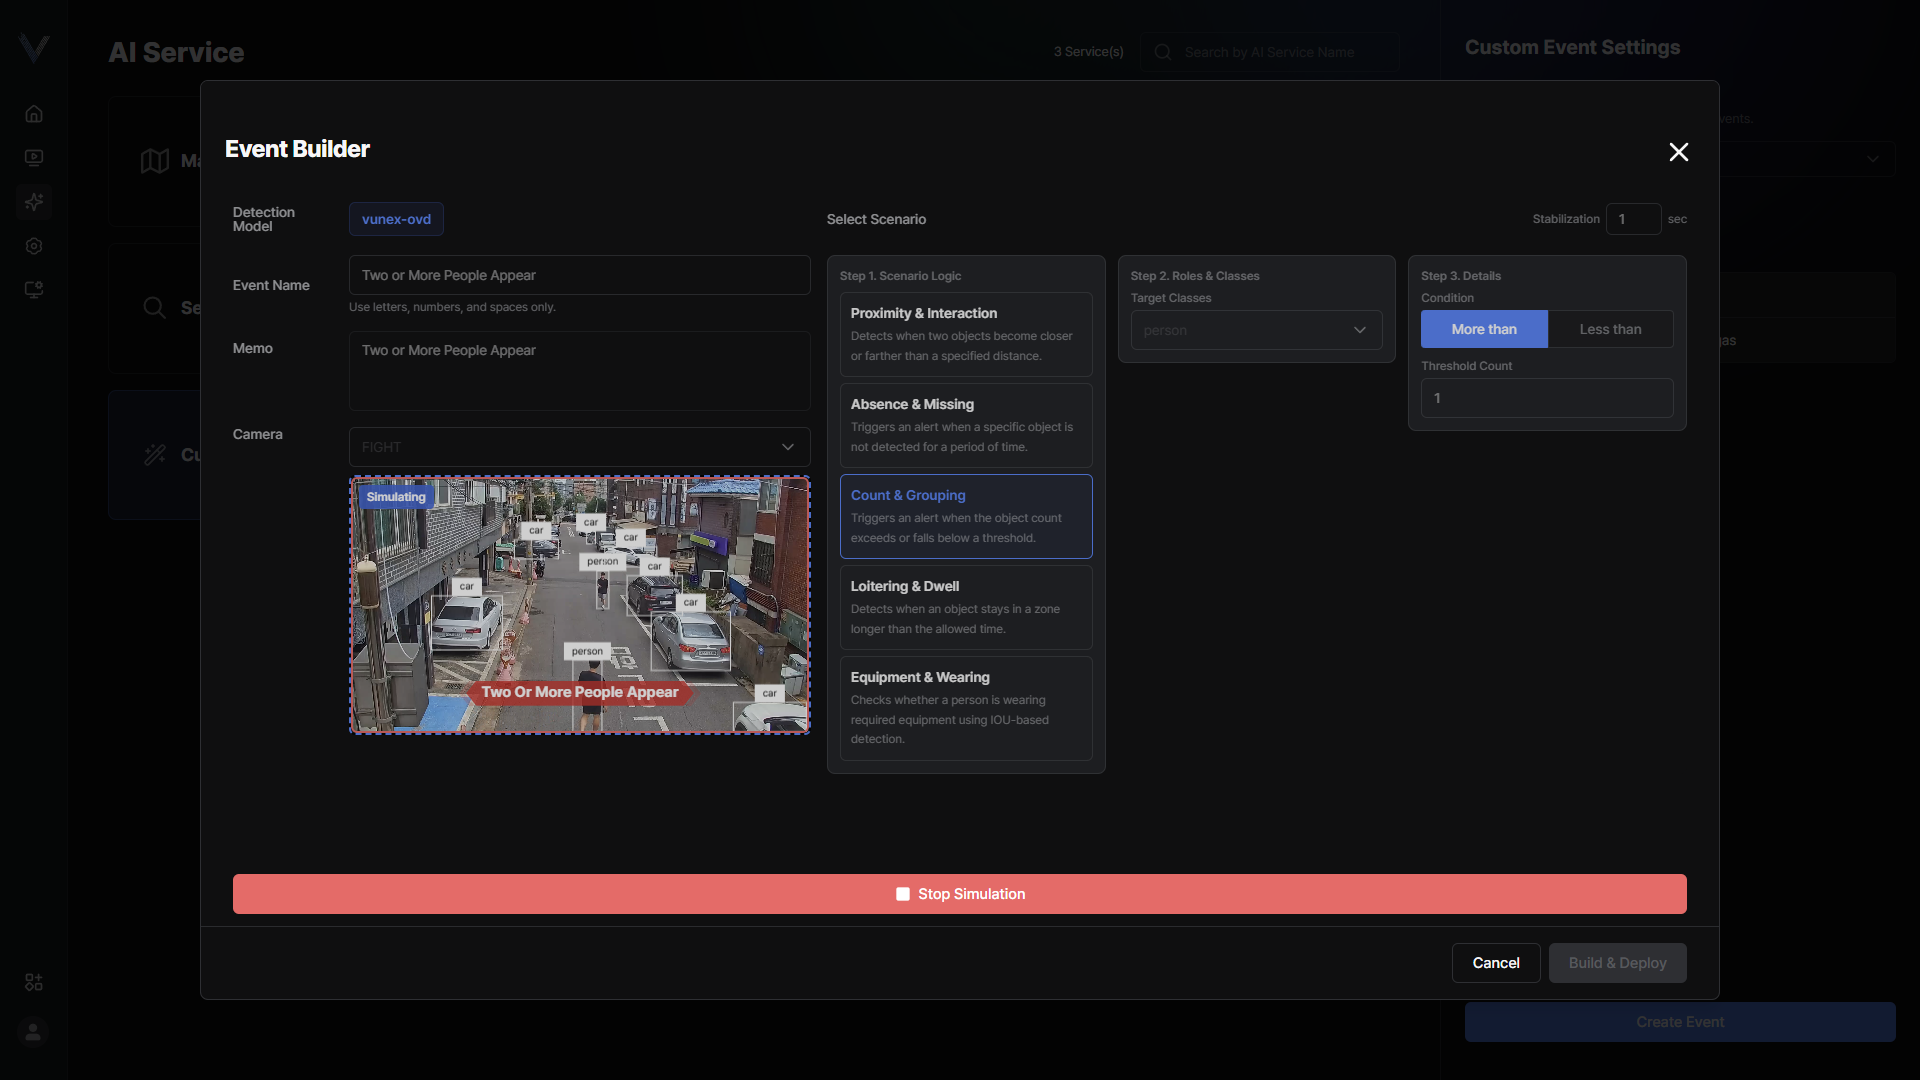 Figure 5-29. Custom Event Simulation
 - Click [Build & Deploy]
Settings
Configure system settings.
Changing the Theme and Language
Change the screen theme and the display language in the profile area at the bottom of the left menu.
- Look at the profile area at the bottom of the left menu
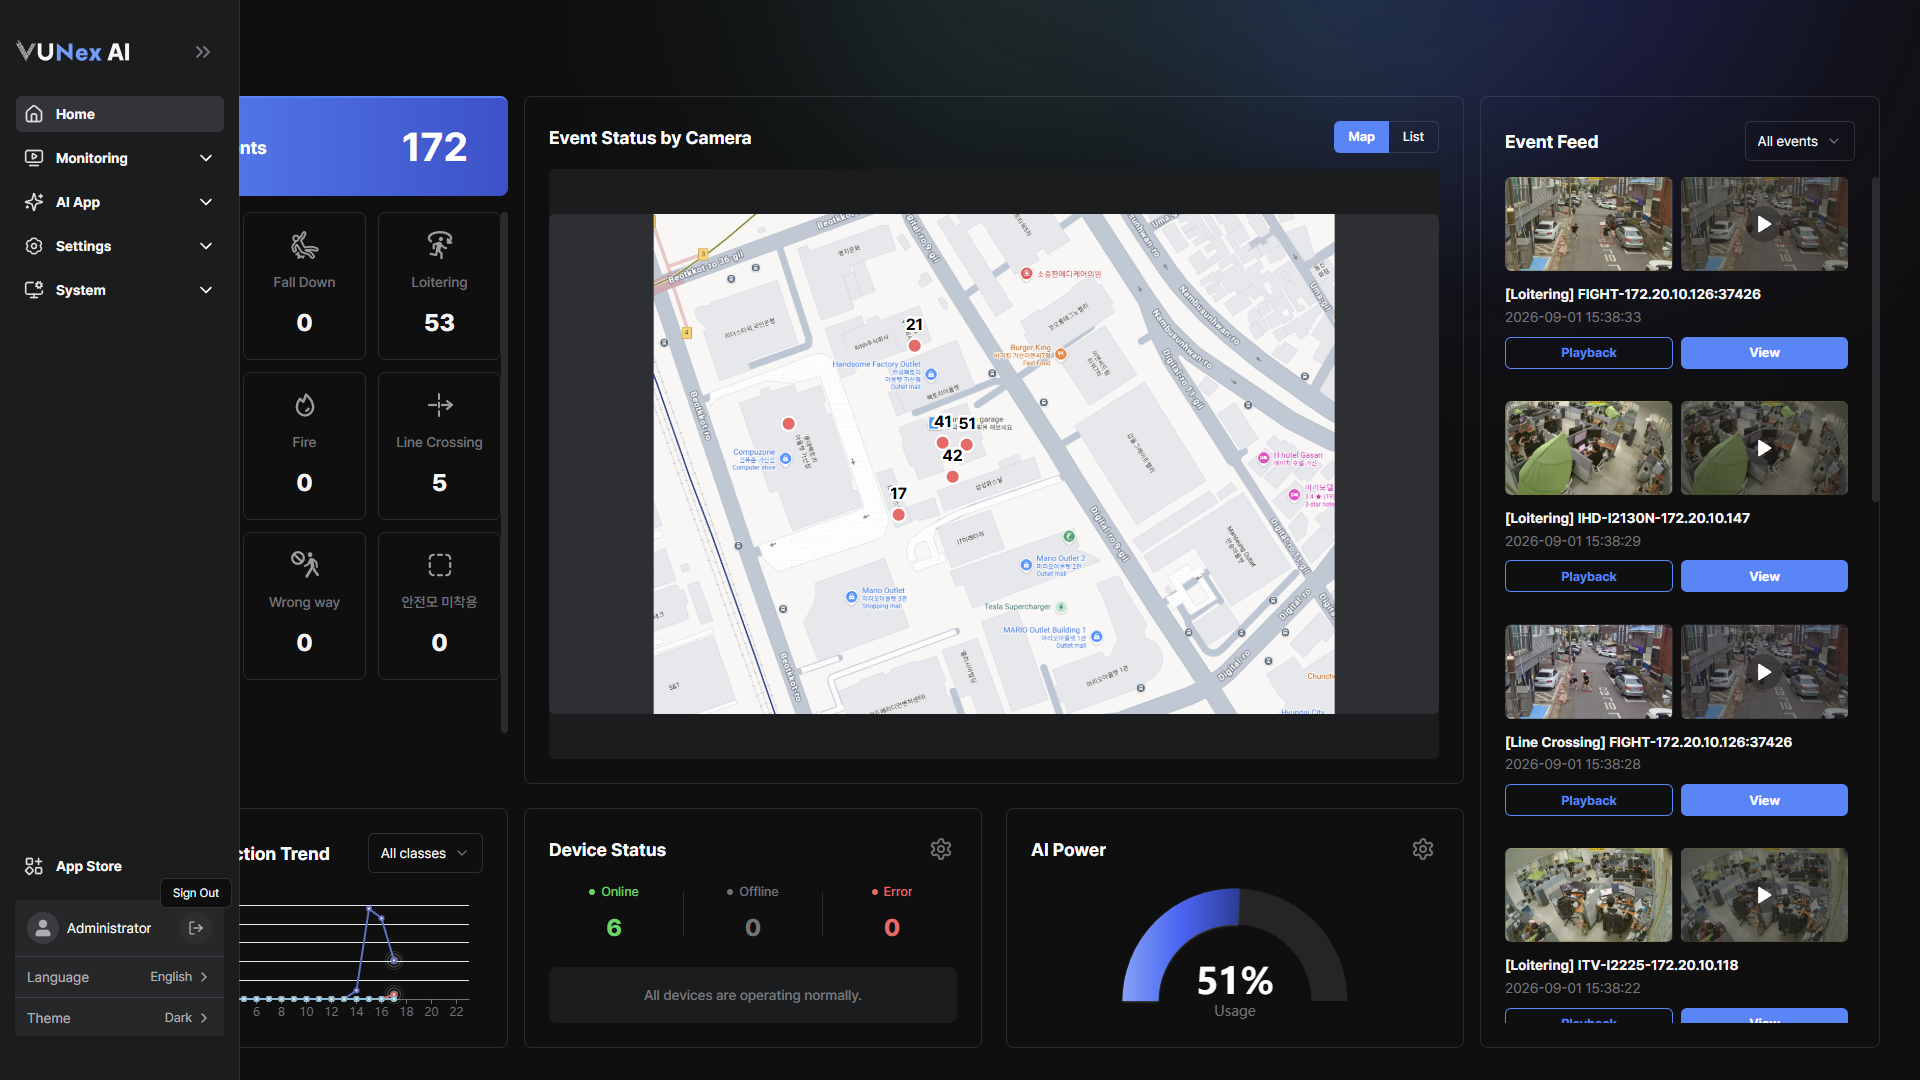 Figure 6-14. Profile Area
 - Click [Language] and select the language to useKorean, English, Japanese and Spanish are supported.
- Click [Theme] and select [Dark] or [Light]
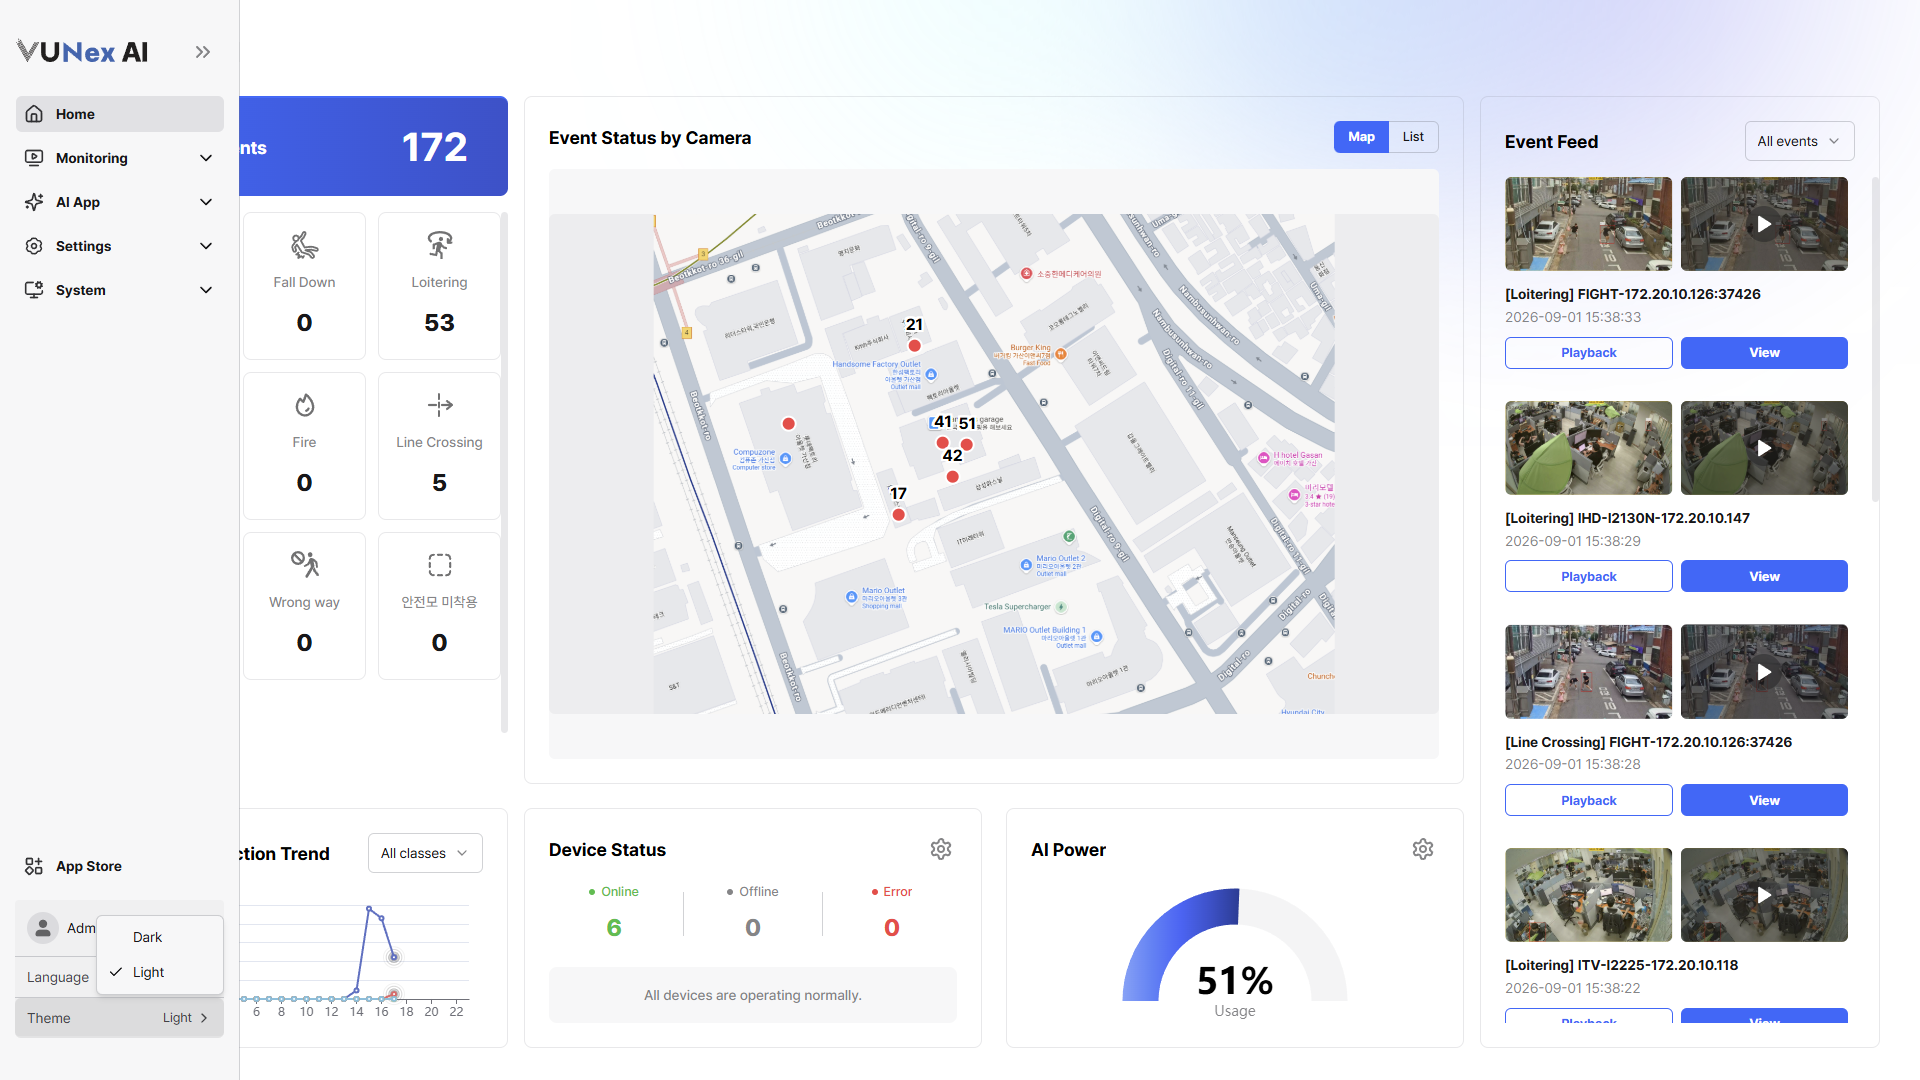 Figure 6-15. Theme Selection
Adding a Device
Add a device.
- In the main menu, click [] > [Device]The Device settings screen appears.
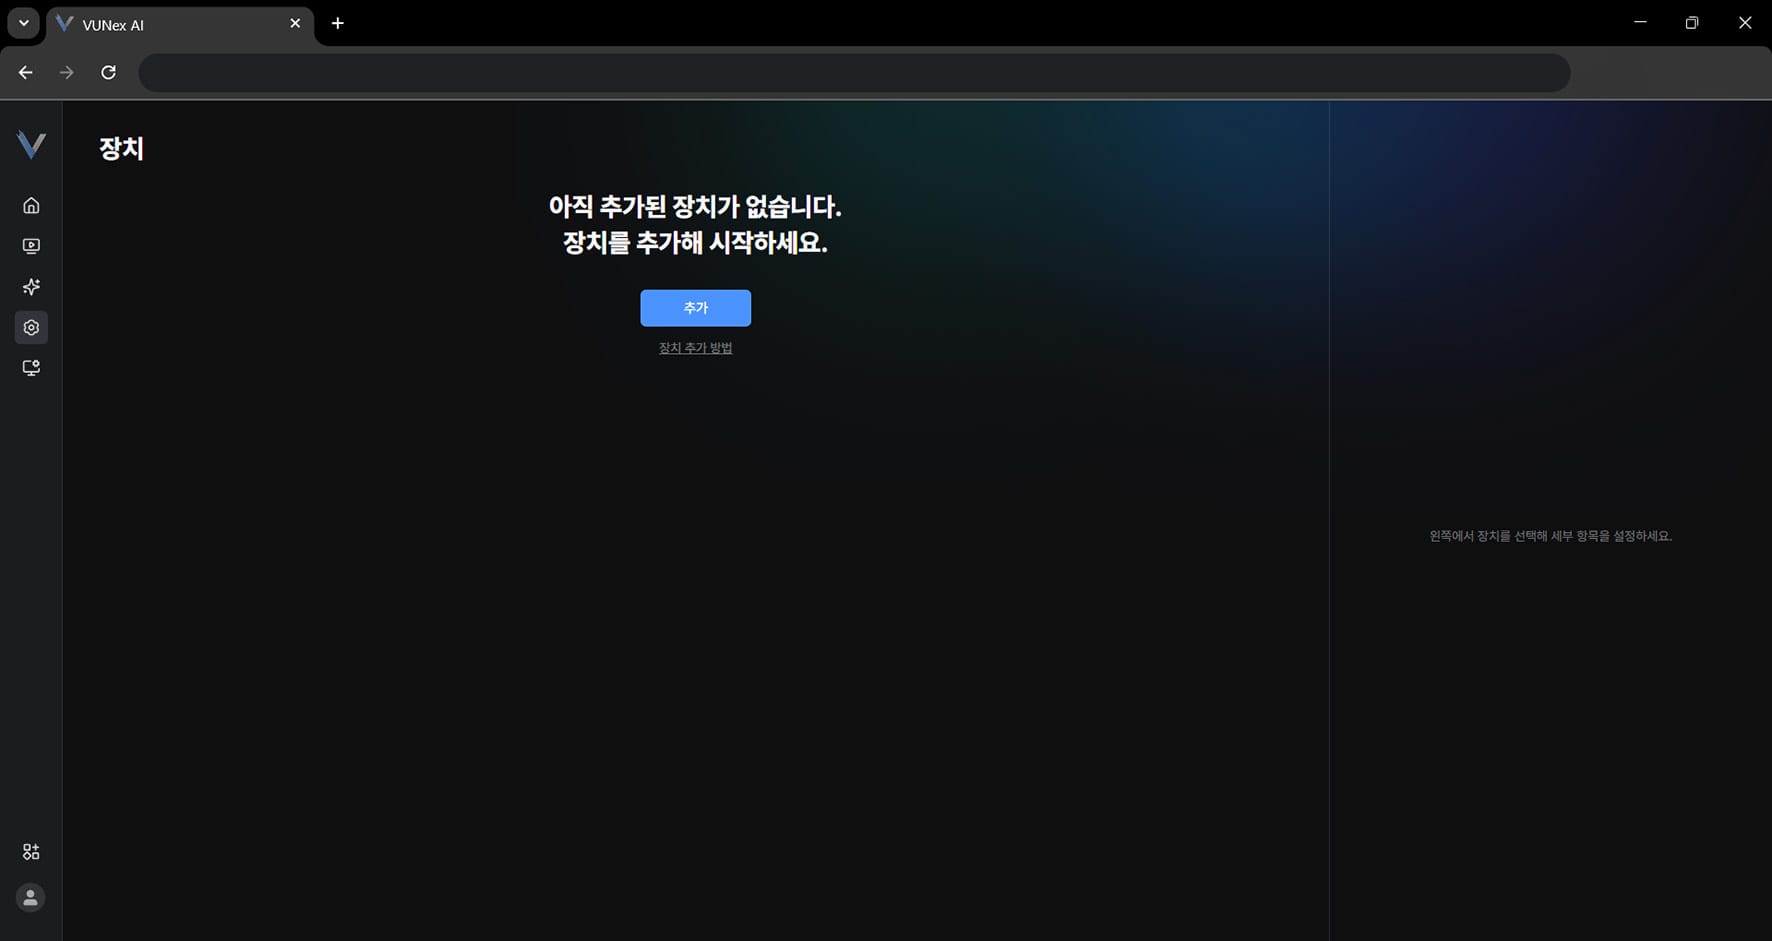 Figure 6-3. Device Settings Screen
 - Click [Add]
- Select the item you want[Auto scan]: automatically finds ONVIF and mDNS devices on the same subnet. [Manual scan]: finds ONVIF devices by entering an IP range and credentials. [Manual add]: adds a device manually by entering an RTSP address and connection details. [File upload]: adds devices by uploading a file.
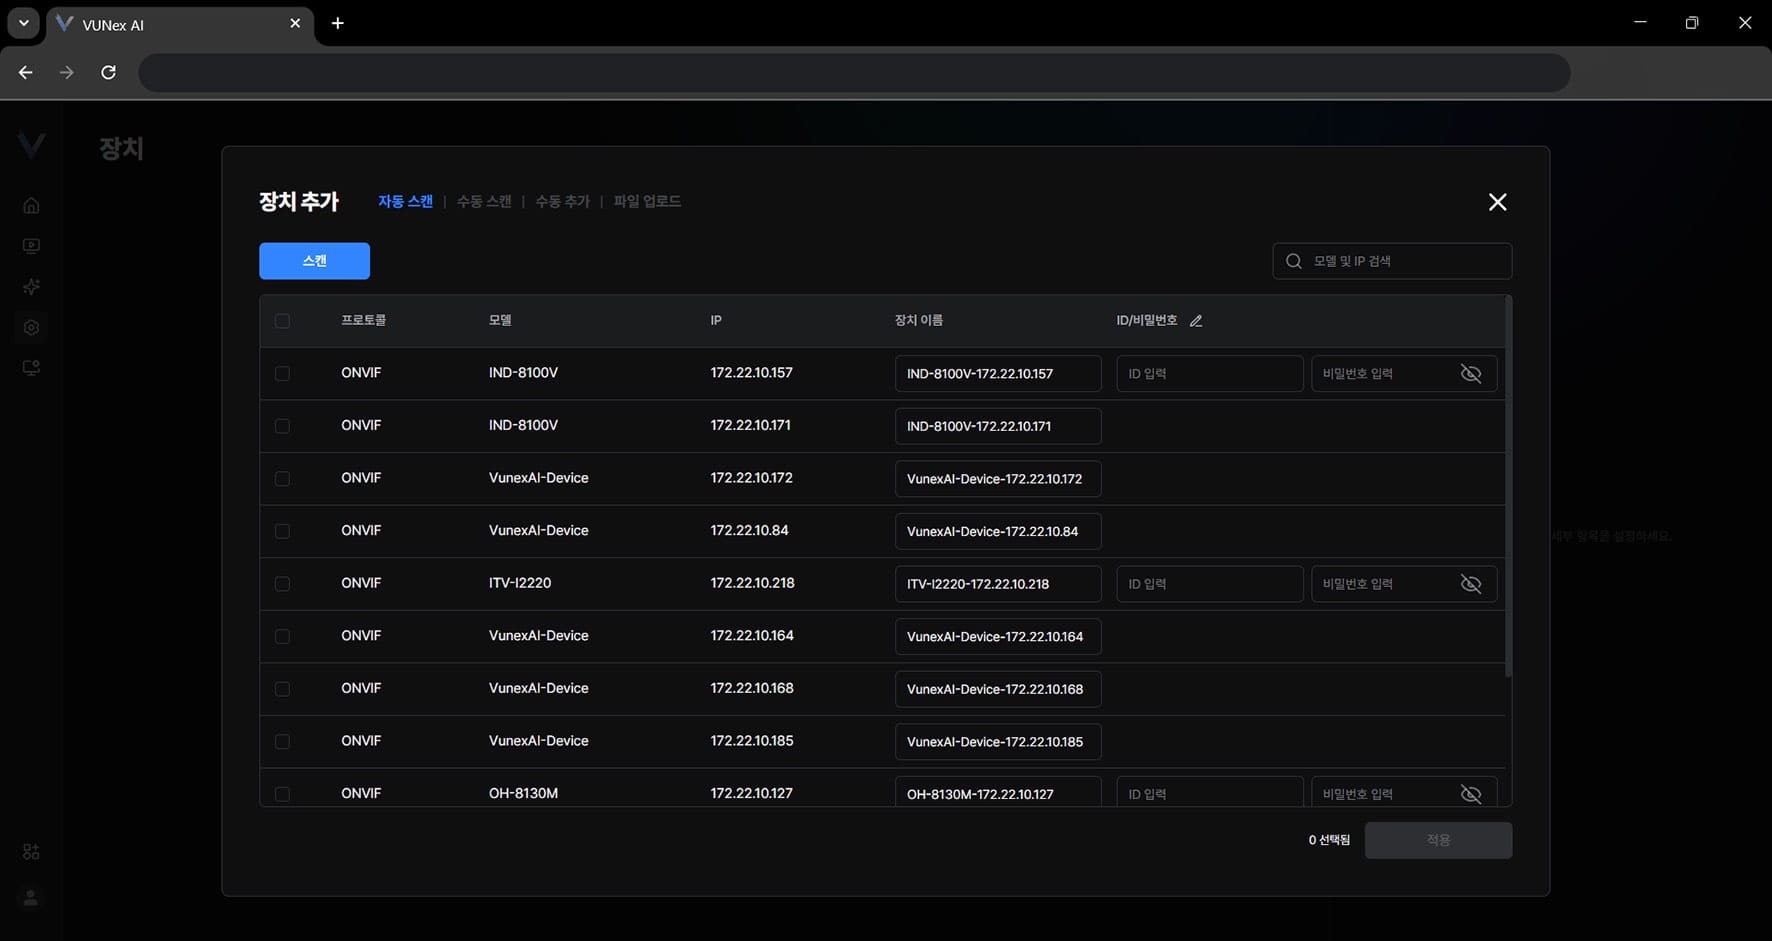 Figure 6-4. Auto Scan
 - Click [Apply]
- Check the result of the added devices
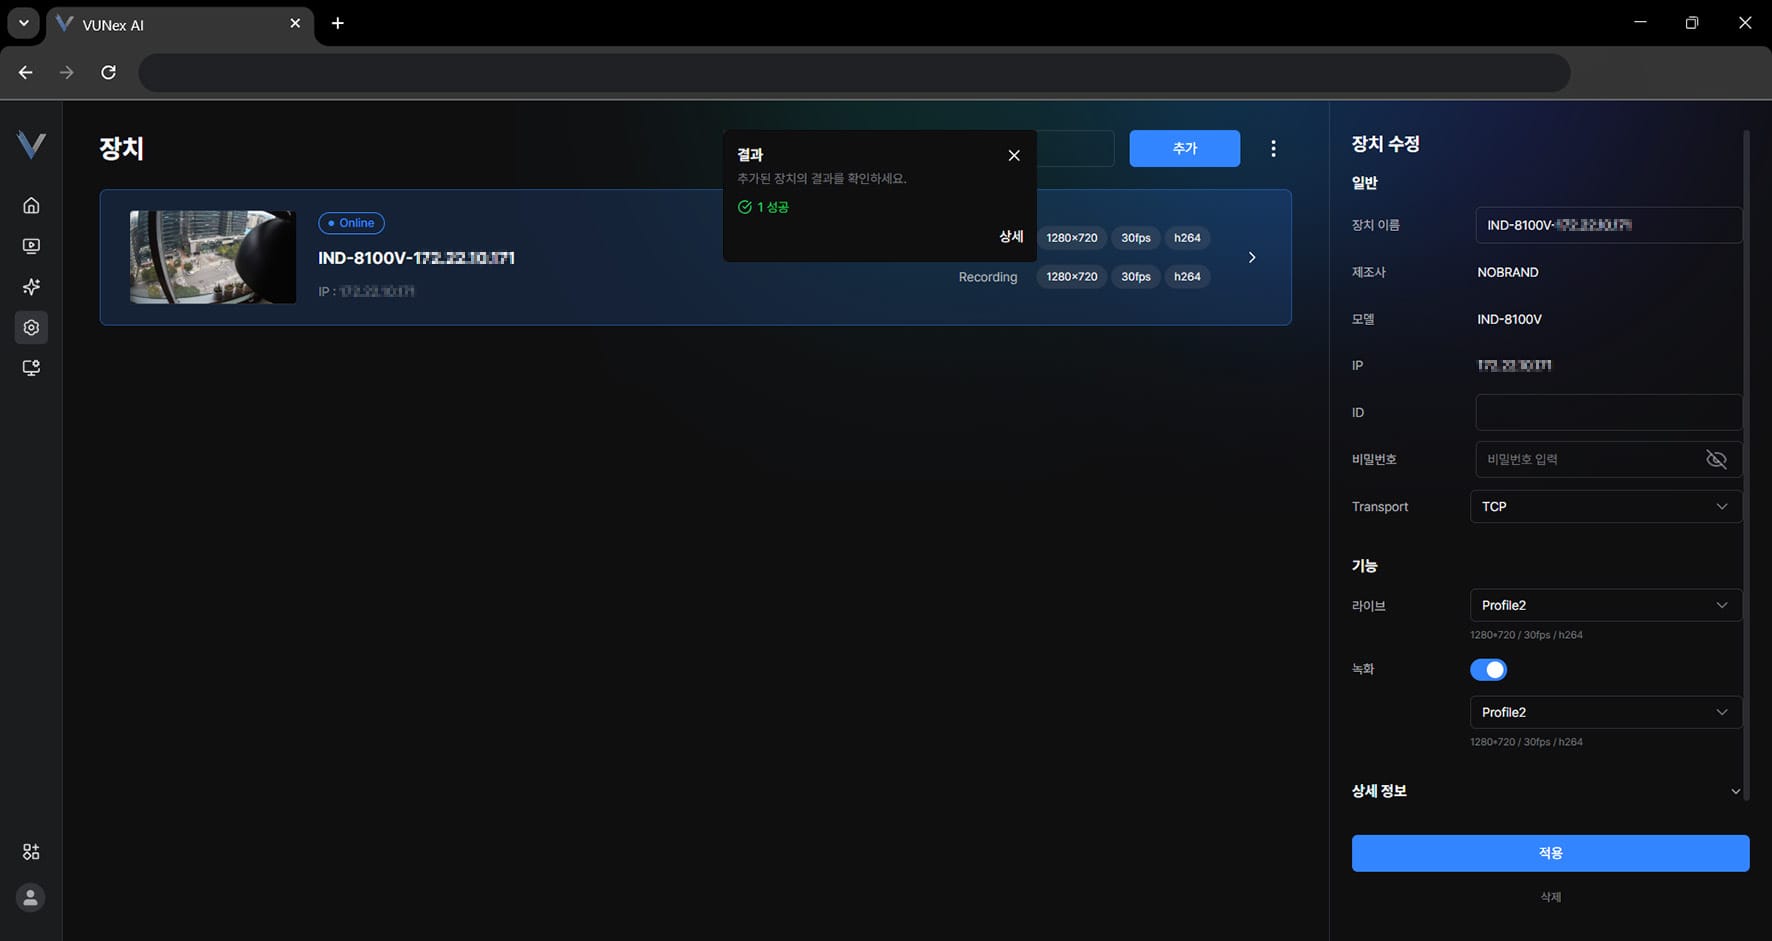 Figure 6-6. Device Registration Result
 - Click [X]
- Add the device
Editing a Device
The device is updated.
- In the main menu, click [] > [Device]The Device settings screen appears.
- Select a device
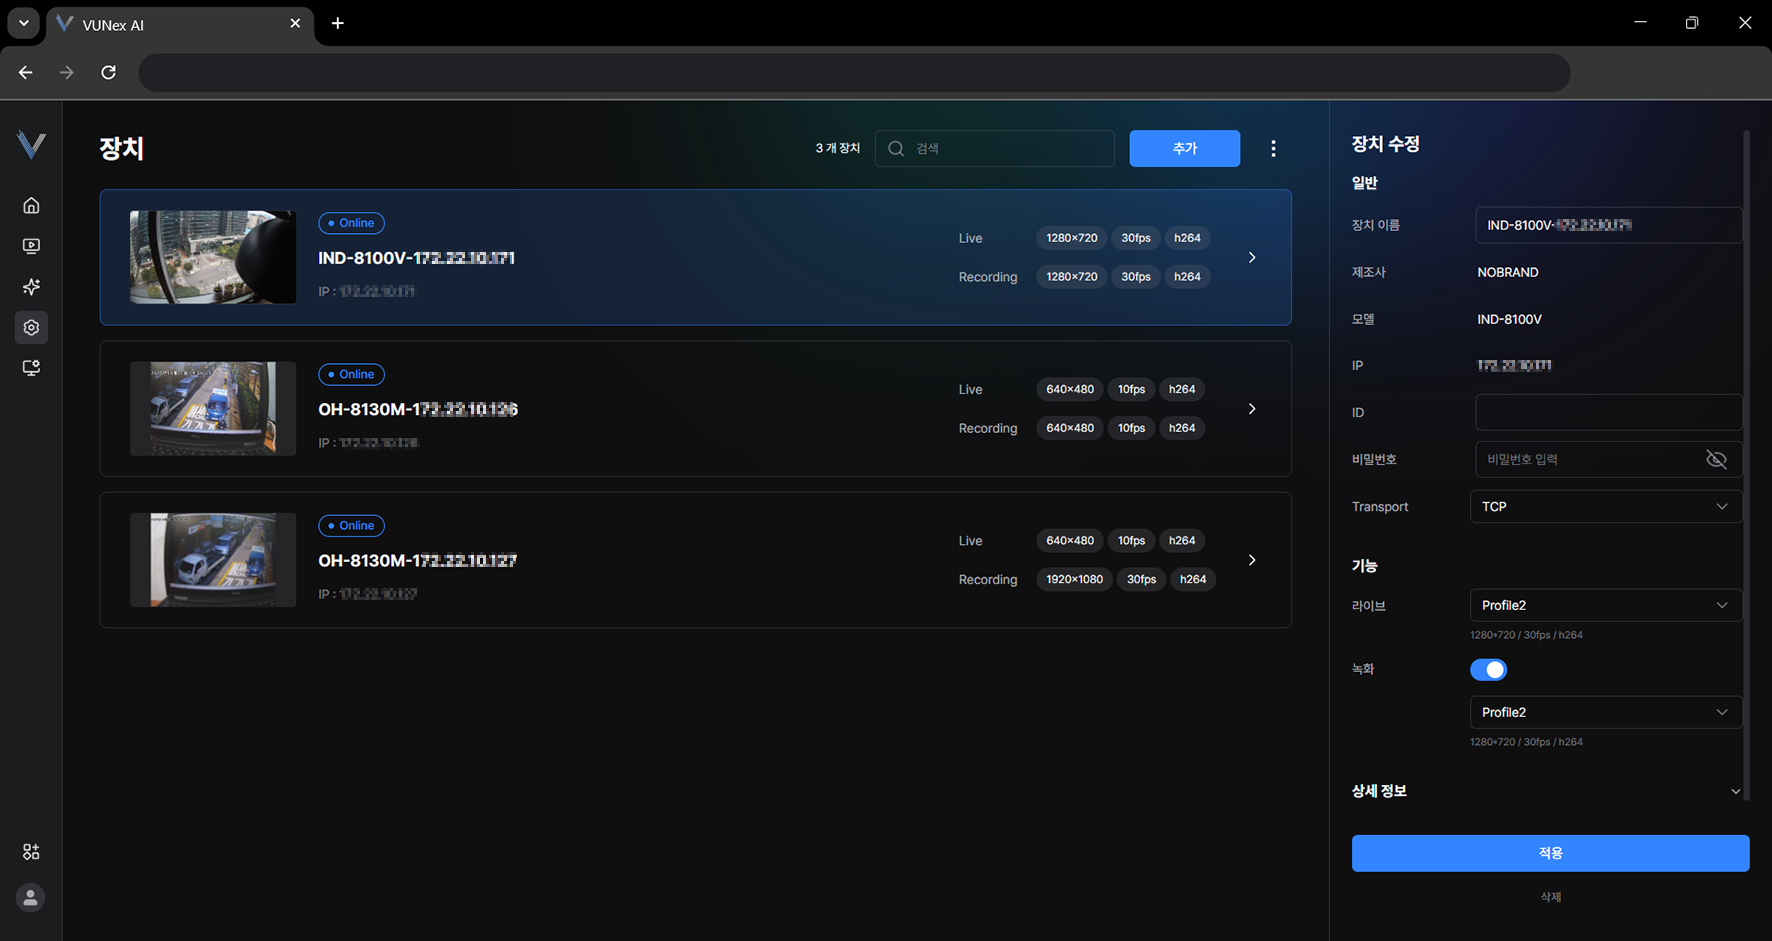 Figure 6-7. Editing a Device
 - Edit the items you want
- Click [Apply]The device is updated.
Deleting All Devices
All devices are deleted.
- In the main menu, click [] > [Device]The Device settings screen appears.
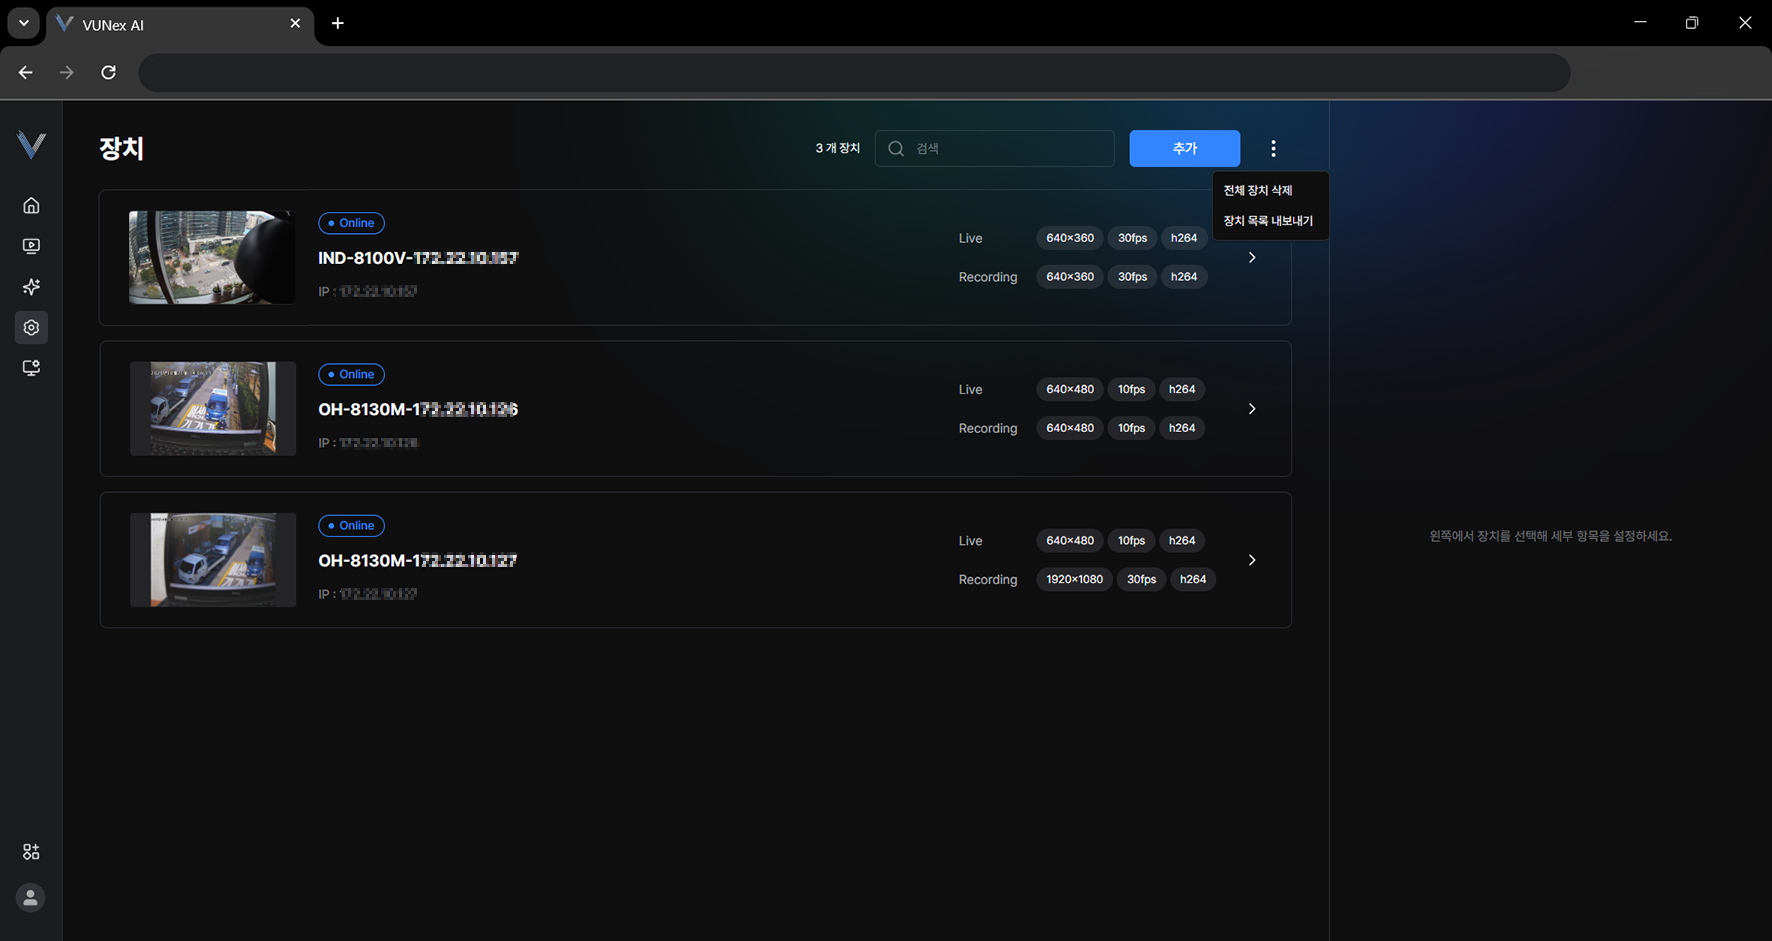 Figure 6-8. Deleting All Devices
 - Click [] > [Delete all devices]
- Click [Delete]All devices are deleted.
Exporting Devices
The devices are exported.
- In the main menu, click [] > [Device]The Device settings screen appears.
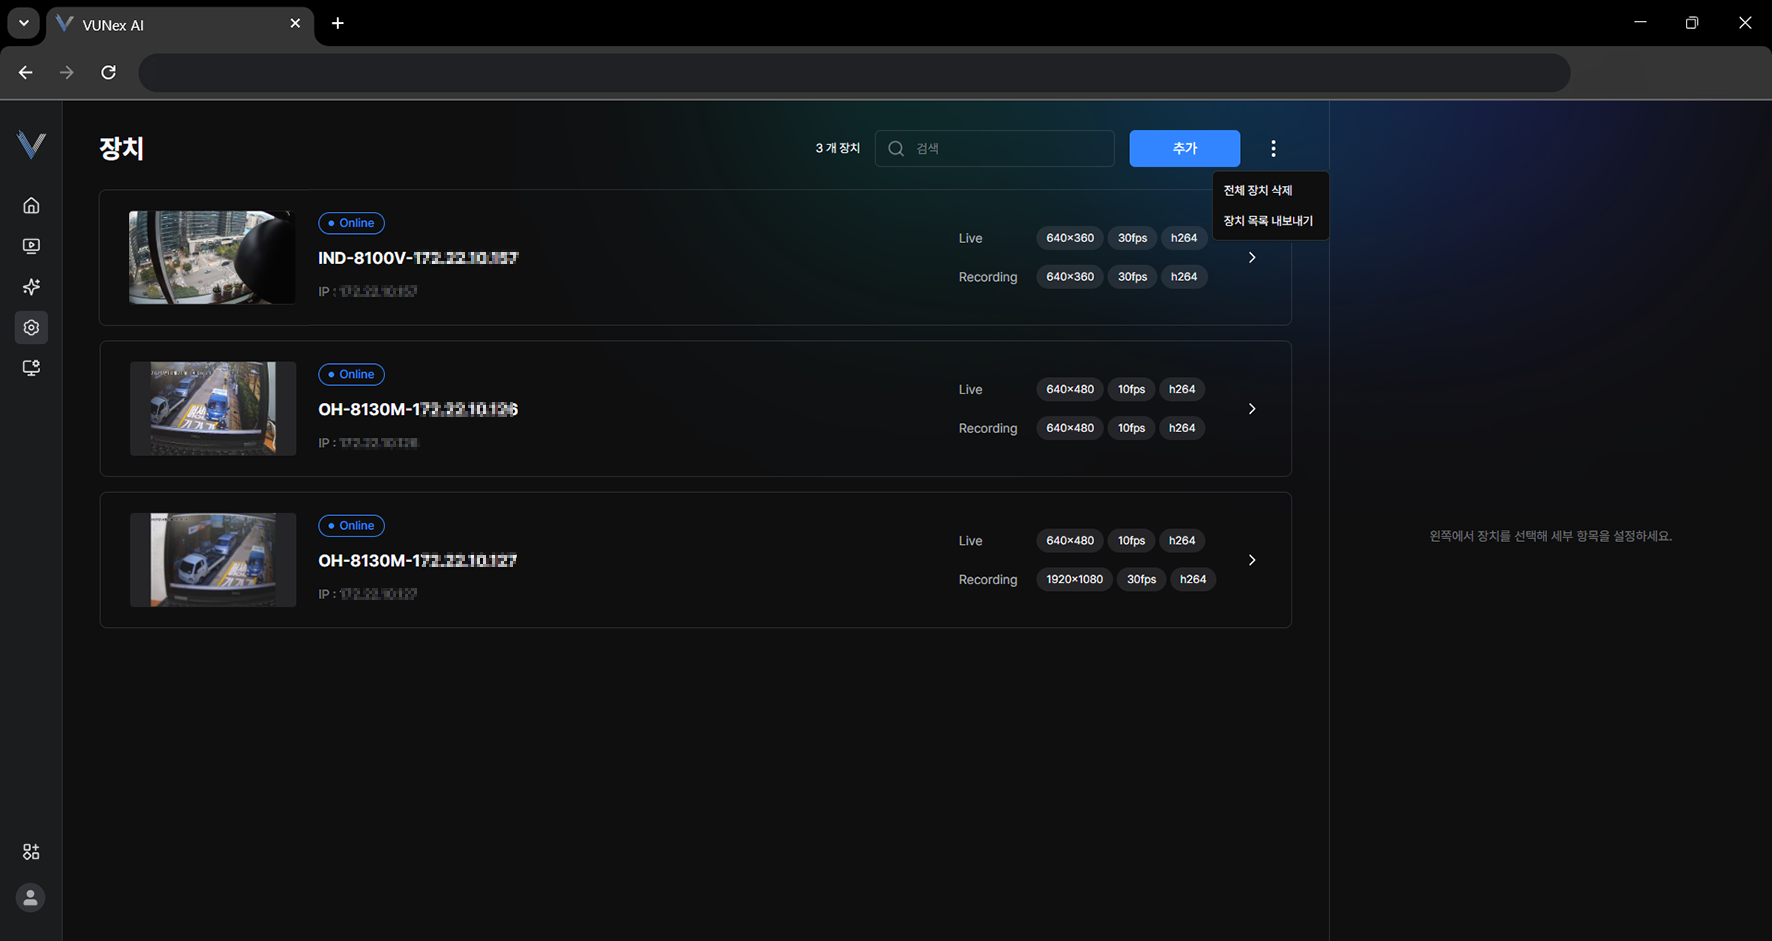 Figure 6-9. Exporting the Device List
 - Click [] > [Export device list]
- Enter the [File password]The devices are exported.
Importing Devices from a File
Register devices in bulk from an exported device list or a template file.
- In the main menu, click [] > [Device]
- Click [Add] > [File Upload]
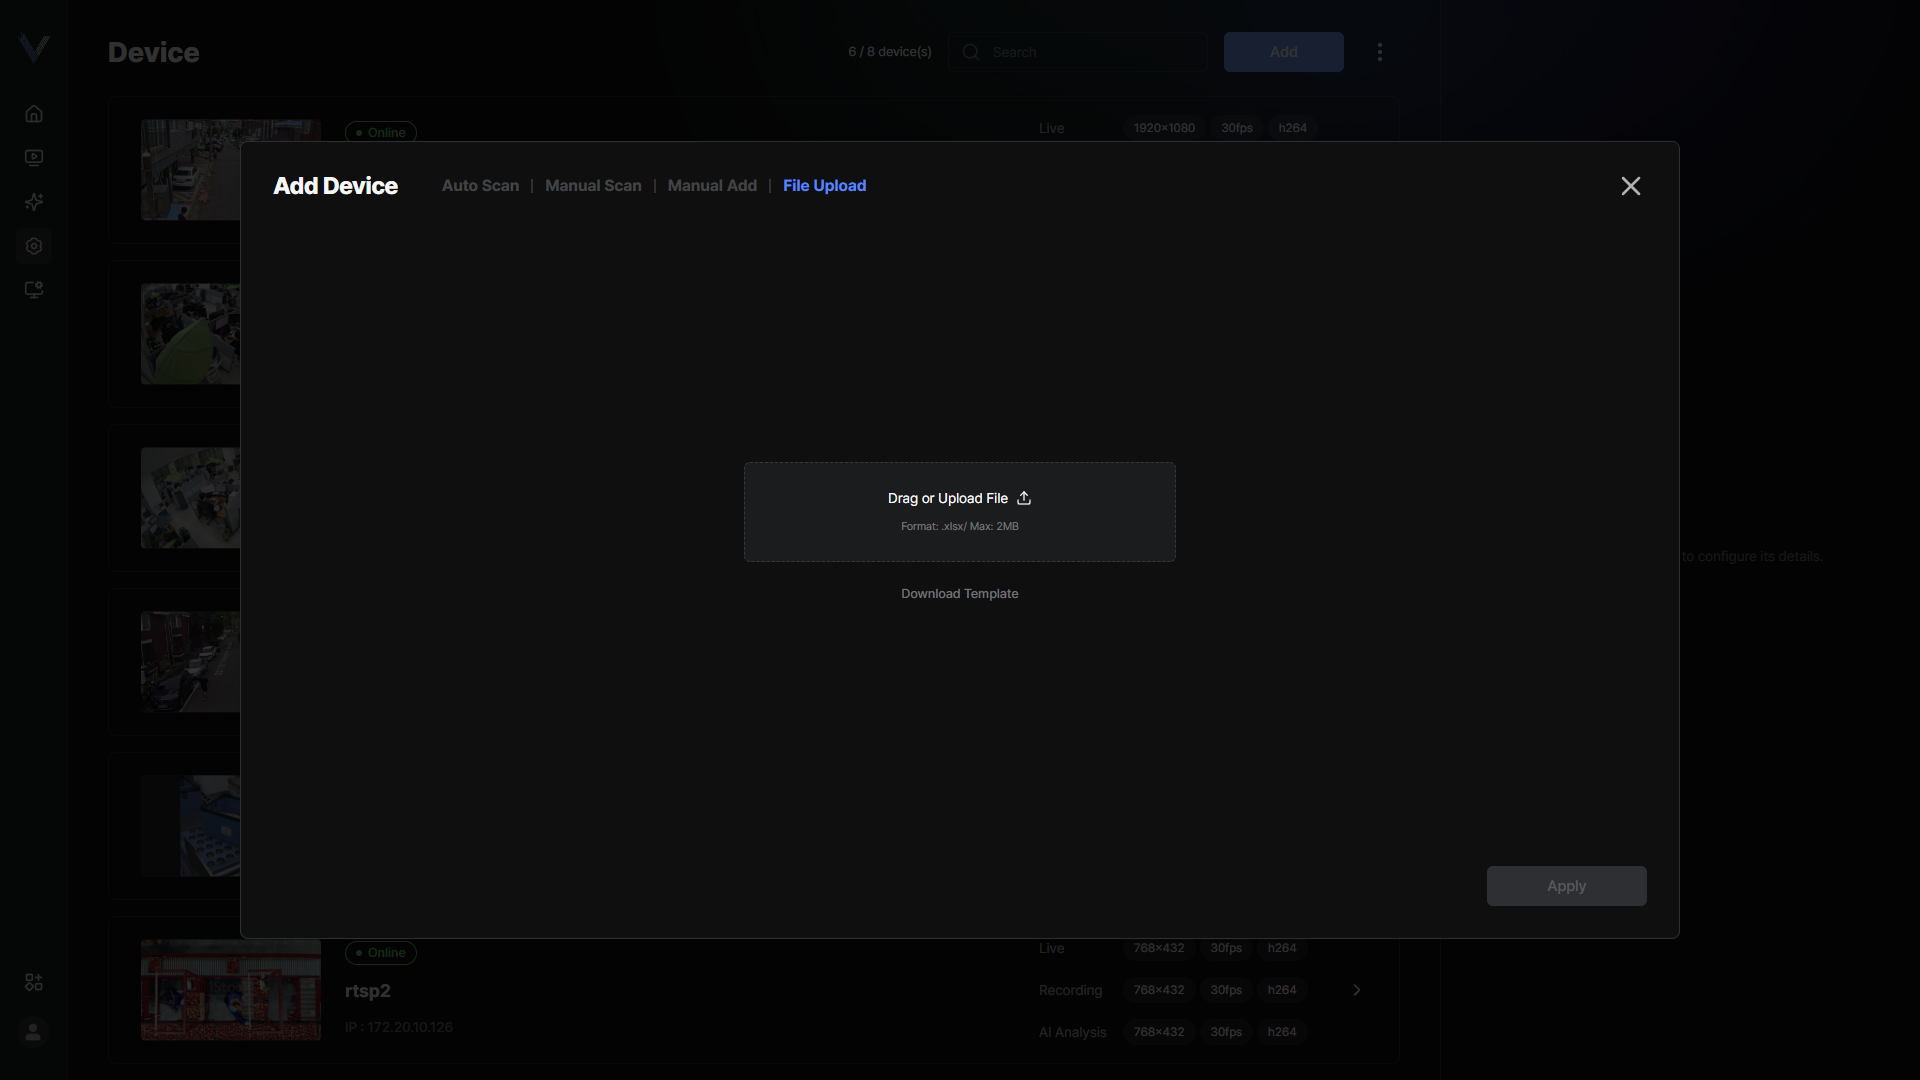 Figure 6-16. Device File Upload
 - Drag and drop the file, or fill in the form obtained from [Download template] and upload itOnly Excel files (.xlsx) are supported.
- For an encrypted file, enter the [File password]
- Click [Apply]
- Check the registration resultDevices that failed are listed with a [Failure reason], and you can register them again with [Retry].
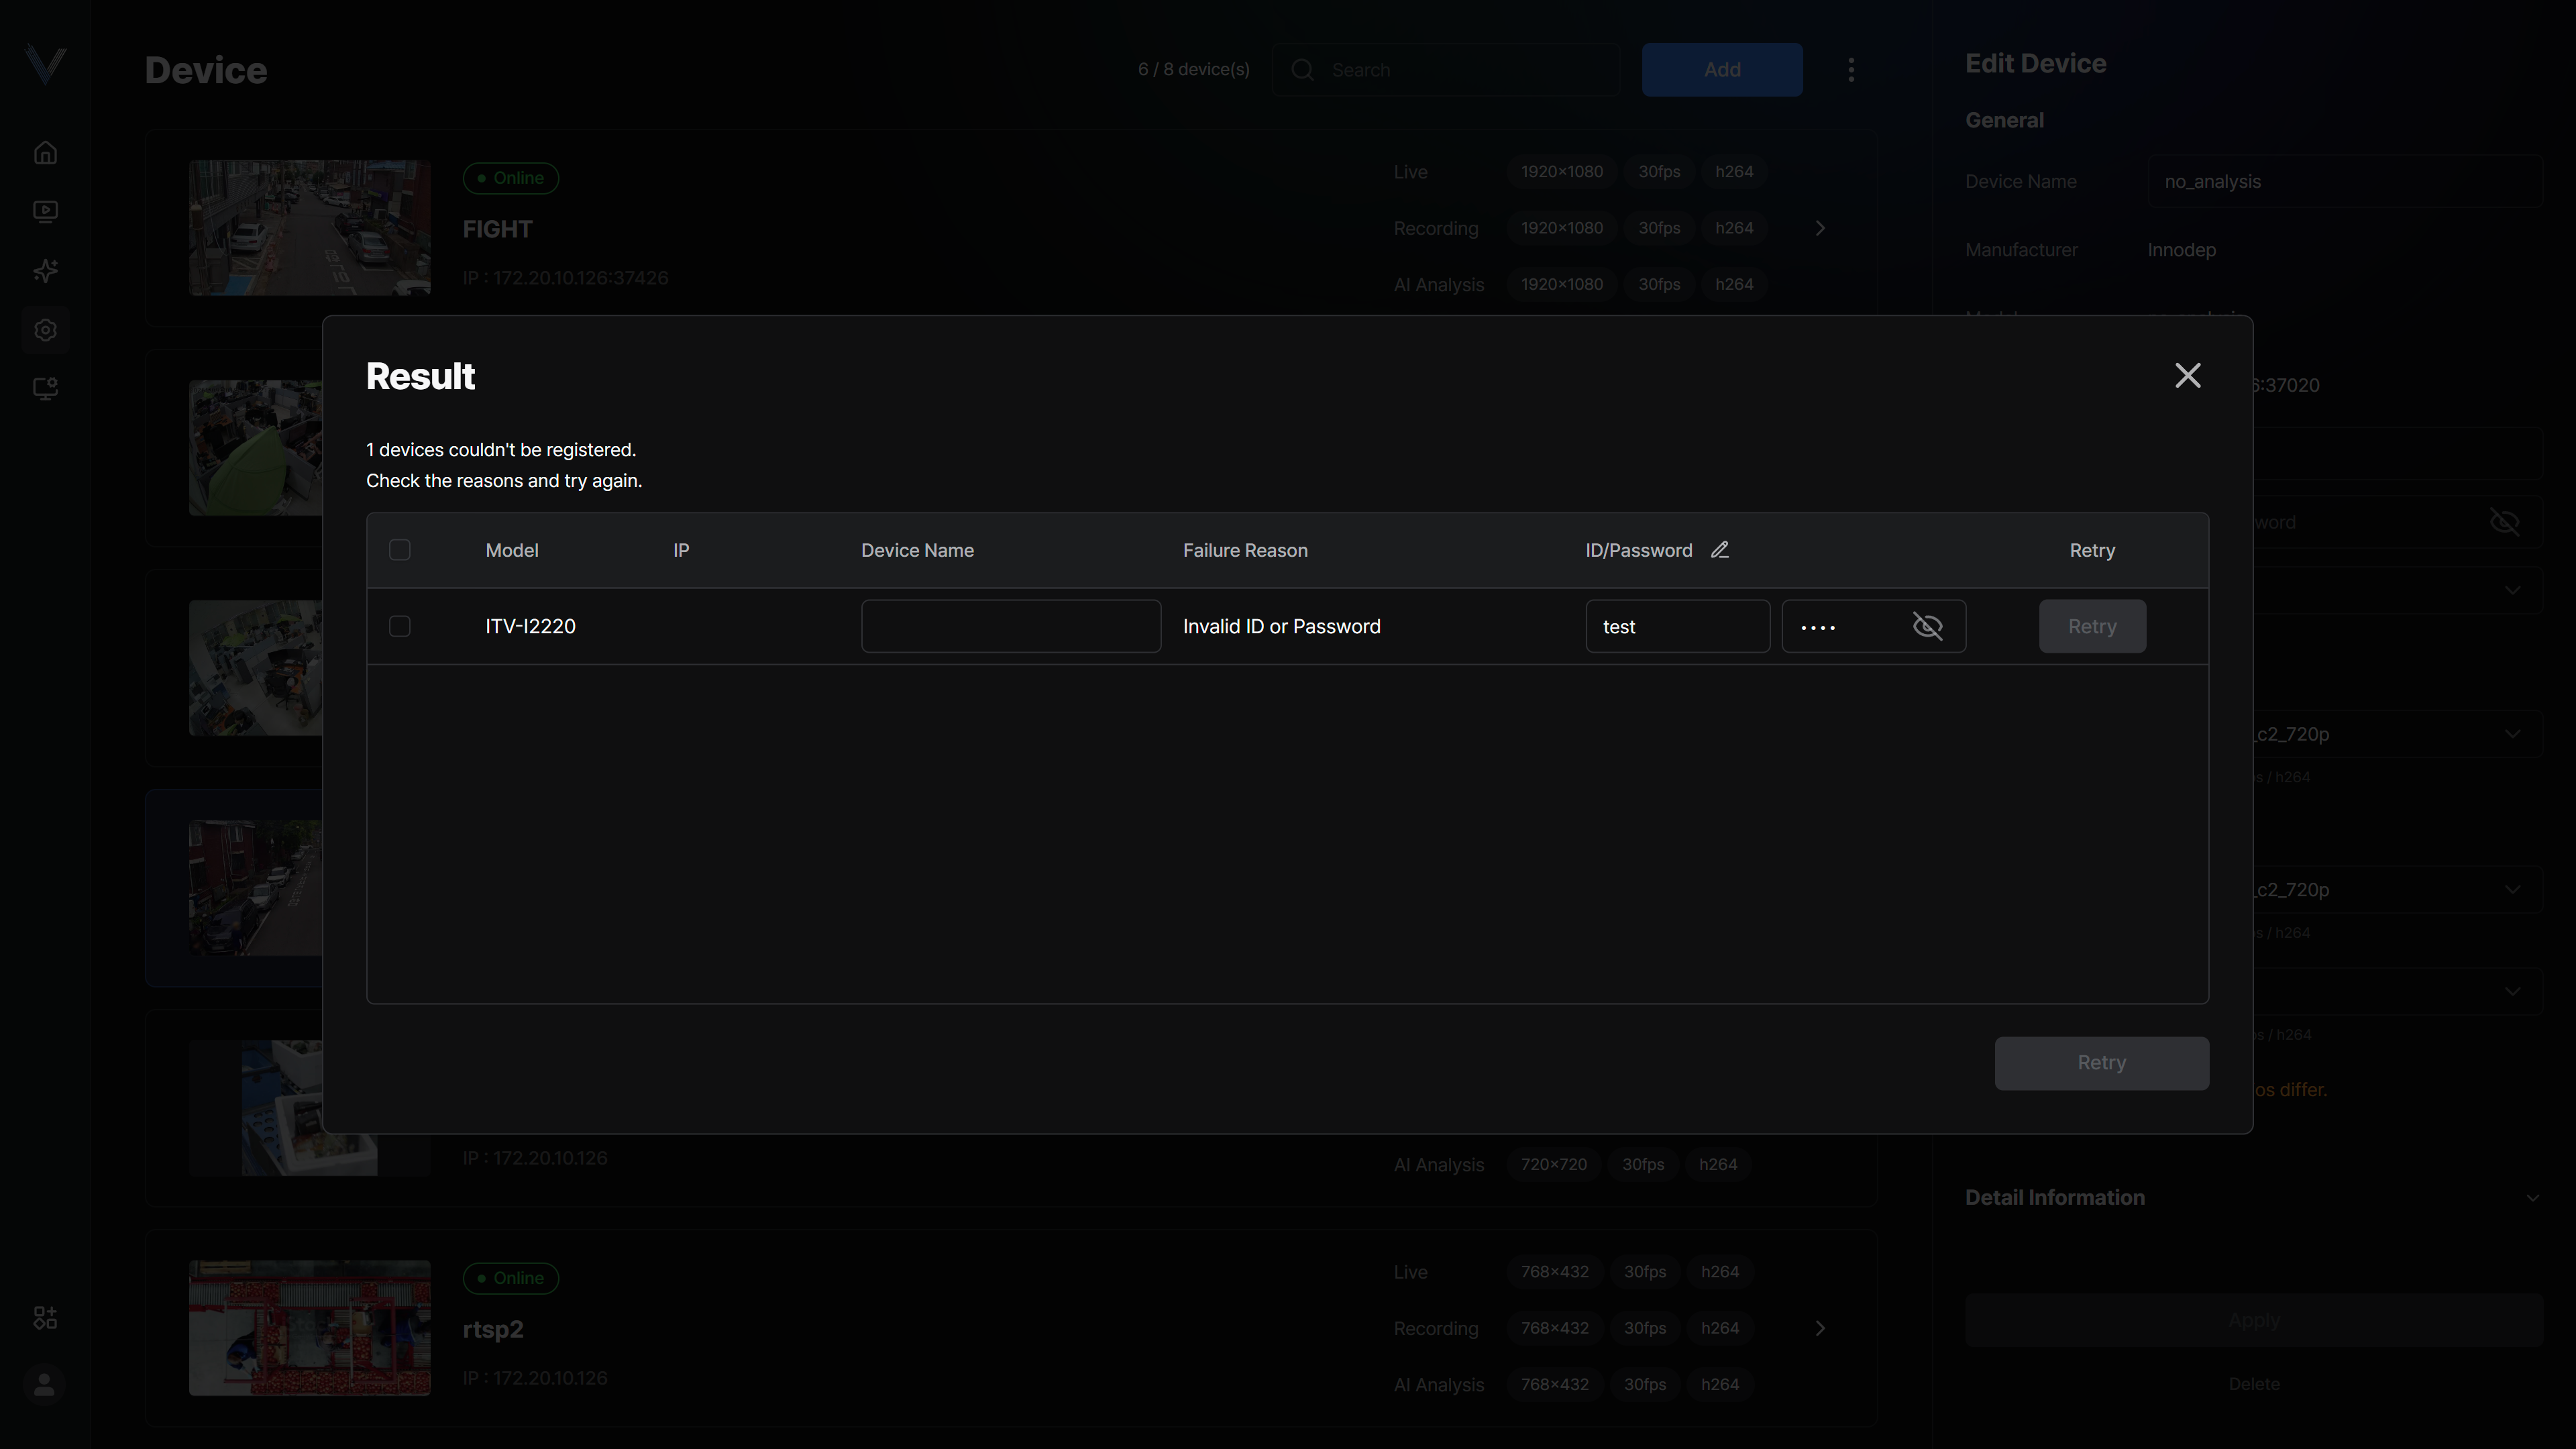 Figure 6-17. Device Registration Result
Enabling the Cloud
The cloud is enabled.
- In the main menu, click [] > [Cloud]The Cloud settings screen appears.
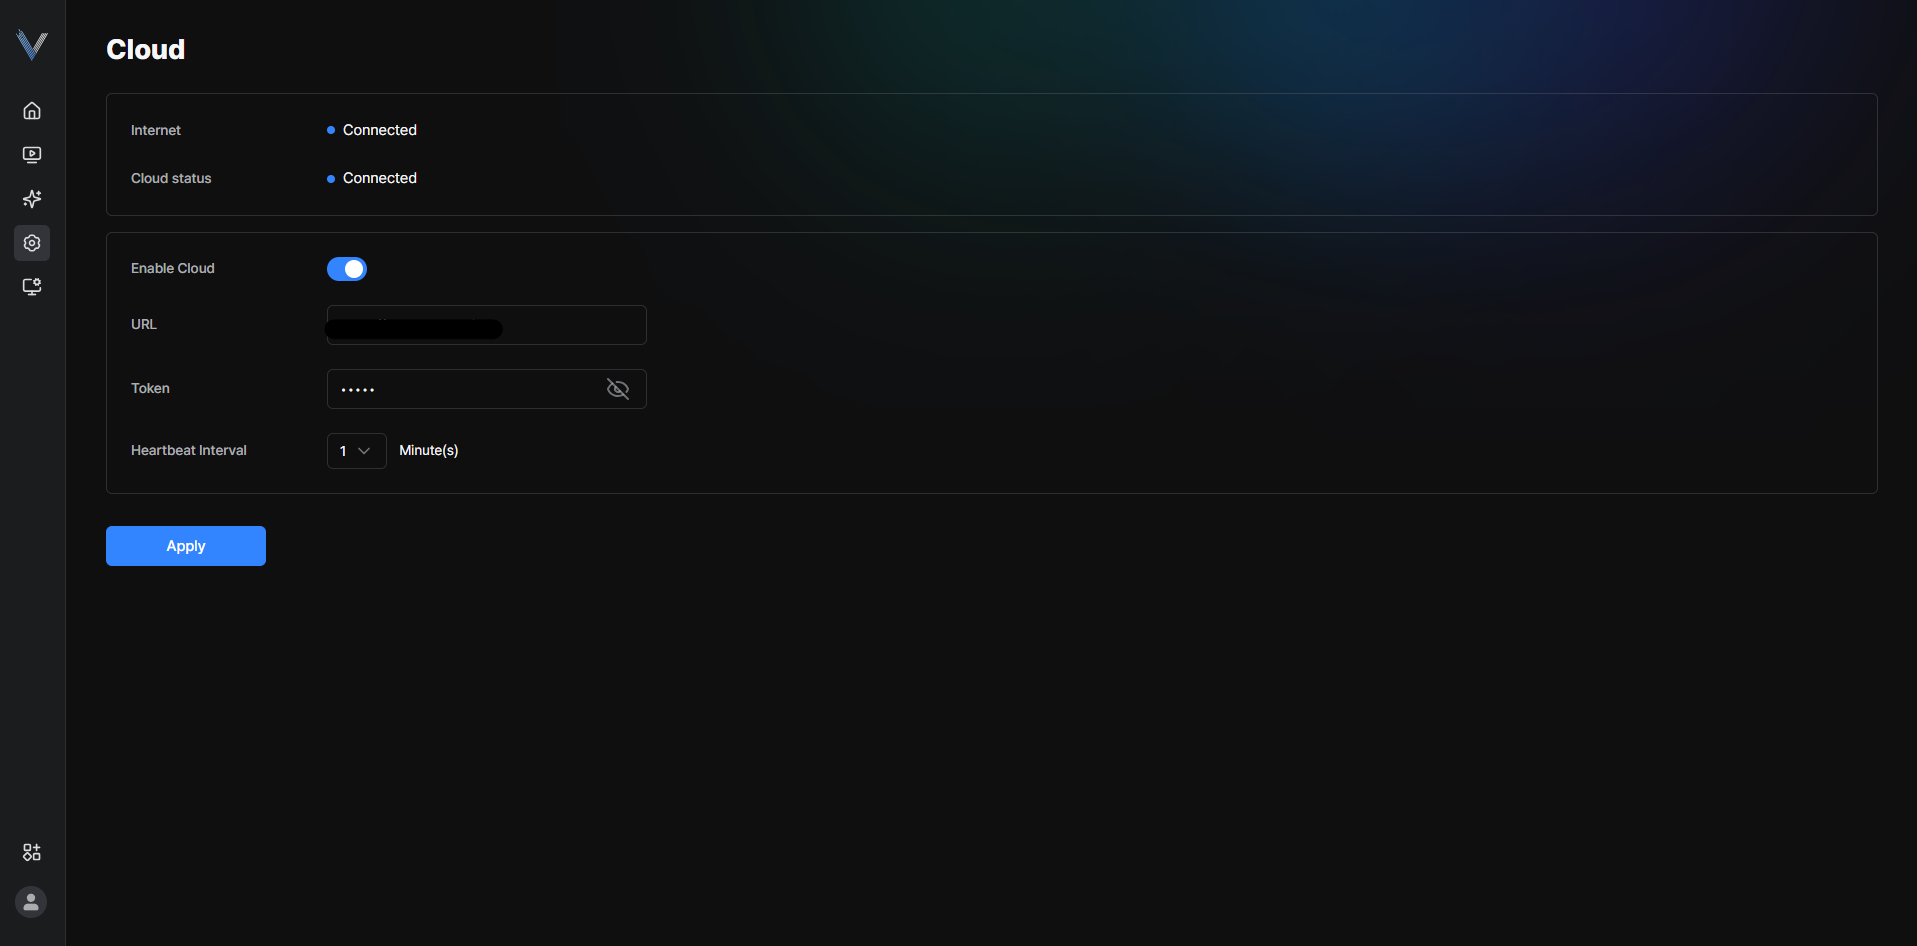 Figure 6-10. Cloud Settings
 - Click [Enable cloud]
- Click [Apply]The cloud is enabled.
Setting Usage and Retention Period
The storage usage limit and the retention period are configured.
- In the main menu, click [] > [Storage]The Storage settings screen appears.
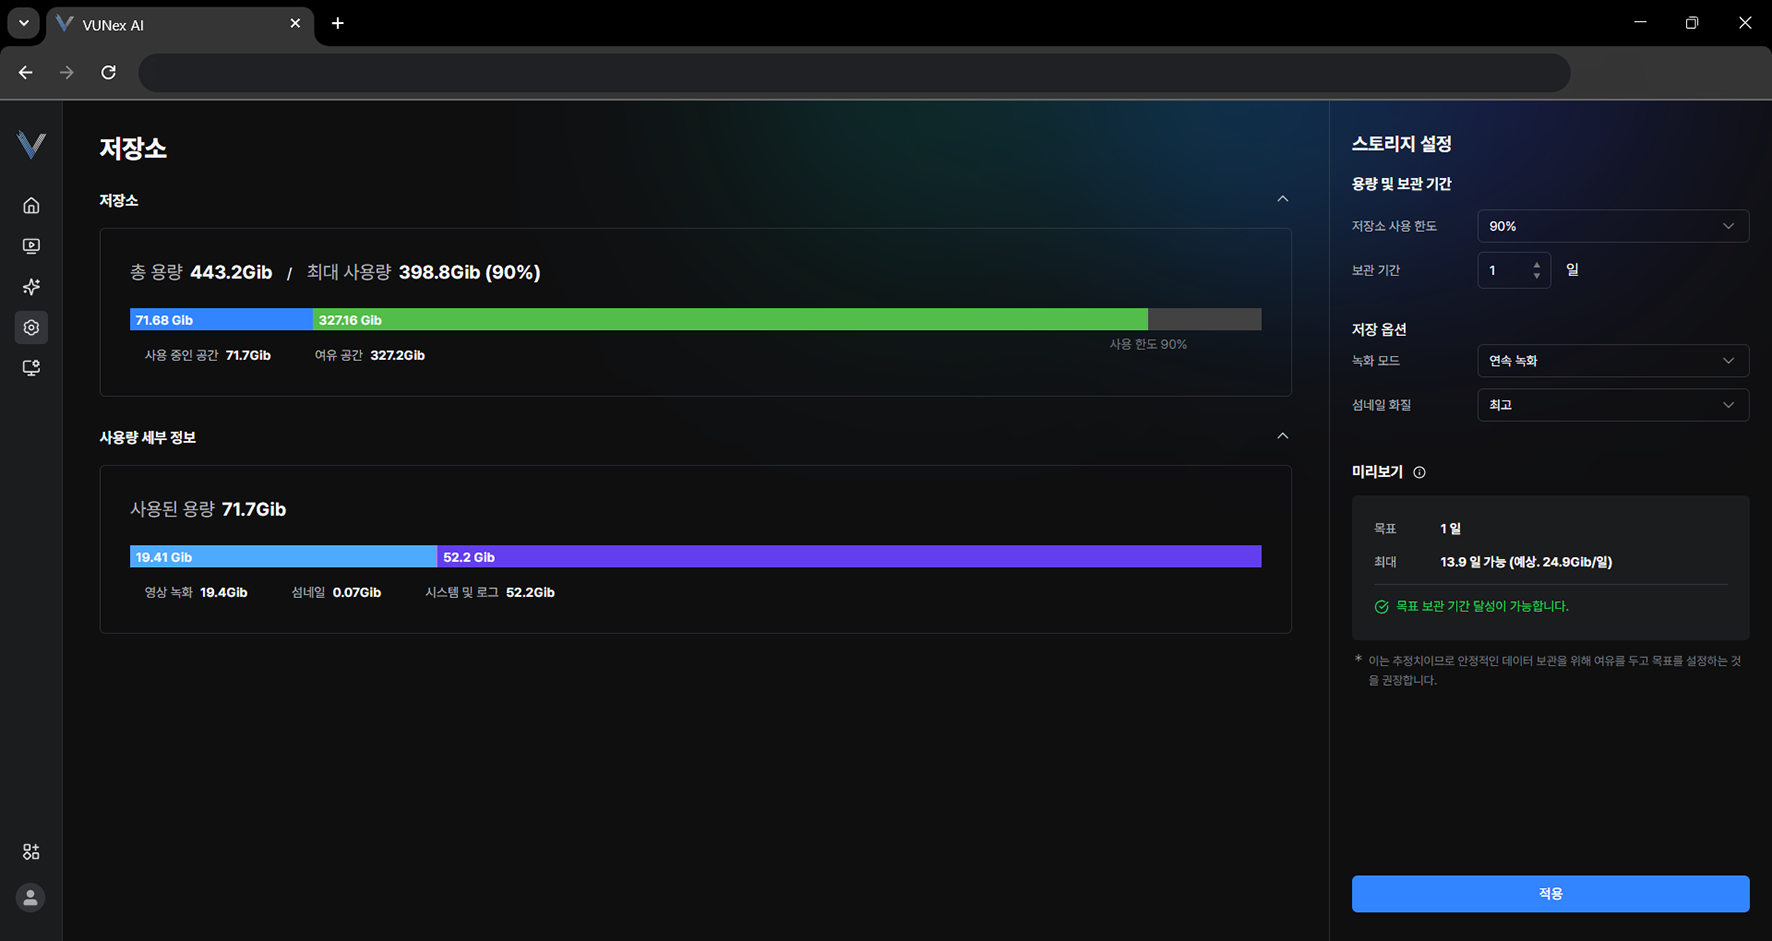 Figure 6-12. Storage Settings
 - Configure [Capacity and retention period][Storage usage limit]: sets the maximum amount of data stored out of the total storage space. [Retention period]: sets how long recorded video and thumbnails are kept.
- Click [Apply]The storage usage limit and the retention period are configured.
Setting the Recording Mode and Thumbnails
The recording mode and the thumbnail quality are configured.
- In the main menu, click [] > [Storage]The Storage settings screen appears.
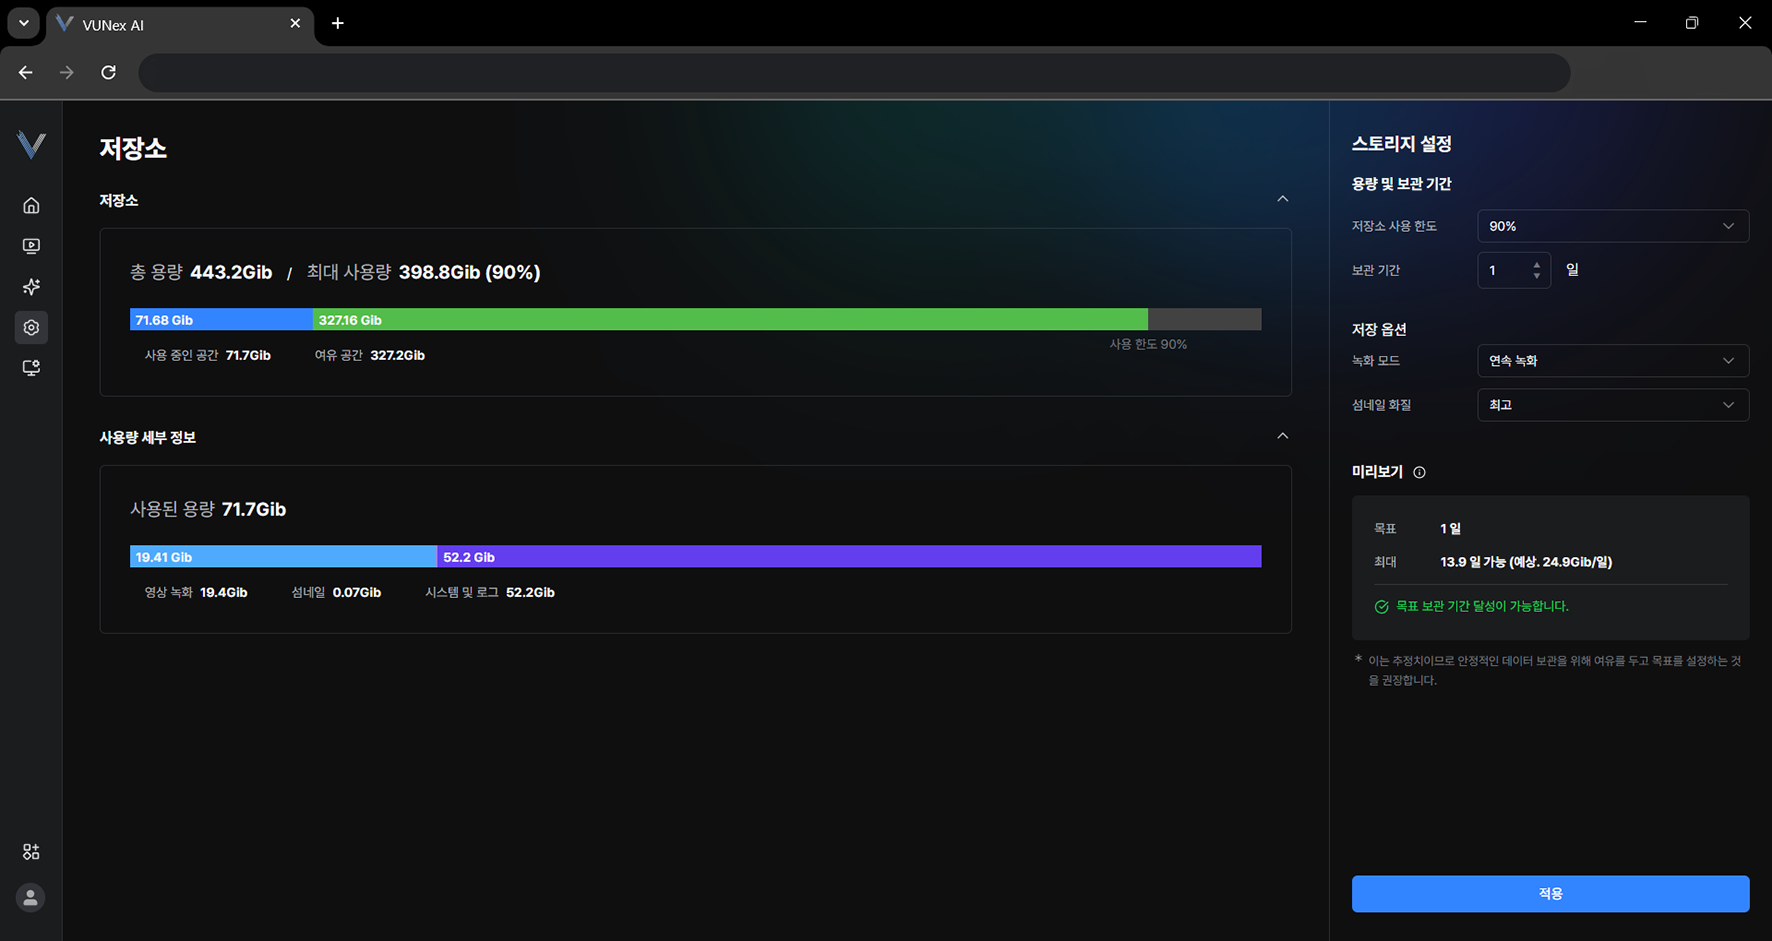 Figure 6-13. Recording Mode and Thumbnail Settings
 - Configure [Save options][Recording mode]: choose how recording works, such as continuous recording or recording only when an event occurs. [Thumbnail quality]: choose the thumbnail quality.
- Click [Apply]The recording mode and the thumbnail quality are configured.
Setting the Log Retention Period
Specify how long the system log and the event log are kept.
- In the main menu, click [] > [Storage]
- Set the periods for [System log] and [Event log] in [Log retention period]
- Click [Apply]
System Management
Update software or control the system.
System Management Menu
- In the main menu, click [] > [System Management]The System Management screen appears.
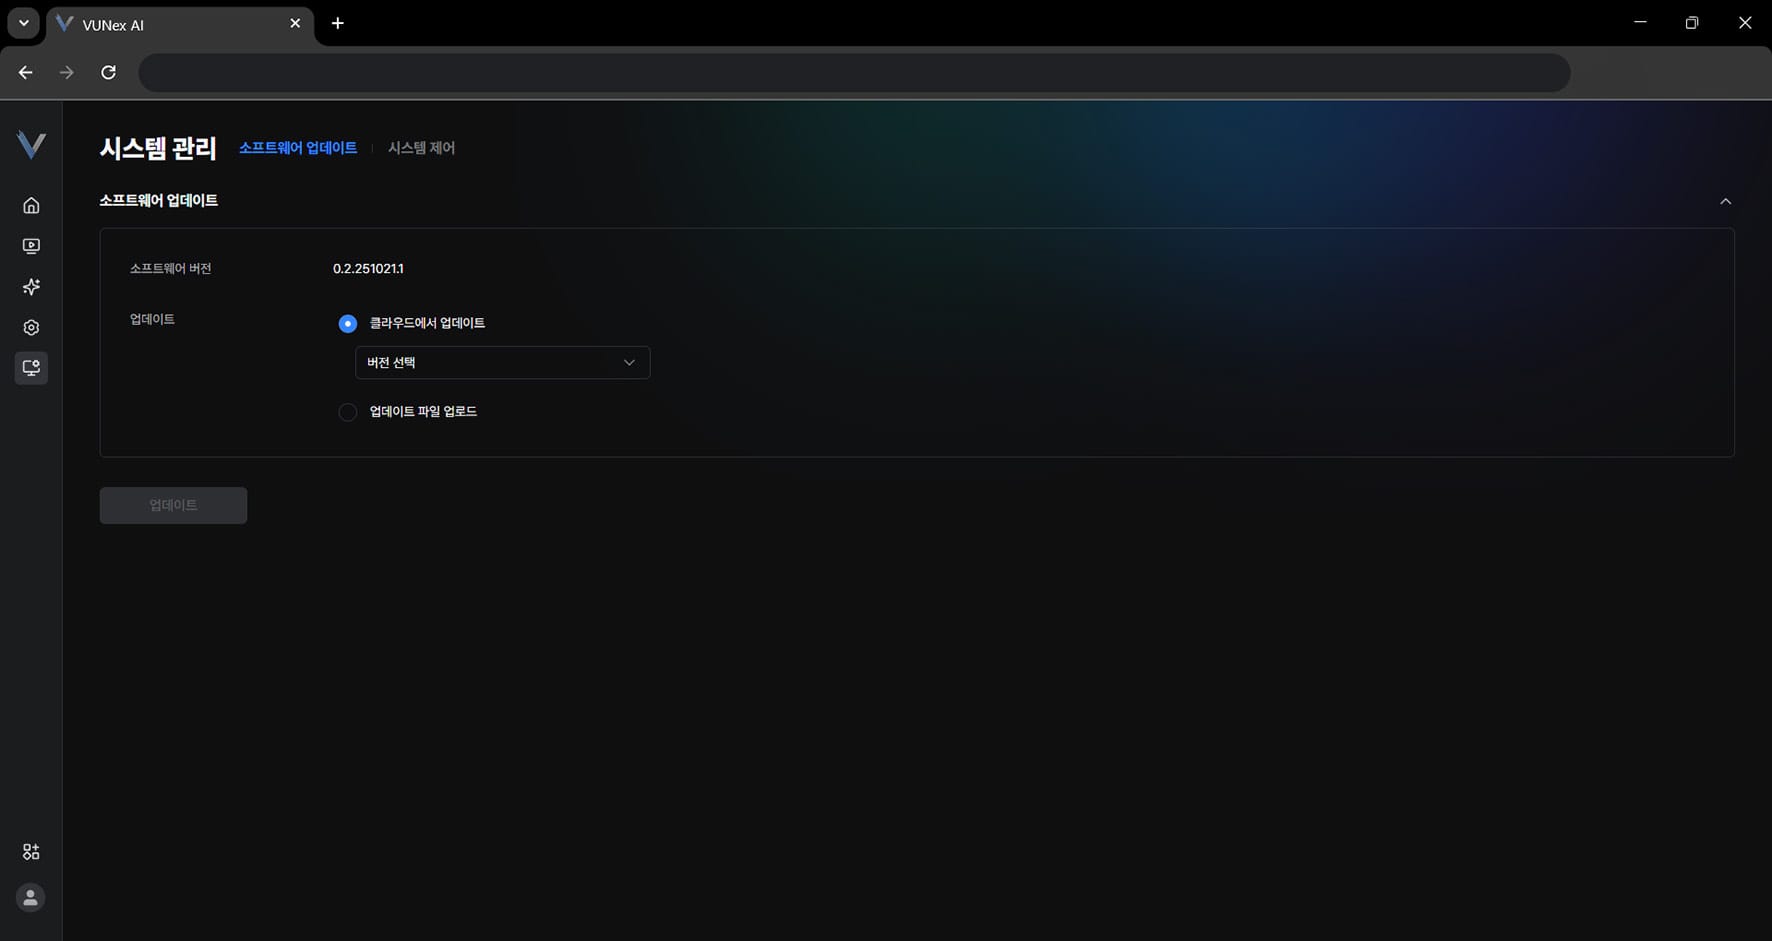 Figure 7-1. System Management Screen
 - Click the item you want[Software Update]: updates the software.
- [Update from cloud]: select an update version from the cloud.
- [Upload update file]: upload an update file.
- [MAC address]: shows the MAC address.
- [Bearer token (HTTP API)]: shows the authentication token.
- [Import/Export Settings]: Exports device settings to a file or imports them from a file.
- [Factory reset]: resets the system.
- [Reboot system]: restarts the system.
- [Shut down system]: shuts the system down.
Updating the Software
The software is updated.
- In the main menu, click [] > [System Management] > [Software Update]
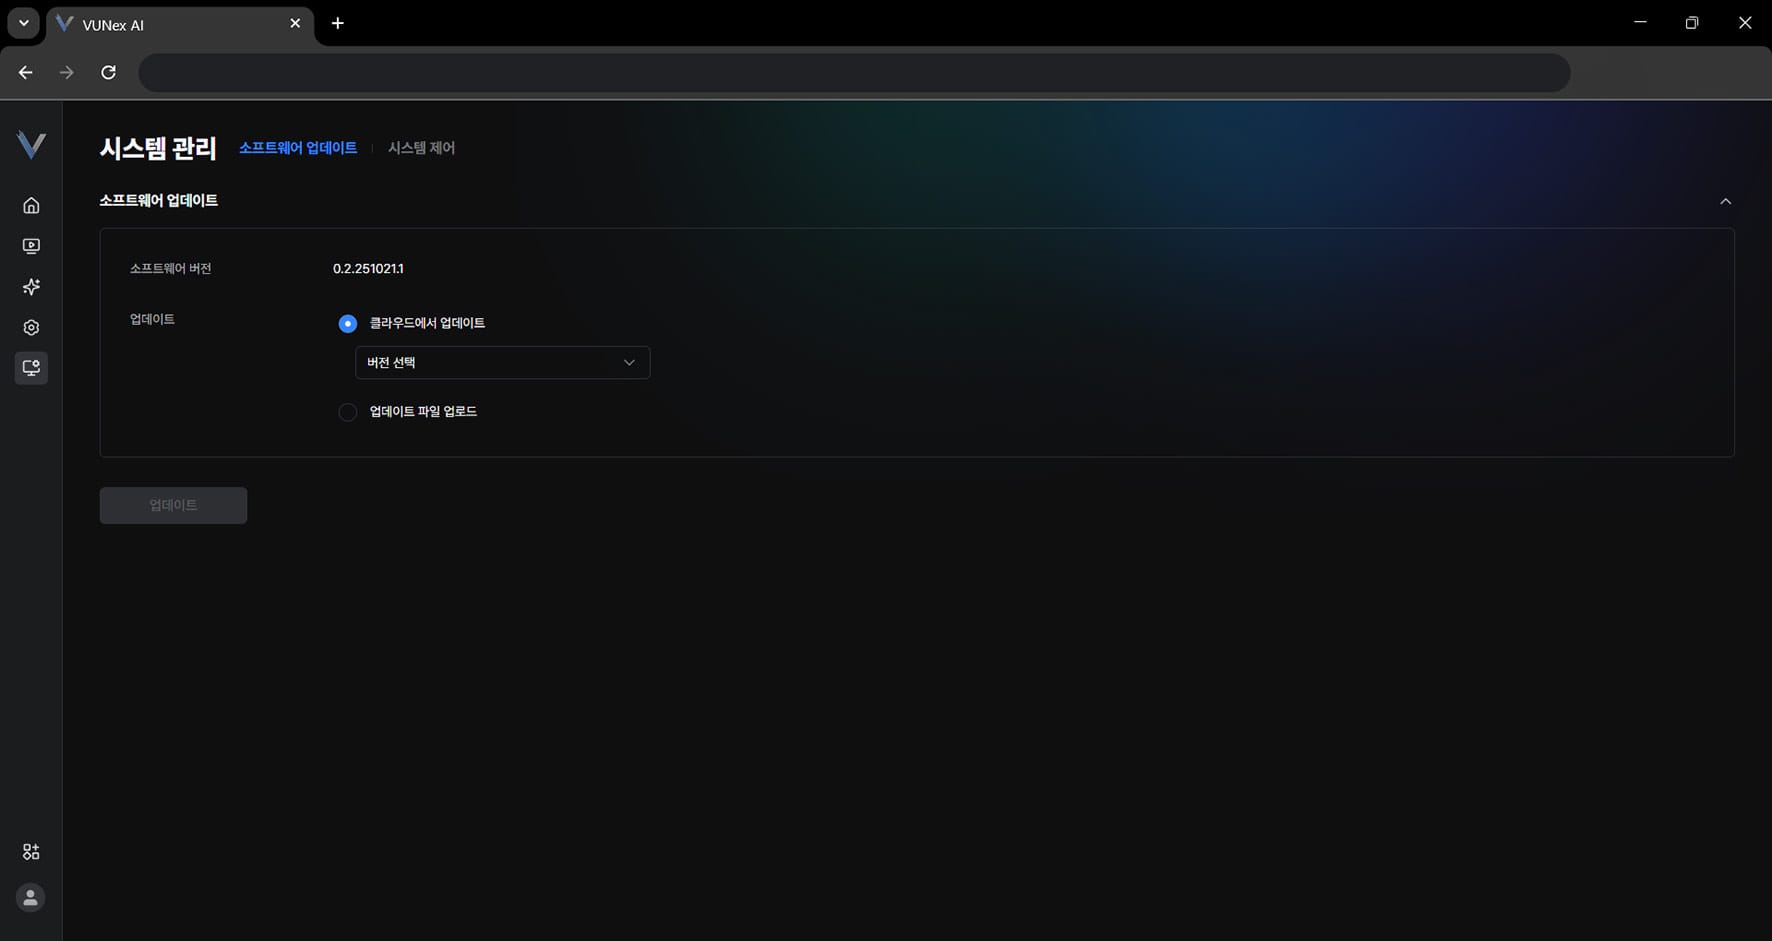 Figure 7-2. Software Update
 - Select the item you want[Update from cloud]: select an update version from the cloud. [Upload update file]: upload an update file.
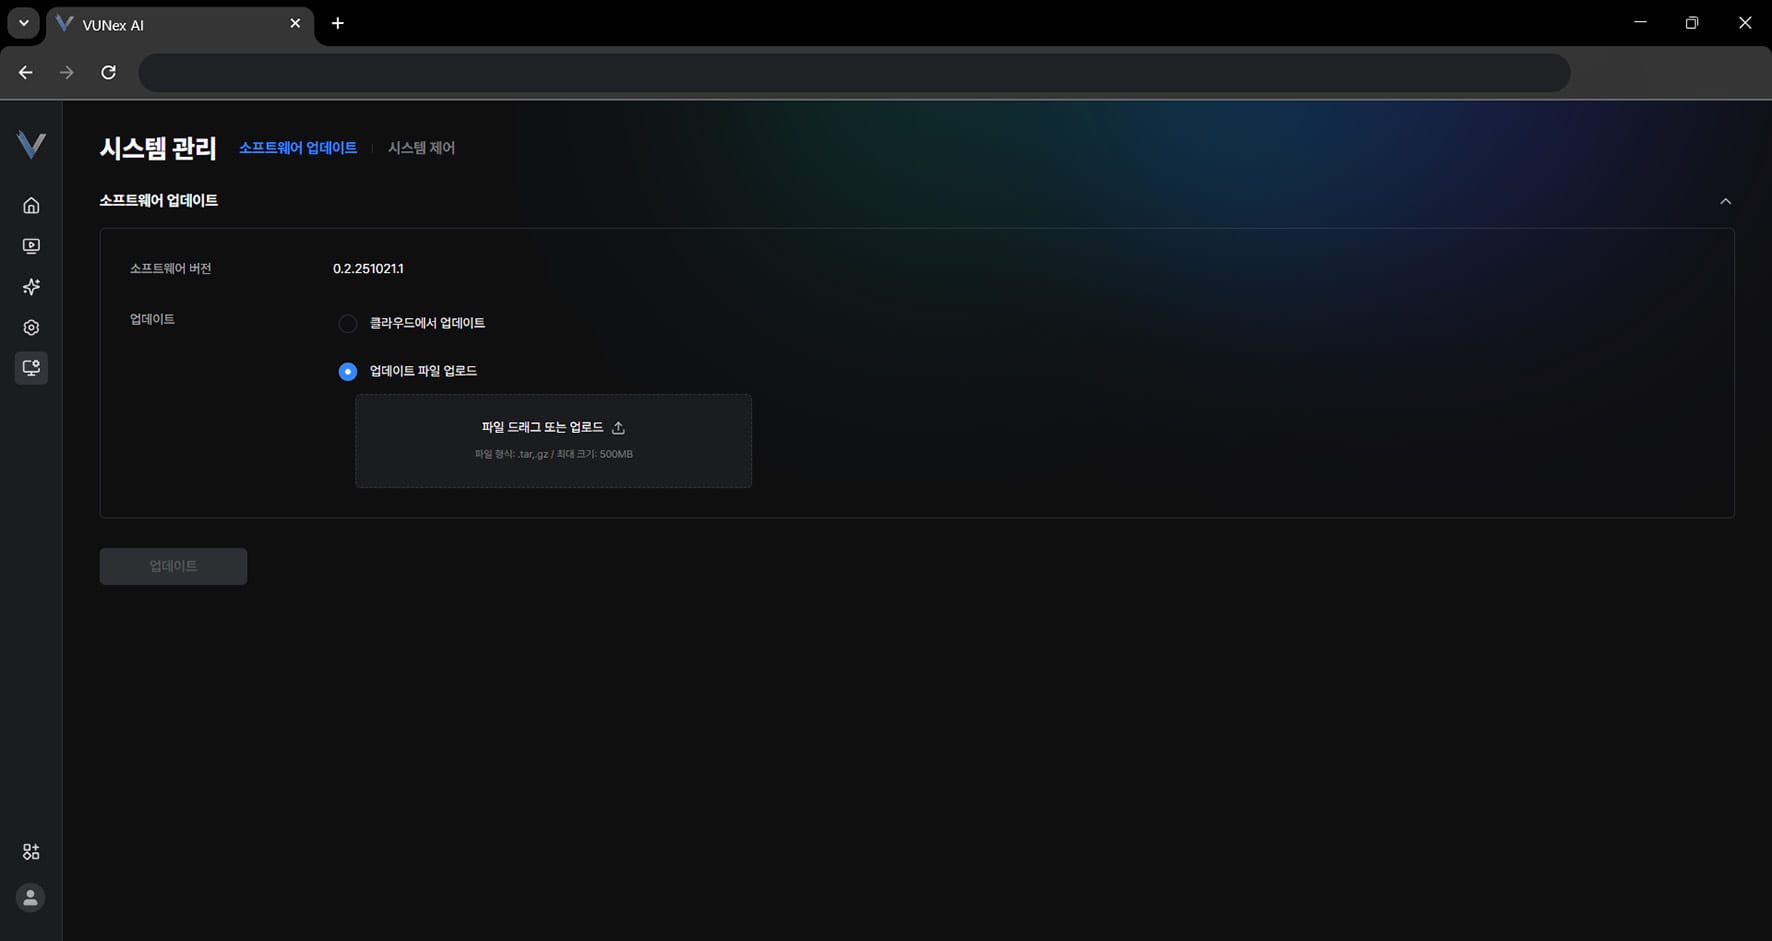 Figure 7-3. Choosing the Update Method
 - Click [Update]The software is updated.
Exporting Settings
Export the device settings to a file so you can apply them to another device.
- In the main menu, click [] > [System Management] > [System Control]
- Click [Import/Export settings] > [Export]
- Enter the [File password]The password must be at least 4 characters and is required when you import the file later.
- Click [Export]
Importing Settings
Restore device settings by loading an exported settings file.
- In the main menu, click [] > [System Management] > [System Control]
- Click [Import/Export settings] > [Import]
- Upload the backup file and enter the [File password]
- Click [OK]
- Check the restore resultRestoration runs in order — devices, schedule presets, AI app check, custom action types, AI service and event settings, ROI settings and AI engine settings — and the number of succeeded, skipped and failed items is shown for each.
Rebooting and Shutting Down the System
Restart the device or shut it down safely.
- In the main menu, click [] > [System Management] > [System Control]
- Click [Reboot System] > [Reboot] or [Shut Down System] > [Shut Down]
- Click [OK]
Performing a Factory Reset
All data is returned to the state right after installation.
- In the main menu, click [] > [System Management] > [System Control]
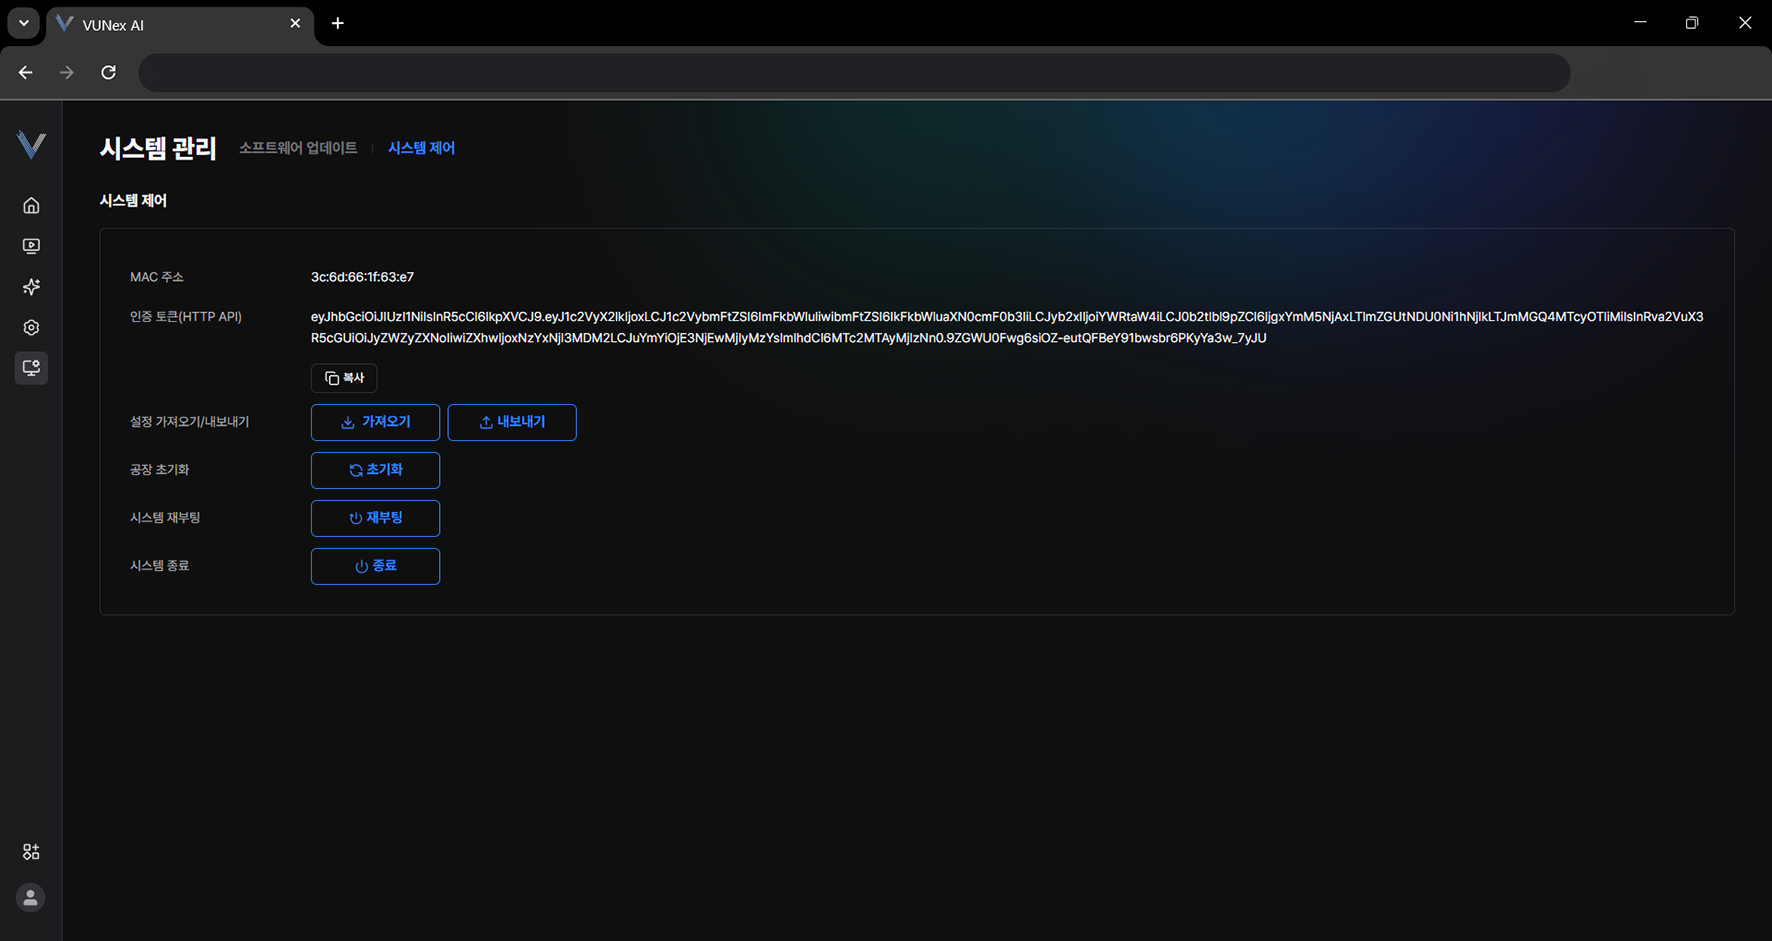 Figure 7-4. Factory Reset
 - Click [Factory reset] > [Reset]
- Enter the [Password]
- Click [Reset]All data is returned to the state right after installation.
Setting the Date and Time
Set the time zone of the device and how the time is synchronized.
- In the main menu, click [] > [Timezone]
- Select the [Timezone]You can find a time zone by typing a region name in the search box.
- In [Sync Mode], select [NTP (auto)] or [Manual]If you select [Manual], enter the time directly in [Set Date & Time].
- Click [Apply]
Viewing the Event Log
- [Date / Time]: when the event occurred
- [Device]: the camera where the event occurred
- [Event], [Action], [Action type]: the event that occurred and the action that ran
- [Result]: the action result ([Success] or [Failed])
- In the main menu, click [] > [Logs]
- Click [Event]
- Set the period, [Select device] and [Select event type]
- Check the log list
Viewing the System Log
Check the record of operations performed on the system, such as logins, setting changes and software updates.
- In the main menu, click [] > [Logs]
- Click [System]
- Set the period and [Select log type]
- Check [Message], [OS & Browser] and [Actor]
Exporting Logs
Download the logs you queried as a CSV file.
- In the main menu, click [] > [Logs]
- Select [Event] or [System], then set the query conditions
- Click [Export]
Configuring the Network
Set the IP address and DNS of the device.
- In the main menu, click [] > [Network]
- Select the [Network profile] of the network to configureThe cable state is shown as [Connected] or [Disconnected], and the interface ID and MAC address are shown as well.
- In [IP mode], select [DHCP (auto)] or [Static IP (manual)]
- For [Static IP (manual)], enter the [IP address], [Subnet mask] and [Gateway]Click [Check availability] to verify that the IP address is not already used by another device. The gateway must be in the same subnet as the IP address.
- Select the [DNS mode] and, for [Manual], enter the [DNS server]
- Click [Apply], then click [OK]
AI Teaching
This section explains how to teach new classes by selecting targets directly in the video.
Starting AI Teaching
Open the AI Teaching screen from the live video or the playback screen.
- In the main menu, click [] > [AI Live View]
- Click [AI Teaching] at the top right of the screenYou can also open it from the playback screen by selecting the [AI Teaching] icon.
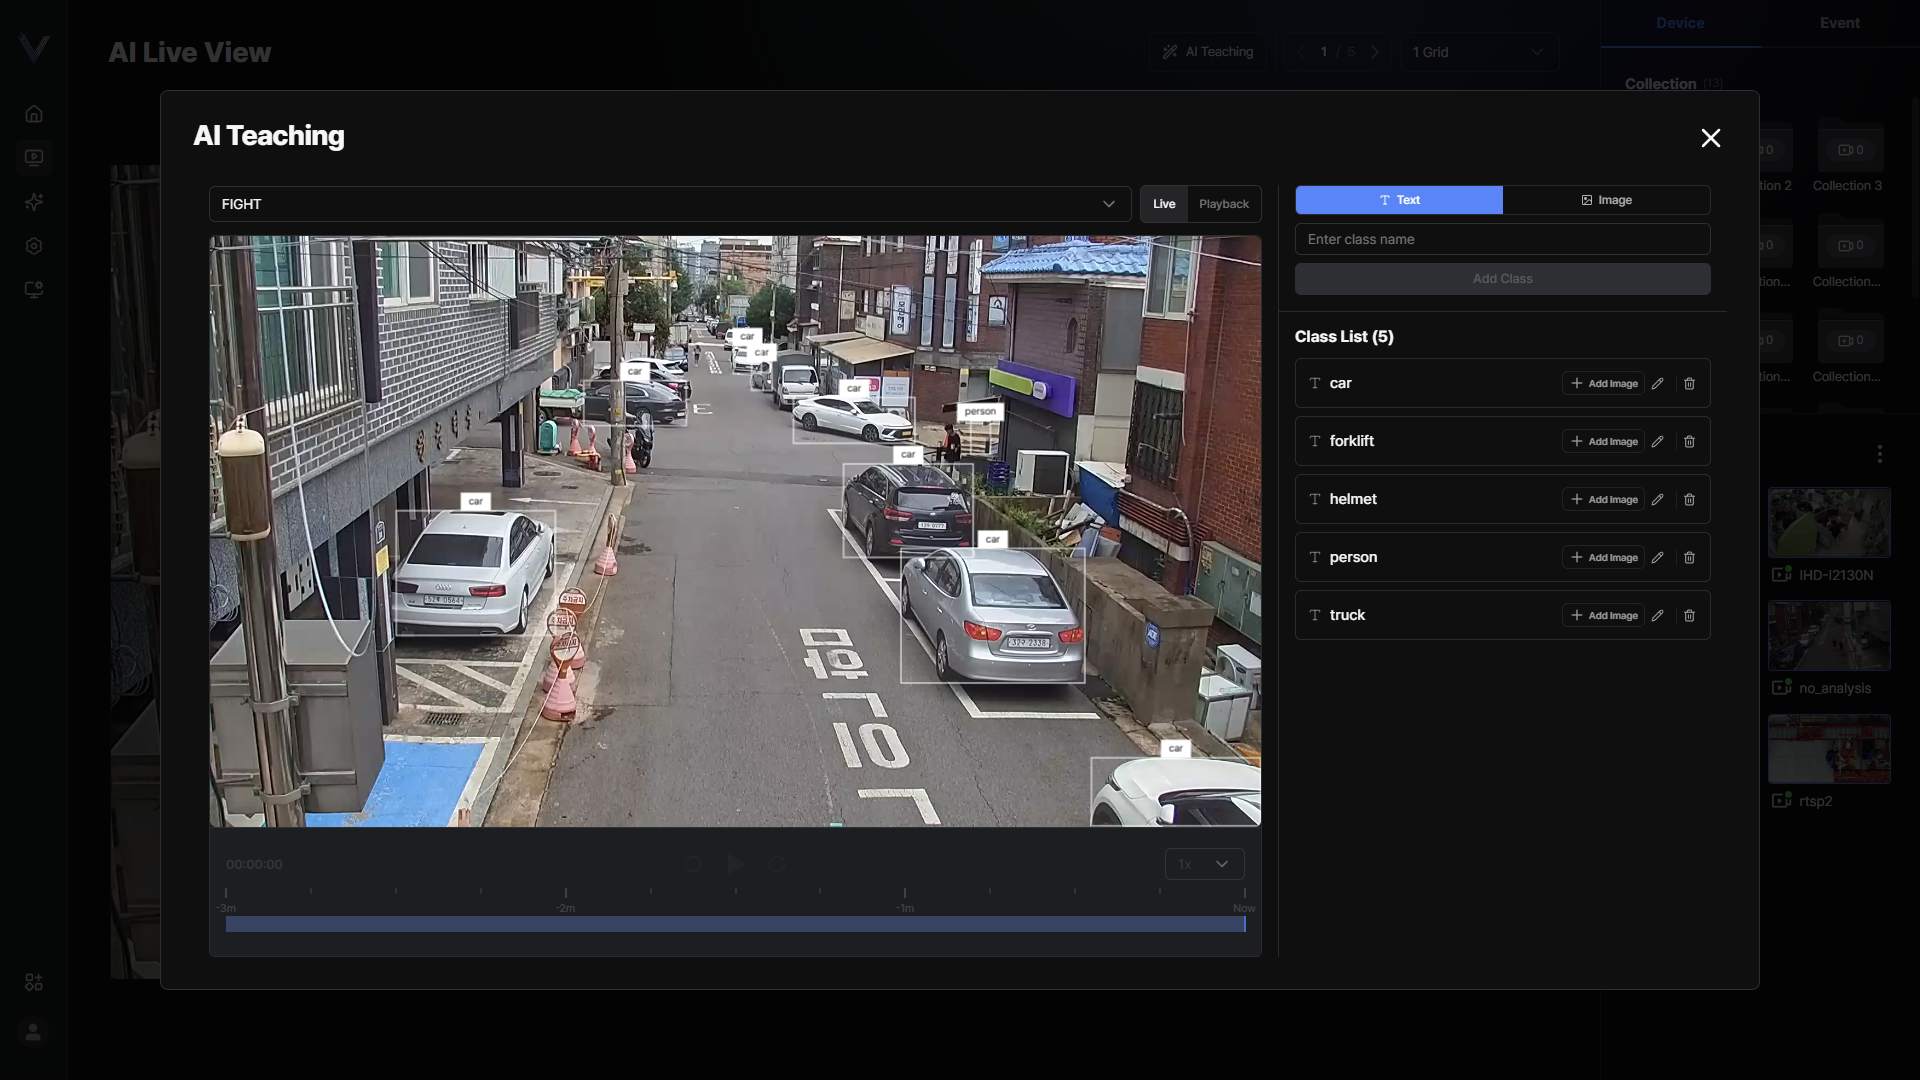 Figure 8-1. Opening AI Teaching
 - Choose the camera to use for teaching in [Select Camera]
- Select [Live] or [Playback]In [Playback], use [Seek Back 10s] and [Seek Forward 10s] to find the scene you want.
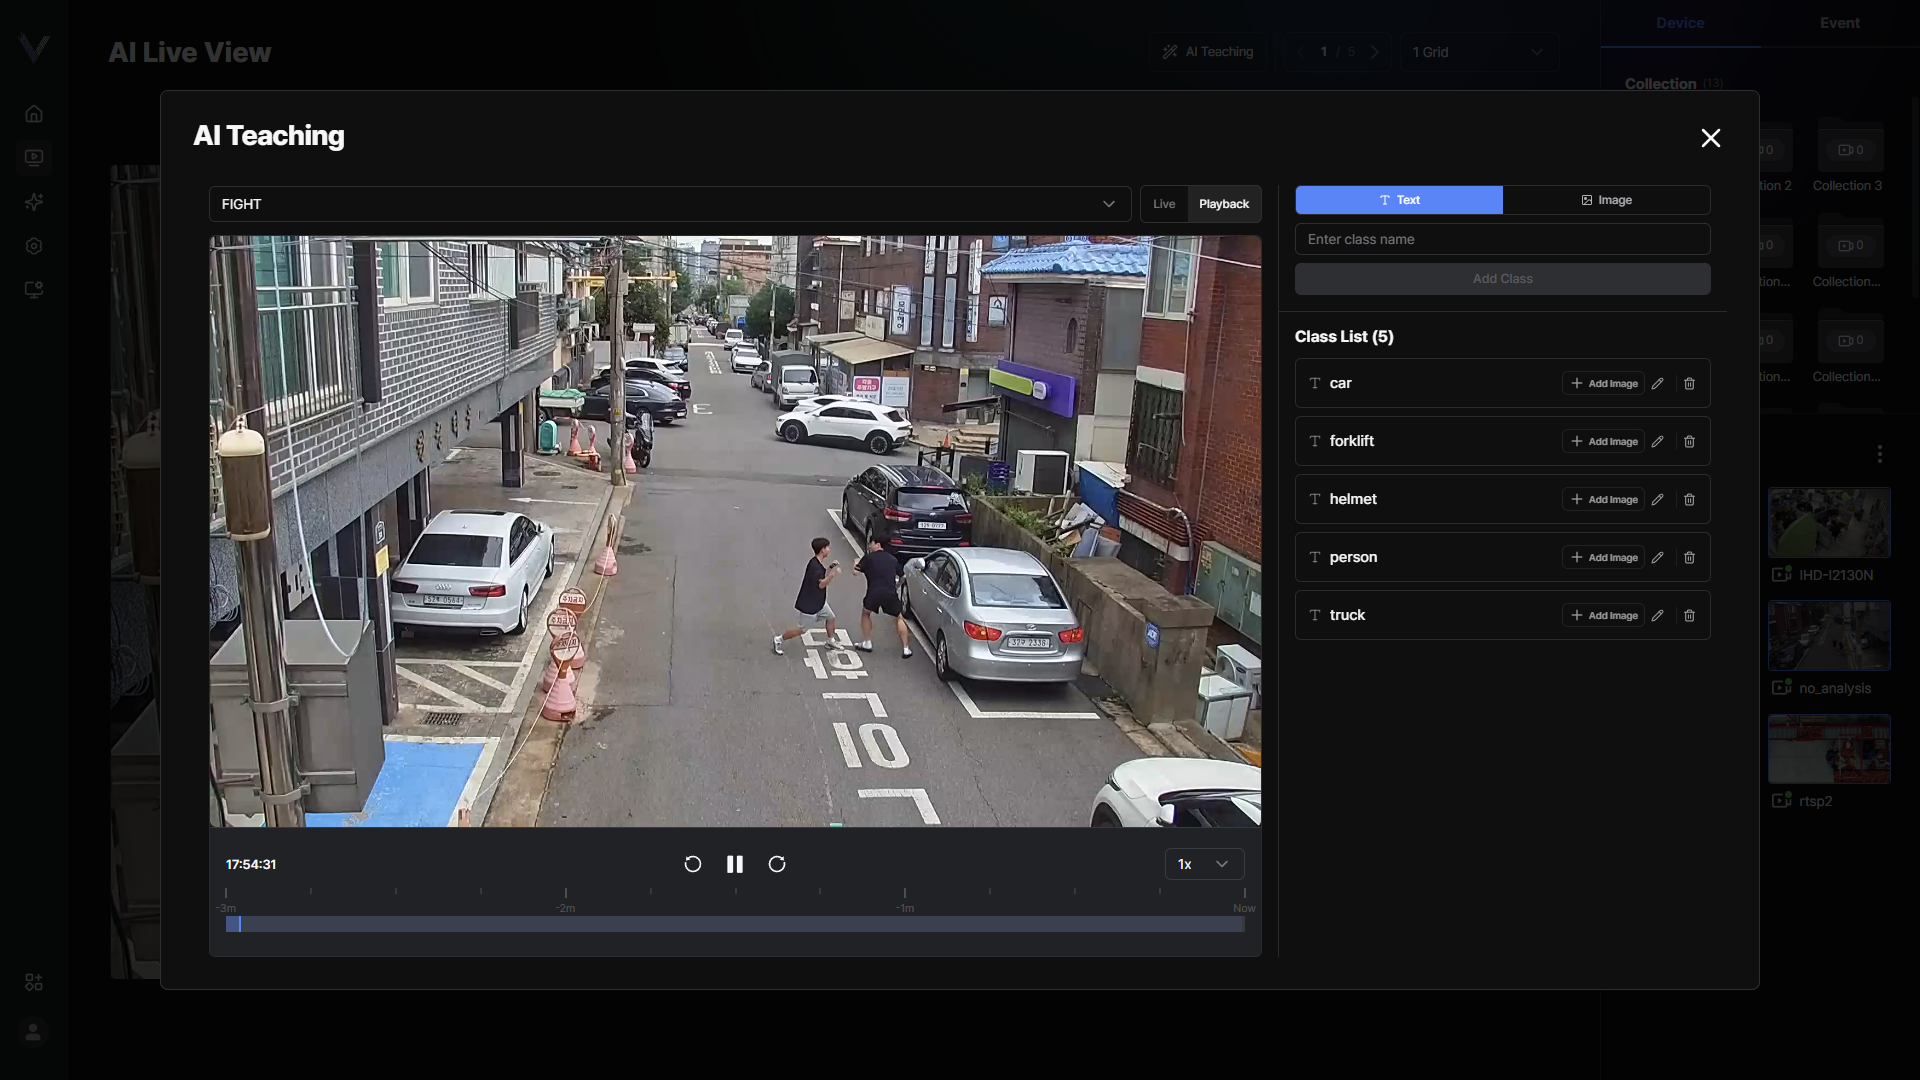 Figure 8-2. AI Teaching Screen
Teaching a New Class
Create a new class by drawing a box around the target in the video.
- On the AI Teaching screen, select [Image]
- Enter a name in [Enter class name]Only letters, numbers and spaces are allowed. A name already in use cannot be reused.
- Drag on the video to draw a box around the targetA box that is too small is not added as a sample. At least one box is required.
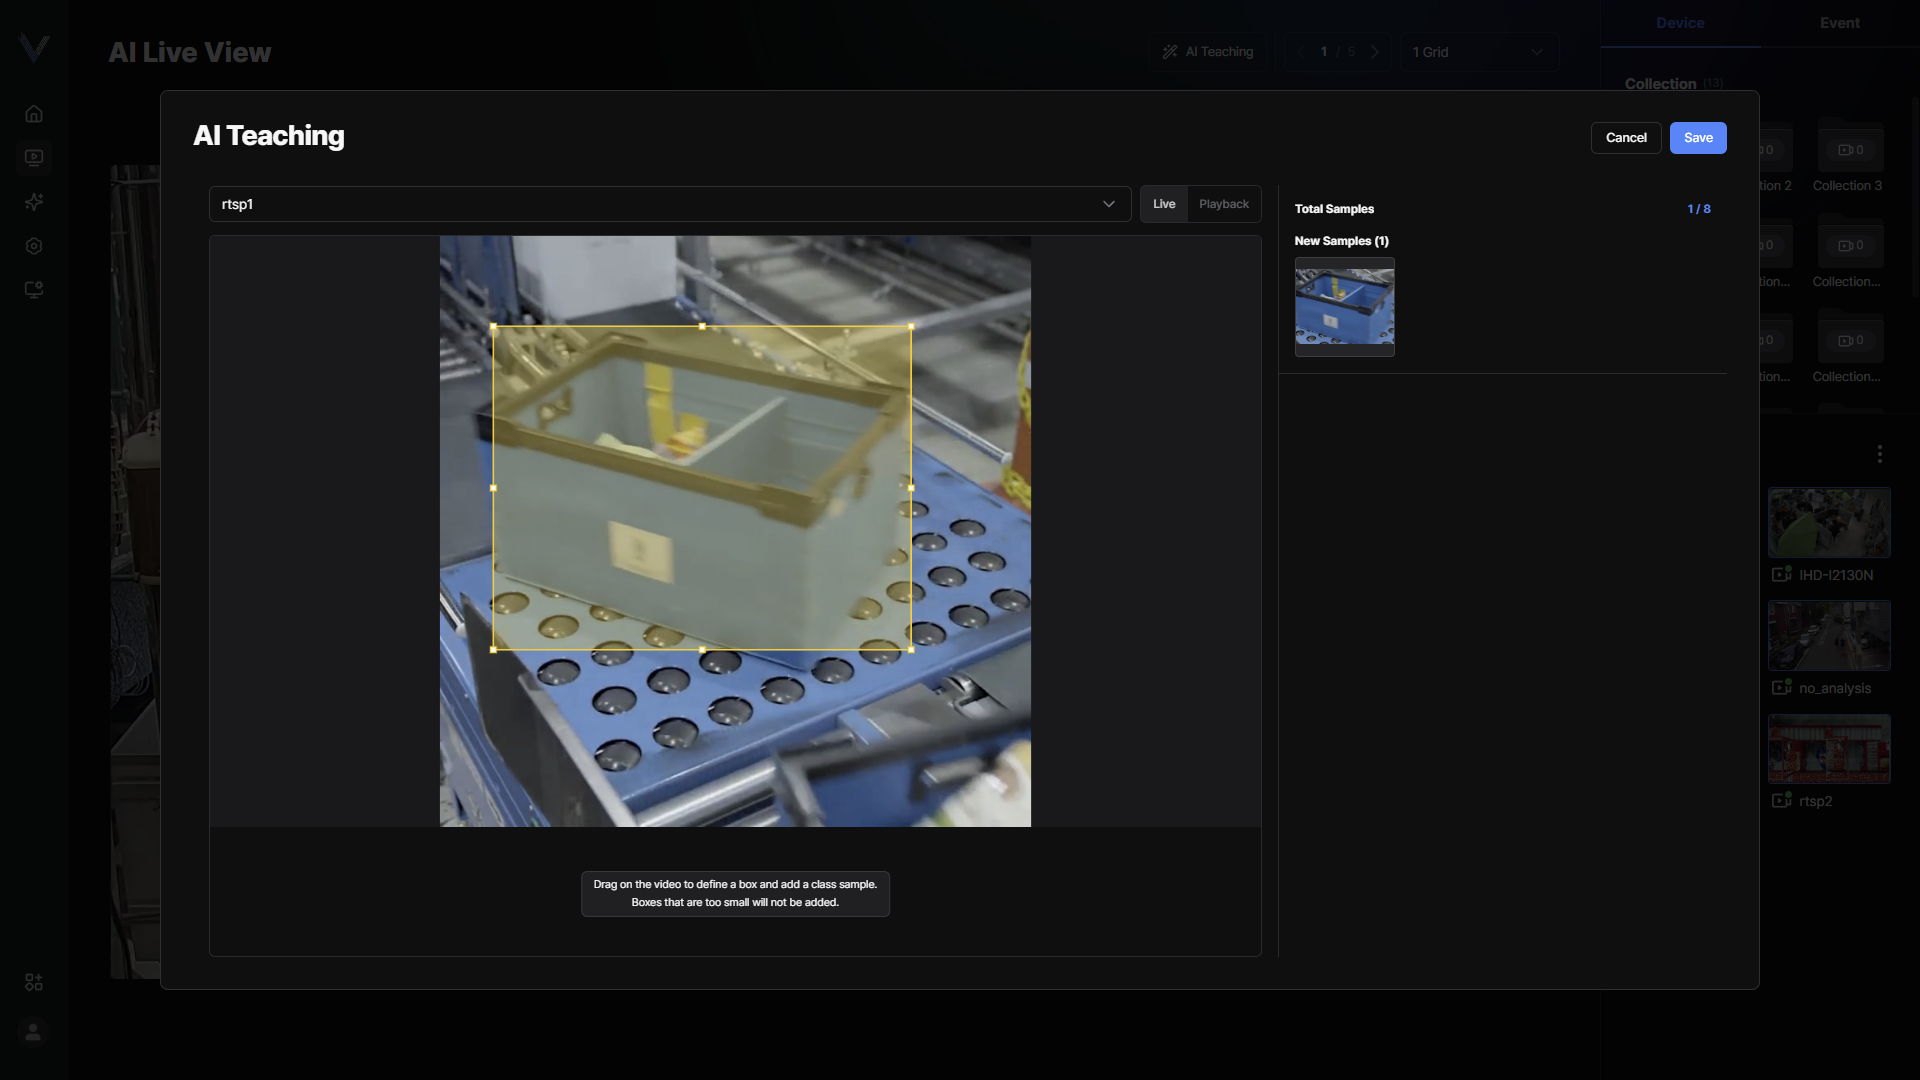 Figure 8-3. Drawing the Target Box
 - Click [Add Class]
- Click [Save&Close]The taught classes are saved and the AI Teaching screen closes.
Adding Samples to an Existing Class
Add more images to an existing class to improve recognition accuracy.
- On the AI Teaching screen, select [Image]
- Select a class and click the [Add Image] button.
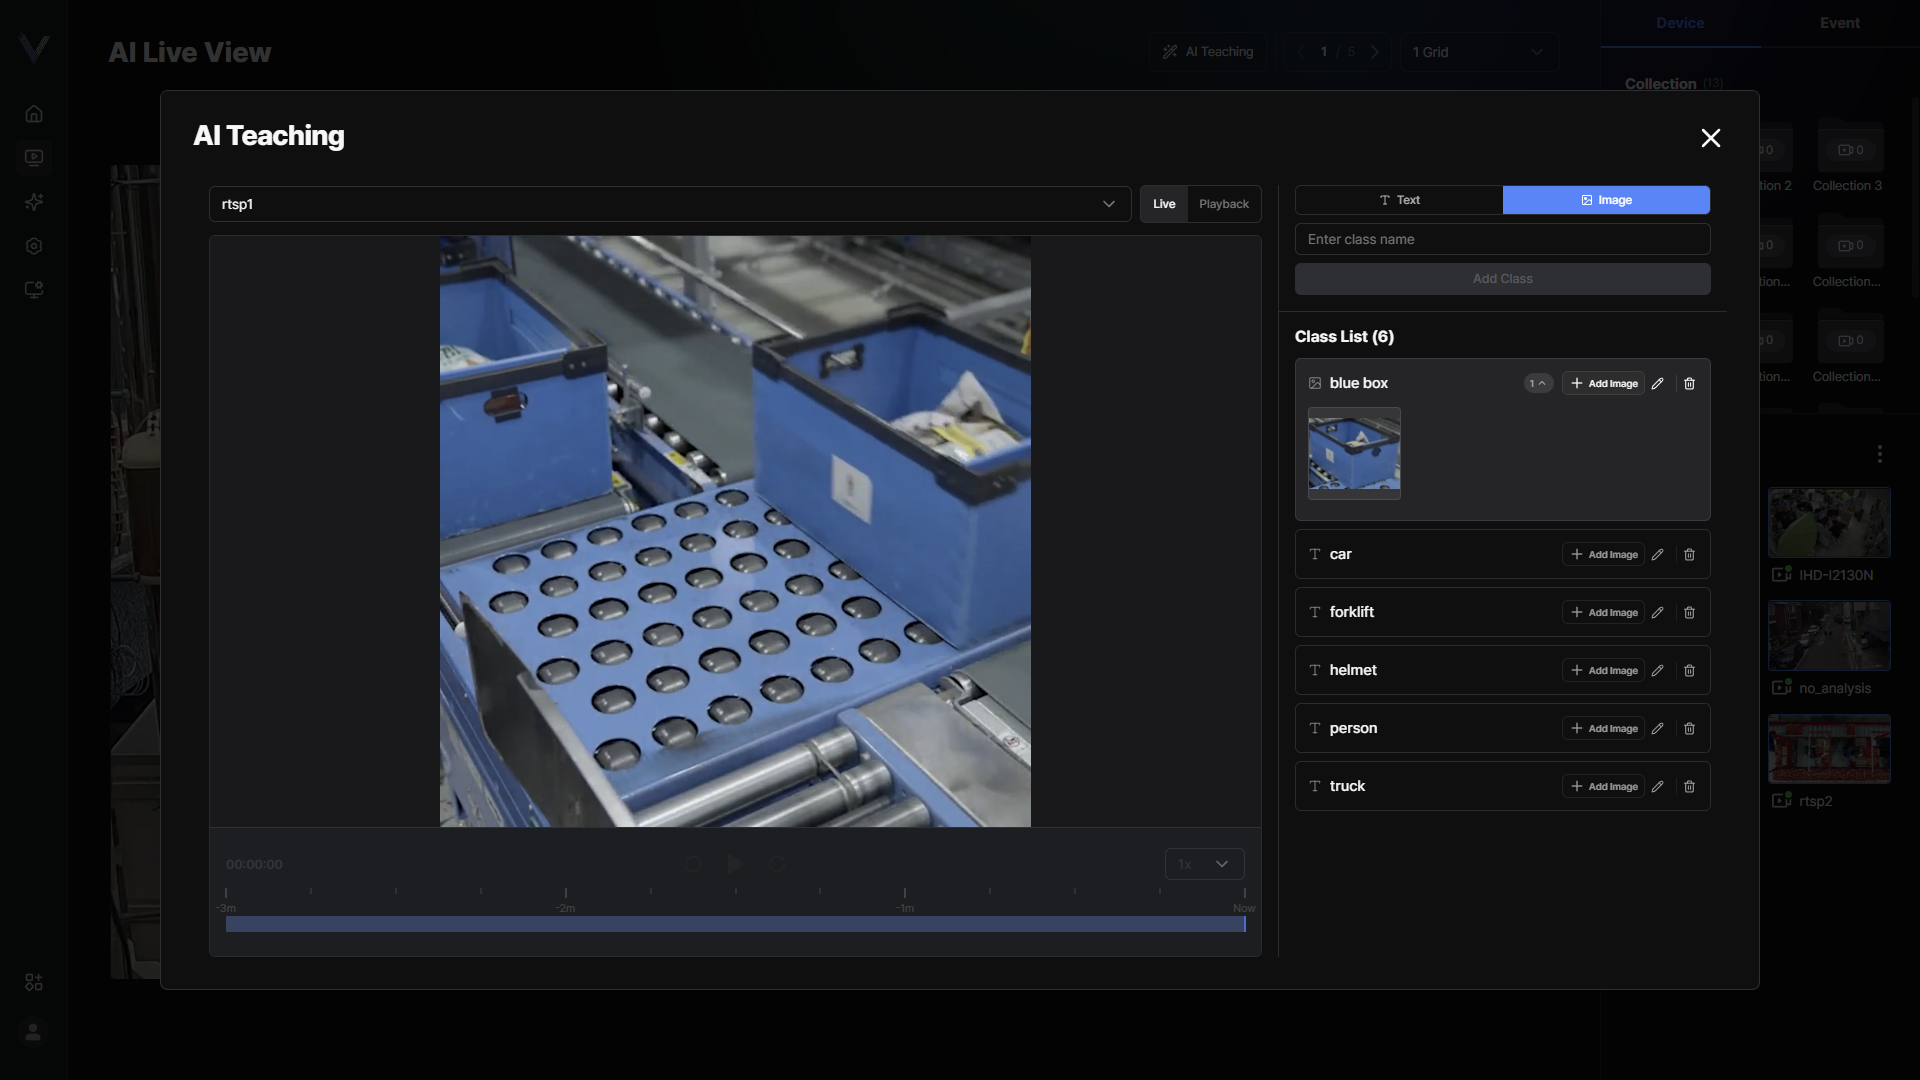 Figure 8-5. Adding to an Existing Class
 - Drag on the video to draw a box around the target
- Click [Add Image]
- Click [Save&Close]
Renaming and Deleting a Class
Rename a taught class, or delete classes and samples you no longer use.
- Check [Class List] on the AI Teaching screen
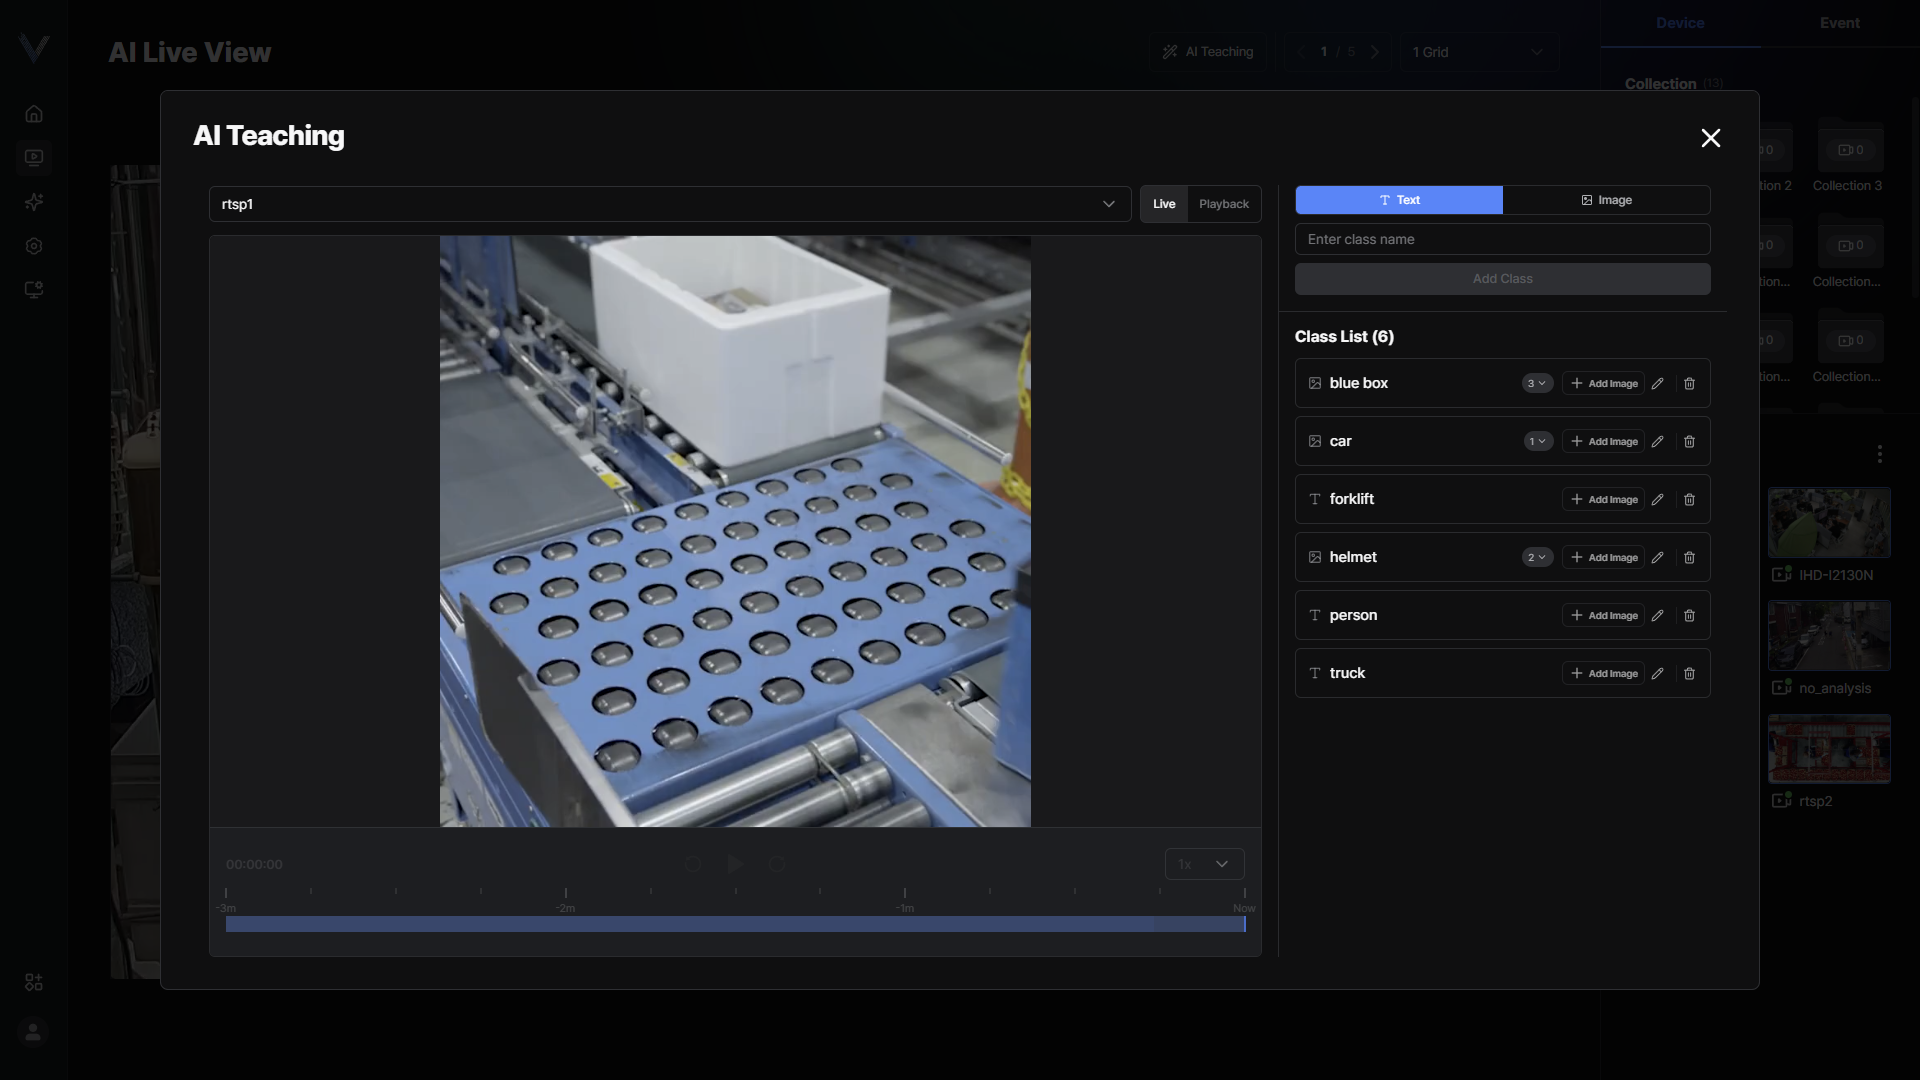 Figure 8-6. Class List
 - Select the class to rename, type the new name and press [Enter]Only letters, numbers and spaces are allowed, and unsupported characters are flagged as you type.
- To delete, click [Delete] on the class or the sample image
- Click [OK]
App Store
This section explains how to turn the AI features of this device on and off and how to check the applied AI model and AI Power usage.
Viewing the App Store Screen
- [AI model]: the model currently running on the device and when it was last updated
- [Class(es) from Model]: the classes the current model can detect
- [AI Power Breakdown]: total cost, used cost and free cost
- [My AI APP]: the installed AI Events and AI Services
- In the main menu, click [] > [App Store]
- Check the item you want
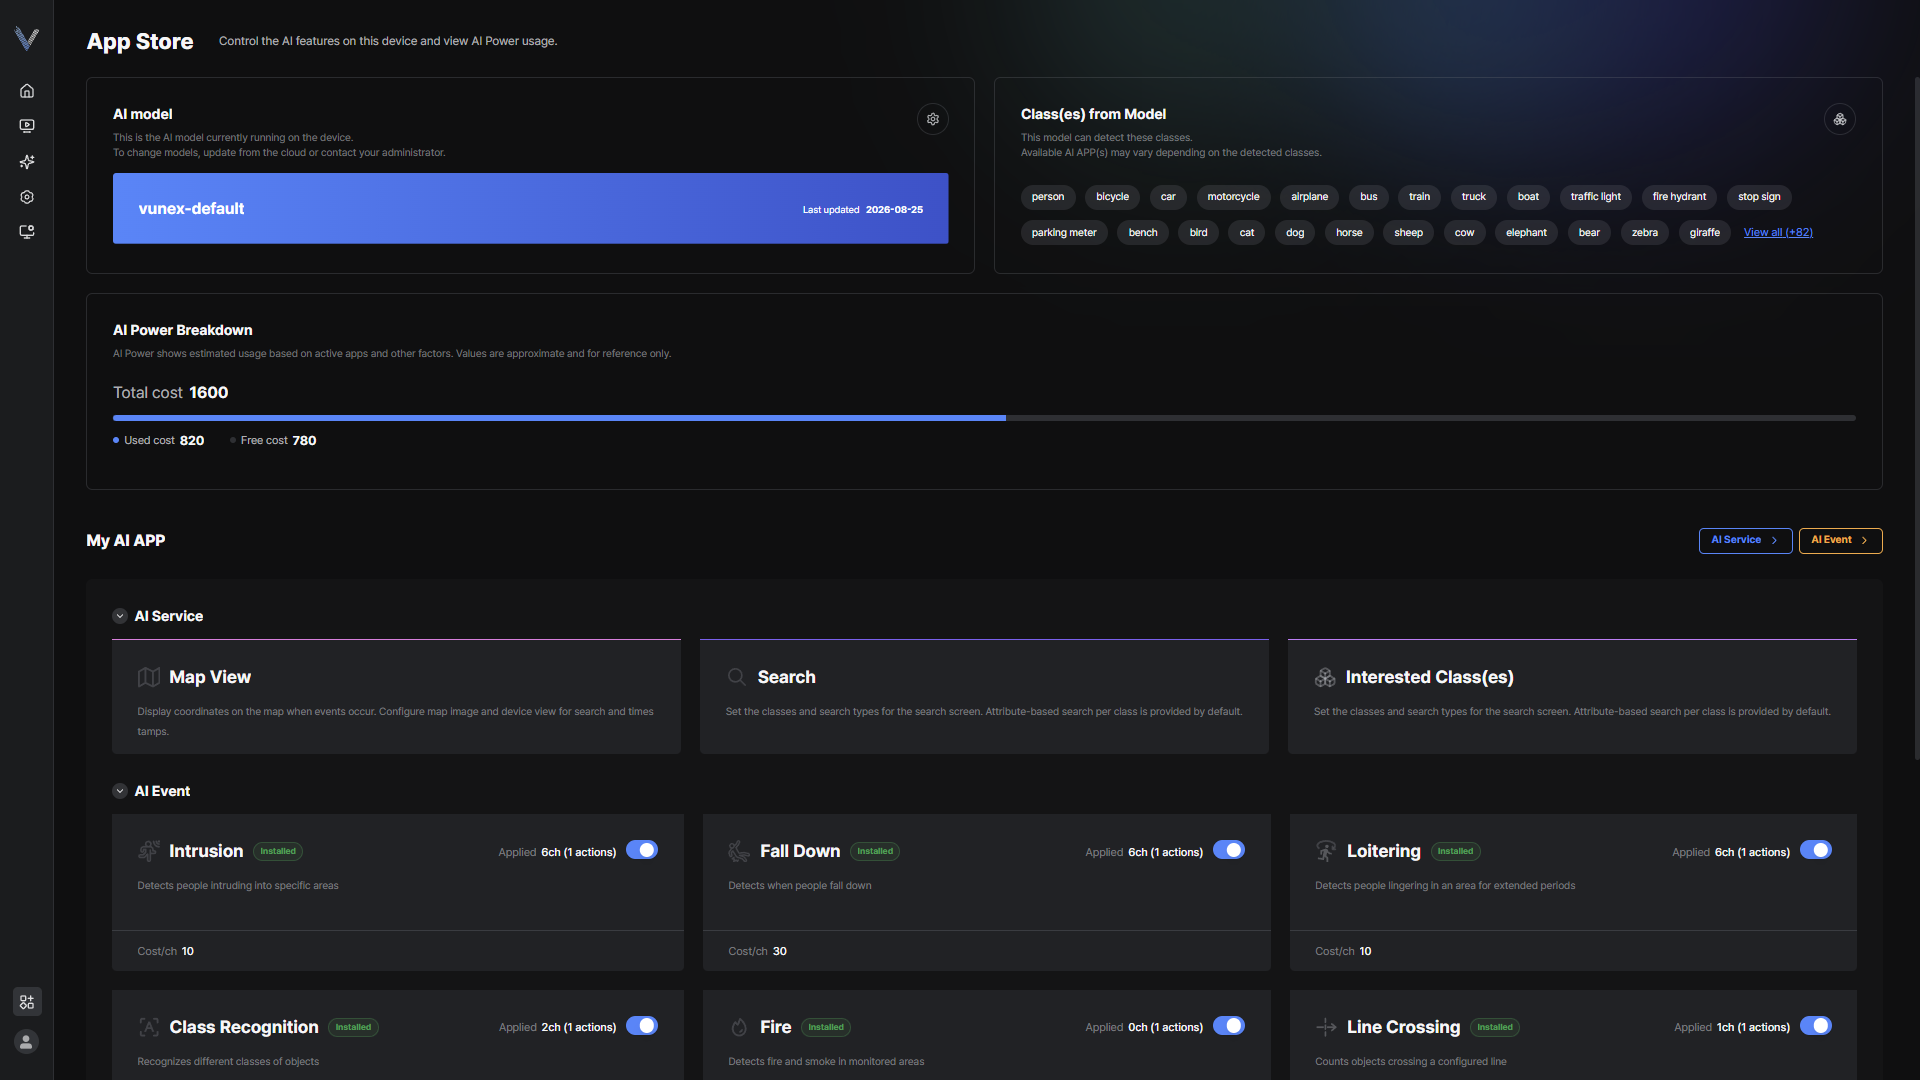 Figure 9-1. App Store Screen
Changing the AI Model
Replace the AI model applied to the device with a different one.
- In the main menu, click [] > [App Store]
- Click [AI model] > [Change AI Model]
- Select the model to use
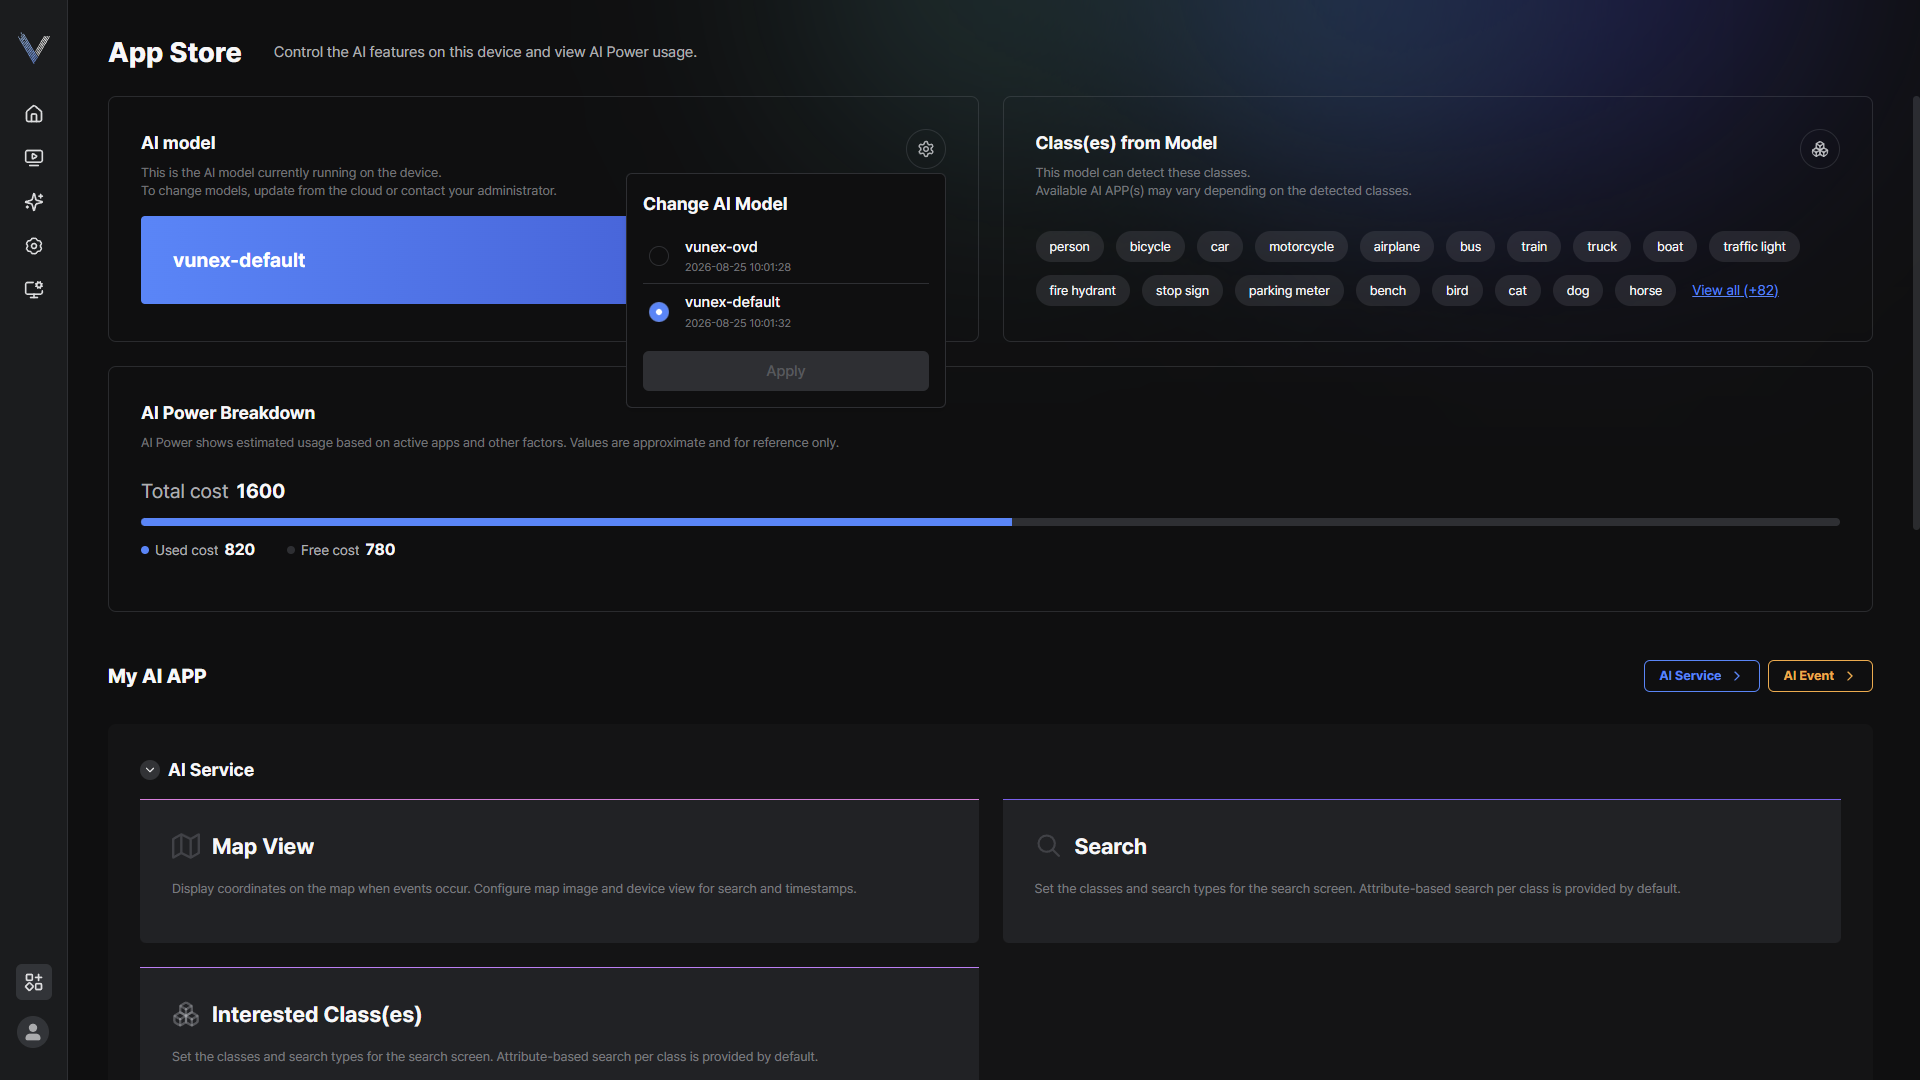 Figure 9-2. Changing the AI Model
 - Click [OK]A progress indicator appears while the model is being changed, and the status is reflected on the screen as soon as it finishes.
Checking the Classes Provided by the Model
View all classes the current model can detect.
- In the main menu, click [] > [App Store]
- Click [Class(es) from Model] > [View all]
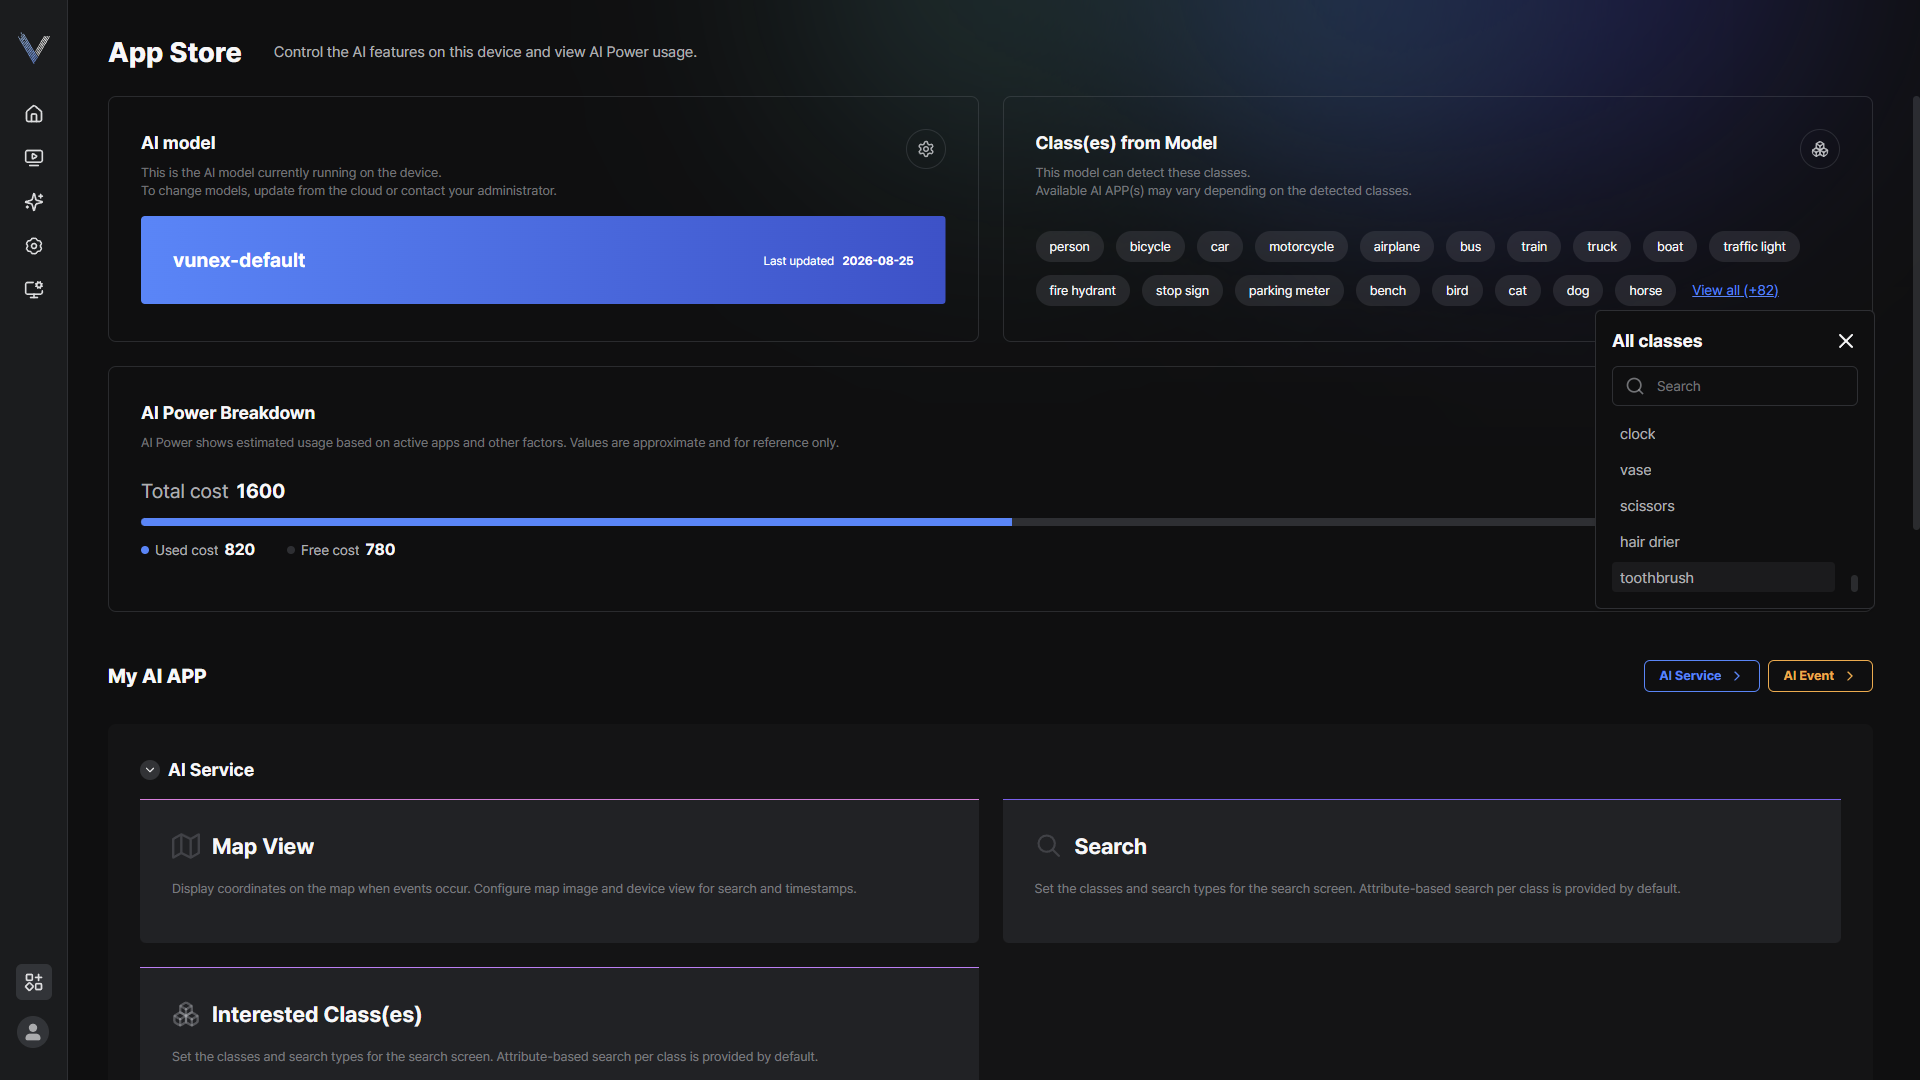 Figure 9-3. Classes Provided by the Model
 - Enter a class name in [Search] to find the class you want
Checking AI Power Usage
Check how much AI analysis capacity the device has and how much is currently used.
- In the main menu, click [] > [App Store]
- Check [Total cost], [Used cost] and [Free cost] in [AI Power Breakdown]
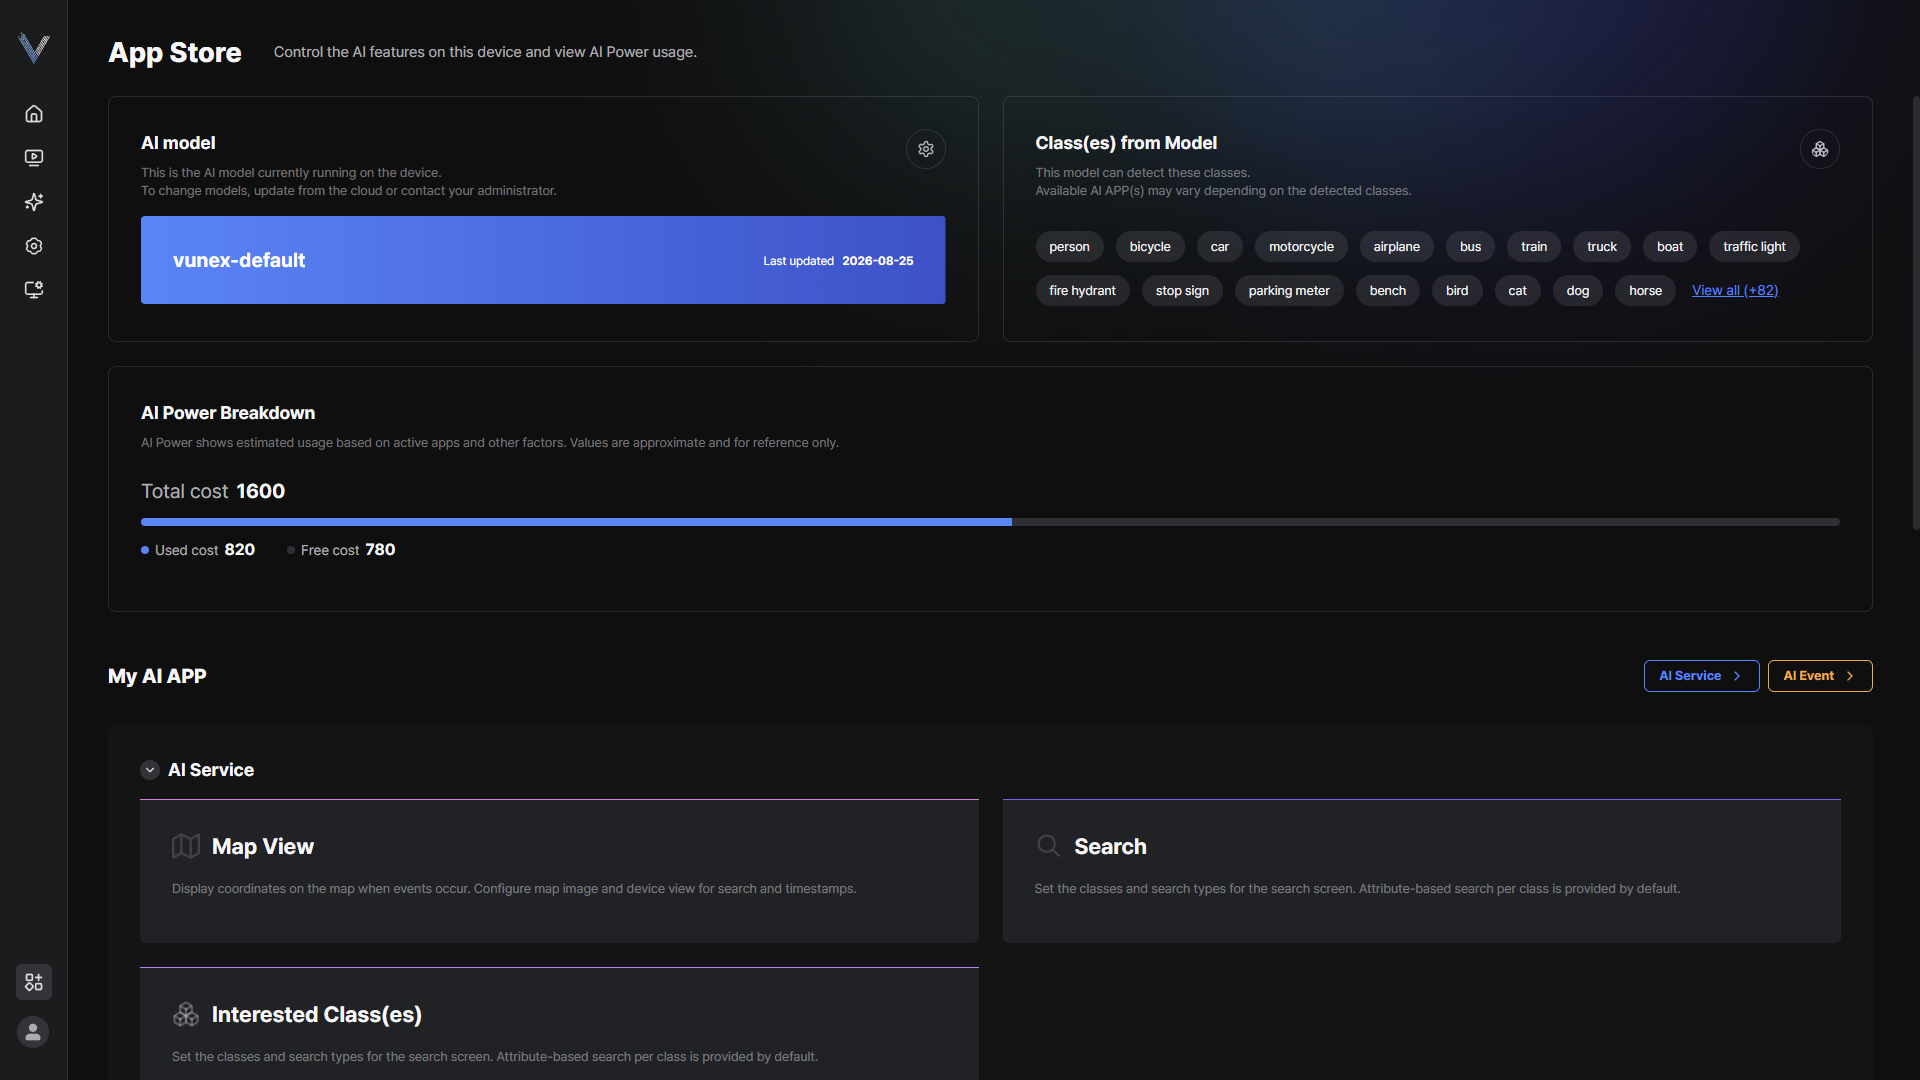 Figure 9-4. AI Power Breakdown
Enabling and Disabling AI Apps
Turn the installed AI Events and AI Services on or off.
- In the main menu, click [] > [App Store]
- In [My AI APP], click [AI Event] or [AI Service]
- Click the app's [] to enable or disable itYou can also see the number of applied channels and actions, and the cost per channel.
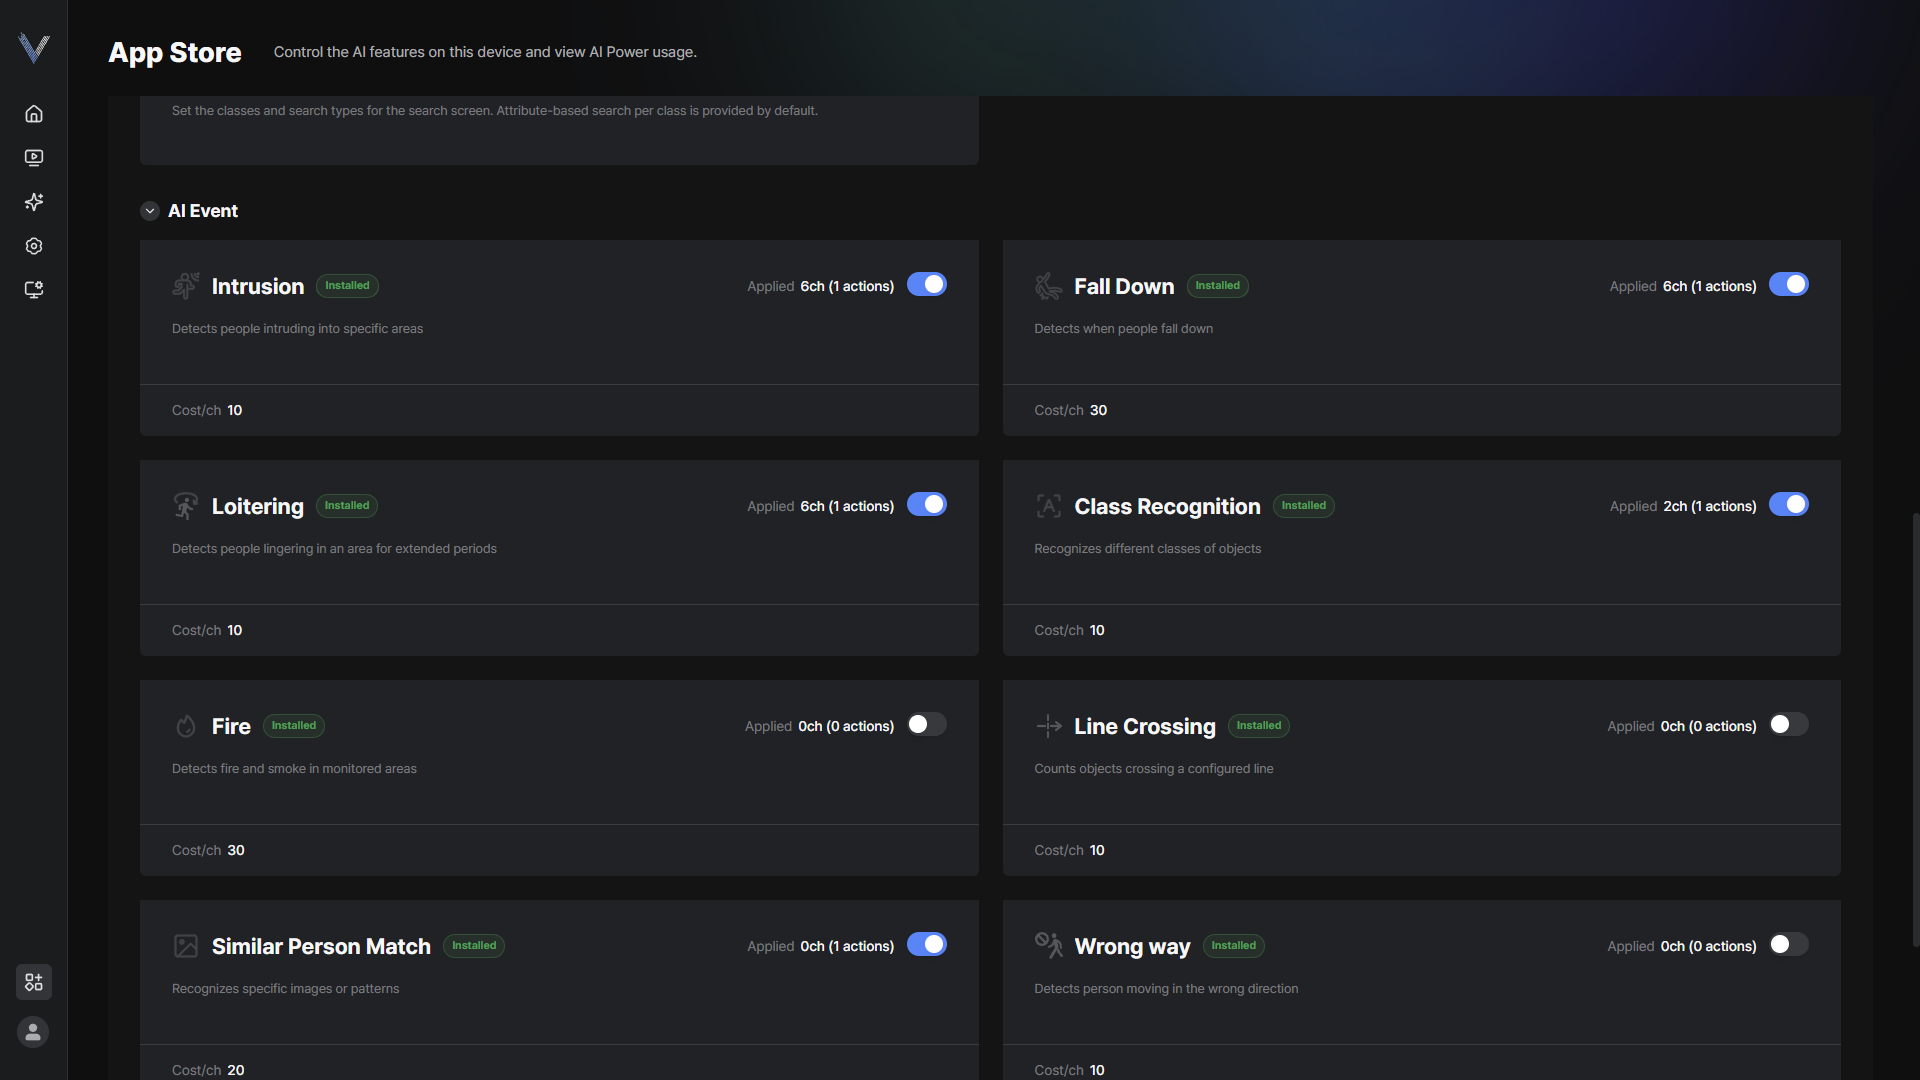 Figure 9-5. Enabling AI Apps
 - Check the installation statusThe status is shown as [Installed], [Installing] or [Error], and the progress is shown while installation is running.
Reference
This section provides reference information and legal notices.
Symbols Used in This Manual
| Symbol | Meaning |
|---|---|
| Warning | Violating a warning can cause serious injury or an accident. |
| Caution | Violating a caution can cause minor injury or damage to the product. |
| Note | Explains details such as correct use of a feature and how it works. |
Installation Precautions
- Do not install the product in an unsafe place or position. It may damage or break the product.
- Do not disassemble, repair or modify the product yourself. It may damage or break the product.
- Do not install the product too close to a wall. It may damage the product and cause fire or electric shock.
- Do not install the product where the temperature is too high or too low, or where humidity is high. It may cause fire or electric shock.
- Do not install the product where there is a lot of moisture, dust or soot. It may cause fire or electric shock.
- Do not install the product near heat-generating equipment such as heaters or amplifiers. It may cause fire or electric shock.
- Always cut off the power before installing the product or carrying out additional work. It may cause fire or electric shock.
Usage Precautions
Storage Precautions
Other Notes
- The power connector is damaged
- Liquid has entered the product
- A foreign object has entered the product
- There is a problem with product performance
- The product is damaged by a natural disaster such as lightning
- The product is damaged due to careless installation
Troubleshooting Guide
| Symptom | Solution |
|---|---|
| Cannot connect to the device from a particular client | Check the proxy settings in the web browser. Check all cables and connectors. |
| The device works locally but not from another network | Check the firewall and router settings. |
| The network connection is unstable or drops | Check the network connection type. |
| Cannot reach the device by host name | Check that the host name and the DNS server settings match. |
| Cannot sign in | Use the correct protocol (HTTP or HTTPS). |
Customer Service Center
For questions about the product, contact your partner or the customer service center.
| Item | Information |
|---|---|
| Customer service center | 1661-6806 |
| Business hours | Open 24/7 |
| sales@innodep.com | |
| Website | innodep.co.kr |
Release Notes
This section covers what changed in each version of VUNex AI.
1.0.0 (2026-09-03)
Release notes are provided from this release onward.
VUNex AI analyzes camera video in real time to detect intrusion, falls, fire and more, and runs the actions you assign when an event occurs.
You can teach the system the targets you want or build events by combining your own conditions, and detected objects can be searched later.
Access it from a web browser.
- You can sign in from a web browser. On first access you change the default password and set security questions, and you can reset the password with those questions later.
- You can select Korean, English, Japanese or Spanish on the sign-in screen.
- You can set the screen theme to dark or light. The product is optimized for Google Chrome, and a guidance screen appears on unsupported browsers.
- You can review the day at a glance with today's events, the object detection trend and the event feed.
- You can check the number of online, offline and error devices in device status, and how much analysis capacity is used in the AI Power widget.
- You can view event status as a map, a list or statistics, and see the statistics by ROI and by hour.
- You can monitor multiple cameras in a grid, and the auto grid applies the layout that fits the number of devices.
- You can drag cameras into the video area and group them into collections that can be saved, edited and deleted. Up to 20 collections can be created.
- You can show the camera list as a list or as thumbnails, and toggle object boxes, skeletons, detection zones and the camera name on the video.
- The cell blinks when an event occurs, and you can open the latest event list and its details from the cell. The event tab on the right shows the notification list with thumbnails and the actions that ran.
- You can query and play recorded video by camera and by period, drag the timeline to move to a point in time, or search by specifying a date and time.
- You can select several videos and play them together in multi view.
- You can use playback speed control, 5-second skip, reverse playback, snapshots and event markers, and start a similar person search directly from the playback screen.
- You can choose a recording mode that stores only the segments where events occurred. In this mode the recorded video screen is organized around the event list.
- You can search detected objects by period, device and accuracy.
- You can turn text search, attribute search and similar person search on or off per object type.
- You can combine object, event, gender, top, bottom, hat, carried item and color as detailed conditions, and upload an image containing your target to find scenes with similar objects.
- You can select a thumbnail in the results to see the video clip and the location on the map.
- You can teach the system by selecting your target directly in the video. The teaching screen opens from both live video and playback, and you can move or resize the selection box.
- You can rename a class you created later.
- You can use intrusion, fall down, loitering, theft, similar person match, class recognition, looking around, gaze detection, fire, forklift overspeed, wrong-way movement, concealing and line crossing.
- You can build custom events by combining the conditions you want. Absence and equipment scenarios, condition combinations and overlap thresholds can be configured, and the events you create attach to detection zones and actions just like any other event.
- You can exclude people riding a car, motorcycle or forklift from intrusion and loitering notifications, and turn this on or off per detection zone.
- You can add, edit and delete actions per event and assign cameras and detection zones to each action. Action types include cloud transfer (image/video), cell alarm, pop-up message, thumbnail and ONVIF metadata.
- You can schedule the actions that run when an event occurs by day of week and time slot. Frequently used time slots can be saved as presets, and the name and times of a saved preset can be edited later.
- You can create several named detection zones per camera and turn them on or off per action. If none is set, the whole frame is the detection zone.
- You can place a reference zone on the floor and enter the real distance so speed can be calculated for overspeed detection.
- You can register HTTP custom actions to forward events to external systems. User-defined actions can also be sent to the cloud, and the delivery result is kept in history.
- You can configure the search mode per object type in the search service. A mode that is off stores no data.
- You can upload single-floor or multi-floor maps in the map view service and place camera positions and fields of view.
- You can preselect the classes used by events and services as interested classes. The AI model is changed in the App Store.
- You can check the applied AI model, the classes it provides and AI Power usage in the App Store, and turn installed AI Events and AI Services on or off.
- The models and modules an AI app needs are installed automatically, and you can also download an AI app as a file and install it directly. Installation and applied status is shown on screen in real time.
- You can register devices in four ways: auto scan, manual scan, manual add and file upload.
- You can choose the RTSP transport among automatic, TCP, UDP and multicast, and assign live, recording and AI analysis profiles separately.
- You can export the device list to a password-protected file or delete all devices at once, and enable cloud and message server integration.
- You can configure the storage usage limit, retention period, thumbnail quality and log retention period, and check the estimated retention with the preview.
- You can update the software by selecting a version from the cloud or uploading an update file.
- You can perform factory reset, system reboot and shutdown with the administrator password, and view and copy the MAC address and the HTTP API bearer token.
- You can select the time zone and set the time automatically via NTP or manually.
- You can query the event log and the system log by period, device and type, and export them to CSV.
- You can configure the network with DHCP or a static IP, check IP availability and set DNS.
- You can choose HTTP or HTTPS for device access. Register a certificate to reach the screen over an encrypted connection.
- You can export device settings to a file and load them onto another device, so you do not have to enter the settings again when installing several identically configured devices.
- You can run VUNex AI on a standard PC with an NVIDIA graphics card, and check and install the required drivers and components in one step.
Offices and Technical Support
Contact us for questions about a release or for technical support.
- Headquarters: 서울특별시 금천구 디지털로 9길 47, 9층·11층 (가산동, 한신IT타워 2차)
- Anyang Center: 경기도 안양시 동안구 시민대로 109번길 62
- Email: PR_sales_team@innodep.com
- Fax: 02-6336-3368
- Call center: 1661-6806 (24 hours, all year round)